How to Delete Locked Files and Folders on Windows 10
Get Free Scanner and check your computer for errors
Fix It NowTo fix found issues, you have to purchase the full version of Combo Cleaner. Free trial available. Combo Cleaner is owned and operated by Rcs Lt, the parent company of PCRisk.com read more.
How to Delete Locked Files and Folders on Windows 10
Locked files can be annoying since you can't delete, edit or move them, and it is often unclear why they are locked. This article outlines several methods to remove locked files and folders.

A locked file or folder is a computer file that can be used only by a single program or process concurrently. The purpose of locking a file is to ensure that it cannot be moved, edited, or deleted while in use.
There are several reasons why your file or folder might be locked. Another user could have opened it on the same network because the file is part of a shared folder on your system.
Alternatively, the file might be opened and locked by an application still active in the background, even though it has been closed. Consequently, you will not be able to edit, move, or delete a file if it is locked (encrypted) or opened in another program.
If you get the error message "The action cannot be completed because the file is open in another program," read this article, which includes several methods to resolve the problem.
The instructions below will show you how to unlock locked files so you can delete, edit or move them.
Video Showing How to Remove Locked Files and Folders
Table of Contents:
- Introduction
- Restart Your Computer
- Unlock Files Using Process Explorer
- Remove Files Using Safe Mode
- Unlock Files Using IObit Unlocker
- Video Showing How to Remove Locked Files and Folders
Download Computer Malware Repair Tool
It is recommended to run a free scan with Combo Cleaner - a tool to detect viruses and malware on your device. You will need to purchase the full version to remove infections. Free trial available. Combo Cleaner is owned and operated by Rcs Lt, the parent company of PCRisk.com read more.
Restart Your Computer
A locked file can be unlocked after you restart your computer. Restarting your computer will not help if the program that locked the file is a startup program (that locks files as soon as you log into Windows). If you have a locked file or folder and do not want to use the more complex methods described below, you can simply try to restart your computer. You should then be able to delete, move, or rename the file. If this does not help, try the following solutions.
Unlock Files Using Process Explorer
Process Explorer is a freeware task manager and system monitor for Microsoft Windows created by Winternals Software, which has been acquired by Microsoft. It provides the functionality of Windows Task Manager with a rich set of features for collecting information about processes running on the system.
Process Explorer can be used to track down problems. For example, it provides a means to list or search for named resources held by a process or all processes. This can be used to track reasons for keeping files open and preventing use by other programs. It also can show the command lines used to start a program, allowing otherwise identical processes to be distinguished. You can download Process Explorer from the Microsoft website here.
Once you have downloaded Process Explorer installation files, you will see two types of .exe files: "procexp.exe" and "procexp64.exe". One is for users running the 32-bit version of Windows, and the other is for 64-bit. If you are not sure of your Windows type, read this article.
Double-click the right version of the .exe file to launch Process Explorer.

In Process Explorer, click "File" and select "Show Details for All Processes" from the drop-down menu.

Now, click "Find" and select "Find Handle or DLL..." from the drop-down menu.

Type the name of the locked file and click "Search". It will find the process holding your file.

Select the result in the Search window and right-click on it in Process Explorer. Select "Close Handle" from the drop-down menu. It will mark it in red, and your file will be unlocked. If the file is being used by more than one process, repeat the steps with all programs to close all handles.

Now you can delete, remove or edit your file since it is no longer locked.
Remove Files Using Safe Mode
Safe Mode is a diagnostic startup mode in Windows operating systems used to obtain limited access to Windows when the operating system does not start or function normally. It is the opposite of Normal Mode, which starts Windows in the usual manner. Safe Mode is available on Windows XP, Windows Vista, Windows 7, Windows 8, Windows 10, and most older versions of Windows.
One of the most common steps when troubleshooting a computer is to boot into Safe Mode. Safe Mode starts Windows in a basic state, using a limited set of files and drivers. It can help to troubleshoot problems on your computer. If, for example, the problem does not occur in Safe Mode, this will confirm that the default settings and basic device drivers are not causing the issue.
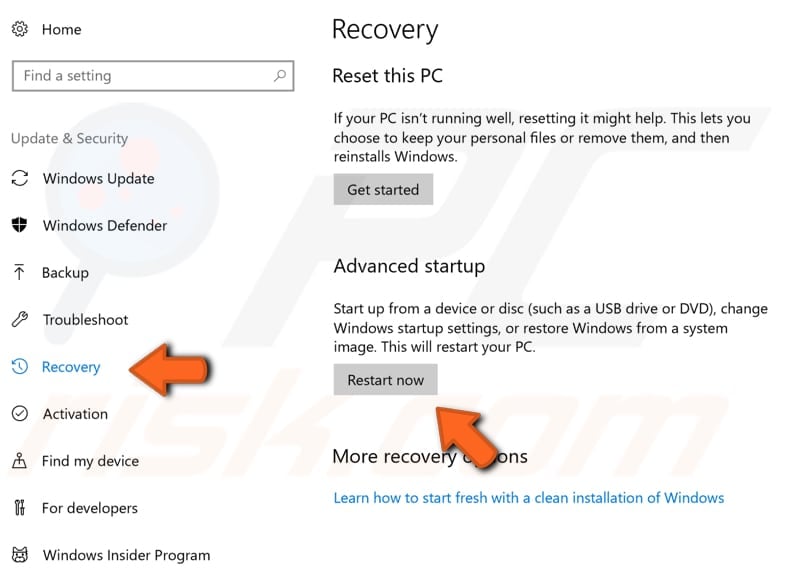
If you have issues with your computer, or there are reasons you wish to load windows in Safe Mode, there are a number of ways to achieve this. One of them is to use the Recovery Option in Settings. Open Settings and then click "Update & Security".

Then click "Recovery" on the left pane. Find the "Restart now" button under "Advanced startup" and click on it.

Your computer will restart, and you will see a menu on a blue screen. You will be given three options. Select "Troubleshoot".

In Troubleshoot, click "Advanced options".

In Advanced options, click "Startup Settings".

In Startup Settings, click "Restart". After restart, you will be able to enable low-resolution video mode, debugging mode, boot logging, Safe Mode, disable early-launch anti-malware protection, and automatic restart on system failure.

You will be given a list of options. To choose an option, press its number on your keyboard or use function keys from F1 to F9. Press 4 or F4 to enable Safe Mode. If you need to enable Safe Mode with Networking, press 5. If you need to enable Safe Mode with Command Prompt, press 6. If you change your mind and no longer wish to start Windows in Safe Mode, press Enter to exit Startup Settings.

Your PC will boot into Safe Mode. Locate the relevant file and delete it. Restart your computer to exit Safe Mode. If you cannot boot into Safe mode in this way, read this article for more ways to boot into Safe Mode on Windows 10.
Unlock Files Using IObit Unlocker
There are many tools available on the Internet to deal with locked files, including IObit Unlocker. If you feel comfortable using third-party software, this one might be worth considering.
IObit Unlocker unlocks files and folders that Windows will not let you delete because they are locked or open in another program. IObit Unlocker unlocks files and folders from Windows context menus by drag-and-drop or by browsing and adding. You can download IObit Unlocker here.
Open IObit Unlocker, simply drag-and-drop the locked file into the IObit Unlocker window, and then click "Unlock". Your file will be unlocked, and you will be able to delete, move, or edit it.

Alternatively, you can right-click on the file you want to unlock and select "IObit Unlocker" from the drop-down menu. This will add the locked file into the IObit Unlocker window, and you can unlock it by clicking "Unlock", as in the method described above.

We hope that these methods help you unlock locked files and remove, edit, and move them without problems.
Share:

Rimvydas Iliavicius
Researcher, author
Rimvydas is a researcher with over four years of experience in the cybersecurity industry. He attended Kaunas University of Technology and graduated with a Master's degree in Translation and Localization of Technical texts. His interests in computers and technology led him to become a versatile author in the IT industry. At PCrisk, he's responsible for writing in-depth how-to articles for Microsoft Windows.

▼ Show Discussion