10 Ways to Fix" DNS server isn't responding" Error on Windows 10

Get Free Scanner and check your computer for errors
Fix It NowTo fix found issues, you have to purchase the full version of Combo Cleaner. Free trial available. Combo Cleaner is owned and operated by Rcs Lt, the parent company of PCRisk.com read more.
How to Fix the DNS Server Not Responding Error on Windows 10
When connecting a device to your home network, you may get the "The DNS server isn't responding" error. The troubleshooting steps in this article are dedicated to helping you fix this issue.
The Domain Name System (DNS) is a hierarchical decentralized naming system for computers, services, and other resources connected to the Internet or a private network. This system translates hostnames to IP addresses.
An example of a hostname is www.pcrisk.com. An IP address looks like this: 215.57.216.55. If DNS did not exist, surfing the web would not be easy since we would have to enter IP addresses for each website. A DNS server is like a translator between an IP address and the hostname.
When you connect a device to your home network or another network with Internet access, the connection may fail with a "DNS server isn't responding" error. There could be several reasons for this error.
How to Fix the DNS Server Not Responding Error
You can fix DNS problems by troubleshooting your current connection, disabling extra connections, flushing the DNS cache, changing your computer's default DNS server, and simply resetting your router.
This article describes possible solutions to the "DNS server isn't responding" error that you may use to resolve the issue.
Video Showing How to Fix "The DNS server isn't responding" Error
Table of Contents:
- Introduction
- Change the DNS Server
- Disable IPv6
- Reset Your Router
- Enter MAC Address Manually
- Reset Your IP and Clear DNS Cache
- Start Your Computer In Safe Mode
- Update Your Drivers
- Disable Your Antivirus
- Disable Secondary Connections
- Disable Windows Update Peer-to-peer Feature
- Video Showing How to Fix "The DNS server isn't responding" Error
Download Computer Malware Repair Tool
It is recommended to run a free scan with Combo Cleaner - a tool to detect viruses and malware on your device. You will need to purchase the full version to remove infections. Free trial available. Combo Cleaner is owned and operated by Rcs Lt, the parent company of PCRisk.com read more.
Change the DNS Server
If there is a problem with your IP DNS server, you can try to change your DNS server to Google's Public DNS, a free alternative Domain Name System (DNS) service offered to Internet users around the world. The public DNS service and servers are maintained and owned by Google.
It functions as a recursive name server providing domain name resolution for any host on the Internet. You will have to change the DNS manually.
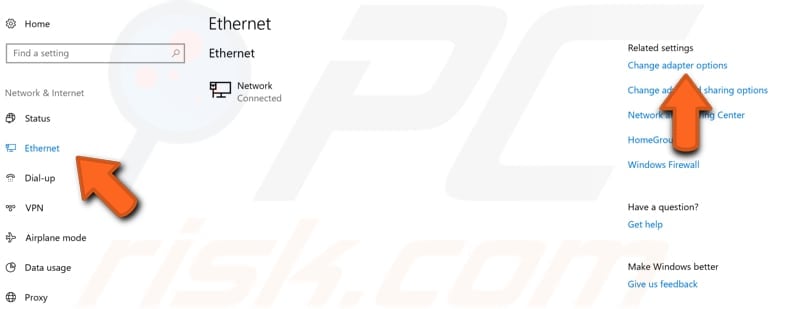
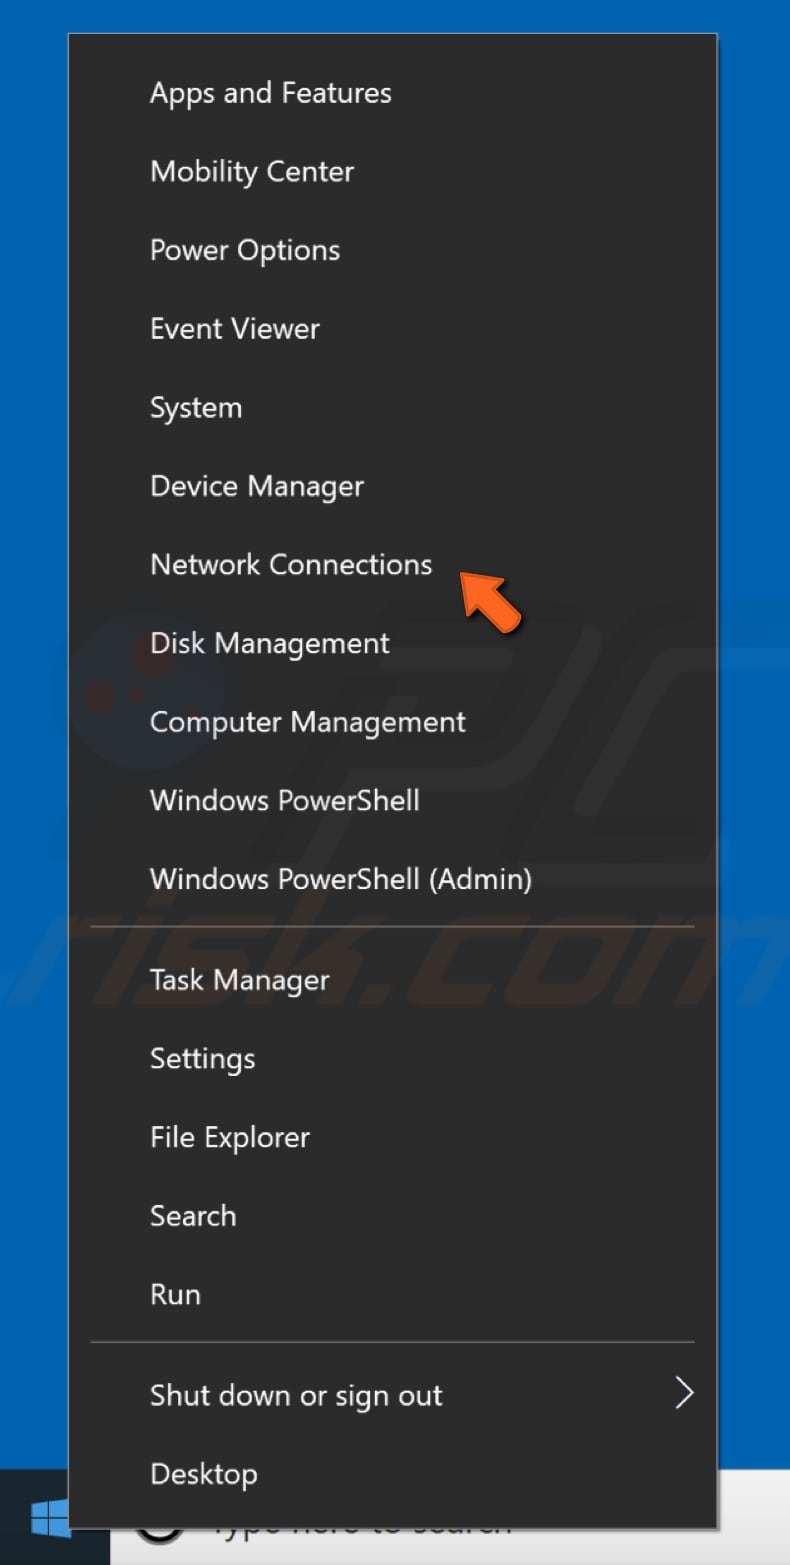
To change your DNS server to Google's DNS server, go to your Network Connections settings. Right-click the Start menu and select "Network Connections", or go to Settings and click" Network & Internet".
In the Network & Internet settings window, select your connection type (in our case, "Ethernet") on the left pane and then click "Change adapter options" on the right pane.
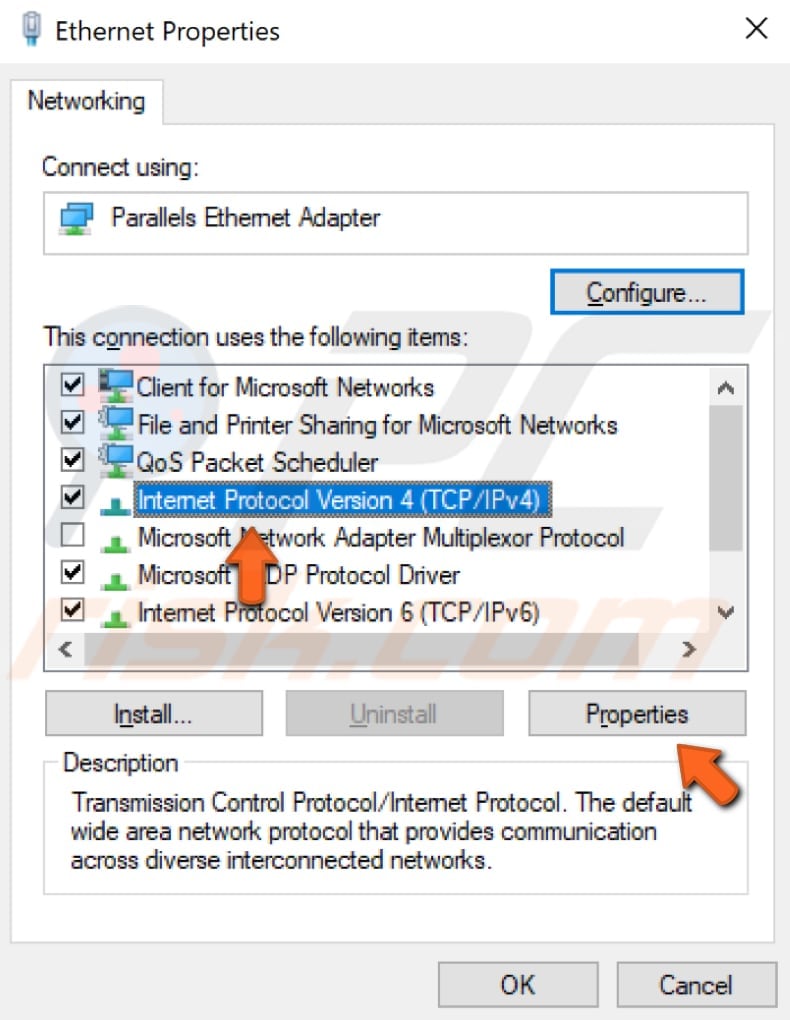
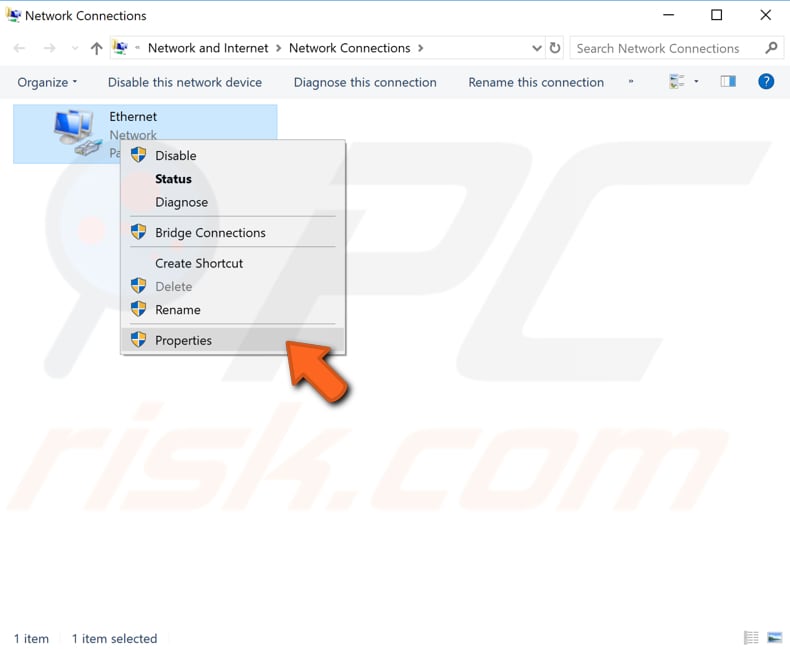
Right-click on your connection and select "Properties" from the drop-down menu.

Select "Internet Protocol Version 4 (TCP/IPv4)" and click "Properties".
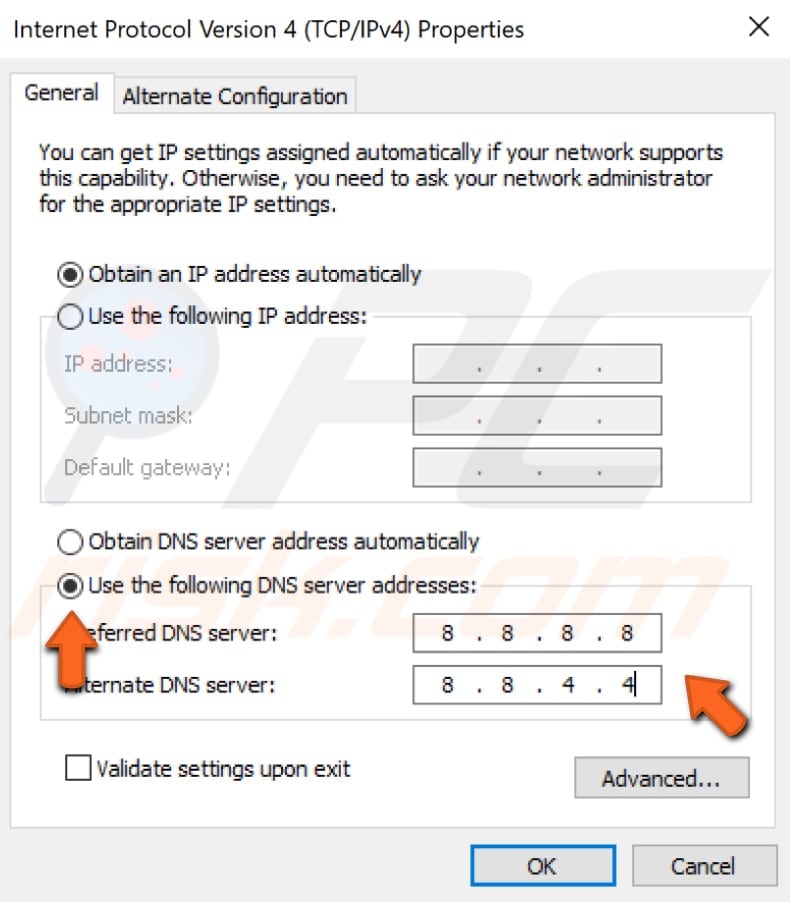
In the Internet Protocol Version 4 (TCP/IPv4) Properties window, select "Use the following DNS server addresses", enter 8.8.8.8 as the "Preferred DNS server" and 8.8.4.4 as the "Alternate DNS server".
Click "OK" to save changes and check if this helps fix the problem with the "DNS server is not responding" error.
Disable IPv6
Internet Protocol version 6 (IPv6) is the most recent Internet Protocol (IP) version. This communications protocol provides an identification and location system for computers on networks and routes traffic across the Internet.
IPv6 was developed to deal with the long-anticipated problem of IPv4 address exhaustion. Disabling the IPv6 feature might help fix the "DNS server is not responding" error.
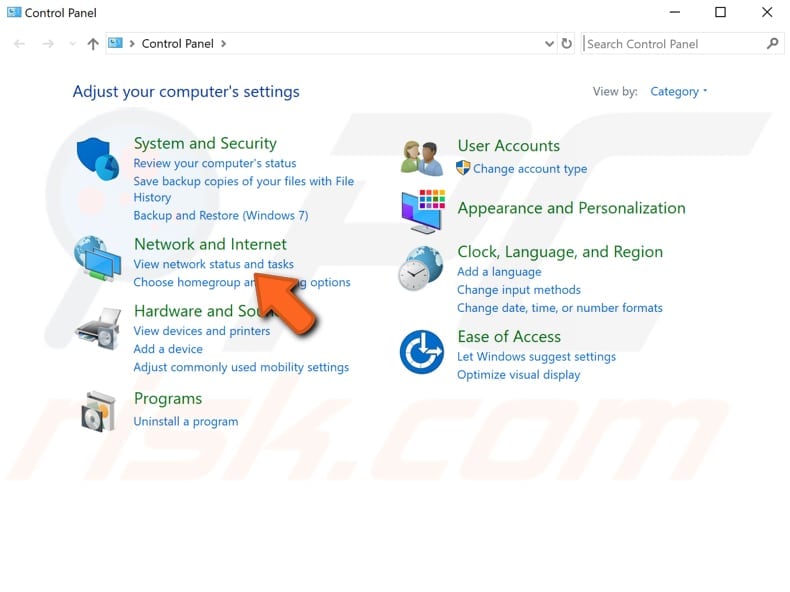
The easiest way to disable IPv6 on the Windows operating system is via the Network and Sharing Center. To open it, go to Control Panel and click "View network status and tasks" under "Network and Internet".
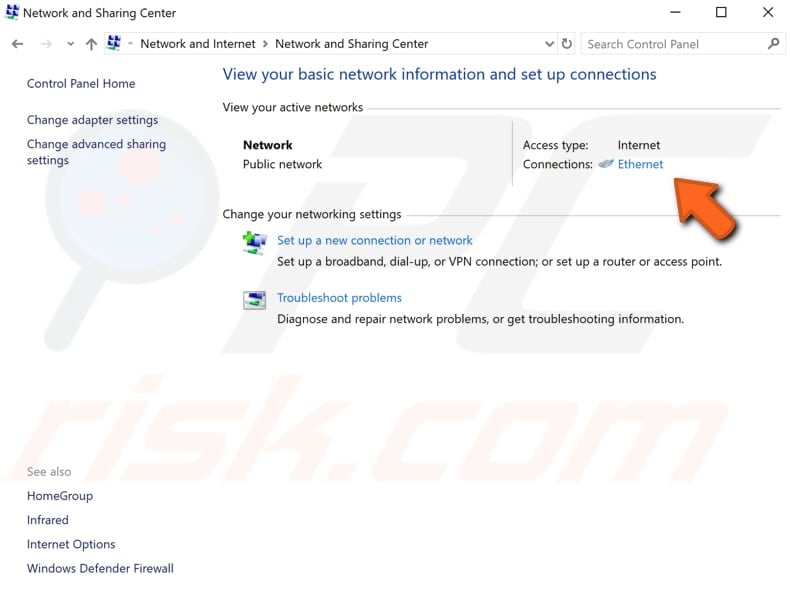
Click your connection (in our case, "Ethernet").
In your connection status window, click "Properties".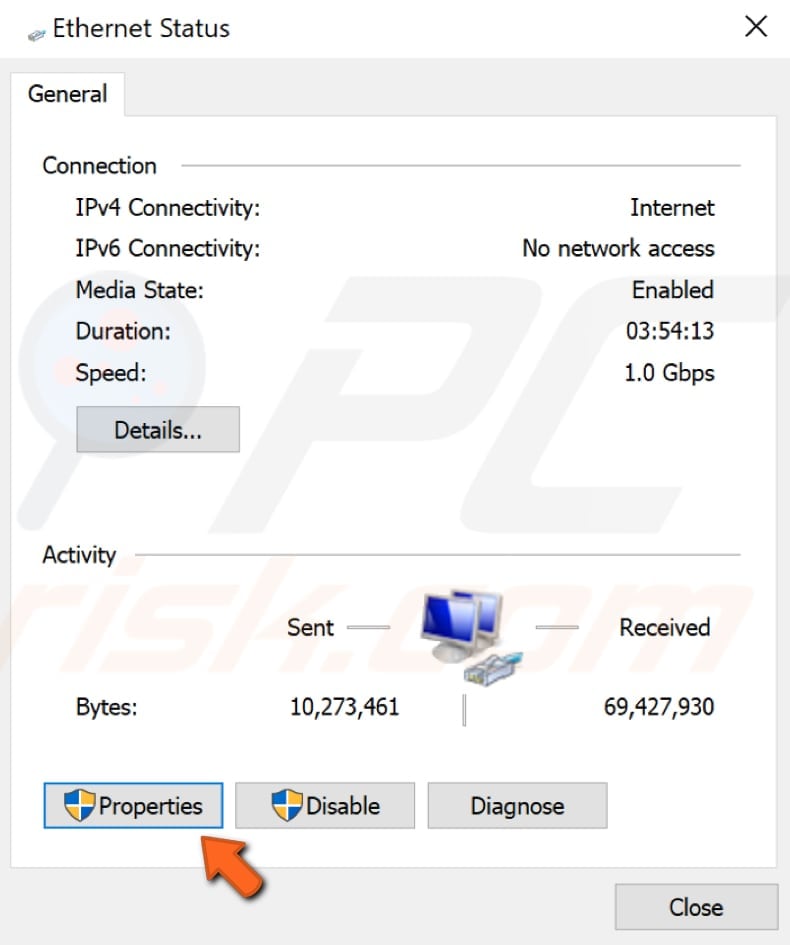
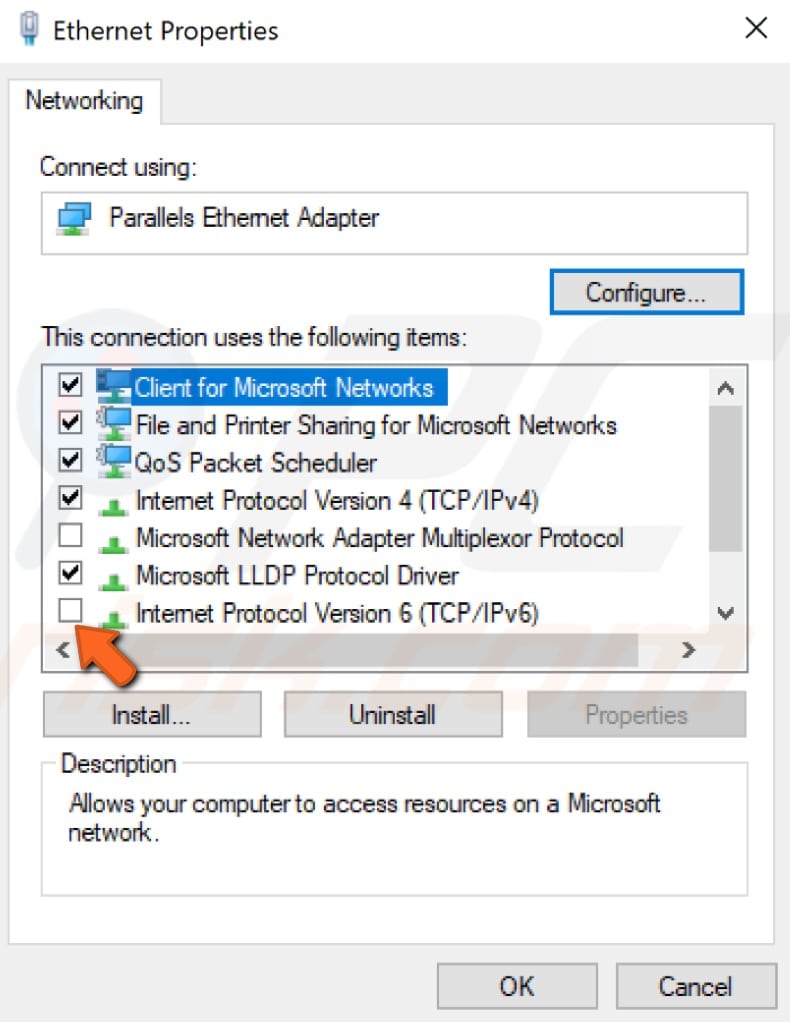
Find "Internet Protocol Version 6 (IPv6)" in your connections properties window and unmark the checkbox to disable it. Click "OK" to save changes and see if this helps fix the "DNS server is not responding" error.
Reset Your Router
Simply restarting your router or modem may help to fix this problem. We suggest you try this possibility first. If there is an "On/Off" button on your router, simply press it to turn off your router, wait a while, and then turn it on again.
If there is no button on your router, disconnect it from the power supply. When your router has restarted, try restarting your computer as well and see if this helps.
There might be a problem with your router configuration - this can also cause this "DNS server is not responding" error. To fix it, reset the router to its default settings. Open your router's configuration web page and find the "Reset" option.
If you cannot access the router's web-based setup page and want to reset it to its default factory settings, press and hold the Reset button for 10 seconds. Remember that resetting your router to its default factory settings will also reset your router's password.
Enter MAC Address Manually
A Media Access Control address (MAC address) of a device is a unique identifier assigned to network interfaces for communications at the data link layer of a network segment. MAC addresses are used as a network address for most IEEE 802 network technologies, including Ethernet and Wi-Fi.
MAC addresses are used in the media access control protocol sublayer of the OSI reference model. These MAC addresses are often assigned by the manufacturer of a network interface controller and stored in its hardware, such as the card's read-only memory or other firmware mechanism.
To fix the "DNS server is not responding" error, you will need to enter the MAC address manually, but first, you need to find it using an elevated Command Prompt and one of the commands.
To use Command Prompt, you must enter a valid command along with any optional parameters. Some commands available in Windows require that you run them from an elevated Command Prompt i.e. with administrator-level privileges.
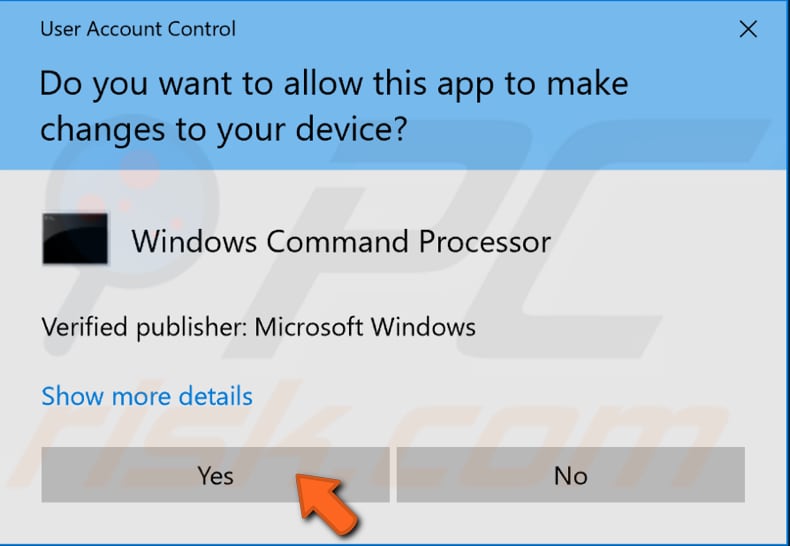
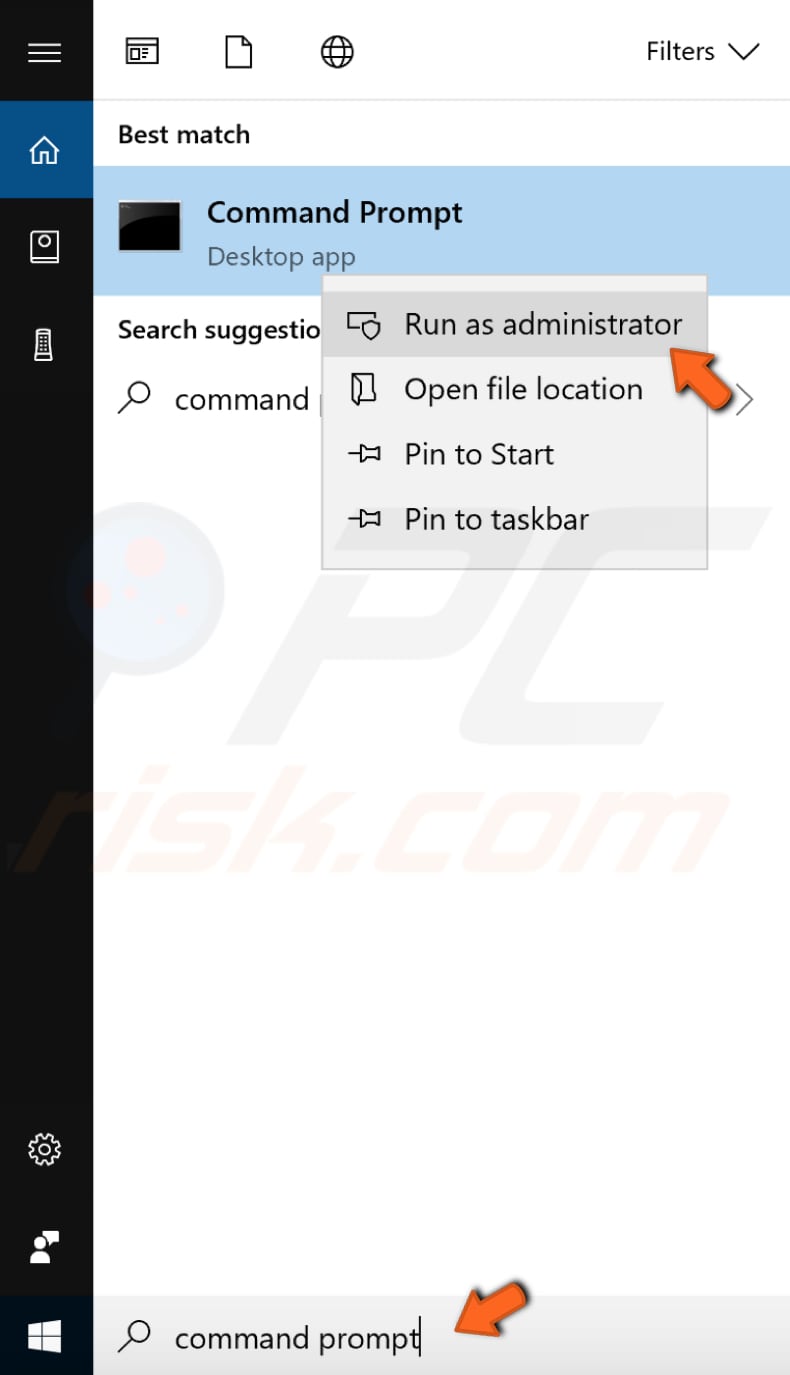
The command we need to use requires an elevated Command Prompt to be opened with administrator privileges. To open an elevated Command Prompt, type "command prompt" in Search and right-click the "Command Prompt" result. Choose "Run as administrator" to run it with administrative privileges.

When you select "Run as administrator", a User Account Control prompt will appear asking if you allow the Command Prompt to make changes to your computer. Click "Yes".
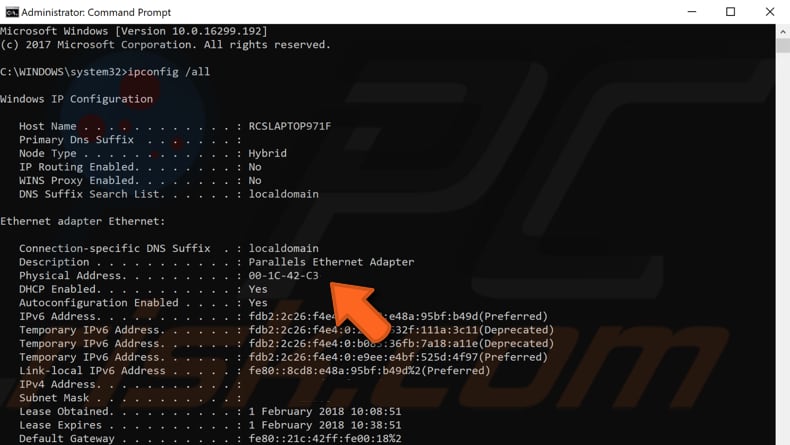
Elevated Command Prompt will appear. Type the "ipconfig /all" command in the Command Prompt window and press Enter on your keyboard.
You will see a list of information about the configuration. Find "Physical Address" and take a note of it somewhere - you will need it to proceed to the next step.
Now that you have your MAC address, you can configure your network connection manually. To do so, Right-click on the Start menu and select "Network Connections", or go to Settings and click "Network & Internet".
In the Network & Internet settings window, select your connection type (in our case, "Ethernet") on the left pane and then click on "Change adapter options" on the right pane.

Right-click on your connection and select "Properties" from the drop-down menu.
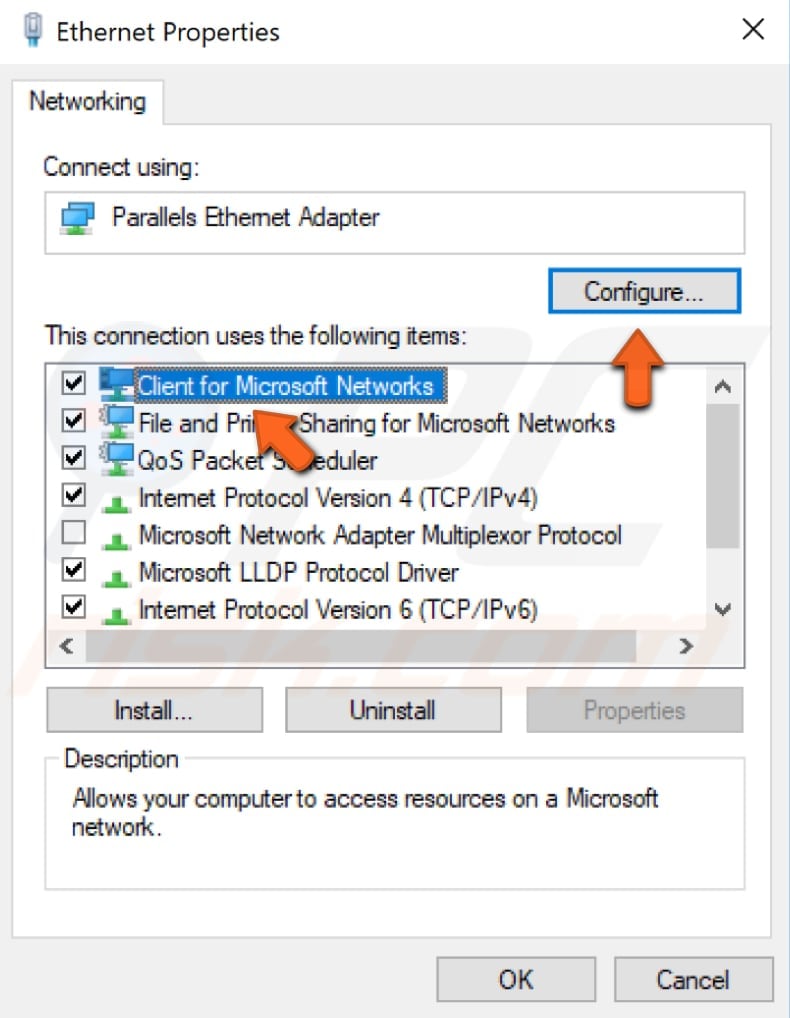
In the Properties window, select "Client for Microsoft Networks" (it should be selected automatically) and click "Configure".
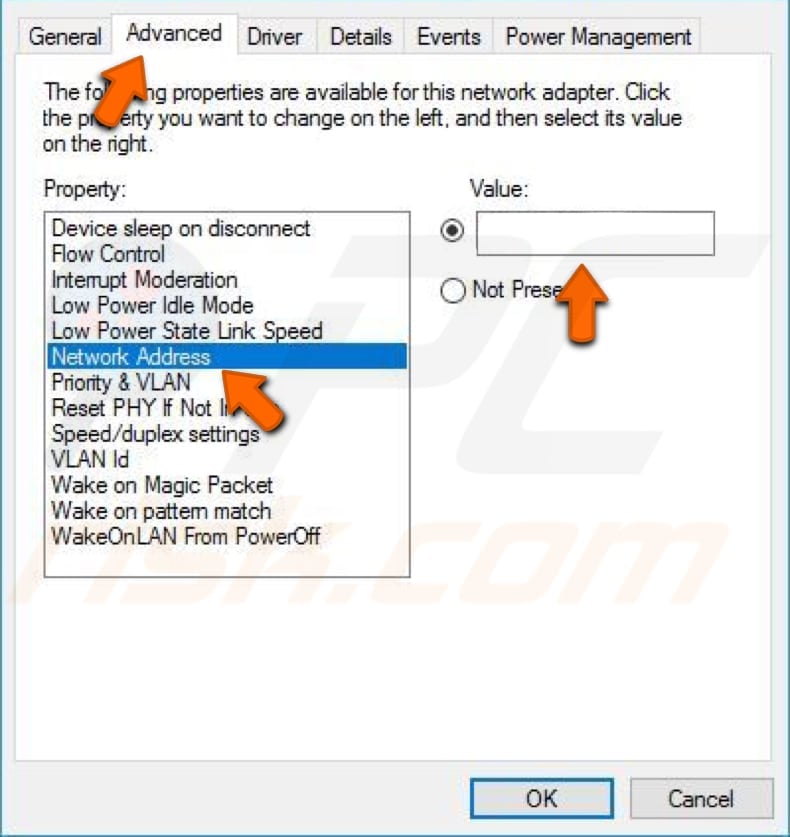
Now select the "Advanced" tab and then select "Network Address" under "Property:" Select "Value:" on the right pane and enter your MAC address (Physical Address), which you received when you entered the "ipconfig/ all" command in Command Prompt.
Click "OK" to save the changes and see if this helps to fix the "DNS server is not responding" error. There is a higher chance that it will be fixed if you were using Google DNS before entering the MAC address manually.
Reset Your IP and Clear DNS Cache
This method includes entering and executing "netsh" and "ipcofig" commands into Command Prompt.
Netsh is a command-line scripting utility that allows you to, either locally or remotely, display or modify the network configuration of a computer that is currently running. Netsh also provides a scripting feature to run a group of commands in batch mode against a specified computer.
Ipconfig is a command-line tool that displays the current configuration of the installed IP stack on a networked computer. Using the tool, we can flush and reset the contents of the DNS client resolver cache and renew the DHCP configuration.
The commands require an elevated Command Prompt opened with administrator privileges. To open an elevated Command Prompt, type "command prompt" in Search and right-click on the "Command Prompt" result. Choose "Run as administrator" to run it with administrative privileges.
When you select "Run as administrator", a User Account Control prompt will appear asking if you allow the Command Prompt to make changes to your computer. Click "Yes".

Elevated Command Prompt will appear. In the Command Prompt window, type these commands:
netsh int ip reset
netsh winsock reset
ipconfig /flushdns
ipconfig /renew
Press Enter on your keyboard after entering each command. When all commands are executed, restart your computer and see if this helps fix the "DNS server is not responding" error.
Start Your Computer in Safe Mode
Safe Mode is a diagnostic start-up mode in Windows operating systems used to obtain limited access to Windows when the operating system does not start or function normally. It is the opposite of Normal Mode, which starts Windows in the usual manner.
One of the most common steps when troubleshooting a computer is to boot into Safe Mode. Safe Mode starts Windows in a basic state, using a limited set of files and drivers. It can help to troubleshoot problems on your computer. Read this article about how to boot your Windows 10 into Safe Mode.
Check if you are still having network connection problems when Windows starts in Safe Mode. If there are no problems with the network connection, you probably have third-party software installed in Windows that is causing the problem.
Third-party applications can affect the DNS - almost any network-related or security application can interfere with your DNS, so find the problematic software and uninstall (or re-install) it.
Update Your Drivers
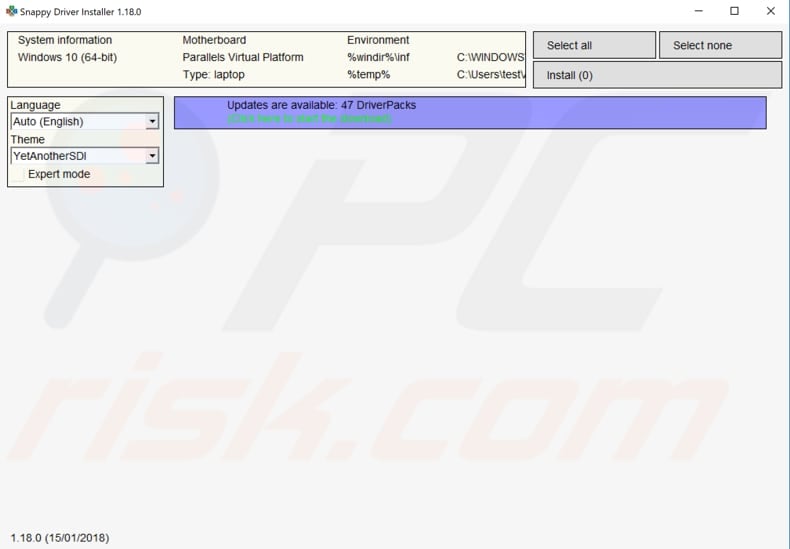
This problem might be caused by an old or incorrect driver. In this case, you need to get an updated/new driver for your network adapter. There is an easy way to do this automatically with Snappy Driver Installer. You will need a computer with a working internet connection to download it.
Snappy Driver Installer (SDI) is a powerful free driver updater tool for Windows that can store its entire collection of drivers offline. Having offline drivers gives Snappy Driver Installer the ability to have access to fast driver updates, even if there is no active internet connection.
Snappy Driver works with 32-bit and 64-bit versions of Windows 10, Windows 8, Windows 7, Windows Vista, and XP. Drivers are downloaded through Snappy Driver Installer in driverpacks, which are just collections (packs) of drivers for various hardware like sound devices, video cards, network adapters etc.
It can also show duplicate drivers and invalid drivers, and it separates the updates that require you to restart your computer so it would be easier to distinguish them from the rest. You can download Snappy Driver Installer from here.
After you have finished updating and installing drivers, restart Windows 10 for them to take effect and try to connect to the Internet to see if it works.
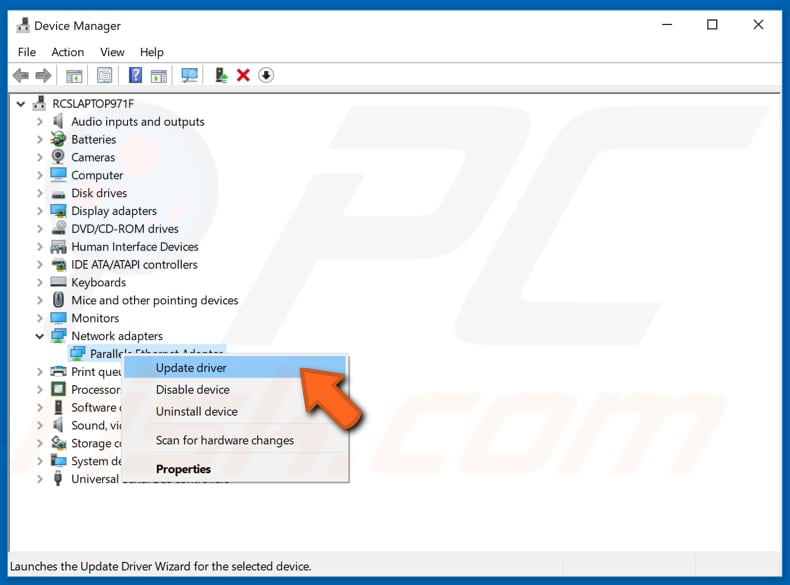
You can also update your drivers manually, but you will need a computer with a working Internet connection. Go to the network adapter manufacturer's website and download the latest driver. Copy it onto your USB drive. Go to Device Manager (type "device manager" in Search and open it). Expand the "Network adapters" section, select your network adapter, right-click on it, and then choose "Update Driver".
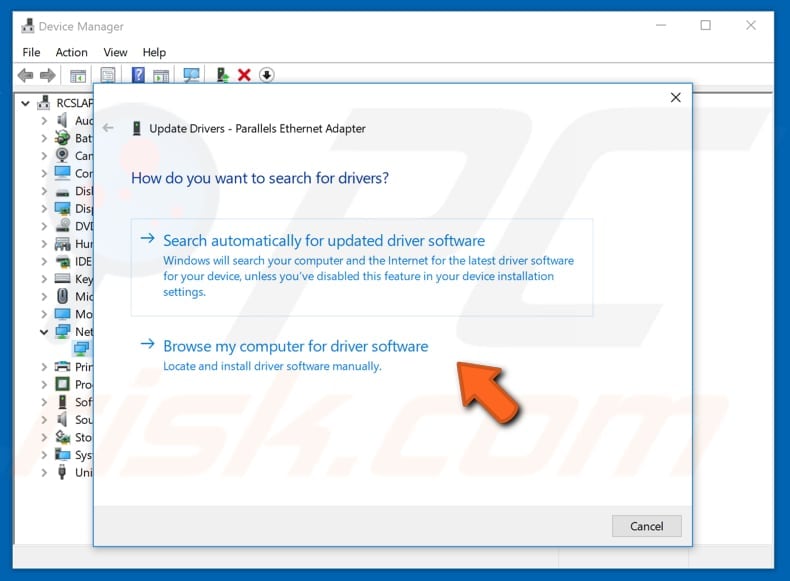
You will be asked how to search for drivers and given two options: 1) to search automatically for updated driver software, and; 2) to browse your computer for driver software. The first option requires an Internet connection. Since you have problems with your Internet connection, choose the second option. Locate the driver on your USB drive and follow the instructions.
When you have finished installing the new/updated driver, restart your computer for the changes to take effect and see if the network connectivity problem is fixed.
Disable Your Antivirus
"The DNS server is'nt responding" error can occur due to installed antivirus software. Temporarily disabling it might help to fix the problem. If disabling the antivirus software fixes the problem, you might want to consider switching to a different antivirus program. This error usually occurs when you have installed third-party antivirus software, but you should not be concerned about your safety since the built-in Windows Defender software should be adequate.
Disable Secondary Connections
If you have more than one network connection available on your computer, try disabling the other connections and leave only the current connection enabled. Go to Network Connection settings. Right-click the Start menu and select "Network Connections", or go to Settings and click "Network & Internet".

In the Network & Internet settings window, select your connection type (in our case, "Ethernet") on the left pane and then click "Change adapter options" on the right pane.

Right-click on the other connection and select "Disable" from the drop-down menu. Apply this to all secondary connections.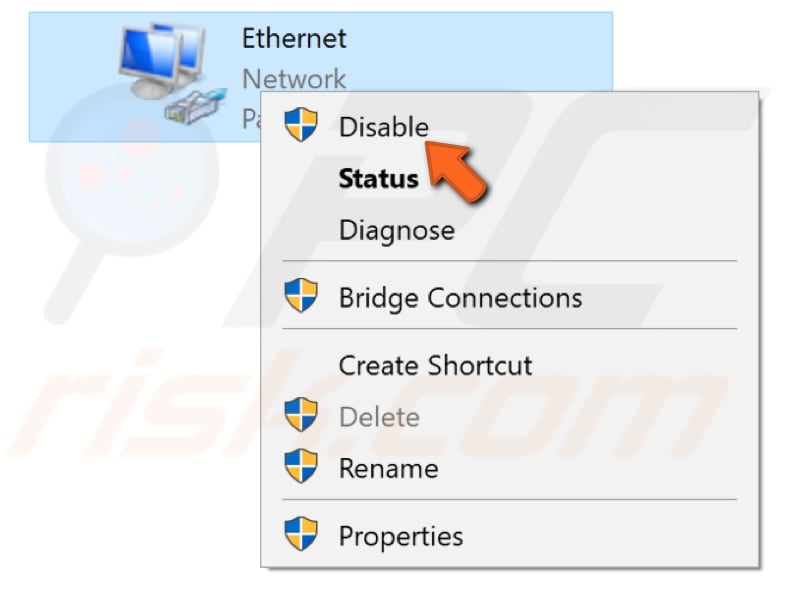
Disable Windows Update Peer-to-peer Feature
Windows 10 has a new feature that helps to save download bandwidth. It is a new peer-to-peer (P2P) delivery update mechanism. Using the P2P option, you can download a Windows update once and then use that machine to spread the update to all computers on your local network. You can also download Windows updates from other users in your area.
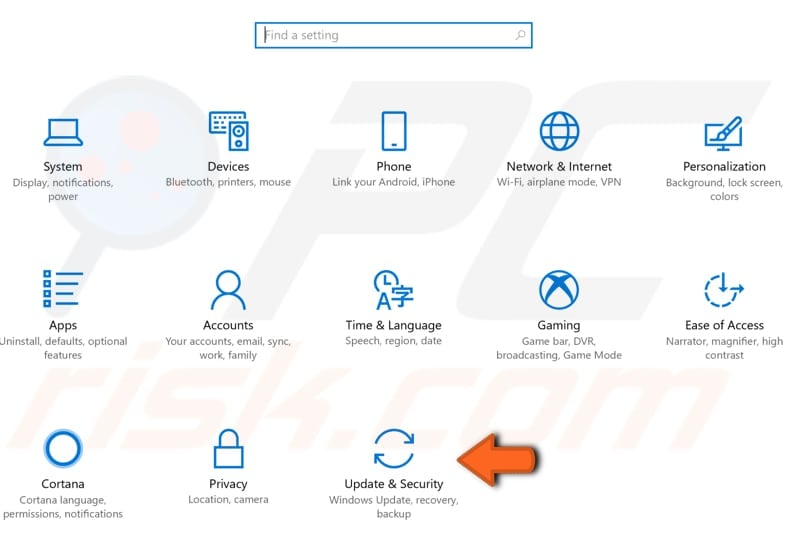
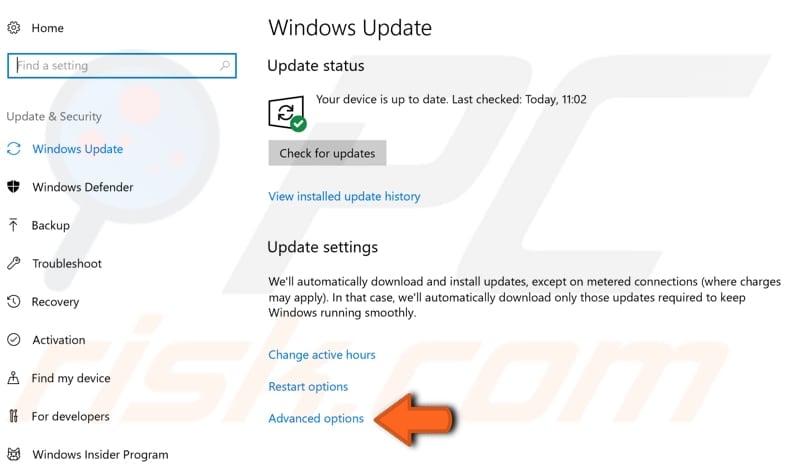
This feature can interfere with the DNS, and disabling it might fix "The DNS server isn't responding" error. To disable this feature, go to Settings and select "Update & Security".
Locate "Advanced options" under "Update settings" and click it.
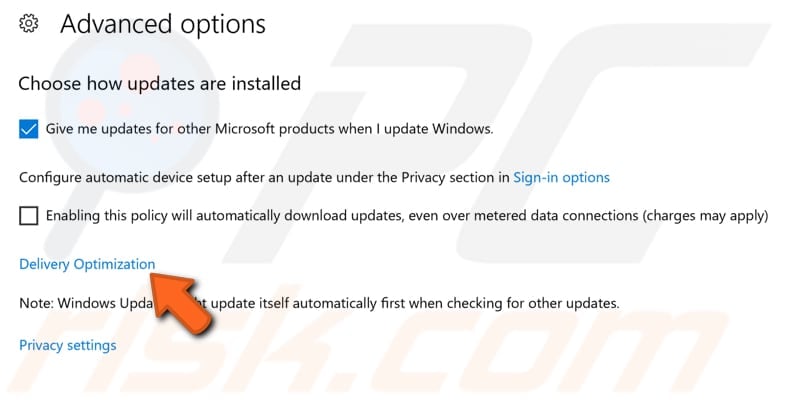
In the Advanced options window, click "Delivery Optimization".
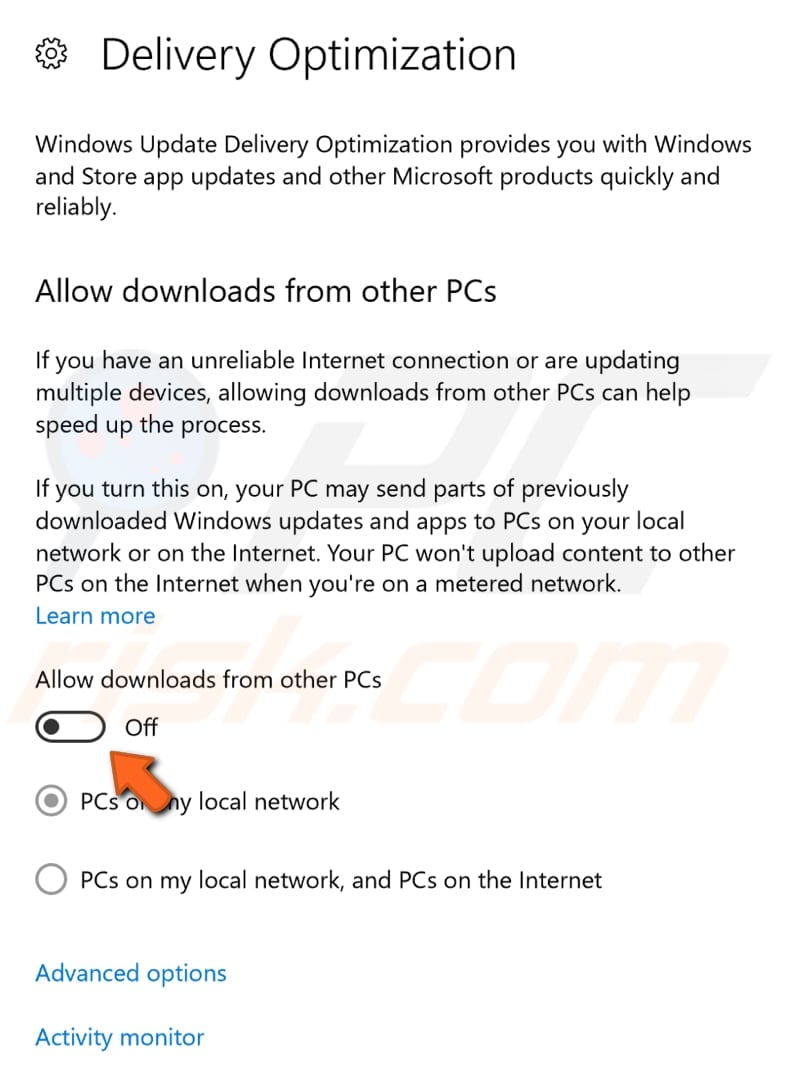
Turn off the "Allow downloads from other PCs" option in the Delivery Optimization window by toggling the switch. Check if the "DNS server is not responding" error persists.
We hope that the methods described above helped you fix "The DNS server isn't responding" error, and you can connect to the Internet without any network connection problems.
If none of the above solutions worked, the error might be caused by your Internet service provider. Wait until your Internet service provider fixes the technical issues, and try connecting to the Internet after a few hours.
Share:

Rimvydas Iliavicius
Researcher, author
Rimvydas is a researcher with over four years of experience in the cybersecurity industry. He attended Kaunas University of Technology and graduated with a Master's degree in Translation and Localization of Technical texts. His interests in computers and technology led him to become a versatile author in the IT industry. At PCrisk, he's responsible for writing in-depth how-to articles for Microsoft Windows.
▼ Show Discussion