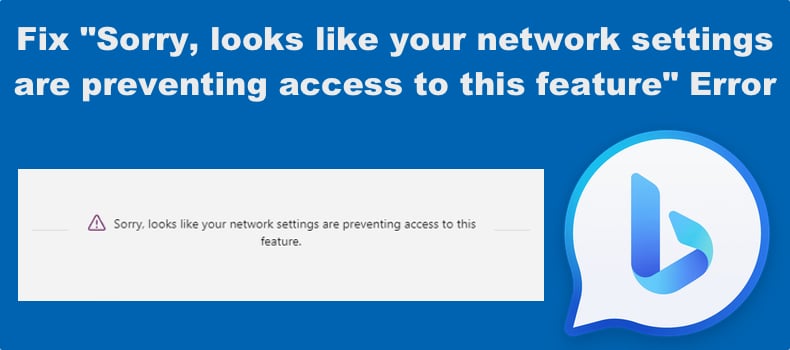
Fix "Sorry, looks like your network settings are preventing access to this feature" Error in Bing Chat

Get Free Scanner and check your computer for errors
Fix It NowTo fix found issues, you have to purchase the full version of Combo Cleaner. Free trial available. Combo Cleaner is owned and operated by Rcs Lt, the parent company of PCRisk.com read more.
How to Fix "Sorry, looks like your network settings are preventing access to this feature" Error in Bing Chat
The “network settings preventing access” in Bing AI can occur if you use a VPN service or another third-party app that modifies how you connect to the Internet. In this article, we will delve deeper into what causes this error and provide you with several proven ways to fix it.
What Causes This Error?
This error prevents users from accessing Bing AI’s chat feature. There are many causes for this issue, but we have listed the most common reasons below.
- Geo-restrictions. Some of Bing AI’s chatbot features are region-restricted and may trigger the "Sorry, looks like your network settings are preventing access to this feature" error.
- Server-side issues. Since Bing AI is very popular, its servers are sometimes overwhelmed during peak hours, resulting in access-related issues.
- VPN services. If you use a VPN, Bing’s webserver may flag your requests as suspicious. To fix the “network settings preventing access” error, make sure your network connection isn’t compromised by a third-party service.
- Corrupted web browser cache and or cookies. Corrupt browser cache or cookies are known to cause issues accessing certain websites, including Bing AI.
- Misconfigured browser privacy settings. Misconfigured browser privacy settings, particularly not allowing third-party cookies, can break websites like Bing AI. Bing AI requires third-party cookies to function properly, so make sure that third-party cookies are allowed on your browser.
- Interference from browser extensions. Browser extensions, particularly those that modify how your browser connects to the Internet, may cause websites like Bing AI to stop working.
Before trying any of our fixes:
- Ensure your web browser is updated to the latest version.
- Try a different browser. Sometimes, Bing Chat stops working on browsers other than Microsoft Edge. In such a case, try using the Edge browser.
- Update your VPN app.
- Switch to a different VPN service provider.
- Temporarily disable your anti-virus and firewall software. Your antivirus or firewall software may interfere with the connection to Bing Chat. disabling the software or whitelisting Bing Chat may fix the error.
Video on How to Fix "Sorry, looks like your network settings are preventing access to this feature"
Table of Contents:
- Introduction
- Method 1. Clear All Cookies, Allow Third-Party Cookies, and Disable Extensions
- Clear Cookies and Disable Extensions on Google Chrome
- Clear Cookies and Disable Extensions on Mozilla Firefox
- Clear Cookies and Disable Extensions on Microsoft Edge
- Method 2. Install the ModHeader Browser Extension
- Install ModHeader on Google Chrome
- Install ModHeader on Mozilla Firefox
- Install ModHeader on Microsoft Edge
- Method 3. Sign in to Your Microsoft Account
- Method 4. Update Your Date of Birth
- Method 5. Switch to a Third-Party DNS Server
- Method 6. Reset Network Settings to Default
- Video on How to Fix "Sorry, looks like your network settings are preventing access to this feature"
Download Computer Malware Repair Tool
It is recommended to run a free scan with Combo Cleaner - a tool to detect viruses and malware on your device. You will need to purchase the full version to remove infections. Free trial available. Combo Cleaner is owned and operated by Rcs Lt, the parent company of PCRisk.com read more.
Browser cookies are used to remember settings for a specific website to improve the browsing experience. Strict privacy settings in your browser may impact the functionality of websites such as Bing AI.
The instructions below will show you how to allow third-party Internet cookies on your web browser. Allowing third-party cookies may fix the “Sorry, looks like your network settings are preventing access to this feature” error.
They will also show you how to clear your existing browser cookies and cache and disable browser extensions.

1. Open Chrome. Click the three-dot menu button on the top-right corner and click Clear browsing data.
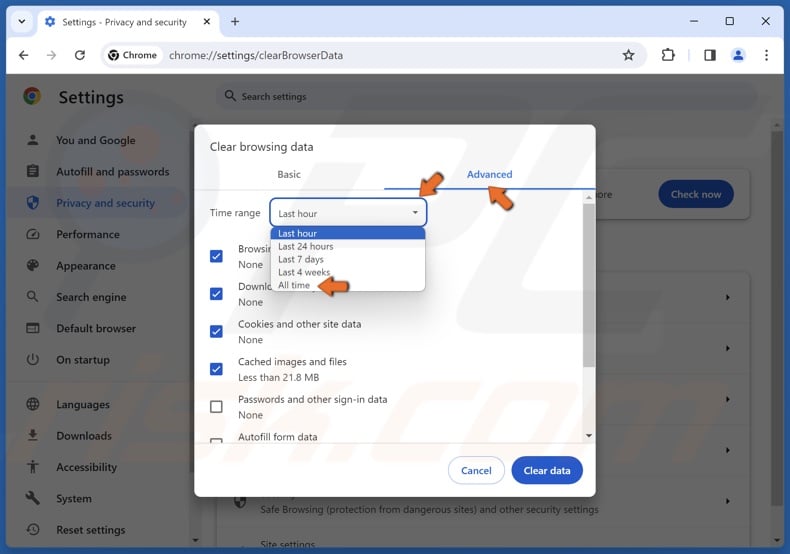
2. Select the Advanced tab.
3. Open the Time range menu and select All time.

4. Leave only Cookies and other site data and Cached images and files checkboxes marked.
5. Click Clear data.
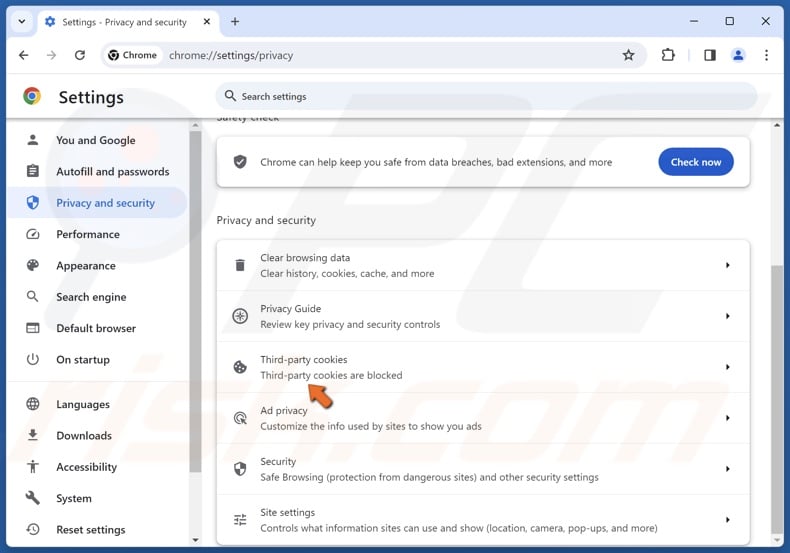
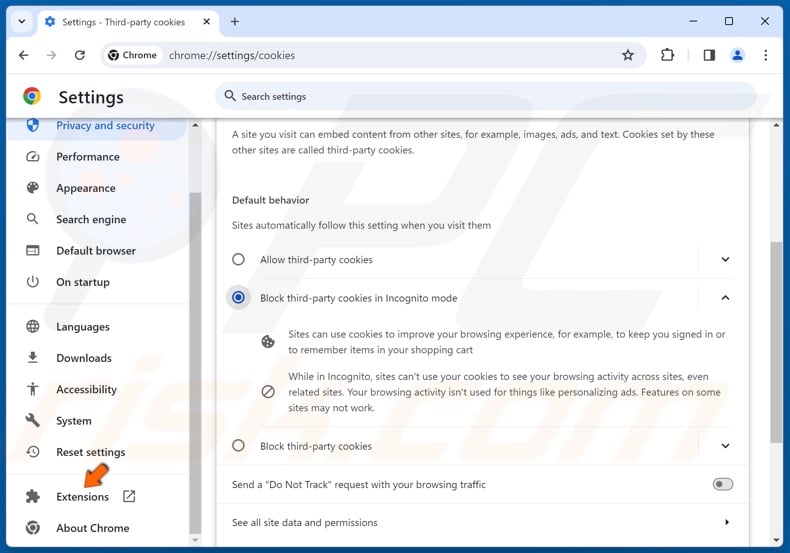
6. Then, in the Privacy and security panel, click Third-party cookies.
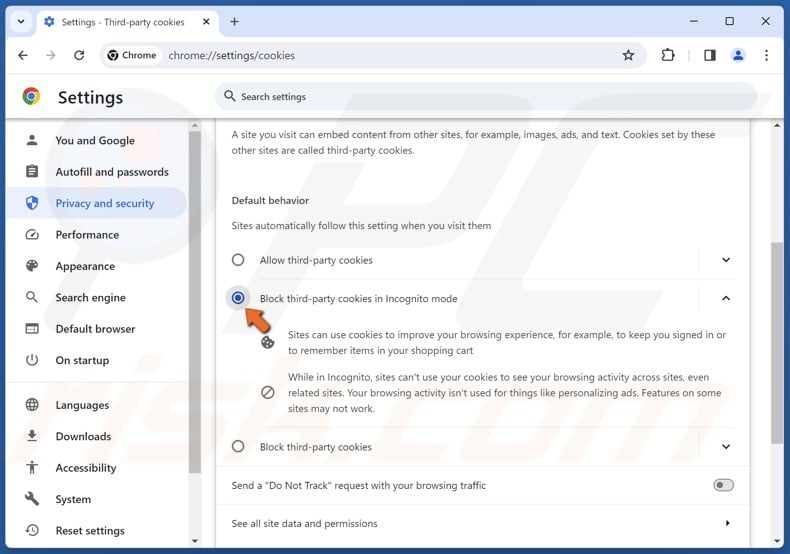
7. Tick the Block third-party cookies in Incognito mode option.
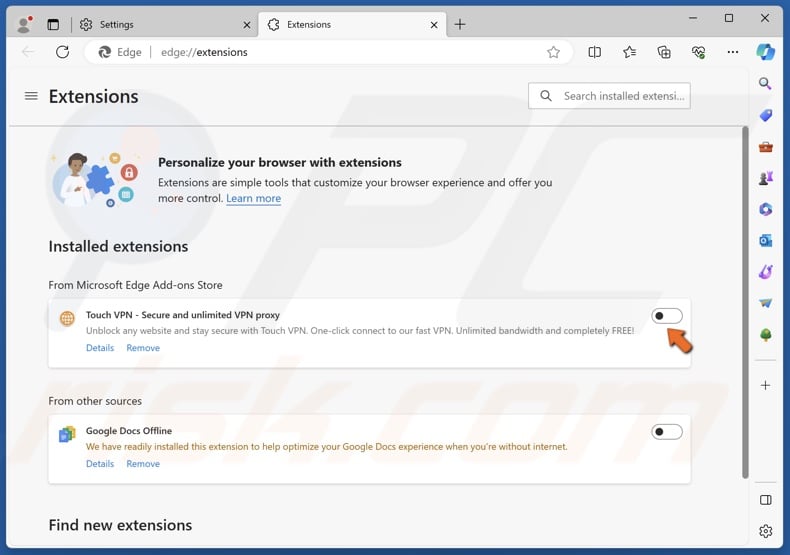
8. Then, select the Extensions panel.
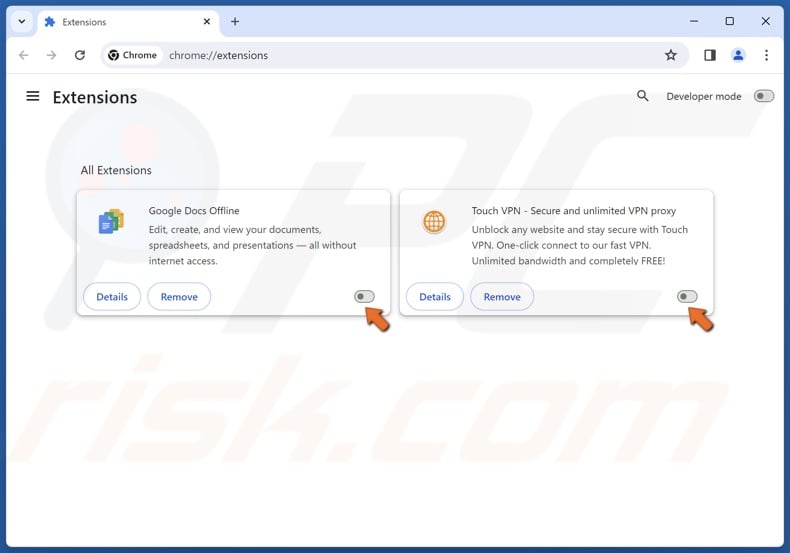
9. Toggle off the slider next to each extension to disable it.
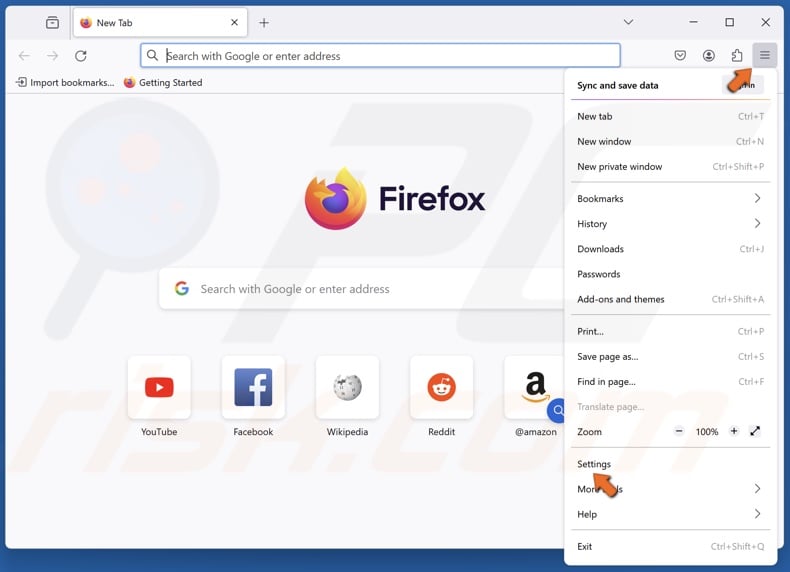
1. Open Firefox. Click the menu icon on the top-right corner and click Settings.
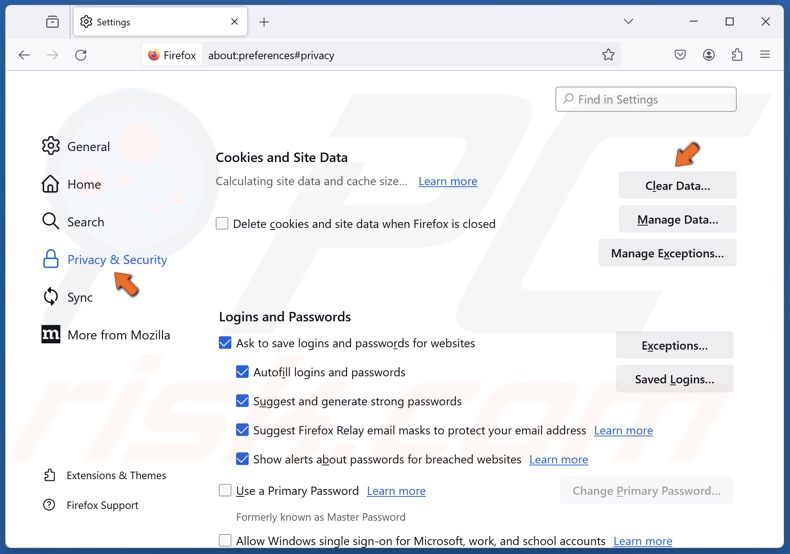
2. Select the Privacy & Security panel on the left.
3. Scroll to the Cookies and Site Data menu and click Clear Data.
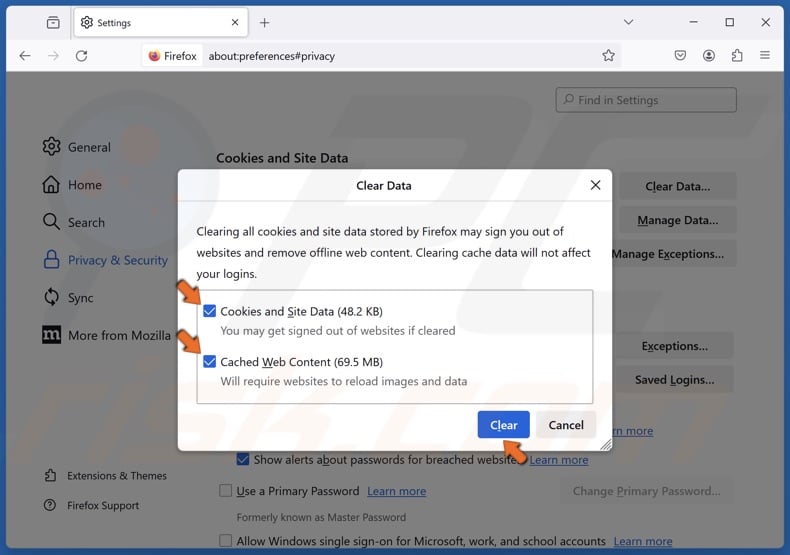
4. Ensure the Cookies and Site Data and Cached Web Content checkboxes are marked and click Clear.
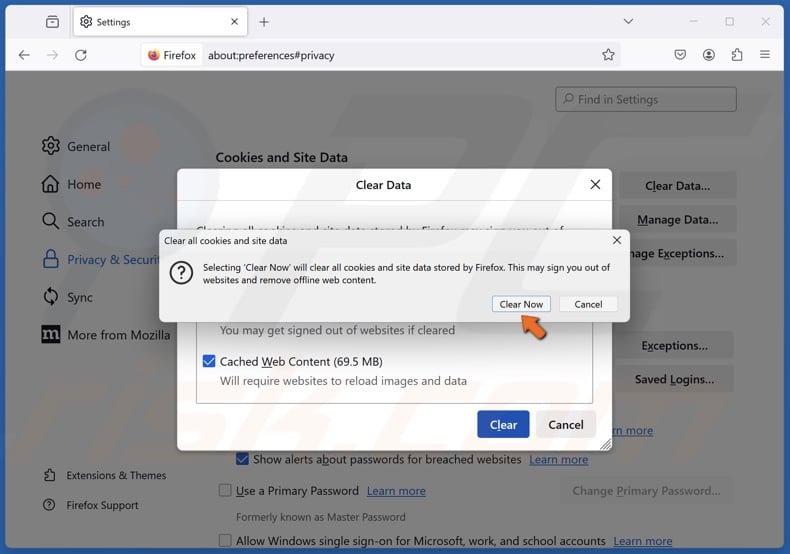
5. Click Clear Now to delete all cookies and cache on Firefox.
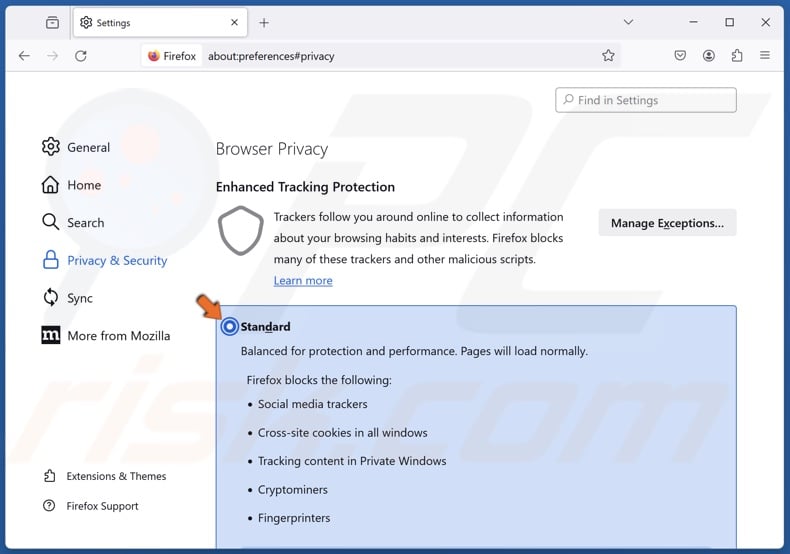
6. Then, choose Standard in the Browser Privacy section.
7. Click Extensions & Themes at the bottom left of the browser window.

8. Select the Extensions panel.
9. Toggle off the slider next to each extension to disable it.

1. Open Edge. Click the three-dot menu button on the top-right corner and click Settings.
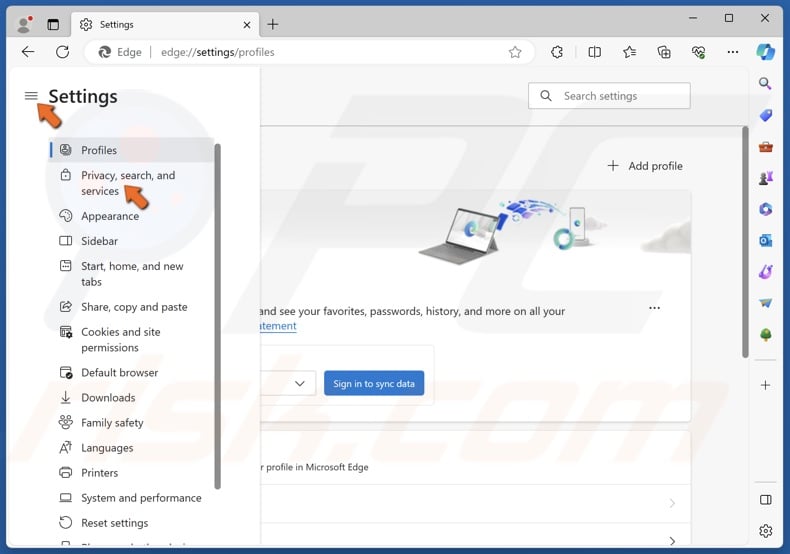
2. Select the Privacy, search, and services panel on the left.
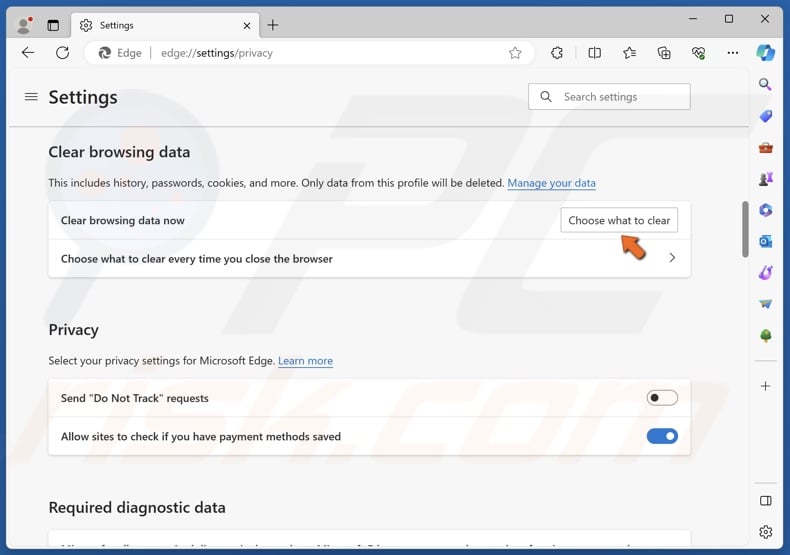
3. Scroll down and click Choose what to clear.
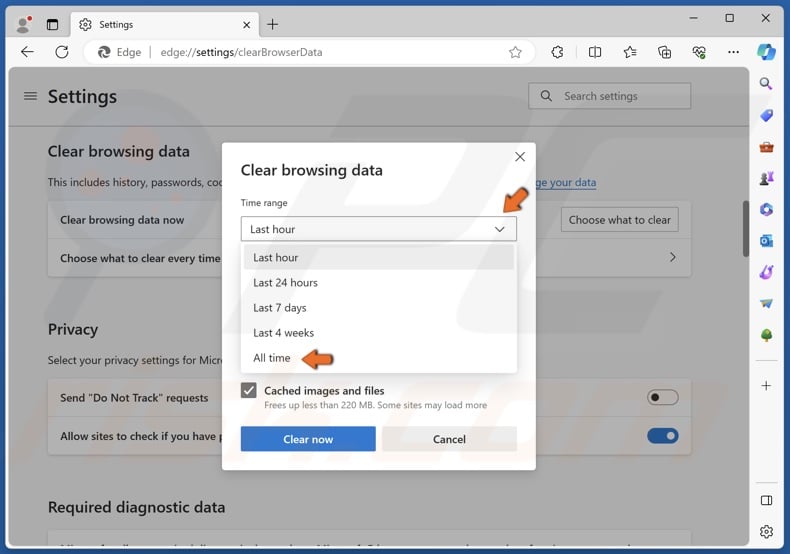
4. Open the Time range menu and select All time.

5. Leave only Cookies and other site data and Cached images and files checkboxes marked.
6. Click Clear now to delete all cookies and cache on Edge.
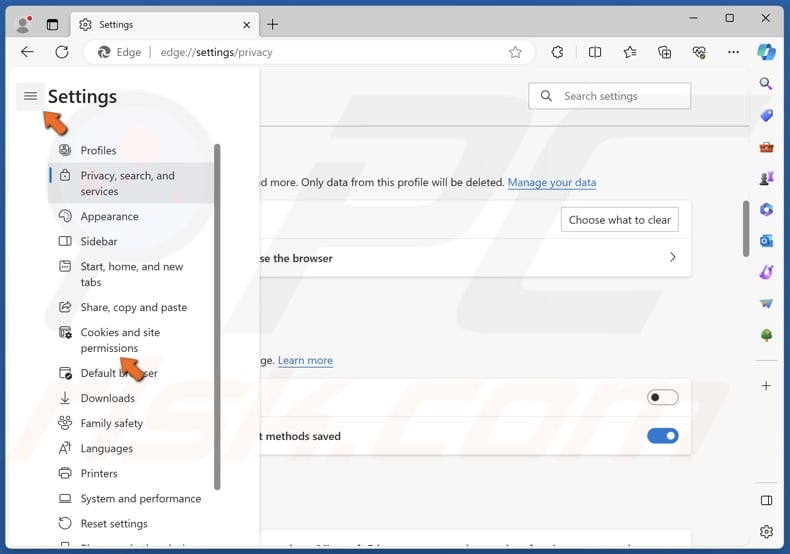
7. Select the Cookies and site permissions panel on the left.
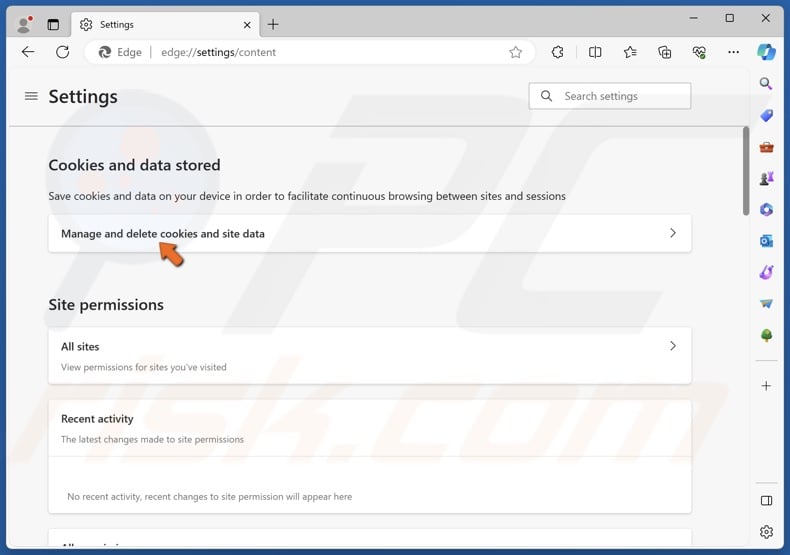
8. Click Manage and delete cookies and site data.
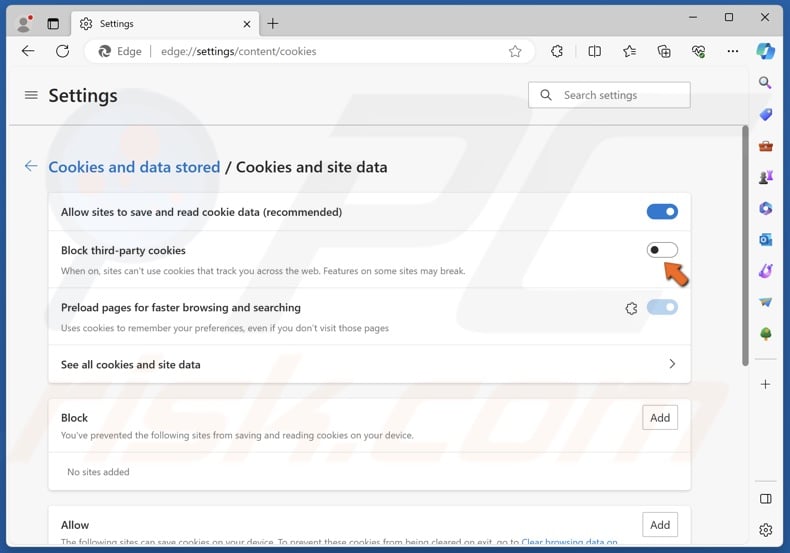
9. Toggle off the Block third-party cookies option.
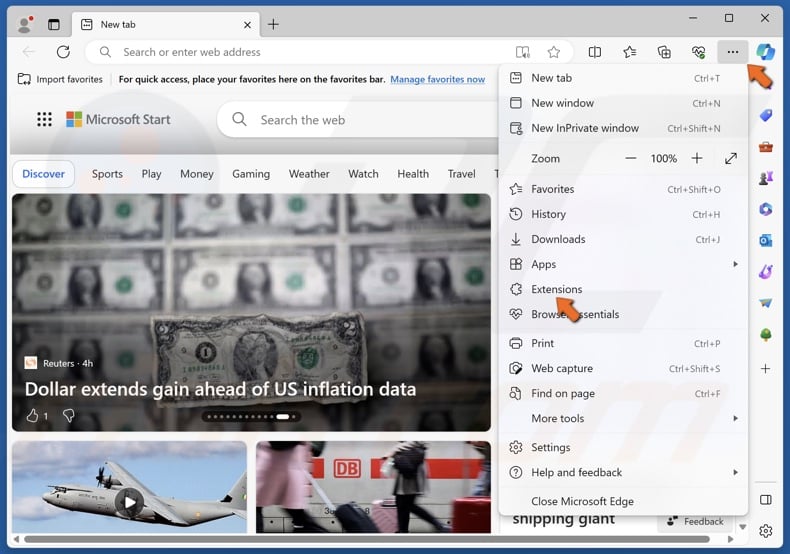
10. Click the three-dot menu button again and click Extensions.
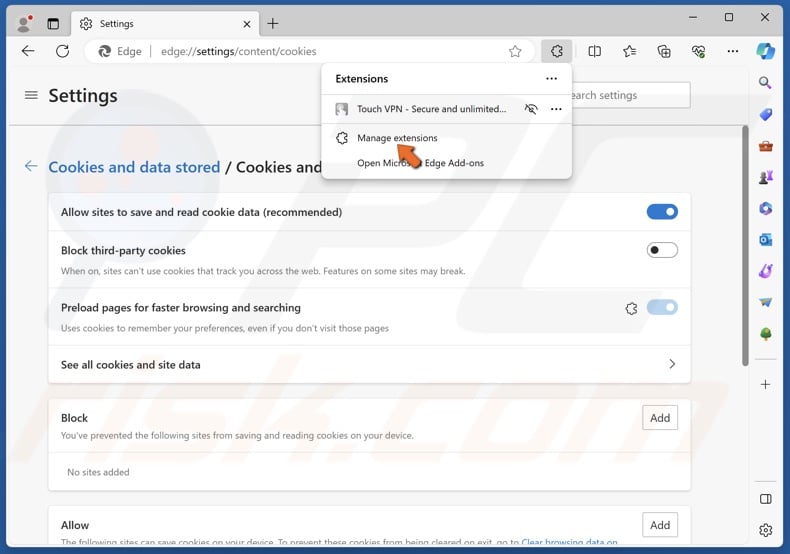
11. Select Manage extensions.
12. Toggle off the slider next to each extension to disable it.
Method 2. Install the ModHeader Browser Extension
Many users reported fixing the "Sorry, looks like your network settings are preventing access to this feature" error by installing the ModHeader extension on their browser. However, installing it is not enough, as you need to add a request header “x-forwarded-for” and set the value to “1.1.1.1.”.
Install ModHeader on Google Chrome
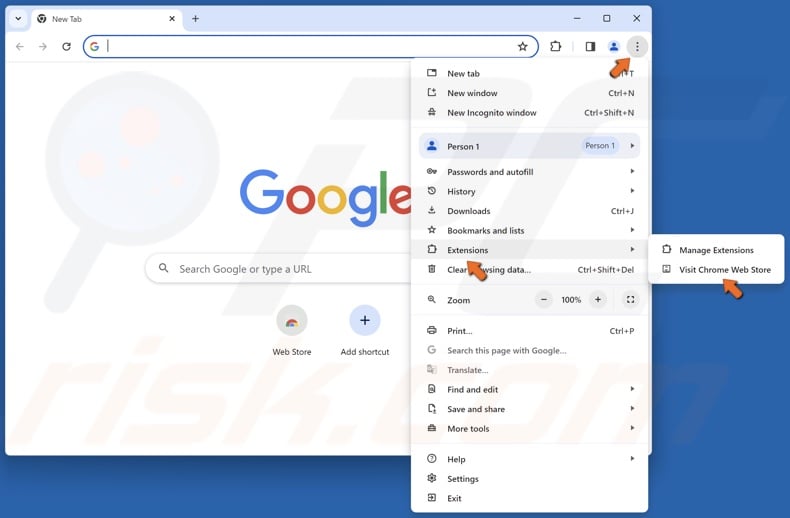
1. Open Chrome. Click the three-dot menu button at the top-right corner, select Extensions, and click Visit Chrome Web Store.
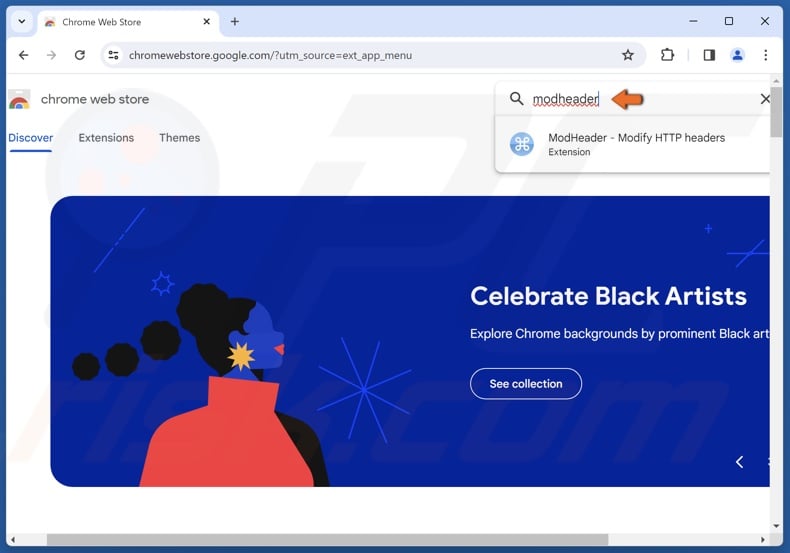
2. Type ModHeader in the search box and press Enter.
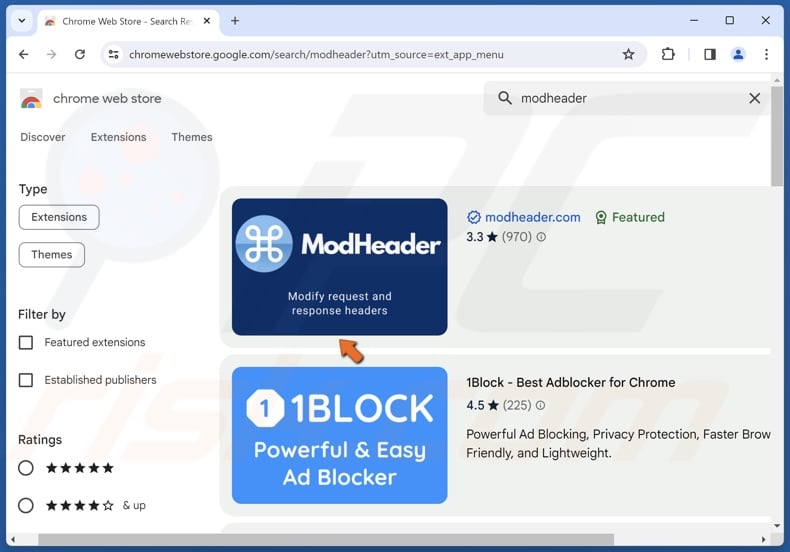
3. Select ModHeader.
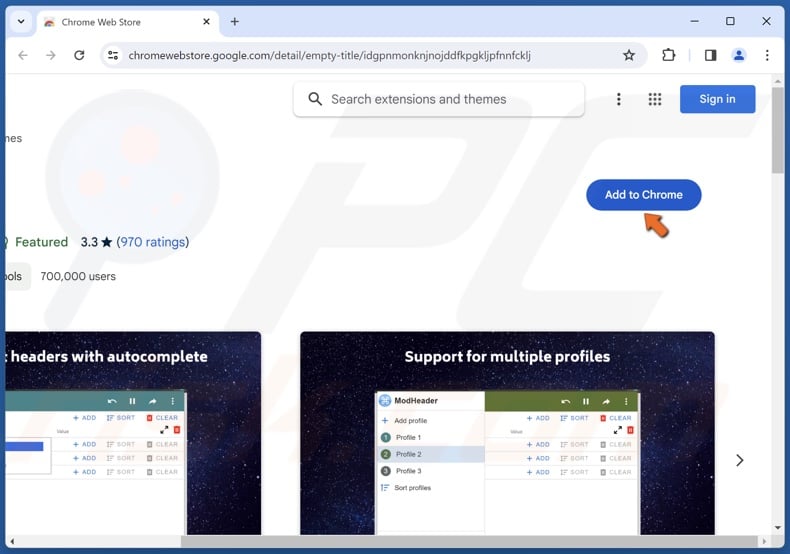
4. Then, click Add to Chrome.
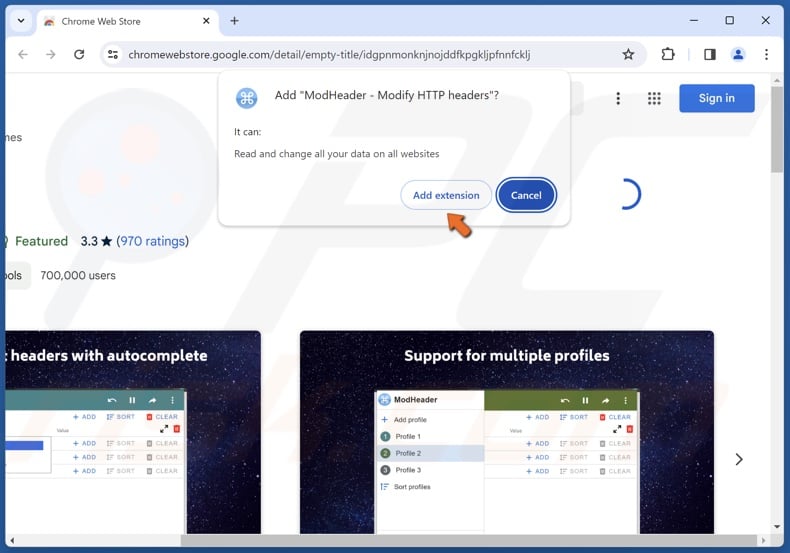
5. Click Add extension when prompted.
![]()
6. Click the Extensions icon and select ModHeader.
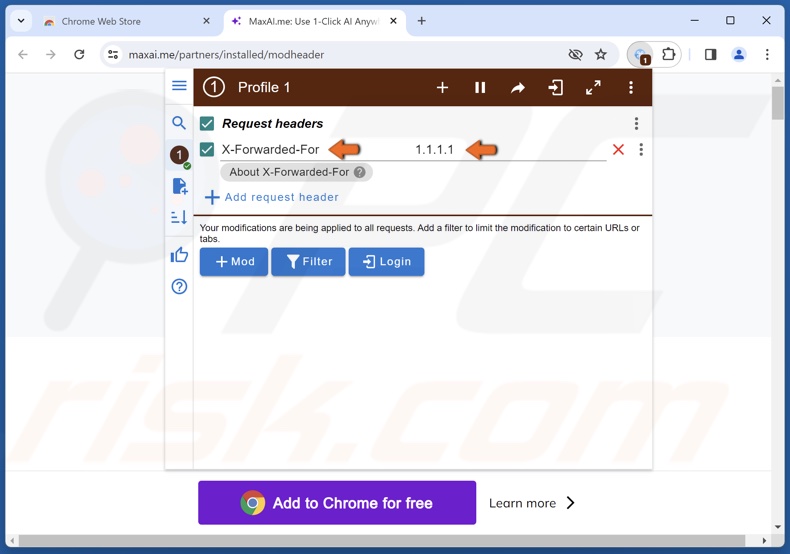
7. In the Request Header Name field, type in:
x-forwarded-for
8. In the Value field type in:
1.1.1.1
Install ModHeader on Mozilla Firefox

1. Open Firefox. Click the menu icon on the top-right corner and click Add-ons and themes.
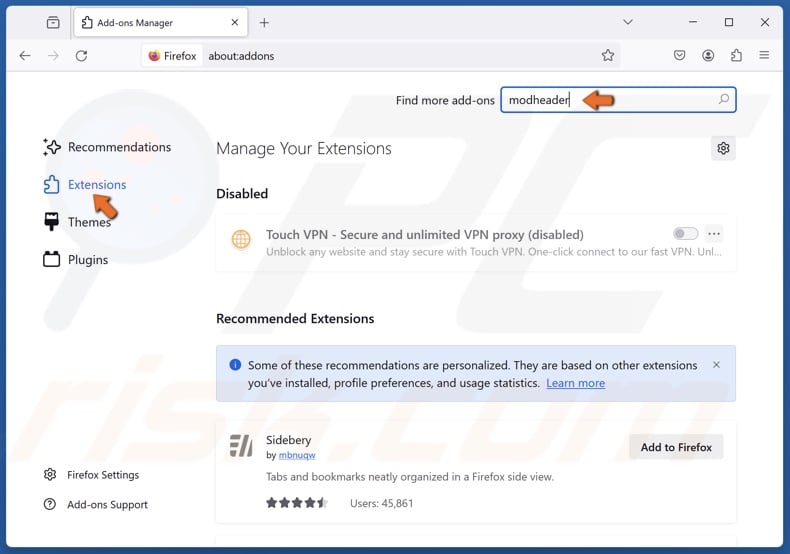
2. Type ModHeader in the search box and press Enter.
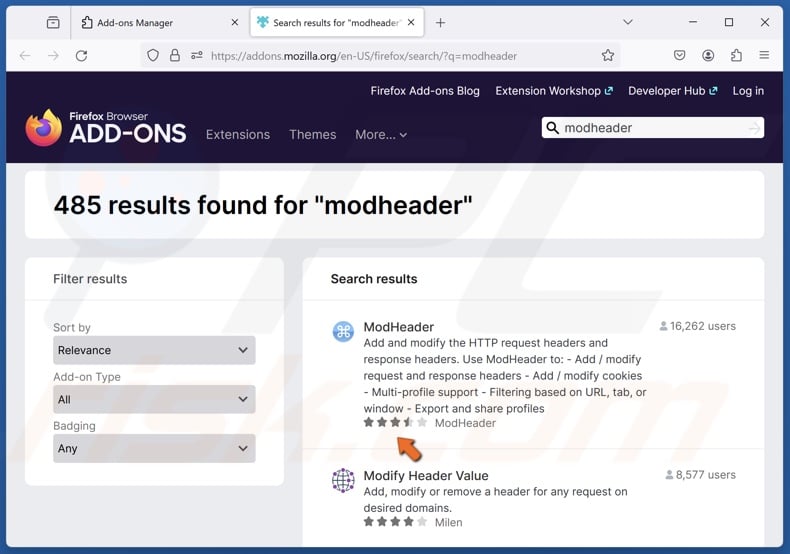
3. Select ModHeader in the search results.
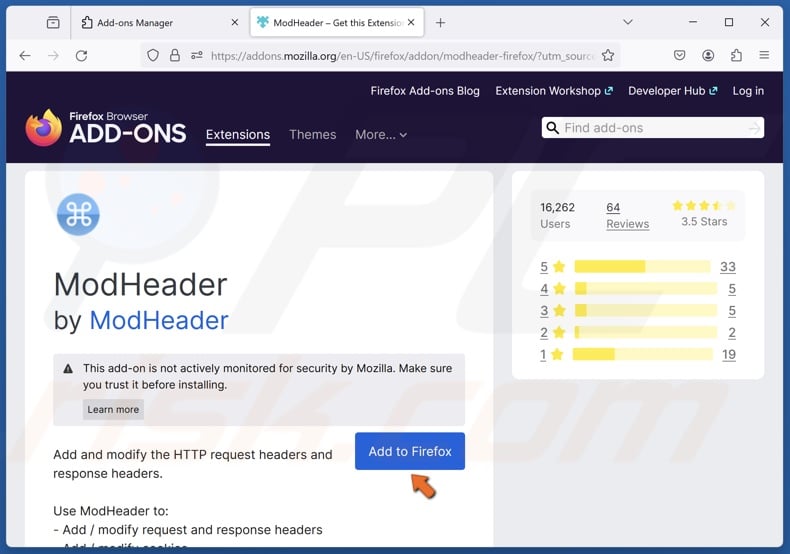
4. Click Add to Firefox.
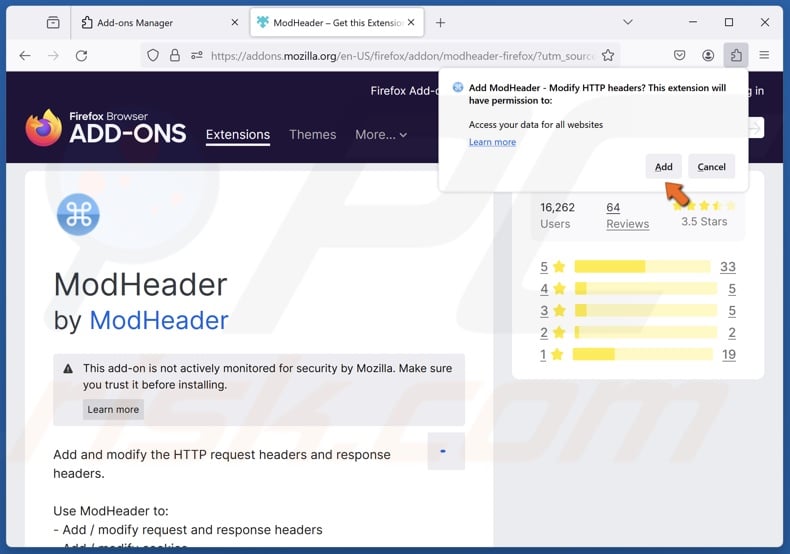
5. Click Add when prompted.
![]()
6. Click the Extensions icon and select ModHeader.
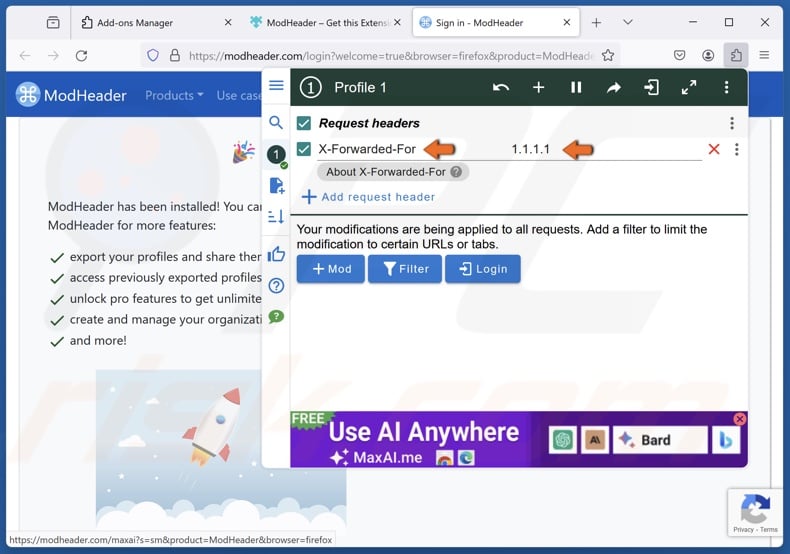
7. In the Request Header Name field, type in:
x-forwarded-for
8. In the Value field type in:
1.1.1.1
Install ModHeader on Microsoft Edge
1. Open Edge. Click the three-dot menu button at the top-right corner and click Extensions.
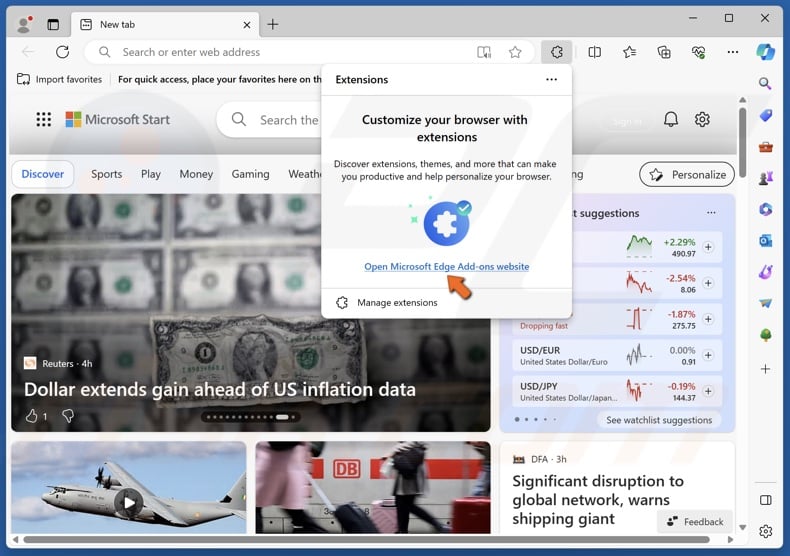
2. Click Open Microsoft Edge Add-ons website.
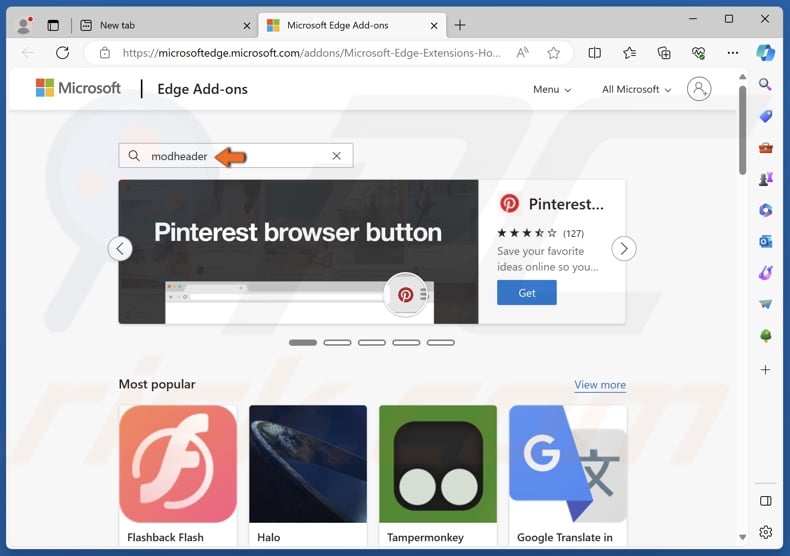
3. Type ModHeader in the search box and press Enter.
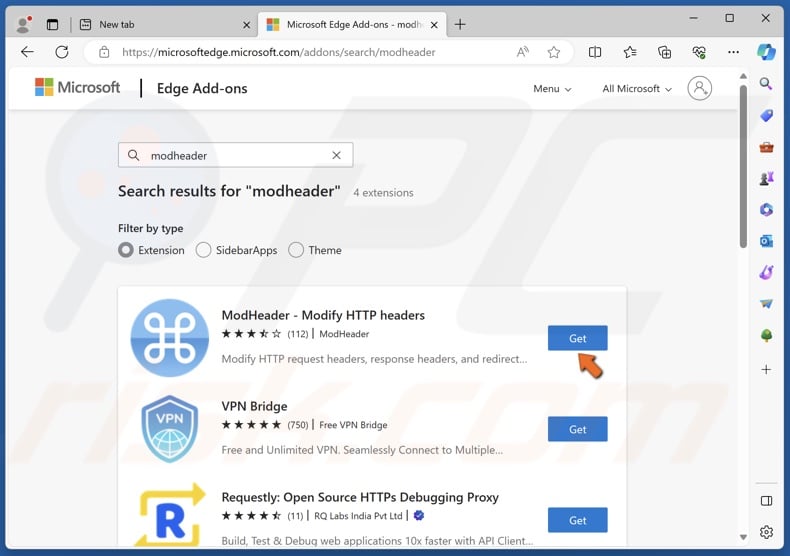
4. Click Get next to ModHeader.
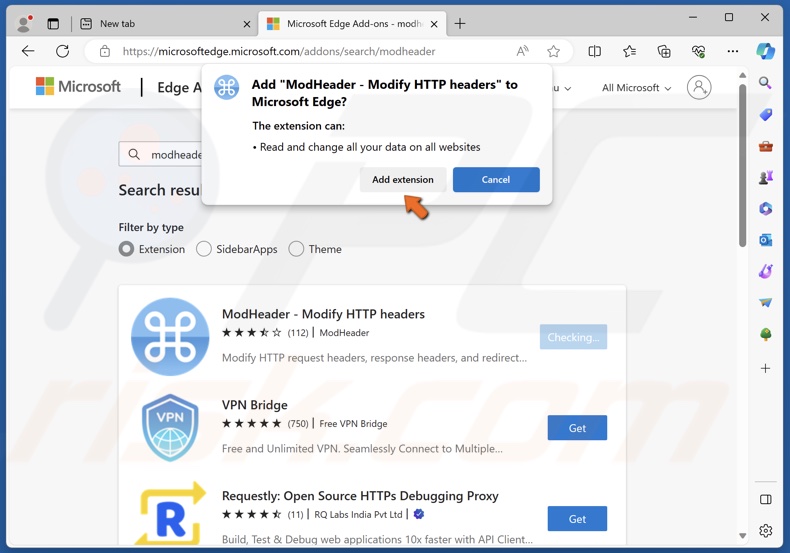
5. Click Add extension when prompted.
![]()
6. Click the Extensions icon and select ModHeader.
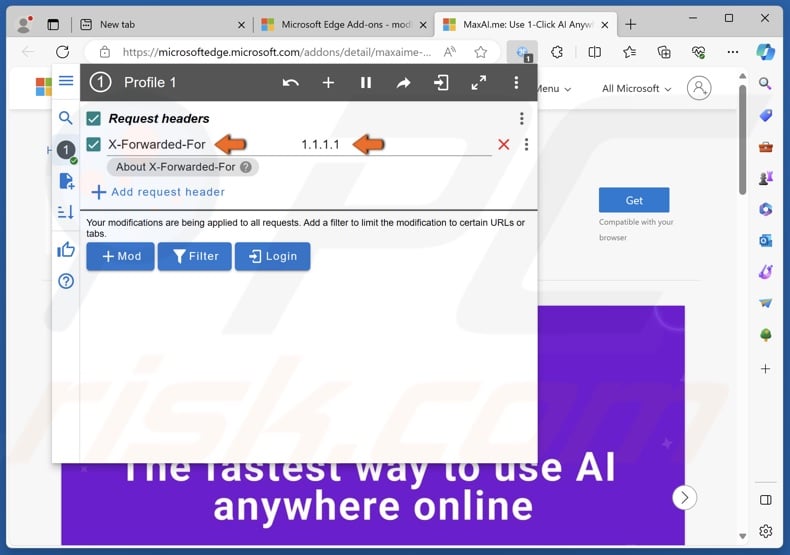
7. In the Request Header Name field, type in:
x-forwarded-for
8. In the Value field type in:
1.1.1.1
Method 3. Sign in to Your Microsoft Account
Signing into your Microsoft account verifies your identity and your connection to Bing. Signing in with your Microsoft account may fix the “network settings preventing access” error, even if you’re using a VPN.
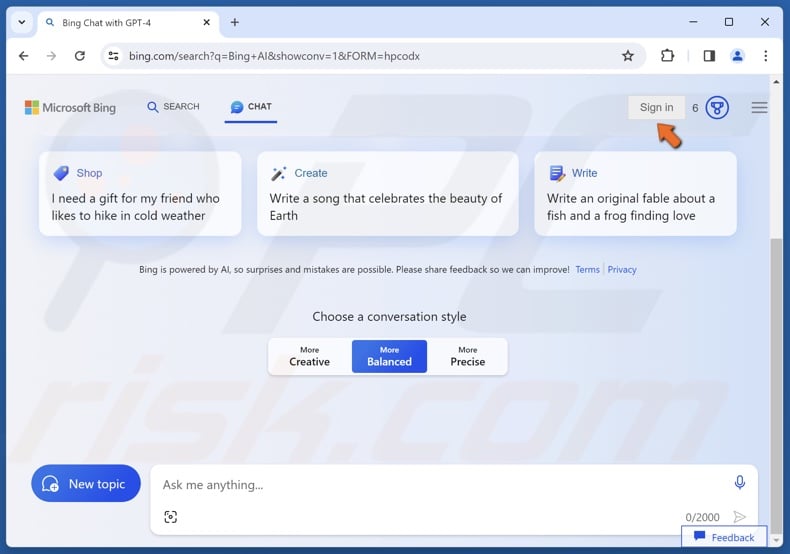
1. Open your browser and go to the Bing Chat website.
2. Click the Sign in button at the top-right corner of the webpage.
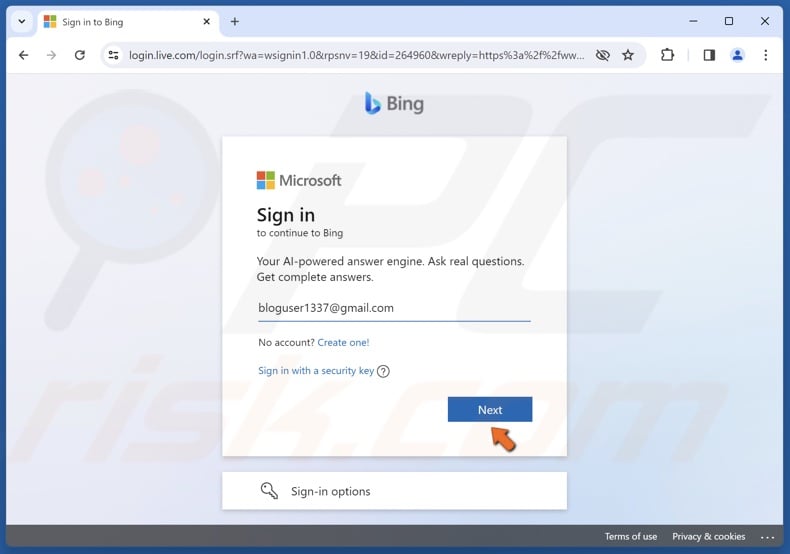
3. Enter your Microsoft account credentials and click Next.
4. Refresh the Bing Chat webpage to verify that you’ve signed in successfully.
Method 4. Update Your Date of Birth
Outdated or missing account information is known to cause access restrictions on Bing Chat. The “Sorry, looks like your network settings are preventing access to this feature” error can occur if you haven’t set your date of birth. The instructions below will show you how to update your date of birth.
![]()
1. Open your browser and go to the Bing Chat website.
2. Click your profile icon at the top-right corner and click Manage account.
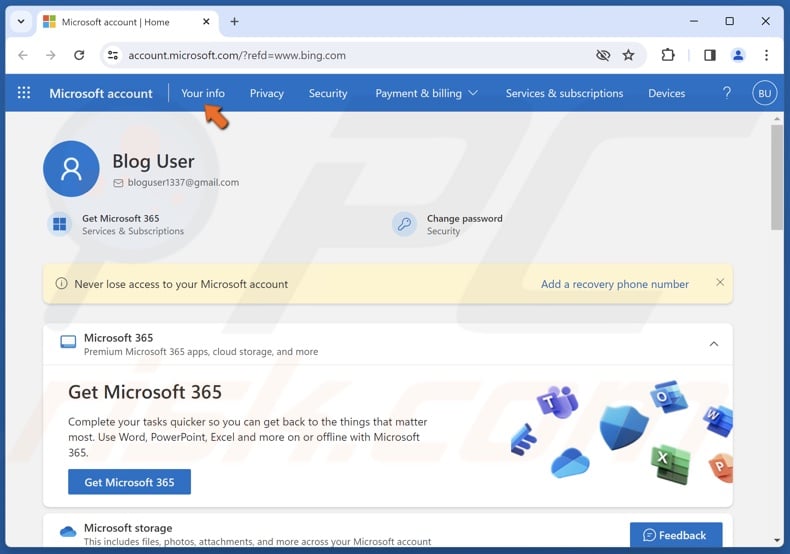
3. Select the Your info tab.
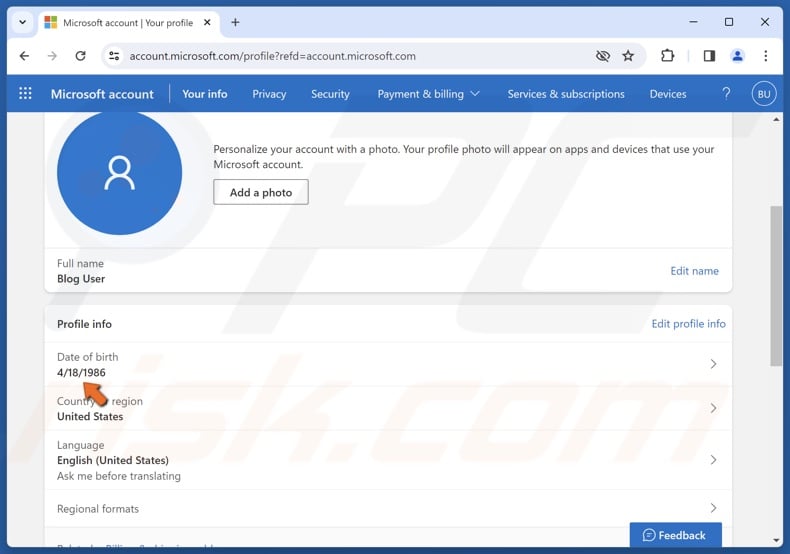
4. Select the Date of Birth section.
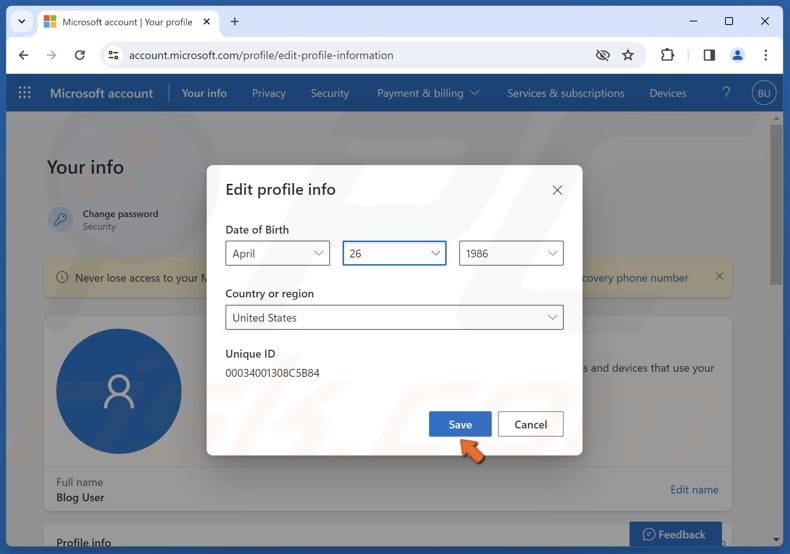
5. Enter your correct date of birth and click Save.
6. Refresh the Bing Chat webpage.
Method 5. Switch to a Third-Party DNS Server
You may get this error if your ISP-provided DNS server fails to resolve network requests. Therefore, you may fix it by switching to a reliable third-party DNS server.
1. Hold down Windows+R keys to open Run.

2. Type ncpa.cpl in the Run dialog and click OK.
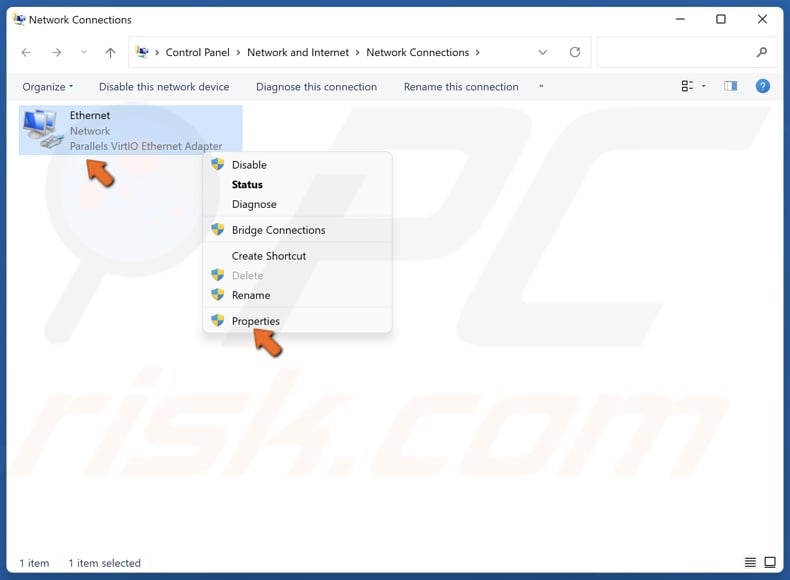
3. Right-click your network adapter and select Properties.
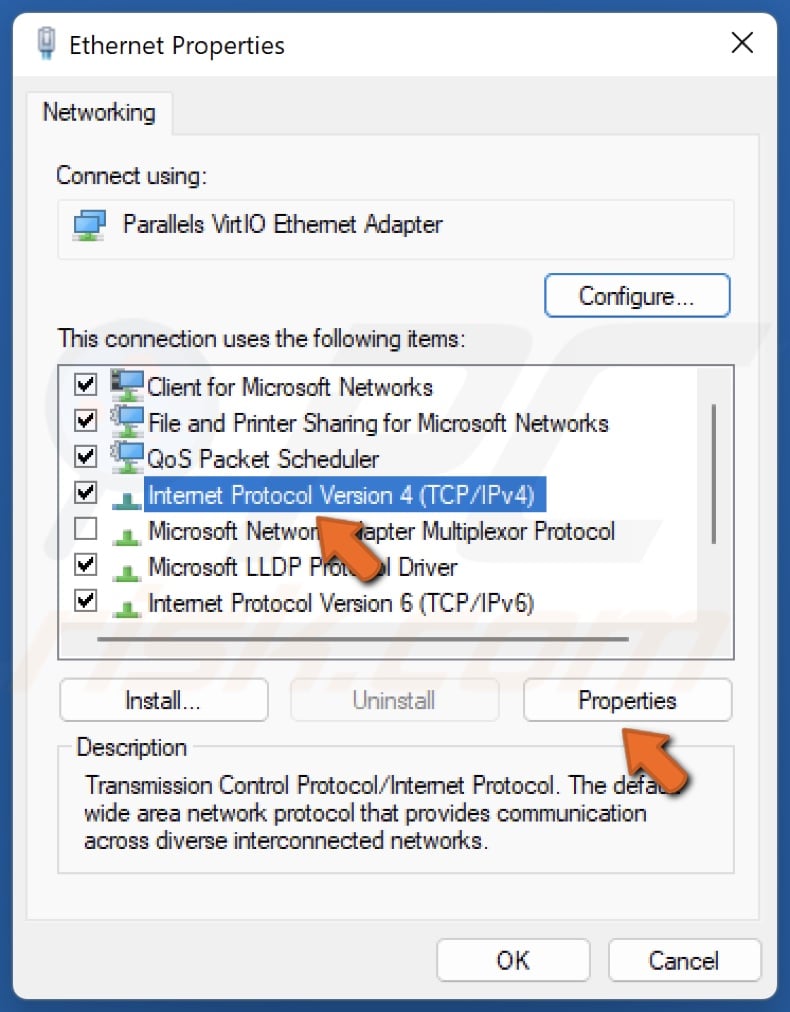
4. Select Internet Protocol Version 4 (TCP/IPv4) and click Properties.
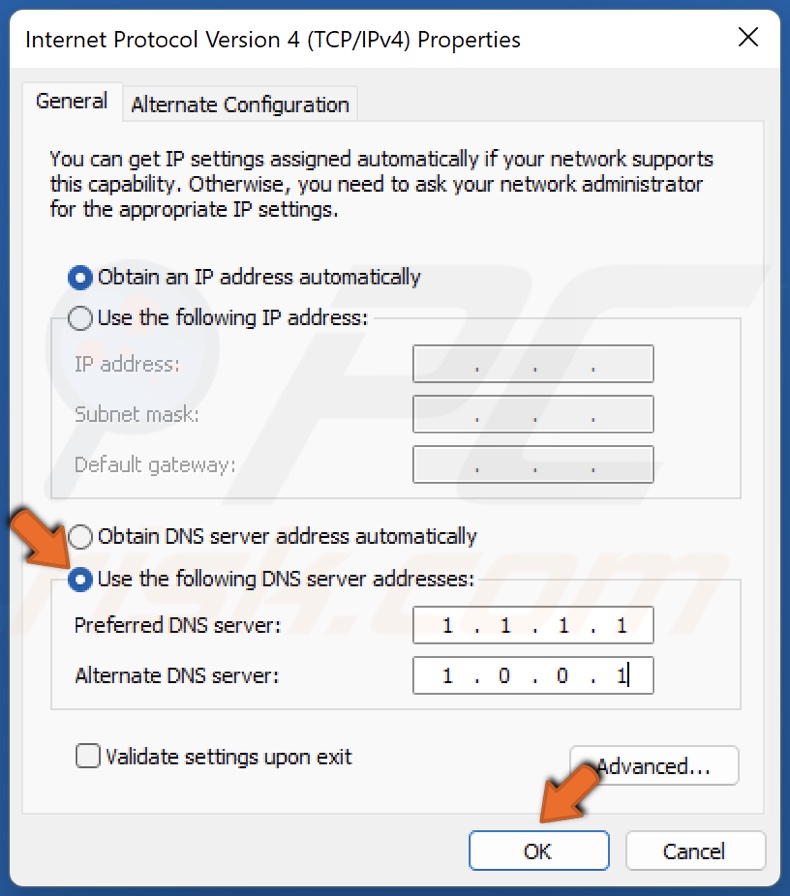
5. In the resulting Internet Protocol window, tick Use the following DNS server addresses.
6. In the Preferred DNS server, type in 1.1.1.1
7. In the Alternate DNS server, type in 1.0.0.1
8. Click OK.
9. Restart your PC.
Method 6. Reset Network Settings to Default
If your network settings have been misconfigured, resetting all of your network settings to default may fix the "Sorry, looks like your network settings are preventing access to this feature" error.
Note that all your networking components will be reset to their default settings, so you will have to re-enter your Wi-Fi connection password.
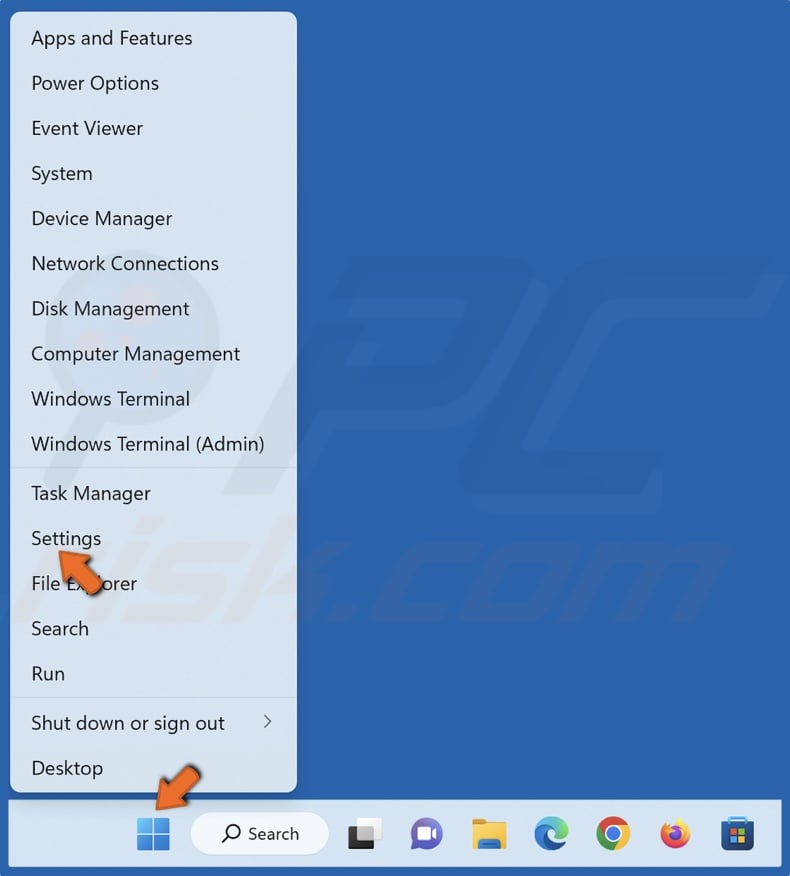
1. Right-click the Windows Start button and click Settings.
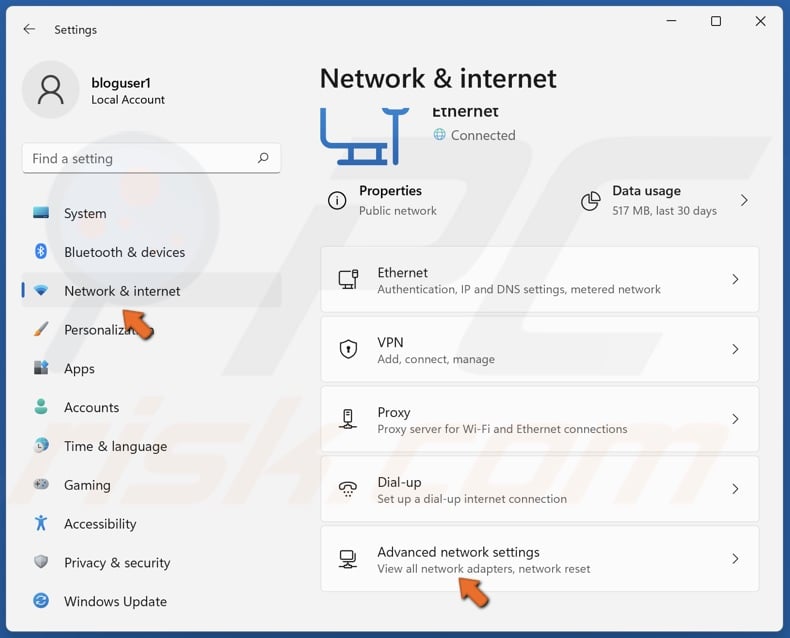
2. Select the Network & internet panel.
3. Select Advanced network settings.
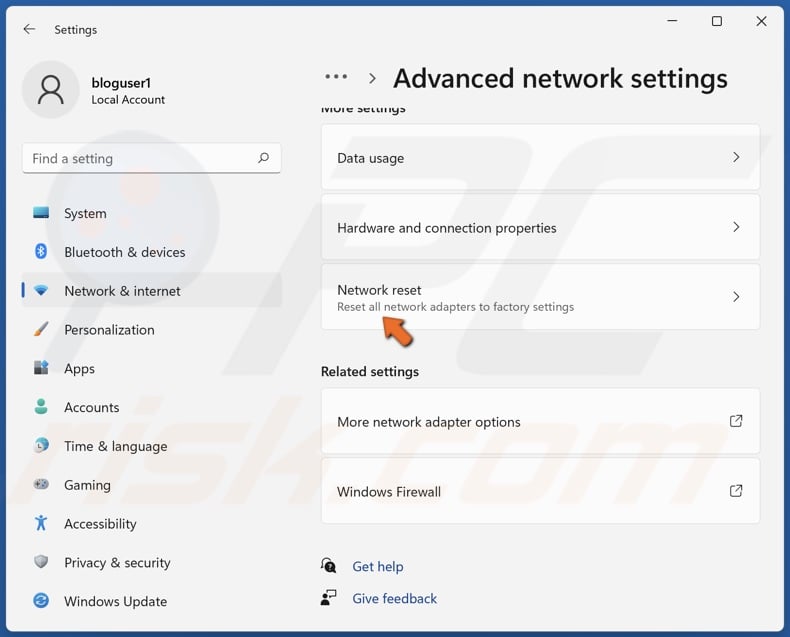
4. Select Network reset.
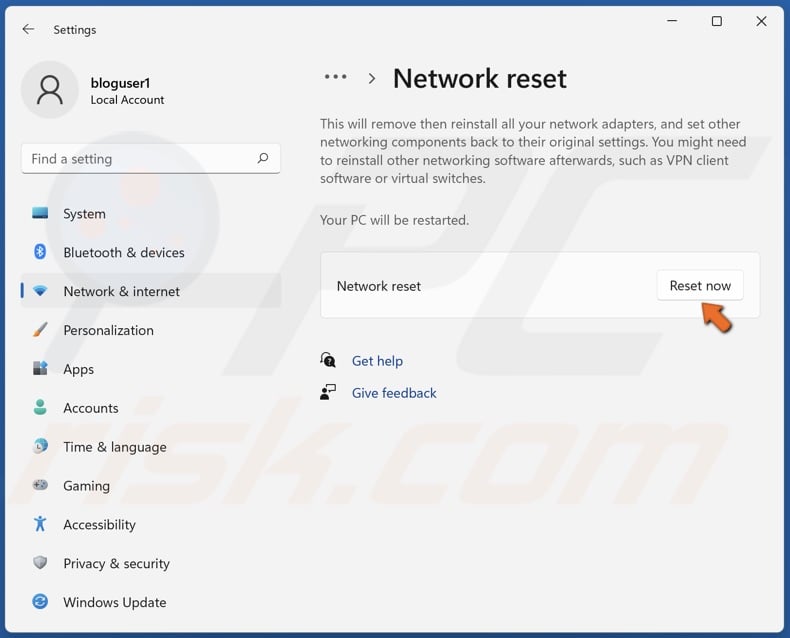
5. Click Reset now.
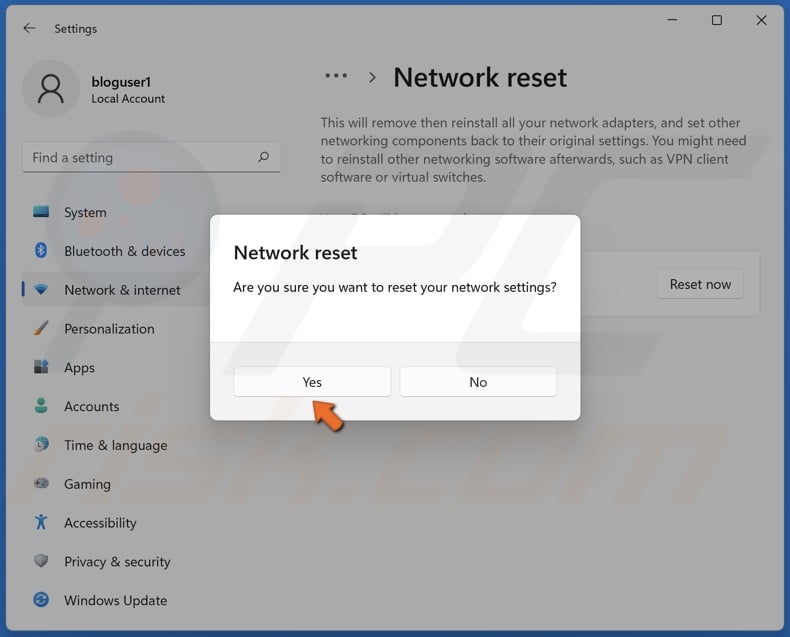
6. Click Yes to confirm the reset.
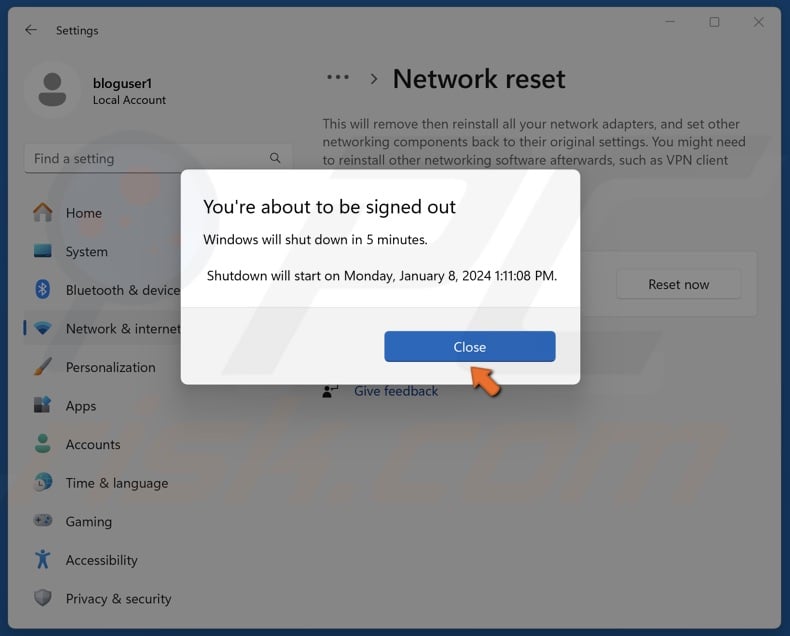
7. Click Close when prompted.
8. Restart your PC.
Did this article help you fix the "Sorry, looks like your network settings are preventing access to this feature" error when using Bing Chat? Leave your thoughts and suggestions below.
Share:

Rimvydas Iliavicius
Researcher, author
Rimvydas is a researcher with over four years of experience in the cybersecurity industry. He attended Kaunas University of Technology and graduated with a Master's degree in Translation and Localization of Technical texts. His interests in computers and technology led him to become a versatile author in the IT industry. At PCrisk, he's responsible for writing in-depth how-to articles for Microsoft Windows.
▼ Show Discussion