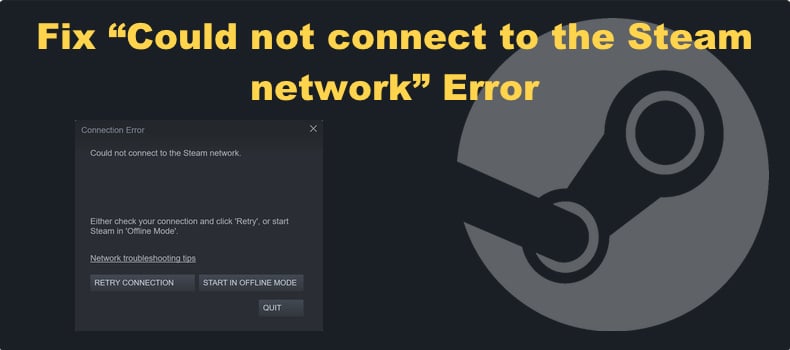
How to Fix "Could Not Connect to the Steam Network" Error

Get Free Scanner and check your computer for errors
Fix It NowTo fix found issues, you have to purchase the full version of Combo Cleaner. Free trial available. Combo Cleaner is owned and operated by Rcs Lt, the parent company of PCRisk.com read more.
How to Fix the “Could not connect to the Steam network” Error on Windows 11
The “Could not connect to Steam network” error can occur out of nowhere when you try to log into your Steam account. This article will explain what causes this error and provide several proven methods to fix it.
Why Can’t I Connect to the Steam Network?
Users have reported that the “Could not connect to the Steam network” error occurs when trying to log into their Steam account. You may get this error due to a network or software issue. A buggy Steam update, server outage, or corrupted Winsock entries can trigger it. Our research has confirmed two proven causes of this error.
- UDP (User Datagram Protocol) is unstable. Steam uses UDP by default because it’s faster than TCP but is prone to becoming unstable since it doesn’t assure the delivery of packets. As a result, you will get the “Could not connect to the Steam network.” To fix this issue, switch to the TCP (Transmission Control Protocol), as shown in Method 1.
- Misconfigured network settings. Misoncigured network settings could be the reason Steam won’t connect. Resetting the Winsock catalog and flushing the DNS cache may fix the issue. If that doesn’t work, try resetting your network settings to default.
Before trying our fixes, here are some tips:
- Check Steam Server Status. If you can’t connect to the Steam network, you should check if the error occurs due to a Steam server issue or on your end. Go to SteamDB to check for problems with Steam servers.
- Restart your PC. A simple computer restart can clear software and driver issues and reset certain network settings, which may fix Steam not connecting to the Steam network.
- Close unnecessary background applications. Some applications, particularly antivirus and VPN programs, can interfere with Steam. Try disabling them and try logging in to Steam.
- Power-cycle your Internet router. Unplug your router from the power outlet, wait a few minutes, then plug it back in. Restarting your router will reset some of your network settings and clear temporary files.
- Force close Steam using Task Manager and relaunch it.
- Connect to the Internet using your Ethernet cable if you’re using a wireless connection.
Video Tutorial on How to Fix “Could not connect to the Steam network” Error
Table of Contents:
- Introduction
- Method 1. Change Your Steam Internet Protocol
- Method 2. Perform a DNS Flush and Reset the Winsock Catalog
- Method 3. Reset Network Settings to Default
- Method 4. Update Your Network Adapter Driver
- Method 5. Allow Steam Through Windows Defender Firewall
- Video Tutorial on How to Fix “Could not connect to the Steam network” Error
Download Computer Malware Repair Tool
It is recommended to run a free scan with Combo Cleaner - a tool to detect viruses and malware on your device. You will need to purchase the full version to remove infections. Free trial available. Combo Cleaner is owned and operated by Rcs Lt, the parent company of PCRisk.com read more.
Method 1. Change Your Steam Internet Protocol
Steam uses the UDP (User Datagram Protocol) by default, but it is less stable. Changing to the more stable and faster TCP (Transmission Control Protocol) may fix Steam not connecting.
1. Close Steam if it’s running.
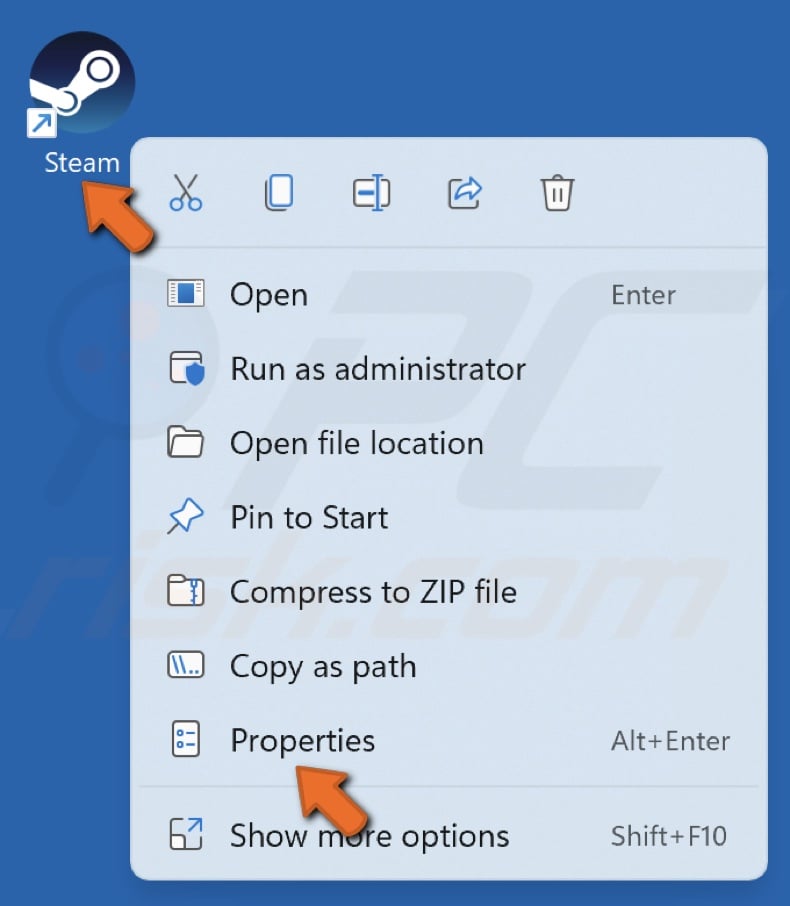
2. Right-click your Steam desktop shortcut and click Properties.
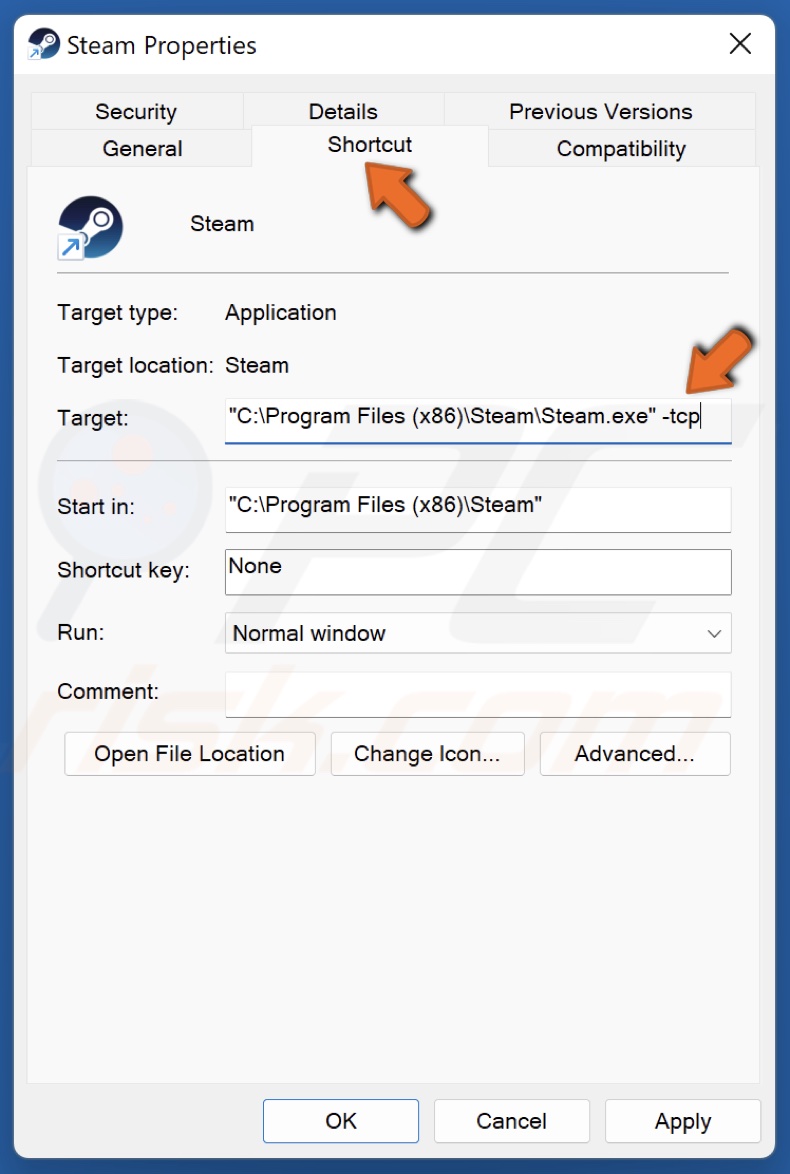
3. In the Properties window, select the Shortcut tab.
4. In the Target line, add a space and type in -tcp at the end of the Target. The resulting Target line should be: "C:\Program Files (x86)\Steam\Steam.exe" -tcp
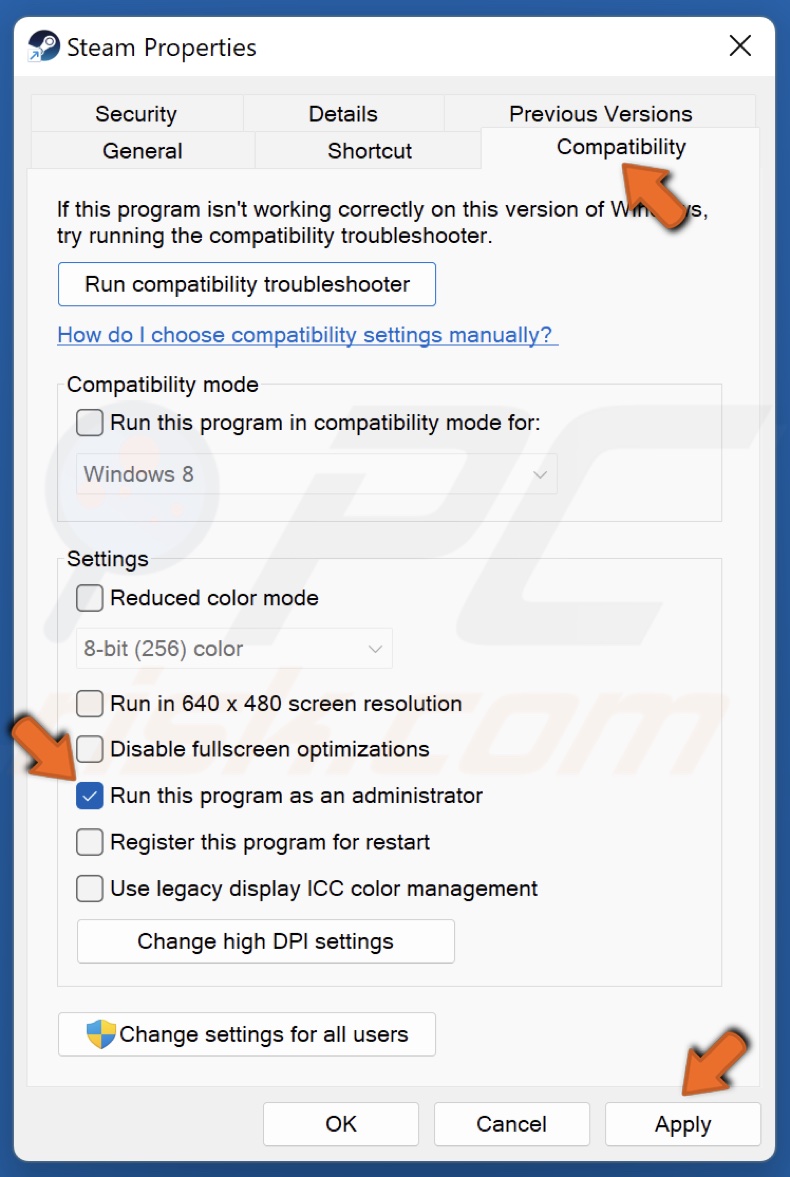
5. Then, select the Compatibility tab.
6. Mark the Run this program as an administrator checkbox.
7. Click Apply to save the change.
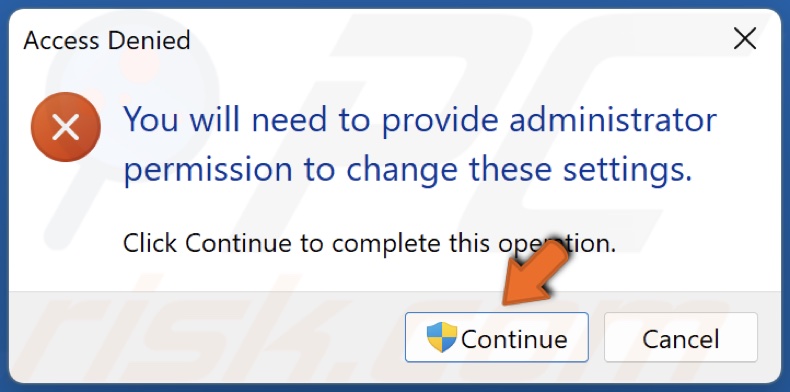
8. Click Continue when prompted.
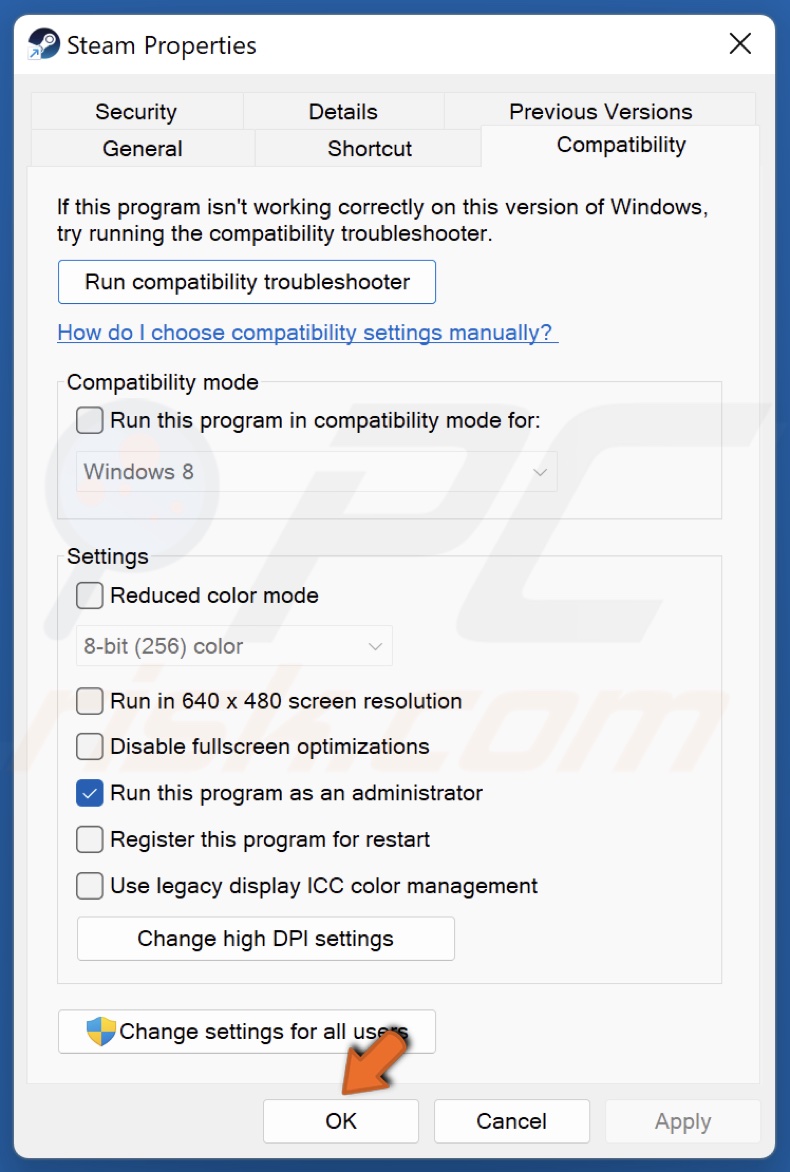
9. Click OK to close the Properties window.
Method 2. Perform a DNS Flush and Reset the Winsock Catalog
The DNS cache can become corrupt over time. Running the ipconfig /release command will release your IP address from your router, and the ipconfig /renew will assign a new IP address to it. Running the ipconfig /flushdns command will fix the overflow of packets.
If your network settings have been misconfigured, running the netsh winsock reset command will reset the socket settings of the TCP/IP stack.
1. Hold down Windows+R keys to open Run.
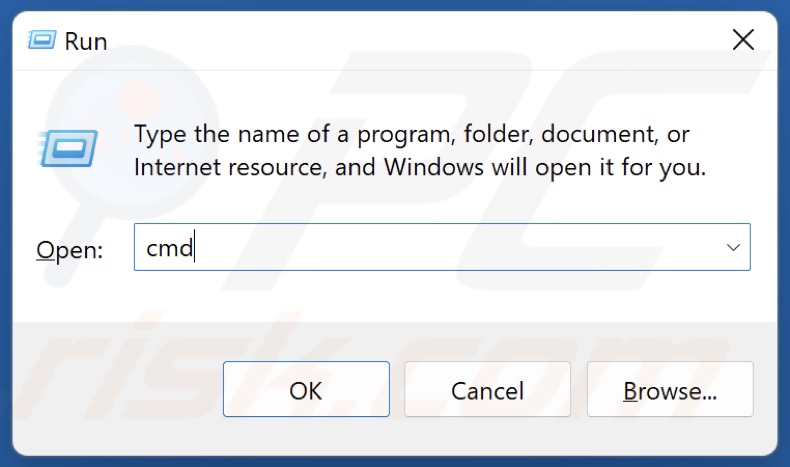
2. In the Run dialog, type in CMD and hold down Ctrl+Shift+Enter keys to open Command Prompt as an administrator.
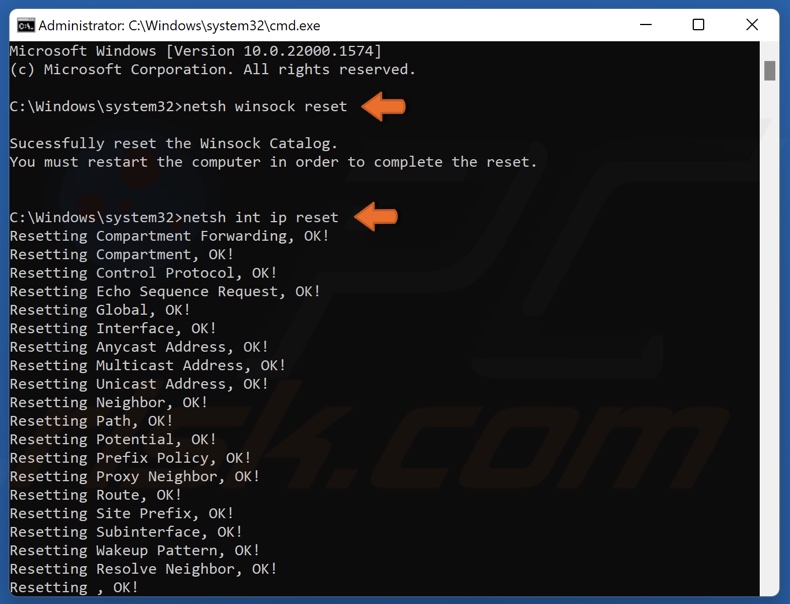
3. In the Command Prompt window, type in the commands below and press the Enter key after typing in each one.
- netsh winsock reset
- netsh int ip reset
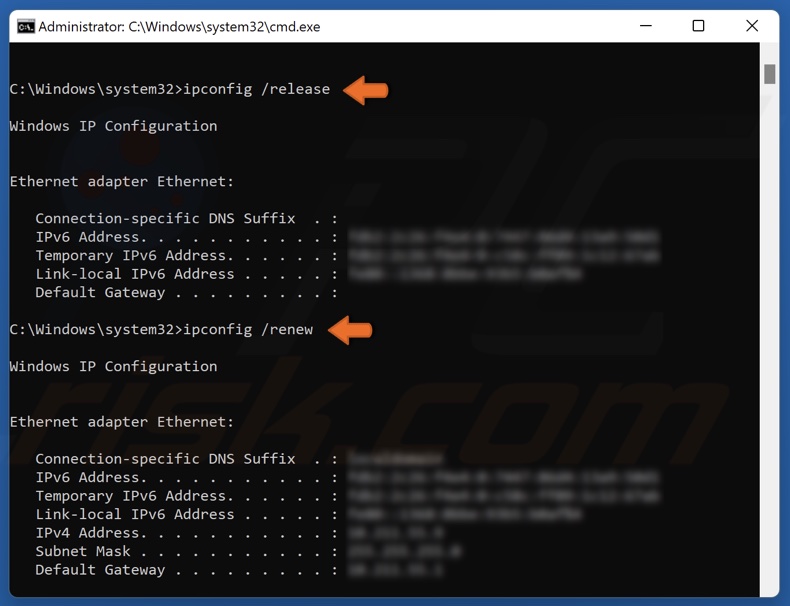
- ipconfig /release
- ipconfig /renew

- ipconfig /flushdns
4. Restart your PC.
Method 3. Reset Network Settings to Default
If your network settings have been misconfigured, resetting all of your network settings to default should fix the “Could not connect to Steam network” error.
Note: All your networking components will be set to their default settings, and you will have to re-enter your Wi-Fi connection password.

1. Right-click the Start button and click Settings.
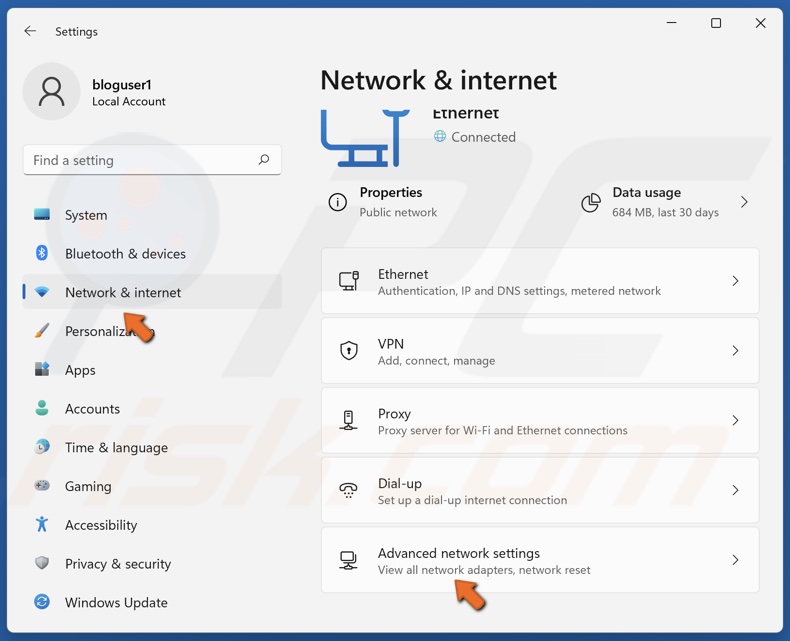
2. Select the Network & internet panel and select Advanced network settings.
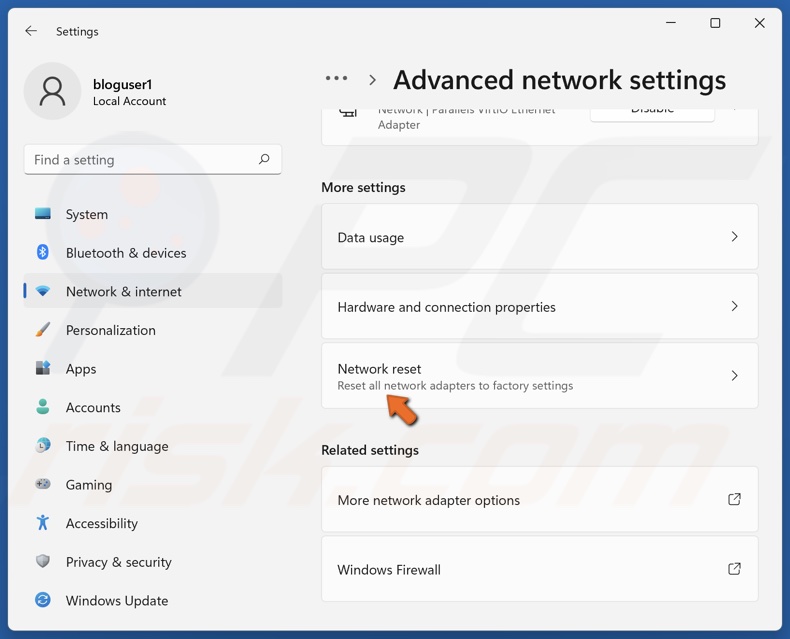
3. Select Network reset.
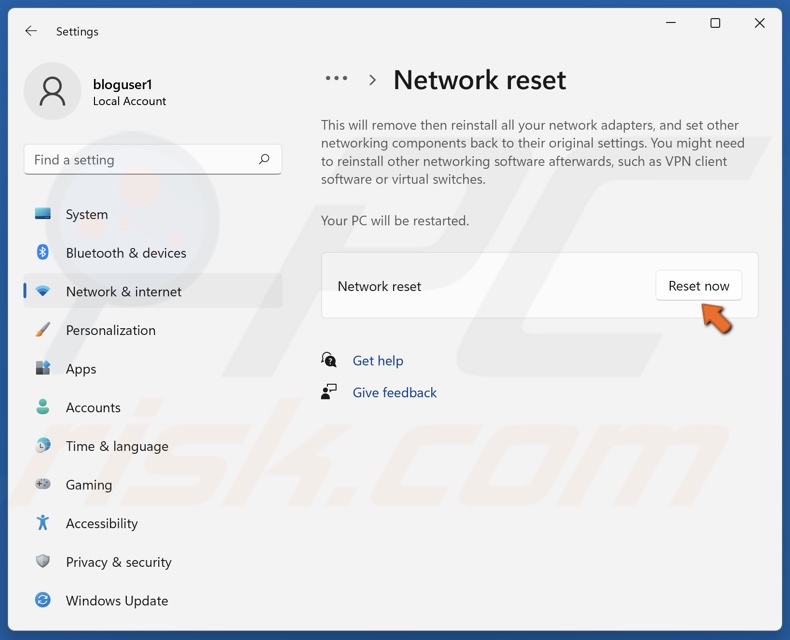
4. Then, click Reset now.
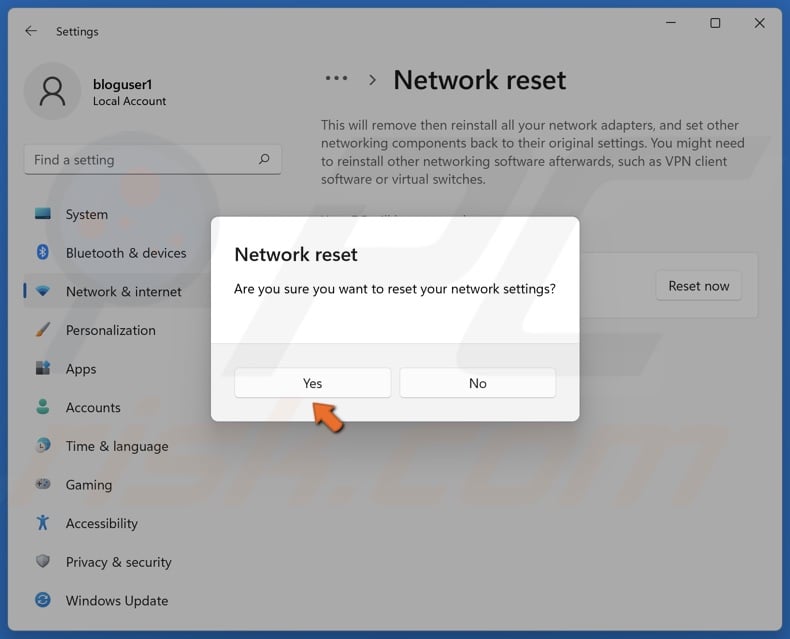
5. Click Yes to confirm the reset.
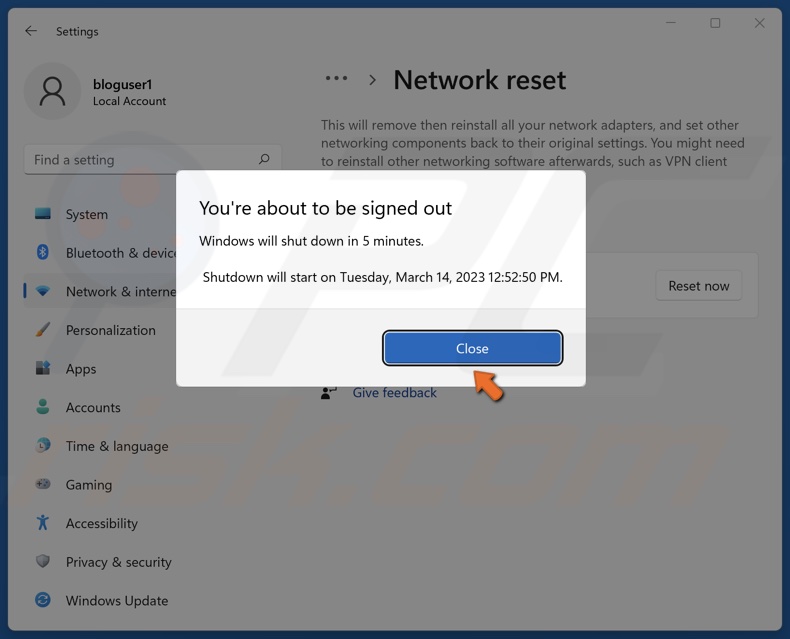
6. Click Close when prompted.
7. Restart your PC.
Method 4. Update Your Network Adapter Driver
An outdated network adapter driver often causes the “Could not connect to Steam network” error. The Device Manager offers several ways to update a device driver: 1) update the driver with the best available driver already on your PC or 2) install a device driver you downloaded from the hardware vendor’s website or install a driver from a list of drivers available on your PC.
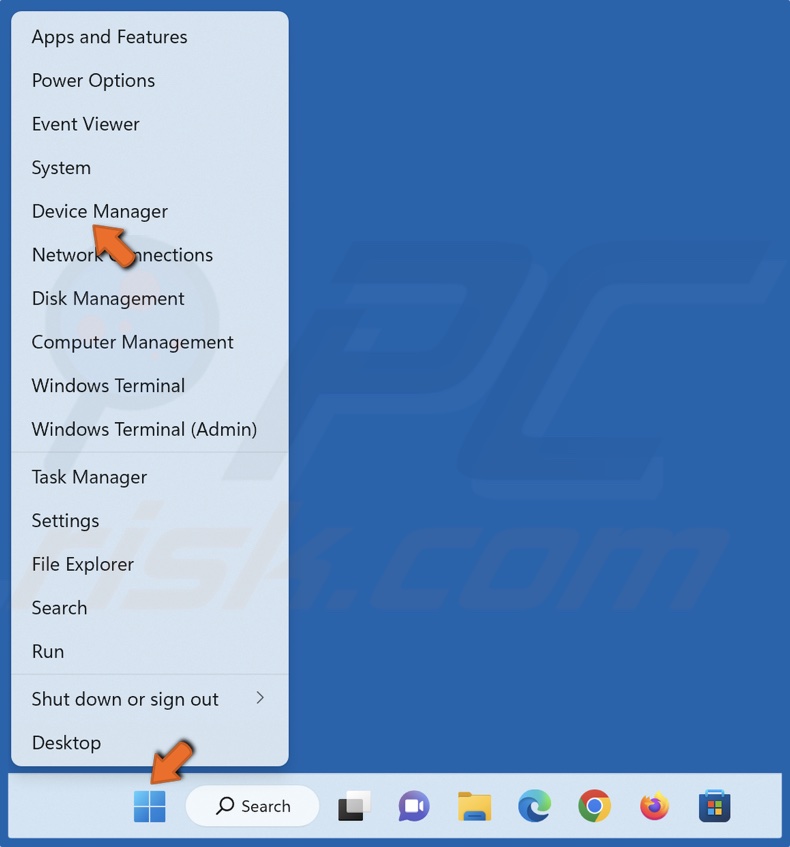
1. Right-click the Start button and click Device Manager.
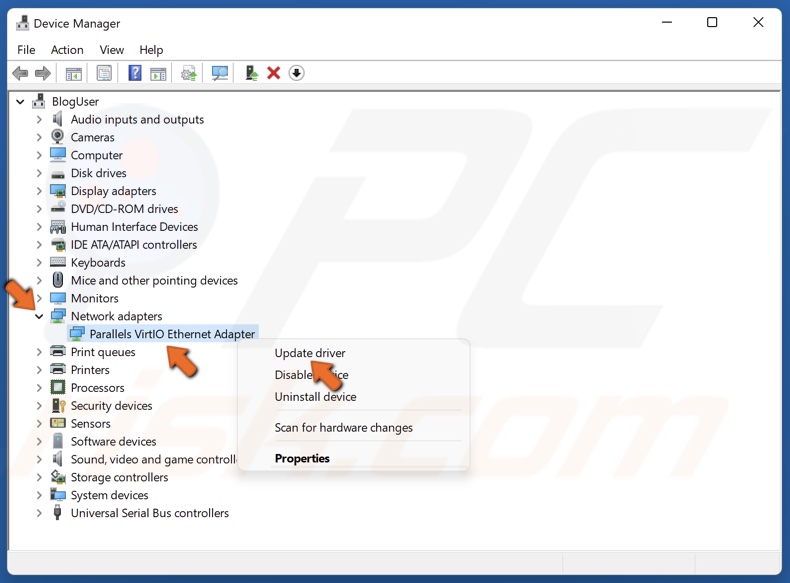
2. Expand the Network adapters list.
3. Right-click your network adapter and click Update driver.
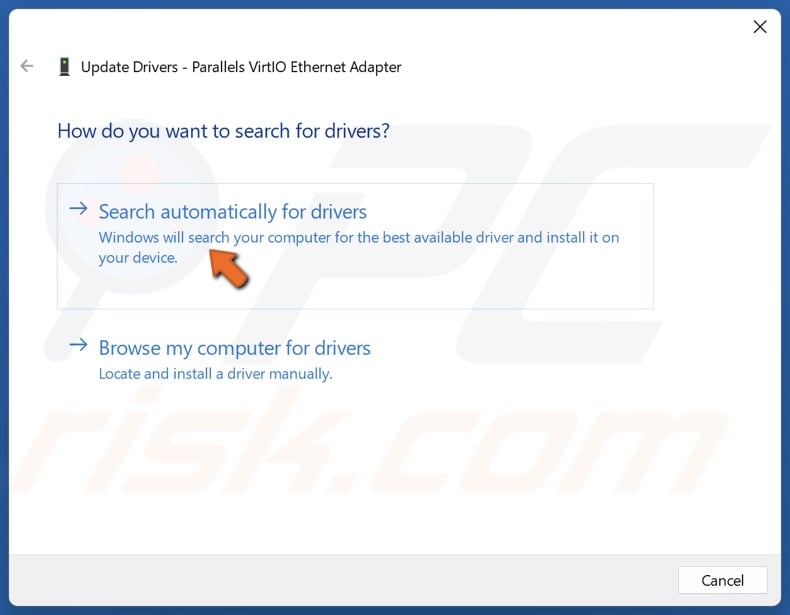
4. Select Search Automatically for drivers. Windows will search your PC for the best available driver and install it.
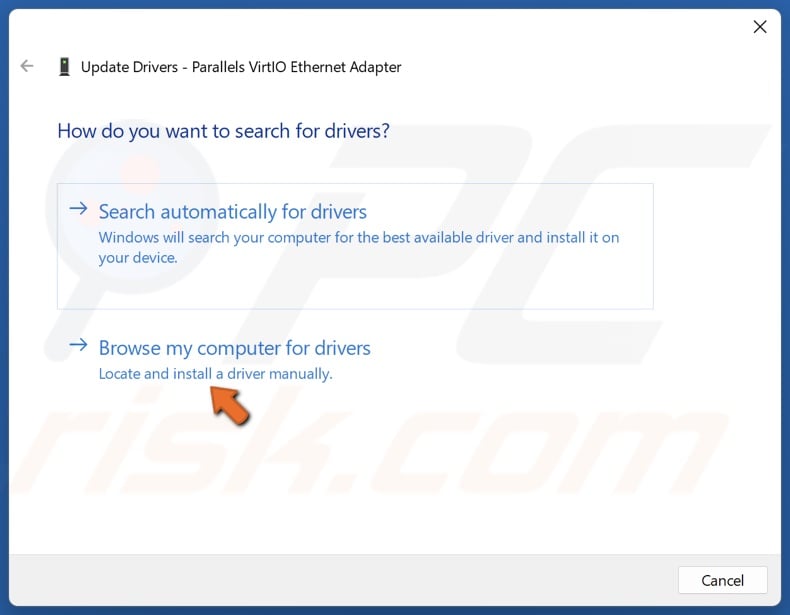
5. Alternatively, select Browse my computer for drivers.
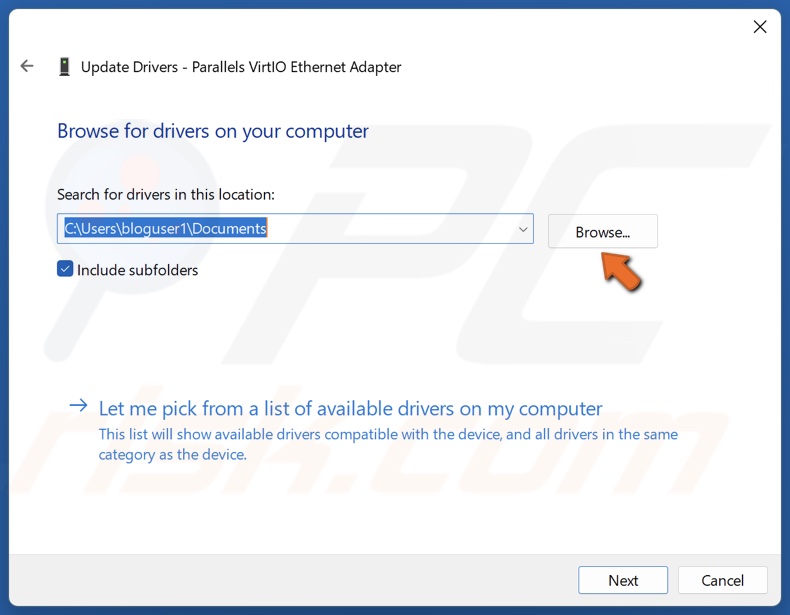
6. Click Browse and select a driver you downloaded from the hardware vendor’s website.
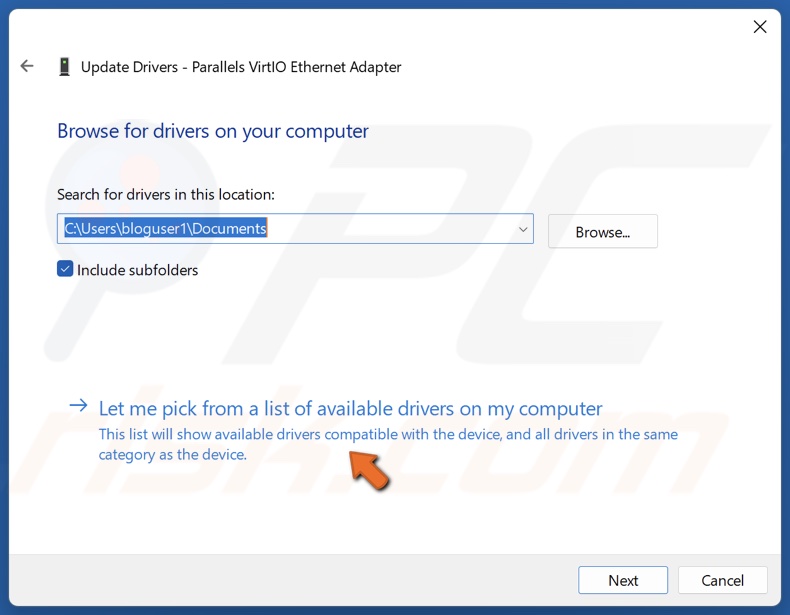
7. Or click Let me pick from a list of available drivers on my computer.
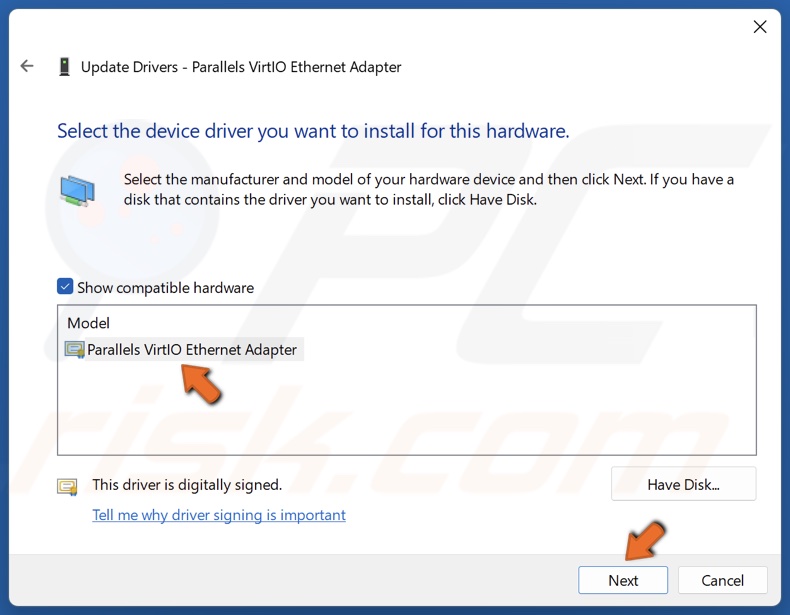
8. Select a driver from the list of available drivers and click Next.

9. Click Close.
10. Restart your PC.
Method 5. Allow Steam Through Windows Defender Firewall
Windows Defender Firewall (or third-party firewall) may be why Steam won’t connect to the Steam network. The instructions below demonstrate how to allow Steam through Windows Defender Firewall. If you have a third-party firewall, check if it’s blocking Steam and add it to the exceptions list if it is.
1. Hold down Windows+R keys to open Run.
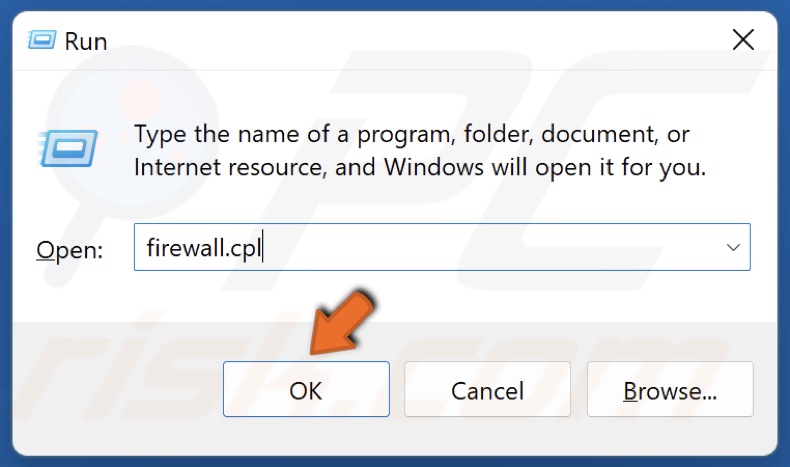
2. In the Run dialog, type in firewall.cpl and click OK.
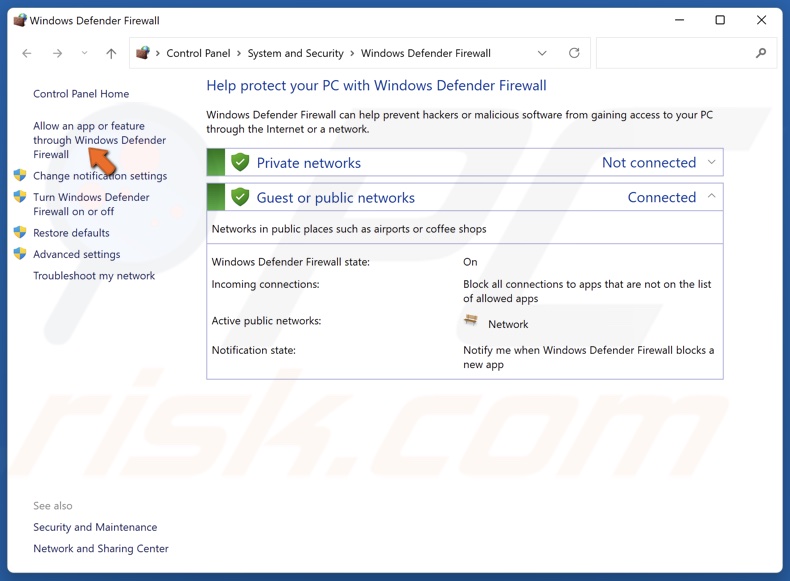
3. Click Allow an app or feature through Windows Defender Firewall.
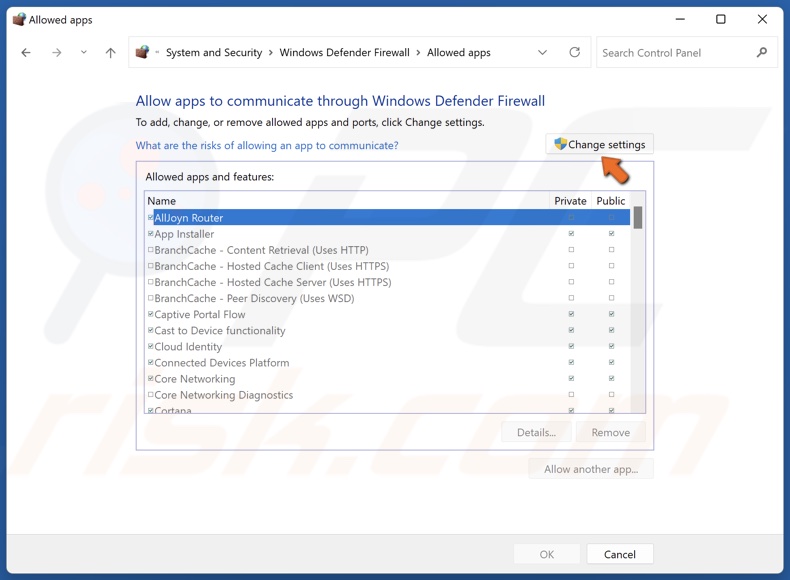
4. Then, click Change settings.

5. Scroll down and locate Steam.
6. Mark the Private and Public checkboxes next to Steam and click OK. Do the same for Steam Web Helper.
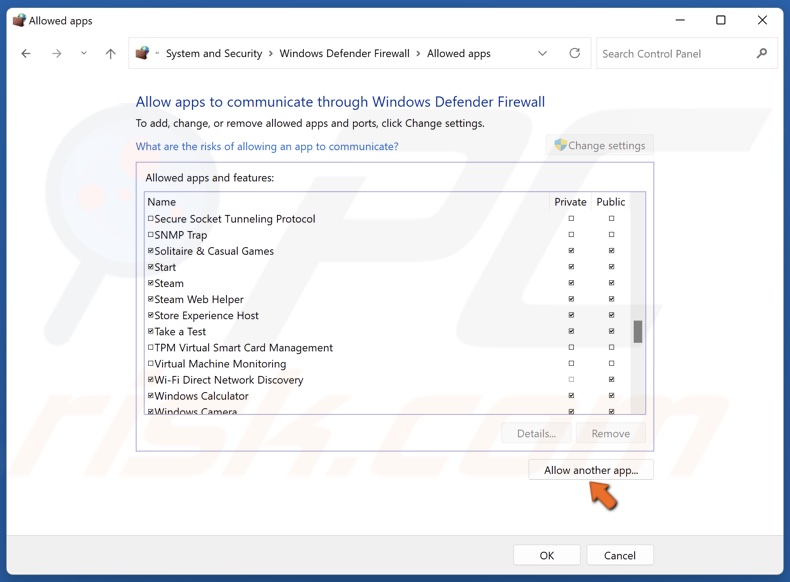
7. If Steam is not on the list, click Allow another app.
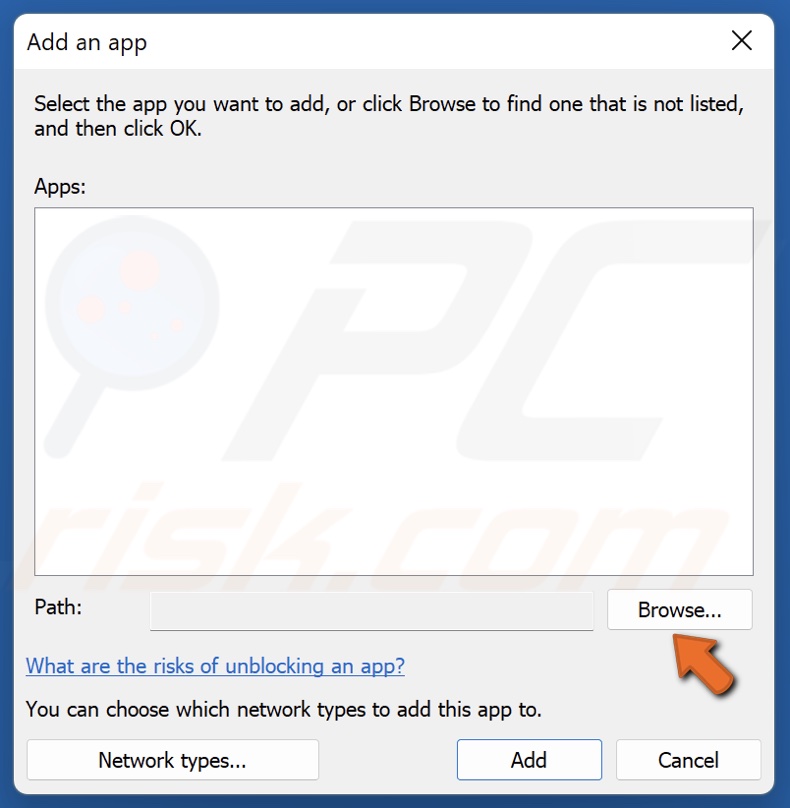
8. Click Browse.
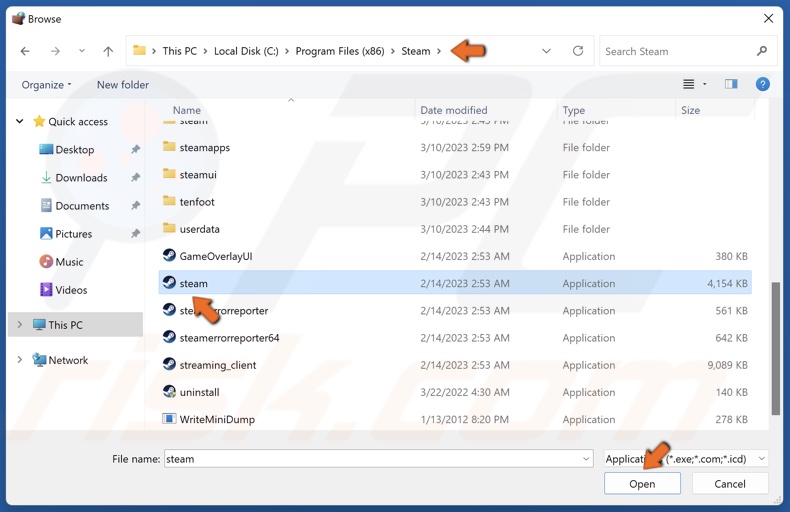
9. Navigate to C:\Program Files (x86)\Steam
10. Select steam.exe and click Open.
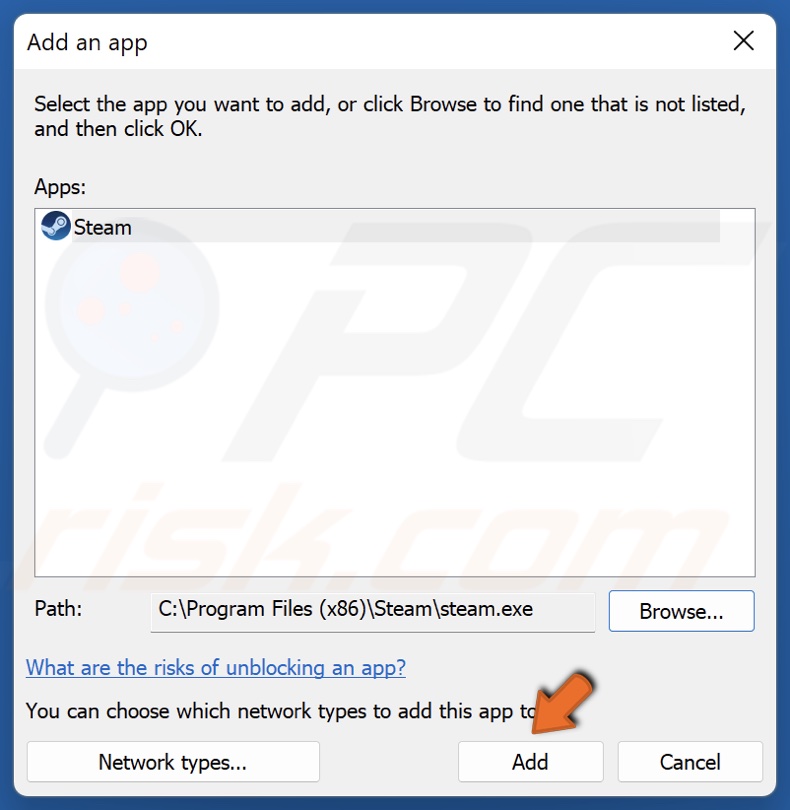
11. Click Add.
12. Then, mark the Private and Public checkboxes next to Steam and click OK.
Did this article help you fix the “Could not connect to Steam network” error on your PC? Let us know by commenting below.
Share:

Rimvydas Iliavicius
Researcher, author
Rimvydas is a researcher with over four years of experience in the cybersecurity industry. He attended Kaunas University of Technology and graduated with a Master's degree in Translation and Localization of Technical texts. His interests in computers and technology led him to become a versatile author in the IT industry. At PCrisk, he's responsible for writing in-depth how-to articles for Microsoft Windows.
▼ Show Discussion