How to Fix Lost Ark High Ping and Lag Spikes
Get Free Scanner and check your computer for errors
Fix It NowTo fix found issues, you have to purchase the full version of Combo Cleaner. Free trial available. Combo Cleaner is owned and operated by Rcs Lt, the parent company of PCRisk.com read more.
How to Fix Lost Ark High Ping and Lag Spikes on Windows 11
Lost Ark is an MMOARPG. Many users have reported latency issues, such as lag spikes and high ping while playing Lost Ark. It’s common for games like Lost Ark to have lag issues. If you’re experiencing high ping and lag in Lost Ark, this article will help you resolve them.

Since Lost Ark relies heavily on fast synchronization with its servers, minor latency differences can significantly impact gameplay. If your Ping is high, data packets take too long to reach Lost Ark’s server, which results in laggy gameplay.
In Lost Ark and online games in general, an acceptable ping should be less than 70ms. Anything higher will result in noticeable delays hampering gameplay.
Why is My Ping So High in Lost Ark?
You may experience lag spikes or high ping in Lost ark for a few reasons. In most cases, you will experience latency-related issues due to a weak or unstable Internet connection or game server instability.
Furthermore, you may experience lag spikes due to too many applications running in the background, causing network congestion and limited bandwidth. Also, insufficient system resources and interference from a firewall application can cause the issue as well.
Before trying any of our fixes, here are some tips:
- To fix lag spikes, disable tab notifications for all chat windows. However, you might fix the issue by disabling only the Area chat.
- Power-cycle your Internet router.
- Close unnecessary background applications, especially network-intensive apps.
- If you’re using a wireless connection, try connecting to the Internet using your Ethernet cable.
- Disable VPN and proxy servers.
- Update your graphics card driver and Windows operating system.
- Update your network adapter driver.
Video Tutorial on How to Fix Lost Ark High Ping and Lag Spikes
Table of Contents:
- Introduction
- Check Lost Ark Server Status
- Method 1. Disable Network Adapter Power Saving
- Method 2. Perform a DNS Flush and Reset the Winsock Catalog
- Method 3. Change DNS Server Address
- Method 4. Verify Lost Ark Game Files
- Method 5. Disable Microsoft Background Apps with Group Policy
- Video Tutorial on How to Fix Lost Ark High Ping and Lag Spikes
Download Computer Malware Repair Tool
It is recommended to run a free scan with Combo Cleaner - a tool to detect viruses and malware on your device. You will need to purchase the full version to remove infections. Free trial available. Combo Cleaner is owned and operated by Rcs Lt, the parent company of PCRisk.com read more.
Check Lost Ark Server Status
Before you try any of our fixes, find out if your latency issue occurs on your side or the server side. Go to the Lost Ark Server Status website and check if the servers in your region are operational. Sometimes servers are shut down for maintenance.
Method 1. Disable Network Adapter Power Saving
Some users have found that disabling the power-saving feature for the network adapter can significantly lower your ping in Lost Ark.
1. Hold down Windows+R keys to open Run.
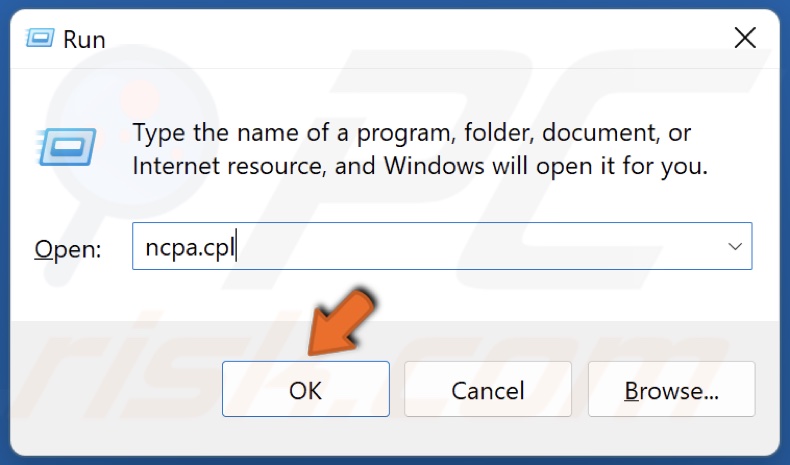
2. In the Run dialog, type in ncpa.cpl and click OK.
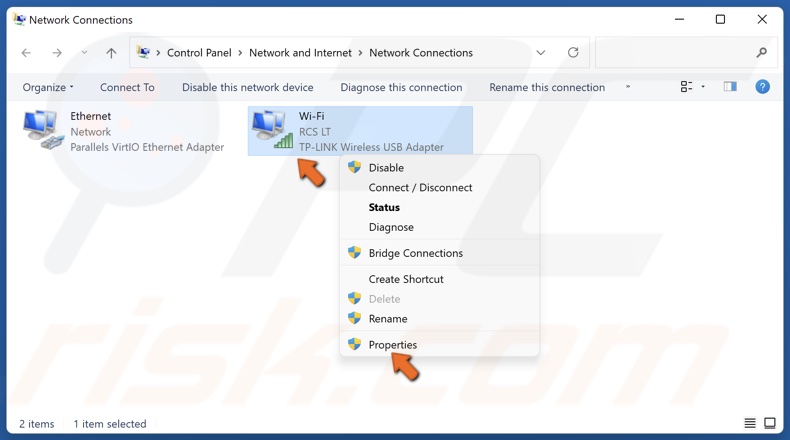
3. Right-click your network adapter and click Properties.
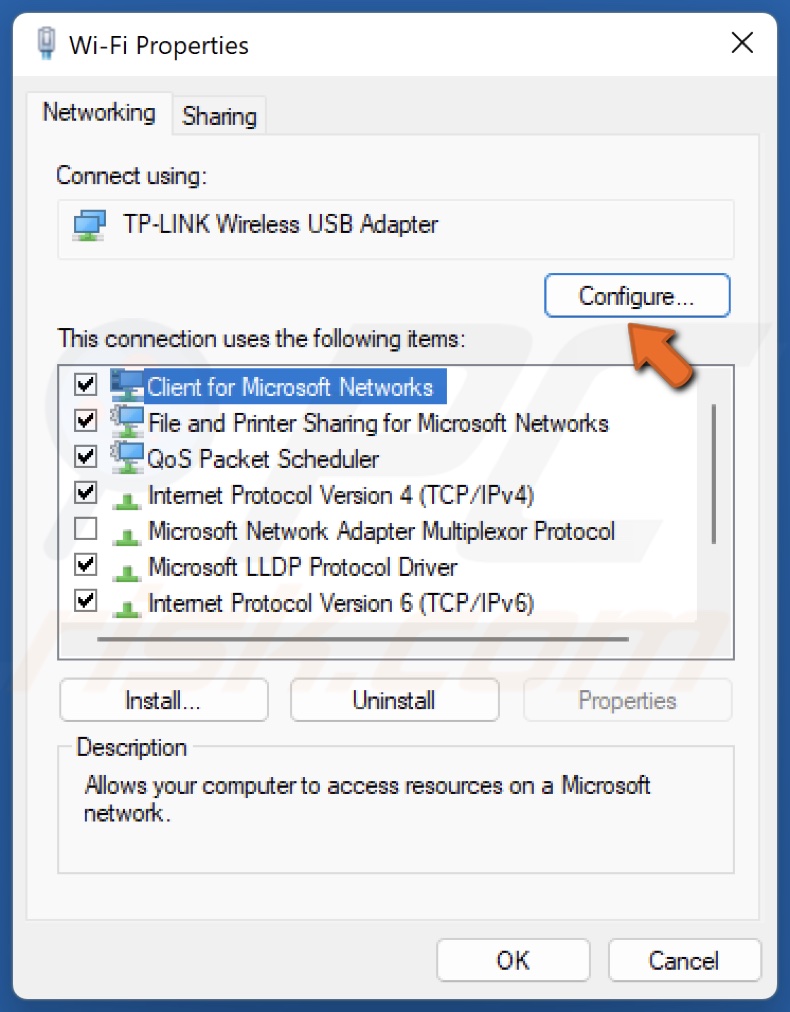
4. In the resulting Properties window, click Configure.
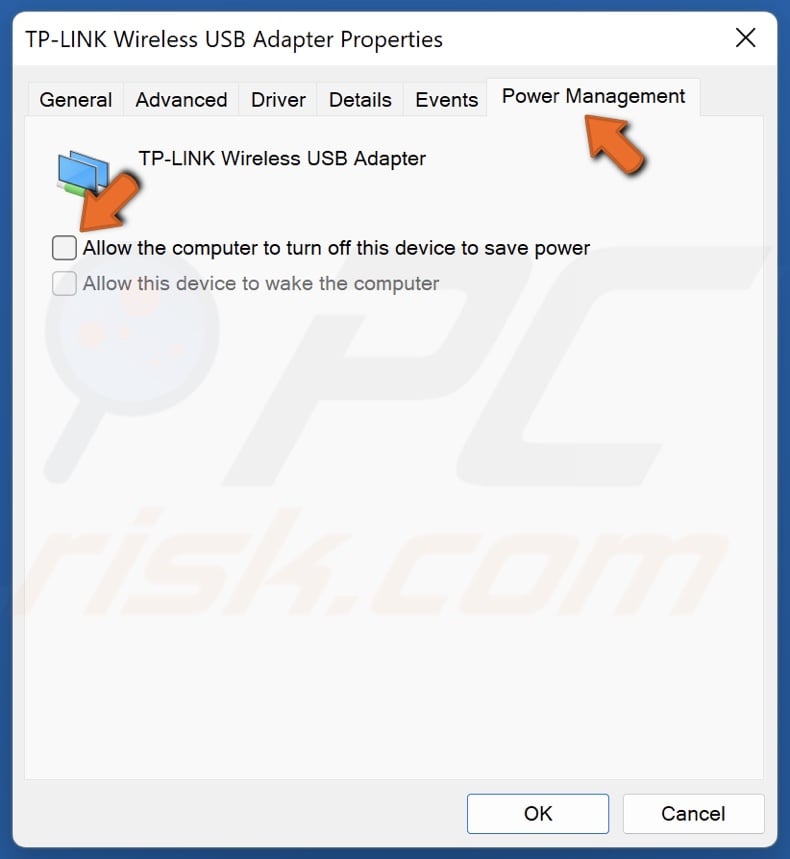
5. Select the Power Management tab.
6. Uncheck the Allow this computer to turn off this device to save power option.
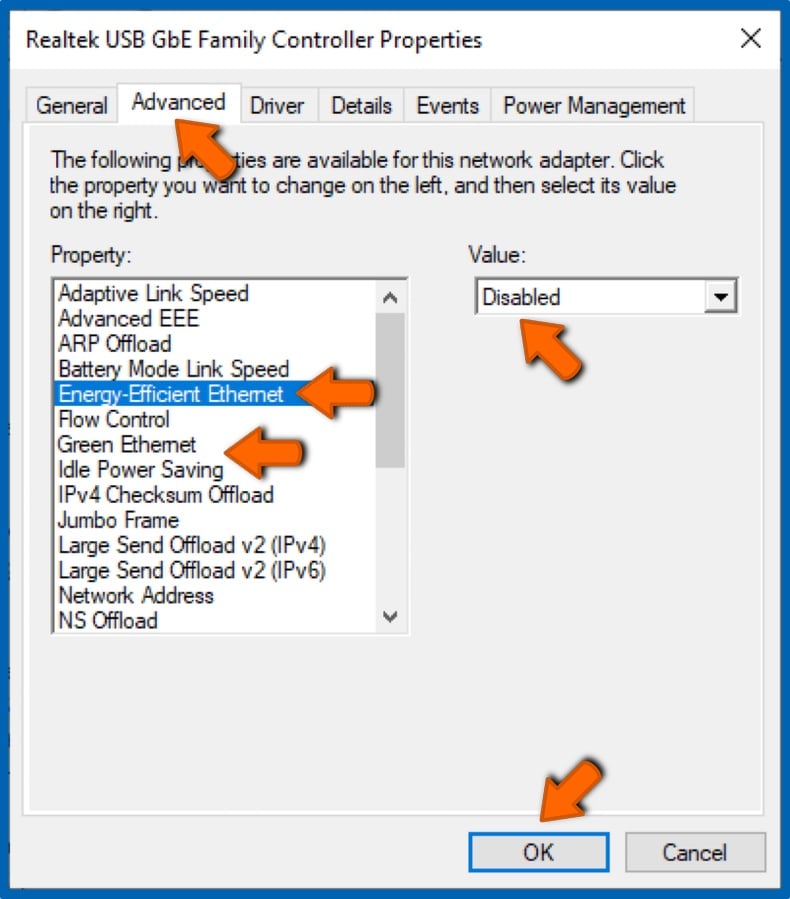
7. Select the Advanced tab.
8. Disable Energy Efficient Ethernet, Green Ethernet, and Power Saving Mode options in the Property list if available.
9. Click OK to save the changes.
Method 2. Perform a DNS Flush and Reset the Winsock Catalog
The DNS cache can become corrupt over time. Running the ipconfig /release command will release your IP address from your router, and the ipconfig /renew will assign a new IP address to it. Running the ipconfig /flushdns command will fix the overflow of packets.
If your network settings have been misconfigured, running the netsh winsock reset command will reset the socket settings of the TCP/IP stack. Running these commands will fix Lost Ark lag spikes.
1. Hold down Windows+R keys to open Run.
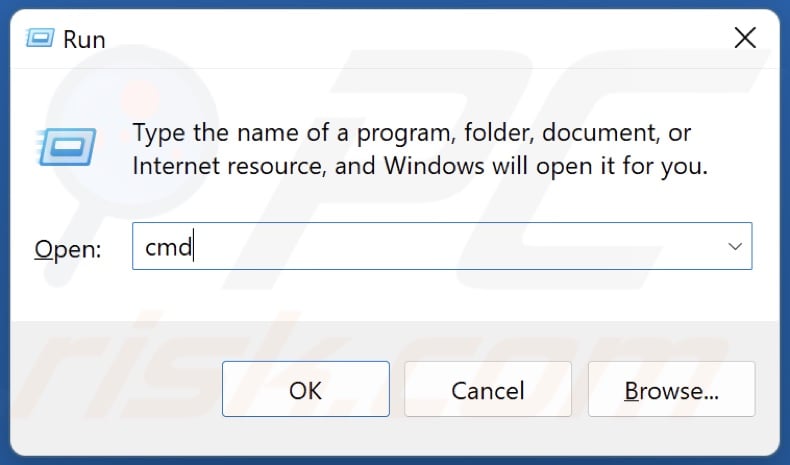
2. In the Run dialog, type in CMD and hold down Ctrl+Shift+Enter keys to open Command Prompt as an administrator.
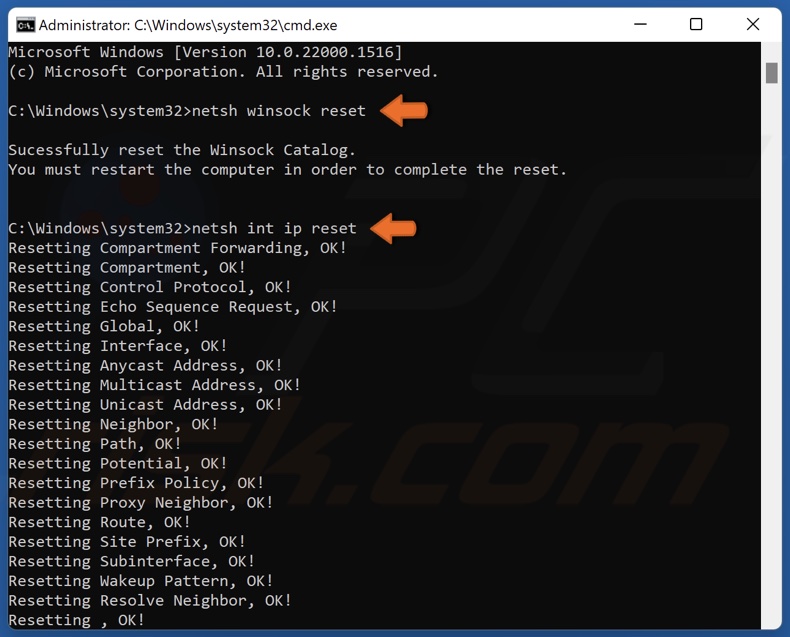
3. In the Command Prompt window, type in the commands below and press the Enter key after typing in each one.
- netsh winsock reset
- netsh int ip reset
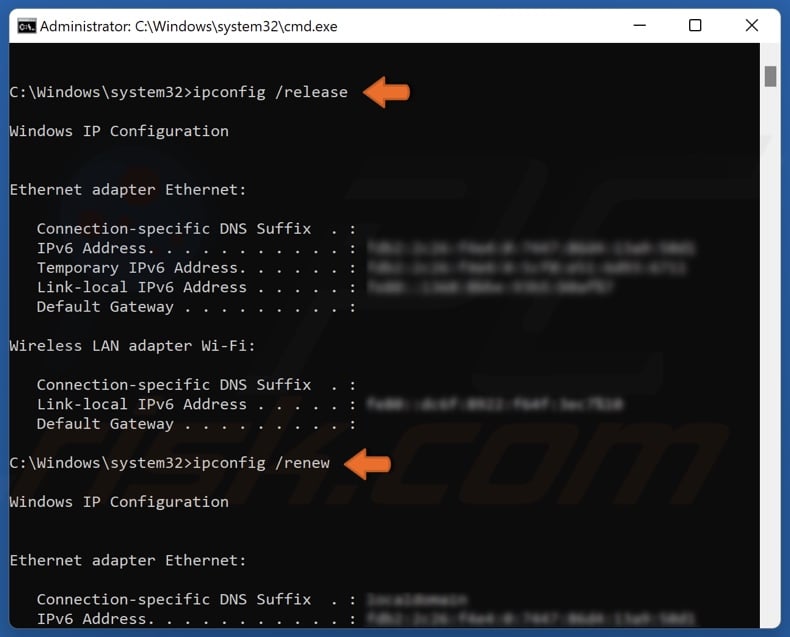
- ipconfig /release
- ipconfig /renew
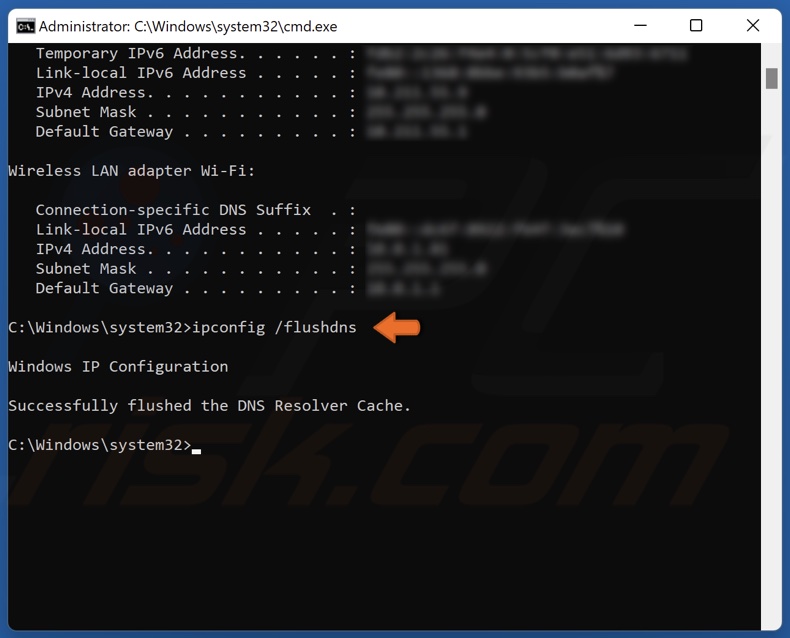
- ipconfig /flushdns
4. Restart your PC.
Method 3. Change DNS Server Address
Correct network settings are essential in ensuring a stable ping and smooth gaming experience in Lost Ark. Changing the default DNS server address to a third-party DNS server can reduce high ping in Lost Ark.
1. Hold down Windows+R keys to open Run.

2. In the Run dialog, type in ncpa.cpl and click OK.

3. Right-click your network adapter and click Properties.
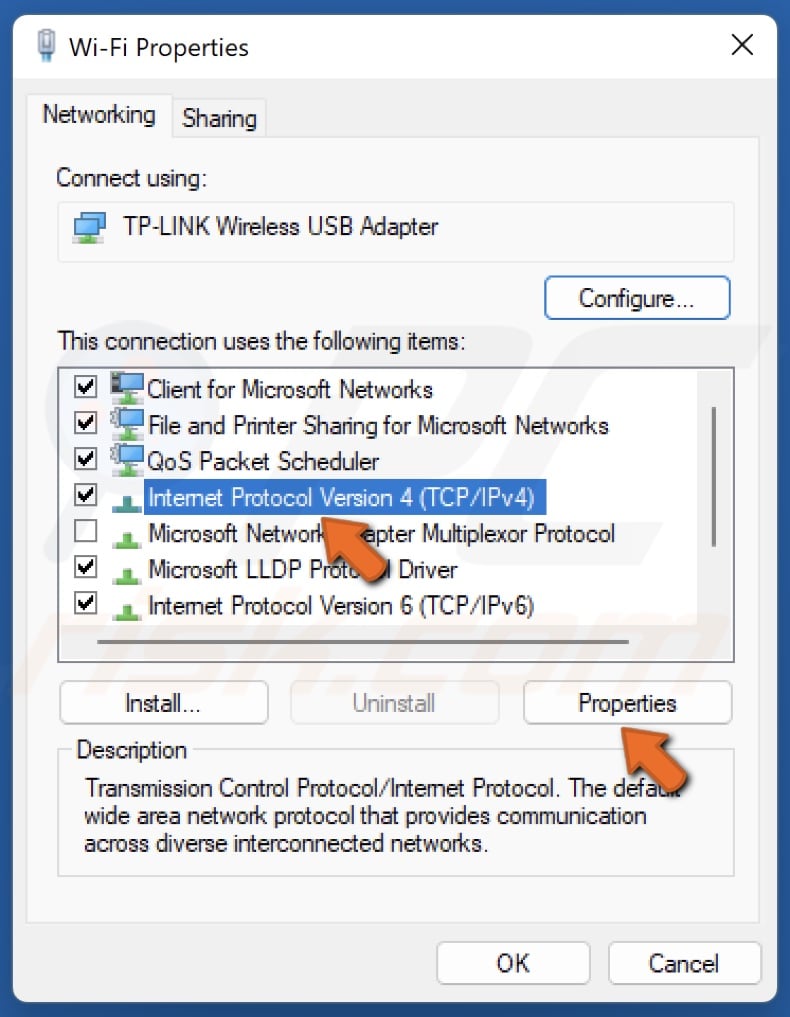
4. Select Internet Protocol Version 4 (TCP/IPv4) and click Properties.
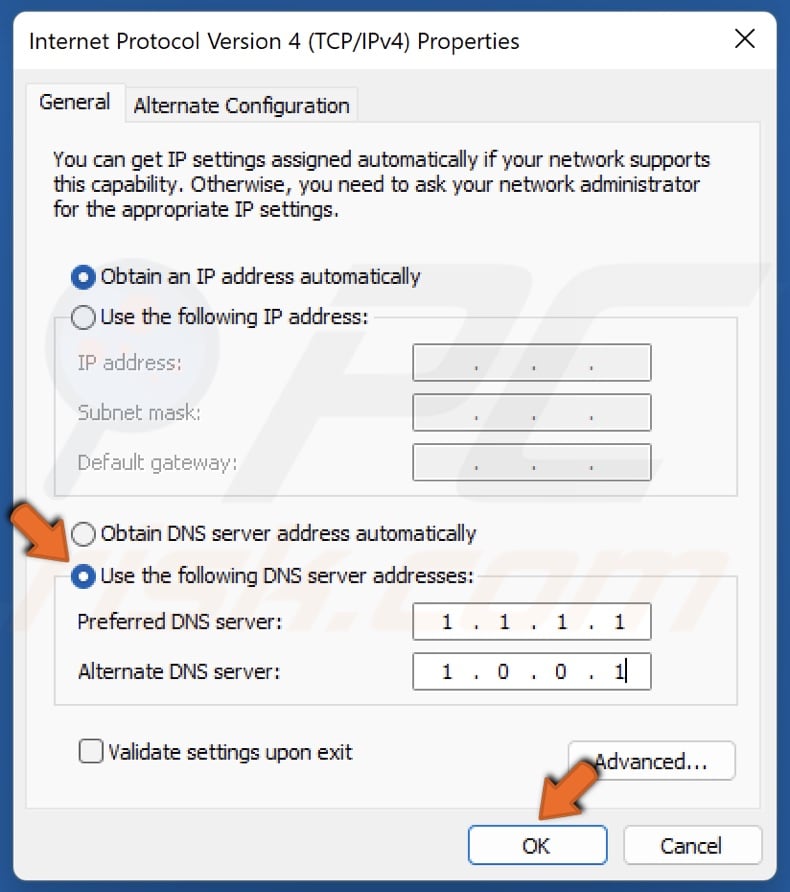
5. Tick Use the following DNS server addresses.
6. In the Preferred DNS server, type in 1.1.1.1
7. In the Alternate DNS server, type in 1.0.0.1
8. Click OK to save settings.
9. Restart your PC.
Method 4. Verify Lost Ark Game Files
Lost Ark latency issues are known to be caused by corrupted game files. Verifying game file integrity will replace all modified and corrupted files from Steam’s servers and should resolve your Lost Ark lag issues.

1. Open Steam. In the Library window, right-click Lost Ark and select Properties.
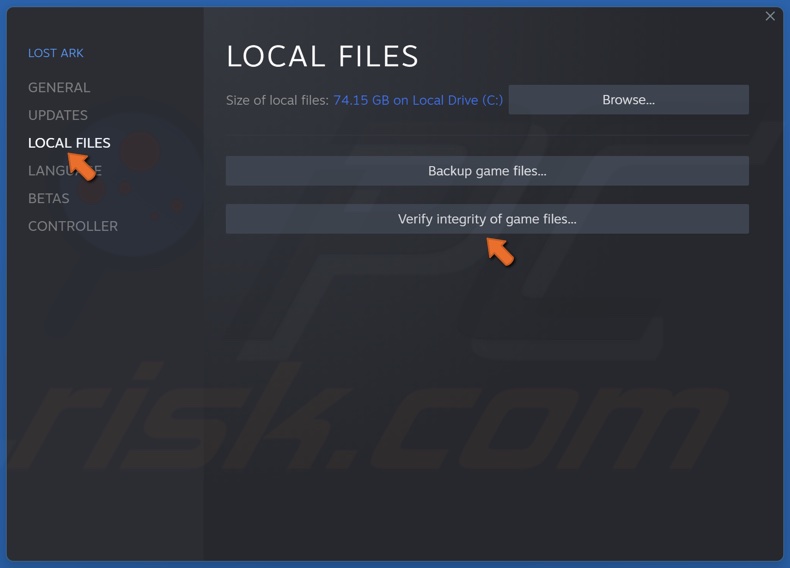
2. In the left pane, select the Local Files tab.
3. Click Verify integrity of game files. Wait for the verification process to complete.
Method 5. Disable Microsoft Background Apps with Group Policy
Lost Ark players have suggested preventing Windows apps from running in the background to fix high ping and lag in Lost Ark. Windows apps can consume extra bandwidth, so disabling them will improve the throughput capacity of your network.
1. Hold down Windows+R keys to open Run.
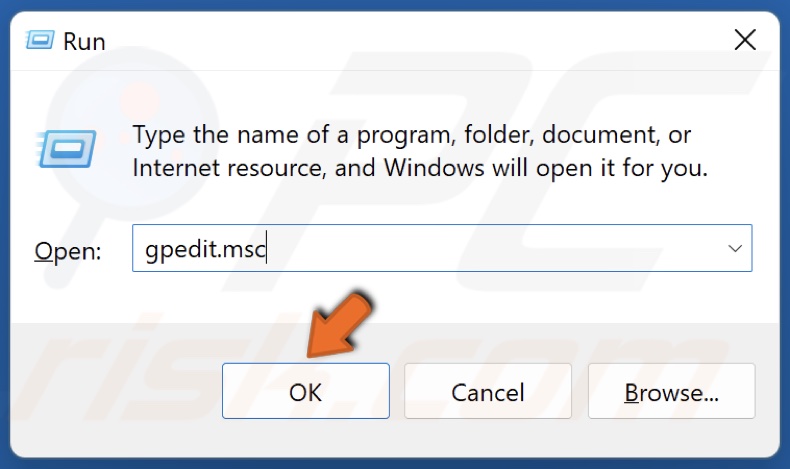
2. In the Run dialog, type in gpedit.msc and click OK.
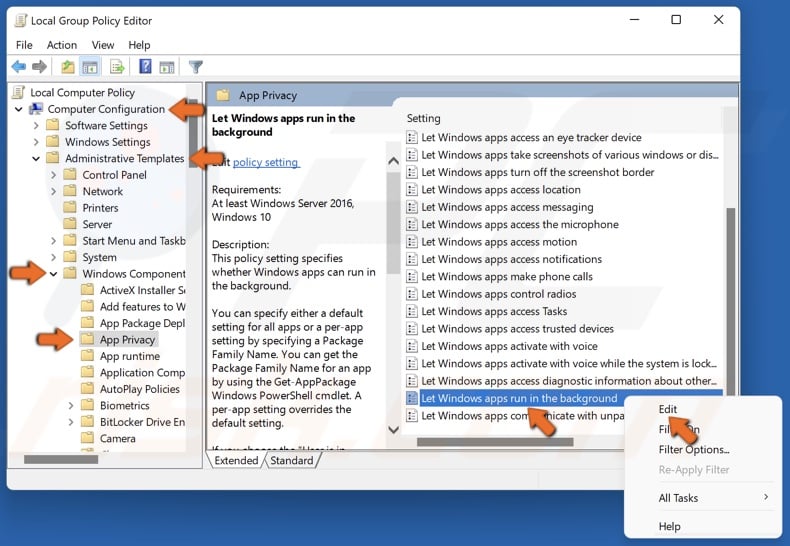
3. In the Local Group Policy Editor, navigate to:
Computer Configuration\Administrative Templates\Windows Components\App Privacy
4. Scroll down, right-click the Let Windows apps run in the background policy, and click Edit.
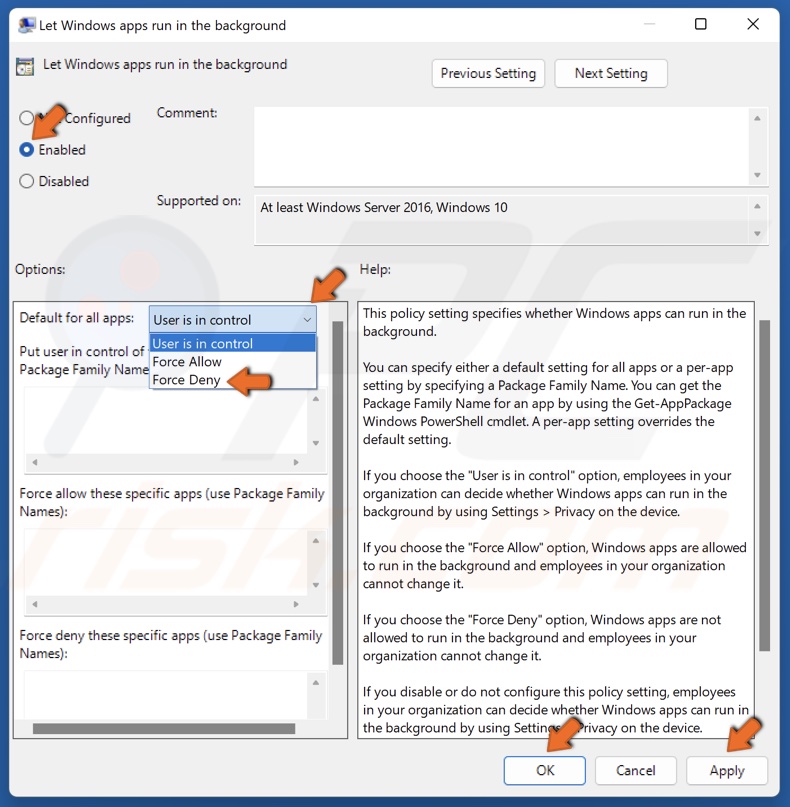
5. Set the Policy to Enabled.
6. Under the Options section, open the Default for all apps drop-down menu and select Force Deny.
7. Click Apply and click OK.
Did this article help you fix lag spikes and high ping in Lost Ark? Leave a comment in the comments section below.
Share:

Rimvydas Iliavicius
Researcher, author
Rimvydas is a researcher with over four years of experience in the cybersecurity industry. He attended Kaunas University of Technology and graduated with a Master's degree in Translation and Localization of Technical texts. His interests in computers and technology led him to become a versatile author in the IT industry. At PCrisk, he's responsible for writing in-depth how-to articles for Microsoft Windows.

▼ Show Discussion