How to Fix Lost Ark Stuttering and FPS Drops

Get Free Scanner and check your computer for errors
Fix It NowTo fix found issues, you have to purchase the full version of Combo Cleaner. Free trial available. Combo Cleaner is owned and operated by Rcs Lt, the parent company of PCRisk.com read more.
How to Fix Lost Ark Stuttering and FPS Drops on Windows 11
Lost Ark is an MMOARPG that runs on Unreal Engine 3. However, many users report stuttering and FPS drops while playing Lost Ark. If you're experiencing this issue, this article will help you fix them.

Game stuttering is irregular delays between frames that can hurt gameplay. While stuttering can occur in single-player and multiplayer games, this issue has a much more negative impact on multiplayer games.
Why Is Lost Ark Stuttering?
The stuttering issue is related to FPS drops. Our research has revealed that stuttering and FPS drops in Lost Ark can occur due to 1) computer data processing performance and 2) game data transmission speed.
- Computer data processing performance. This includes system hardware configuration and optimal game settings. If your PC can't handle the data it needs to process, you will experience stuttering. Check if your computer meets the minimum system requirements.
- Data transmission speed. Insufficient game data processing speed noticeably affects Lost Ark. Insufficient transmission speed can be caused by a congested network, wireless connection, bandwidth, and server.
In addition, you may experience stuttering and FPS drops by bugs or corrupted Lost Ark game files.
Before trying any of our fixes, here are some tips:
- Turn off tab notifications for all chat windows. However, you might fix the issue by disabling only the Area chat.
- Prioritize Performance over Quality in Lost Ark's video settings.
- Set the Run the game in Borderless mode in video settings.
- Set Lost Ark's framerate to match your monitor's refresh rate.
- Disable overlays like Steam, Discord, Xbox Game Bar, Nvidia GeForce Experience, or Riva Tuner.
- Update your graphics card driver.
Video Tutorial on How to Fix Lost Ark Stuttering and FPS Drops
Table of Contents:
- Introduction
- Method 1. Enable Game Mode on Windows
- Method 2. Disable Steam Overlay
- Method 3. Disable Xbox Game Bar
- Method 4. Verify Lost Ark Game Files
- Method 5. Update DirectX Runtime Libraries
- Method 6. Delete Temporary Windows Files in Temp Folder
- Method 7. Lower Easy Anti-Cheat and Increase Lost Ark Priority
- Method 8. Configure Windows to Prioritize Gaming
- Video Tutorial on How to Fix Lost Ark Stuttering and FPS Drops
Download Computer Malware Repair Tool
It is recommended to run a free scan with Combo Cleaner - a tool to detect viruses and malware on your device. You will need to purchase the full version to remove infections. Free trial available. Combo Cleaner is owned and operated by Rcs Lt, the parent company of PCRisk.com read more.
Method 1. Enable Game Mode on Windows
Game Mode is enabled by default on Windows 11. However, if you have disabled it, try enabling it and check if it made a difference in performance.
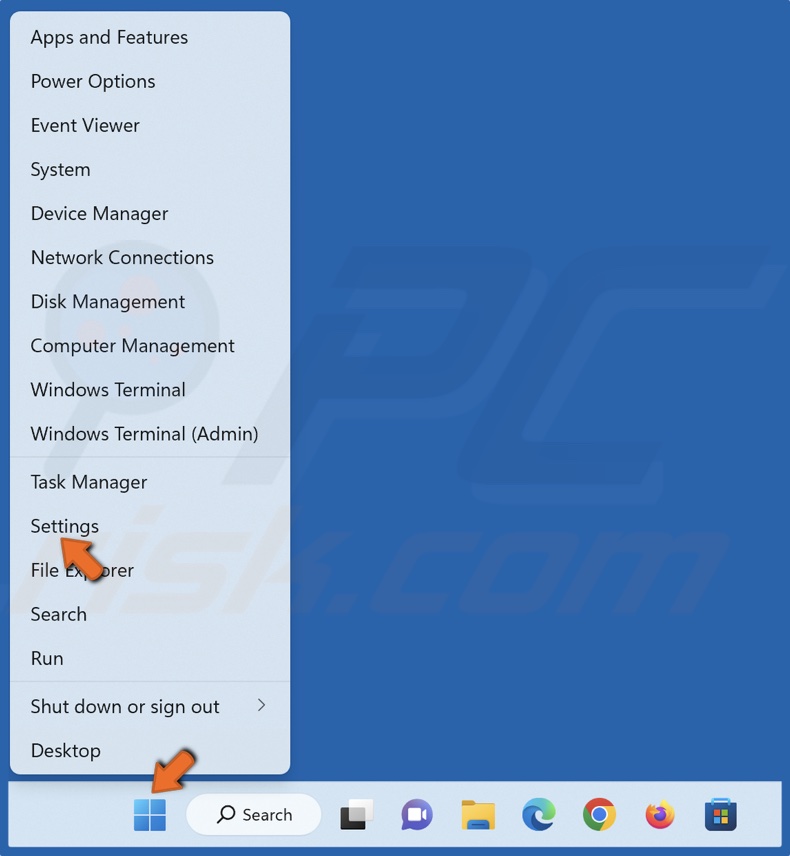
1. Right-click the Start menu button and click Settings.
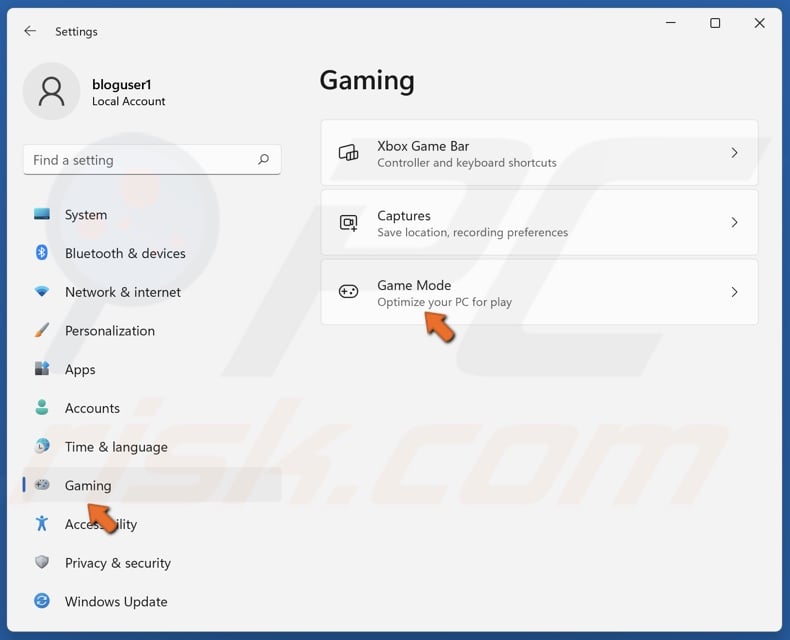
2. In the right pane, select Gaming, and select Game Mode.
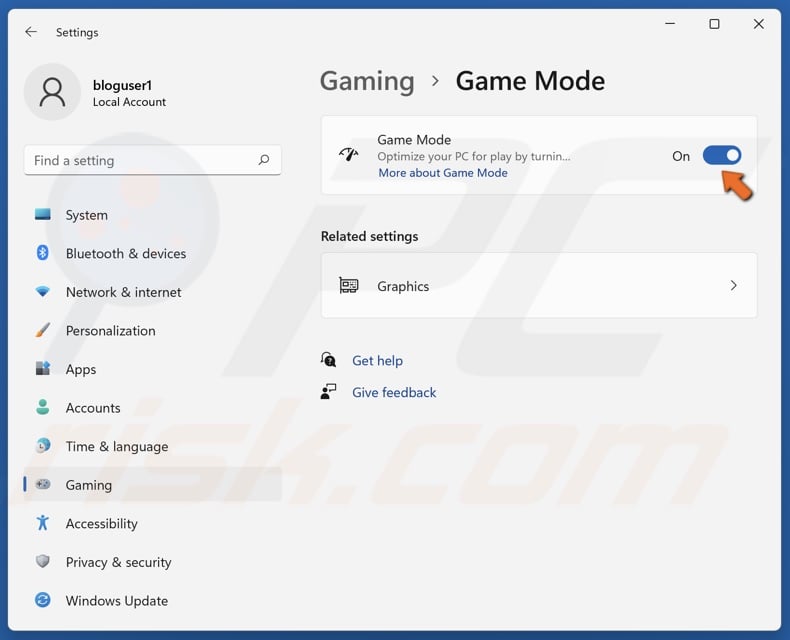
3. Toggle on the Game Mode feature.
Method 2. Disable Steam Overlay
The Steam Overlay is used to access Steam features while in-game. However, Lost Ark doesn't work well with software with game overlays. Disabling Steam Overlay should fix or at least reduce stuttering in Lost Ark.

1. Open Steam. In the menu bar, click Steam and then click Settings.
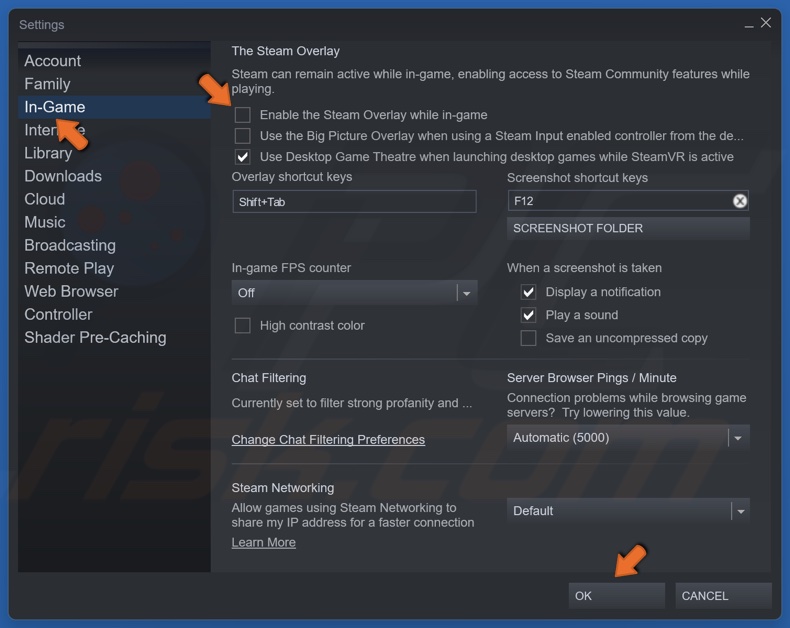
2. Select the In-Game tab.
3. Unmark Enable the Steam Overlay while in-game checkbox and click OK.
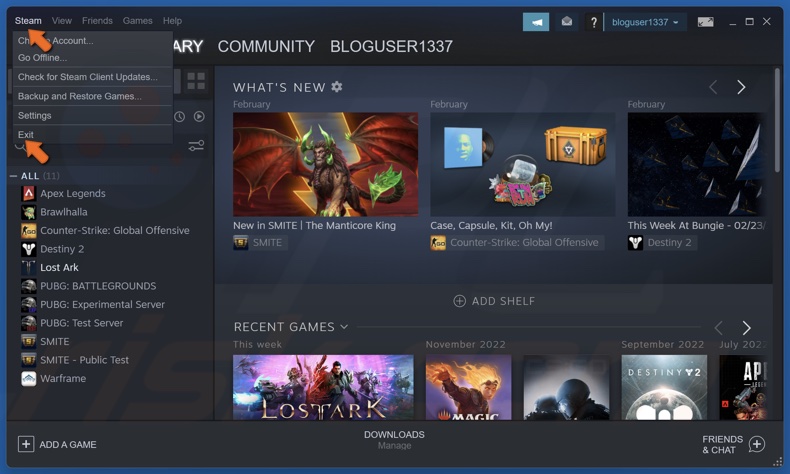
4. Click Steam in the menu bar and click Exit.
5. Relaunch Steam.
Method 3. Disable Xbox Game Bar
Xbox Game Bar is a built-in Windows application with a game overlay. Disable it along with Record what happened and Capture audio when recording a game features, and check if doing this resolved the FPS drop and stuttering issue.
1. Right-click the Start menu button and click Settings.
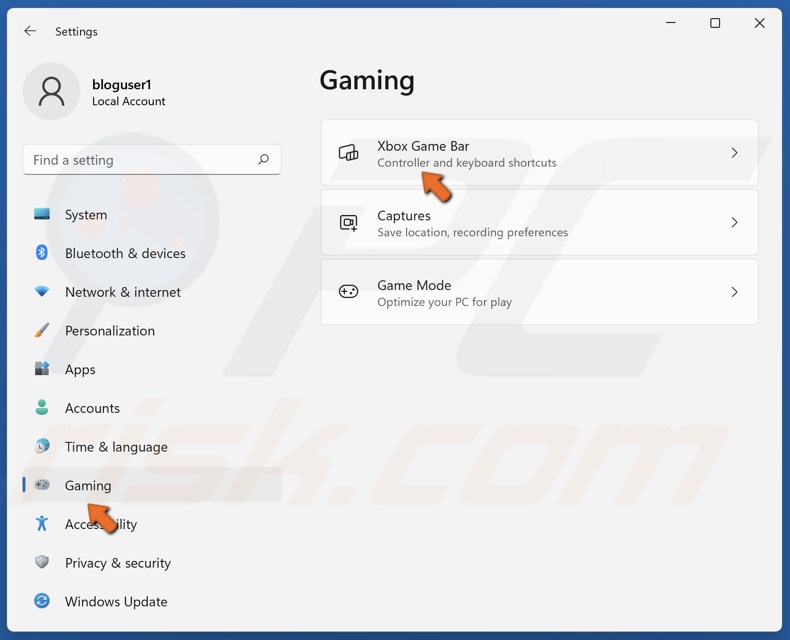
2. Select the Gaming tab and select Xbox Game Bar.
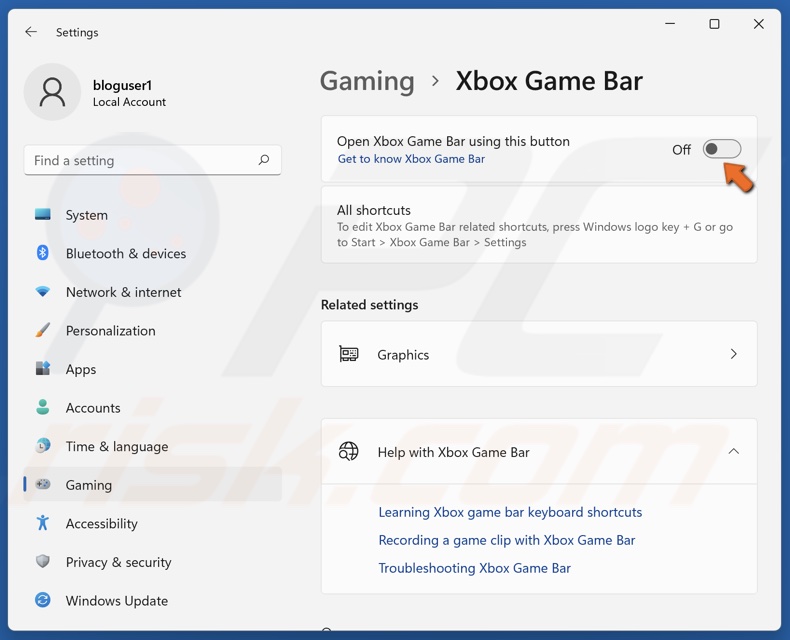
3. Toggle off the Open Xbox Game Bar using this button option.
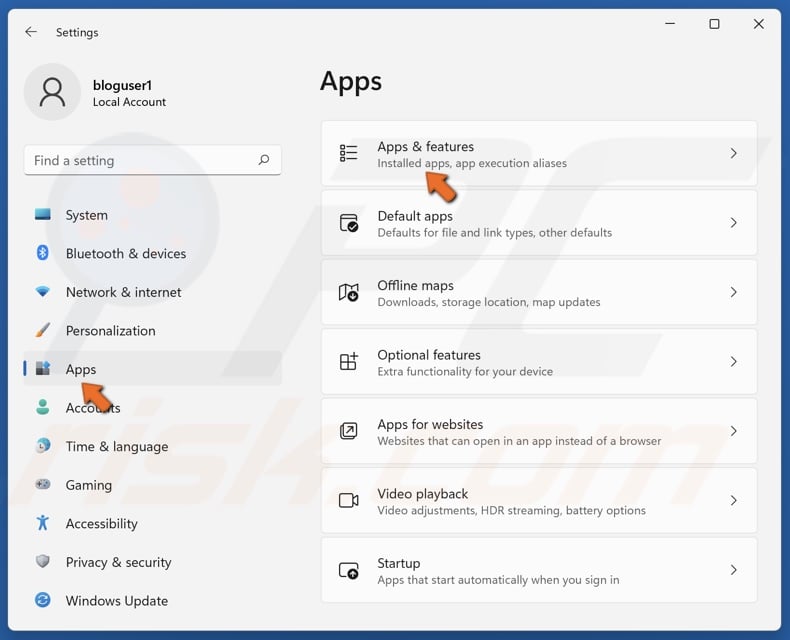
4. Then, select the Apps tab and select Apps & features.
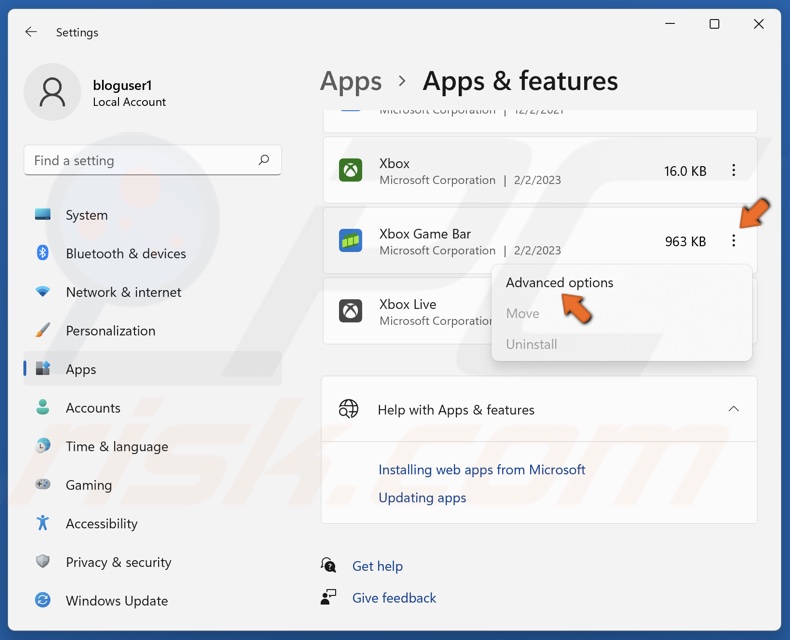
5. Scroll down. Click the three dots next to Xbox Game Bar and select Advanced options.
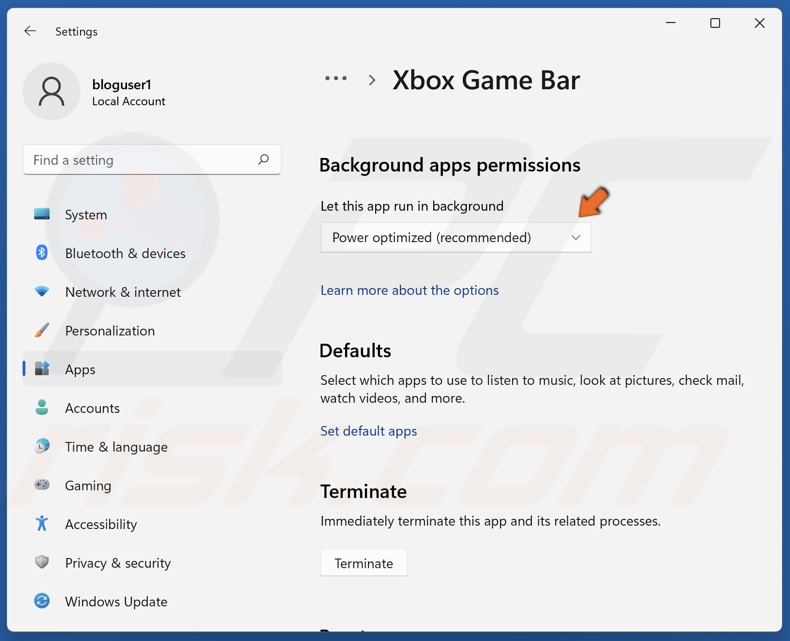
6. In the Background apps permissions section, open the drop-down menu.
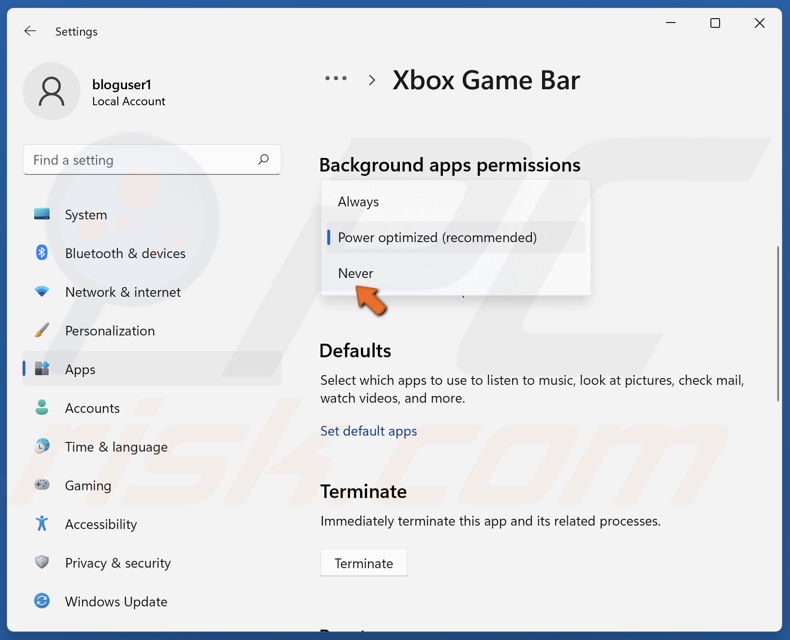
7. Select Never.
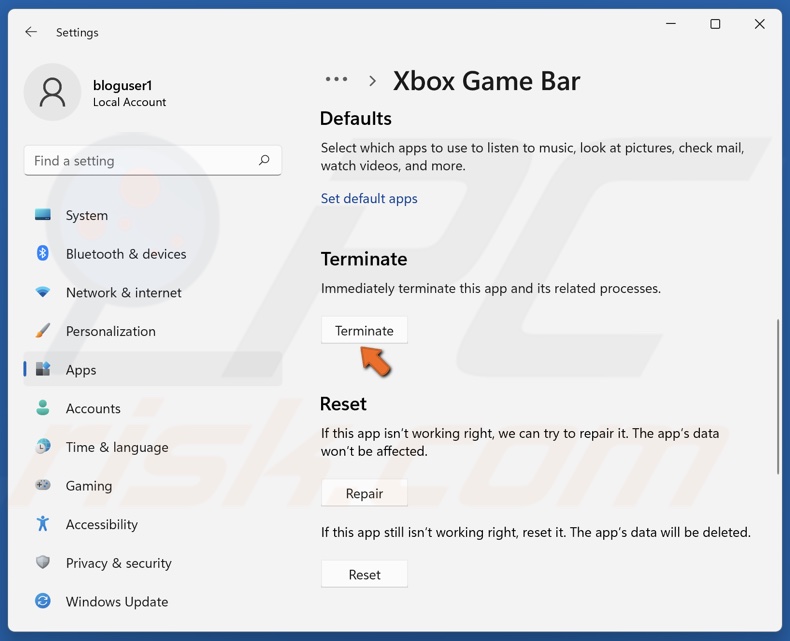
8. Then, click Terminate.
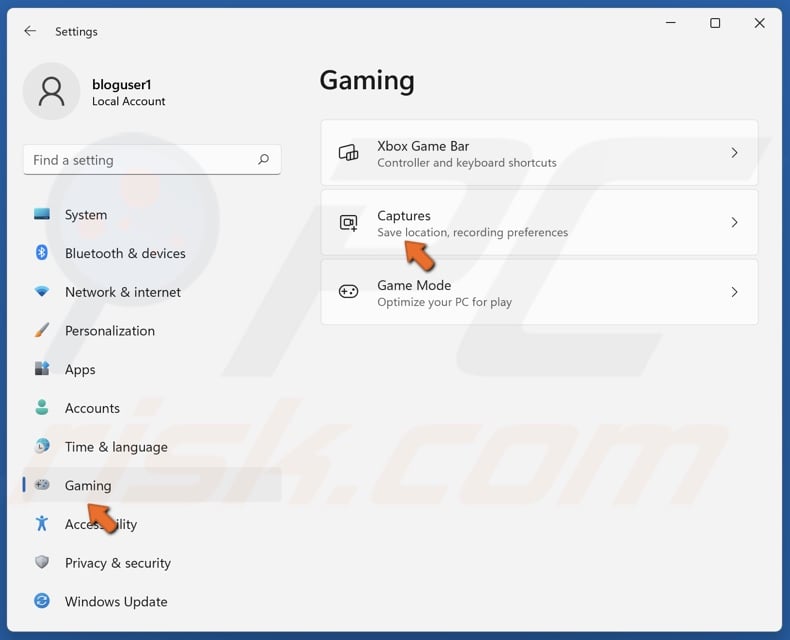
9. Select the Gaming tab again and select Captures.
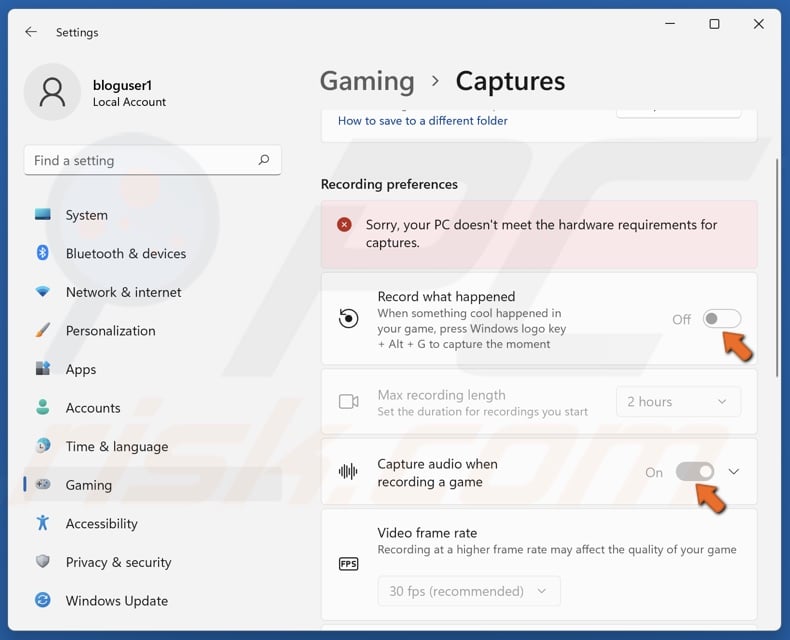
10. Toggle off Record what happened and Capture audio when recording a game.
You should also disable the overlays of programs, such as Discord, Nvidia GeForce Experience, and Riva Tuner.
Method 4. Verify Lost Ark Game Files
If stuttering and FPS drops are caused by corrupted Lost Ark game files, verifying game file integrity will replace any modified and corrupted files from Steam's servers.
1. Open Steam.
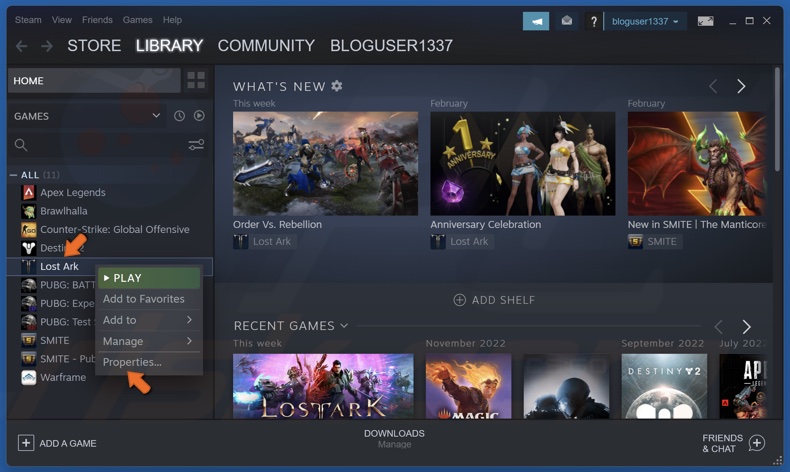
2. In the Library window, right-click Lost Ark and click Properties.
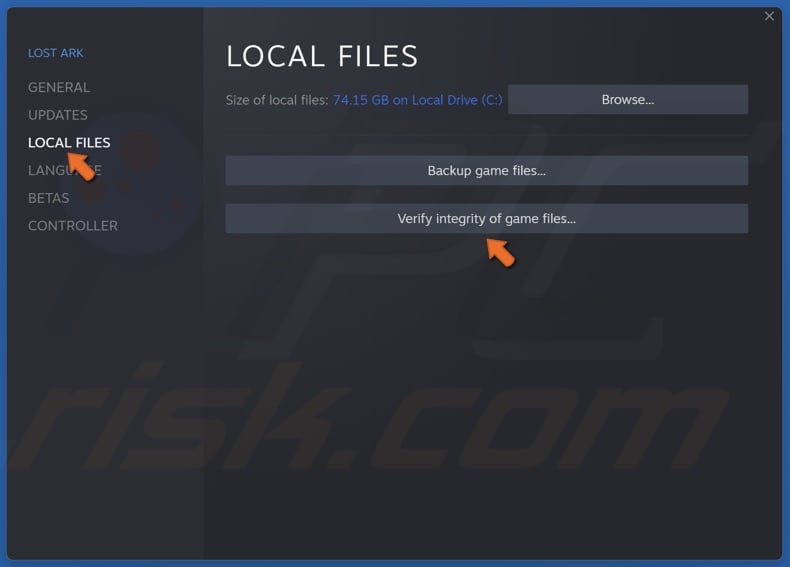
3. In the left pane, select the Local Files tab.
4. Click Verify integrity of game files. Wait for the verification process to complete.
Method 5. Update DirectX Runtime Libraries
Updating your DirectX version is known to fix or, at the very least, reduce stuttering in Lost Ark.
1. Open your web browser and go to the DirectX End-User Runtime Web Installer download page.
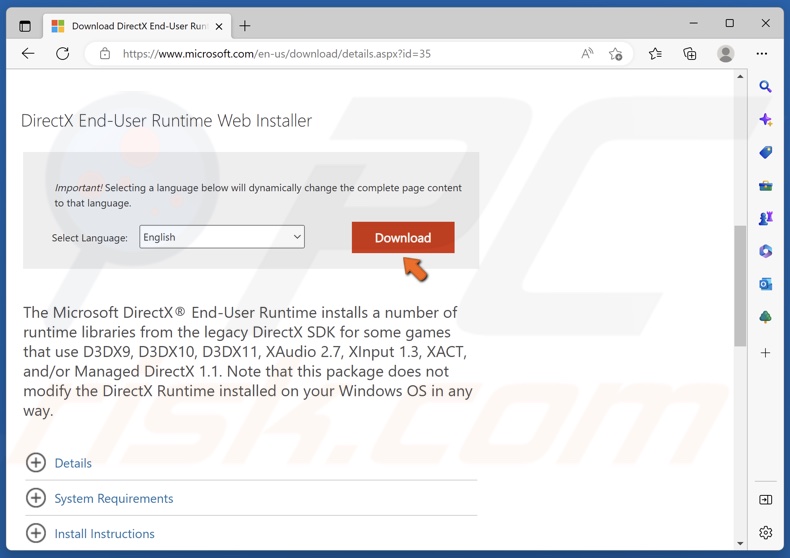
2. Click the Download button.

3. Go to your Downloads folder and run dxwebsetup.exe.
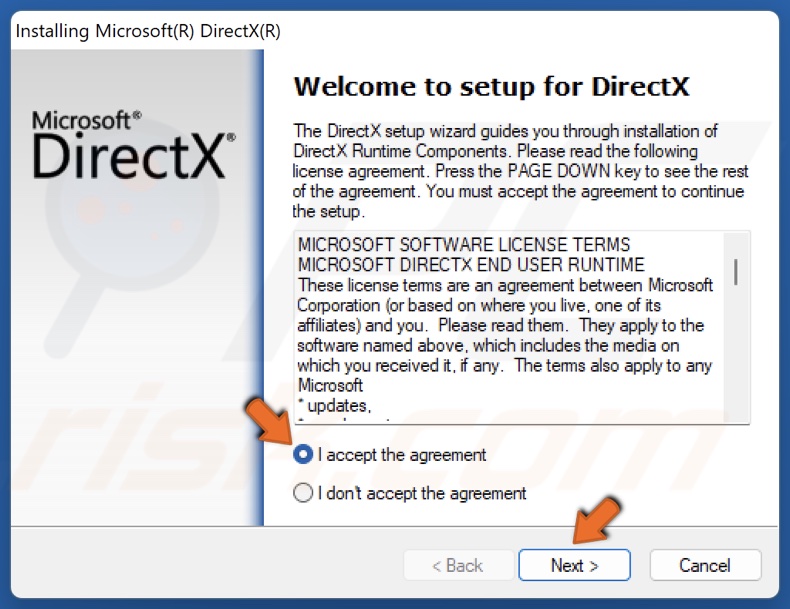
4. Accept the license agreement and click Next.
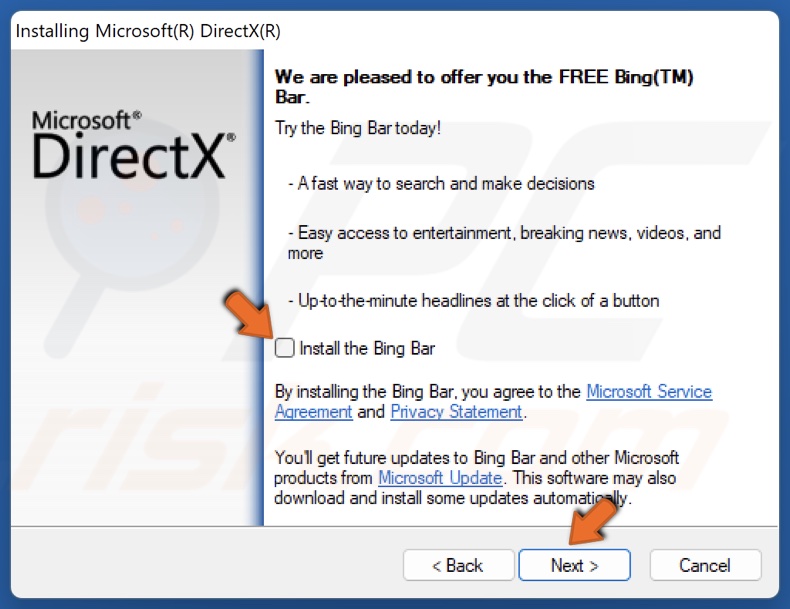
5. Uncheck the Install the Bing Bar checkbox if you don't want it and click Next.
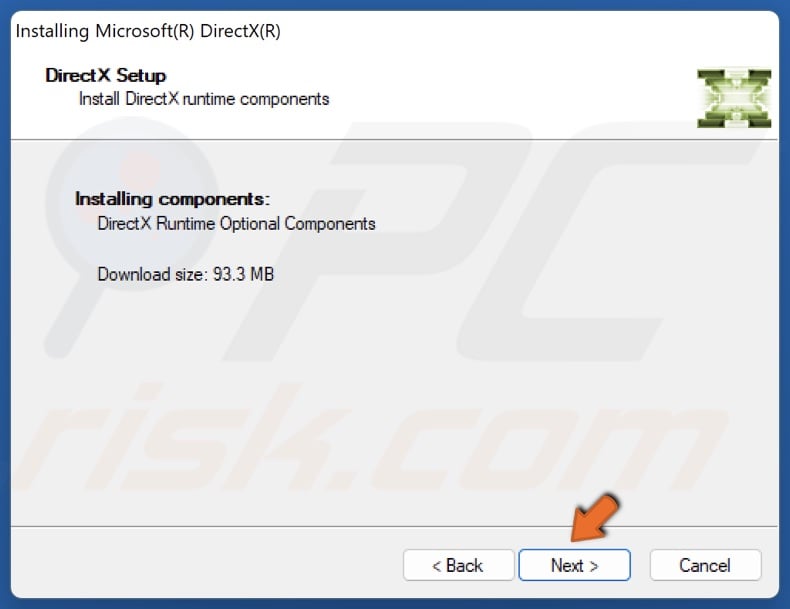
6. Click Next again.
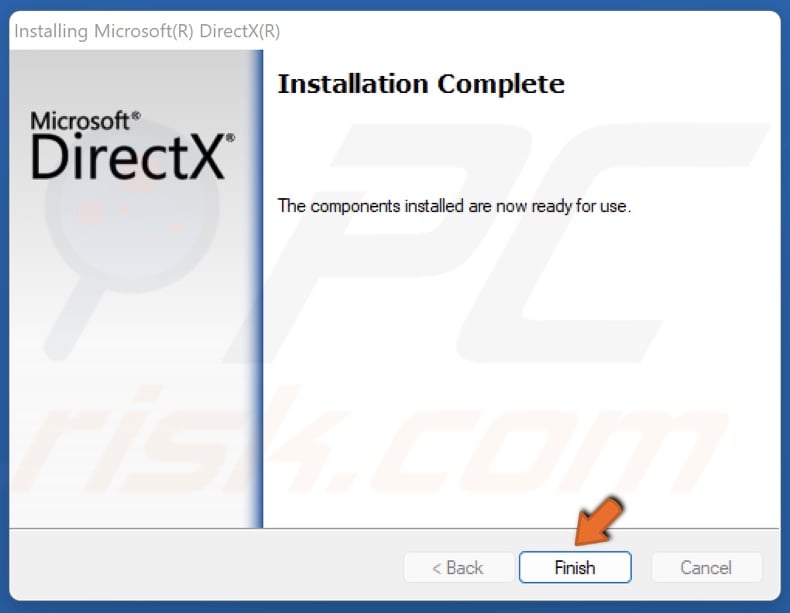
7. Click Finish once the installation is complete.
Method 6. Delete Temporary Windows Files in Temp Folder
Windows stores its temporary program files in the Temp folder. Deleting the temporary files will remove unnecessary files cluttering your PC. Note that deleting these files is entirely safe.
1. Hold down Windows+R keys to open Run.
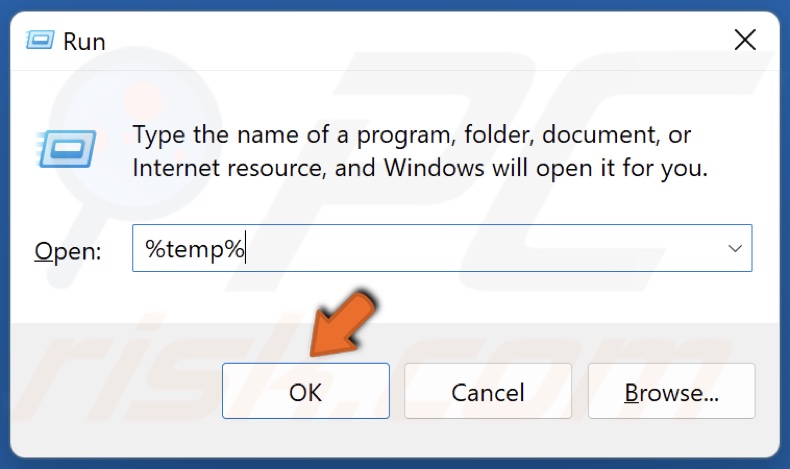
2. In the Run dialog, type in %temp% and click OK.
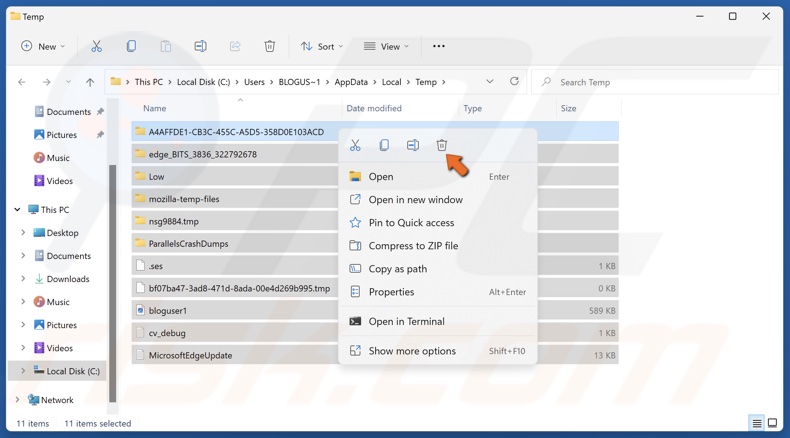
3. Hold down Ctrl+A to select all files in the resulting Temp folder.
4. Right-click the selected files and click Delete. You can safely delete these files. However, files that are in use will remain.
Method 7. Lower Easy Anti-Cheat and Increase Lost Ark Priority
Increasing Lost Ark's performance priority can fix the stuttering and low FPS issue. However, Easy Anti-Cheat is an anti-cheat service that protects gamers against hacking and cheating in multiplayer PC games, but it won't let you change the performance priority for any game. The guide below explains how to lower the performance priority for Easy Anti-Cheat and increase it for Lost Ark using the Windows Registry Editor.
1. Hold down Windows+R keys to open Run.
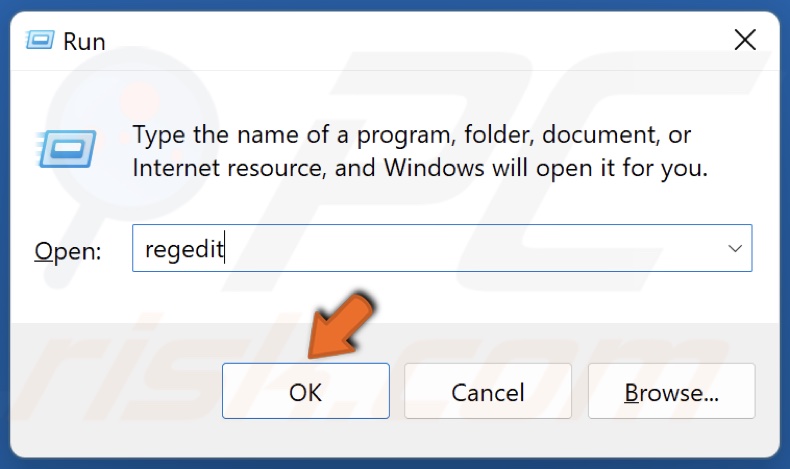
2. In the Run dialog, type in regedit and click OK.
3. In the Windows Registry Editor, navigate to:
HKEY_LOCAL_MACHINE\SOFTWARE\Microsoft\Windows NT\CurrentVersion\Image File Execution Options
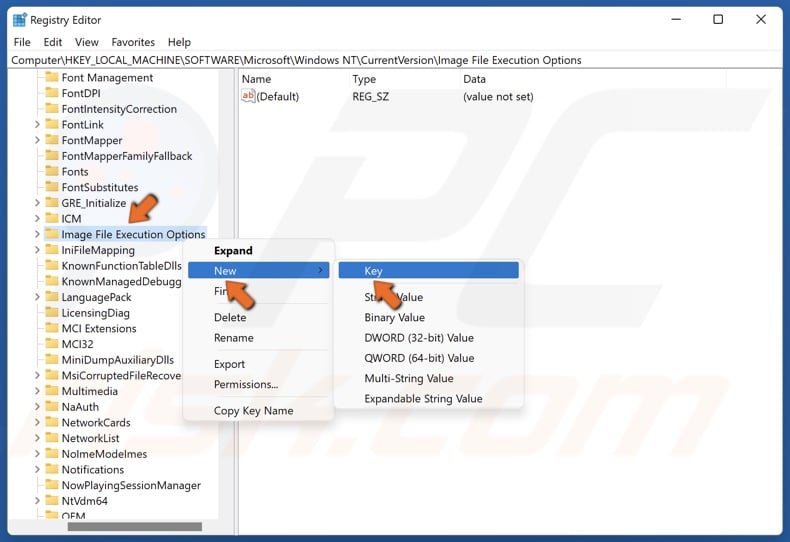
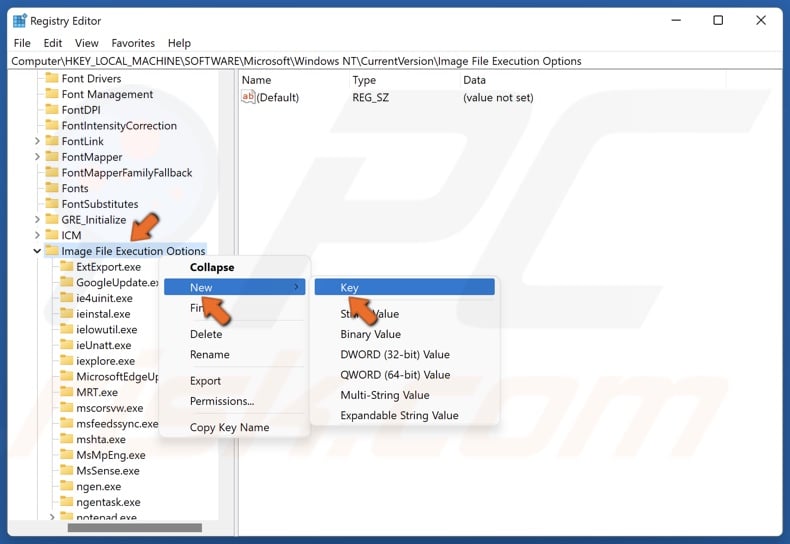
4. Right-click the Image File Execution Options key, select New, and click Key.
5. A new key will be created. Name the new key LOSTARK.exe. The key name must match the Lost Ark executable name.
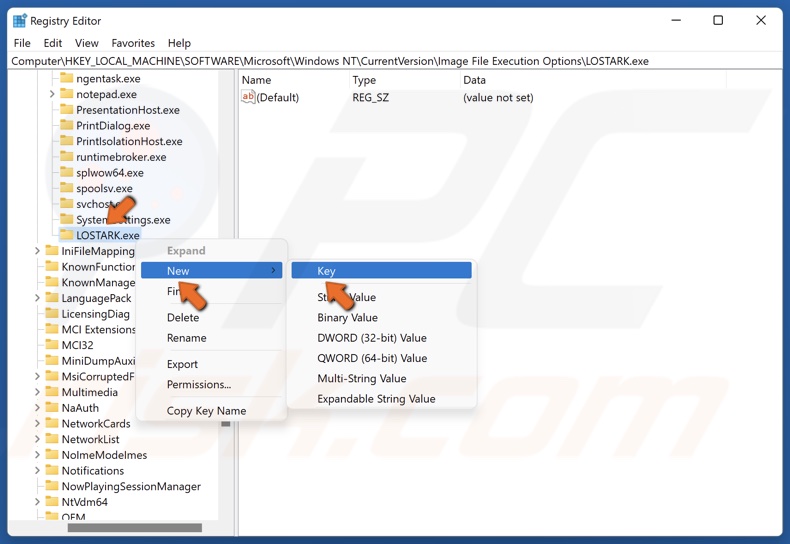
6. Right-click the LOSTARK.exe key, select New, and click Key.
7. A new key will be created. Name the new key PerfOptions.
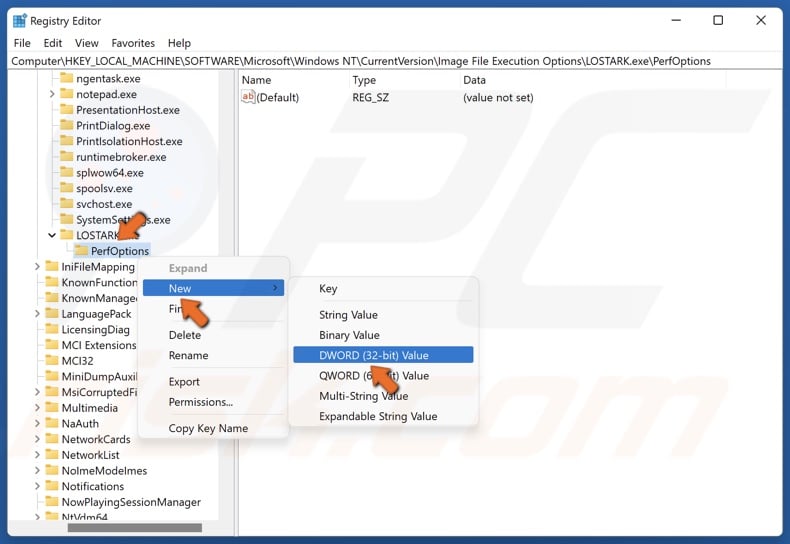
8. Right-click the PerfOptions key, select New, and click DWORD (32-bit) Value.
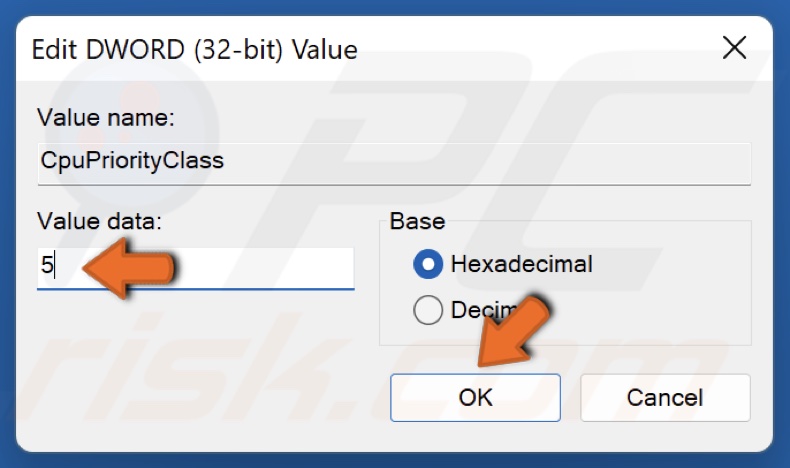
9. Name the new value CpuPriorityClass.
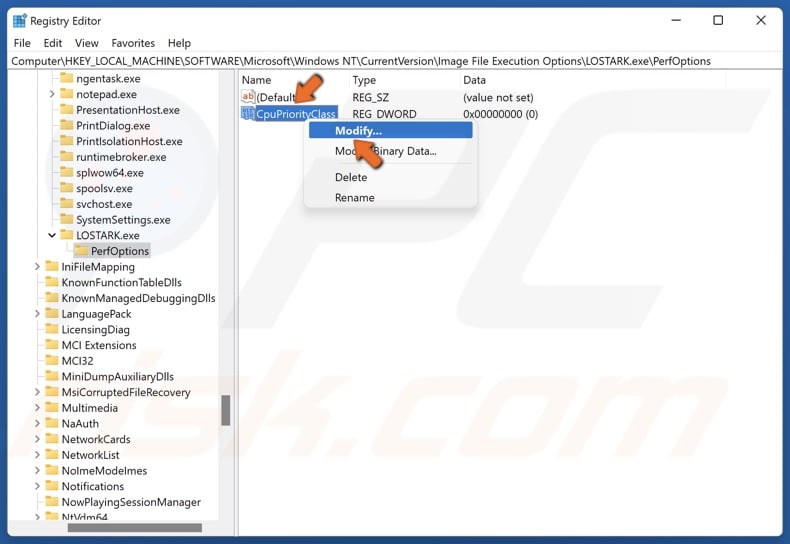
10. Right-click CpuPriorityClass and click Modify.

11. Enter 3 in the Value data box and click OK. 3 is High Priority.
12. Then, go back to the Image File Execution Options key. Right-click the Image File Execution Options key, select New, and click Key.
13. Name the new key EasyAntiCheat.exe.
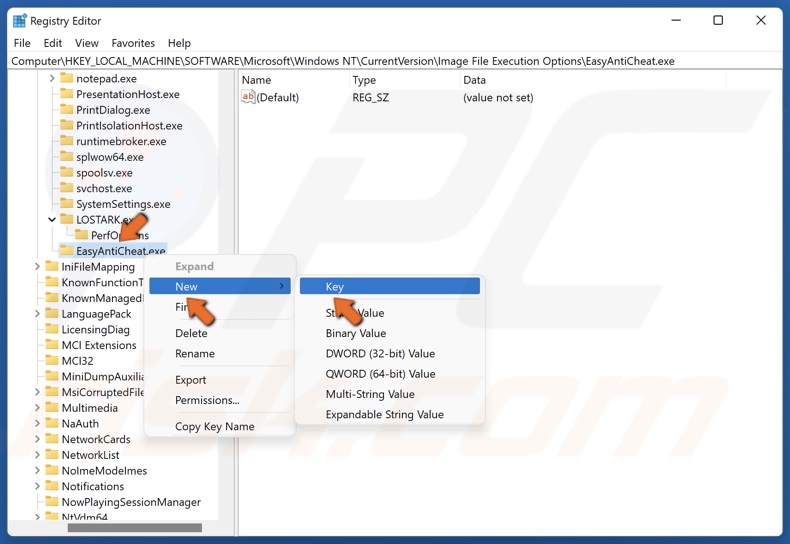
14. Right-click the EasyAntiCheat.exe key select New, and click Key.
15. Name the new key PerfOptions.
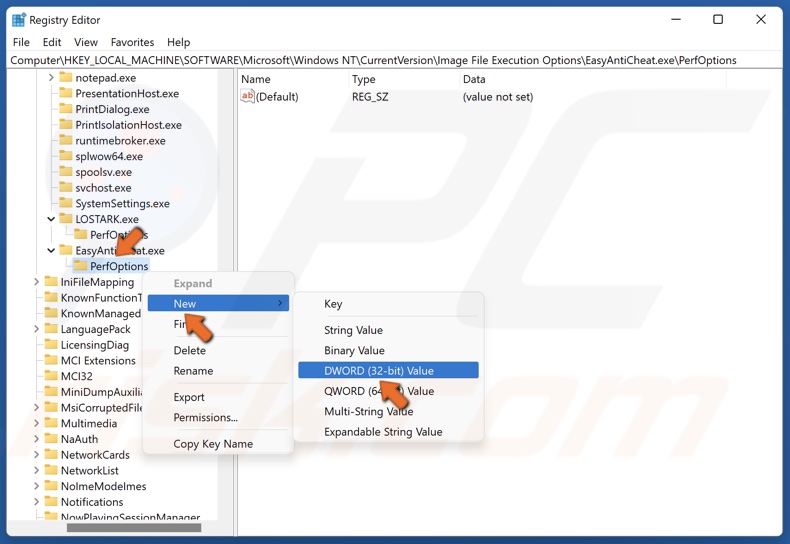
16. Right-click the PerfOptions key, select New, and click DWORD (32-bit) Value.
17. Name the new value CpuPriorityClass.
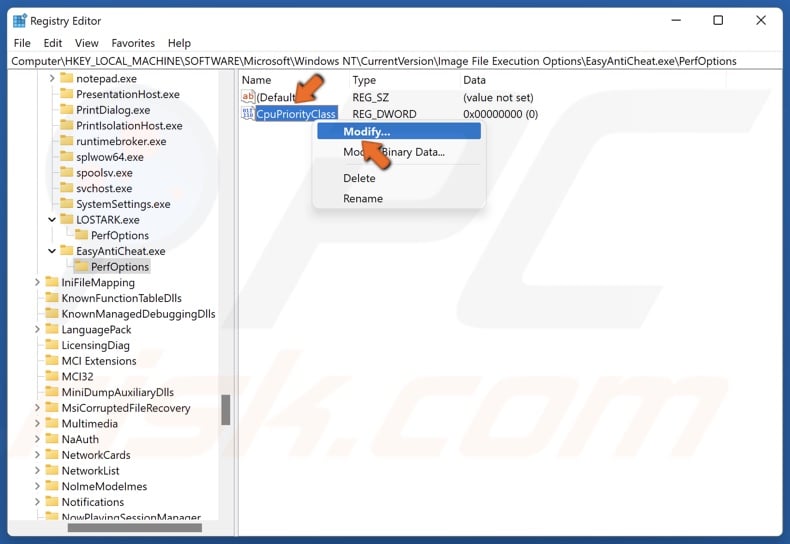
18. Right-click CpuPriorityClass and click Modify.
19. Enter 5 in the Value data box and click OK. 5 is Below Normal Priority.
When you open Task Manager and select the Details tab, you should see Lost Ark running as high priority and Easy Ani-Cheat as Below Normal priority.
Method 8. Configure Windows to Prioritize Gaming
The instructions below will show you how to optimize Windows 10/11 for gaming using the Windows Registry Editor.
1. Hold down Windows+R keys to open Run.
2. In the Run dialog, type in regedit and click OK.
3. In the Windows Registry Editor, navigate to:
HKEY_LOCAL_MACHINE\SOFTWARE\Microsoft\Windows NT\CurrentVersion\Multimedia\SystemProfile
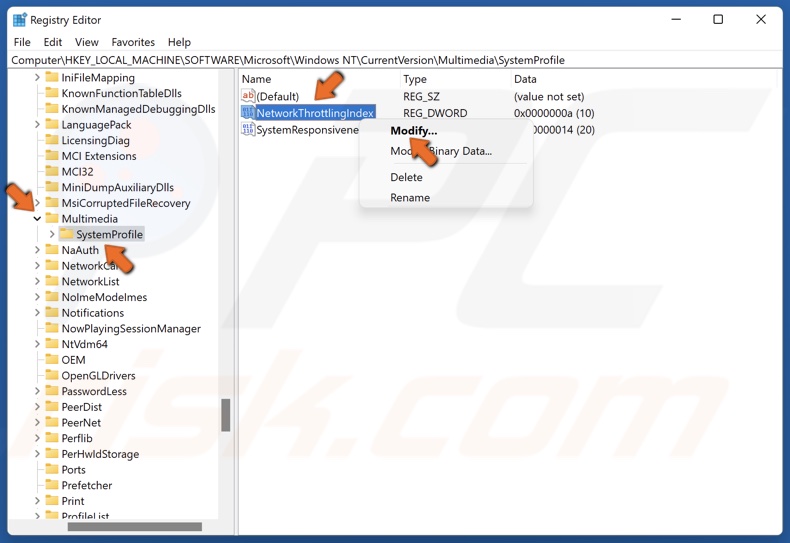
4. Expand the Multimedia key and select SystemProfile.
5. In the right pane, right-click NetworkThrottlingIndex and click Modify.
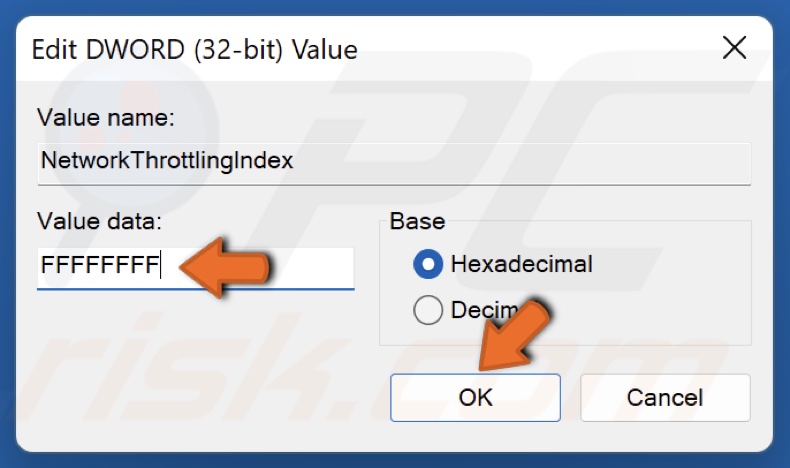
6. Enter FFFFFFFF in the Value data box and click OK. This will disable network throttling.
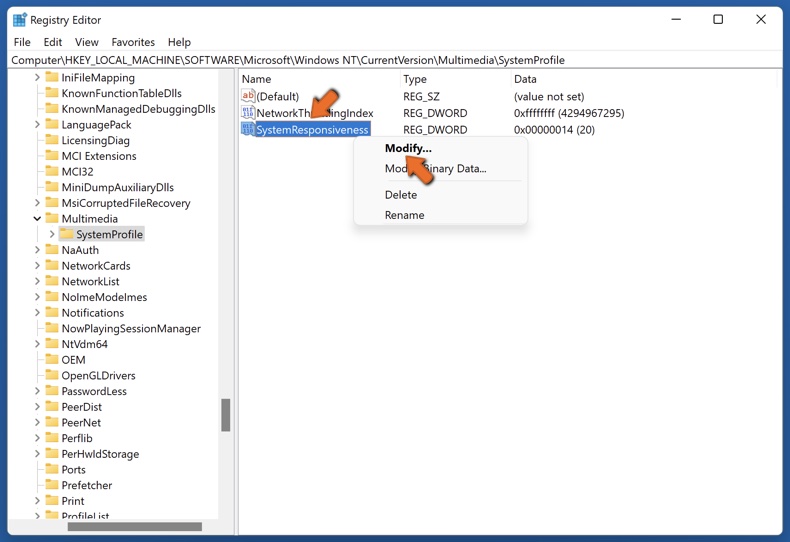
7. Right-click SystemResponsiveness and click Modify.
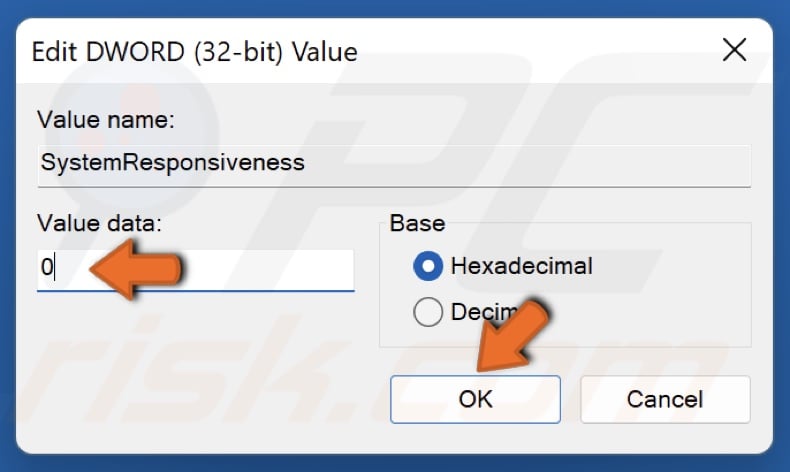
8. Enter 0 in the Value data box and click OK. This will allow all CPU resources to go toward gaming.
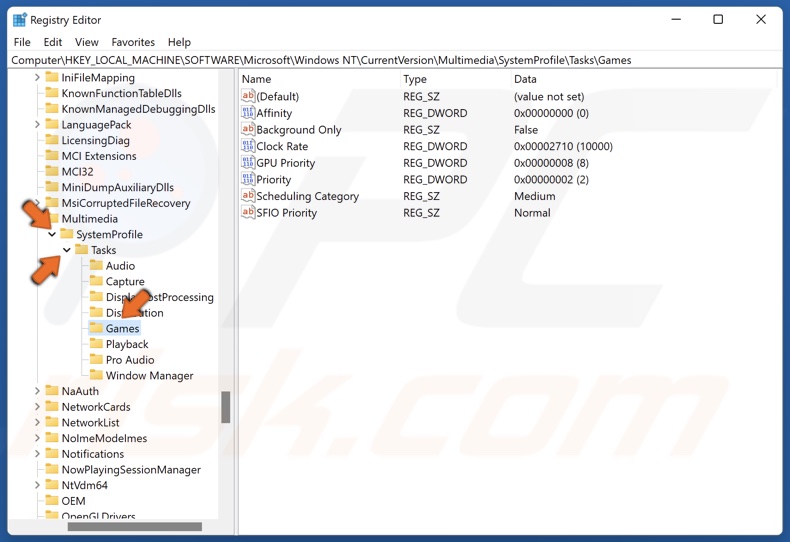
9. Expand the SystemProfile key, expand the Tasks key, and click Games.
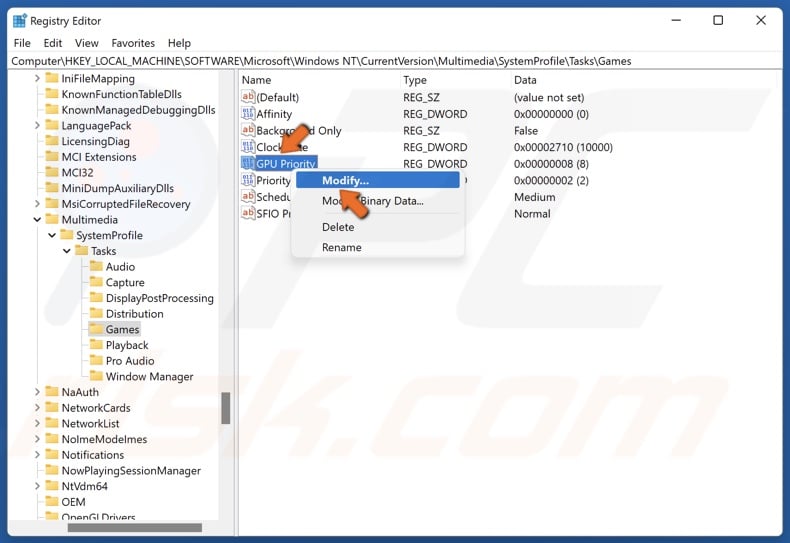
10. Right-click GPU Priority and click Modify.
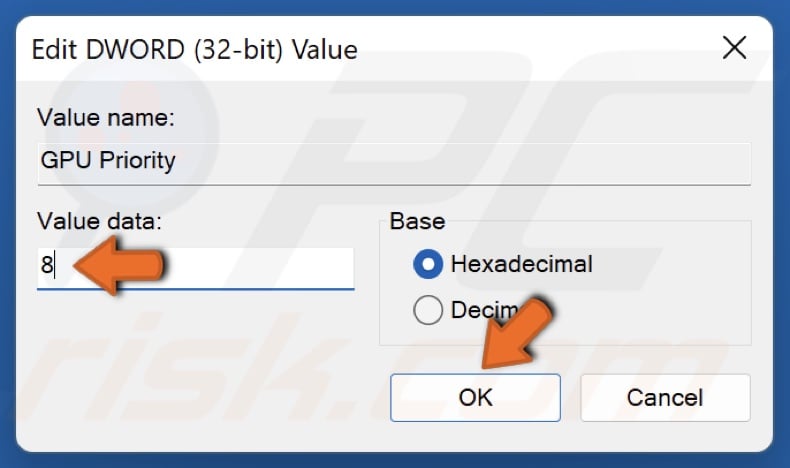
11. Enter 8 in the Value data box and click OK.
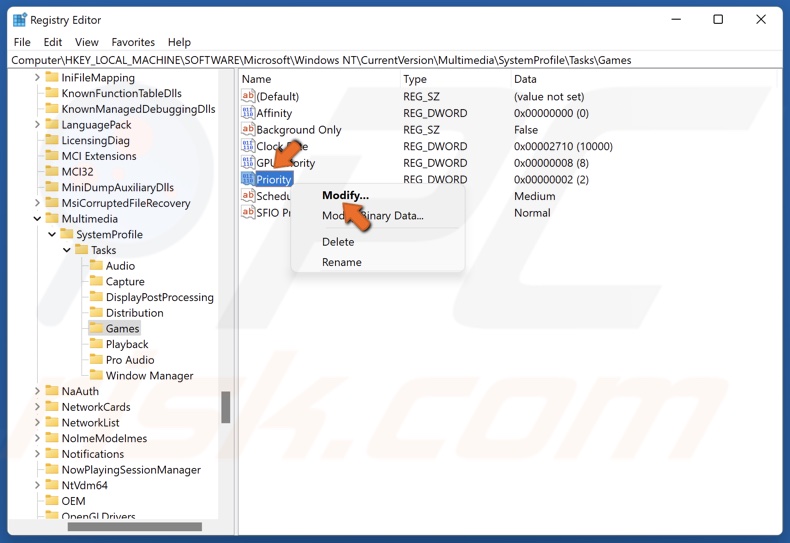
12. Right-click Priority and click Modify.
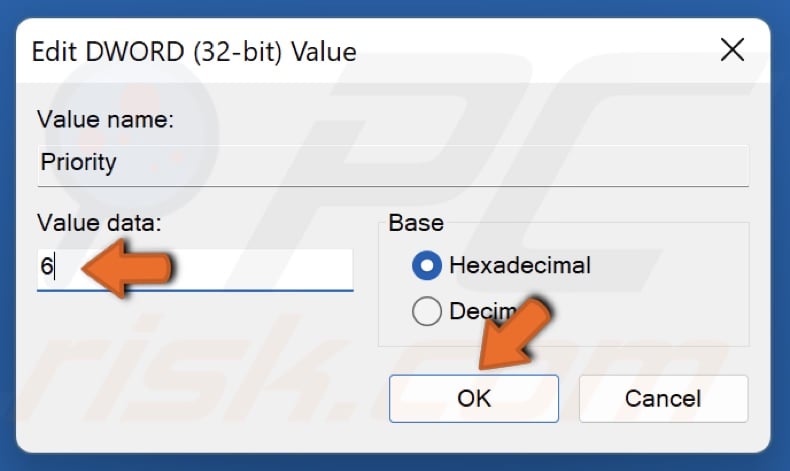
13. Enter 6 in the Value data box and click OK.
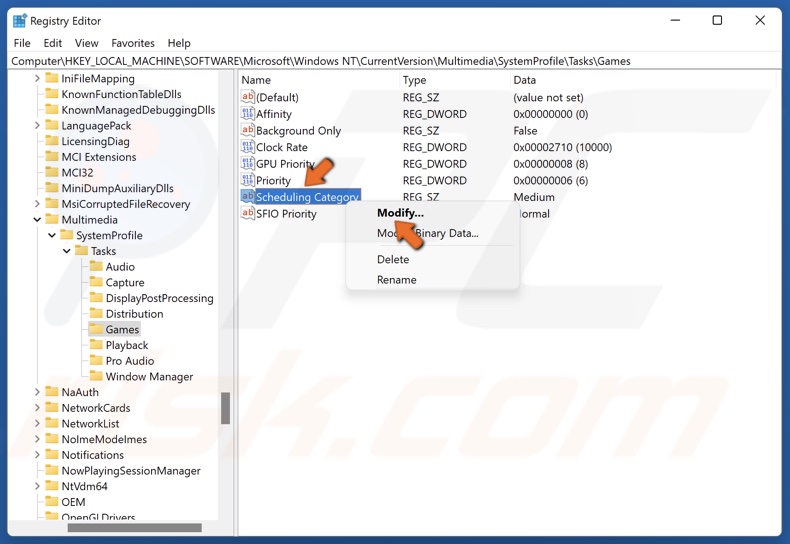
14. Right-click Scheduling Category and click Modify.
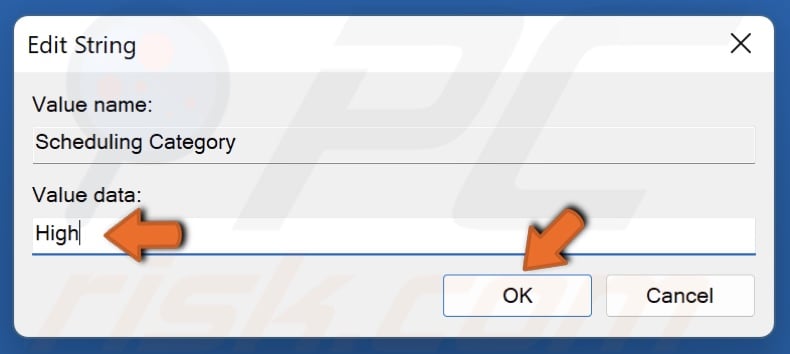
15. Enter High in the Value data box and click OK.
Did this article help you fix stuttering and FPS drops in Lost Ark? Comment below to let us know. And, if you know of other ways to fix this issue, share them with other Lost Ark gamers in the comments as well.
Share:

Rimvydas Iliavicius
Researcher, author
Rimvydas is a researcher with over four years of experience in the cybersecurity industry. He attended Kaunas University of Technology and graduated with a Master's degree in Translation and Localization of Technical texts. His interests in computers and technology led him to become a versatile author in the IT industry. At PCrisk, he's responsible for writing in-depth how-to articles for Microsoft Windows.
▼ Show Discussion