How to Fix Error 0x80070091 "System Restore did not complete successfully" on Windows 10

Get Free Scanner and check your computer for errors
Fix It NowTo fix found issues, you have to purchase the full version of Combo Cleaner. Free trial available. Combo Cleaner is owned and operated by Rcs Lt, the parent company of PCRisk.com read more.
How to Fix Error 0x80070091 "System Restore did not complete successfully" on Windows 10
The System Restore feature in Windows operating systems allows users to return to a previous computer state (to a restore point, if one was created) automatically or manually. However, even System Restore can experience issues.
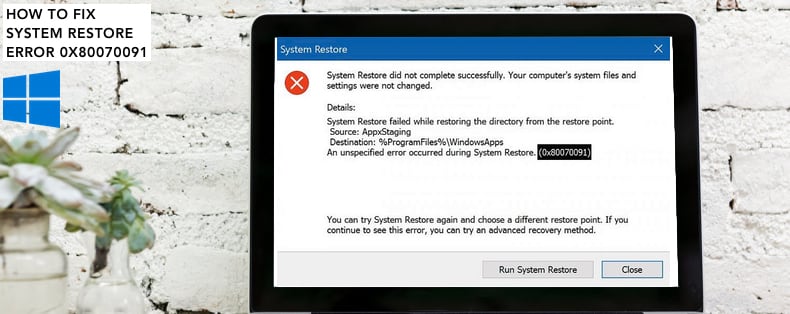
System Restore often helps resolve problems. However, in some cases, you might receive an error when attempting to restore the system. The error usually contains information such as "System Restore did not complete successfully. Your computer's system files and settings were not changed".
It might also state that System Restore failed while restoring the directory from the restore point and that this is an unspecified error with code 0x80070091 and source AppxStaging. It also gives the option to run System Restore again and choose a different restore point. This might not be useful if you only have one restore point created or other restore points are not at the required dates/times.
This error 0x80070091 often indicates problems with the WindowsApps folder or that the destination folder is not empty, i.e., a folder was required to be empty but contained files, and thus System Restore could not be completed. You could simply delete or rename the folder, but this is not as easy as it may seem. Fortunately, you can address this problem by following the steps in the guide below.
Video Guide on How to Fix Error 0x80070091 "System Restore did not complete successfully"
Table of Contents:
- Introduction
- Rename the WindowsApps Folder in Safe Mode
- Rename the WindowsApps Folder From the Windows Recovery Environment
- Temporary Disable Your Antivirus
- Check Your Disk for Errors
- Video Guide on How to Fix Error 0x80070091 "System Restore did not complete successfully"
Download Computer Malware Repair Tool
It is recommended to run a free scan with Combo Cleaner - a tool to detect viruses and malware on your device. You will need to purchase the full version to remove infections. Free trial available. Combo Cleaner is owned and operated by Rcs Lt, the parent company of PCRisk.com read more.
Rename the WindowsApps Folder in Safe Mode
Safe Mode is a diagnostic startup mode in Windows operating systems used to obtain limited access to Windows when the operating system does not start or function normally. It can help to troubleshoot problems on your computer. If, for example, the problem does not occur in Safe Mode, this will confirm that the default settings and basic device drivers are not causing the issue.
To rename the WindowsApps folder, you must use Safe Mode or the Windows Recovery Environment (WinRE). First, we demonstrate Safe Mode.
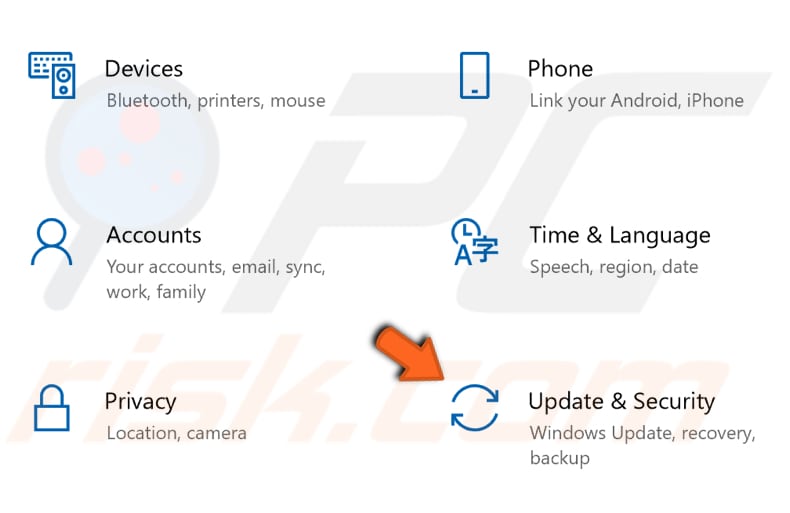
To boot into Safe Mode, go to Windows Settings and click the "Update & Security" option.
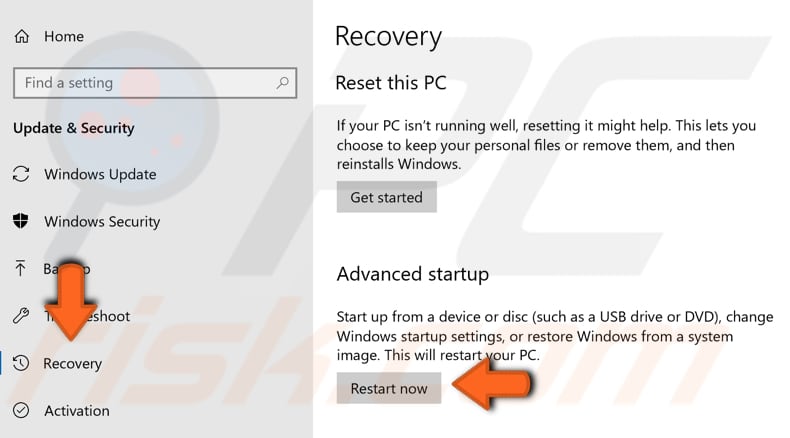
Select the "Recovery" section in the left pane and click the "Restart now" button under Advanced startup.
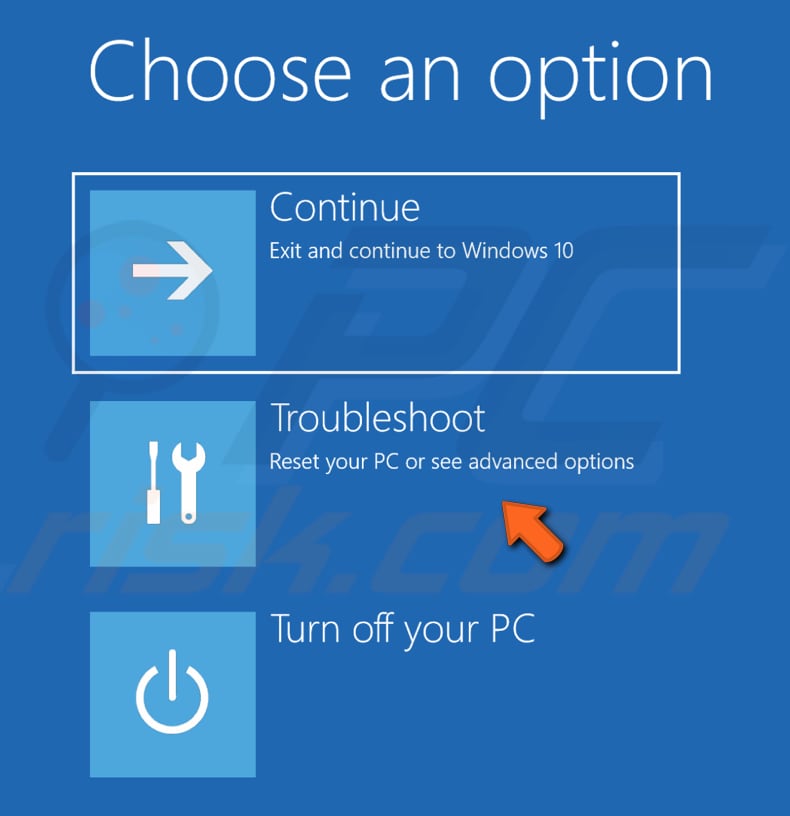
Your computer will restart, and you will see a menu on a blue screen. Select the "Troubleshoot" option.
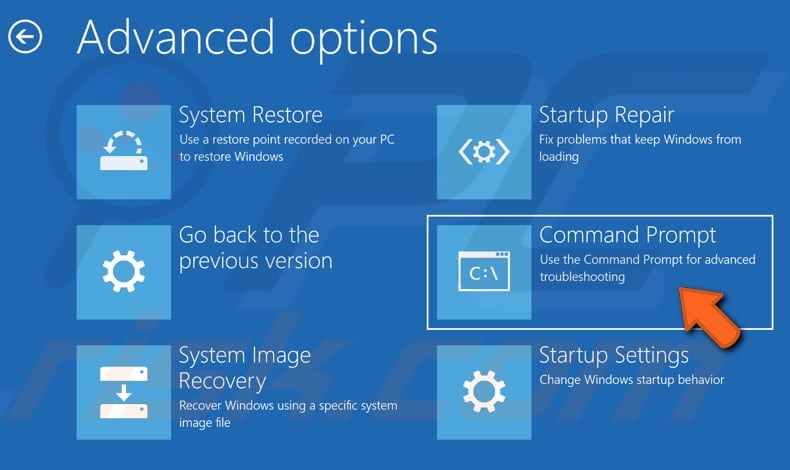
In the Troubleshoot menu, click "Advanced options".

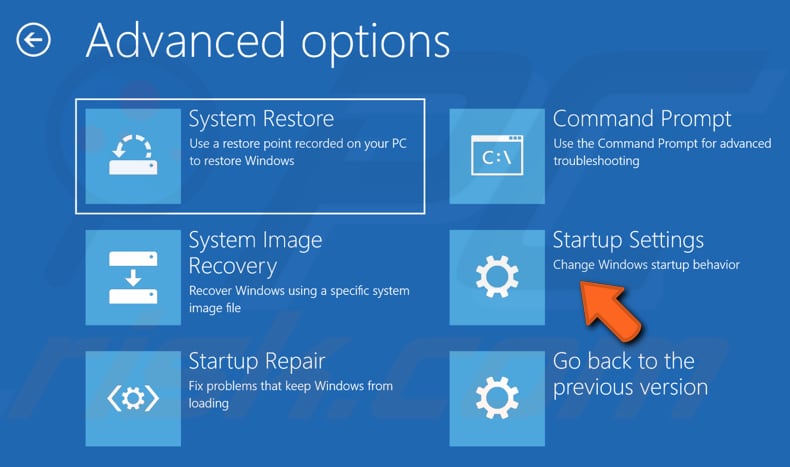
In the Advanced options window, find and click "Startup Settings".
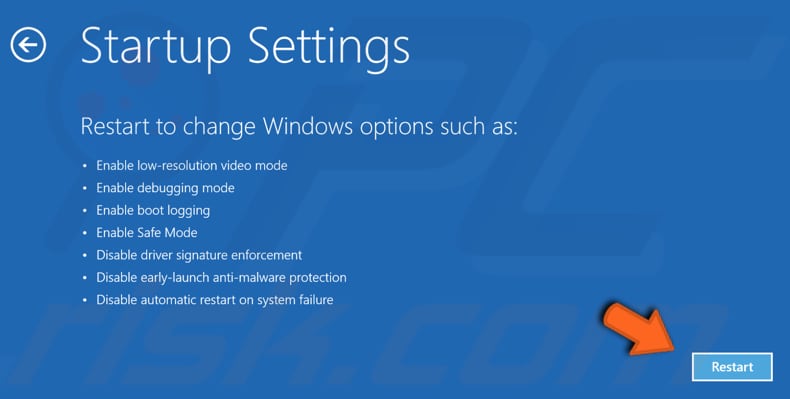
In Startup Settings, click "Restart".
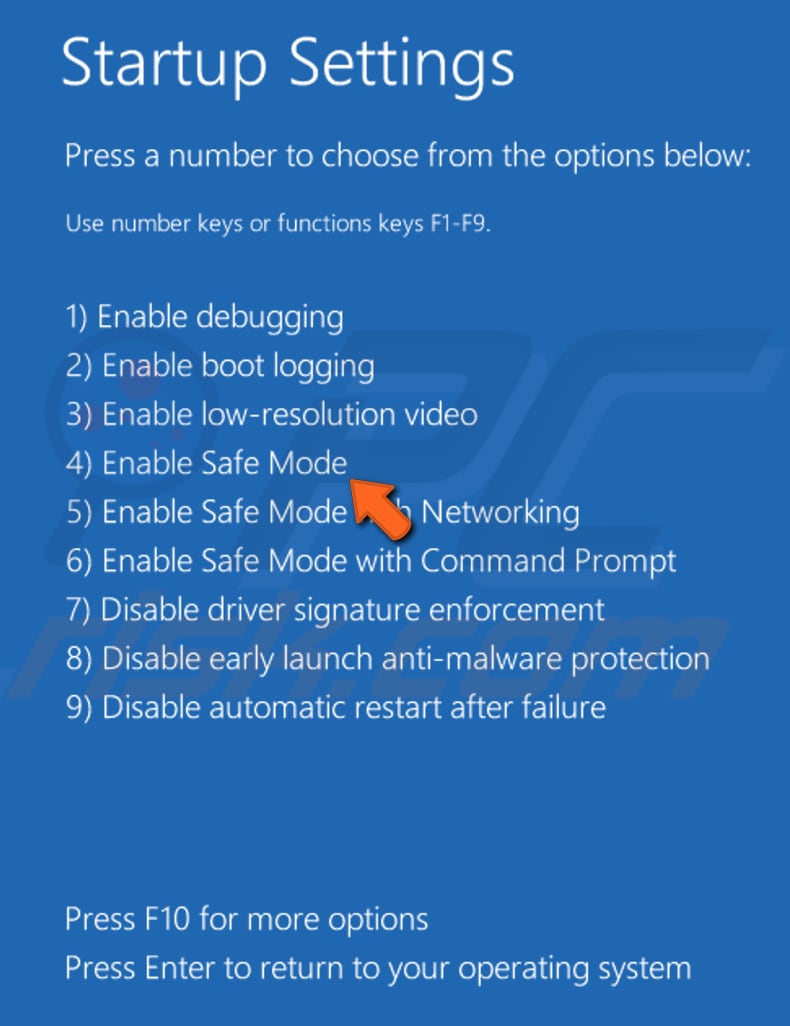
You will be presented with a list of options. To choose an option, press the number on your keyboard or use function keys from F1 to F9. Press 4 or F4 on your keyboard to enable Safe Mode. If you need to enable Safe Mode with Networking, press 5.
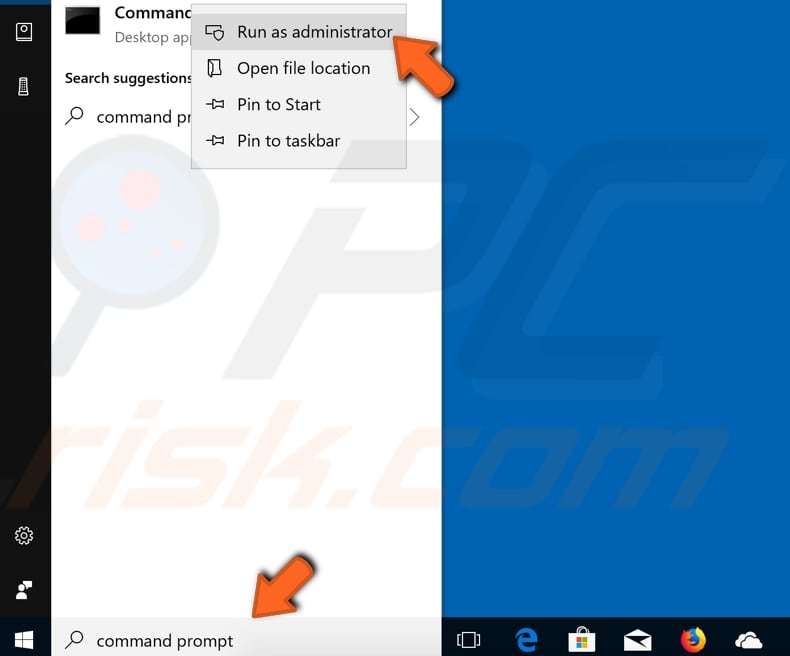
In Safe Mode, type "command prompt" in Search and right-click the "Command Prompt" result. Select the "Run as administrator" option from the contextual menu.
Now enter the following commands, pressing Enter after each to execute:
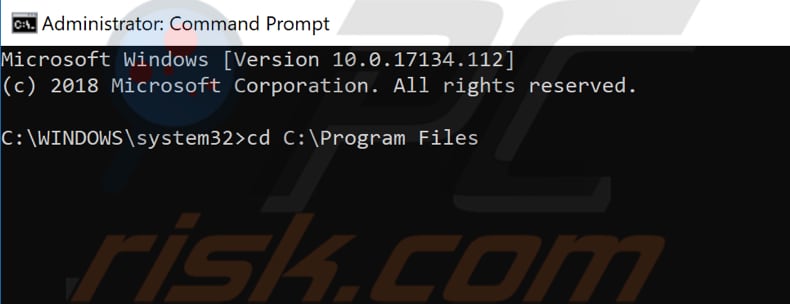
cd C:\Program Files
takeown /f WindowsApps /r /d Y
icacls WindowsApps /grant “%USERDOMAIN%\%USERNAME%”:(F) /t
attrib WindowsApps -h
rename WindowsApps WindowsApps.old
Now restart the computer to boot into Windows normally. Try to run System Restore again and check if System Restore error 0x80070091 persists.
Rename the WindowsApps Folder From the Windows Recovery Environment
If you were unable to rename the WindowsApps folder through Safe Mode, we suggest that you attempt it through Windows Recovery Environment by following the same steps described in the previous method, and by selecting the "Command Prompt" option instead of "Startup Settings" in the Advanced options window.
Select your administrator account and enter the password. Click "Continue".

Now type the following commands and press Enter after each:
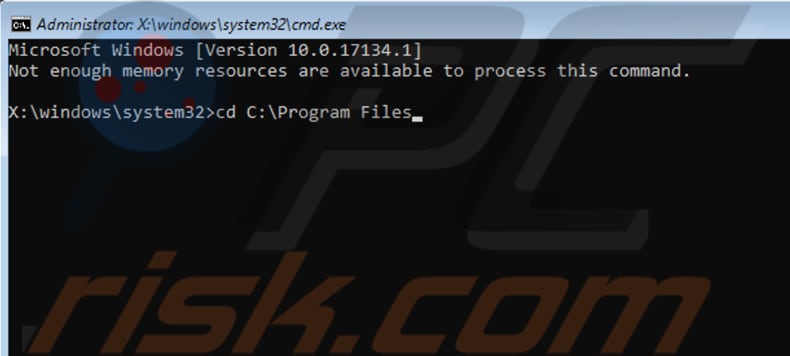
cd C:\Program Files
attrib WindowsApps -h
rename WindowsApps WindowsAppsOld
Now restart the computer to boot Windows normally and try to run System Restore again. Check if System Restore error 0x80070091 persists.
Temporary Disable Your Antivirus Software
Installed and enabled antivirus software might prevent you from running the System Restore feature. To check if third-party antivirus software is the cause, temporarily disable it, try to run System Restore again, and check if the problem persists.
If disabling (or uninstalling) the antivirus software resolves the problem, we recommend that you switch to other antivirus software or reinstall the currently-installed version (or simply disable it again).
If you are not sure how to disable your antivirus software, read this guide, in which you will find instructions on how to disable some of the most popular antivirus programs.
Check the Disk for Errors
A built-in Windows tool allows you to check the integrity of disks. It examines disks and corrects many types of common errors. Some errors may prevent you from running System Restore, and they can be fixed using this tool. You can run this tool from the command line or through a graphical interface. In this guide, we run it through Command Prompt.
Open Command Prompt as administrator, type the "chkdsk C: /f" command, and press Enter on the keyboard. Replace "C" with the letter associated with the hard drive if it is not the C: drive you wish to scan or the Windows operating system resides on another drive.
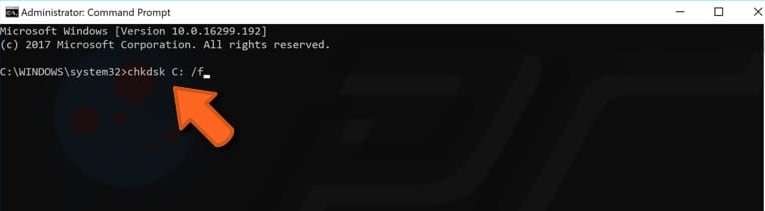
You will be asked if you want to restart your computer to perform the scan. Type the "Y" letter and press Enter. Wait for the chkdsk process to finish and check if this command resolved System Restore error 0x80070091.
We hope that this guide was helpful and you were able to successfully perform a System Restore without receiving System Restore error 0x80070091.
Share:

Rimvydas Iliavicius
Researcher, author
Rimvydas is a researcher with over four years of experience in the cybersecurity industry. He attended Kaunas University of Technology and graduated with a Master's degree in Translation and Localization of Technical texts. His interests in computers and technology led him to become a versatile author in the IT industry. At PCrisk, he's responsible for writing in-depth how-to articles for Microsoft Windows.
▼ Show Discussion