How to Fix Limited Access, Limited Connectivity, No Internet Access on Windows 10

Get Free Scanner and check your computer for errors
Fix It NowTo fix found issues, you have to purchase the full version of Combo Cleaner. Free trial available. Combo Cleaner is owned and operated by Rcs Lt, the parent company of PCRisk.com read more.
How to Fix Limited Access, Limited Connectivity, or No Internet Access Problems in Windows 10
When setting up a network or using your PC, you may get an error message saying you're connected to a network with limited access or limited connectivity. This article contains several guides to help fix this problem.

Usually, when you get this error, you are unable to access the Internet. However, limited means that you still can access locally shared files and folders. This error can occur in several forms, saying limited access, no internet access, limited or no connectivity.
However, this does not always mean that there is no Internet connection at all. In many cases, the Internet connection is stable, and you can still use it with other devices without any problems.
To fix this issue, you may need to reset the TCP/IP, re-enable your network adapter, restart your router or modem, change the DNS server address, temporarily disable your installed antivirus software or firewall, run the Windows troubleshooter, and other things.
Read the guide below and try out our described methods one by one and see if any of them solve this limited connectivity (limited access) problem for you.
Video Showing How to Fix Limited Access or Connectivity Problems:
Table of Contents:
- Introduction
- Restart Modem or Router
- Re-enable Your Networking Device
- Run Windows Troubleshooter
- Reset TCP/IP Stack
- Temporarily Disable Your Antivirus
- Change DNS
- Reset Network Configuration
- Adjust Power Management Options
- Roll Back Network Adapter Driver
- Video Showing How to Fix Limited Access or Connectivity Problem
Download Computer Malware Repair Tool
It is recommended to run a free scan with Combo Cleaner - a tool to detect viruses and malware on your device. You will need to purchase the full version to remove infections. Free trial available. Combo Cleaner is owned and operated by Rcs Lt, the parent company of PCRisk.com read more.
Restart Modem or Router
The first thing we recommend you try out is to restart your router or modem. Unplug your modem (or router) from the power outlet and leave it unplugged for a couple of minutes. Then plug your router (or modem) in again and wait until the startup (self-test) process finishes. See if you can connect to the Internet without any limitations.
Re-enable Your Networking Device
Another simple method that could solve this problem is disabling your networking device (network adapter) and then enabling it again.
To do so, you need to open Device Manager first. Open Device Manager by right-clicking the Start button and selecting the "Device Manager" result from the contextual menu or type "device manager" in Search and click the "Device Manager" result.
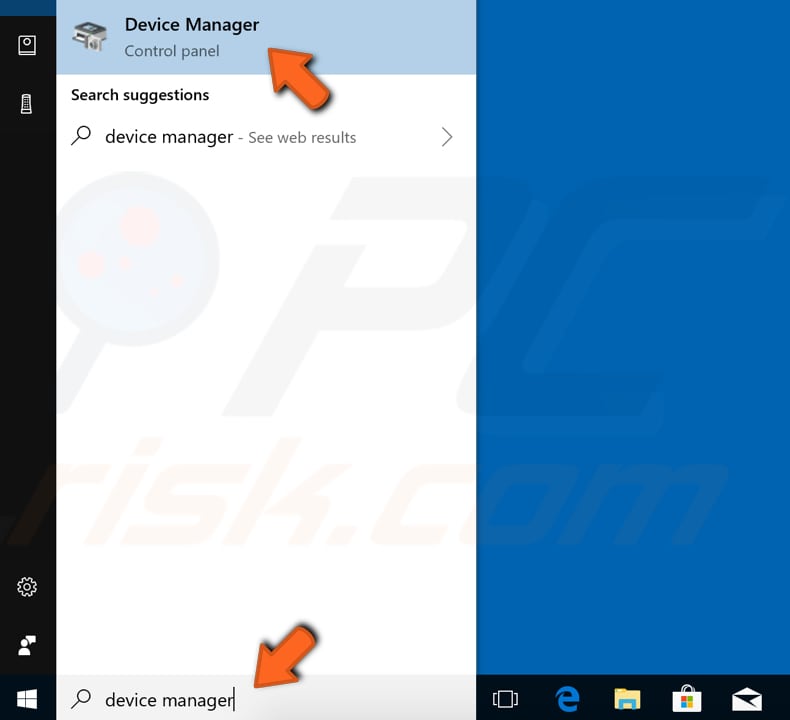
In Device Manager, you will see a list of devices connected to your computer. Expand the "Network adapters" category and right-click your networking device.
Select the "Disable device" option from the contextual menu. You will be asked if you really want to disable it because disabling it will cause it to stop functioning.
Click "Yes". Restart your computer and enable it again by following previously described steps and selecting "Enable device" when right-clicking your networking device. See if this solves the problem.

Run Windows Troubleshooter
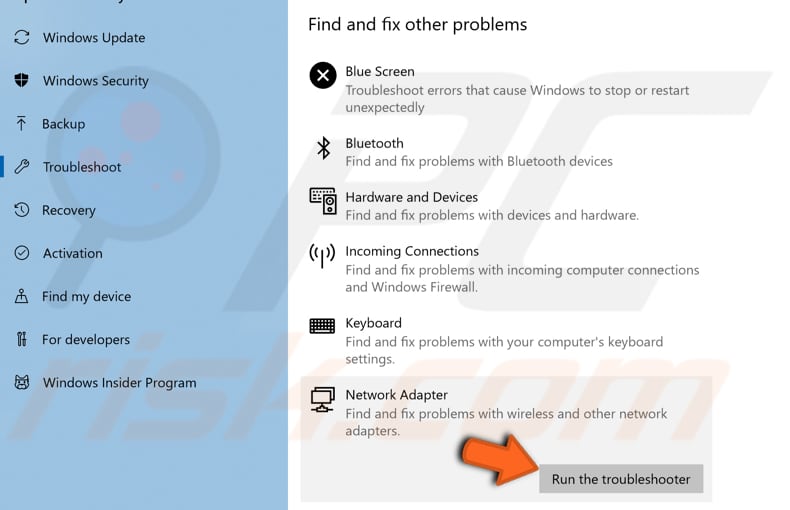
Another simple thing you might want to try is to run the Windows Network Adapter troubleshooter.
To start Blue Screen troubleshooter, go to Settings, type "troubleshoot, " and select "Troubleshoot" from the list.
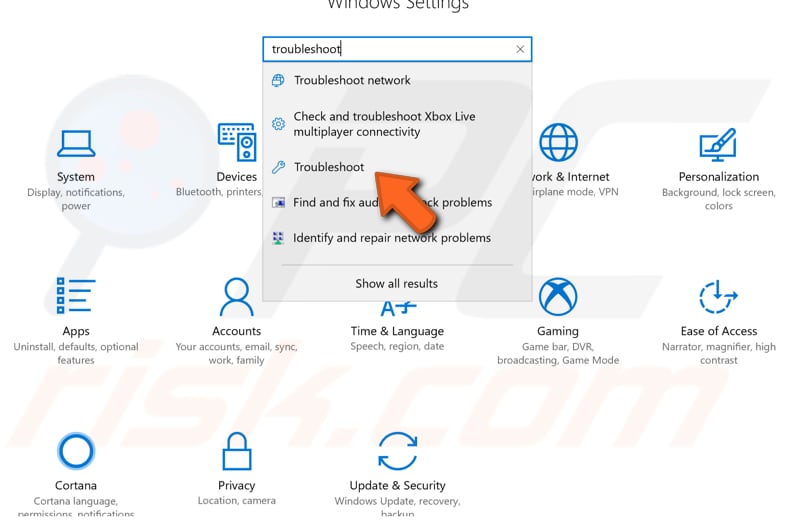
Now find the "Network Adapter" troubleshooter under Find and fix other problems, select it and click the "Run the troubleshooter" button. It will start looking for issues related to wireless and other network adapters.
Additionally, we recommend you try to run the Internet Connections troubleshooter as well.
Reset TCP/IP Stack
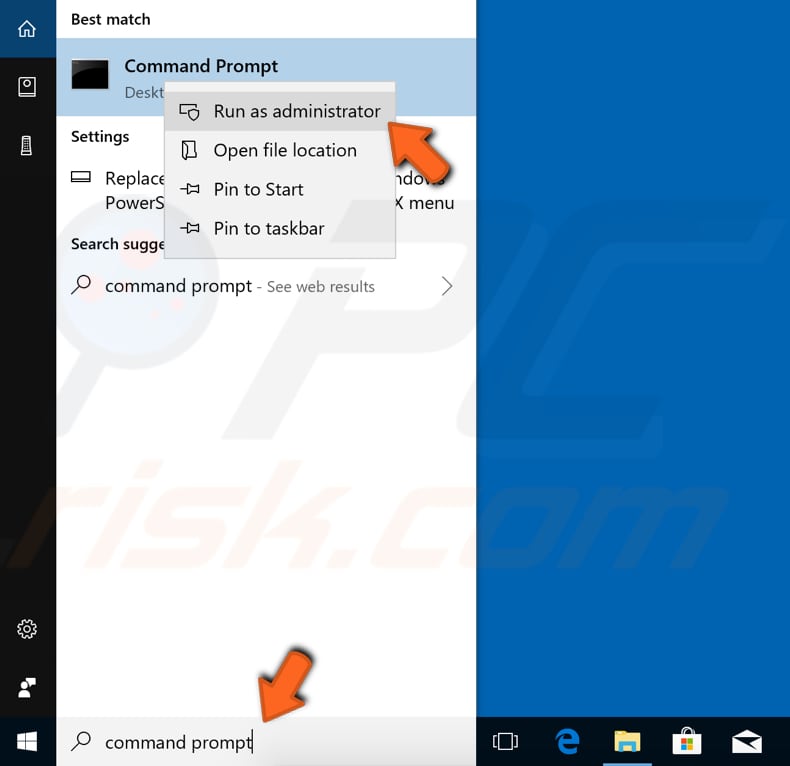
To reset network settings, you will need to execute several commands using Command Prompt. This method includes entering and executing "netsh" commands.
Netsh is a command-line scripting utility that allows you to, either locally or remotely, display or modify the network configuration of a computer that is currently running. Netsh also provides a scripting feature to run a group of commands in batch mode against a specified computer. The commands require an elevated Command Prompt opened with administrator privileges.
To open elevated Command Prompt, type "command prompt" in Search and right-click on the "Command Prompt" result. Choose "Run as administrator" to run it with administrative privileges. When you select "Run as administrator", a User Account Control prompt will appear asking if you allow the Command Prompt to make changes to your computer. Click "Yes".
Now type these commands and press Enter after each:
netsh int ip reset C:\logreset.txt
netsh int tcp set heuristics disabled
netsh int tcp set global autotuninglevel=disabled
netsh int tcp set global rss=enabled
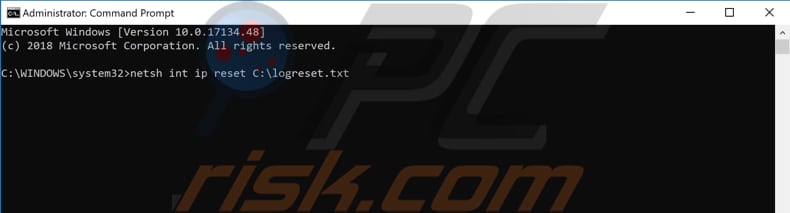
Restart your computer and see if you are still having problems with limited access or connectivity.
Temporarily Disable Your Antivirus
Your antivirus (anti-malware) software may be blocking access to the Internet, which is why the limited connectivity or limited access problem occurs. To ensure that the installed third-party antivirus software is not the culprit of this problem, we recommend you temporarily disable it and check if the problem still persists.
If disabling (or uninstalling) your antivirus actually helps, then we recommend you to switch to another antivirus software or reinstall the currently installed one.
If you are not sure how to disable your antivirus, then read this guide. There you will find instructions on how to disable some of the most popular antivirus programs.
Change DNS
You might want to change the DNS address to Google Public DNS and see if this solves the problem. Google's Public DNS, a free alternative Domain Name System (DNS) service offered to Internet users worldwide. The public DNS service and servers are maintained and owned by Google.
It functions as a recursive name server providing domain name resolution for any host on the Internet. We recommend using Google DNS for a faster and secure connection. You will have to change the DNS manually, and we are going to show you how.
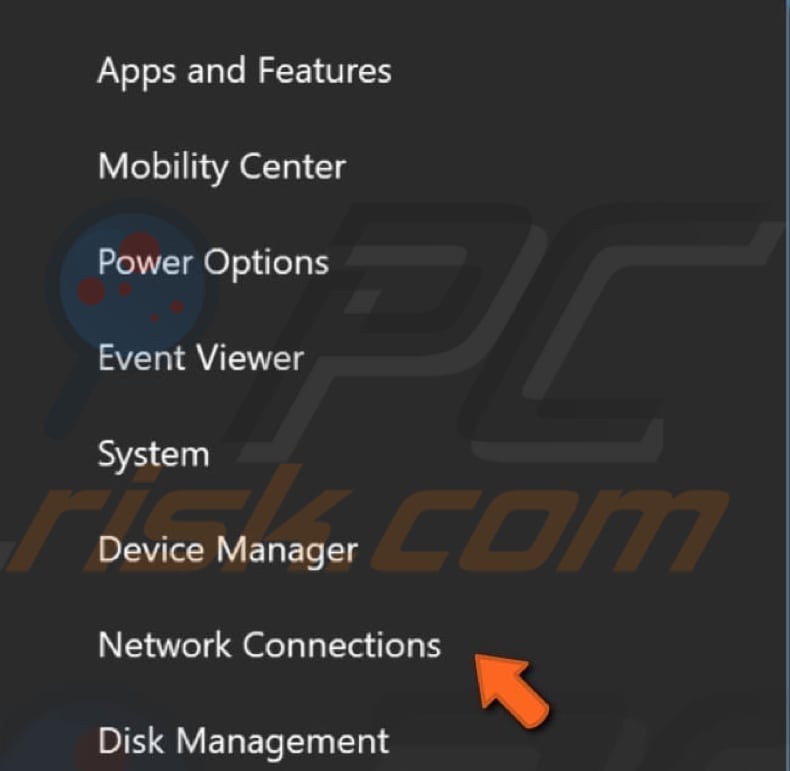
To change your DNS server to Google's DNS server, go to your Network Connections settings. Right-click the Start menu and select "Network Connections", or go to Settings and click "Network & Internet".
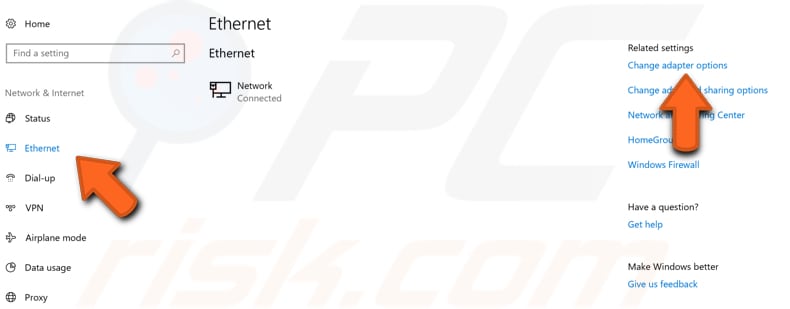
In the Network & Internet settings window, select your connection type (in our case, "Ethernet") on the left pane and then click "Change adapter options" on the right pane.
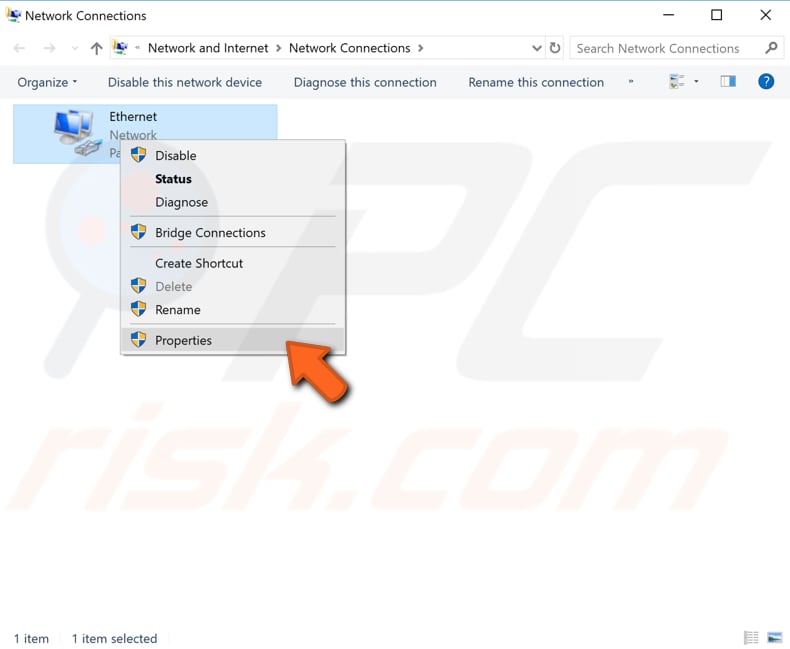
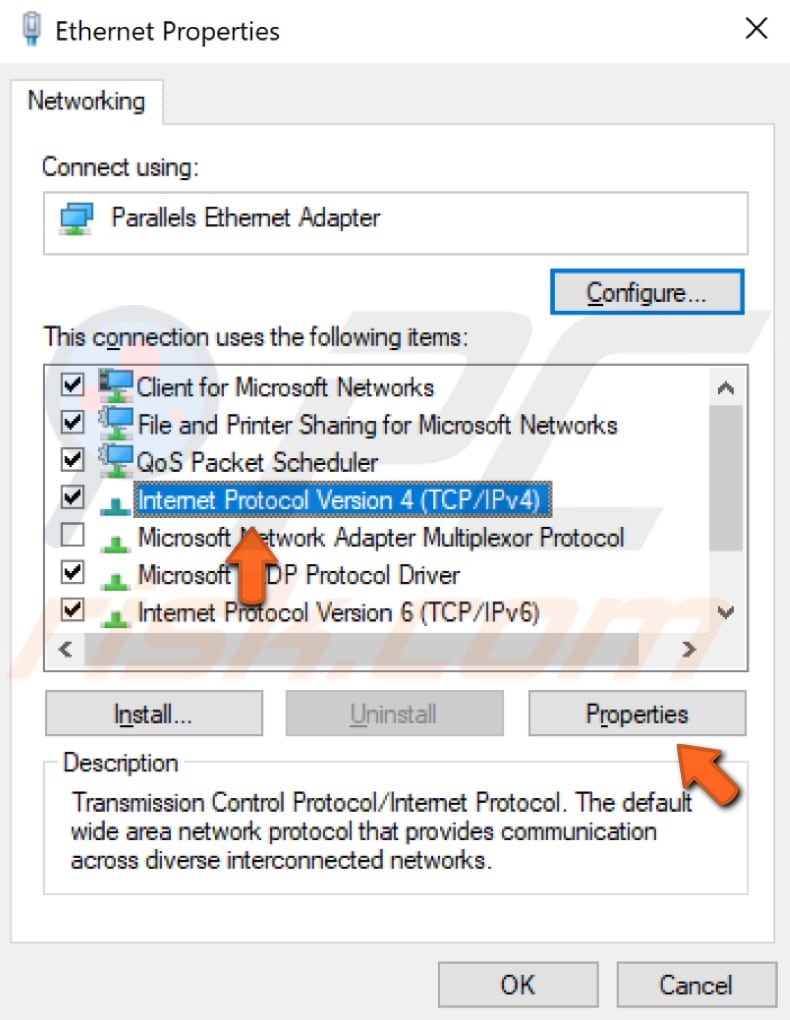
Right-click on your connection and select "Properties" from the drop-down menu.
Select "Internet Protocol Version 4 (TCP/IPv4)" and click "Properties".
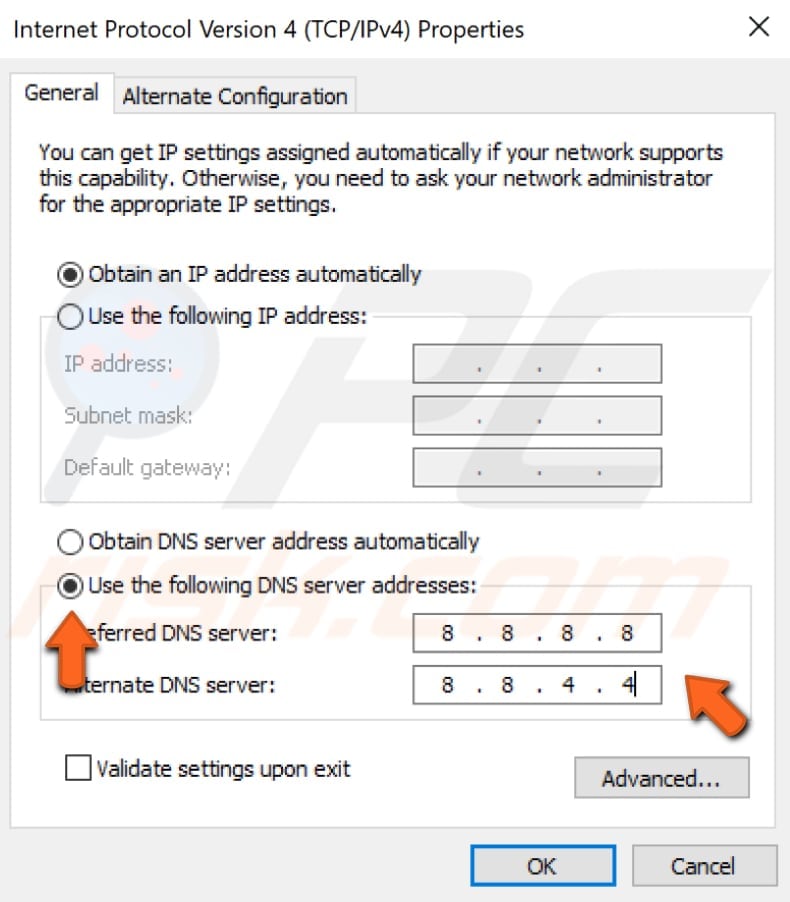
In the Internet Protocol Version 4 (TCP/IPv4) Properties window, select "Use the following DNS server addresses", enter 8.8.8.8 as the "Preferred DNS server" and 8.8.4.4 as the "Alternate DNS server". Click "OK" to save changes. Restart your computer and see if you are now able to connect to the Internet without any limitations.
Reset Network Configuration
This method includes running some other netsh sub-commands via Command Prompt launched as administrator. In this method, we will show you how to reset winsock and TCP/IP stack using a little bit different commands than we used previously.
Run Command Prompt as administrator again and type the following commands (do not forget to press Enter after each command):
netsh winsock reset catalog
netsh int ipv4 reset reset.log
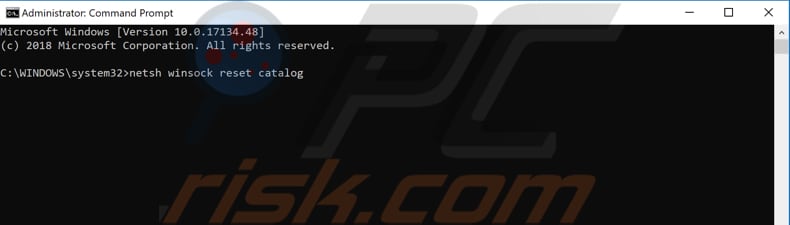
Restart your computer and see if executing these two commands solved the problem.
Adjust Power Management Options
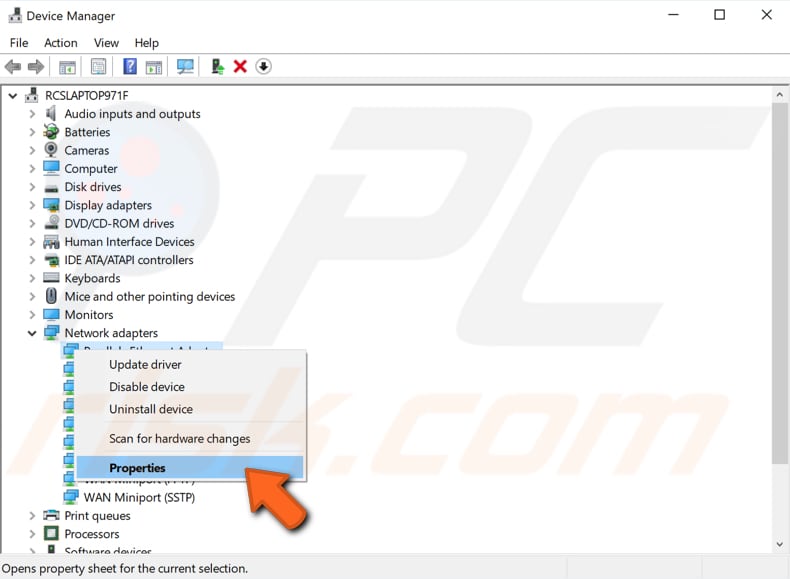
To adjust Power Management settings, you will need to open Device Manager again and expand the "Network adapters" section.
Right-click the network adapter and select "Properties" from the contextual menu (or simply double-click it).
In the network adapter properties window, find and click the "Power Management" tab and ensure that the "Allow the computer to turn off this device to save power" option is disabled.

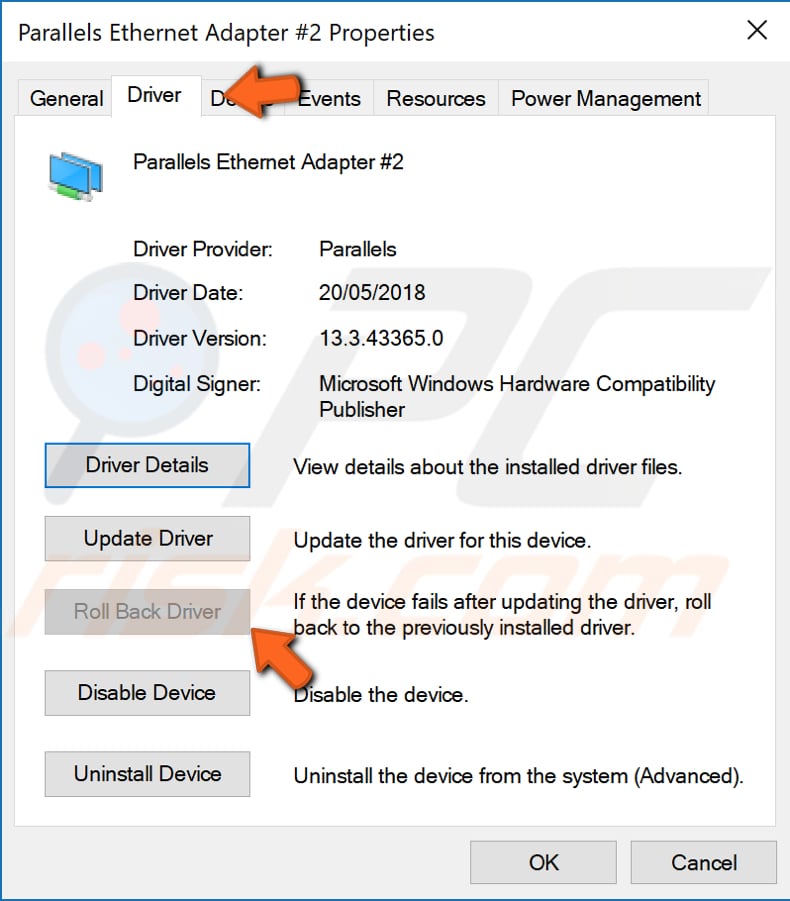
Roll Back Network Adapter Driver
Roll Back Driver is a Windows Device Manager feature that is available in all versions of Windows. This feature enables you to uninstall the currently-installed driver of a hardware device and then install the previously-installed driver. This feature is typically used when latest or newer drivers are not working properly.
If you started experiencing this limited connectivity problem after a Windows update, it is possible that Windows automatically updates your Network adapter driver, and it is not working properly.
To roll back drivers, go to Device Manager again (type "device manager" in Search and click the Device Manager result), expand the Network adapters category and right-click your network adapter. Select "Properties" from the contextual menu.

Now, select the "Driver" tab, click the "Roll Back Driver" button, and follow the instructions. If the button is greyed-out and you cannot click it, a previous driver version has not been installed for this device.
If you could roll back this driver, then restart your computer and see if you are still unable to connect to the Internet without any connectivity limitations.
That's it, we hope that one of the methods solved this limited connectivity or access problem for you can connect to the Internet without any problems. However, if none of the methods helped, you may need to check if there is no problem with the cables and if they are connected properly on both ends.
Share:

Rimvydas Iliavicius
Researcher, author
Rimvydas is a researcher with over four years of experience in the cybersecurity industry. He attended Kaunas University of Technology and graduated with a Master's degree in Translation and Localization of Technical texts. His interests in computers and technology led him to become a versatile author in the IT industry. At PCrisk, he's responsible for writing in-depth how-to articles for Microsoft Windows.
▼ Show Discussion