How to Fix The "Start Menu Not Working" Critical Error

Get Free Scanner and check your computer for errors
Fix It NowTo fix found issues, you have to purchase the full version of Combo Cleaner. Free trial available. Combo Cleaner is owned and operated by Rcs Lt, the parent company of PCRisk.com read more.
How to Fix the 'Start Menu Not Working' Critical Error on Windows 10?
The Start Menu is a significant user interface element used in Microsoft Windows that sometimes stops working. This article shows how to fix your Windows Start Menu not working.
The Start Menu is one of the most useful and used components of the Windows 10 operating system. Having problems with Start Menu can severely affect your user experience.
That doesn't mean that you can't use your Windows at all, since there are various roundabouts how to access files, folders, and so on. However, this is not a problem that you can ignore.
If you're getting a critical error that says "Critical Error – Start menu isn't working," we will show you how to fix this problem using different ways, and hopefully, it will help you resolve this error.
Video Showing How to Fix 'Start Menu Not Working' Critical Error:
Table of Contents:
- Introduction
- Uninstall Dropbox
- Boot Into Safe Mode
- End Local Security Authority Process
- Hide Cortana
- Disable Internet Explorer
- Run Start Menu Troubleshooter
- Run SFC and DISM Scans
- Reset Your Windows 10
- Video Showing How to Fix 'Start Menu Not Working' Critical Error
Download Computer Malware Repair Tool
It is recommended to run a free scan with Combo Cleaner - a tool to detect viruses and malware on your device. You will need to purchase the full version to remove infections. Free trial available. Combo Cleaner is owned and operated by Rcs Lt, the parent company of PCRisk.com read more.
Uninstall Dropbox
Dropbox is a file hosting service operated by an American company that offers cloud storage, file synchronization, personal cloud, and client software. This program is a common cause of getting the "Start menu not working" error since many users reported that uninstalling this program helped fix this problem.
If you have Dropbox installed on your Windows, we recommend uninstalling it and see if it was the reason why you are having problems with Start Menu.
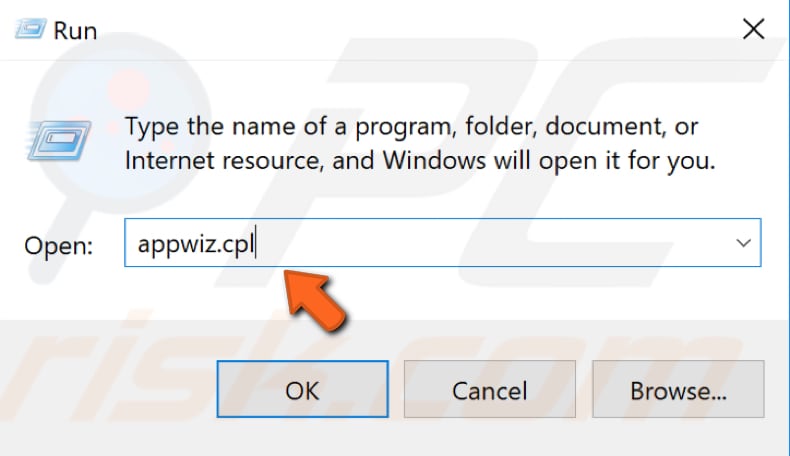
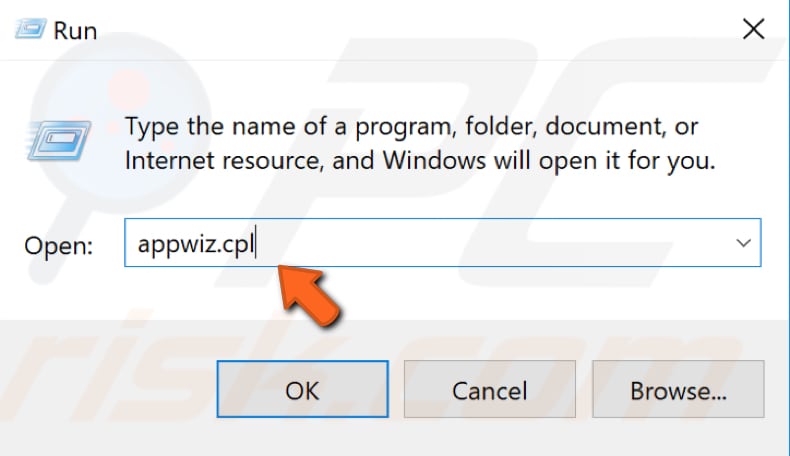
If your Start Menu is not working and you can't access Control Panel the traditional way, press Windows Key + R, and Windows will open the Run dialog box. Type "appwiz.cpl" and press Enter on your keyboard to launch the Programs and Features window.
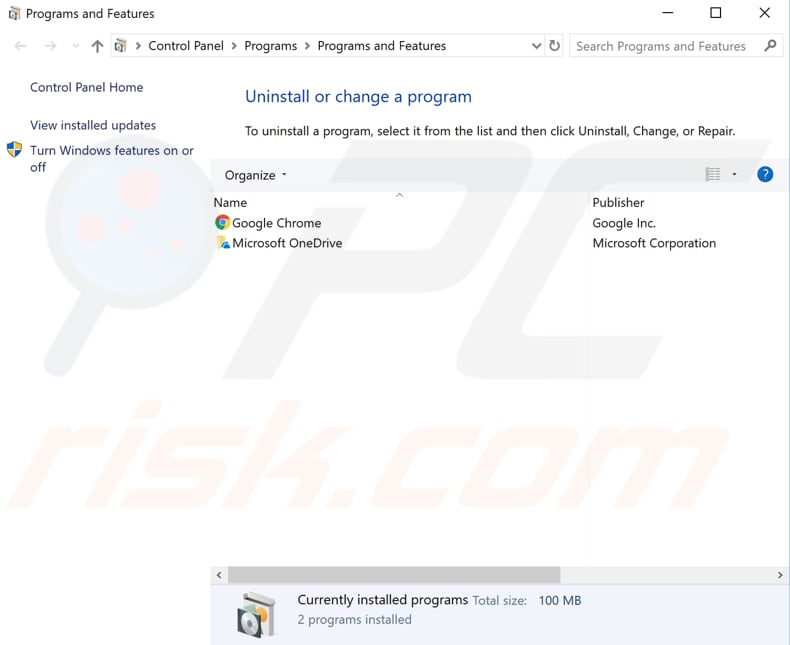
In the Programs and Features window, you will see a list of installed programs. Find Dropbox and uninstall it. Restart Windows to see if this helped to resolve the problem.
Boot Into Safe Mode
Safe Mode is a diagnostic start-up mode in Windows operating systems used to obtain limited access to Windows when the operating system does not start or function normally. One of the most common steps when troubleshooting a computer is to boot into Safe Mode.
Safe Mode starts Windows in a basic state, using a limited set of files and drivers. It can help to troubleshoot problems on your computer. If, for example, the problem does not occur in Safe Mode, this will confirm that the default settings and basic device drivers are not causing the issue.
It is quite common that booting Windows into Safe Mode helps fix this problem with the Start Menu. To boot into Safe Mode from Windows, press Windows Key + L. This will log you out from your local account. When on Sing In screen, click on the Power button and choose "Restart" while holding the Shift key on your keyboard. You can find other ways how to boot your Windows into Safe Mode here.

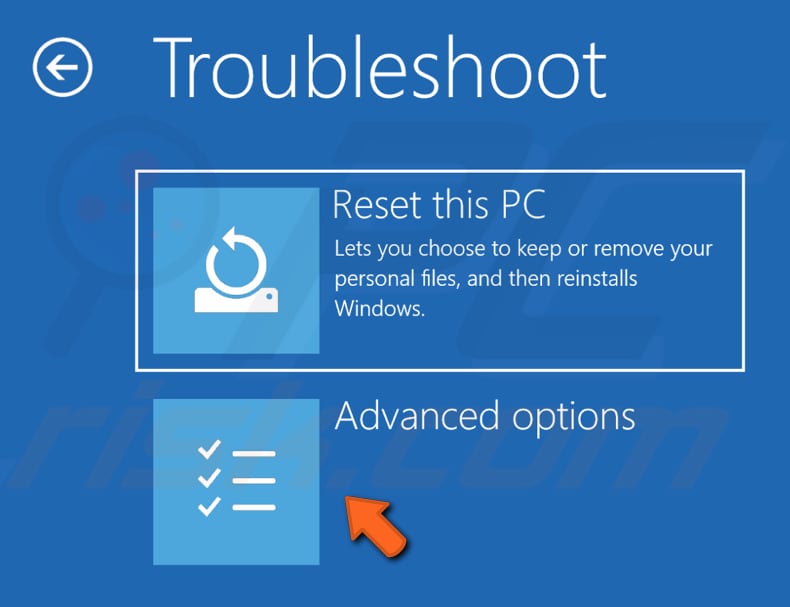
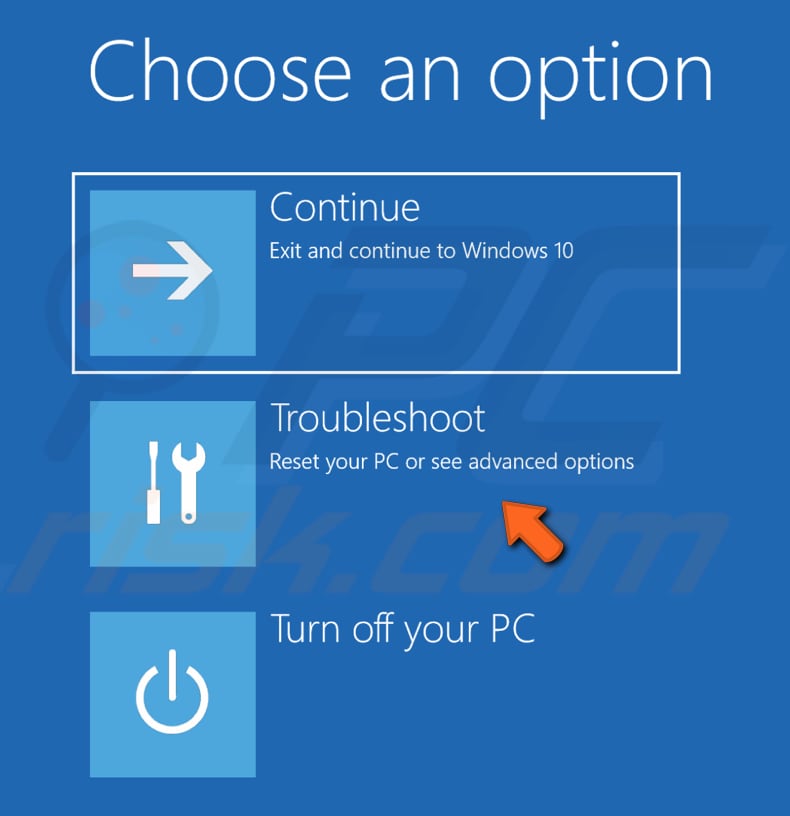
This will restart your Windows and open boot options. Select "Troubleshoot."

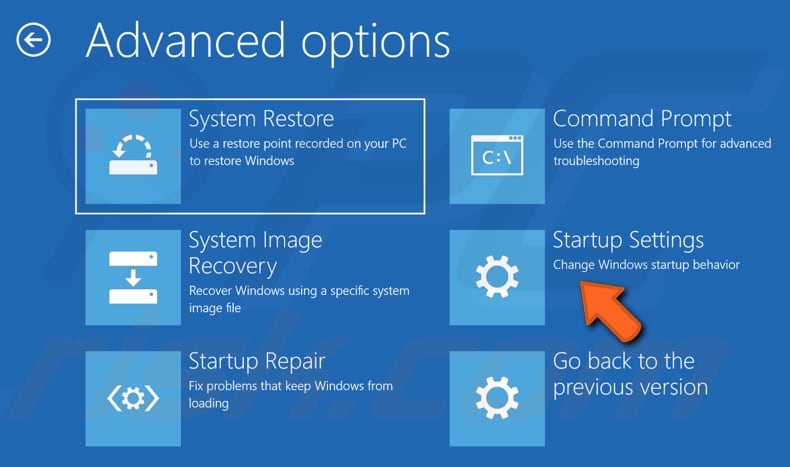
In Troubleshoot menu, click on "Advanced options."
In Advanced options, click on "Startup Settings."
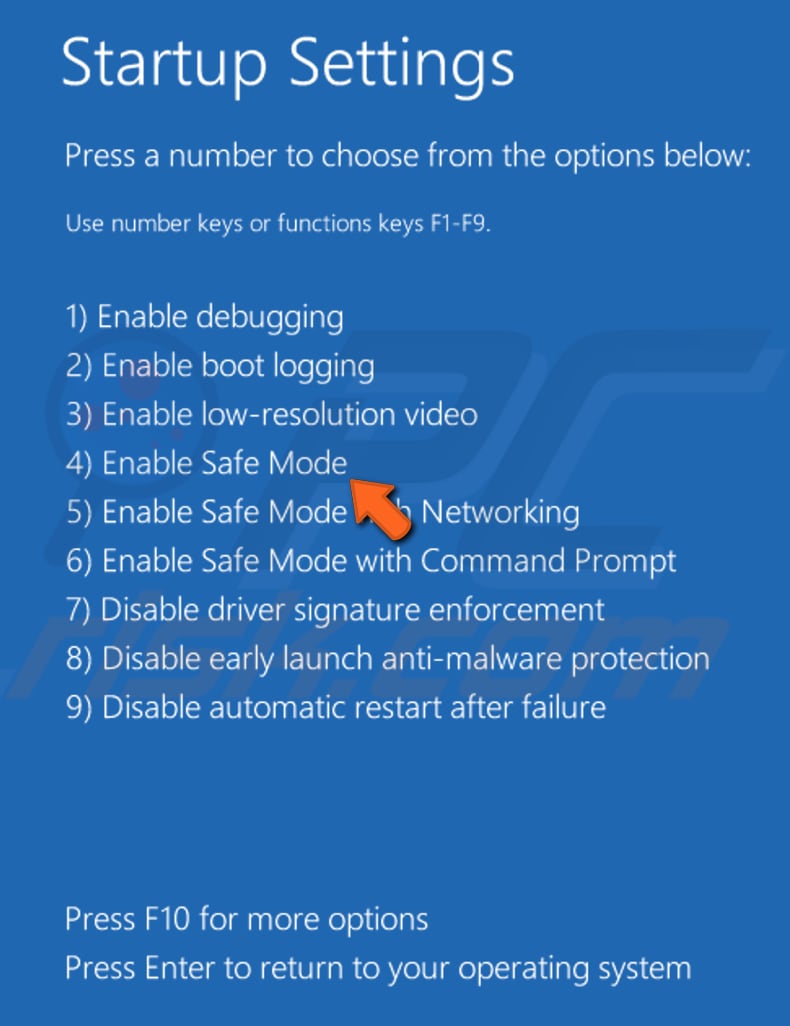
In Startup settings, click on "Restart," which will restart your Windows, and you will be able to enable Safe Mode.

Press number 4 or F4 on your keyboard to boot your Windows into Safe Mode.
Restart your computer after booting into Safe mode and see if you still have problems with the Start Menu.
Ending this process requires using Task Manager. Task manager is a system monitor program used to provide information about the processes and programs running on a computer and the general status of the computer. Some implementations can also be used to terminate processes and programs and change the processes' priority.
To open it, press Ctrl+Alt+Delete or Ctrl+Shift+Esc on your keyboard. When Task Manager is opened, click on the "Processes" tab and find "Local Security Authority Process." Right-click on it and choose "End task" from the dropdown menu.
Close Task Manager and restart your computer to see if this helped you fix the "Start menu not working" error.

Hide Cortana
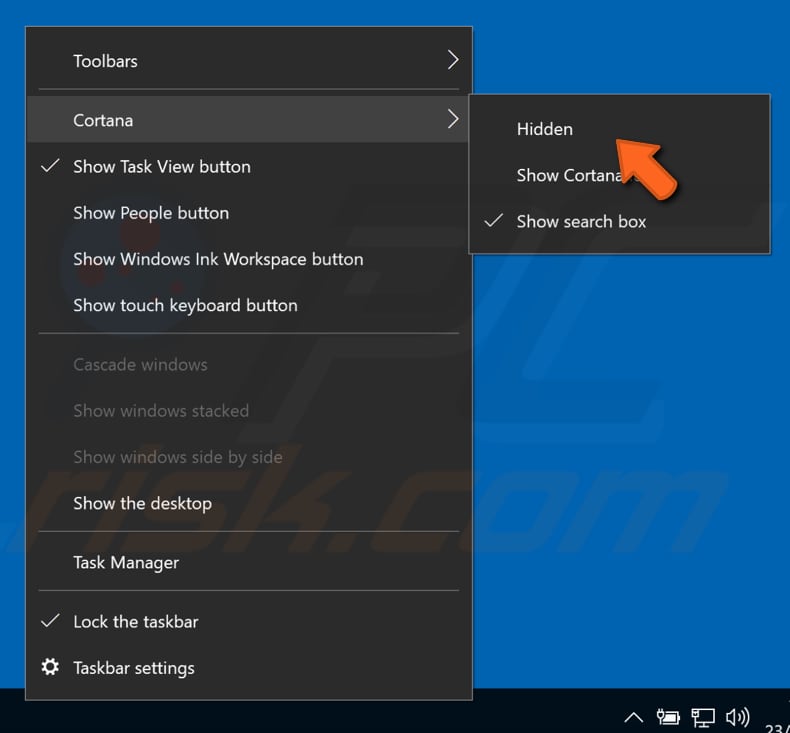
Cortana is a virtual assistant created by Microsoft, and sometimes hiding it helps resolve this problem with Start Menu. To hide Cortana, right-click on the Taskbar, select "Cortana," and click on "Hidden."
Turn Cortana on again. Right-click on your Taskbar and repeat the steps mentioned above. Change "Hidden" to "Show search box." Restart your computer to see if it helped to resolve the problem.
Disable Internet Explorer
Sometimes it is the Internet Explorer that causes this problem. Try disabling Internet Explorer. To disable it, press Windows Key + R to open the Run dialog box. In the Run dialog box, type "appwiz.cpl" and press Enter to launch Programs and Features.
In the Programs and Features window, click on "Turn Windows features on or off."
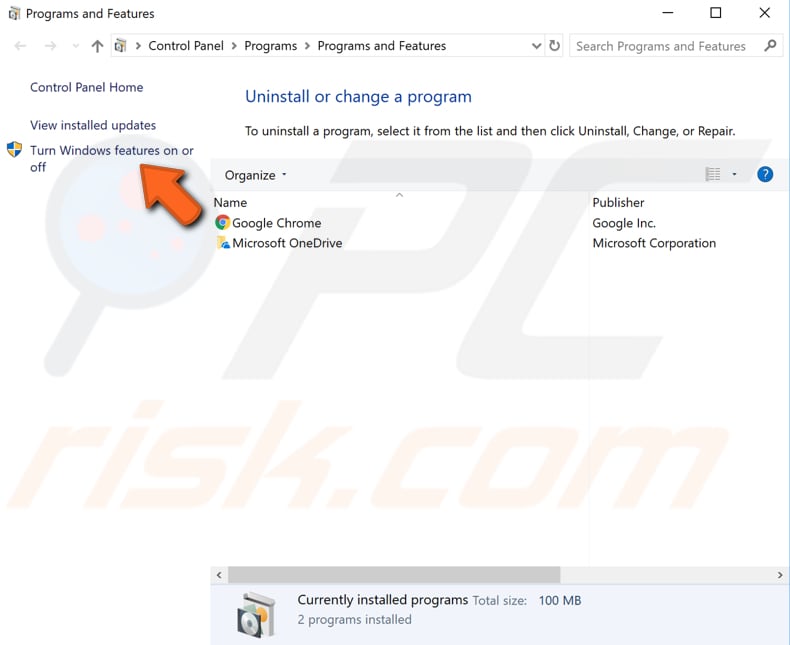
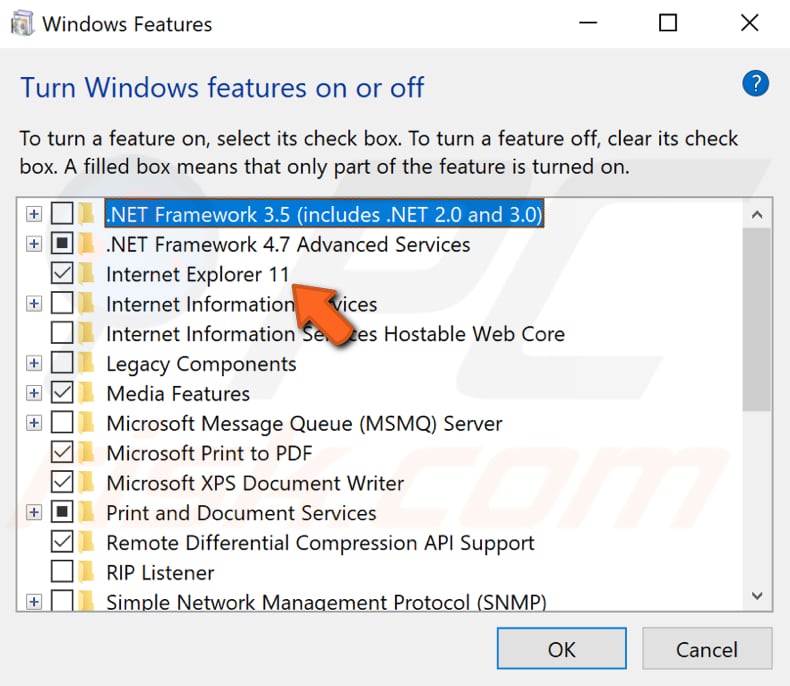
Find "Internet Explorer 11" on the list and unmark its checkbox. If you get a warning message, just click Yes. Click OK to save changes and restart your computer to see if this helped.
Microsoft has released a Start Menu Troubleshooter for Windows 10 that will troubleshoot and fix your Windows 10 Start Menu problems & issues automatically. Start Menu Troubleshooter will check if the Start Menu and Cortana are installed correctly and whether registry key permissions and database corruptions are in place etc. Install this troubleshooter and see if your problem can be fixed by it. You can download it here.
Run SFC and DISM Scans
System File Checker is a utility in Windows that allows users to scan for corruptions in Windows system files and restore corrupted files. This guide describes how to run the System File Checker tool (SFC.exe) to scan your system files and repair missing or corrupted system files. If a Windows Resource Protection (WRP) file is missing or is corrupted, Windows may not behave as expected. For example, some Windows functions may not work, or Windows may crash.
The "sfc /scannow" option is one of the several specific switches available in the SFC command, the Command Prompt command used to run System File Checker.
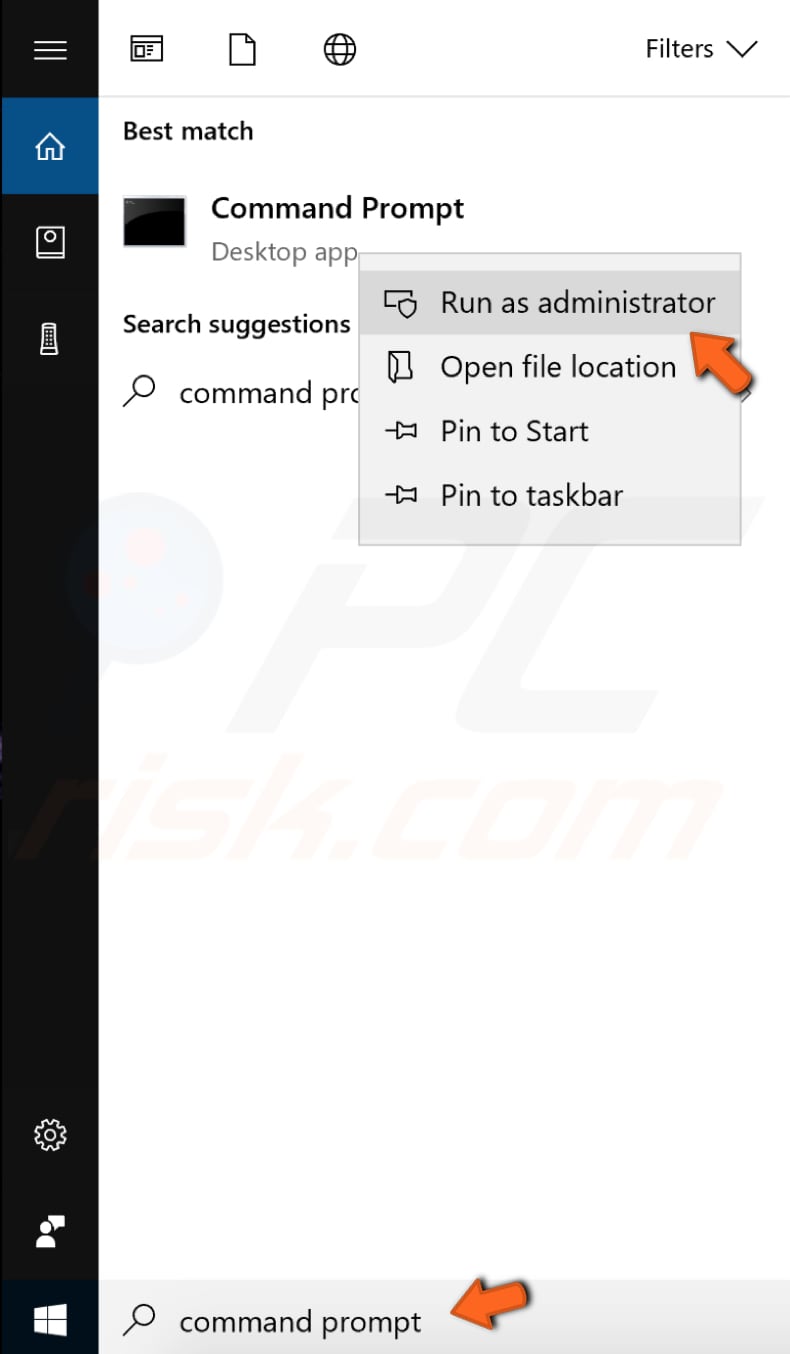
To run it, you need to open Command Prompt first. To open it, type "command prompt" in Search and then right-click on the "Command Prompt," select "Run as administrator" from the dropdown menu to run Command Prompt with administrator privileges. You must run an elevated Command Prompt to be able to perform an SFC scan.
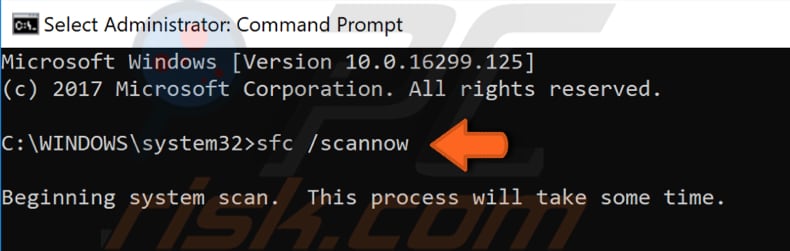
In opened Command Prompt window, type "sfc /scannow" and press Enter on your keyboard to execute this command. System File Checker will start, and it should take some time to complete the scan. It should take about 15 minutes. Wait for the scanning process to complete, and then restart your computer.
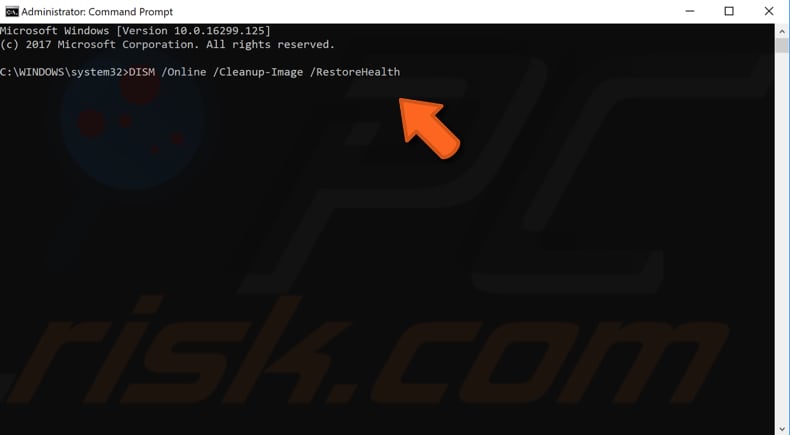
You might need to perform a DISM scan to fix the "Start menu not working problem." DISM stands for Deployment Image Servicing and Management, and it can be used to repair and prepare Windows images, including the Windows Recovery Environment, Windows Setup, and Windows PE.
To run a DISM scan, you need to open Command Prompt as administrator again and type in this command: "DISM /Online /Cleanup-Image /RestoreHealth." Press Enter on your keyboard to execute it.
Try restarting your computer after both tests and check if your Start Menu started working properly.
Reset Your Windows 10
This is the last thing you might want to do, but resetting your computer can help you fix this problem. Make sure that you tried out all of the methods mentioned above before going any further. By refreshing Windows 10, your downloaded files and applications might be deleted, so make sure to create a backup. To complete this step, you might need Windows 10 installation USB or DVD, so make sure to have one.
To reset your PC, press Windows Key + L to log out of your current account. When on Sing In screen, click on the Power button and choose "Restart" while holding the Shift key on your keyboard. This will restart your Windows and open boot options. Select "Troubleshoot."
In Troubleshoot menu, select "Reset this PC" and follow the instructions.

We hope one of the methods described in our guide helped you fix the "Start menu not working" error.
Share:

Rimvydas Iliavicius
Researcher, author
Rimvydas is a researcher with over four years of experience in the cybersecurity industry. He attended Kaunas University of Technology and graduated with a Master's degree in Translation and Localization of Technical texts. His interests in computers and technology led him to become a versatile author in the IT industry. At PCrisk, he's responsible for writing in-depth how-to articles for Microsoft Windows.
▼ Show Discussion