10 solutions to fix Migration Assistant errors on your Mac

Get Free Scanner and check your computer for errors
Fix It NowTo fix found issues, you have to purchase the full version of Combo Cleaner. Free trial available. Combo Cleaner is owned and operated by Rcs Lt, the parent company of PCRisk.com read more.
Get Migration Assistant up and running again in minutes!
Getting the Migration Assistant to work smoothly is key when moving your data to a new computer. Sometimes, though, it might not work as expected. Don't worry, you're not alone!
Many people face challenges with Migration Assistant. The good news is that this guide can help you get things moving smoothly again. Whether it's a connectivity issue, a software glitch, or something else entirely, I've got you covered.
So, let's not let these technical glitches dampen your spirits. In this guide, you'll explore how to troubleshoot and fix the problems to ensure your Migration Assistant works perfectly again.
Video on 10 solutions to fix Migration Assistant errors on your Mac
Table of Contents:
- Introduction
- Method 1. Check the internet connection
- Method 2. Restart Mac
- Method 3. Optimize your transfer
- Method 4. Troubleshoot connection issues
- Method 5. Set user account password
- Method 6. Turn off Firewall, antivirus and VPN
- Method 7. Resolve user account conflicts
- Method 8. Run Apple Diagnostics
- Method 9. Reset SMC
- Method 10. Reinstall macOS
- Video on 10 solutions to fix Migration Assistant errors on your Mac
Download Computer Malware Repair Tool
It is recommended to run a free scan with Combo Cleaner - a tool to detect viruses and malware on your device. You will need to purchase the full version to remove infections. Free trial available. Combo Cleaner is owned and operated by Rcs Lt, the parent company of PCRisk.com read more.
Check the internet connection
A stable Wi-Fi connection is important to make sure your Migration Assistant works smoothly, especially for wireless transfers. If the process is slow or won't start, there's a chance it's a connection hiccup.
1. Make sure both of your devices are connected to the same Wi-Fi network. Having them close to each other can also boost the strength of the connection.
2. Sometimes, all your network needs is a fresh start. Turning off your router, waiting a moment, and then turning it back on can restart your connection.
3. Ensure the Migration Assistant is up and running on both computers.
If, after these steps, you're still seeing messages like "Unable to connect," "Cannot find another Mac," or "Looking for other sources," it's time to consider a connection with cables.
Using a USB-C or Ethernet cable can be a game-changer for speed and reliability. A direct link between your computers minimizes interference and maximizes transfer efficiency.
Restart Mac
Error "Authentication failed, unable to retrieve credentials from authorizing user" often appears on the receiving Mac, and the transfer process is stopped. If you run into this error on the receiving Mac, restart it.
1. Close the Migration Assistant.
2. Navigate to the Apple menu at the top-left corner and select "Restart."
3. Once your Mac has restarted, open Migration Assistant and attempt the transfer once more. Often, a reboot is all it takes to smooth out those pesky authentication issues.
Optimize your transfer
While transferring apps might seem convenient, it significantly increases the transfer size, potentially leading to delays or even causing Migration Assistant to hang during startup.
1. When in the "Select Information to Transfer" window, look for the "Applications folder" option and uncheck it.
2. Click "Continue" to transfer without the apps.
3. Once the transfer is complete, you can easily install your essential apps on the new Mac.
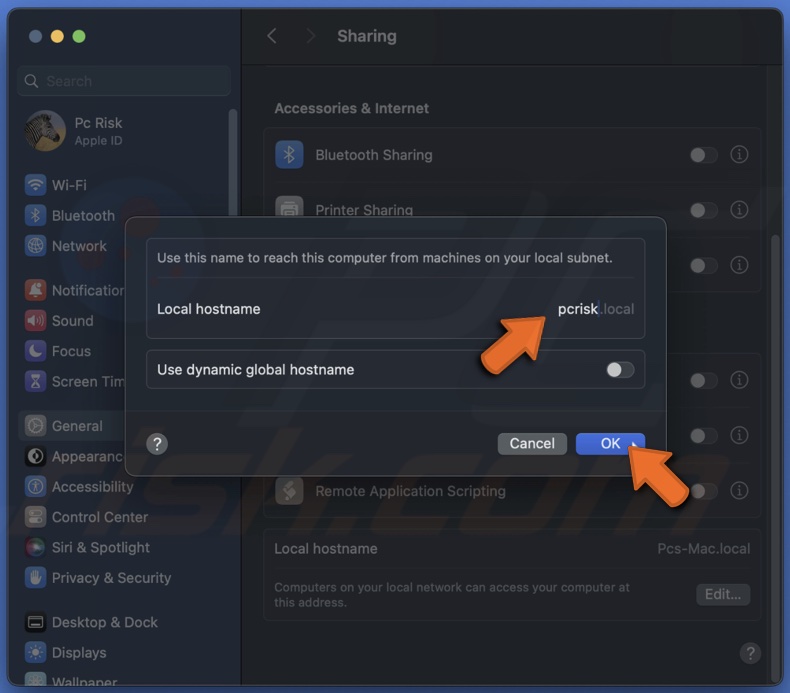
Troubleshoot connection issues
If you encounter an "Unable to Connect" error, it's likely because the source Mac lacks a hostname in its Sharing settings. The new Mac relies on this to locate its target files.
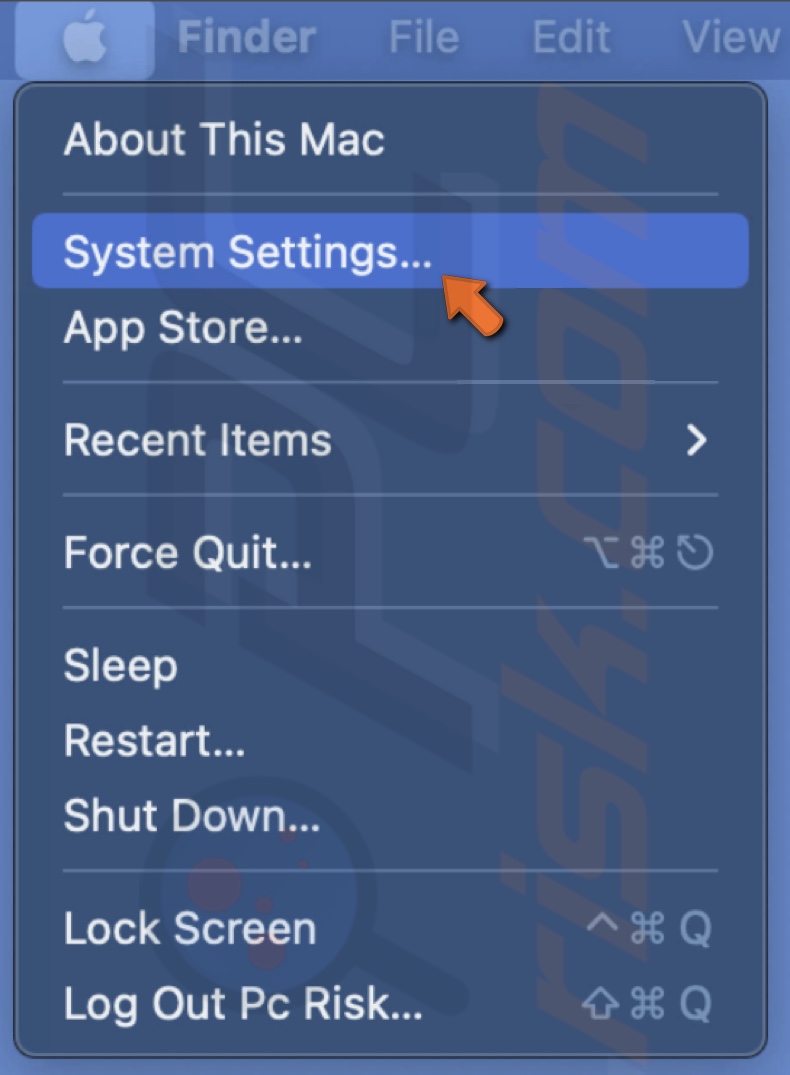
1. Open the Apple menu by clicking the Apple logo.
2. Choose "System Settings".
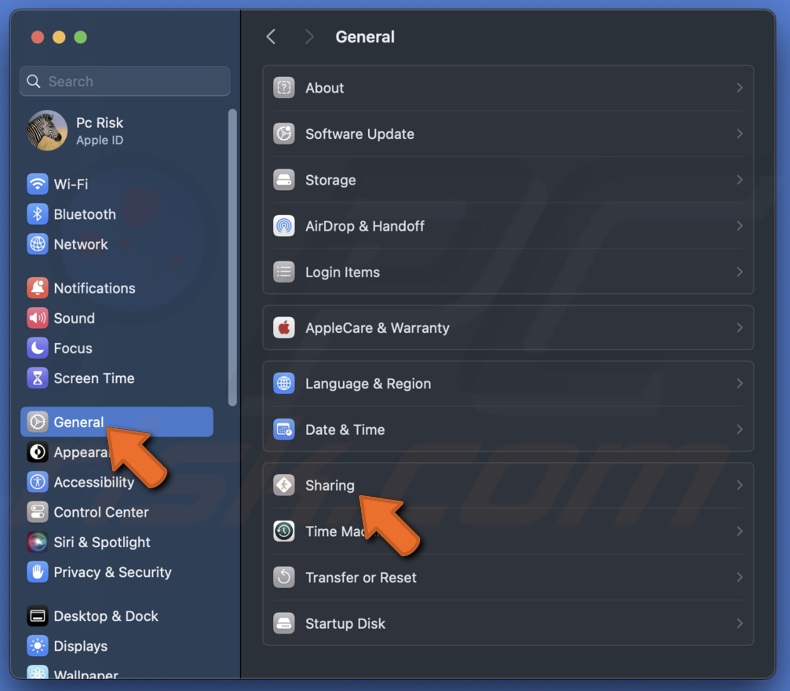
3. Click on the "General" section on the left panel and select "Sharing".
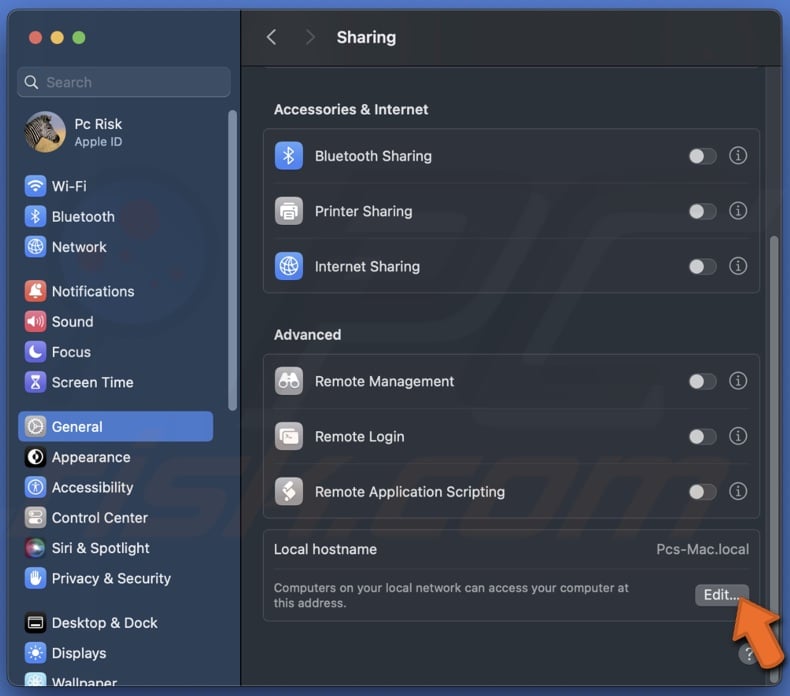
4. Scroll down to find and click on the "Edit "button near the bottom right.
5. Enter a new hostname. Ensure it's distinct from the one on your new Mac to avoid any conflicts.
6. Click "OK" to save your changes.
Set user account password
Apple places a high emphasis on the privacy and security of its users. As part of this commitment, the Migration Assistant requires both the old and new Macs to have login passwords to ensure a secure data transfer.
If your new Mac doesn't have a user account login password, you might run into the error message "This Mac can't be used to migrate data". Setting up a login password or updating your existing one can help bypass this hurdle.
1. Open the System Settings from the Apple menu.
2. Click the "Users & Groups" section on the sidebar.
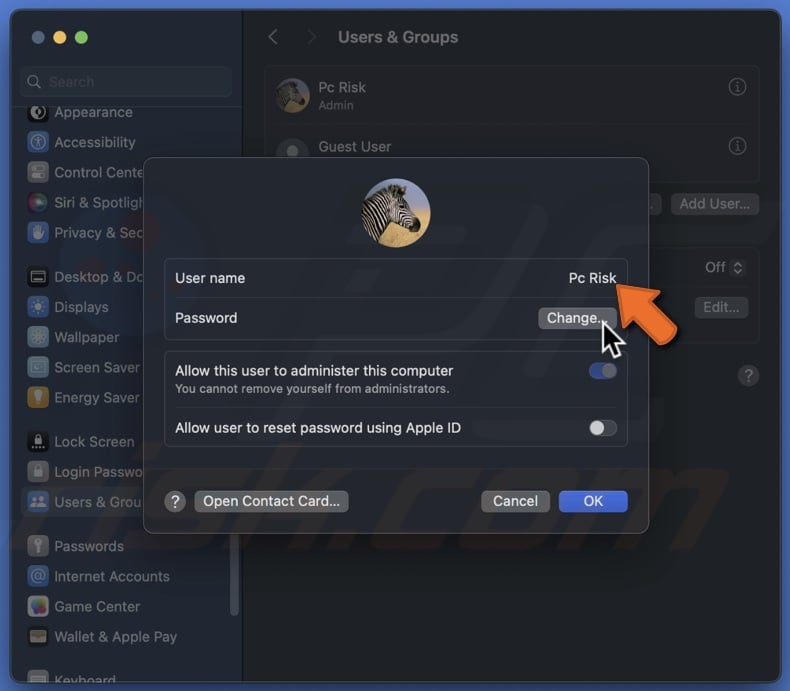
3. Next to your username, there's an info icon. Click on it to open the settings specific to your user account.
![]()
4. Within your account settings, locate the "Change" button next to the "Password" field.
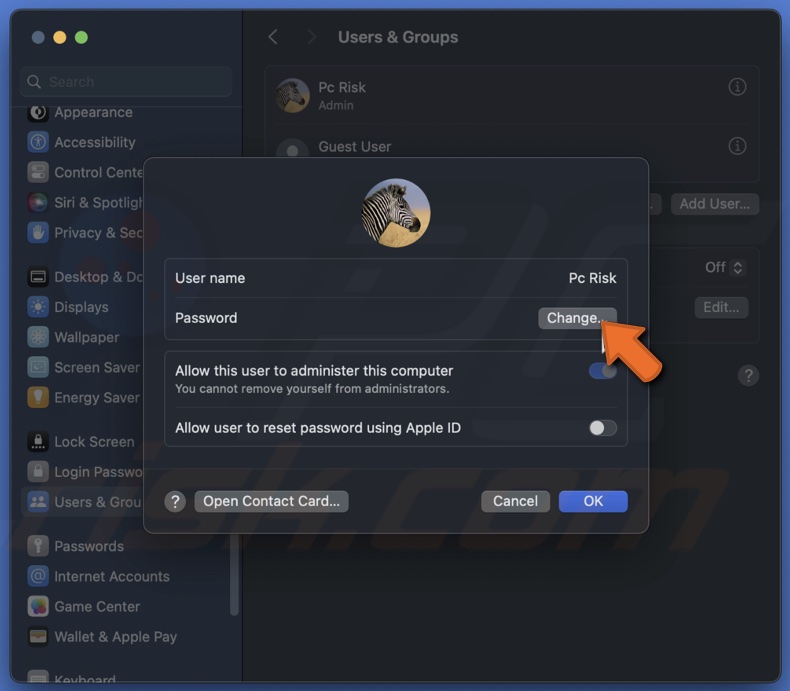
5. You will now be prompted to fill in the details required to set up your password.
6. Once you've filled out the necessary fields, click "Change Password" to confirm your new password.
7. After you've successfully updated your login password, give your Mac a quick restart. Then, try initiating the data transfer again with Migration Assistant.
Turn off Firewall, antivirus and VPN
To ensure your file transfer goes as smoothly as silk, we will take a moment to temporarily turn off some of the security features on your computer. These include the Firewall and any antivirus software you might have running.
While these tools are fantastic for keeping your Mac safe from unwanted intrusions, they can sometimes interfere with the transfer process.
Firewall:
1. Navigate to System Settings from the Apple logo and click "Network".
2. Look for the "Firewall "option.
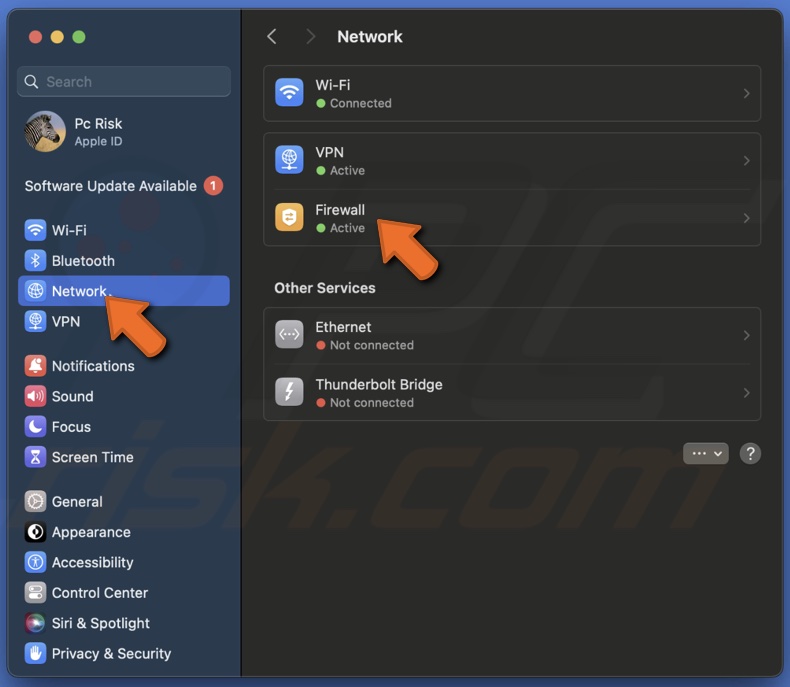
3. Toggle the Firewall to the off position.
Antivirus Software:
Since the steps can vary greatly depending on the antivirus software you're using, the best approach is to open the software and look for an option to turn it off temporarily.
If you're unsure how to do this, a quick search with the name of your antivirus followed by "how to disable" should provide you with straightforward instructions.
VPN:
1. Click the Apple logo, select "System Settings", and navigate to "VPN".
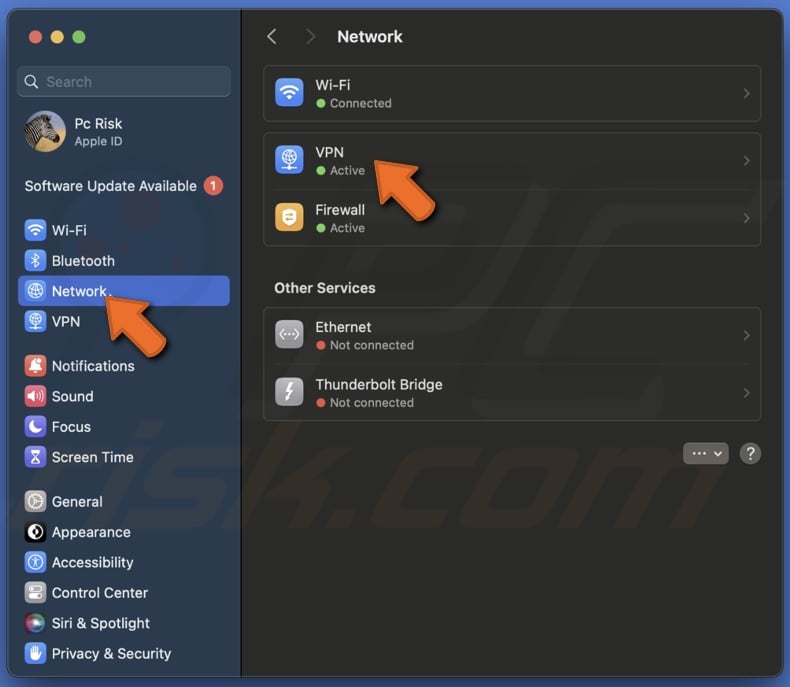
2. Next to your VPN, toggle the switch to turn it off.
After your transfer is successfully completed, remember to turn your Firewall and antivirus software back on.
Resolve user account conflicts
When using Migration Assistant to restore data from a Time Machine backup, you might encounter a "Conflicts Detected" message. It usually happens if user accounts with the same name on both Mac computers are involved in the process. But don't worry! You have a couple of options to sort this out.
Rename a user account
If you'd prefer to keep both user accounts but distinguish between them, renaming one account is the simplest solution. This way, you can easily identify and keep the files separate for each account.
1. Click the Apple logo and open "System Settings".
2. Go to "Users & Groups" and click the info icon next to your account.
![]()
3. Next to "User name", enter a new name for your account.
4. Click "OK" to save the changes.
Remove the conflicting user account
Alternatively, if you find that one of the user accounts is no longer needed, you can choose to remove it from one of the Macs.
1. When the "Conflicts Detected" message appears, click on the popup to begin resolving the issue.
2. The system will guide you through the next steps, depending on whether you're renaming or removing a user account. Just follow the on-screen instructions.
Run Apple Diagnostics
Apple Diagnostics is a great tool to help identify any underlying hardware or software issues with your Mac.
1. Press and hold the Power button. Wait for the startup options window to appear before releasing the button.
2. Next, press and hold the Command and D keys together on your keyboard.
3. A prompt will appear asking for your agreement to proceed. Click "I agree" to let Apple Diagnostics do its thing.
4. Allow some time for the hardware test to run its course. Once completed, you'll receive a report containing one or more diagnostic codes. These codes are your clues to what might be wrong.
5. Note these diagnostic codes and click "Get Started".
6. Finally, click the "Restart" button to reboot your Mac. It's like giving your Mac a fresh start after its check-up.
7. Now contact Apple Support and share these codes with the technician. The codes will give valuable insights into your Mac's condition, paving the way for a quicker solution. You can also Google them and try to find the solution on your own.
Reset SMC
For those using an Intel-based Mac, resetting the System Management Controller additionally might be what your Mac needs. The SMC is responsible for many low-level functions on Intel Macs, and resetting it can resolve various issues, including authentication problems with Migration Assistant.
To reset SMC depending on your Mac's type, go to my guide on How to Reset Your Mac's SMC?
Reinstall macOS
Sometimes, starting fresh is exactly what your new Mac needs. This process cleans out everything on your Mac's hard drive and addresses any logical issues, giving you a fresh start.
Before we dive into the steps, make sure to back up any essential data so you won't lose it.
1. Use Time Machine or your preferred backup method to secure all your important files before proceeding.
2. With your data backed up, restart your Mac and immediately hold the Command + R keys.
3. Release the keys when the Apple logo comes into view. It boots your Mac into Recovery Mode.
4. In Recovery Mode, you'll see the macOS Utilities window. Here, choose the "Reinstall macOS" option and click "Continue".
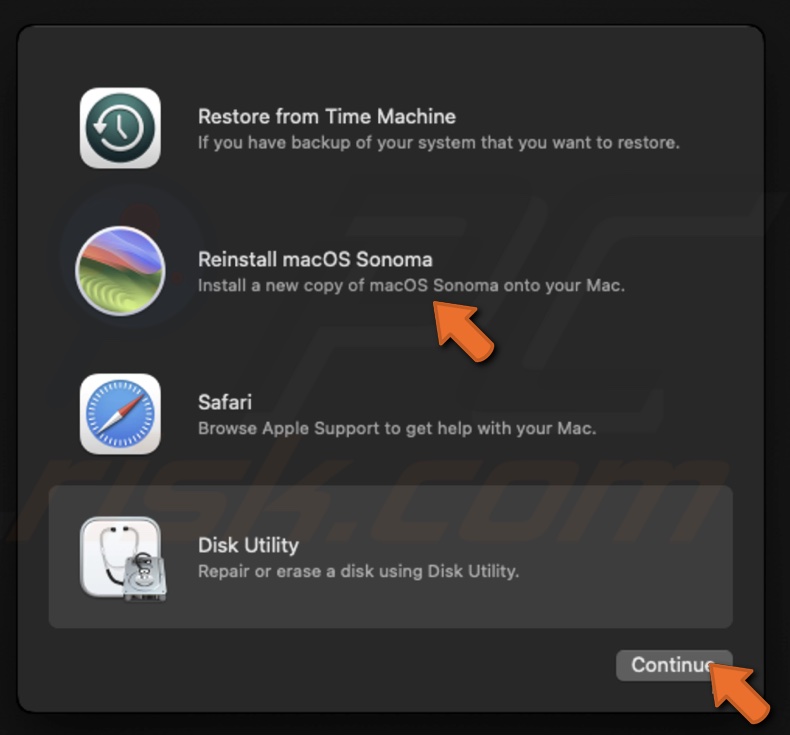
5. Click "Continue" and follow the on-screen prompts to begin the reinstallation process.
6. The installer will guide you through the steps to reinstall macOS. Your Mac may restart several times during this process, which is perfectly normal.
I hope the solutions I shared helped get your Migration Assistant up and running smoothly again. If you have any questions, please leave a comment below.
Share:

Karolina Peistariene
Author of how-to guides for Mac users
Responsible for collecting, analyzing, and presenting problem-solving solution articles related to macOS issues. Years of macOS experience combined with solid research and analyzing skills help Karolina provide readers with working and helpful solutions as well as introduce various features Mac has to offer.
▼ Show Discussion