Can't connect to Wi-Fi on your Mac? Try these 10 solutions!

(updated)
Get Free Scanner and check your computer for errors
Fix It NowTo fix found issues, you have to purchase the full version of Combo Cleaner. Free trial available. Combo Cleaner is owned and operated by Rcs Lt, the parent company of PCRisk.com read more.
10 ways to diagnose and fix Wi-Fi problems on your Mac
Internet connection is an important part of our daily life. It lets you connect with friends, family, colleagues, etc. Most jobs also require the usage of the web in one way or another. But sometimes, you might encounter issues with the Wi-Fi connection. If you recently updated your Mac to macOS Monterey and Wi-Fi stopped working, you've come to the right place.
In this guide, you'll find out what could be the cause of Wi-Fi not working and how to fix it. Some issues can be easily solvable, while others are deeper, and it might be more difficult for you to fix the problem. Make sure to follow the steps carefully, and you should be good.
Video on Can't connect to Wi-Fi on your Mac? Try these 10 solutions!
Table of Contents:
- Introduction
- Method 1. Restart the router
- Method 2. Restart your Mac
- Method 3. Re-add your Wi-Fi network
- Method 4. Update your Mac
- Method 5. Switch to a 5GHz band
- Method 6. Run Wireless Diagnostics
- Method 7. Run Apple Diagnostics
- Method 8. Change the DNS servers
- Method 9. Change DNS settings
- Method 10. Reset SMC and PRAM/NVRAM
- Video on Can't connect to Wi-Fi on your Mac? Try these 10 solutions!
Download Computer Malware Repair Tool
It is recommended to run a free scan with Combo Cleaner - a tool to detect viruses and malware on your device. You will need to purchase the full version to remove infections. Free trial available. Combo Cleaner is owned and operated by Rcs Lt, the parent company of PCRisk.com read more.
Restart the router
If your Wi-Fi stops working, the first thing you should do is restart your router. It's a pretty simple process. Find the button at the back of the router and press it to turn the router off. Wait for a few seconds and press the button again to turn the router on.
You can also unplug it entirely from the power source and plug it back in after a few seconds. It will also reset your router.
Restart your Mac
Another quick and simple thing you can do is to restart your Mac. A restart can get rid of any minor bugs and glitches that might've occurred during the time your Mac was turned on. In many cases, a simple restart can help you solve multiple issues that your Mac encounters.
To restart your Mac click on the Apple logo and select "Restart". Then, confirm the action by clicking on "Restart".
Re-add your Wi-Fi network
If you're Wi-Fi still doesn't work as it should, forget the network and then re-add it.
To re-add Wi-Fi, follow the steps below:
1. Click on the Apple logo.
2. Select "System Preferences".
3. Then, go to "Network".
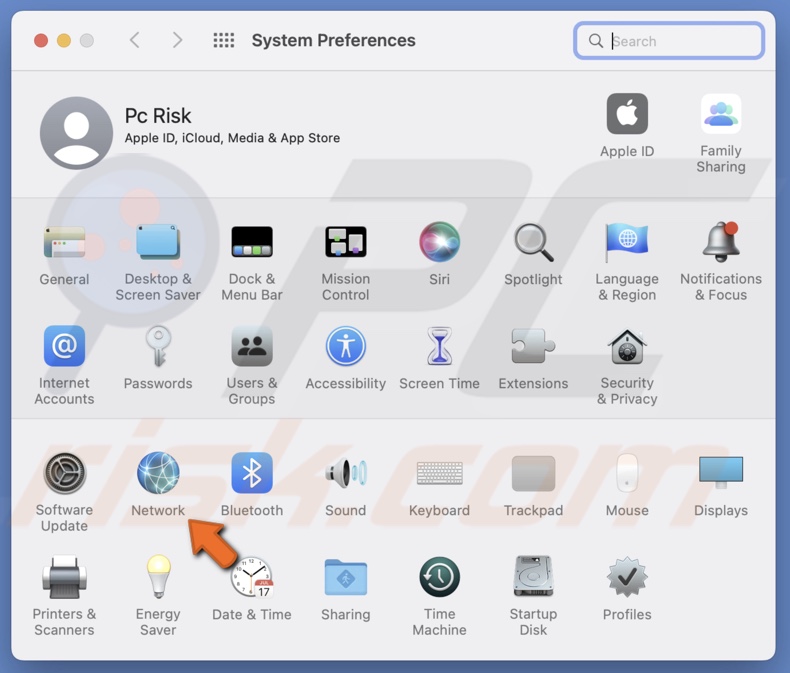
4. On the left sidebar, select your Wi-Fi connection and click on "Advanced".
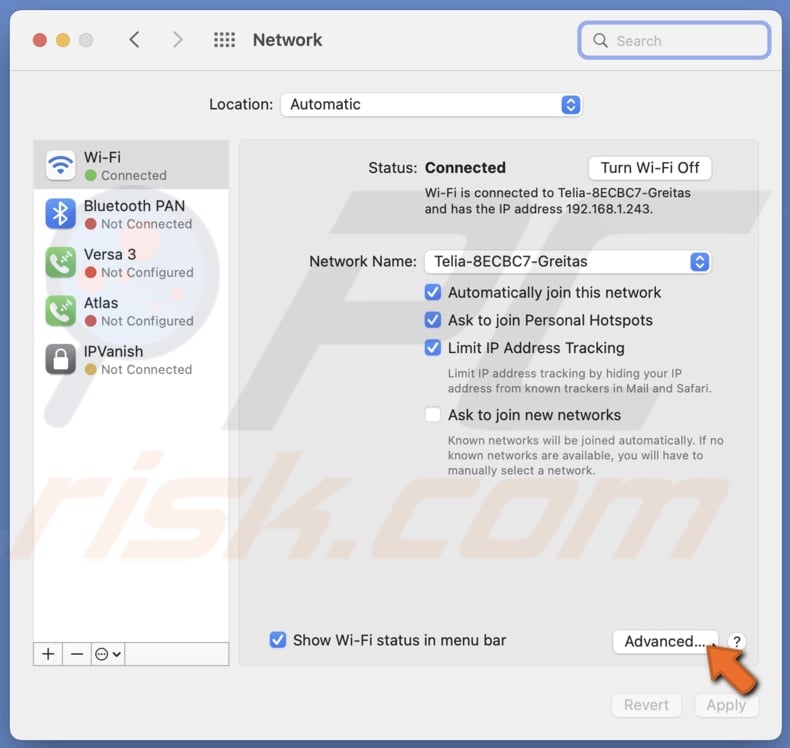
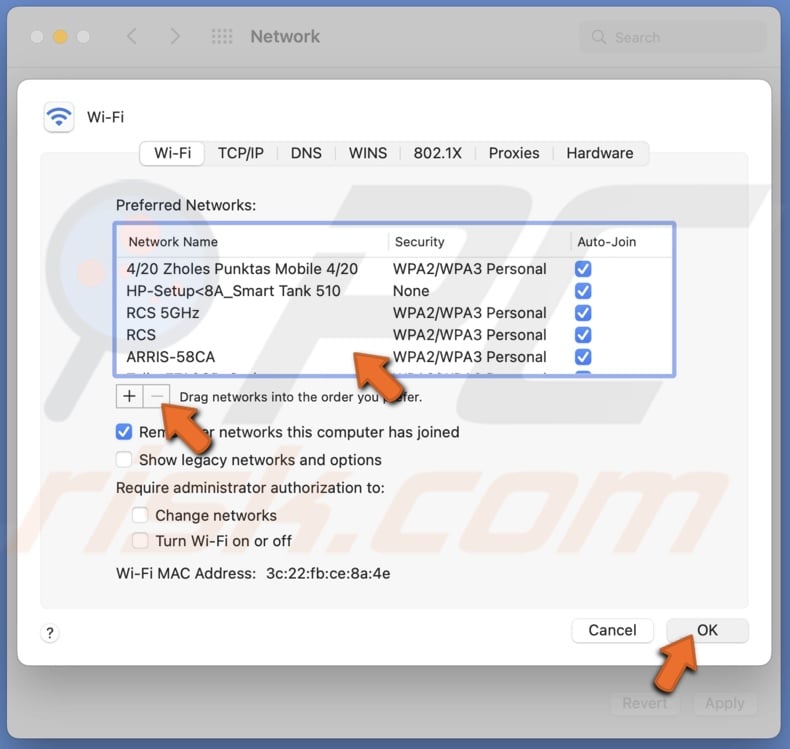
5. In the "Wi-Fi" tab, under "Preferred Networks", select your Wi-Fi.
6. Then, click on the minus (-) button to forget it.
7. Click on "OK" and on "Apply".
8. Then, click on the plus (+) button.
9. Next to "Interface", select "Wi-Fi" and click on "Create".
10. Next to the "Network Name", select your Wi-Fi.
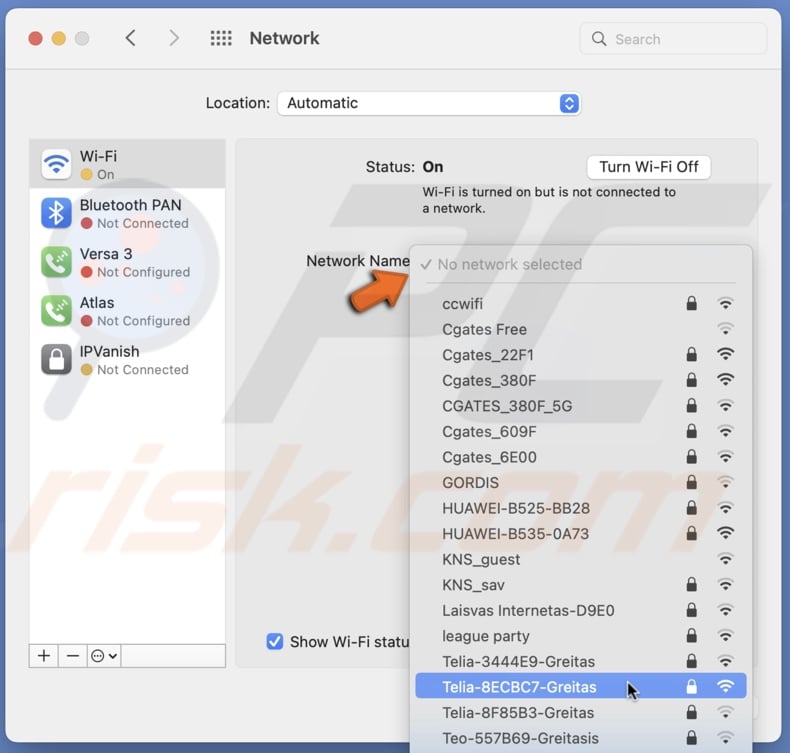
11. Enter the Wi-Fi password and click on "Join".
Update your Mac
Check if your Mac has any updates available. If it does, we recommend updating the operating system as it could solve the Wi-Fi problem, especially if the issue is in Mac's software.
To update your Mac, follow the steps below:
1. Click on the Apple logo and select "System Preferences".
2. Then, go to "Software Update".
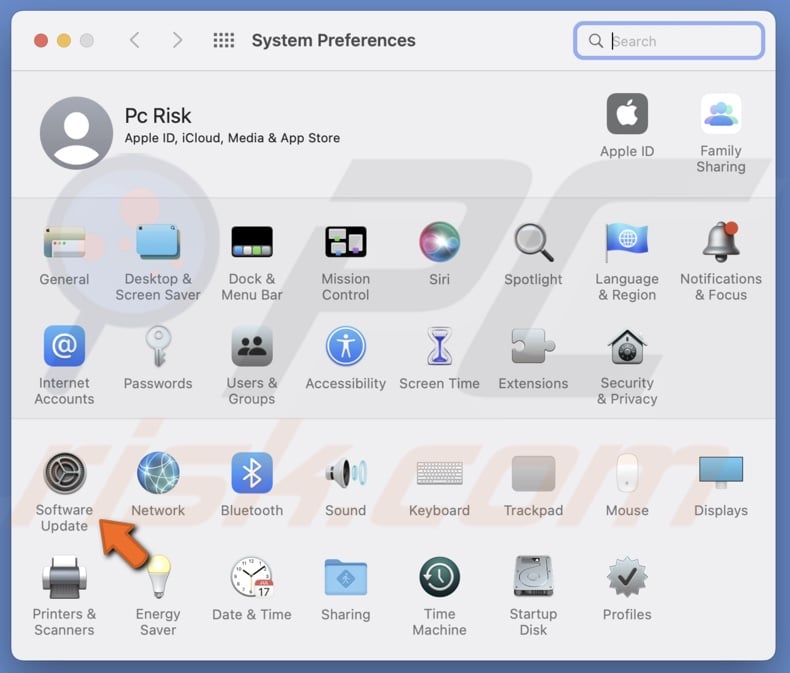
3. Wait while your Mac searches for updates. If found any, click on "Update Now".

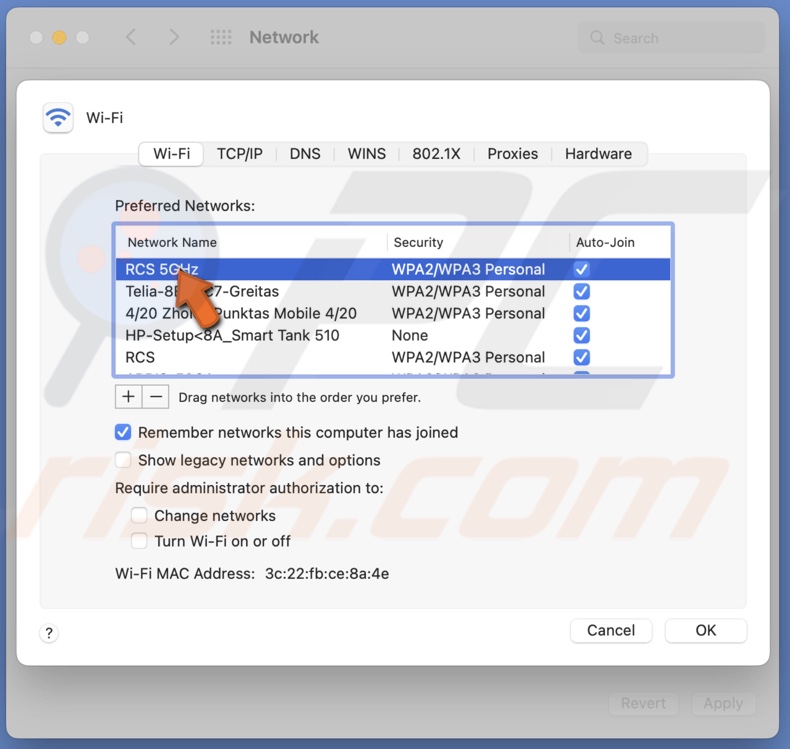
Switch to a 5GHz band
If you have a dual-band router, you can also try to switch from the 2.4GHz band to the 5GHz band. The 5GHz is more efficient and has more bandwidth. Make sure to separate the 2.4GHz and 5GHz networks and give them different names so you can recognize them.
To join the 5GHz network, follow the steps below:
1. From the menu bar, click on the Apple logo.
2. Click on "System Preferences".
3. Then, go to "Network".
4. On the right side, click on the "Advanced" button.
5. In the Wi-Fi tab, under "Preferred Networks", locate your 5GHz network and drag it to the top, so your Mac joins it.
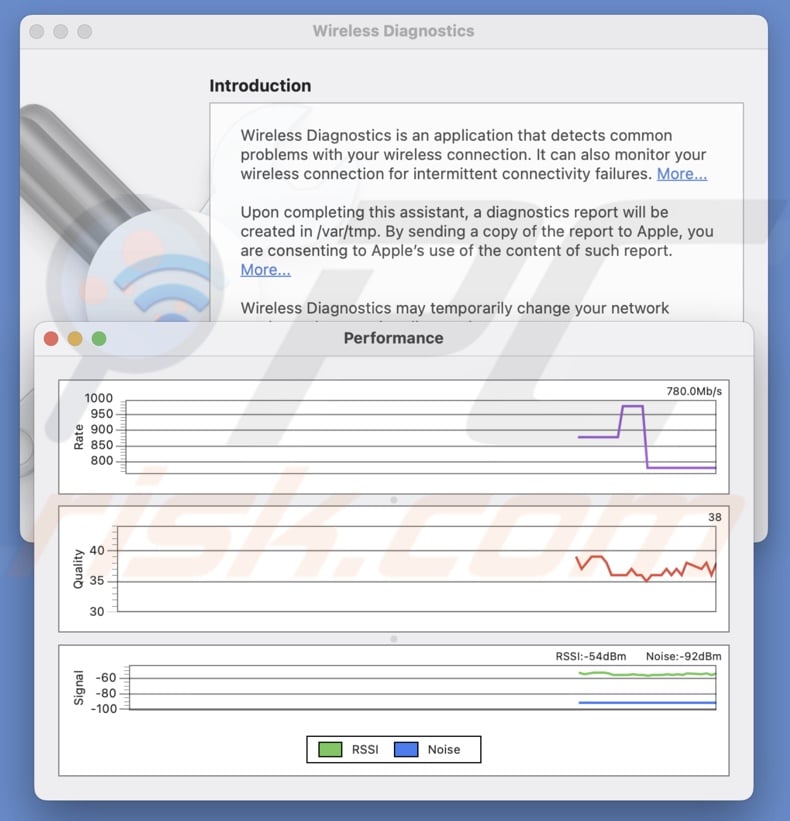
Run Wireless Diagnostics
If the issue with Wi-Fi remains, we recommend running Wireless Diagnostics. It will detect problems your Wi-Fi has run into.
To run Wireless Diagnostics, follow the steps below:
1. Open Wireless Diagnostics. Use Spotlight to do so.
2. From the menu bar, click on "Window".
3. Then, select "Performance".
4. The Wi-Fi performance window will appear. You'll see you're network's rate, quality, and signal strength.
5. All graphs should be more or less consistent.
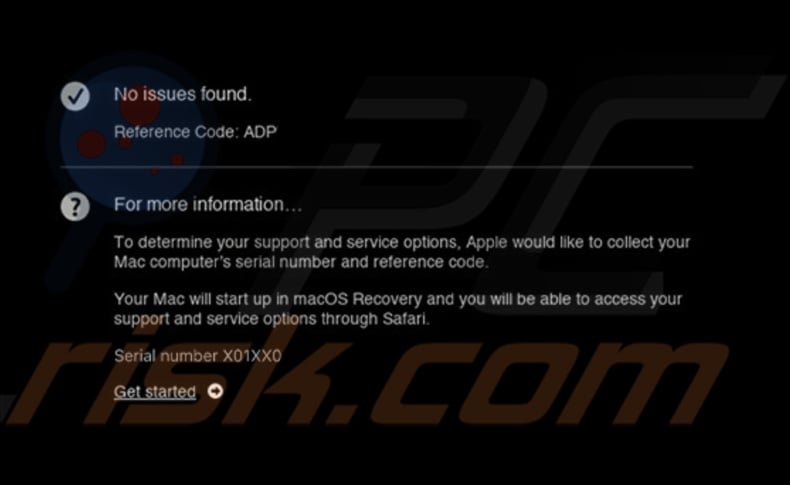
Run Apple Diagnostics
If Apple Diagnostics were no help, run Apple Diagnostics. It can help you indicate a more serious problem.
Before launching Apple Diagnostics, you need to do these steps:
Turn off your Mac.
Disconnect all additional devices. You can keep your mouse, keyboard, monitor, and ethernet connections.
Make sure your Mac is on a stable and even surface.
To run Apple Diagnostics for Intel processor, follow the steps below:
1. Press the Power button on your Mac.
2. When your Mac starts to boot, press the D key on your keyboard.
3. When asked to choose the language, release the D key and select your language.
4. When the hardware test is initialized successfully, wait for about 2-5 minutes to get the diagnostics report.

5. Make sure to write down the report codes you get. You can then google the meaning of the code or contact Apple Support, and they will explain it to you.
To run Apple Diagnostics for Apple Silicon, follow the steps below:
1. Press the Power button on your Mac.
2. When you see the startup options window, release the Power button.
3. Press and hold the Command + D keys combination on your keyboard.
4. Click on "I agree".
5. When the hardware test is initialized successfully, wait for about 2-5 minutes to get the diagnostics report.
6. Make sure to write down the report codes you get. You can then google the meaning of the code or contact Apple Support, and they will explain it to you.
Click on the "Run the test again" option to rerun Apple Diagnostics.
Click on "Restart" or "Shut Down" to exit Apple Diagnostics.
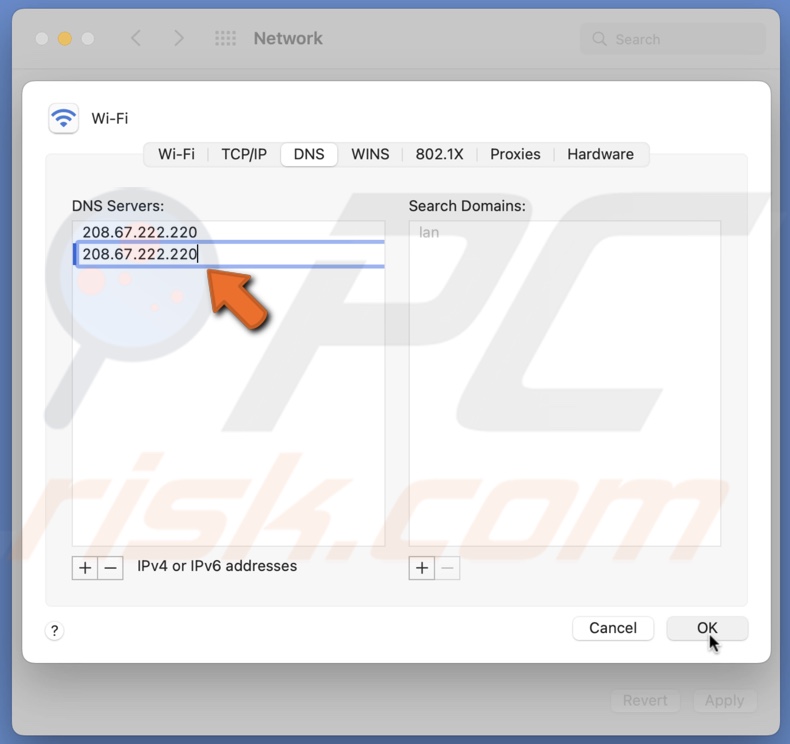
Change the DNS servers
For Wi-Fi to work correctly, it's important that DNS works as well. Try to change the DNS servers and check if Wi-Fi starts working.
To change DNS, follow the steps below:
1. From the menu bar, click on the Apple logo.
2. Click on "System Preferences".
3. Then, go to "Network".
4. Choose your Wi-Fi, and on the right side, click on the "Advanced" button.
5. Go to the "DNS" tab.
6. Now, click on the plus (+) button and enter the 208.67.222.220 server.
7. Click on the plus (+) button again and enter the same server for the second time.
8. When done, click on "OK" and then on "Apply".
Change DNS settings
If nothing helps, change your Wi-Fi DNS settings.
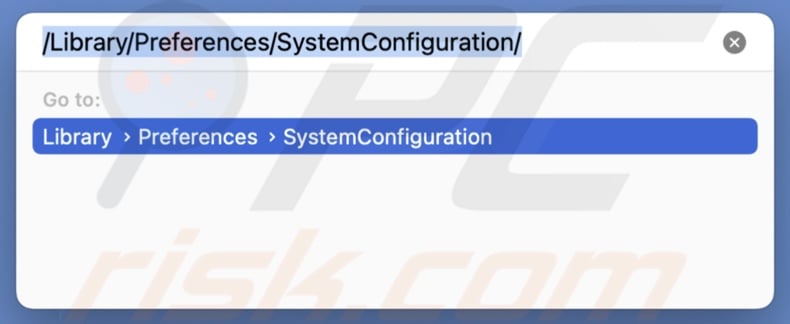
To change DNS settings, follow the steps below:
1. From the menu bar, click on "Go" and select "Go to Folder".
2. In the path bar, enter: /Library/Preferences/SystemConfiguration/
3. Then, select these files:
com.apple.airport.preferences.plist
com.apple.network.identification.plist
com.apple.wifi.message-tracer.plist
NetworkInterfaces.plist
preferences.plist
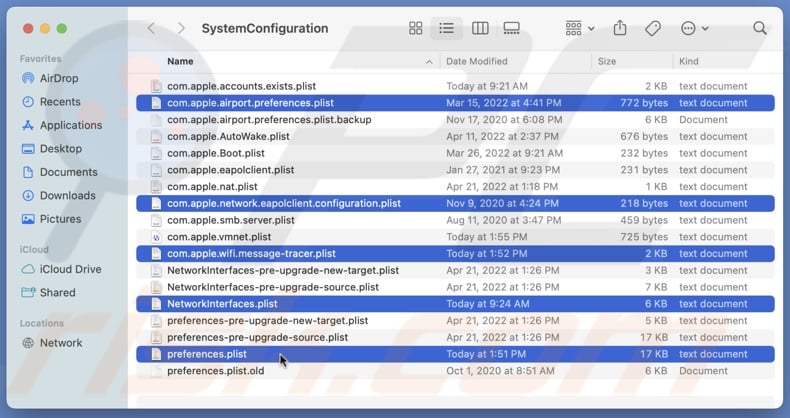
4. Drag them to a separate folder for backup.
5. Now. delete the selected files from the SystemConfiguration folder.
When done, check if Wi-Fi starts working. If not, create a new Wi-Fi location. Before doing that, close all applications using the network, like your browser.
To create a new Wi-Fi location, follow the steps below:
1. From the menu bar, click on the Apple logo.
2. Select "System Preferences".
3. Then, go to "Network".
4. Select your Wi-Fi, and next to "Location", select "Edit Locations".
5. Click on the plus (+) button.
6. name the new location and click on "Done".
7. Then, click on the "Advanced" button and go to the "TCP/IP" tab.
8. Click on "Renew DHCP Lease" and select "Apply".
9. Then, go to the "DNS" tab and click on the plus (+) button.
10. Add the 8.8.8.8 and 8.8.4.4 servers.
11. When done, go to the "Hardware" tab.
12. Next to "Configure", select "Manually".
13. Next to "MTU", select "Custom".
14. In the box, enter 1453 and click on "OK".
15. Then, click on "Apply".
Reset SMC and PRAM/NVRAM
The last thing you can try is to reset the System Management Controller and Parameter Random Access Memory/Nonvolatile Random-Access Memory. They might help solve the Wi-Fi problem.
To reset the SMC on your Mac, visit our guide on How to Reset Your Mac's SMC?
To reset the PRAM/NVRAM on your Mac, follow the steps below:
1. Shut down the Mac.
2. Turn it on and simultaneously hold the Option, Command, P, and R buttons. Keep holding this combination for at least 20 seconds. Your computer should appear to be restarting.
We hope this guide provided you with the information you were looking for, and it helped you fix issues with your Wi-Fi connection.
Share:

Karolina Peistariene
Author of how-to guides for Mac users
Responsible for collecting, analyzing, and presenting problem-solving solution articles related to macOS issues. Years of macOS experience combined with solid research and analyzing skills help Karolina provide readers with working and helpful solutions as well as introduce various features Mac has to offer.
▼ Show Discussion