How to encrypt your Mac with FileVault?

Get Free Scanner and check your computer for errors
Fix It NowTo fix found issues, you have to purchase the full version of Combo Cleaner. Free trial available. Combo Cleaner is owned and operated by Rcs Lt, the parent company of PCRisk.com read more.
How to encrypt your Mac, external drives, and files on Mac?
Due to the increased number of hackers and government tracking, more and more users a concerned for the safety of their data. Even though you get a new security feature with every operating system update, it's still not enough to keep your data from unwanted eyes. Hence the encryption feature.
Your Mac has a built-in feature called FileVault that allows you to encrypt your whole computer and makes it difficult for outsiders to decipher the data. They would first have to break down the encryption wall to access it.
This guide shows you how to encrypt your Mac, external driver, and individual files.
Video on How to encrypt your Mac with FileVault?
Table of Contents:
- Introduction
- Before encrypting your Mac
- How to encrypt Mac with FileVault?
- How to encrypt external drives on Mac?
- How to encrypt files on Mac?
- Video on How to encrypt your Mac with FileVault?
Download Computer Malware Repair Tool
It is recommended to run a free scan with Combo Cleaner - a tool to detect viruses and malware on your device. You will need to purchase the full version to remove infections. Free trial available. Combo Cleaner is owned and operated by Rcs Lt, the parent company of PCRisk.com read more.
Before encrypting your Mac
Before starting to encrypt your Mac and its files, there are a few things you need to know and be prepared for. Even though encryption can help keep the data on your Mac more secure, there are certain risks.
The encryption of your Mac can slow down the read and write speed. That means your files might take longer to save and open.
Another thing to take into consideration is unforeseen errors. If something goes wrong when encrypting data, you might lose all of it. That's why we recommend backing up your Mac. That way, you won't panic if something happens, and you'll be able to restore the files.
How to encrypt Mac with FileVault?
In this step, we will show you how to encrypt your whole Mac. For it to work, you'll need to enable FileVault. It's a built-in disk encryption program.
To encrypt your Mac with FileVault, follow the steps below:
1. From the menu bar, click on the Apple logo.
2. Go to "System Preferences".
3. Then, go to "Security & Privacy".
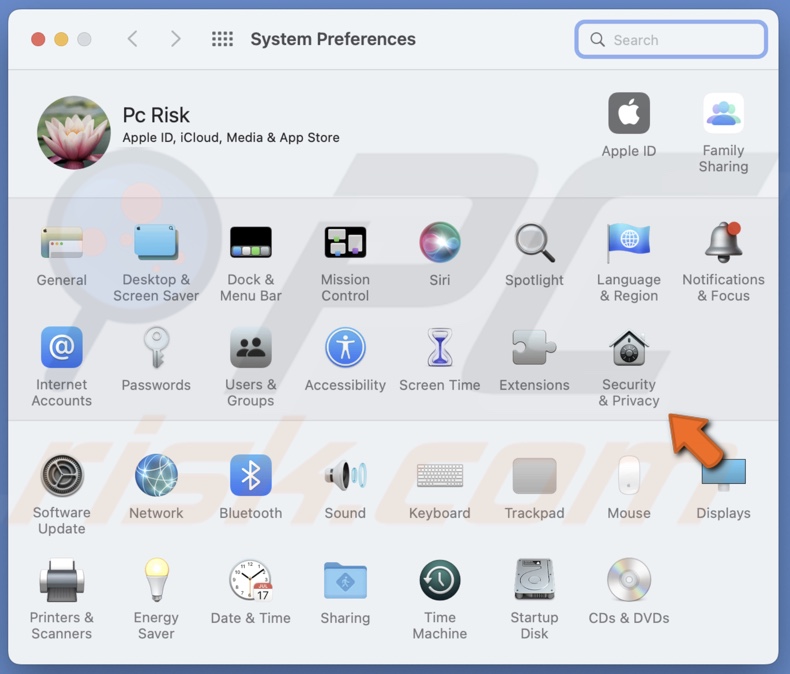
4. Select the "FileVault" tab.
5. At the bottom left corner, click on the lock icon and enter your Mac's password.
6. Next, click on the "Turn On FileVault" button.
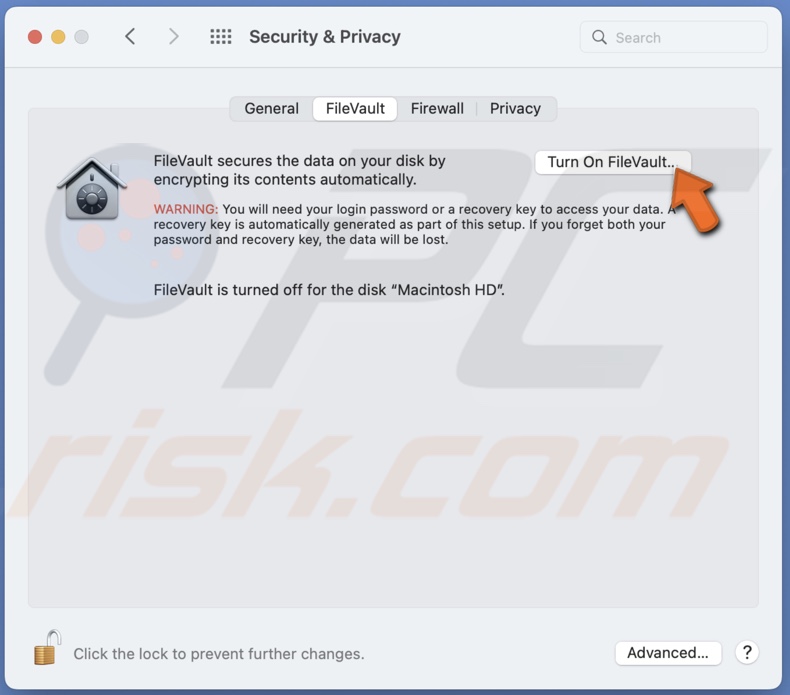
7. Then, you'll need to choose if you want to use iCloud to unlock your disk or create a recovery key. Choose the one you prefer and click on "Continue".
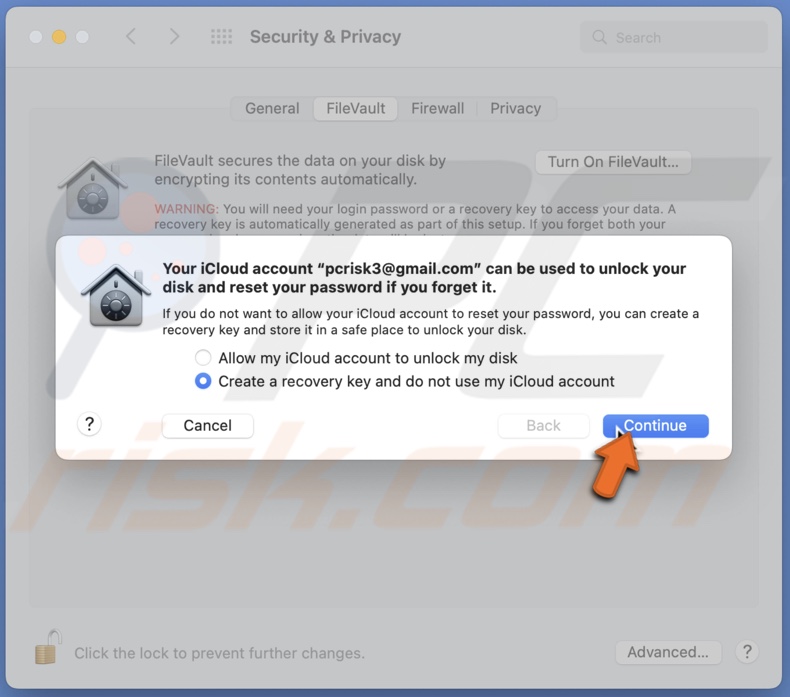
8. If you choose to create a recovery key, you'll see it in the next window. Make sure to save it somewhere safe in case you need it in the future.
9. Click on "Continue".
10. The FileVault will start the encryption process. Depending on how much data you have, the encryption can take from a few minutes to a couple of days. You can use your Mac normally while FileVault encrypts your Mac in the background.
11. When the encryption is done, you'll see a message stating that FileVault is turned on.
12. Restart your Mac to finish the encryption.
If you decide you don't need to keep your Mac encrypted, you can disable the encryption in the Mac preferences.
To disable the encryption, follow the steps below:
1. From the menu bar, click on the Apple logo.
2. Go to "System Preferences".
3. Then, go to "Security & Privacy".
4. Select the "FileVault" tab.
5. At the bottom left corner, click on the lock icon and enter your Mac's password.
6. Next, click on the "Turn Off Encryption" button and confirm the action.
How to encrypt external drives on Mac?
If you want to encrypt the external drive, you first need to format it as Mac OS Extended (Journaled). If you don't know how to do that, go to our guide on How to Format an External Hard Drive on Mac?
To encrypt an external drive on Mac, follow the steps below:
1. Connect the external drive to your Mac.
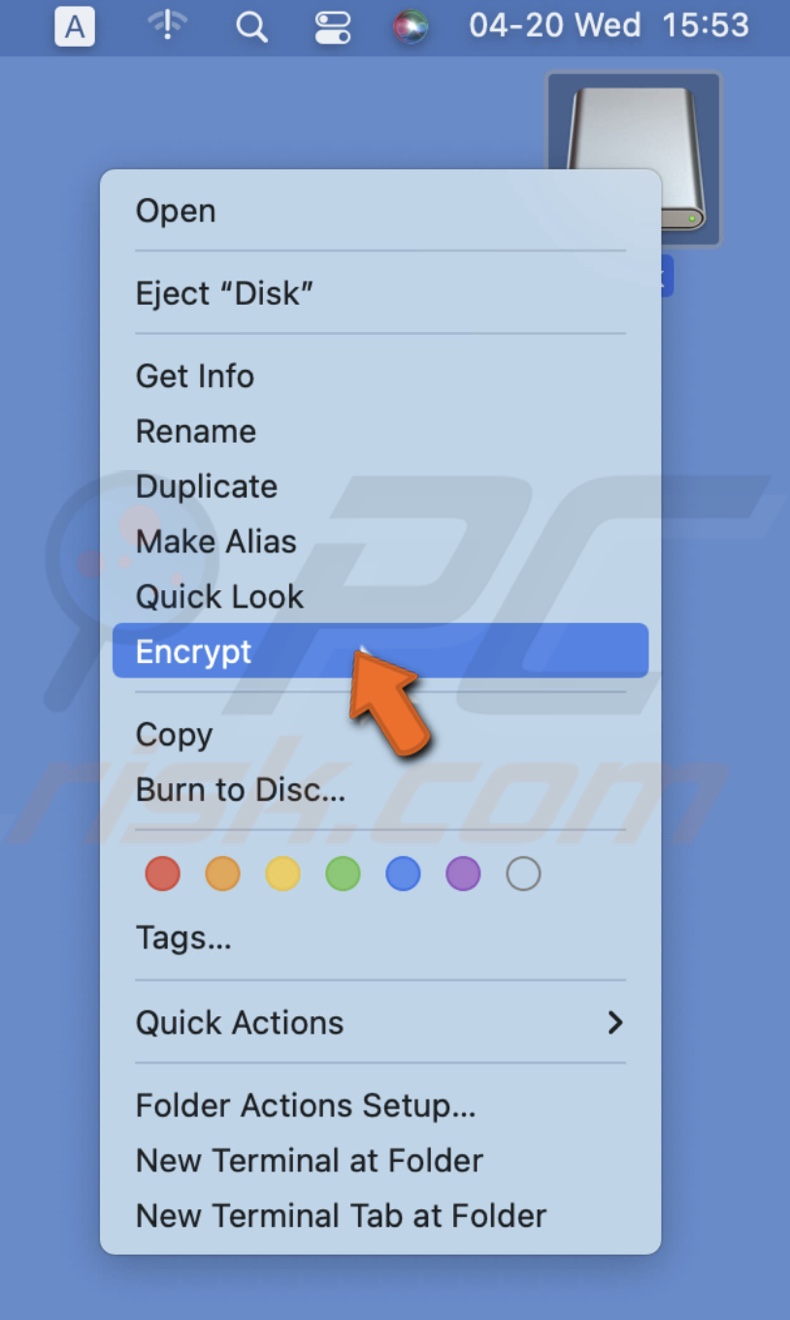
2. The external drive icon should appear on your desktop. Press Control and click on it and select "Encrypt".
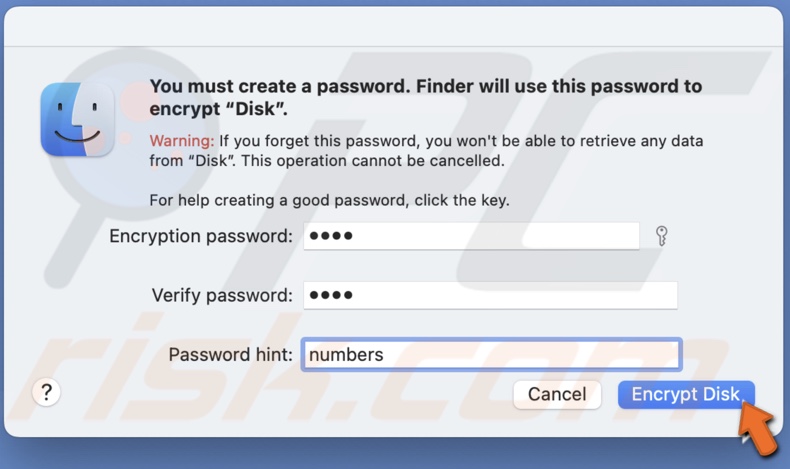
3. You'll be asked to create a password, verify it, and create a hint in case you forget the password. Make sure the hint is something only you would understand.
4. When done, click on "Encrypt Disk".
5. When the encryption process is done, you can safely remove the external disk from your Mac.
Decrypting the external disk is a fast and straightforward process.
To decrypt the external drive on Mac, follow the steps below:
1. Connect the external drive to your Mac.
2. The external drive icon should appear on your desktop. Right-click on it and select "Decrypt".
3. Enter the created password, and your drive should be decrypted.
How to encrypt files on Mac?
You can also encrypt individual files, but it takes more time. You'll also be encrypting them using Disk Utility and not FileVault.
To encrypt a file on Mac, follow the steps below:
1. Form the menu bar, click on "Go", and select "Utilities".
2. Then, locate and double-click on "Disk Utility".
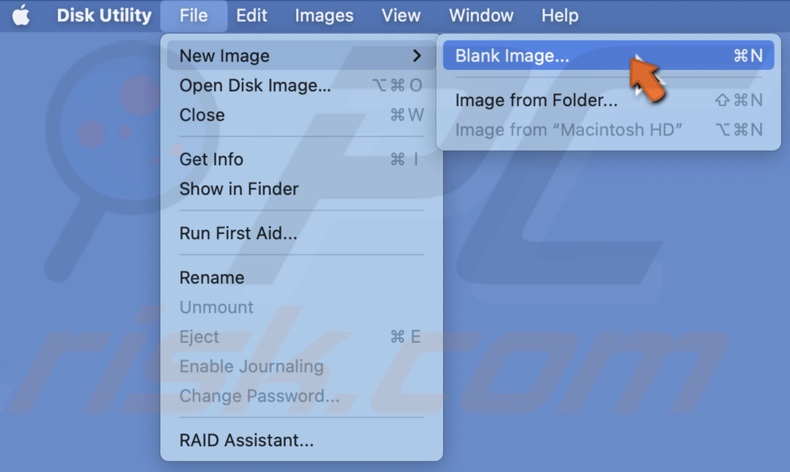
3. From the top menu bar, click on "File", hover over "New Image", and select "Blank Image".
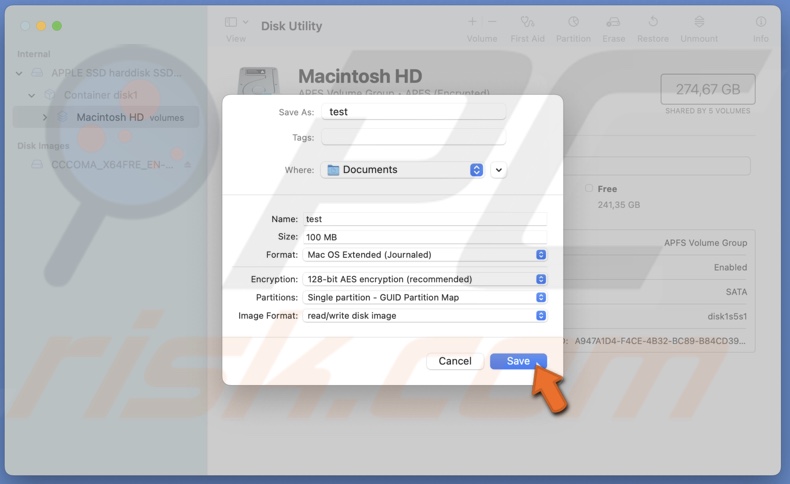
4. Next to "Save As", enter the name for the disk image (DMG) file.
5. Next to "Name", enter the name for the DMG file when it's mounted.
6. Next to "Size", select the maximum storage space for this file.
7. Next to "Format", click on the drop-down menu and select "Mac OS Extended (Journaled)".
8. Next to "Encryption", select either the 128-bit or 256-bit encryption. The 256-bit is more secure but slower than the 128-bit.
9. Next to "Partition", make sure "Single partition -GUID Map" is selected.
10. Next to "Image Format", make sure "read/write disk image" is selected.
11. When done, click on "Save".
12. Create and verify the password for the disk image file.
13. The created DMG file will appear on your desktop. Drag and drop the files you want to encrypt in the created DMG. They will automatically become encrypted.
14. When you want to close the disk image, right-click on it and select "Eject" or drag it to the Trash.
15. You'll be able to find the disk image file where you saved it. Usually, it's the "Documents" folder.
16. To access the DMG file, double-click on it. It will then appear on your desktop again.
Simply drag the files out of the disk image file to decrypt them.
We hope this guide provided you with the information you were looking for, and now you know how to encrypt your Mac, an external drive, and your files.
Share:

Karolina Peistariene
Author of how-to guides for Mac users
Responsible for collecting, analyzing, and presenting problem-solving solution articles related to macOS issues. Years of macOS experience combined with solid research and analyzing skills help Karolina provide readers with working and helpful solutions as well as introduce various features Mac has to offer.
▼ Show Discussion