Fix Mac Keyboard Not Working With These Simple Steps

(updated)
Get Free Scanner and check your computer for errors
Fix It NowTo fix found issues, you have to purchase the full version of Combo Cleaner. Free trial available. Combo Cleaner is owned and operated by Rcs Lt, the parent company of PCRisk.com read more.
How to Fix Mac Keyboard Not Working With These Easy Steps?
A keyboard is a crucial part of your Mac. There is not much you can do without it. So when your keyboard becomes unresponsive, or some keys stop working, you're only left with a few things you can do with the computer.
When your keyboard becomes unresponsive, a few common issues might be the culprit. A lot of the time, dust and debris accumulate under the keyboard keys. Another reason can be the Slow Keys feature. If it's turned on, you might mistake your keyboard not working as it takes longer for your Mac to register the pressed keys.
The other problem can be related to your Mac software or hardware issues. For example, there might be a minor glitch caused by an operating system update. The cause can also be any external damage done to your Mac or the external Mac keyboard that would make it stop working.
If you don't see severe external damage done to your keyboard, try the steps below to fix the keyboard before taking it for a repair or replacing it with a new one.
Video on How to Fix Mac Keyboard Not Working With These Easy Steps?
Table of Contents:
- Introduction
- If The Mac Built-In Keyboard Isn't Working
- If The External Keyboard Isn't Working
- Method 1. Restart Your Mac
- Method 2. Make Sure The Keyboard is Clean
- Method 3. Update Mac Operating System
- Method 4. Reset Parameter Random Access Memory and System Management Controller
- Method 5. Turn Off Slow Keys
- Method 6. Delete Recent Apps
- Video on How to Fix Mac Keyboard Not Working With 6 Easy Steps?
Download Computer Malware Repair Tool
It is recommended to run a free scan with Combo Cleaner - a tool to detect viruses and malware on your device. You will need to purchase the full version to remove infections. Free trial available. Combo Cleaner is owned and operated by Rcs Lt, the parent company of PCRisk.com read more.
If The Mac Built-In Keyboard Isn't Working
If your Mac battery is running low and you can't see the alert, you might not be able to use the MacBook keyboard. Plug your Mac into a wall socket or connect an external keyboard. If the keyboard still doesn't work, proceed to the troubleshooting steps below.
If The External Keyboard Isn't Working
If your external keyboard stopped working, there are a few things that you can do to try and fix it.
First, check if Bluetooth is working.
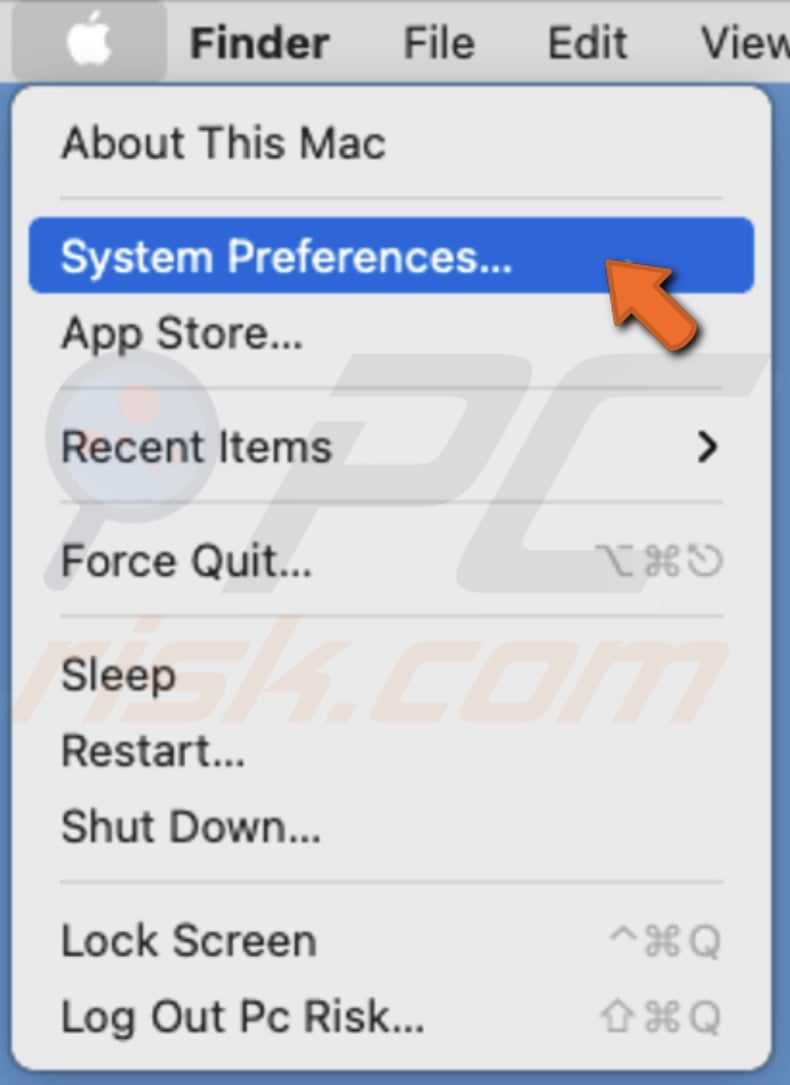
1. Click on the Apple logo and go to "System Preferences".
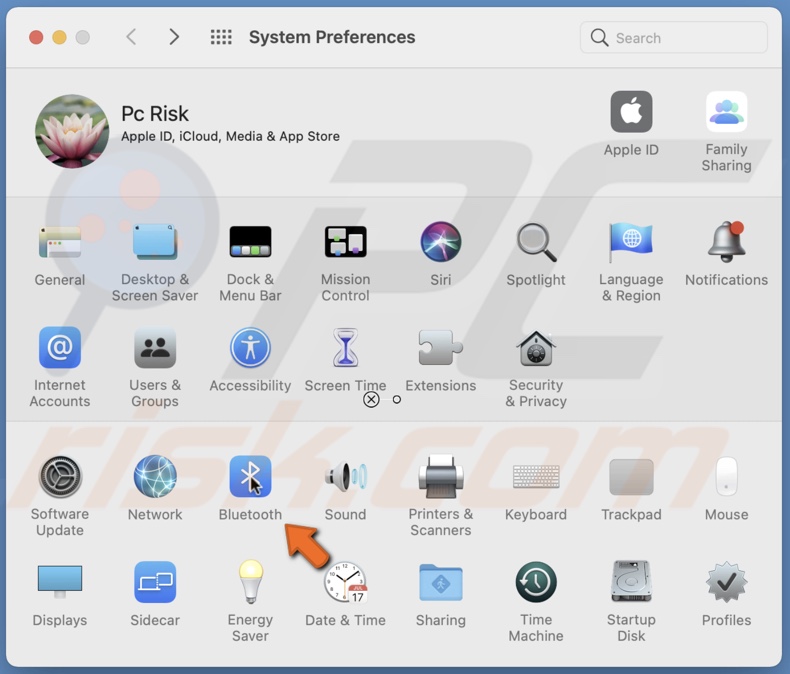
2. Then, go to "Bluetooth" settings.
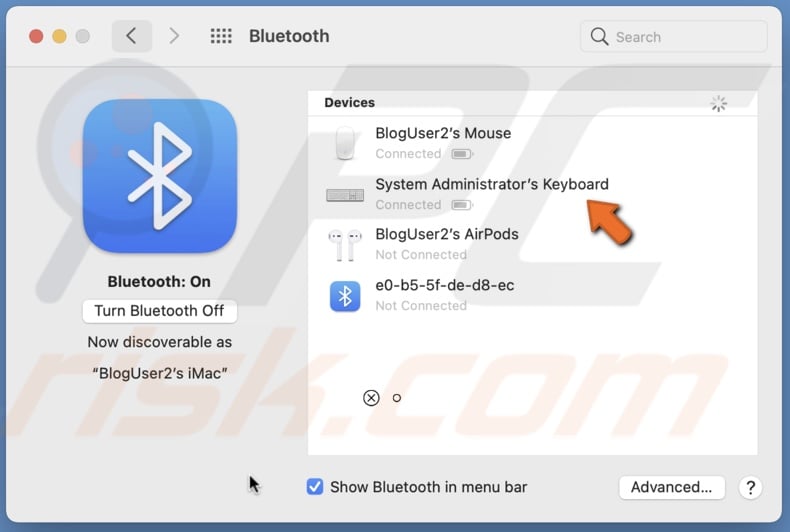
3. Check if Bluetooth is turned on and if the keyboard is connected.
If the keyboard is connected with a cable, connect it to another USB port on your Mac. If the keyboard works when plugged into a different USB port, then the previous USB port is most likely damaged.
If possible, try to connect it to a different Mac and check if it starts working. If it does, then the issue is with your Mac. If the keyboard works with the other Mac, proceed to the troubleshooting steps below.
Restart Your Mac
If you keep your Mac in Sleep mode most of the time and rarely shut it down completely, you might run into system errors. To fix the issue, you need to simply restart the Mac to give the system a 'fresh start'.
This might be an obvious step, but if not tried it yet, we suggest you do. Sometimes all it takes is a system restart.
If the system reboot didn't help, proceed to the next step.
Make Sure The Keyboard is Clean
For your keyboard to work, it needs to be cleaned from time to time as dust particles may accumulate and cause your keyboard to stop working.
If you tend to eat next to your Mac, it's inevitable for food crumbs to land on the keyboard and get into small cracks.
To clean an external or a built-in keyboard, follow the steps below:
1. Get a compressed air spray with a straw to limit the airflow.
2. If the keyboard is external, disconnect the keyboard from Bluetooth or unplug it from the port on your Mac.
If the keyboard is built-in, turn off your MacBook.
3. Tilt the keyboard so that the food crumbs and dust will fall out from the keyboard key cracks when spaying with air.
3. Now, take the compressed air spray and spray the air on the keyboard from left to right. Use it only on the right half of the keyboard.
4. Then, rotate the keyboard vertically and spray the air from left to right on the remaining half of the keyboard.
5. Repeat the process a few times.
If you're not sure how to do this or afraid you might damage the keyboard, take it to a professional to get it done.
Update Mac Operating System
Updating macOS is one of the main steps in fixing issues with your keyboard. If the upgraded operating system is not entirely stable yet, various problems can arise. If there is a glitch or an error, check for macOS updates. If it's a system fault, Apple will have an update that'll fix the problem.
To check for an update, follow the steps below:
1. Click on the Apple logo from the menu bar.
2. Go to "System Preferences".

3. Click on "Software Updates".
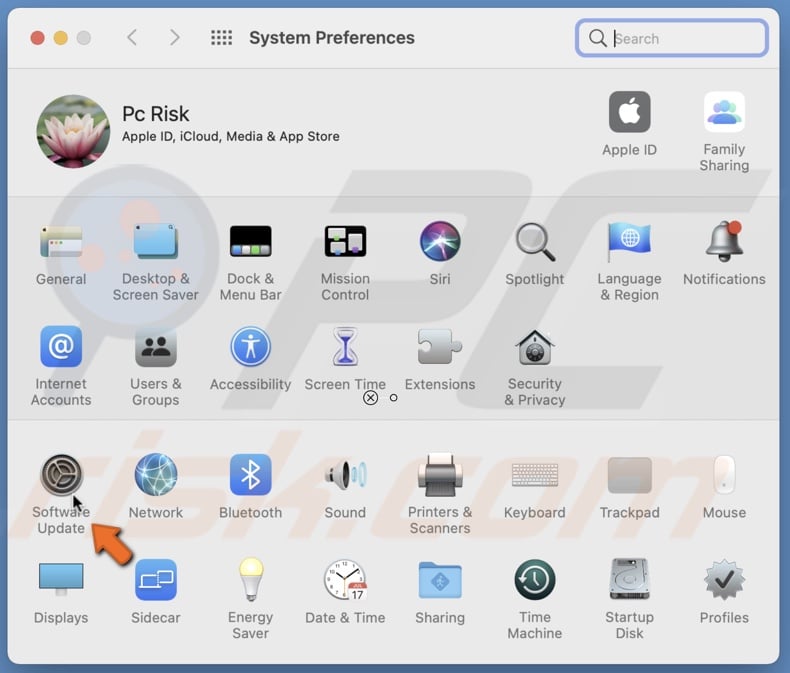
4. Wait for Mac to search for updates. If found any, update macOS by clicking on "Update Now".
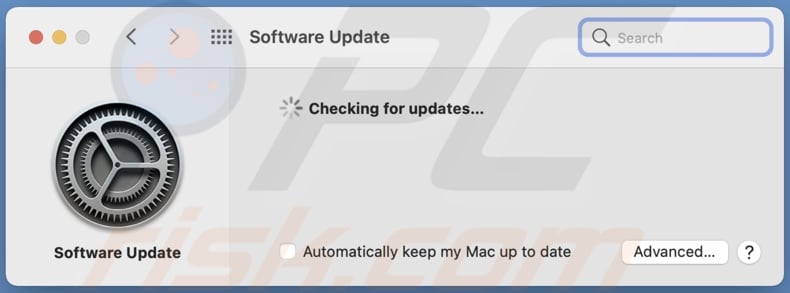
When Mac reboots, check if the keyboard works. If not, go to the next step.
Reset Parameter Random Access Memory and System Management Controller
PRAM (Parameter Random Access Memory) stores your Mac system settings.
SMC (System Management Controller) in your Mac is responsible for cooling fans, keyboard, and more processes.
Resetting both PRAM and SMC might help you fix the not working keyboard.
To reset PRAM, follow the steps below:
1. Shut down your Mac.
2. Then, press the Power button to turn on your Mac and immediately hold down Option + Command + P + R until Mac restarts.
On Macs with T2 Security Chip, hold the keys until you see the Apple logo appear.
On older Macs, hold the four keys until you hear the second chime.
To reset SMC go to our article on How to reset your Mac's SMC?
Turn Off Slow Keys
With the Slow Keys feature, you can control how long you need to press a key for the Mac to recognize it. If Slow Keys is enabled, you might think the keyboard is not functioning correctly as you need to hold down the keys longer than usual for Mac to type process and recognize them.
To disable Slow Keys, follow the steps below:
1. Click on the Apple logo from the menu bar.
2. Go to "System Preferences".

3. Then, go to "Accessibility" settings.
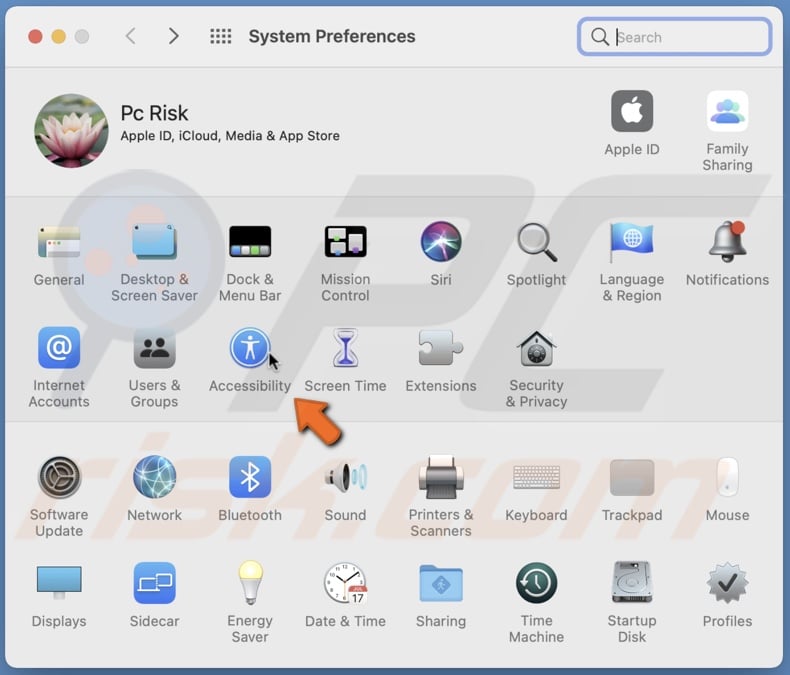
4. Select "Keyboard".
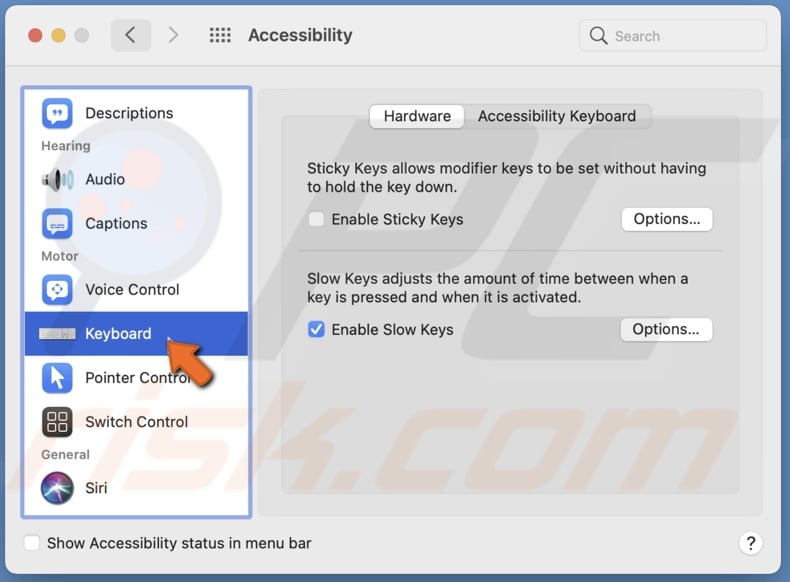
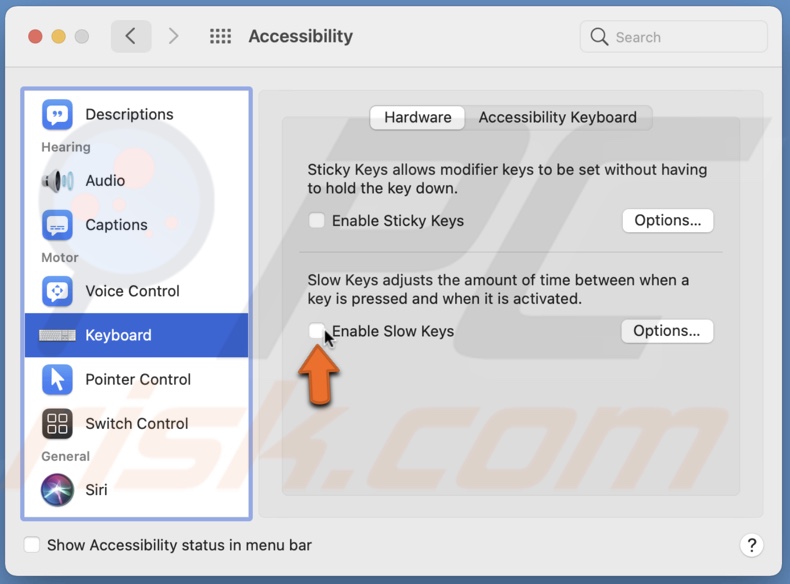
5. In the "Hardware" tab, uncheck the box next to "Slow Keys".
Delete Recent Apps
This might look unrelated, but sometimes, an app can cause a glitch that can affect the keyboard, especially if the app is new or upgraded to a more recent version and is not entirely stable. First, check what app might be causing trouble and then delete it.
To check and remove an app, follow the steps below:
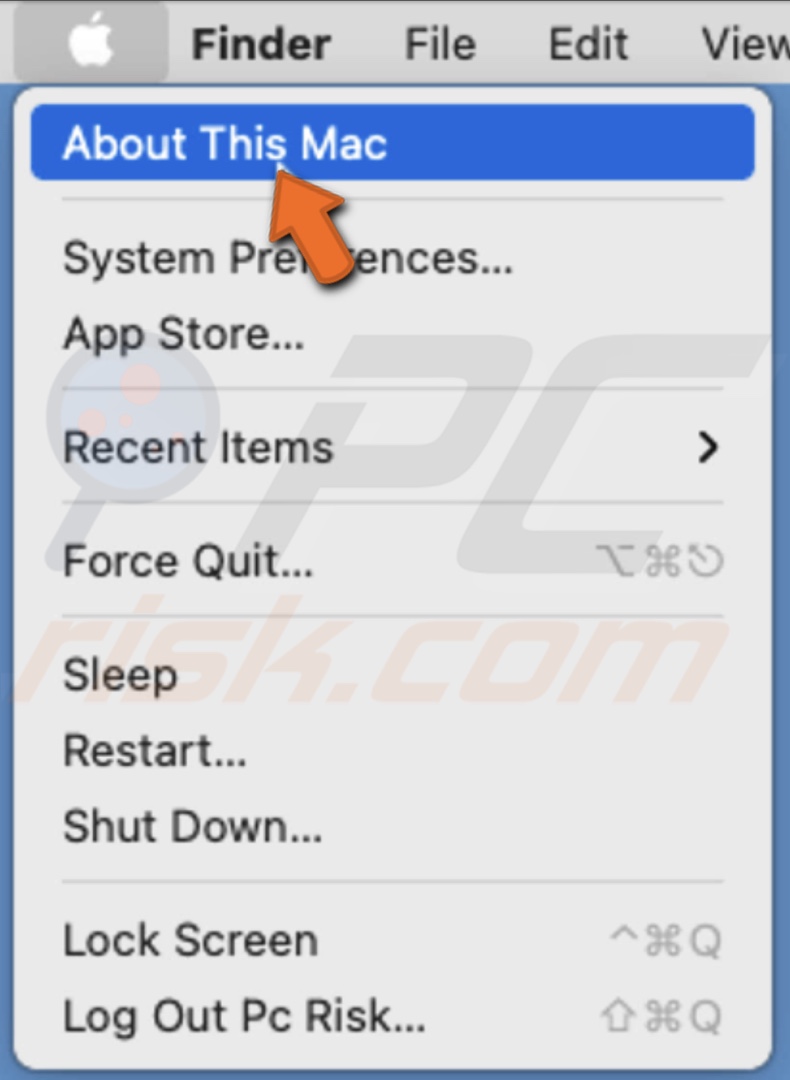
1. Click on the Apple menu from the menu bar and select "About This Mac".
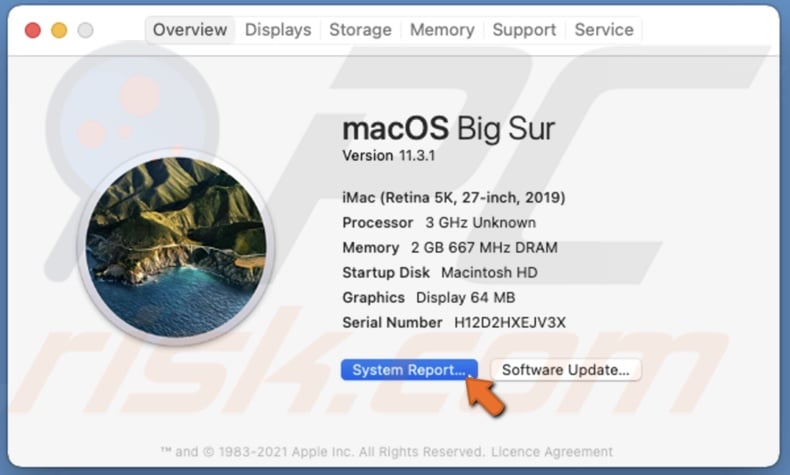
2. Then, click on "System Report".
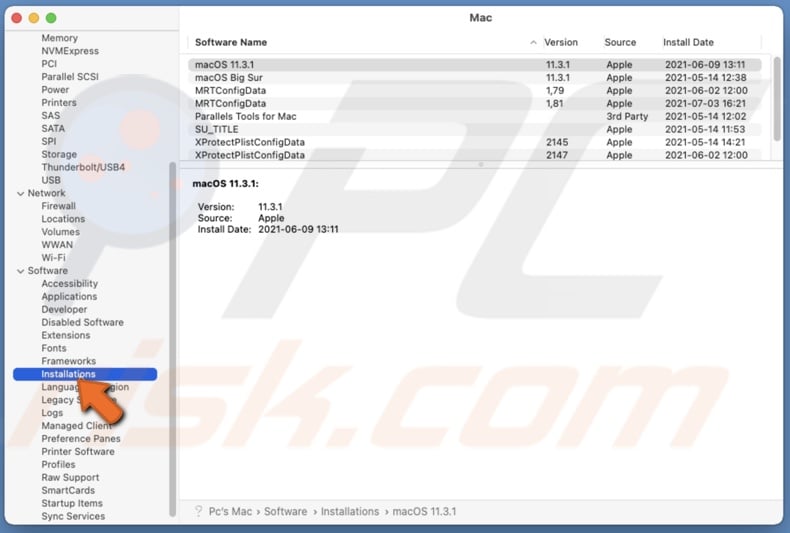
3. In the sidebar, expand the "Software" option and select "Installations". You'll see all apps installed on your Mac with their installation and update date.
4. Then, open Finder.
5. Go to the "Applications" folder.
6. Find the app you think is the culprit, drag it to Trash or right-click on it, and select "Move to Trash".
7. Delete the app from the Trash.
We hope this article was helpful and your keyboard is working perfectly.
You can also check out the video above for a step-by-step tutorial.
Share:

Karolina Peistariene
Author of how-to guides for Mac users
Responsible for collecting, analyzing, and presenting problem-solving solution articles related to macOS issues. Years of macOS experience combined with solid research and analyzing skills help Karolina provide readers with working and helpful solutions as well as introduce various features Mac has to offer.
▼ Show Discussion