How to Delete Time Machine Snapshots on Your Mac?

(updated)
Get Free Scanner and check your computer for errors
Fix It NowTo fix found issues, you have to purchase the full version of Combo Cleaner. Free trial available. Combo Cleaner is owned and operated by Rcs Lt, the parent company of PCRisk.com read more.
How to Delete Local Snapshots on Your Mac?
Mac computers have a built-in backup function called Time Machine. Like most of Apple's developed apps, Time Machine is easy to use and allows users to restore important files and system settings in case your Mac faces a problem or system failure.
If you're experiencing issues caused by a lack of space on the hard drive, and none of the methods listed here solve the problem, try to remove local snapshots created by the Time Machine application.
The Time Machine backup disk might not always be available - in such cases, Time Machine is storing backups as 'local snapshots'.Time Machine creates new snapshots until the hard drive contains a minimum of 20% free space and, therefore, backups can occupy significant space on your internal drive. We describe some methods to remove local Time Machine snapshots below.
Video showing How to Delete Time Machine's Snapshots on Mac?
Table of Contents:
- Introduction
- Conditions, when Time Machine creates local snapshots
- Check how much space your backup files take
- Manually remove the local snapshots
- Prevent local snapshots stored in the internal drive
- Video showing How to Delete Time Machine's Snapshots on Mac?
Download Computer Malware Repair Tool
It is recommended to run a free scan with Combo Cleaner - a tool to detect viruses and malware on your device. You will need to purchase the full version to remove infections. Free trial available. Combo Cleaner is owned and operated by Rcs Lt, the parent company of PCRisk.com read more.
Conditions, when Time Machine creates local snapshots
Firstly, note that local snapshots are created only if you use an Apple laptop such as a MacBook, MacBook Air, or MacBook Pro. Desktop computers such as iMac, Mac Mini, and Mac Pro do not have this feature.
The Time Machine feature must be enabled to create automatic backups. This software creates backups typically on an external drive that is connected when first configuring Time Machine. If the drive is not connected when you create a backup, the MacBook will store it on your internal drive. You can reach these backups through Time Machine if they are part of a local snapshot stored on the internal hard drive.
Check how much space your backup files take
To see if local snapshots exist on the computer and occupy hard disk space, check storage usage.
1. Click the Apple logo in the top left corner of the screen and choose About this Mac.
2. In the new window, select the Storage tab and look for a red section called Backups.
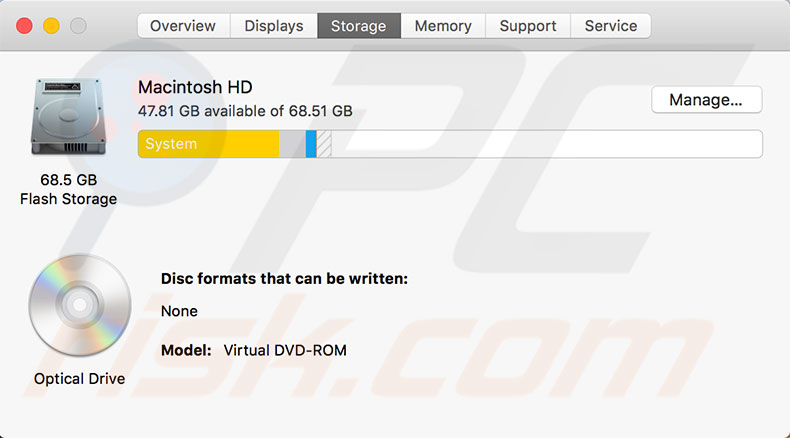
3. These are the local snapshots. If they take a lot of space, you can manually clear this area of storage.
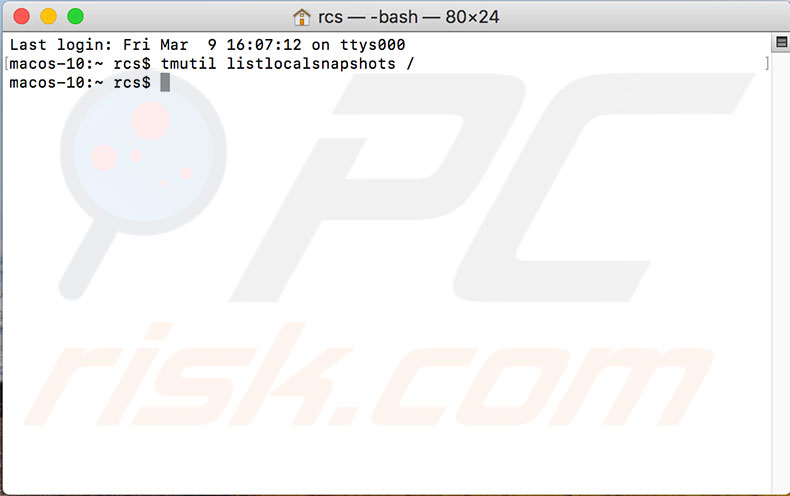
If you are running on the High Sierra operating system, you can launch the Terminal application to check local snapshots.
1. First, run Terminal within the Utilities folder in Applications.
2. In the command window, enter: tmutil listlocalsnapshots /
3. The Terminal will display a list of existing local snapshots with names such as com.apple.TimeMachine.2018-03-19-002011.
Manually remove the local snapshots
Bear in mind that Time Machine monitors storage status. When it reaches 20% of available space, it replaces the oldest snapshots with new ones. Furthermore, if the storage reaches the 10% mark or 5GB, all local snapshots are deleted except the recent ones.
Time Machine can sometimes struggle to remove or replace snapshots, and you might also face this situation when a lot of free space is required. Knowing how to delete backups will save some of your personal content.
Remove backups in OS X
1. First, run the Terminal app by going to Applications and choosing the Utilities folder.
2. When the app has launched, enter the following command: 'sudo rm -rf /.MobileBackups.trash'
3. Then, enter your administrator account password and hit return to proceed.
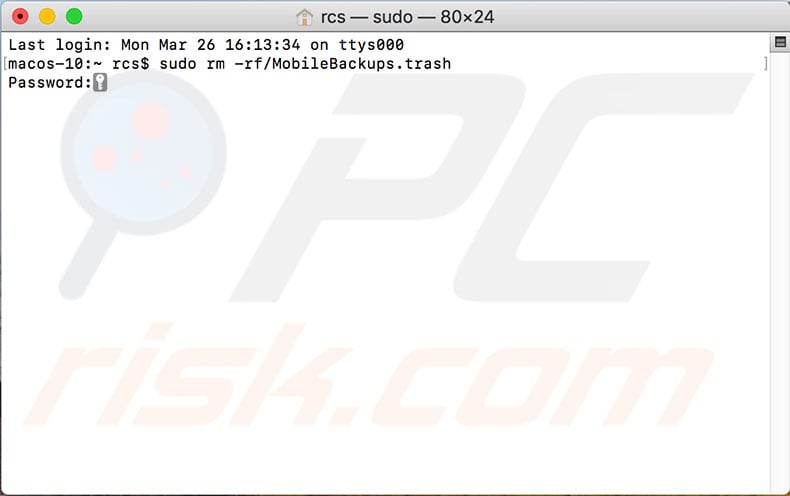
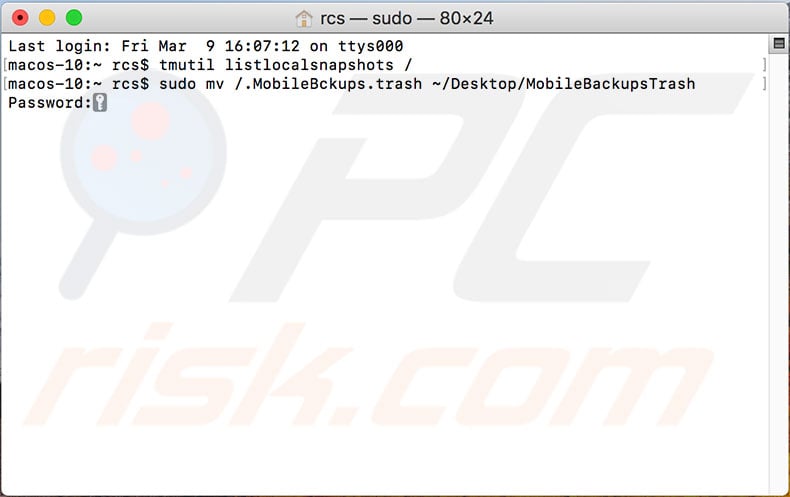
Alternatively, you can use the 'sudo mv / .MobileBackups.trash ~/Desktop/MobileBackupsTrash' command. This will move the backups directory to the Desktop so that you can decide whether to delete it or keep it in Trash. Whichever method you use, administrator account credentials will be required.
Remove backups in macOS High Sierra
With this new version of the operating system, Apple also upgraded the Time Machine backup software. So, if you are running on a High Sierra version, you have more options. Although the steps listed above to remove backups in Mac OS X work on the latest version, you may also wish to remove specific snapshots.
1. First, run the Terminal app and enter the following command: 'tmutil listlocalsnapshots /'
2. The list of all remaining snapshots will be displayed through Terminal with names such as com.apple.TimeMachine.2018.03.19-002011.
3. To remove a particular snapshot, enter the following command: 'sudo tmutil deletelocalsnapshots com.apple.TimeMachine.2018.03.19-002011'
This will remove the specific snapshot.
Note: there must be a space between 'deletelocalsnapshots' and the name of the desired backup file.
Prevent local snapshots stored in the internal drive
If running low on space influences computer performance or you wish to preserve the maximum available space on the Mac, there is an option to disable snapshots being stored on your internal drive.
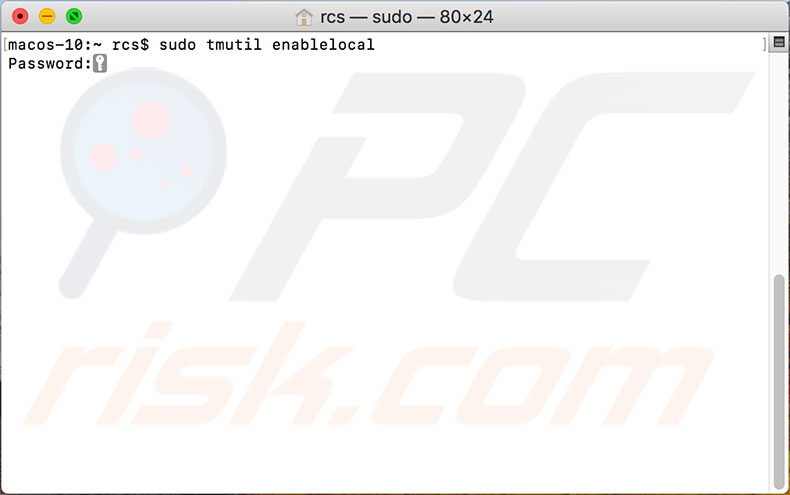
1. Run the Terminal app, which is accessible through Spotlight.
2. When the command window appears, enter the following command: sudo tmutil disablelocal
3. This command will turn off snapshot storing on the internal hard drive and delete all remaining local snapshots. This option can be used as an alternative to clear up storage areas. To re-enable this feature, enter: sudo tmutil enablelocal
To easily clean your computer system, we recommend Combo Cleaner - this application automatically removes temporary and unnecessary files from the computer such as system, browser cache, trash, etc.
Share:

Karolina Peistariene
Author of how-to guides for Mac users
Responsible for collecting, analyzing, and presenting problem-solving solution articles related to macOS issues. Years of macOS experience combined with solid research and analyzing skills help Karolina provide readers with working and helpful solutions as well as introduce various features Mac has to offer.
▼ Show Discussion