How to Bypass Windows 11 TPM Requirements
Get Free Scanner and check your computer for errors
Fix It NowTo fix found issues, you have to purchase the full version of Combo Cleaner. Free trial available. Combo Cleaner is owned and operated by Rcs Lt, the parent company of PCRisk.com read more.
How to Bypass Windows 11 TPM Requirements
Microsoft has implemented minimal hardware requirements that computers must meet to install Windows 11, particularly TPM 2.0 support. As a result, older computers give a message saying that “this PC doesn't currently meet Windows 11 system requirements" when attempting to install Windows 11. Fortunately, you can bypass Windows 11 TPM, RAM, and other requirements. Follow the guide below to install Windows 11 on your unsupported computer.
With the release of Windows 11, Microsoft implemented several requirements for installing it. These requirements include support for TPM 2.0, Secure Boot, and a minimum of 8GB of system RAM. Furthermore, Windows 11 will refuse to install on computers with unsupported CPUs.
Users who attempt to install Windows 11 on a device that does not meet the minimum system requirements get an error that says:
Your PC doesn't meet the requirements
Fortunately, there are at least four ways to install Windows 11 on a seemingly unsupported computer that we have included below.
Video Tutorial on How to Bypass Windows 11 TPM Requirements
Table of Contents:
- Introduction
- Method 1. Bypass Windows 11 TPM Requirement With Registry Tweaks
- Method 2. Bypass Windows 11 TPM Requirement With Rufus
- Method 3. Bypass Windows 11 TPM Requirement from Windows Update
- Method 4. Bypass Windows 11 TPM with Microsoft’s Official Registry Tweak
- Video Tutorial on How to Bypass Windows 11 TPM Requirements
Download Computer Malware Repair Tool
It is recommended to run a free scan with Combo Cleaner - a tool to detect viruses and malware on your device. You will need to purchase the full version to remove infections. Free trial available. Combo Cleaner is owned and operated by Rcs Lt, the parent company of PCRisk.com read more.
Method 1. Bypass Windows 11 TPM Requirement With Registry Tweaks
You can edit the Windows Registry to skip TPM Secure Boot and RAM checks before installing Windows 11 to bypass requirements that your computer does not meet.
1. Boot up your Windows 11 installation media.
2. Hold down Shift+F10 keys to open Command Prompt.
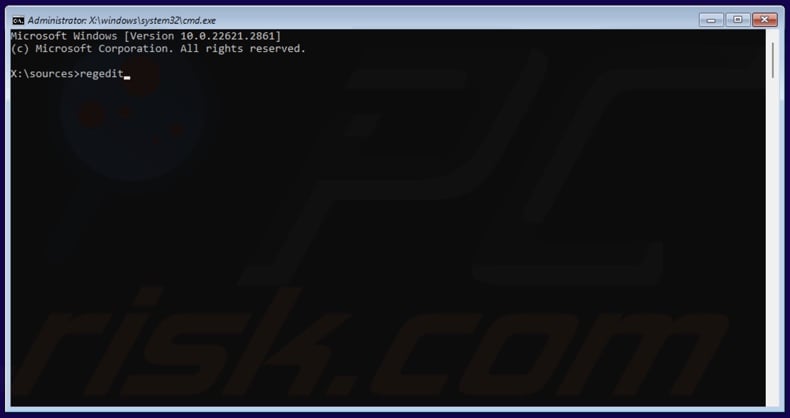
3. In Command Prompt, type regedit and press Enter.
4. In the Registry Editor, navigate to:
HKEY_LOCAL_MACHINE\SYSTEM\Setup
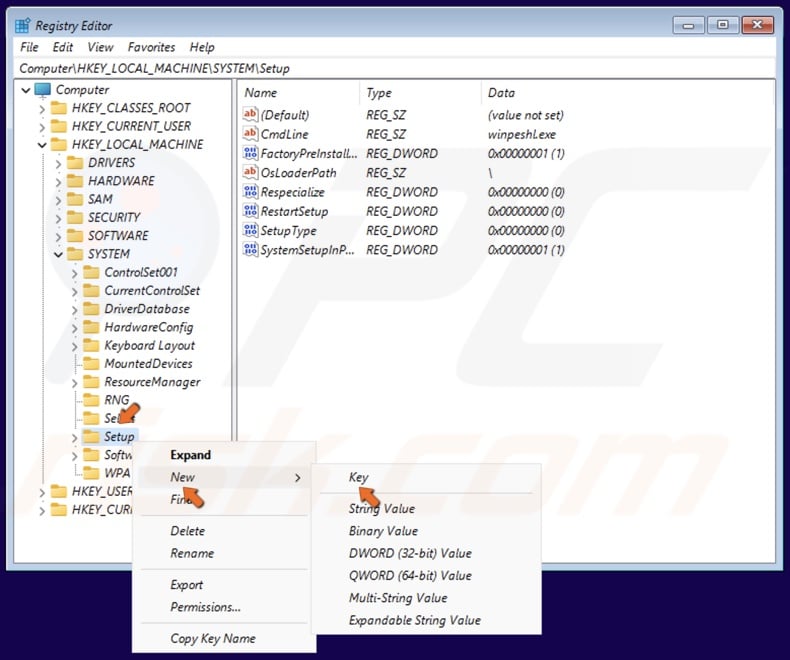
5. Right-click the Setup key, select New, and click Key.
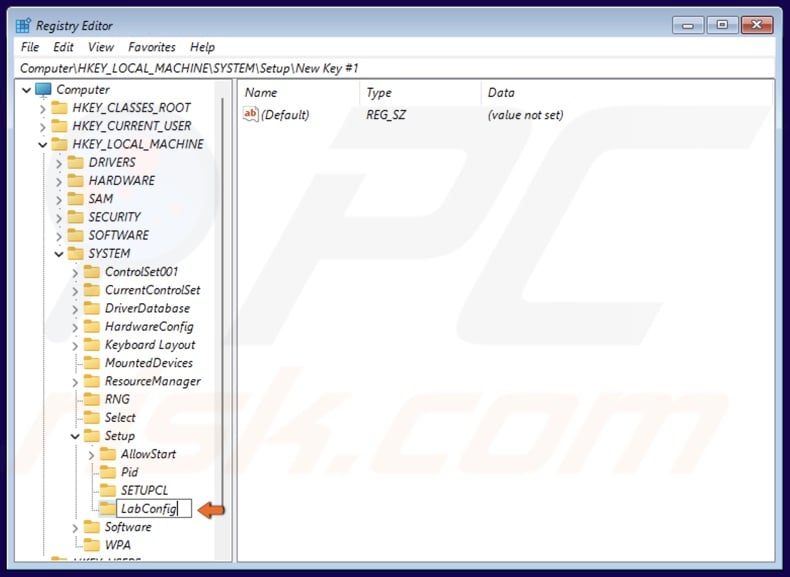
6. Name the new value LabConfig and save it.
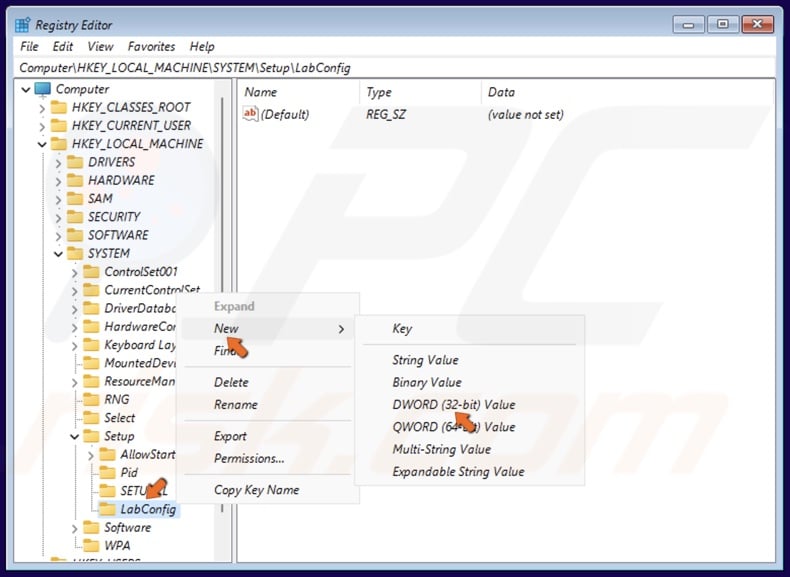
7. Right-click the LabConfig key, select New, and click DWORD (32-bit) Value.
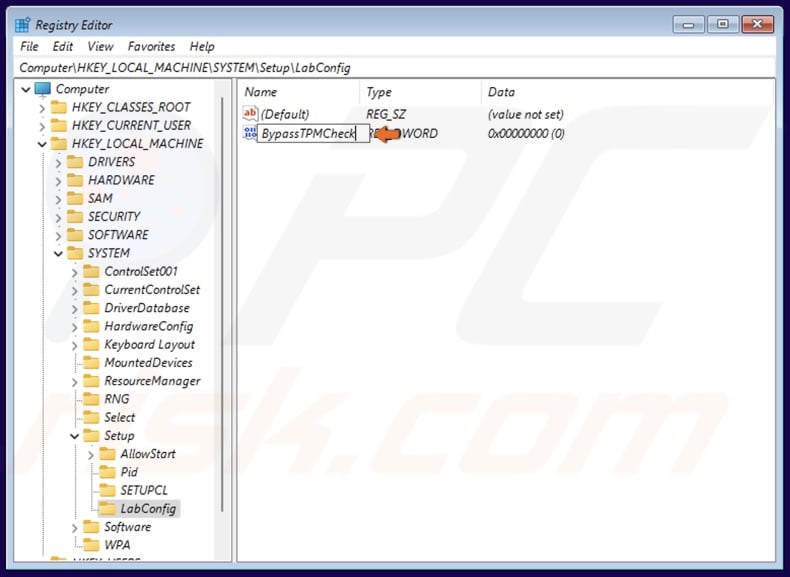
8. Name the new value BypassTPMCheck and save it.
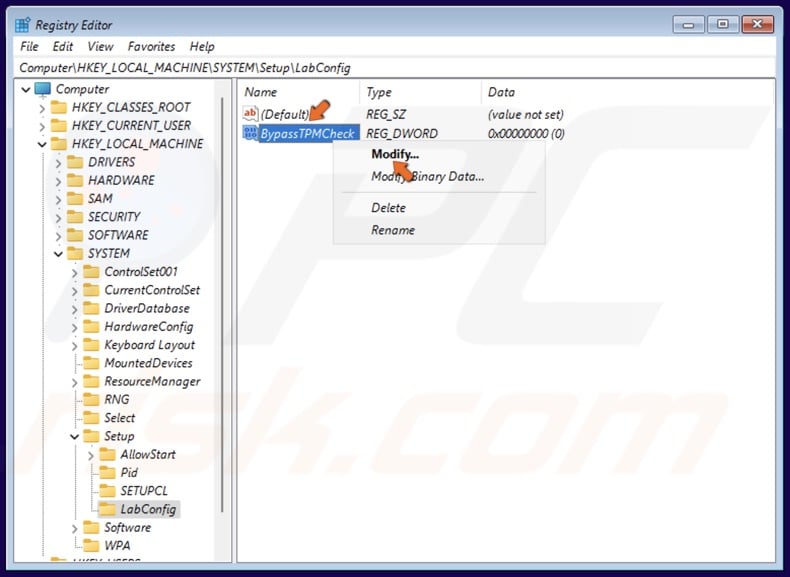
9. Right-click the BypassTPMCheck value and click Modify.
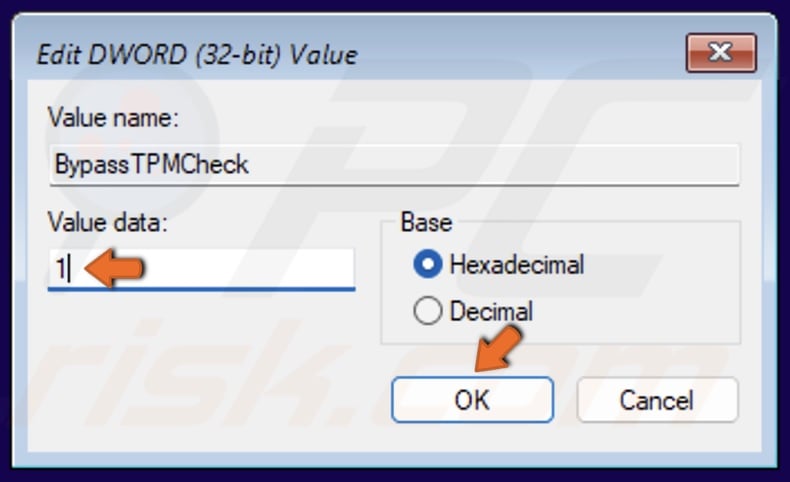
10. Set the Value data to 1 and click OK.
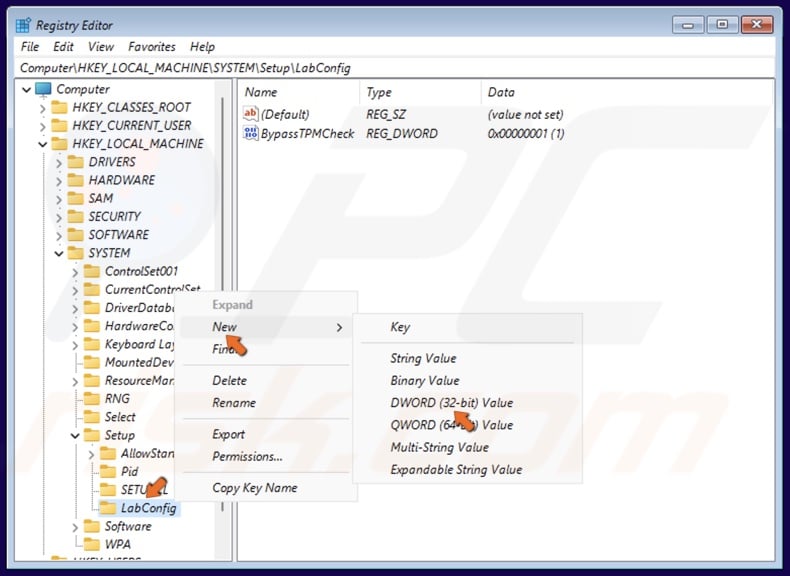
11. Right-click the LabConfig key again, select New, and click DWORD (32-bit) Value.
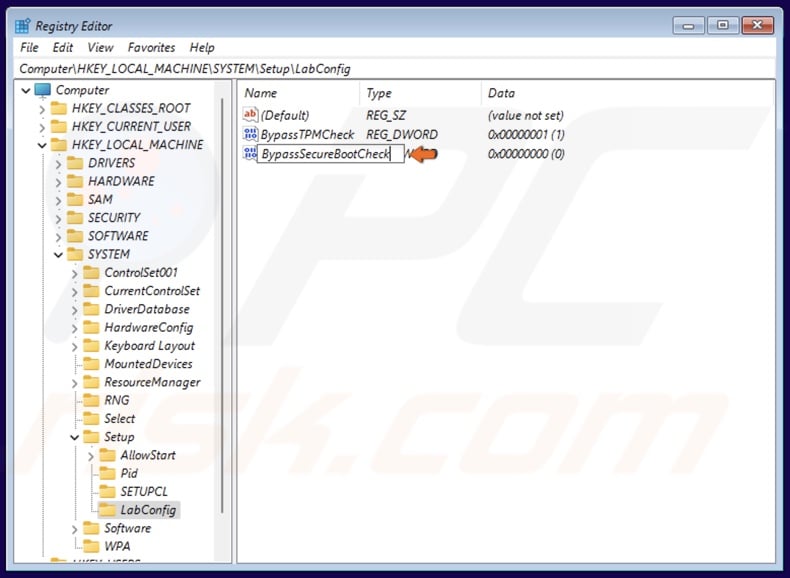
12. Name the new value BypassSecureBootCheck and save it.
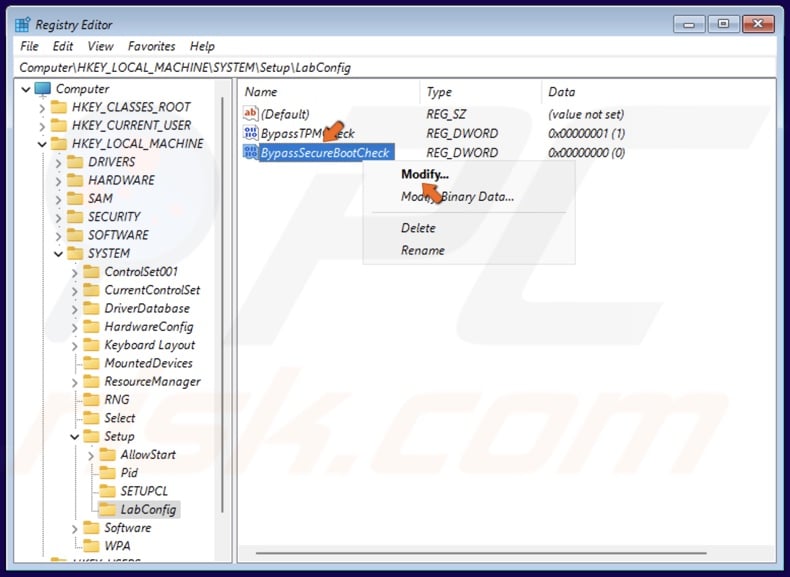
13. Right-click the BypassSecureBootCheck value in the right pane and click Modify.
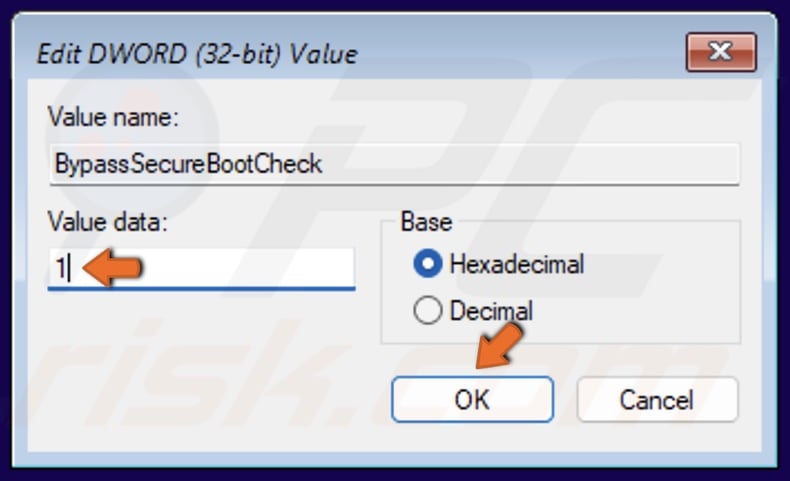
14. Set the Value data to 1 and click OK.
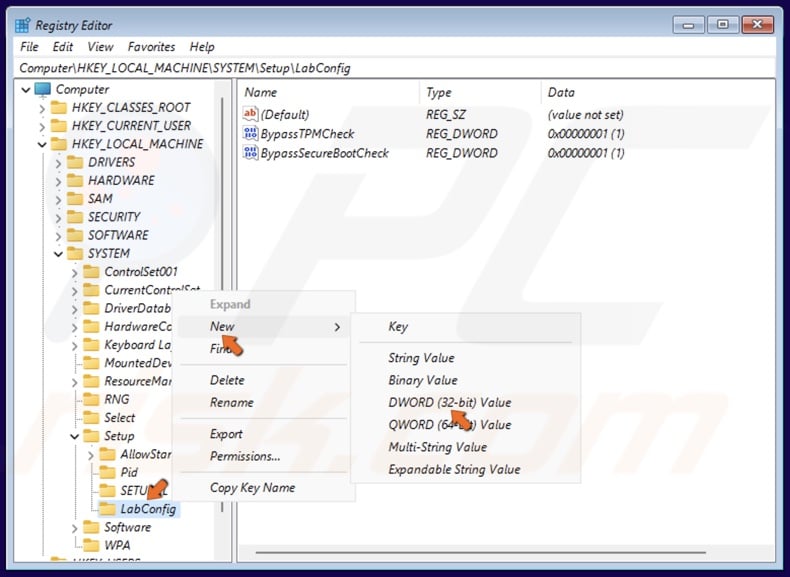
15. To bypass RAM requirements, right-click the LabConfig key yet again, select New, and click DWORD (32-bit) Value.
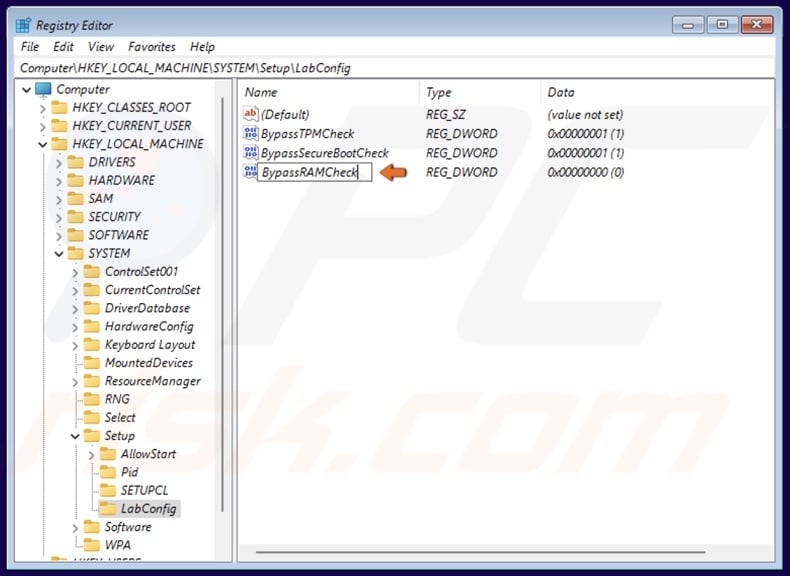
16. Name the new value BypassRAMCheck and save it.
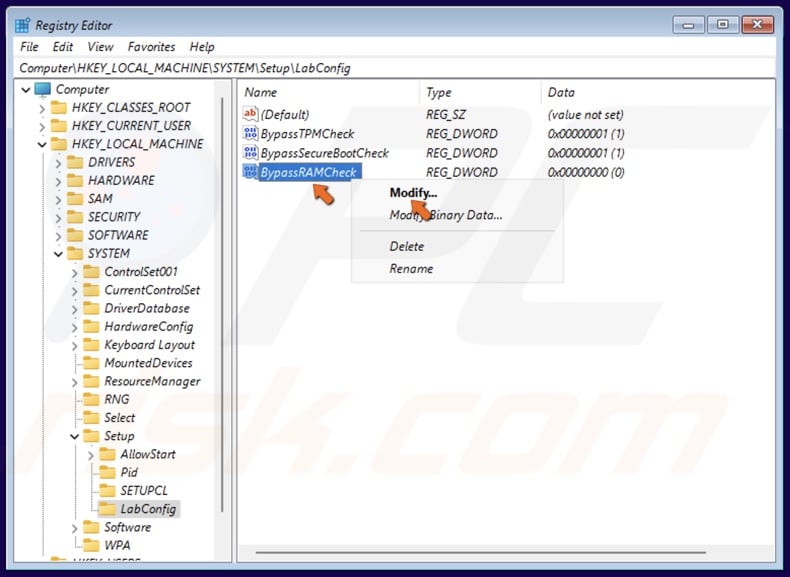
17. Right-click the BypassRAMCheck value and click Modify.
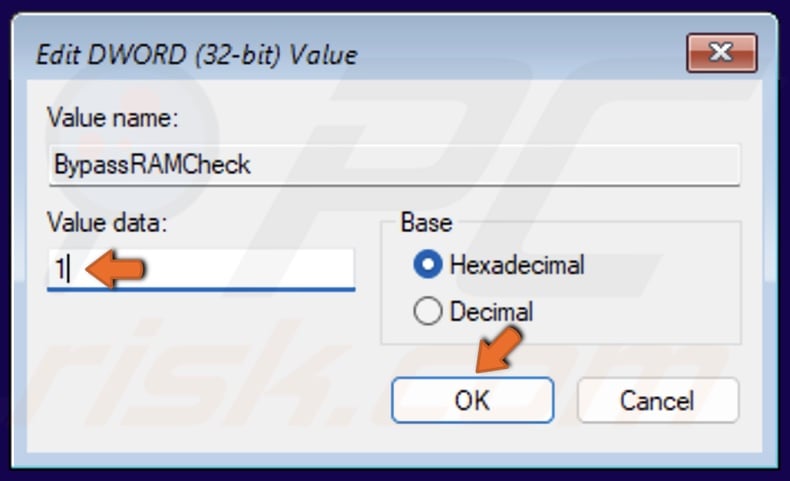
18. Set the Value data to 1 and click OK.
19. Close the Registry Editor and Command Prompt and proceed with your Windows 11 installation.
Method 2. Bypass Windows 11 TPM Requirement With Rufus
Rufus is a free tool for creating a Windows 11 install on a USB flash drive. More importantly, Rufus enables you to bypass TPM, RAM, and CPU requirements. Rufus allows you to do a clean Windows 11 installation off a USB flash drive or run the installation setup off your hard drive to upgrade from Windows 10.
However, there are a few caveats with Rufus. First, it requires a 16GB or larger USB flash drive. Second, because you use a flash drive, it’s somewhat more difficult to install Windows 11 on a virtual machine where an ISO file would be preferable.
1. Open your web browser and go to the Rufus download page.
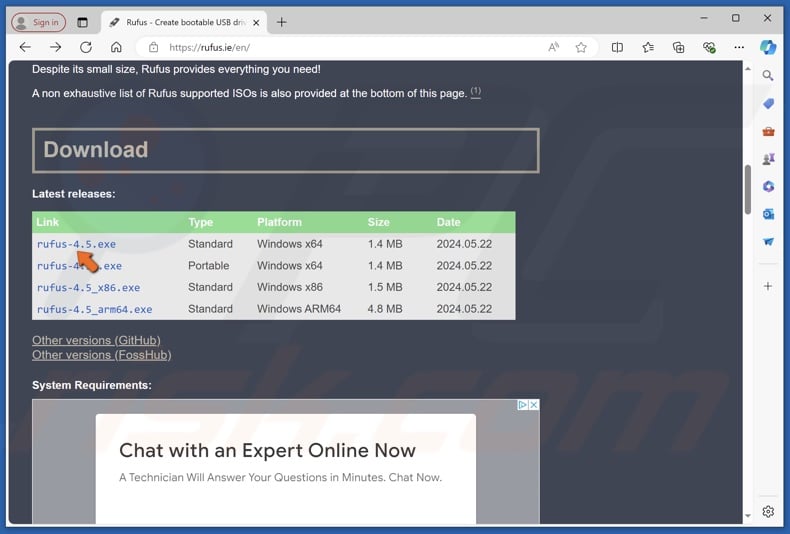
2. Under Latest releases, click the most recent release download link. The latest version is 4.5 at the time of writing, which supports extended Windows 11 image support.
3. Run Rufus once it's downloaded.
4. Insert a blank 16 GB or larger USB flash drive into your computer.
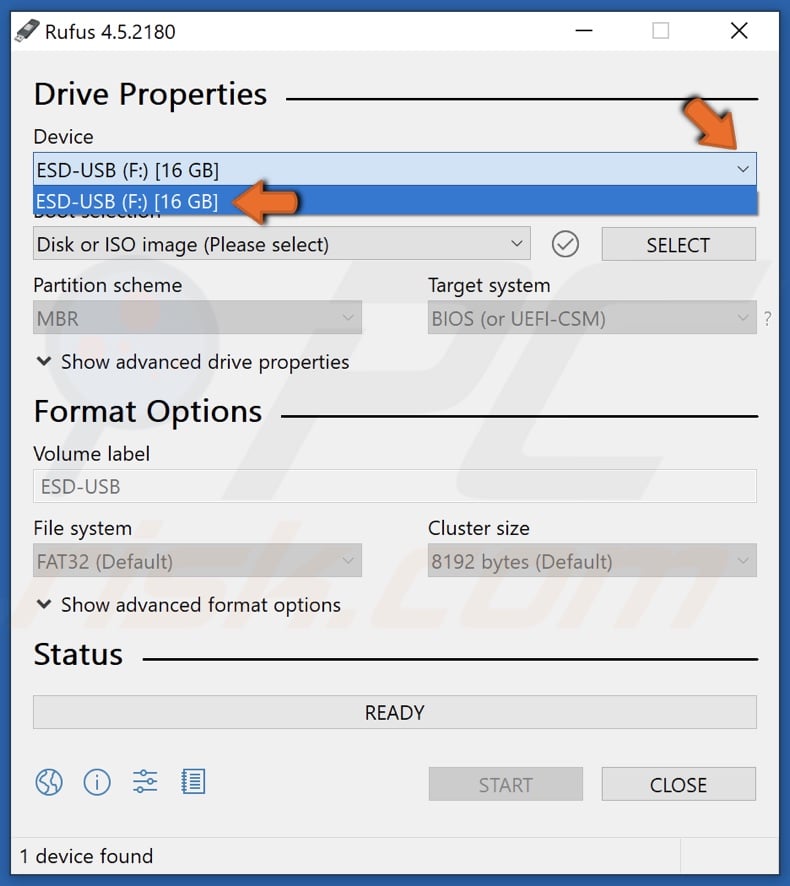
5. Select the USB device you want to create a Windows 11 image on.
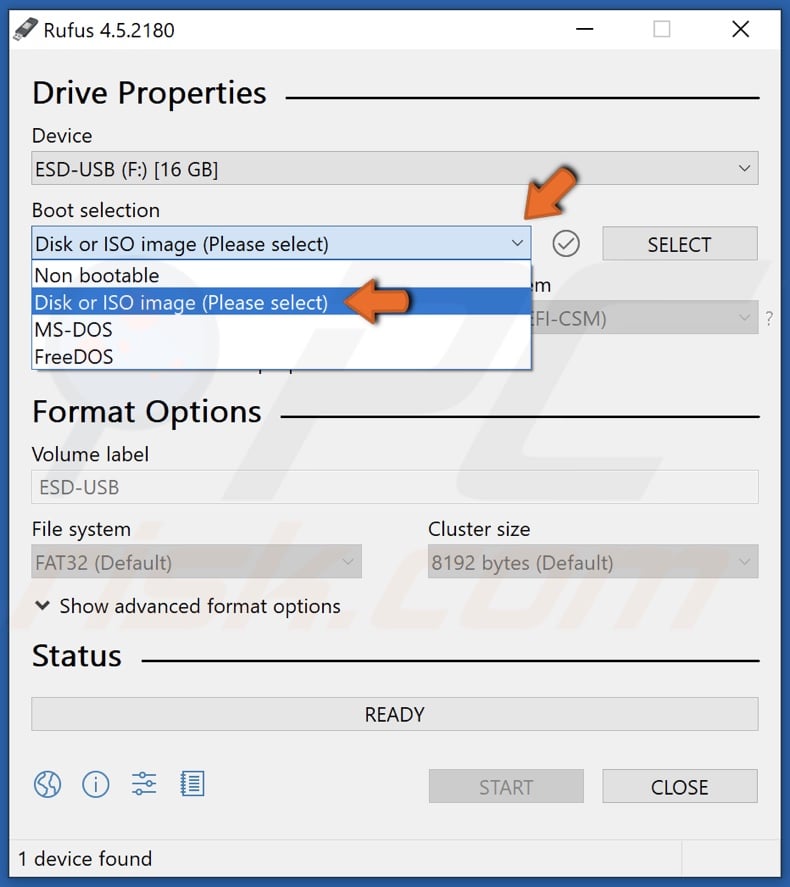
6. Check that Boot Selection shows Disk or ISO image.
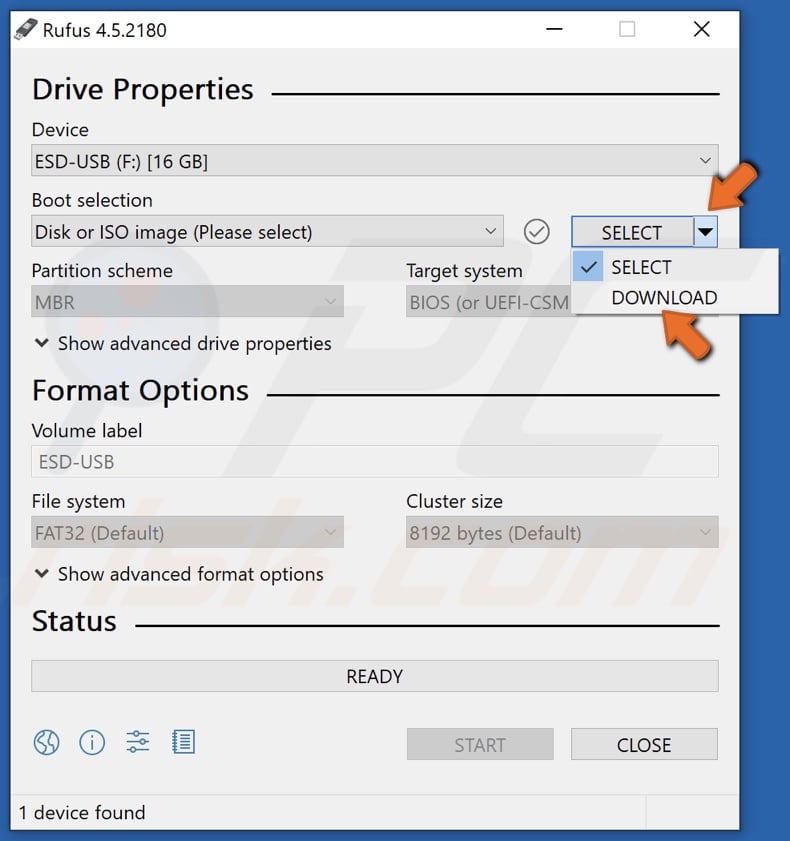
7. Open the SELECT drop-down menu and select DOWNLOAD.
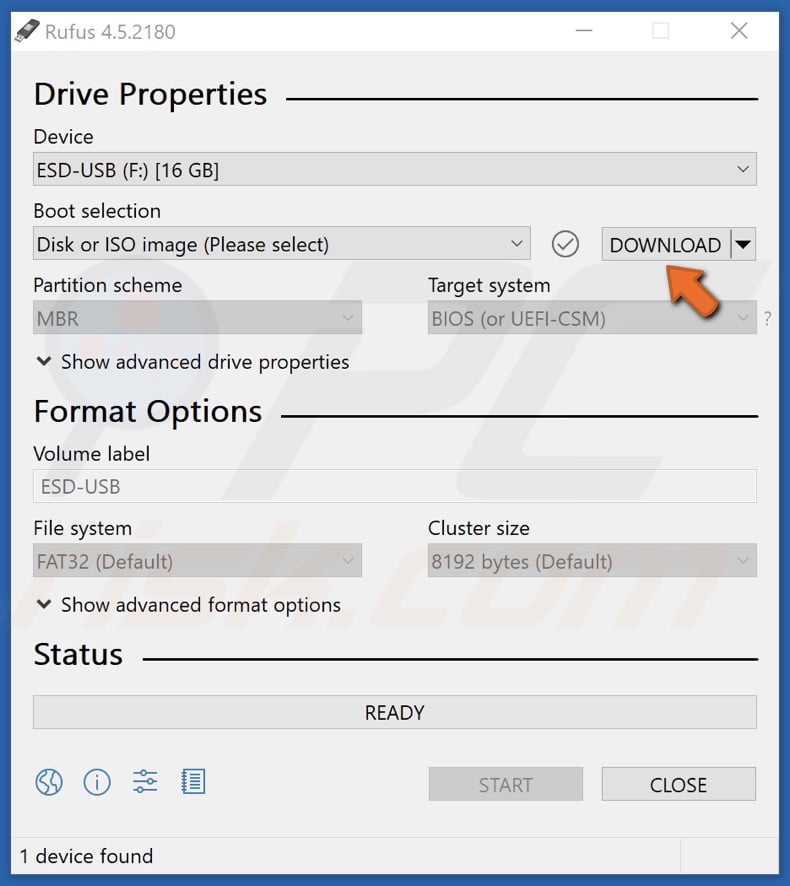
8. Then, click the DOWNLOAD button.
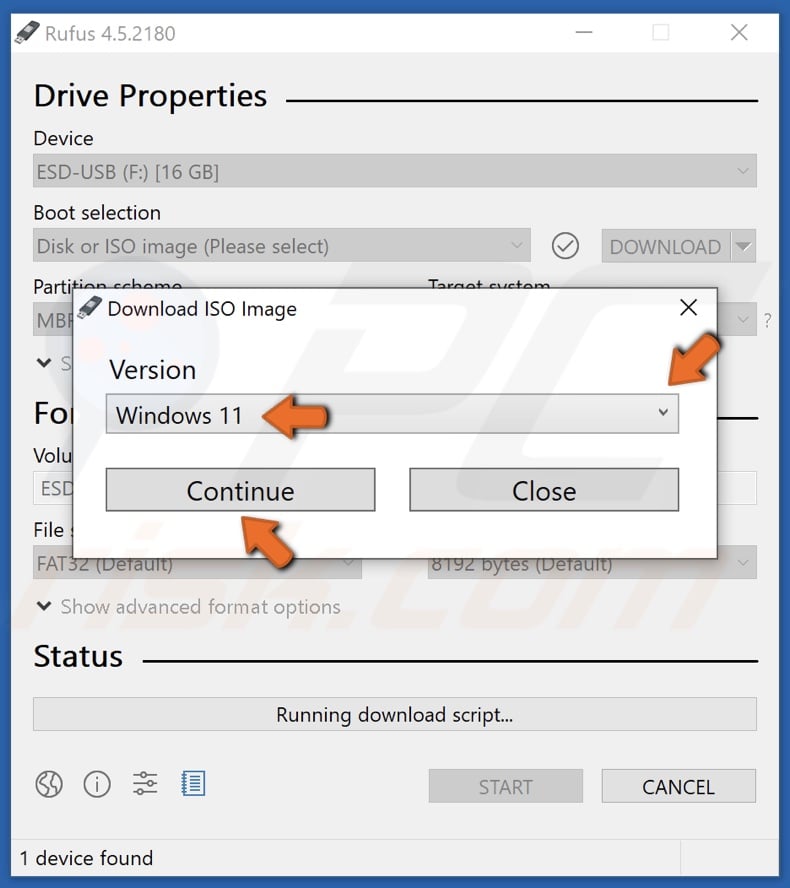
9. Open the Version menu, select Windows 11, and click Continue.
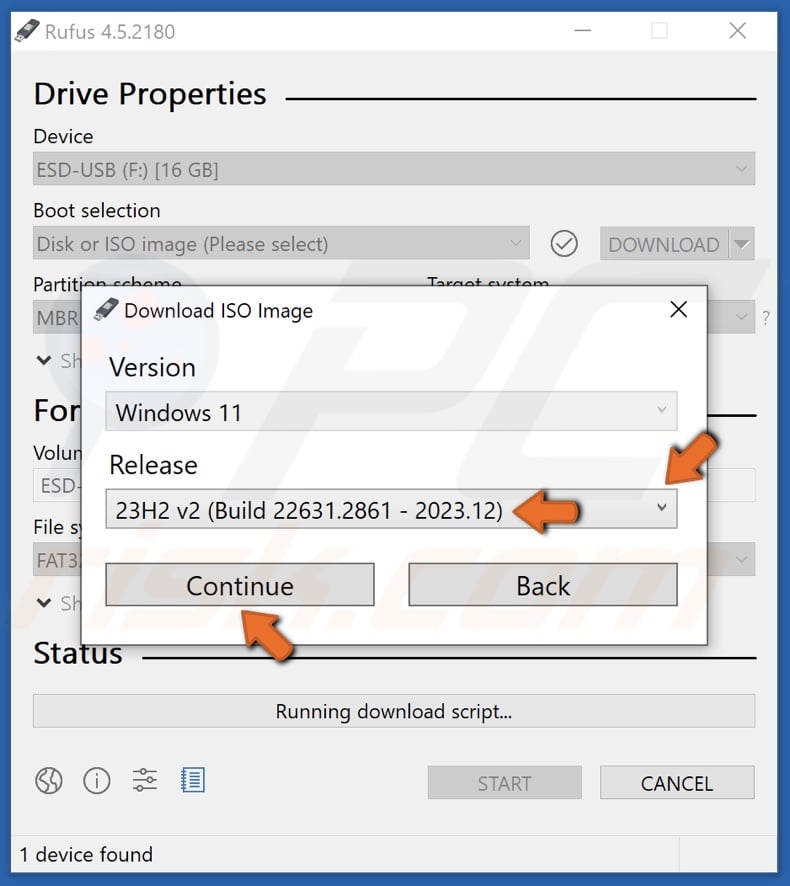
10. Open the Release menu, select the latest release, and click Continue.
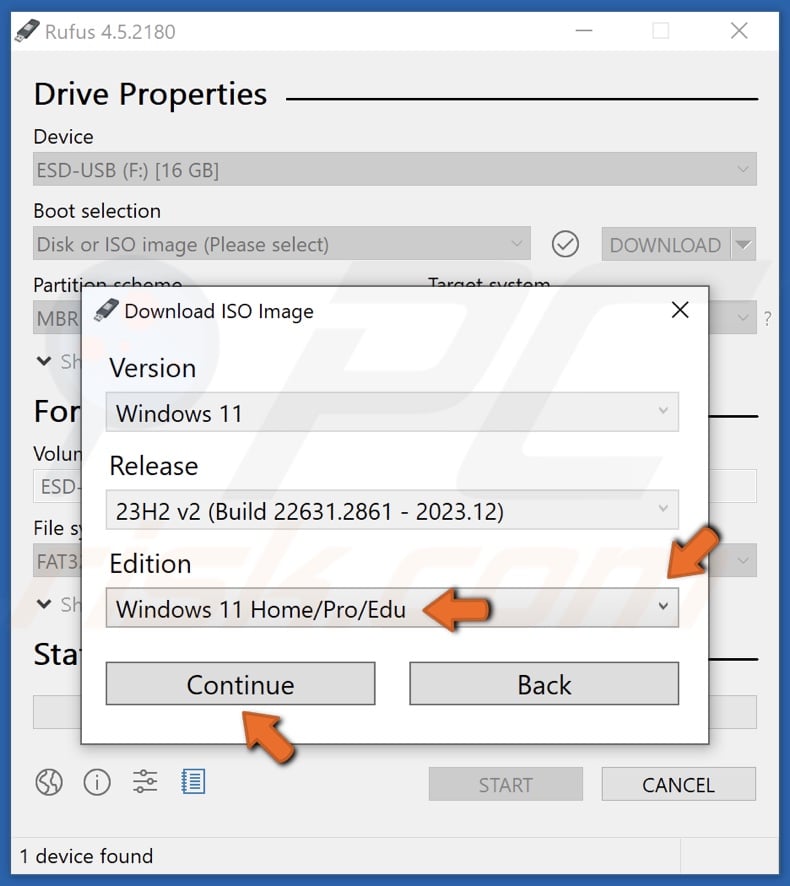
11. Open the Edition menu, select your preferred edition, and click Continue.
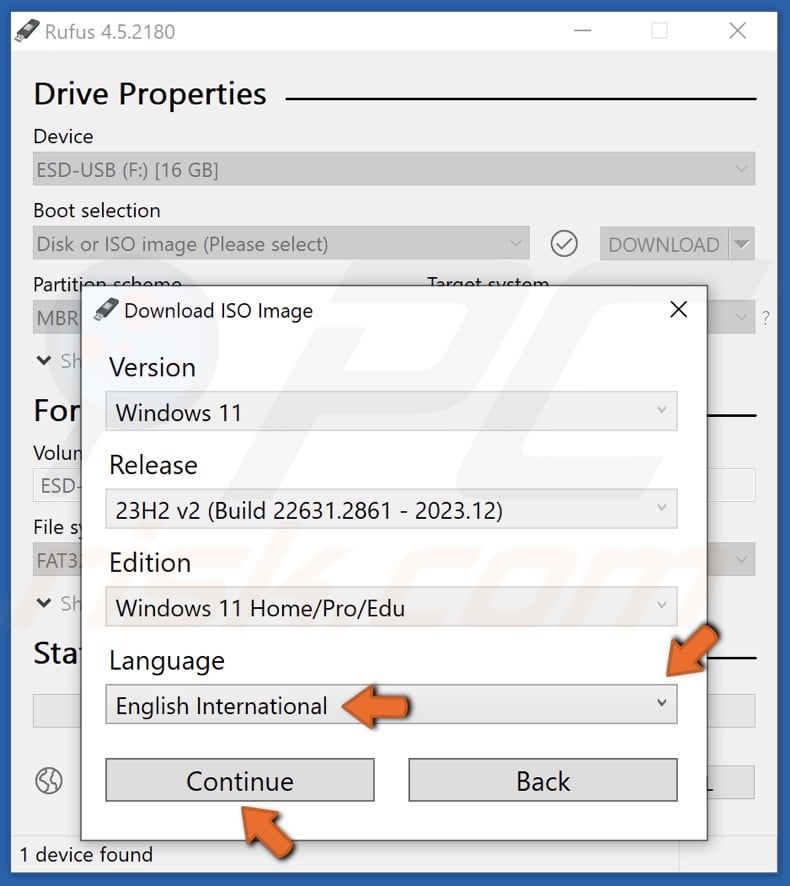
12. Open the Language menu, select your preferred language, and click Continue.
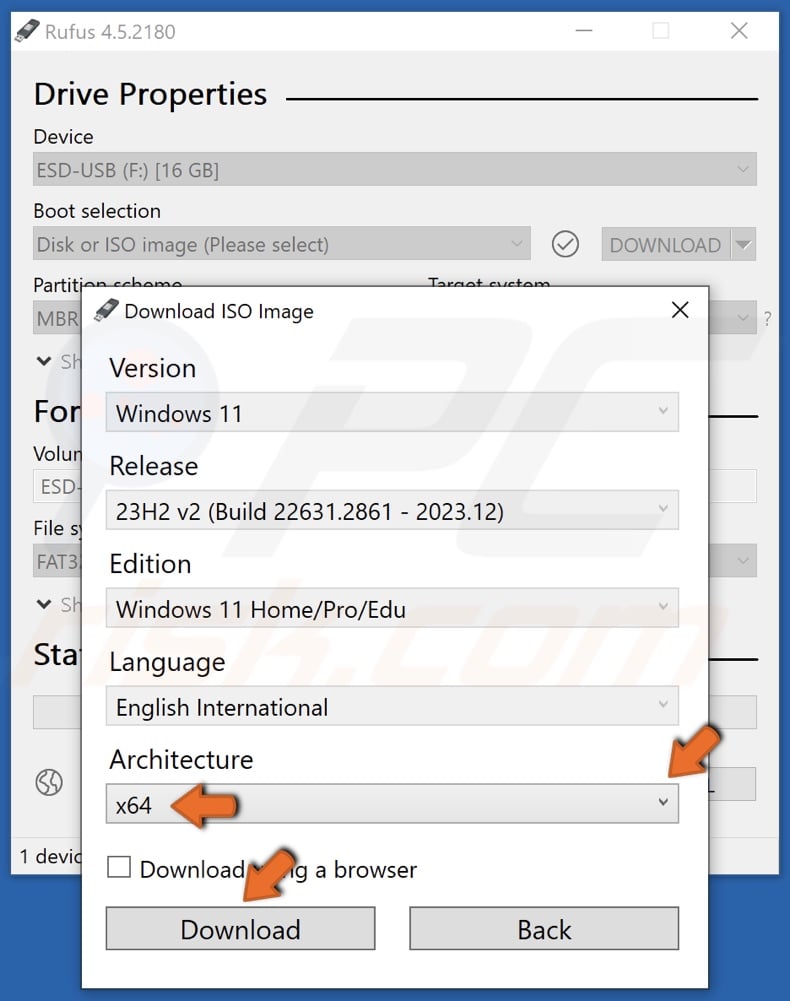
13. Open the Architecture menu and select x64.
14. Click Download.
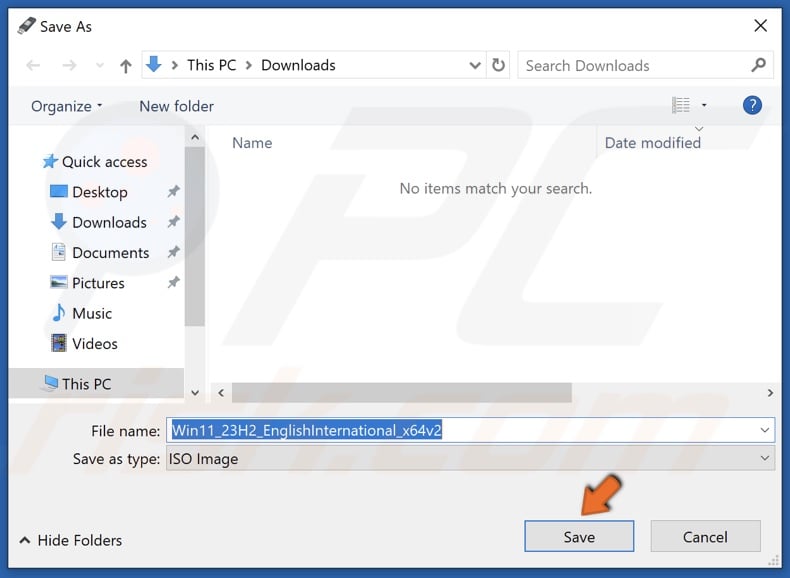
15. Choose where to save the ISO file and click Save. The download will take some time to complete.
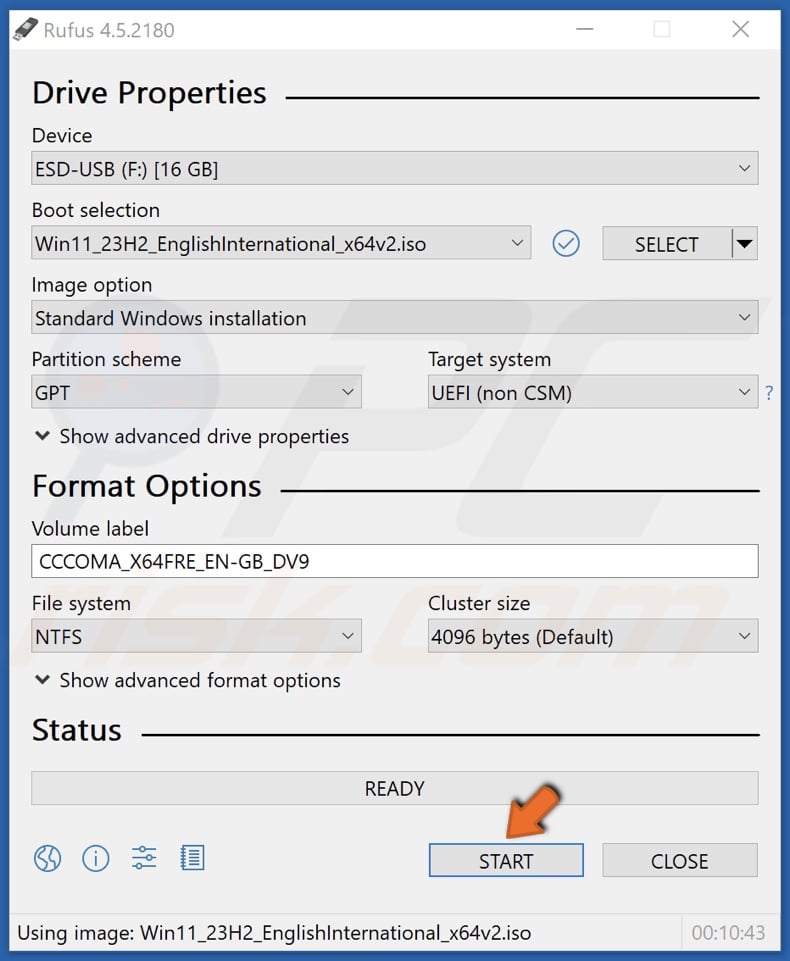
16. Click START.
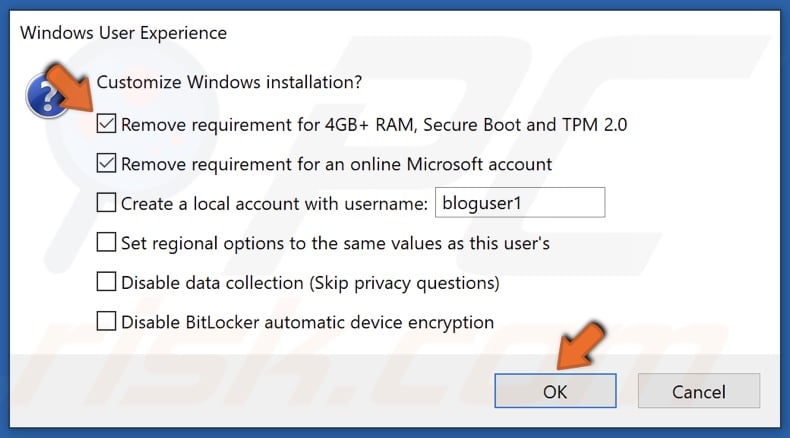
17. In the Windows User Experience dialog, ensure the Remove requirement for 4GB+ RAM, Secure Boot and TPM 2.0 option is marked, and click OK.
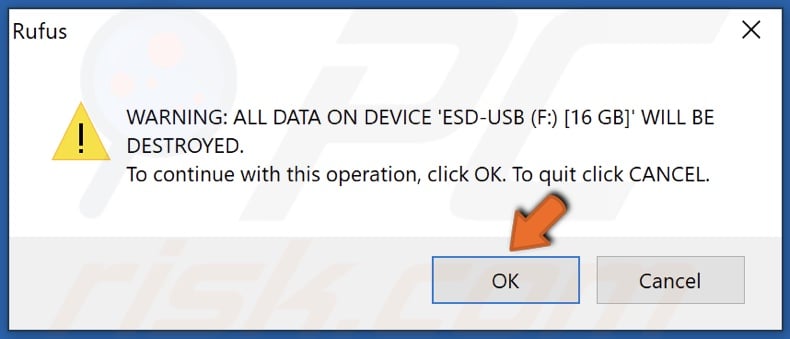
18. Click OK to confirm the formatting of your USB flash drive.
19. Wait for the bootable USB flash drive to be created. The process may take some time. Once done, the USB flash drive can be used to install Windows 11 on your officially unsupported computer.
20. Then, you can Run the Windows 11 installation setup to upgrade from your currently installed operating system or boot from the USB flash drive to perform a clean installation. Note that you may need to disable Secure Boot in your BIOS.
Method 3. Bypass Windows 11 TPM Requirement from Windows Update
If you prefer using Windows Update to upgrade to Windows 11, you will require a custom MediaCreationTool.bat workaround script by AveYo to bypass Windows 11’s TPM requirements.
1. Open your web browser and go to the Skip_TPM_Check_on_Dynamic_Update.cmd GitHub page.
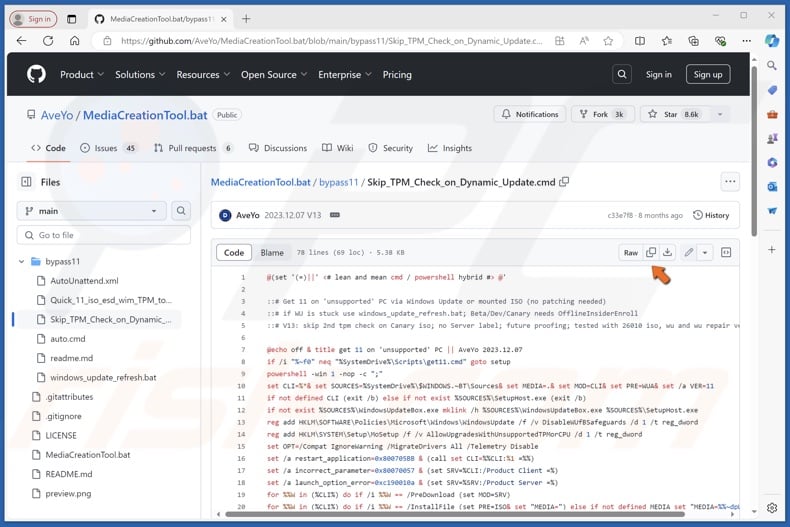
2. Click Copy raw file in the upper right corner of the code window.
3. Hold down Windows+R keys to open Run.
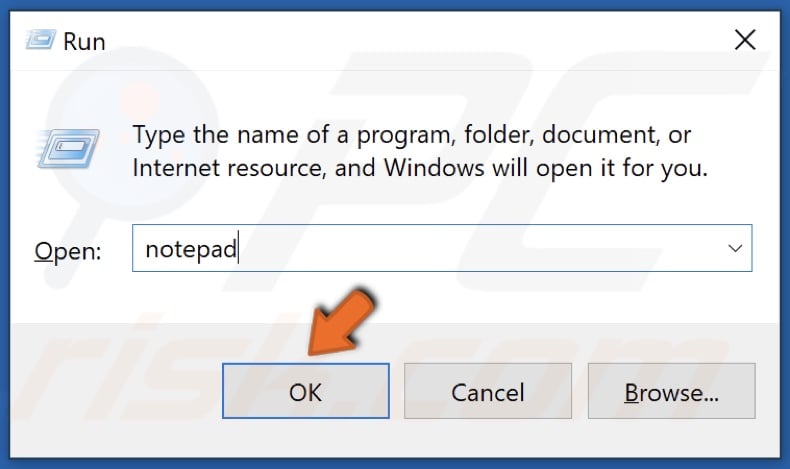
4. Type Notepad in Run and click OK.
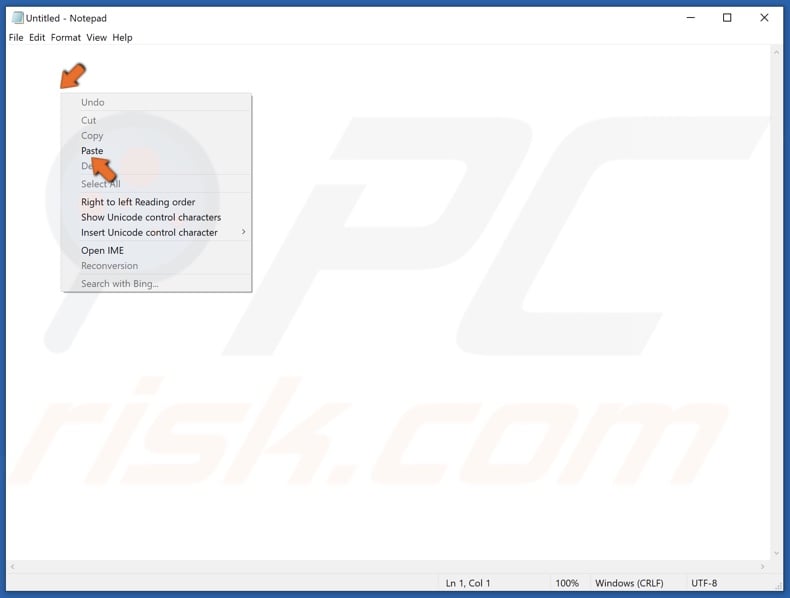
5. Right-click inside Notepad and click Paste. You will paste in the code copied from the Skip_TPM_Check_on_Dynamic_Update.cmd GitHub page.
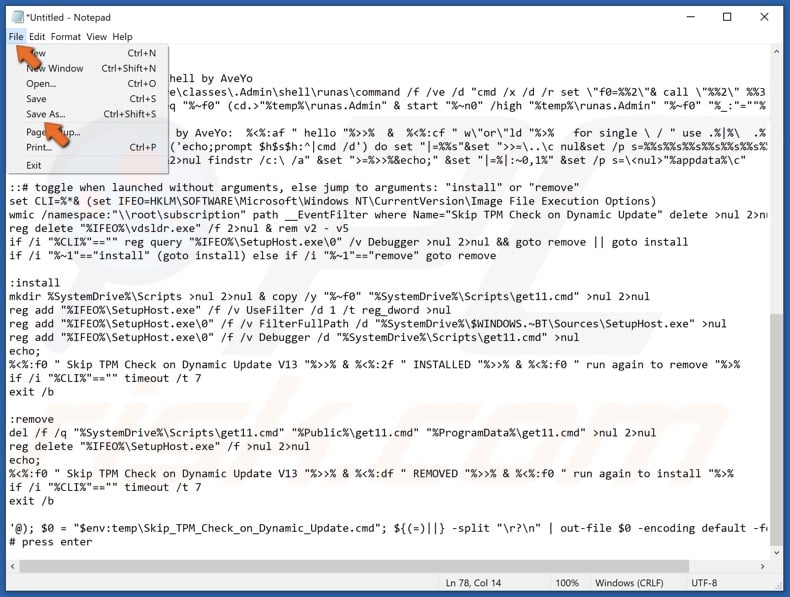
6. Click File in the menu bar and click Save As.
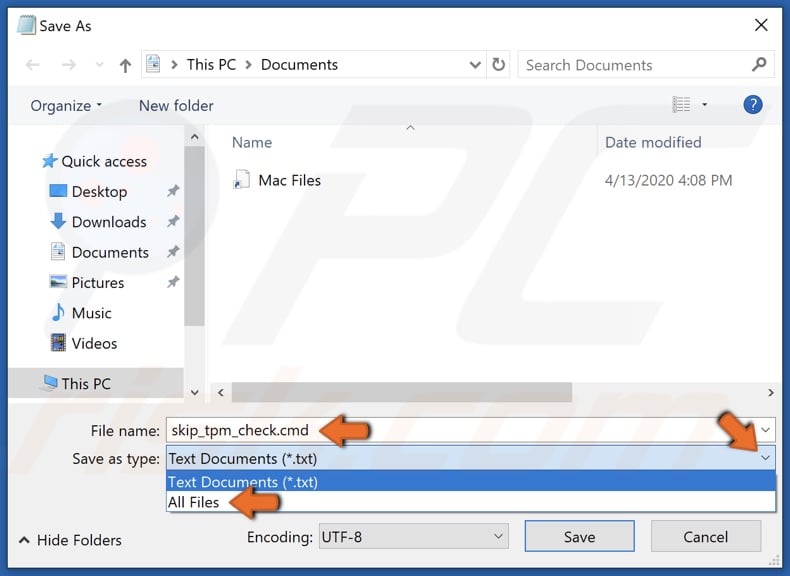
7. Name the file skip_tpm_check.cmd.
8. Open the Save as type menu and select All Files.
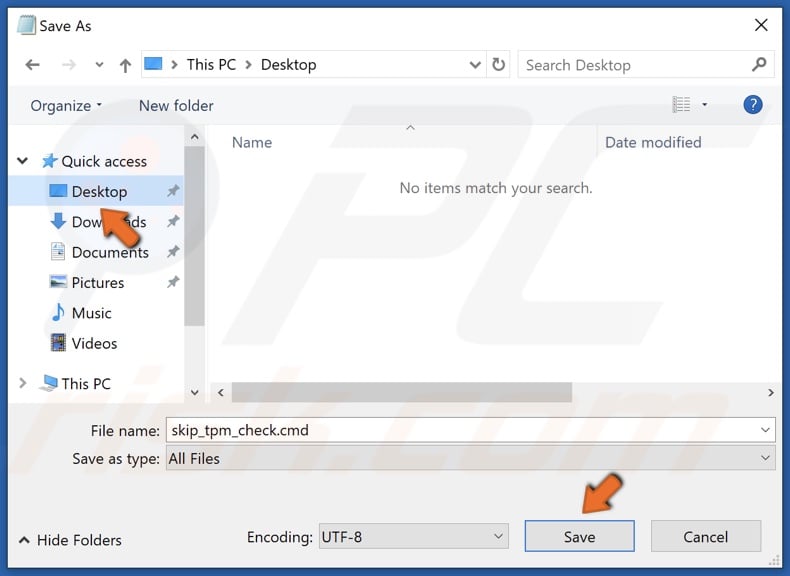
9. Click Save.
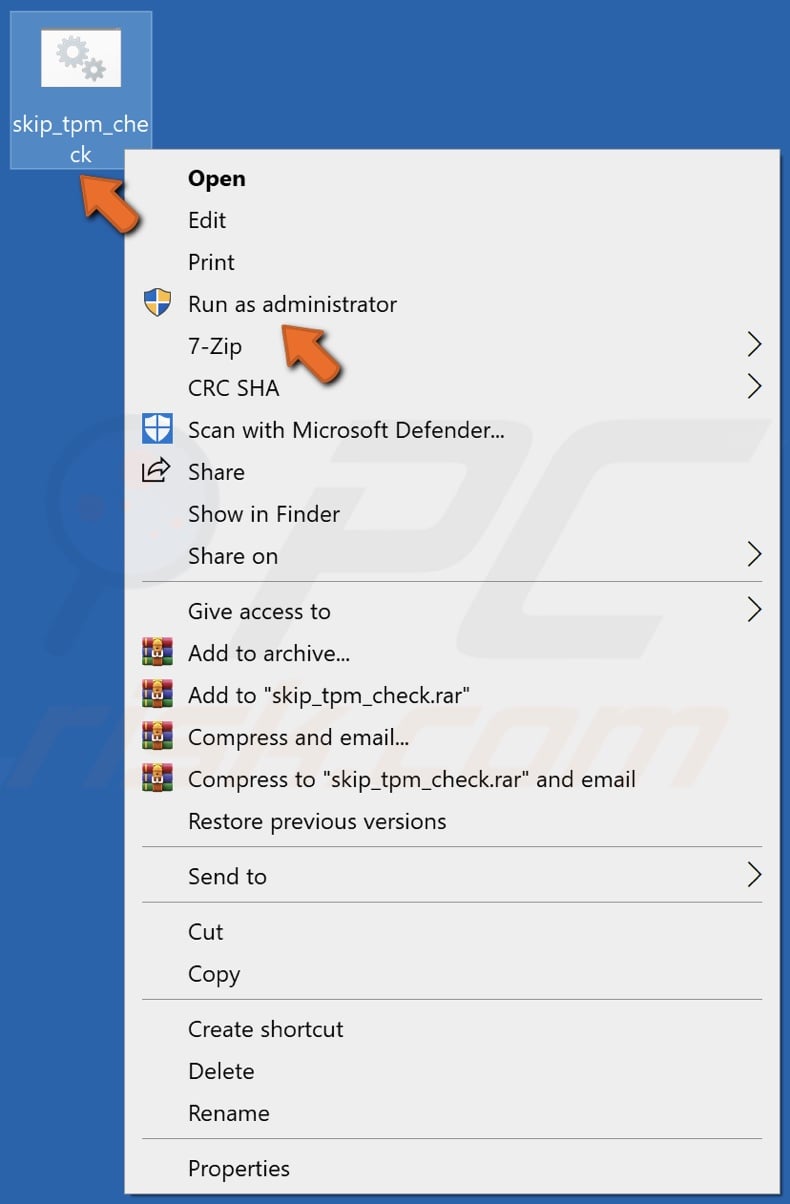
10. Then, right-click skip_tpm_check.cmd and click Run as administrator.
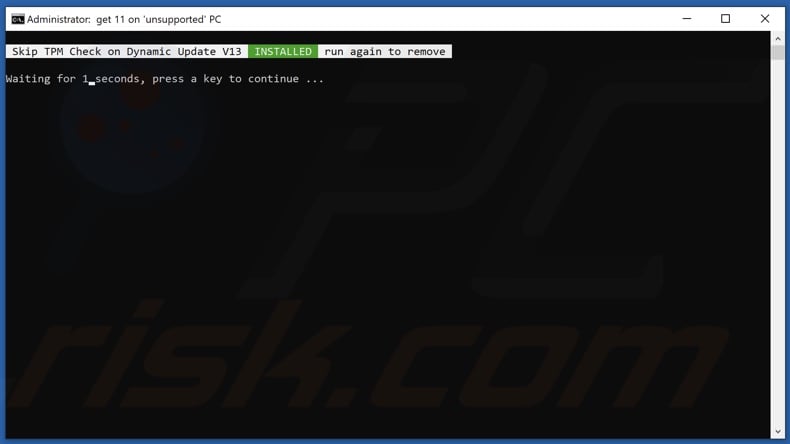
You will get a message saying, "Skip TPM on Dynamic Update Installed".
11. Windows will now be able to upgrade to Windows 11.
Method 4. Bypass Windows 11 TPM with Microsoft’s Official Registry Tweak
Microsoft has provided a Windows Registry tweak that somewhat loosens Windows 11’s system requirements, as many users who don’t meet some of the requirements wish to install it. This tweak allows Windows 11 to be installed on systems that have at least TPM 1.2 and an unsupported CPU.
1. Hold down Windows+R keys to open Run.
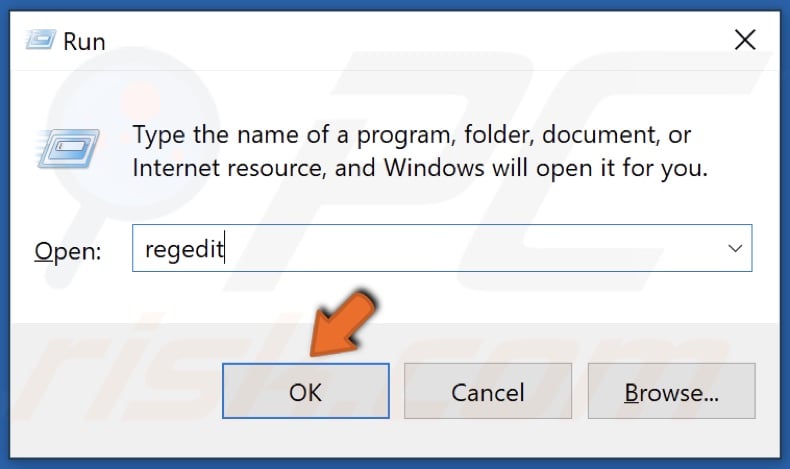
2. Type regedit in Run and click OK.
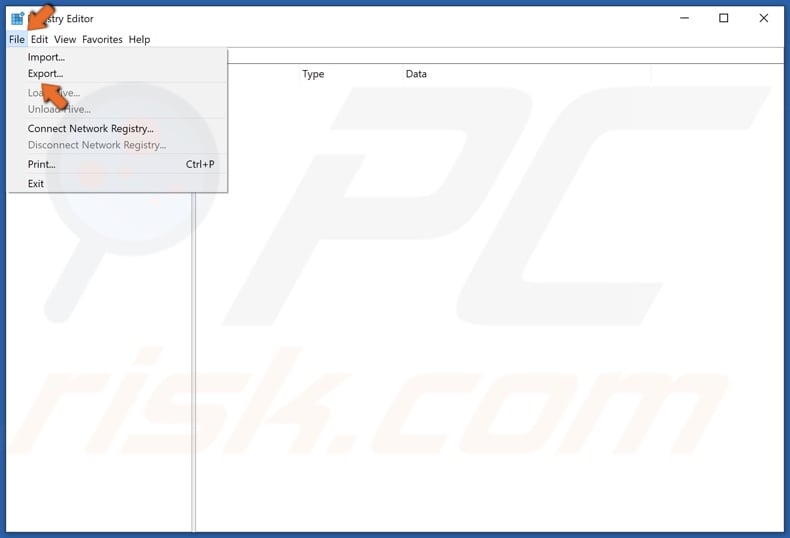
3. Before modifying the Windows Registry, create a backup. Click File and select Export.
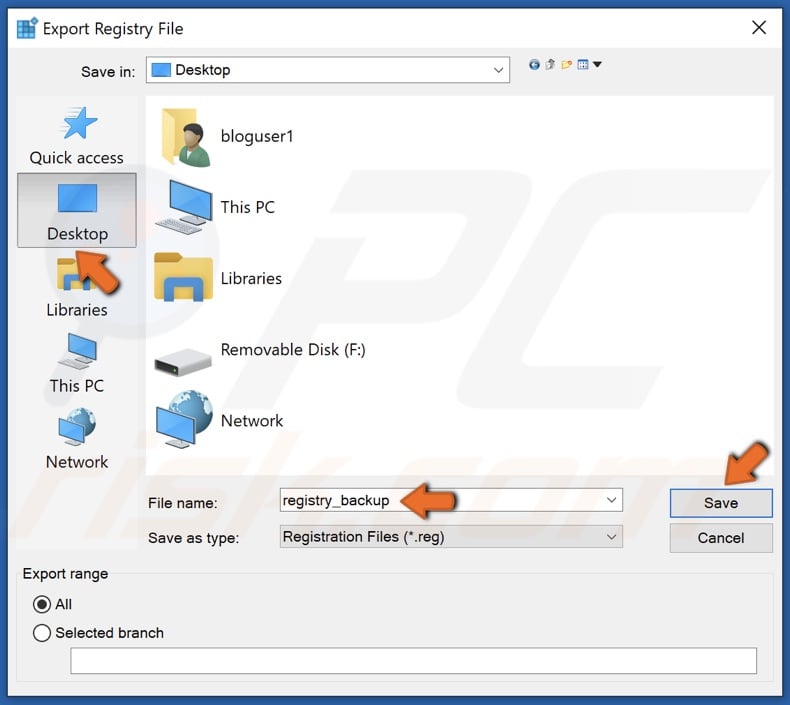
4. Choose where to save the backup and create a name.
5. Then, click Save.
6. In the Registry Editor, navigate to:
HKEY_LOCAL_MACHINE\SYSTEM\Setup\MoSetup
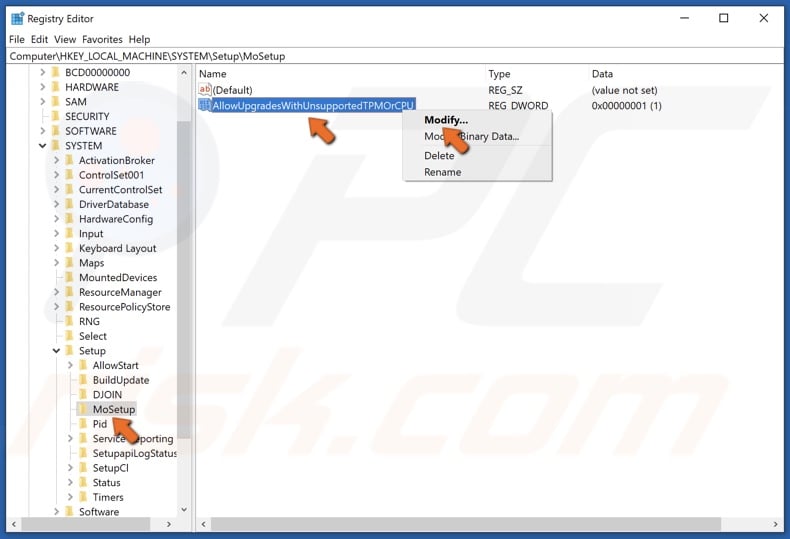
7. Select the MoSetup key.
8. In the right pane, right-click the AllowUpgradesWithUnsupportedTPMOrCPU value and click Modify.
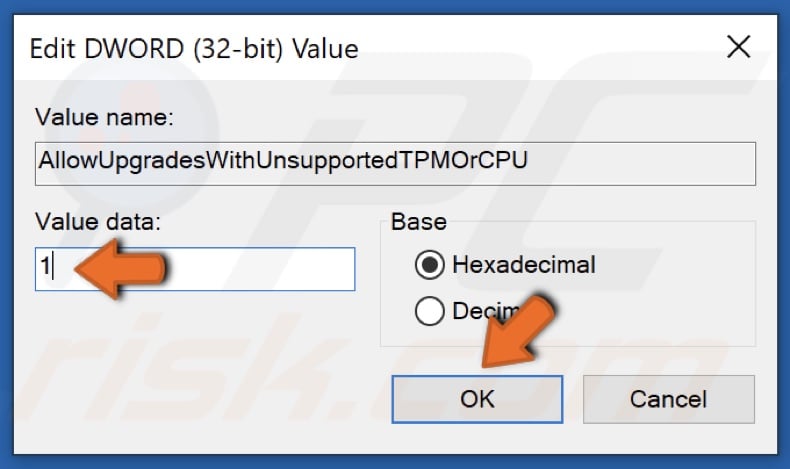
9. Set the Value data to 1 and click OK.
10. If the AllowUpgradesWithUnsupportedTPMOrCPU is not present, create it.
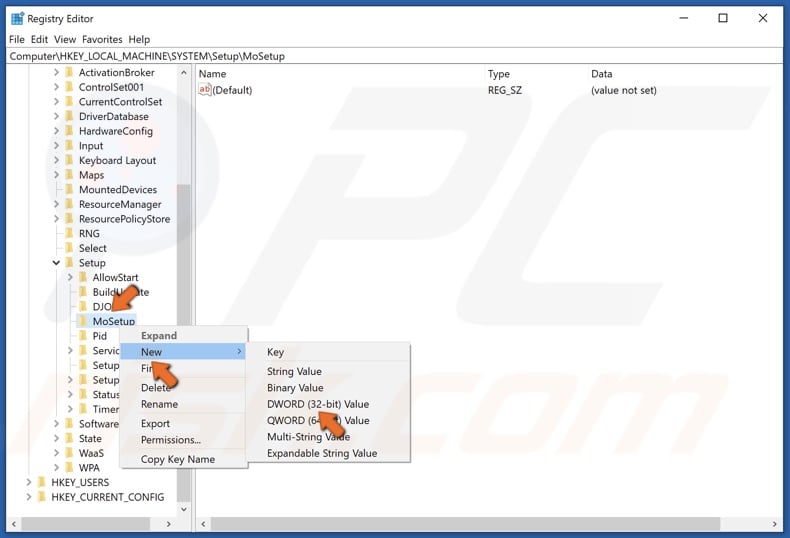
11. Right-click the MoSetup key, select New, and click DWORD (32-bit) Value.
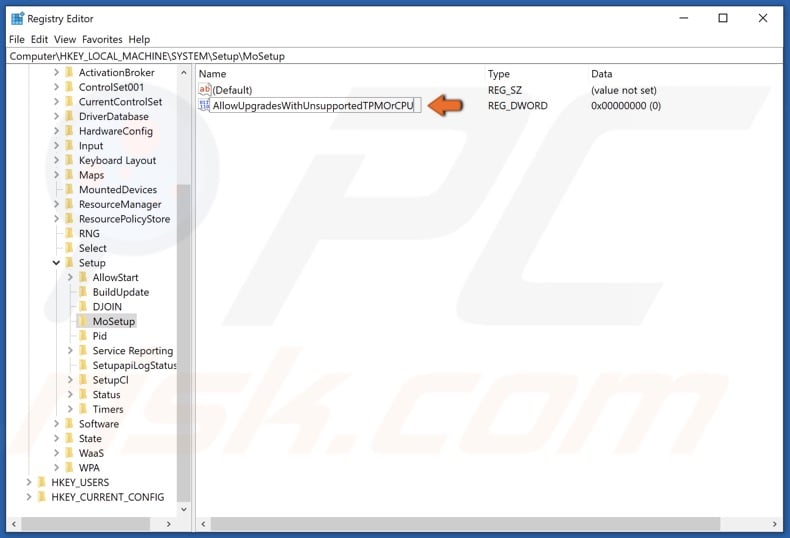
12. Name the new value AllowUpgradesWithUnsupportedTPMOrCPU and save it.
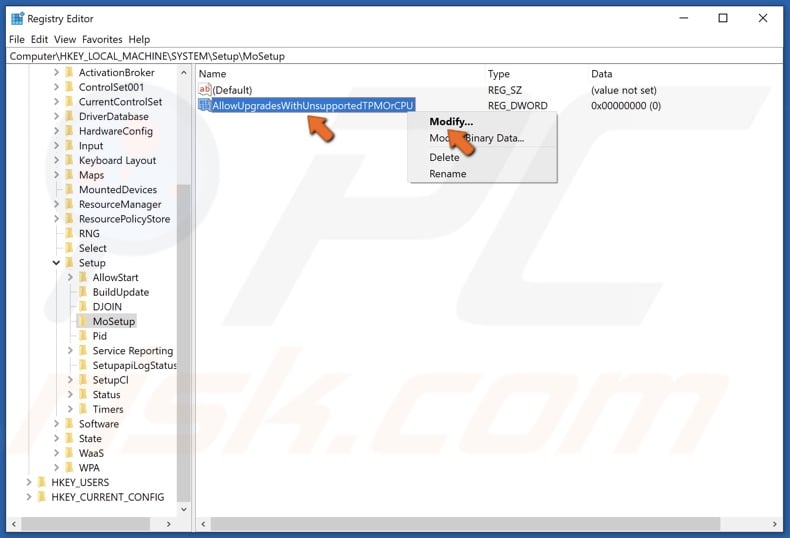
13. Right-click the AllowUpgradesWithUnsupportedTPMOrCPU value and click Modify.
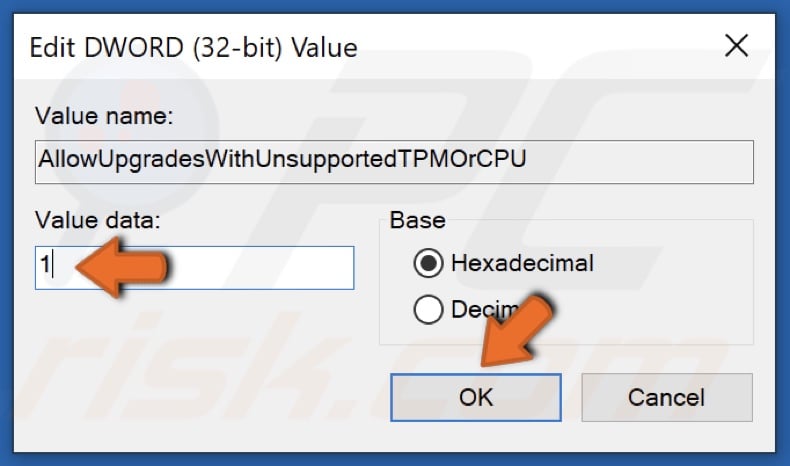
14. Set the Value data to 1 and click OK.
15. Close the Registry Editor and restart your PC.
16. You will now be able to upgrade to Windows 11 from Windows 10 using a bootable USB flash drive.
Did this article help you bypass Windows 11 TPM requirements and install Windows 11? Let us know by leaving a comment in the Discussion section below.
Share:

Rimvydas Iliavicius
Researcher, author
Rimvydas is a researcher with over four years of experience in the cybersecurity industry. He attended Kaunas University of Technology and graduated with a Master's degree in Translation and Localization of Technical texts. His interests in computers and technology led him to become a versatile author in the IT industry. At PCrisk, he's responsible for writing in-depth how-to articles for Microsoft Windows.

▼ Show Discussion