How to Remove PIN from Windows 11 and Fix Remove PIN Grayed Out

Get Free Scanner and check your computer for errors
Fix It NowTo fix found issues, you have to purchase the full version of Combo Cleaner. Free trial available. Combo Cleaner is owned and operated by Rcs Lt, the parent company of PCRisk.com read more.
How to Remove PIN from Windows 11 and Fix Remove PIN Grayed Out Issue
A Windows Hello PIN is an easy-to-remember login code that Windows 11 requires you to set up regardless of whether you want to use a Microsoft account, fingerprint, or facial recognition to sign in to your Windows PC. However, users often experience difficulties removing the PIN because they find the “Remove PIN” option to be grayed out. This article will show how you can remove your Windows Hello PIN.

Windows 11 requires creating a Windows Hello PIN code to access your device. A PIN is easier to remember than a typical password and offers better security since it is only locally relevant.
Turning off the PIN is only available in specific conditions. If you only have the Hello PIN to sign into your device or the Passwordless account feature enabled on your Windows account, the “Remove PIN” button will be grayed out.
Windows 11 purposefully disables the PIN “Remove” option as a security measure because the PIN is only allowed for Microsoft accounts signed in on your system. While enabling this option is not recommended, you can, but you must turn off additional security features in case the “Remove PIN” button is grayed out.
Video Tutorial on How to Remove PIN from Windows 11
Table of Contents:
- Introduction
- Method 1. Disable the Windows Hello Sign-in Requirement
- Method 2. Remove the PIN Using the “I forgot my PIN” Option
- Method 3. Disable Passwordless Login for Your Microsoft Account
- Method 4. Remove the Windows Hello PIN
- How to Remove Password from Windows 11
- Method 1. Sign In with a Local Account
- Method 2. Remove Login Password
- Video Tutorial on How to Remove PIN from Windows 11
Download Computer Malware Repair Tool
It is recommended to run a free scan with Combo Cleaner - a tool to detect viruses and malware on your device. You will need to purchase the full version to remove infections. Free trial available. Combo Cleaner is owned and operated by Rcs Lt, the parent company of PCRisk.com read more.
Method 1. Disable the Windows Hello Sign-in Requirement
Windows Hello sign-in for Windows account requires you to use a PIN code to log in to your PC. While this feature is great for security reasons, it disables the “Remove PIN” option in Windows Settings. If you want to disable the PIN, it may be grayed out in Windows Settings. To Re-enable the “Remove PIN” option, disable the Windows Hello sign-in requirement using the instructions below.

1. Right-click Start and click Settings.
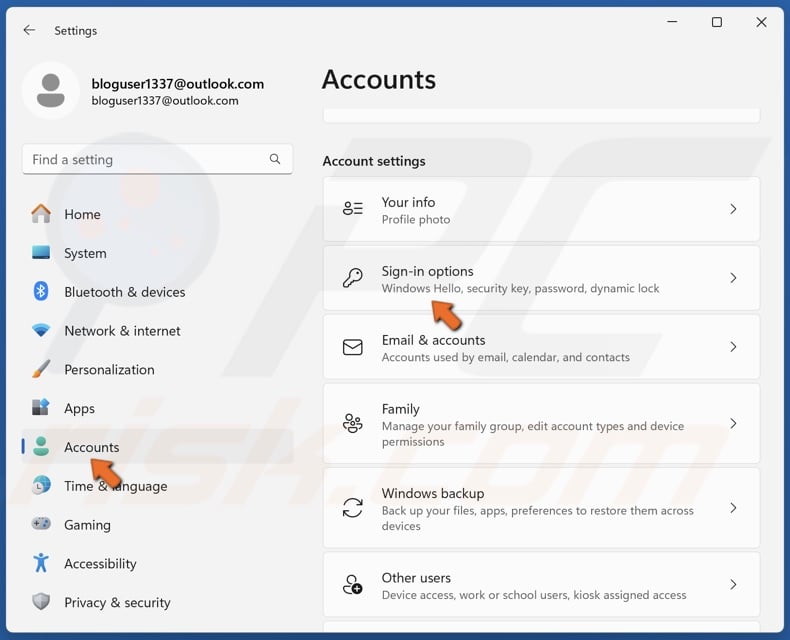
2. Select the Accounts panel and click Sign-in options.
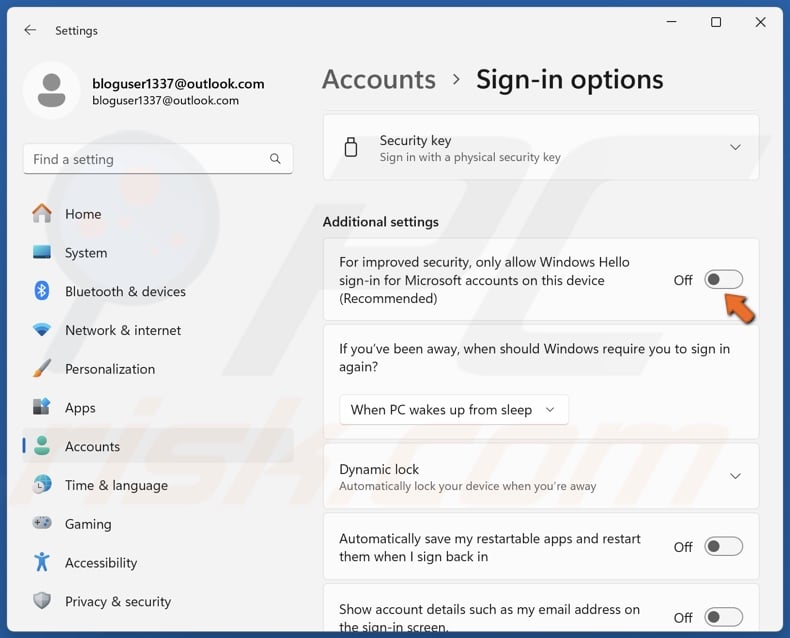
3. In the Additional settings section, toggle off the For improved security, only allow Windows Hello sign-in for Microsoft account on this device (Recommended) option.
4. Restart your PC.
The “Remove PIN” button will become available after the restart.
Method 2. Remove the PIN Using the “I forgot my PIN” Option
Windows 11 allows you to change or disable your PIN code using the “I forgot my PIN” option in Windows Settings. However, to change or replace your PIN, you will need your Microsoft account details for verification.
1. Right-click Start and click Settings.
2. Select the Accounts panel and click Sign-in options.
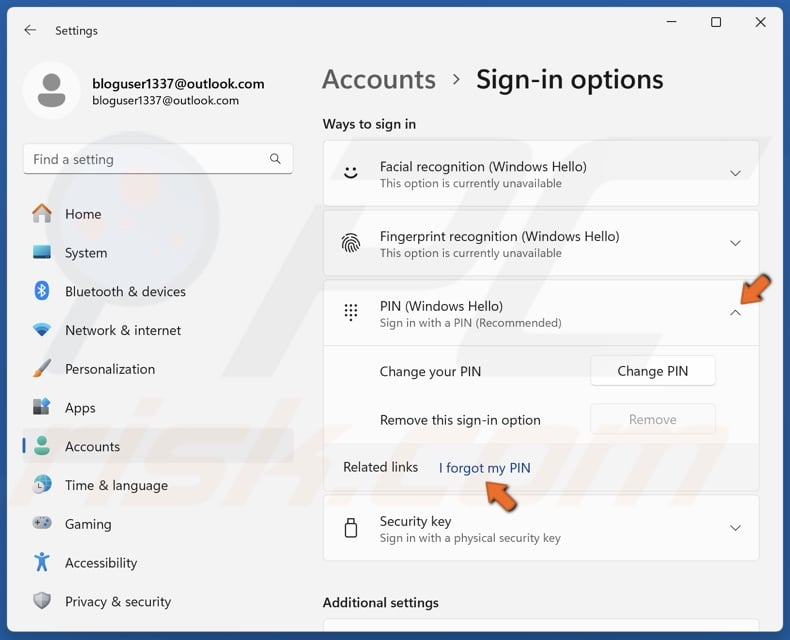
3. Expand the PIN (Windows Hello) section.
4. Click I forgot my PIN next to Related links.
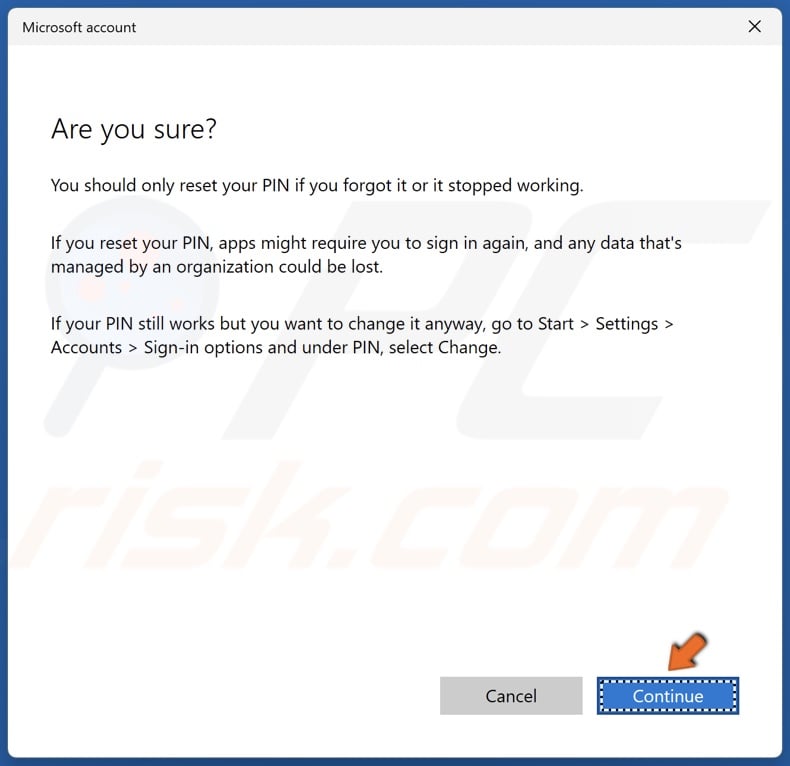
5. Click Continue in the confirmation dialog window.
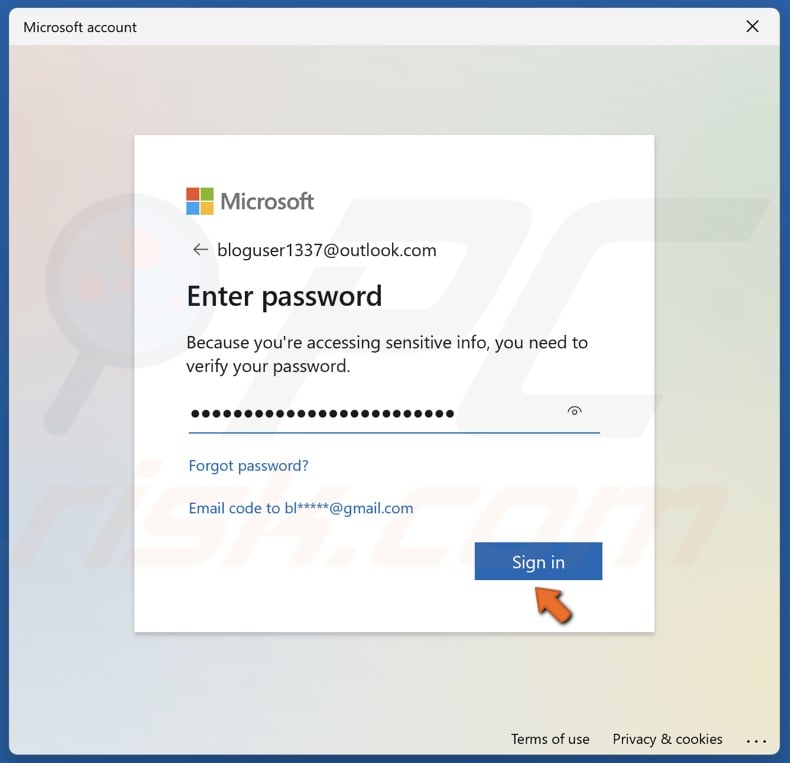
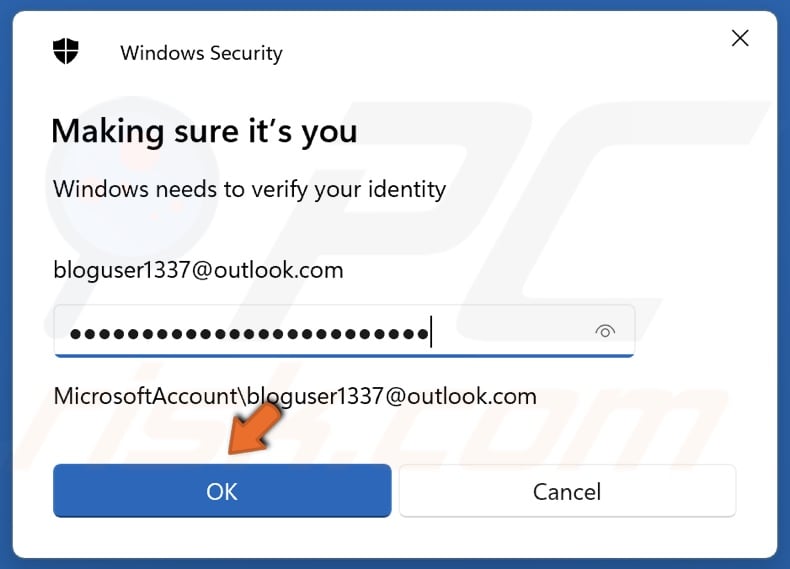
6. Enter your Microsoft account credentials and click Sign in.

7. Click Cancel when the Set up PIN window appears to remove the PIN.
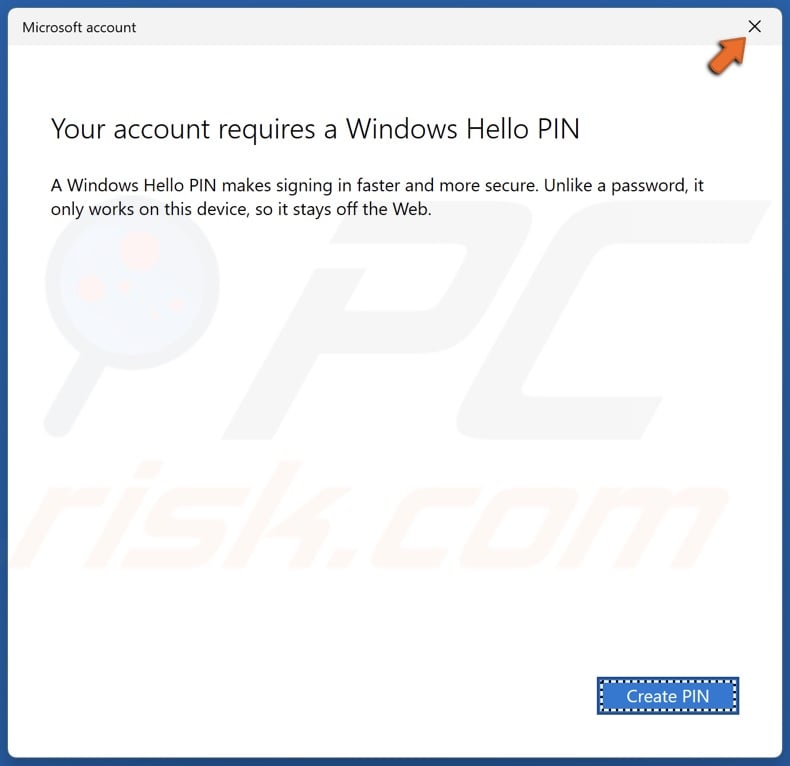
8. Close the PIN setup window.
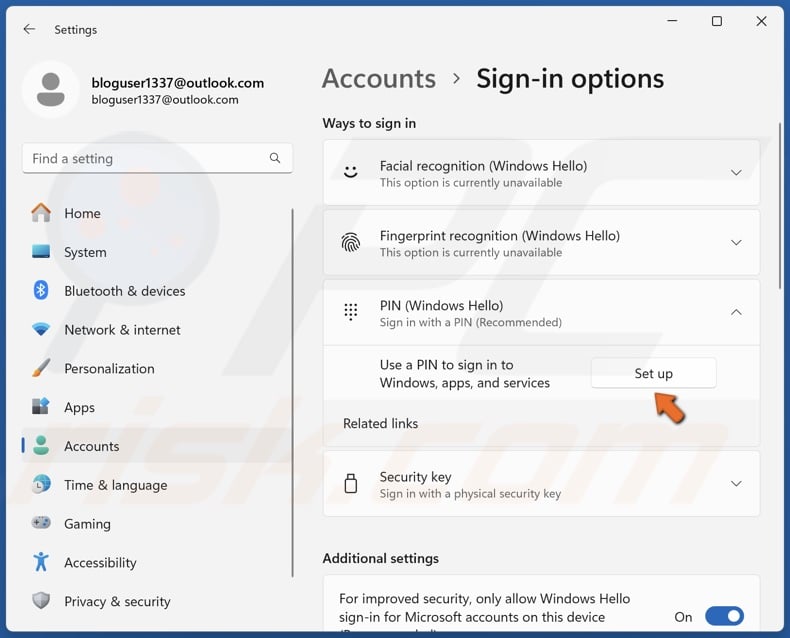
9. Alternatively, if you want to change the PIN, click Set up.

10. Click Next.
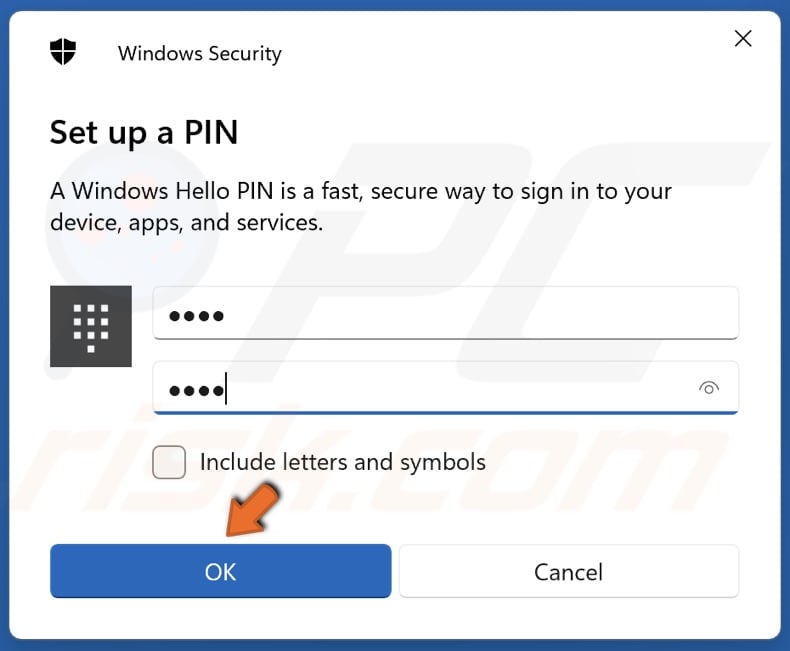
11. Enter a new PIN and click OK.
Method 3. Disable Passwordless Login for Your Microsoft Account
The Passwordless account feature allows you to sign in to your Windows PC using a PIN, SMS code, and the authenticator app. If your “Remove PIN” option is grayed out, you can fix it by turning off the Passwordless account feature.
1. Right-click Start and click Settings.
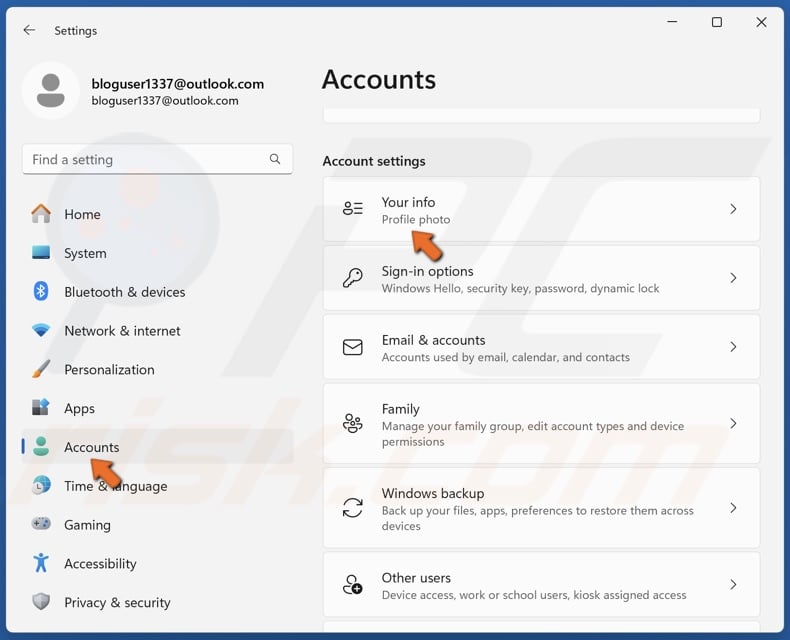
2. Select the Accounts panel and click Your Info.
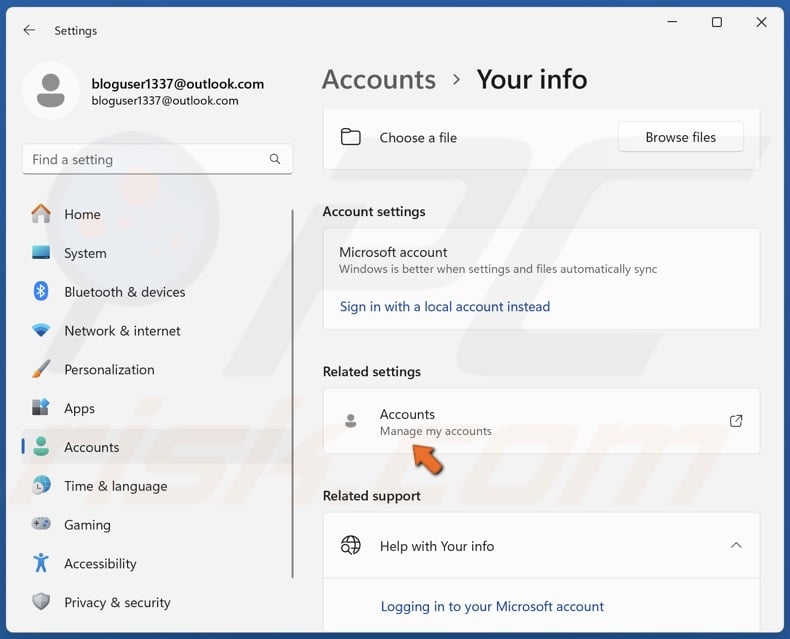
3. In the Related settings section, click Accounts.
4. Your browser will open with your account settings. Sign into your Microsoft account if they don’t.
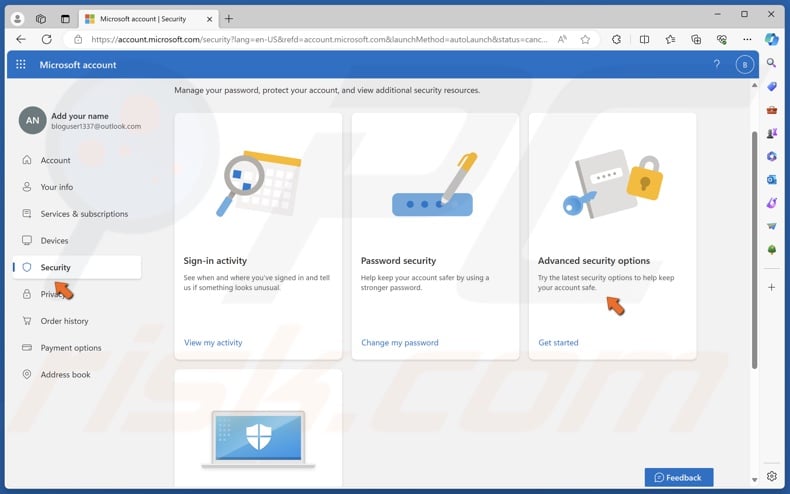
5. Select the Security tab.
6. Click Advanced security options.
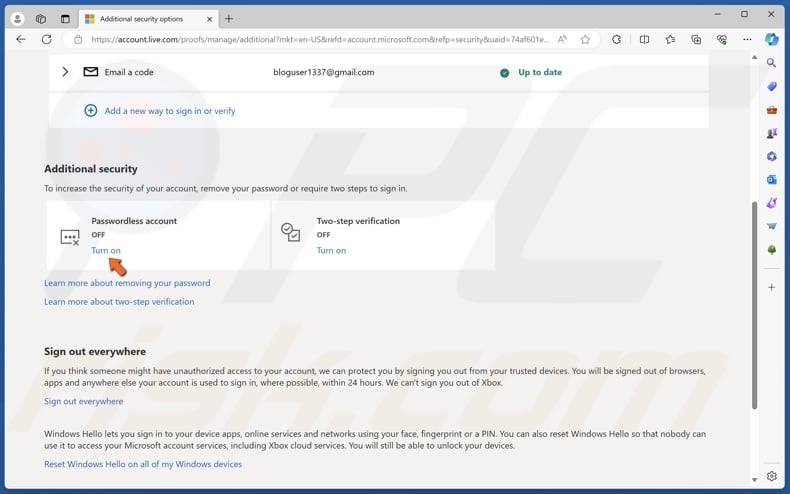
7. Scroll down to the Additional security section and click Turn off next to Passwordless account.
8. Follow the on-screen instructions to complete the process.
9. Restart your PC.
The “Remove PIN” button will become available.
Method 4. Remove the Windows Hello PIN
Once you have re-enabled the “Remove PIN” option using one of the methods above, you can turn off the PIN on your Windows 11 device.
1. Right-click Start and click Settings.
2. Select the Accounts panel and click Sign-in options.
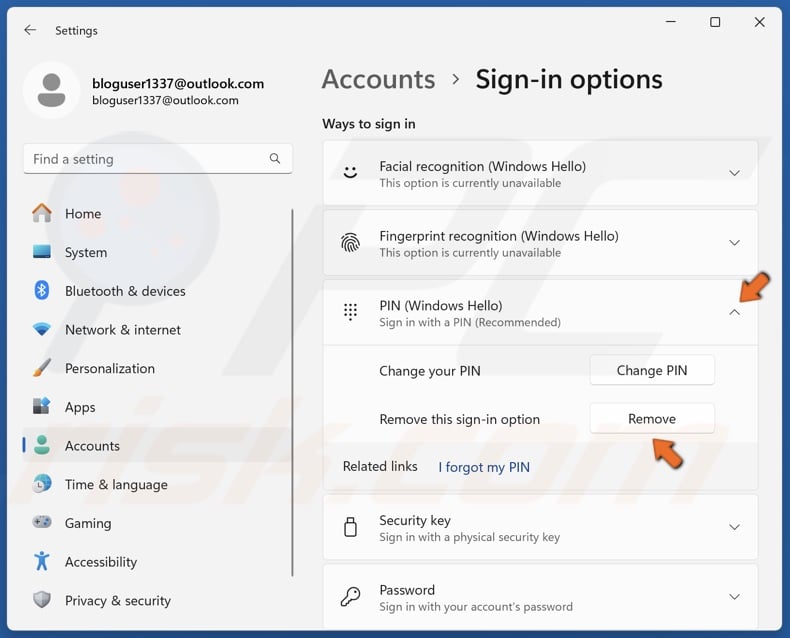
3. Scroll down and click PIN (Windows Hello) to expand it.
4. Click Remove next to Remove this sign-in option.
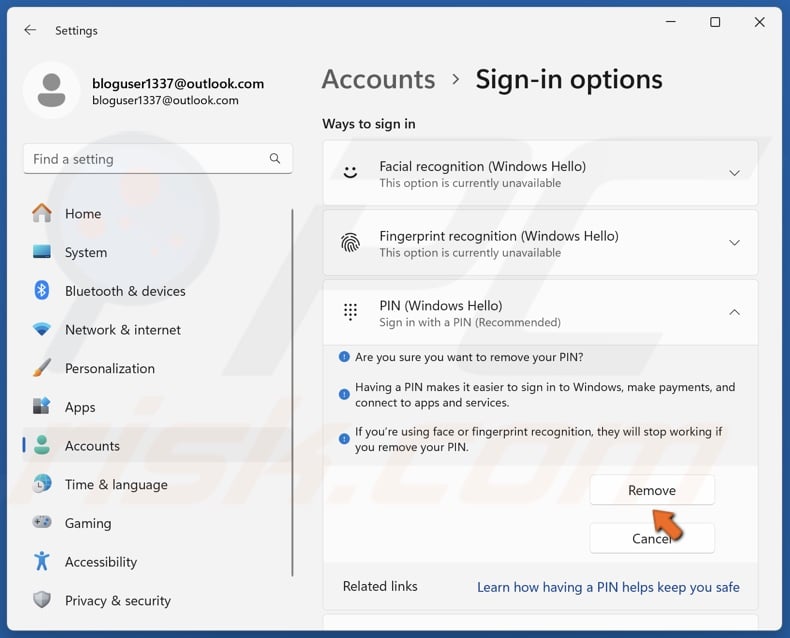
5. Click Remove again to confirm the action.
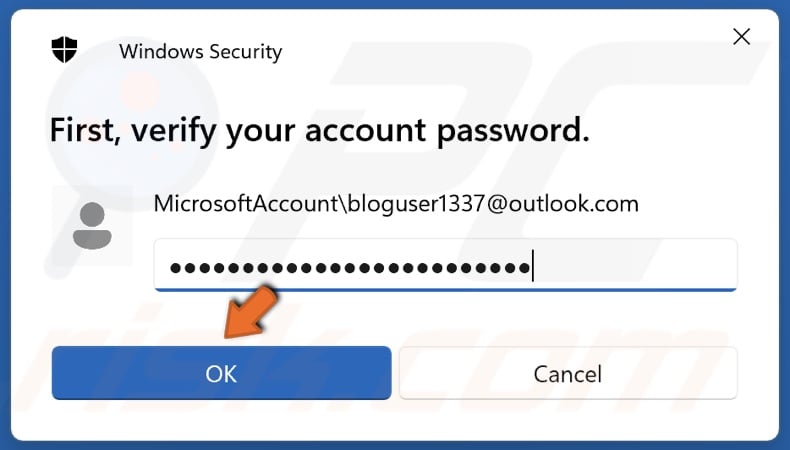
6. Enter your Microsoft account password and click OK.
How to Remove Password from Windows 11
When setting up Windows 11 for the first time, you are required to set a PIN and a Microsoft account password. If you want your computer to sign in to Windows automatically when you boot it up. Removing the PIN is not enough, as Windows 11 will ask you to enter your Microsoft account password. The methods below show how to disable the password on Windows 11.
Method 1. Sign In with a Local Account
The easiest way to remove your password on Windows 11 is to sign in to Windows with a local account since a local account doesn’t require a password. Setting up a local account will detach your Windows user account from your Microsoft account.
1. Right-click Start and click Settings.
2. Select the Accounts panel and click Your info.
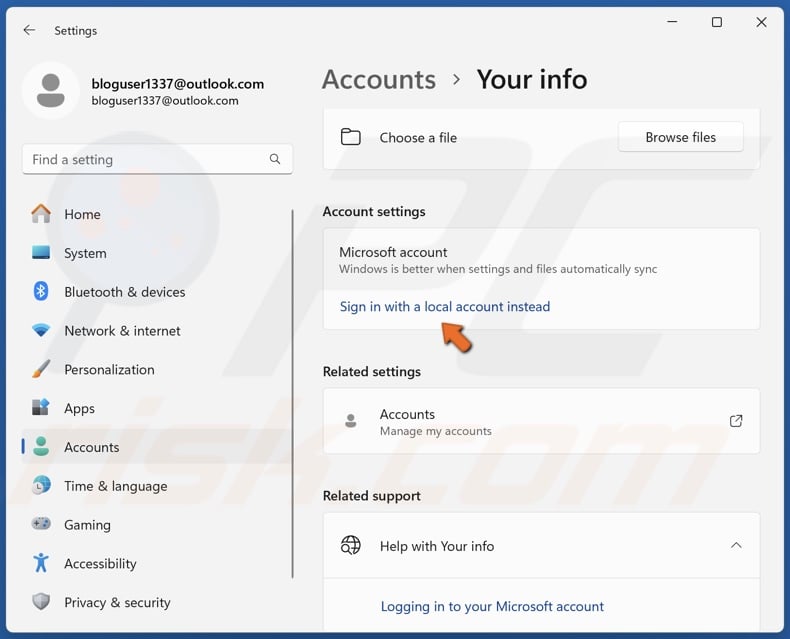
3. Click Sign in with a local account instead.

4. Click Next to configure a local account.
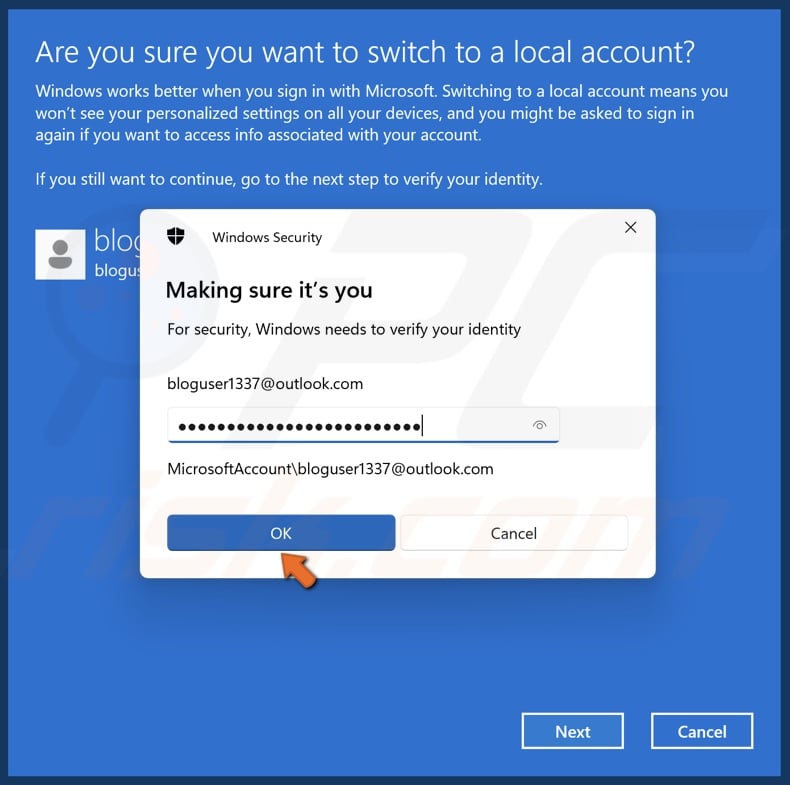
5. Enter your Microsoft account password and click OK.
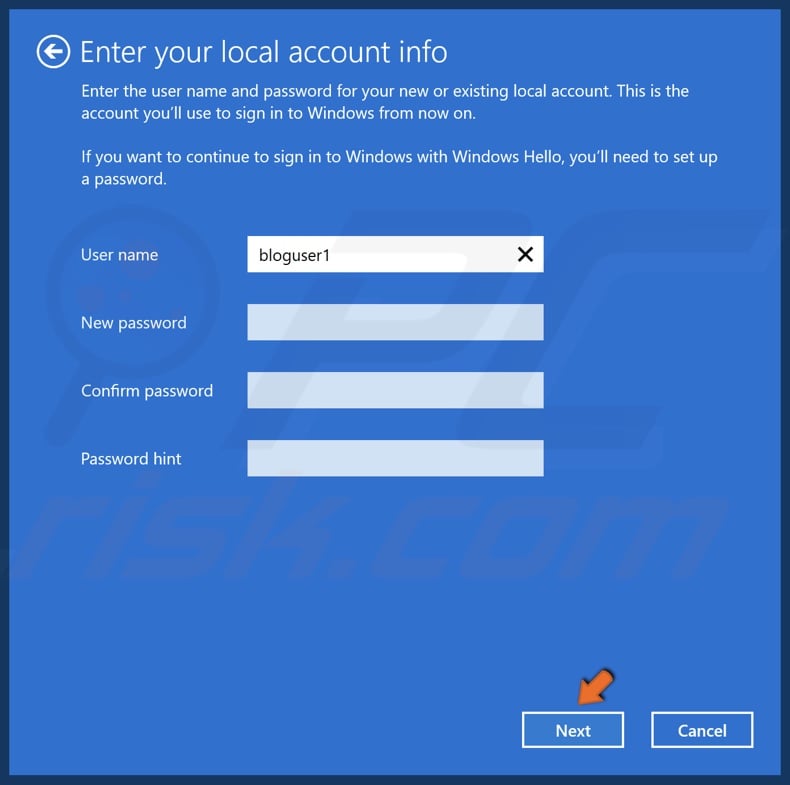
6. Configure your username and click Next.

7. Click Sign out and finish.

8. Click Sign in.
Method 2. Remove Login Password
After removing the PIN, you will still be required to enter your Microsoft account password to use your computer. If you also don’t want to have password protection on your PC, follow the instructions below to remove it.
1. Hold down Windows+R keys to open Run.
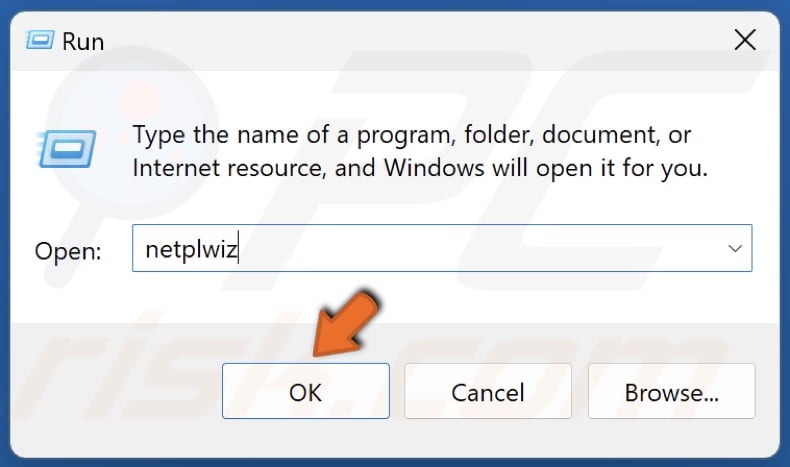
2. Type netplwiz in Run and click OK.
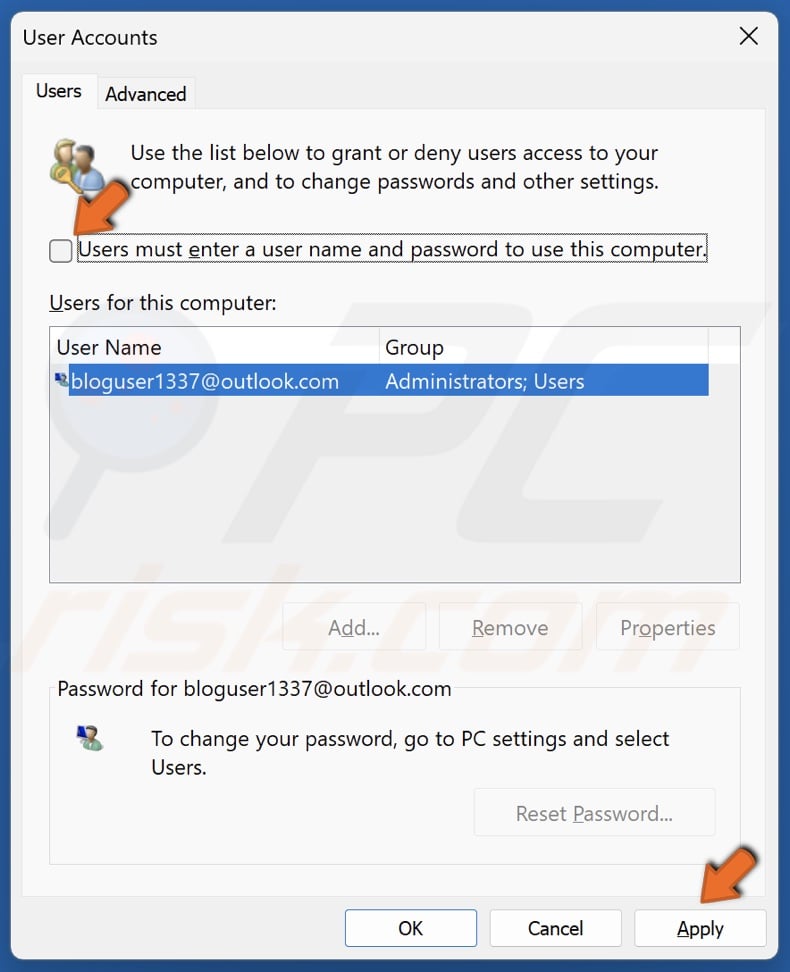
3. In the User Accounts window, unmark the checkbox next to Users must enter a user name and password to use this computer.
4. Click Apply.
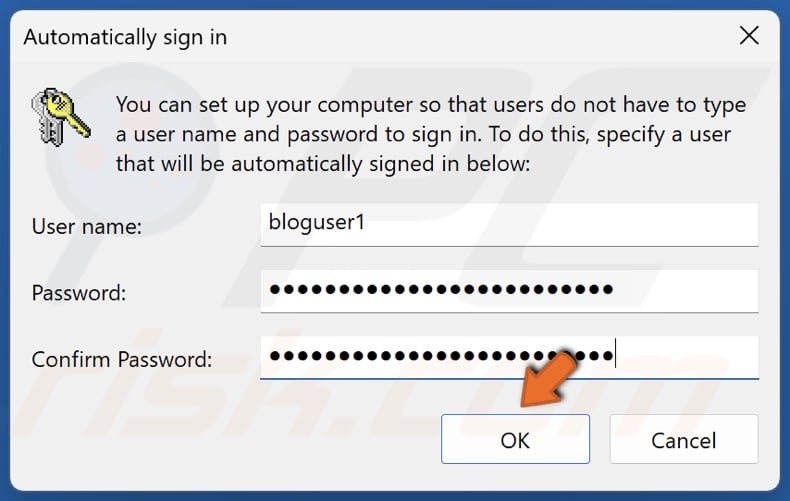
5. Enter your Microsoft account password, enter it again to confirm it, and click OK.
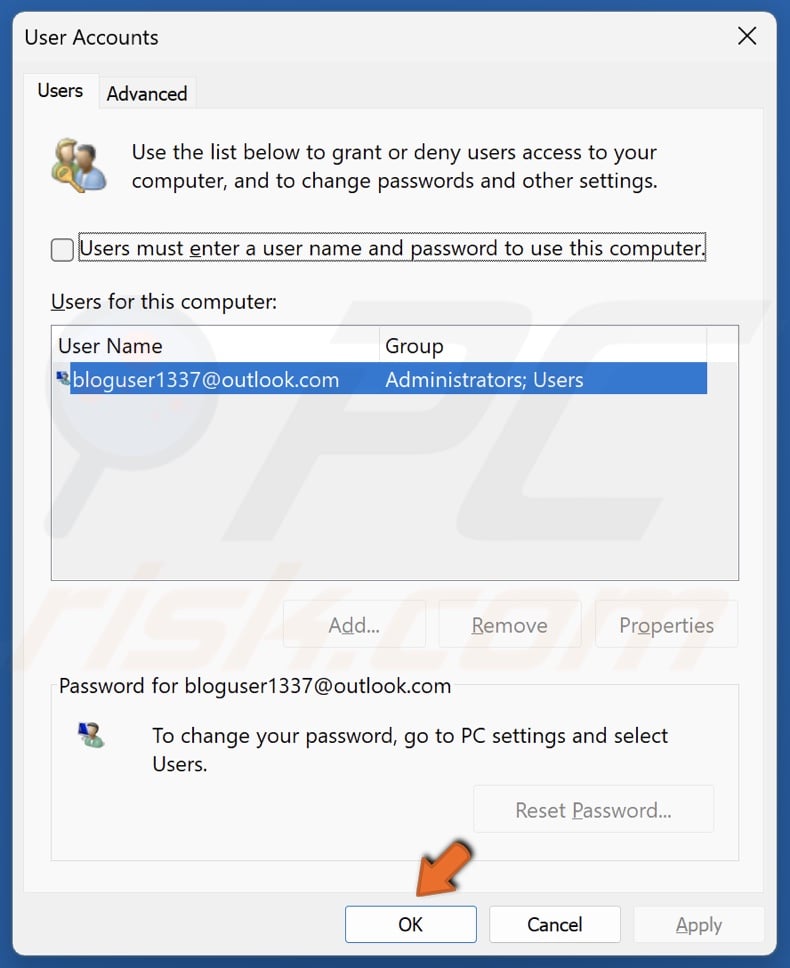
6. Click OK to close the User Accounts window.
7. Right-click Start and click Settings.
8. Select the Accounts panel and click Sign-in options.
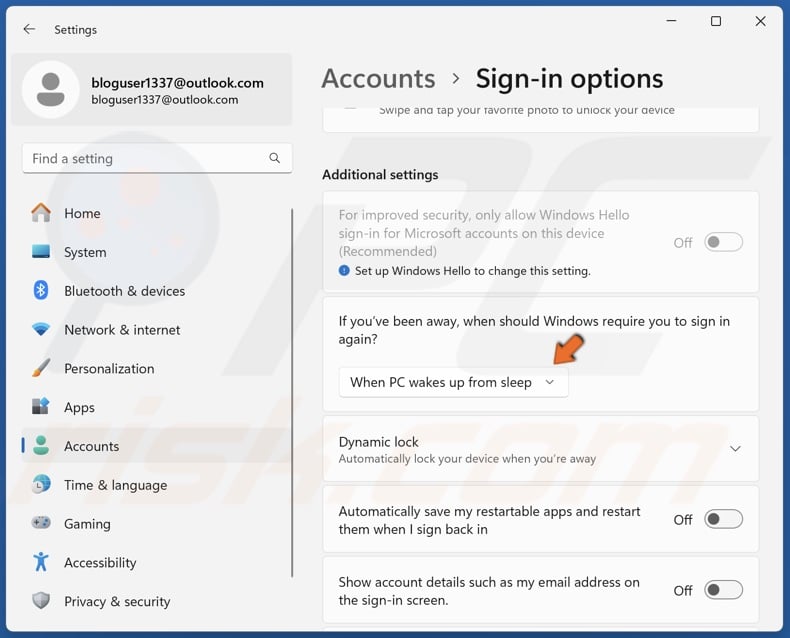
9. In additional settings, open the menu next to If you’ve been away, when should Windows require you to sign in again?
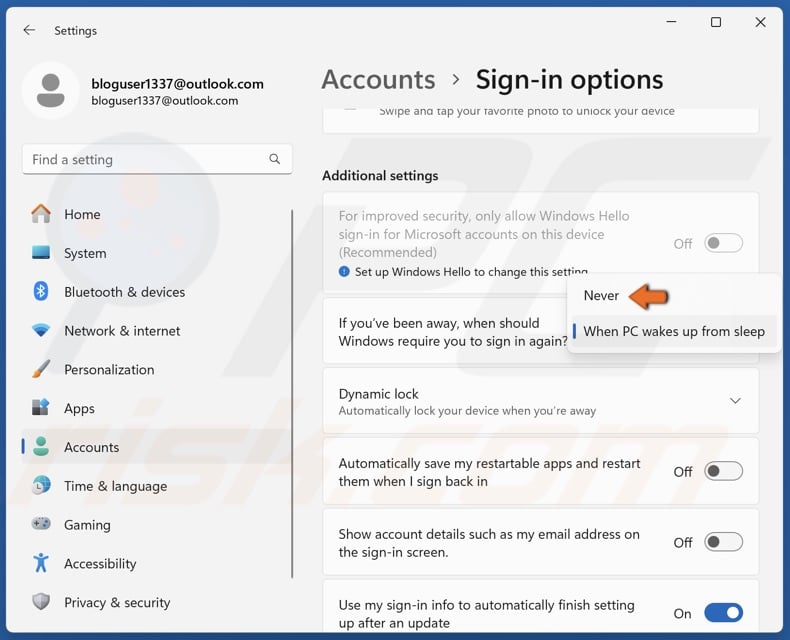
10. Select Never.
11. Enter your Microsoft account password and click OK.
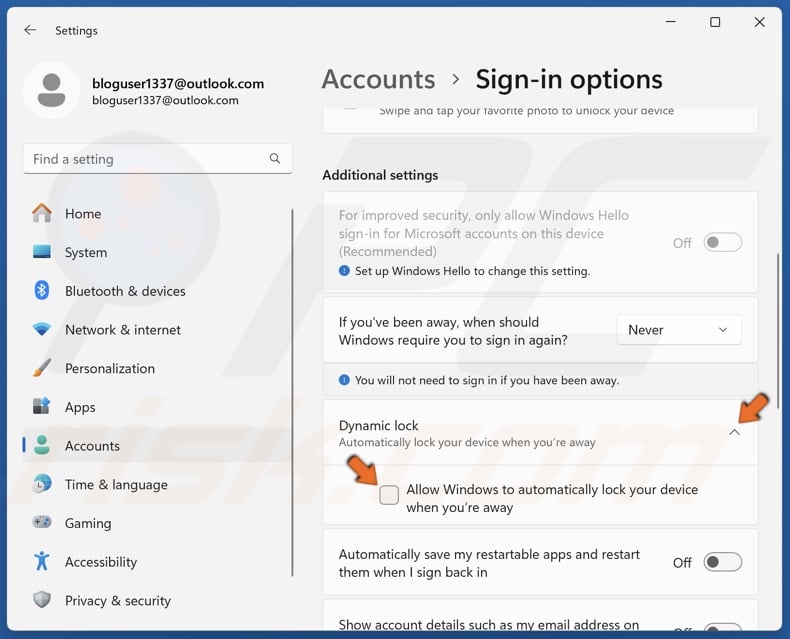
12. Under Dynamic lock, unmark the checkbox next to Allow Windows to lock your device automatically when you’re away.
Note that if you manually sign out of your account, Windows will ask you to enter your Microsoft account password. If you forgot your password, restart your PC and Windows will sign in automatically without asking for the password.
Did this article help you disable the PIN on your Windows 11 device when “Remove PIN” is grayed out? Leave a comment below to let us know.
Share:

Rimvydas Iliavicius
Researcher, author
Rimvydas is a researcher with over four years of experience in the cybersecurity industry. He attended Kaunas University of Technology and graduated with a Master's degree in Translation and Localization of Technical texts. His interests in computers and technology led him to become a versatile author in the IT industry. At PCrisk, he's responsible for writing in-depth how-to articles for Microsoft Windows.
▼ Show Discussion