How to Fix DistributedCOM Event ID 10016 Error on Windows 11

Get Free Scanner and check your computer for errors
Fix It NowTo fix found issues, you have to purchase the full version of Combo Cleaner. Free trial available. Combo Cleaner is owned and operated by Rcs Lt, the parent company of PCRisk.com read more.
How to Fix DistributedCOM Event ID 10016 Error on Windows 11
Event ID 10016 is logged when Windows tries to access DistributedCOM (DCOM) components with a preferred set of parameters but is unsuccessful. You can ignore Event ID 10016 since Windows should access DCOM components using a second set of parameters that don’t impact functionality. However, if you want to fix this issue, follow the guides in this article.
DistributedCOM (also called Distributed Component Object Model or DCOM) is a critical system protocol designed to work across numerous network types of transport like HTTP. This protocol allows various software components and apps to communicate with each other directly over a network.
What Causes DistributedCOM Event ID 10016?
The code first tries to access the necessary DCOM components with one set of parameters. If it cannot successfully access the components with the preferred parameters, it tries again with another set of parameters. The first unsuccessful attempt is recorded as Event ID 10016. The code never skips the first attempt because the first set of parameters is preferable.
Event ID 10016 is logged when Microsoft components attempt to access DCOM components without the necessary permissions or get timed out. Event ID 10016 can be seen in the Events Viewer. The event log usually contains the APPID and CLSID. These IDs are unique to each application and are necessary to grant app-specific permissions.
Do I Need to Fix DistributedCOM Event ID 10016?
You can ignore DCOM Event ID 10016 because it doesn’t adversely affect functionality and is by design. Any event that says “application-specific settings do not grant Local Activation permission” is typical for Windows 11 and older Windows OSs. These events are normal and don’t need to be fixed or removed.
However, if you don’t want to see Event ID 10016 in the Events Viewer, follow the steps in the methods below.
Video Tutorial on How to Fix DCOM Event ID 10016
Table of Contents:
- Introduction
- Method 1. Hide DistributedCOM Event ID 10016 from Event Viewer
- Method 2. Delete Values in Windows Registry
- Method 3. Enable DCOM Permissions for a Specific Error
- Video Tutorial on How to Fix DCOM Event ID 10016
Download Computer Malware Repair Tool
It is recommended to run a free scan with Combo Cleaner - a tool to detect viruses and malware on your device. You will need to purchase the full version to remove infections. Free trial available. Combo Cleaner is owned and operated by Rcs Lt, the parent company of PCRisk.com read more.
Method 1. Hide DistributedCOM Event ID 10016 from Event Viewer
Since Event ID 10016 doesn’t adversely affect functionality, you can choose to hide Event ID 10016 from Event Viewer.
1. Hold down Windows+R keys to open Run.

2. Type eventvwr in Run and click OK to open Event Viewer.
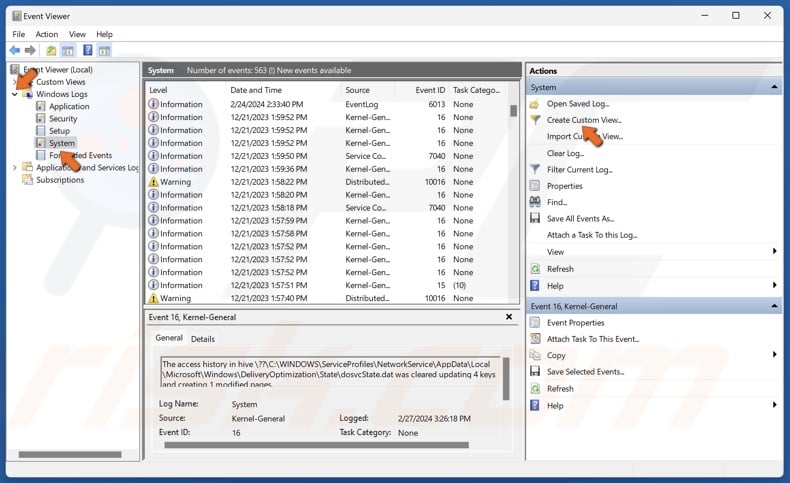
3. In Event Viewer, navigate to:
Windows Logs > System
4. In the Actions panel, click Create Custom View.
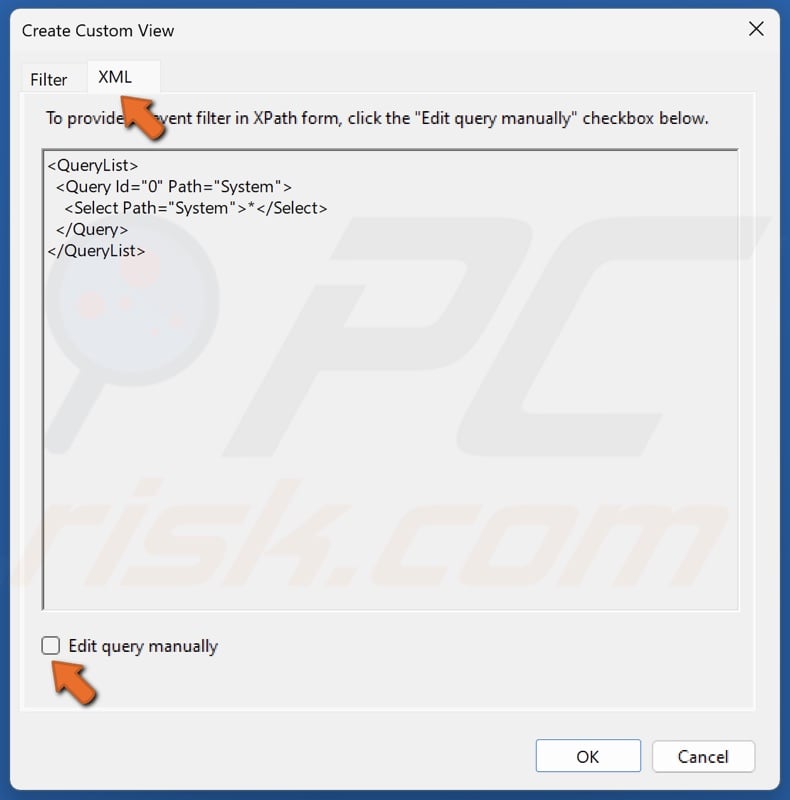
5. Select the XML tab.
6. Click Edit query manually.
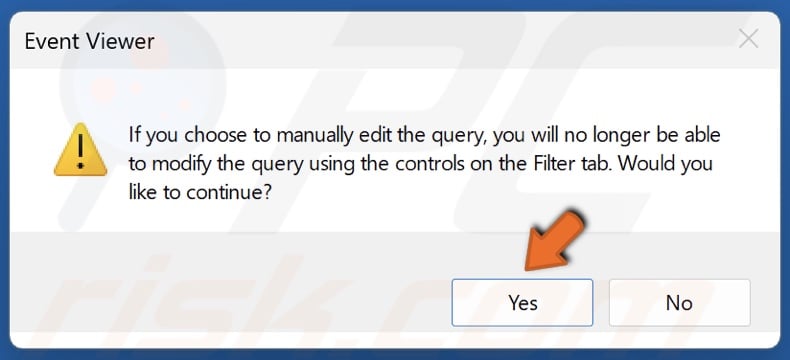
7. Click Yes when prompted by Event Viewer.
8. Copy and paste the XML filter query.
*[System[(EventID=10016)]]
and
*[EventData[
(
Data[@Name='param4'] and Data='{D63B10C5-BB46-4990-A94F-E40B9D520160}' and
Data[@Name='param5'] and Data='{9CA88EE3-ACB7-47C8-AFC4-AB702511C276}' and
Data[@Name='param8'] and Data='S-1-5-18'
)
or
( Data[@Name='param4'] and Data='{260EB9DE-5CBE-4BFF-A99A-3710AF55BF1E}' and
Data[@Name='param5'] and Data='{260EB9DE-5CBE-4BFF-A99A-3710AF55BF1E}'
)
or
(
Data[@Name='param4'] and Data='{C2F03A33-21F5-47FA-B4BB-156362A2F239}' and
Data[@Name='param5'] and Data='{316CDED5-E4AE-4B15-9113-7055D84DCC97}' and
Data[@Name='param8'] and Data='S-1-5-19'
)
or
(
Data[@Name='param4'] and Data='{6B3B8D23-FA8D-40B9-8DBD-B950333E2C52}' and
Data[@Name='param5'] and Data='{4839DDB7-58C2-48F5-8283-E1D1807D0D7D}' and
Data[@Name='param8'] and Data='S-1-5-19'
)
]]
This query contains the following values:
- param4 corresponds to the COM Server application CLSID.
- param5 corresponds to the APPID.
- param8 corresponds to the security context SID.
All of them are recorded in the 10016 event logs. If you can’t find the values, you won’t be able to use this method and the XML query because it’s specific to Event ID 10016.
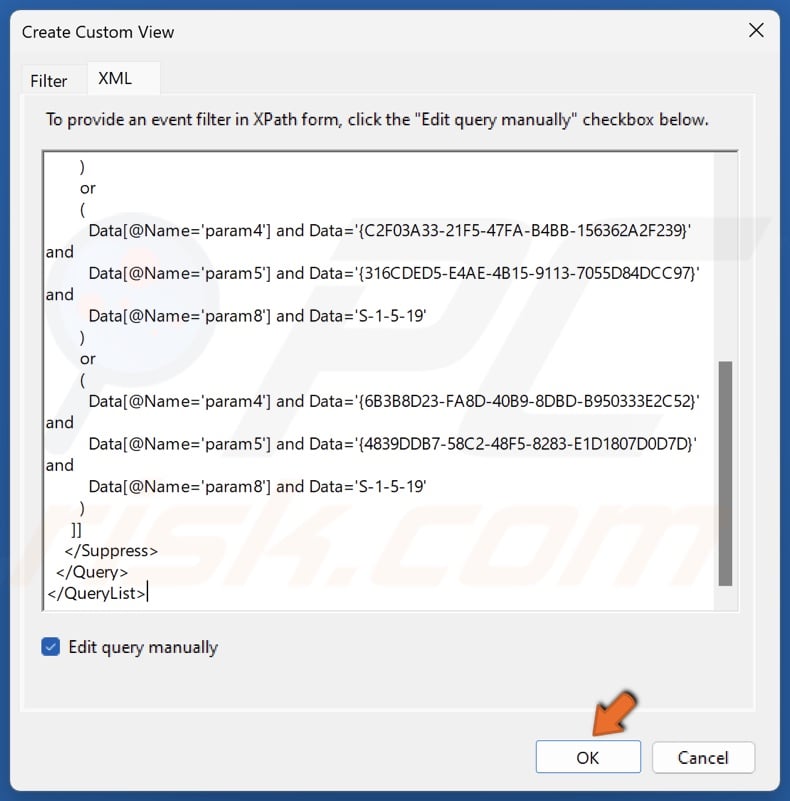
9. Click OK.
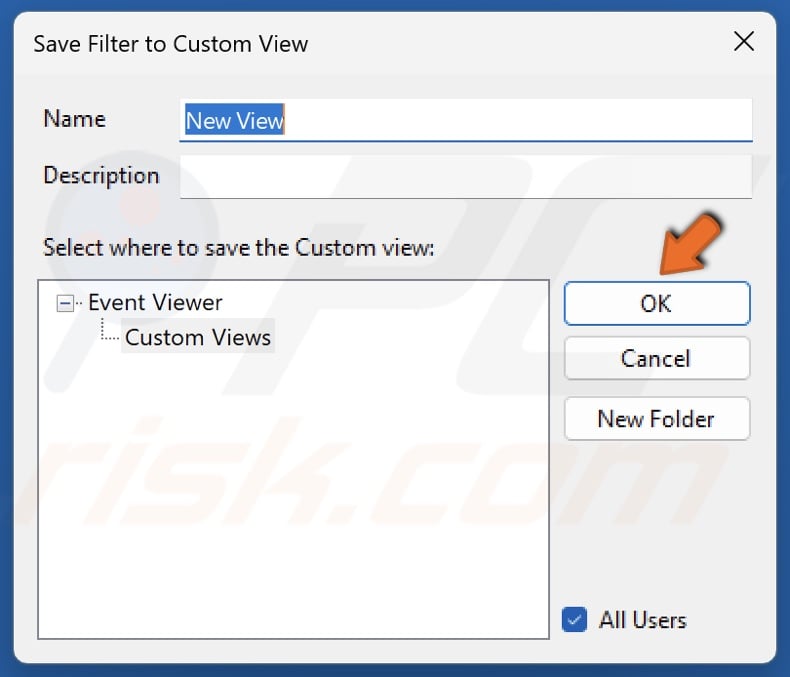
10. Click OK to save the filter.
Method 2. Delete Values in Windows Registry
Deleting some values in Windows Registry Editor will permanently fix Event ID 10016 on your system. However, remember to back up your Windows Registry before deleting the values.
1. Hold down Windows+R keys to open Run.
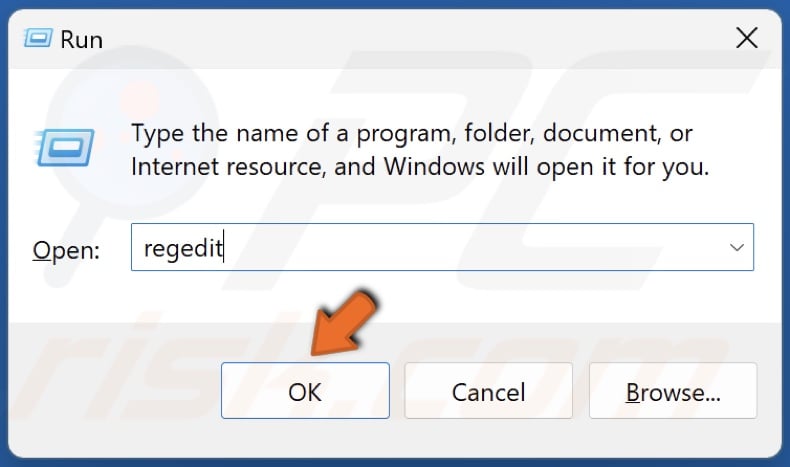
2. Type regedit in Run and click OK.
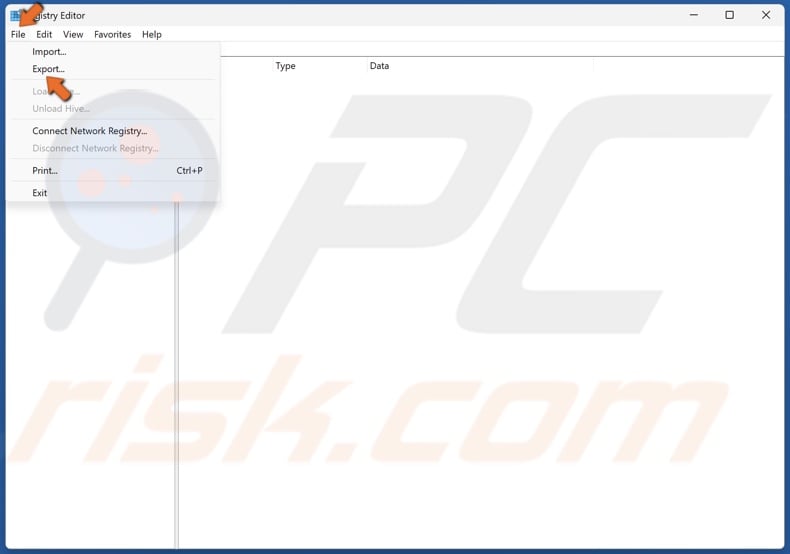
3. Before editing your Windows Registry, click File at the top-left of the window and click Export.
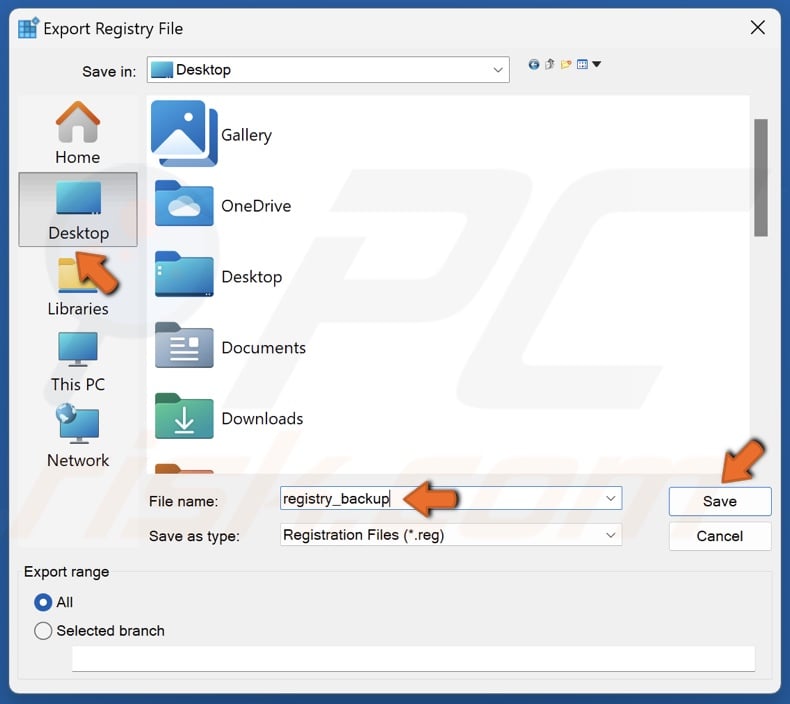
4. Choose where to save the file, name the file Registry backup, and click Save.
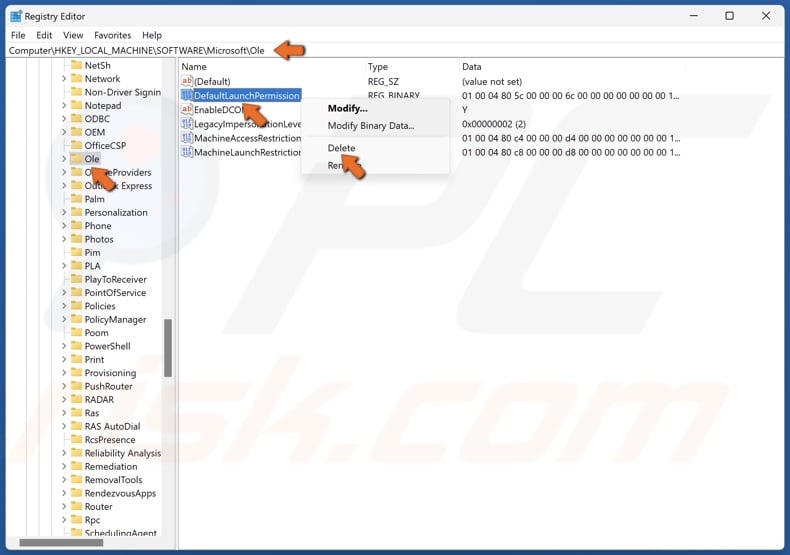
5. In the Registry Editor, navigate to:
HKEY_LOCAL_MACHINE\SOFTWARE\Microsoft\Ole
6. Select the Ole key.
7. In the right pane, right-click the keys listed below and click Delete.
- DefaultAccessPermission
- DefaultLaunchPermission
- MachineAccessRestriction
- MachineLaunchRestriction
8. Close the Registry Editor and restart your PC.
Method 3. Enable DCOM Permissions for a Specific Error
You can enable DCOM permissions for specific applications if you still get the Event ID 10016 error. However, if you have different applications generating DCOM errors, you must repeat this process for each ID log.
DistributedCOM Event ID 10016 contains information about the specific application or process generating the event log.
1. Hold down Windows+R keys to open Run.
2. Type eventvwr in Run and click OK to open Event Viewer.
3. In Event Viewer, navigate to:
Windows Logs > System
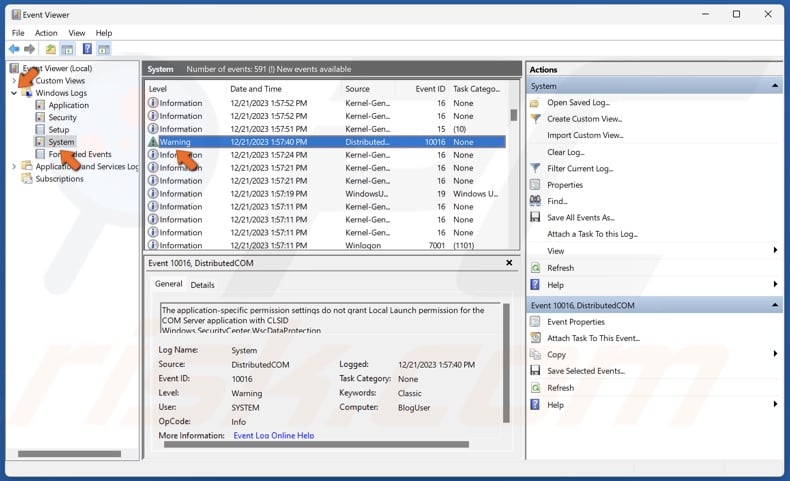
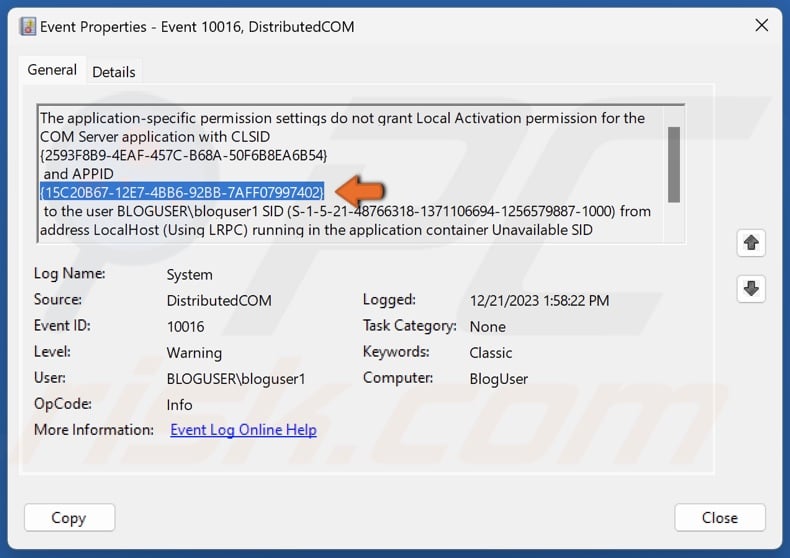
4. Double-click the DistributedCOM Event ID 10016 Error.
5. The General tab contains the CLSID (Class ID) and APPID (Application ID), which you can use to identify the application or service that triggers Event ID 10016.
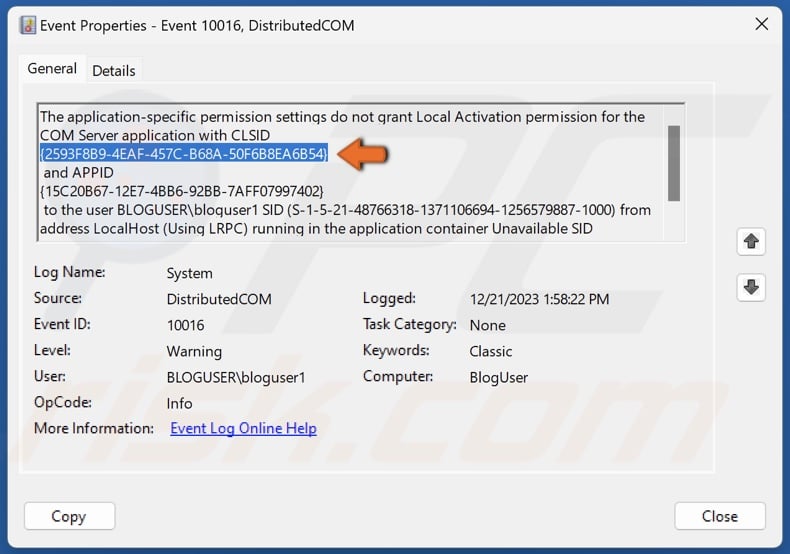
6. Highlight the CLSID and hold down Ctrl+C keys to copy the text to the clipboard. Then, move the Event Viewer window aside.
7. Hold down Windows+R keys to open Run.
8. Type regedit in Run and click OK.
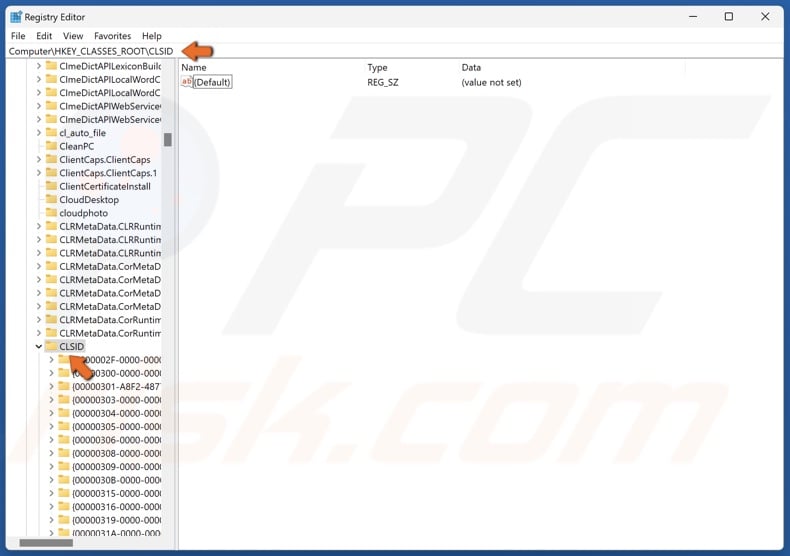
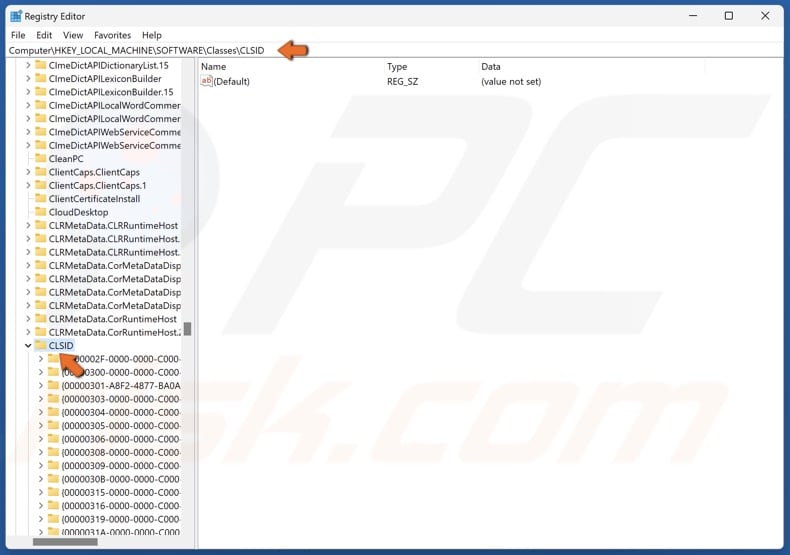
9. In the Registry Editor, navigate to:
HKEY_CLASSES_ROOT\CLSID\
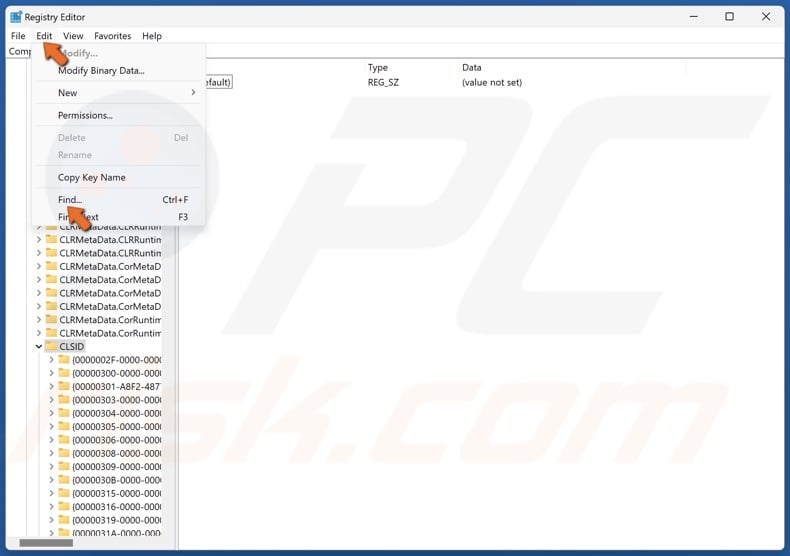
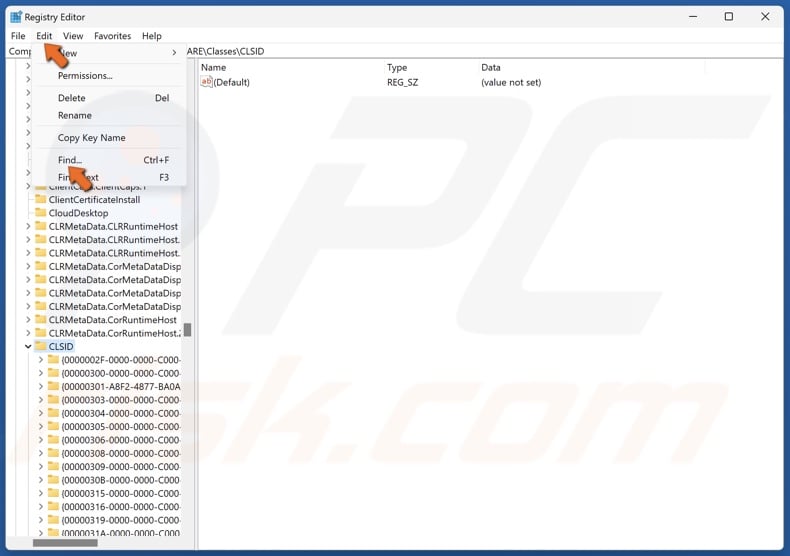
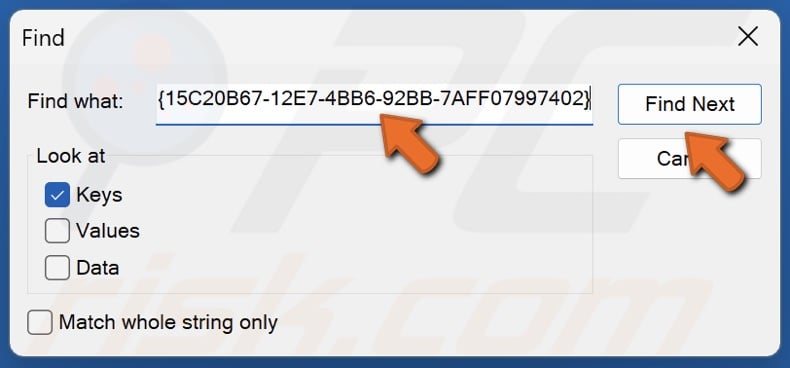
10. Click Edit in the menu bar and click Find.
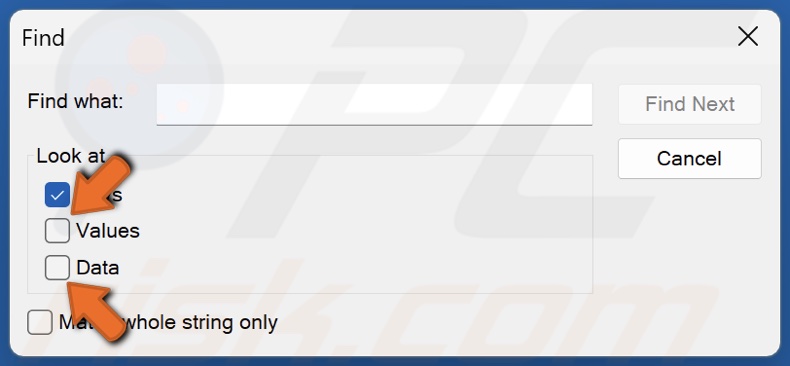
11. Unmark the Values and Data checkboxes.
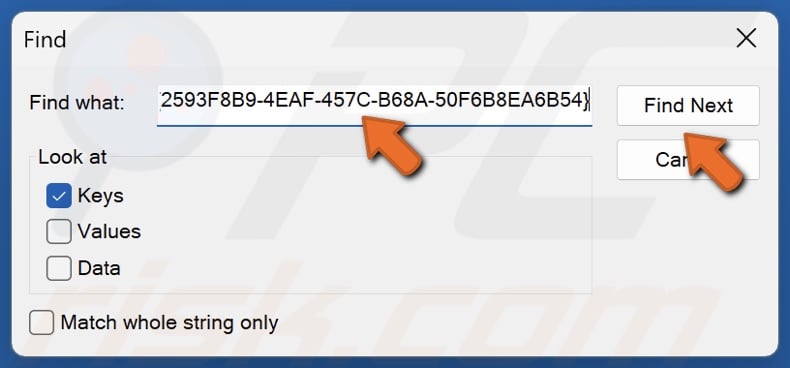
12. Right-click the text field and click Paste. You will paste in the CLSID copied from the Event Viewer.
13. Click Find Next.
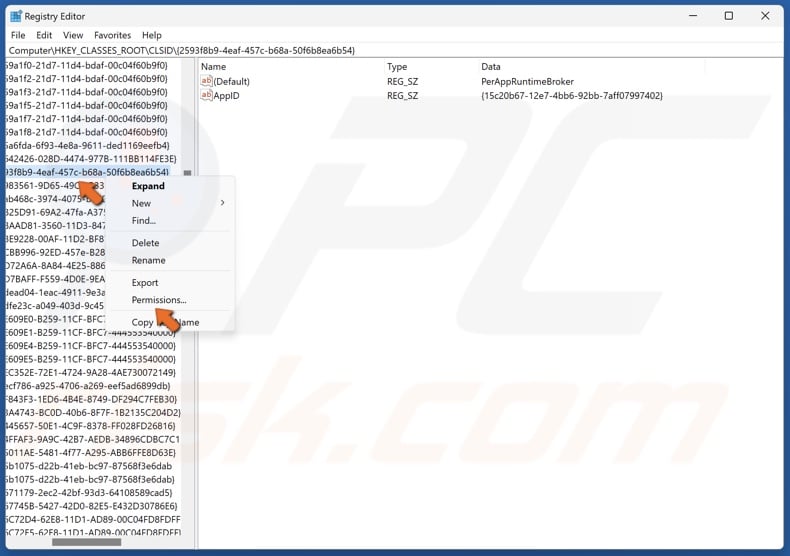
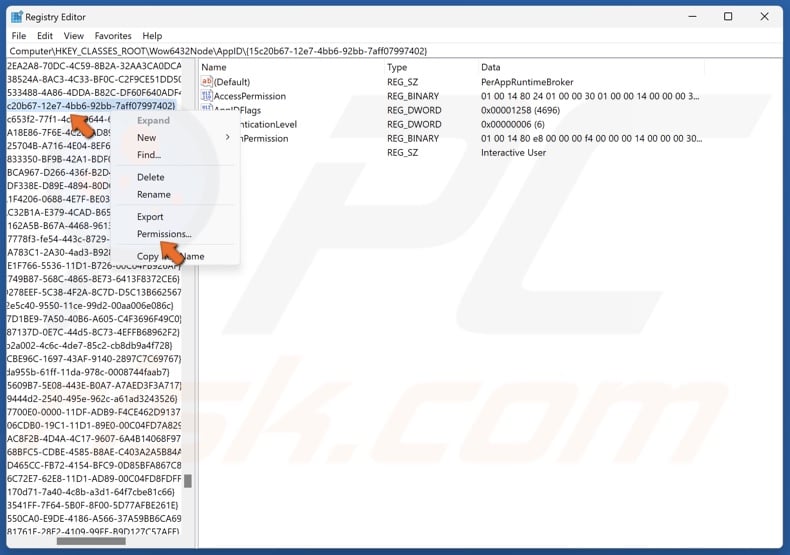
14. Right-click the relevant CLSID and click Permissions.
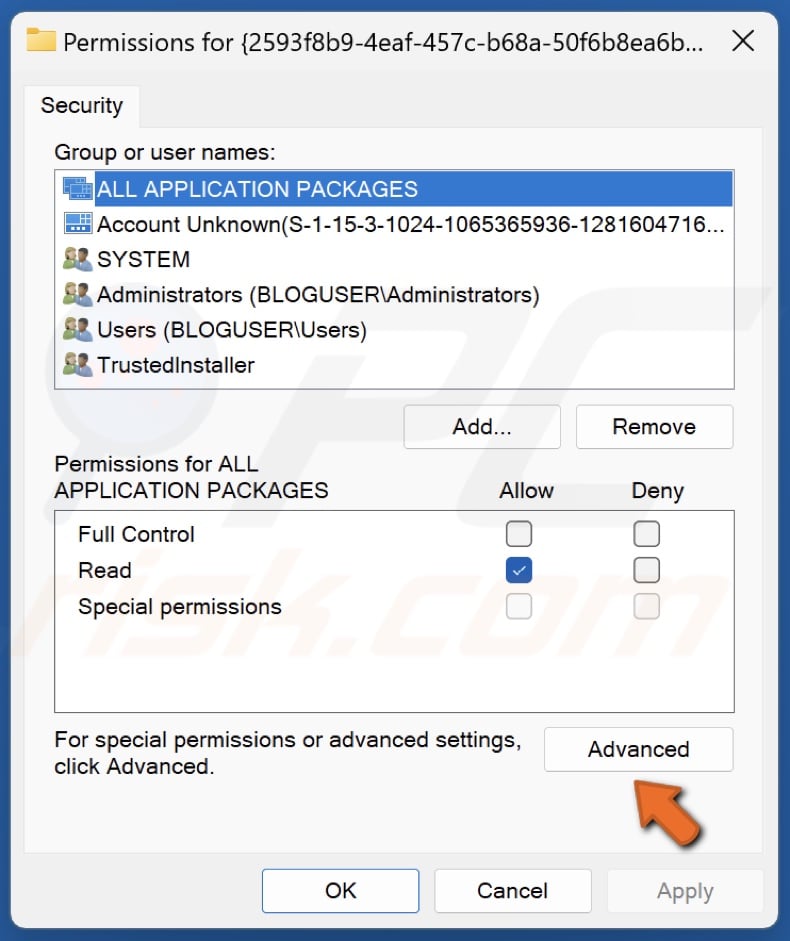
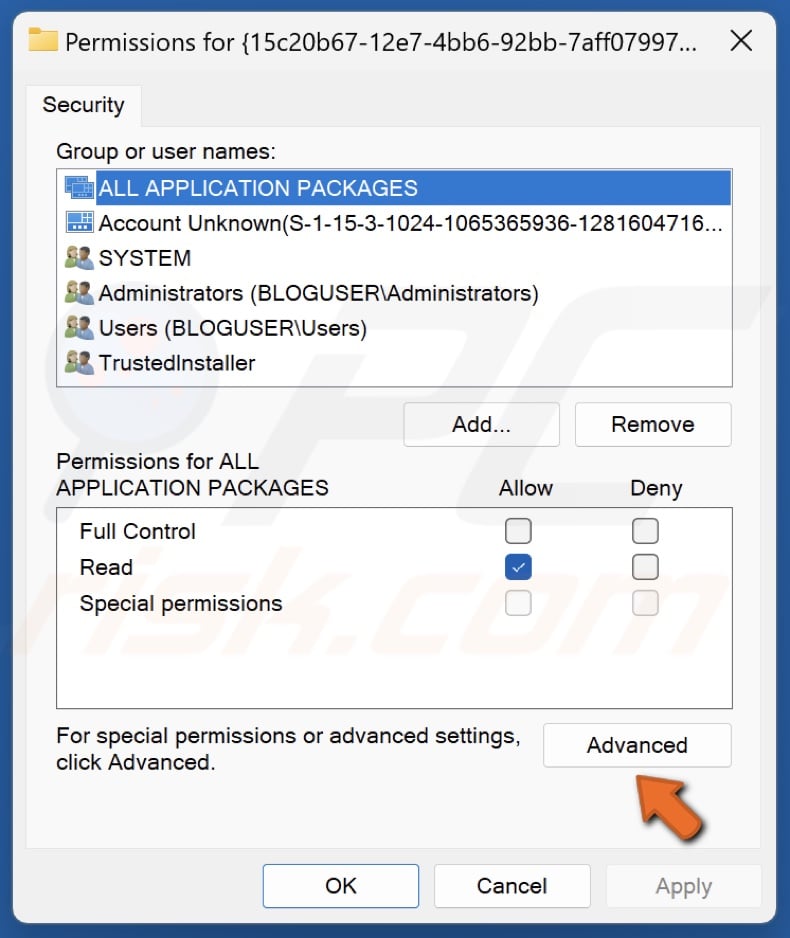
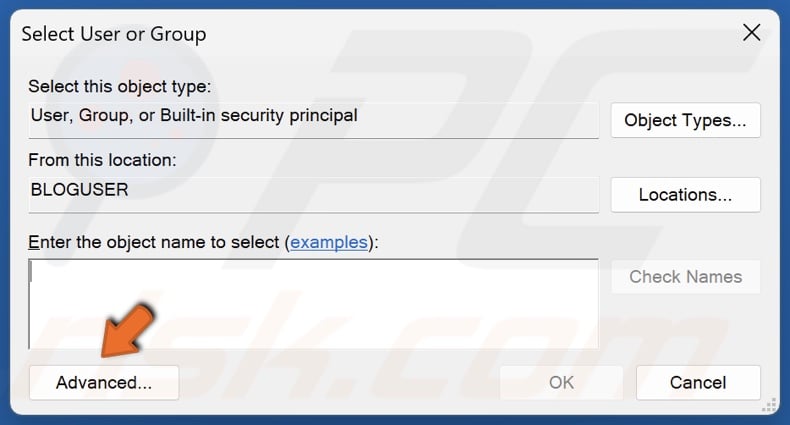
15. In the Permissions window, click Advanced.
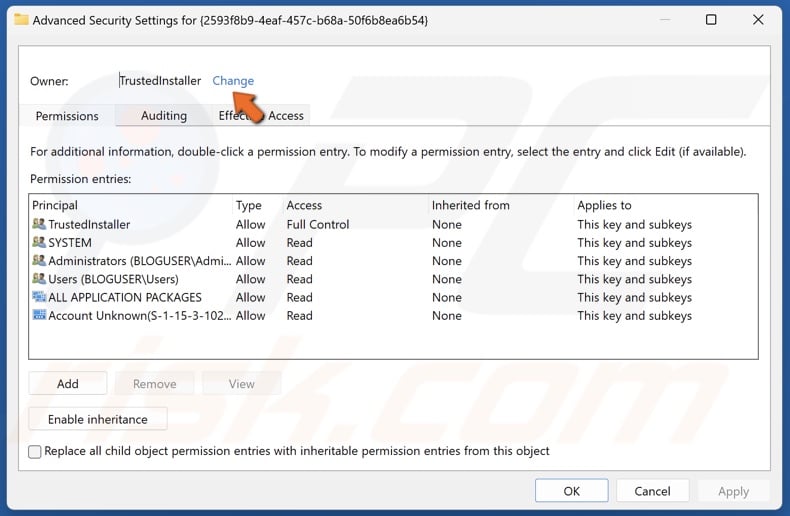
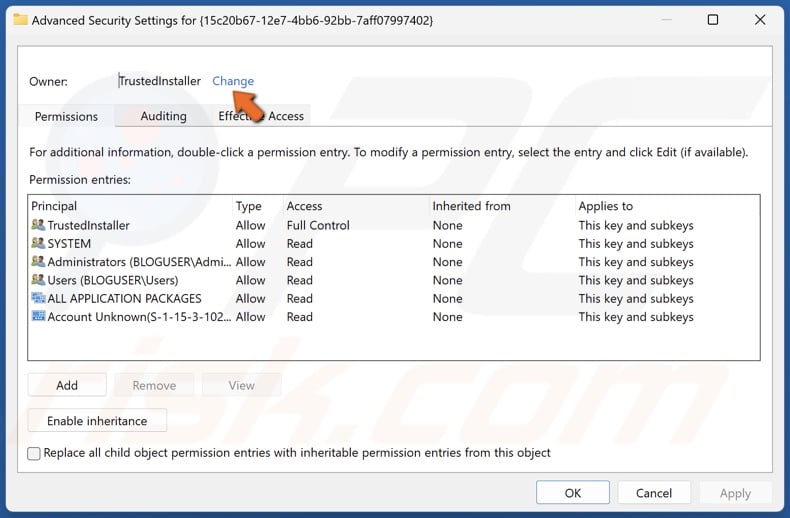
16. In Advanced Security Settings, click Change.
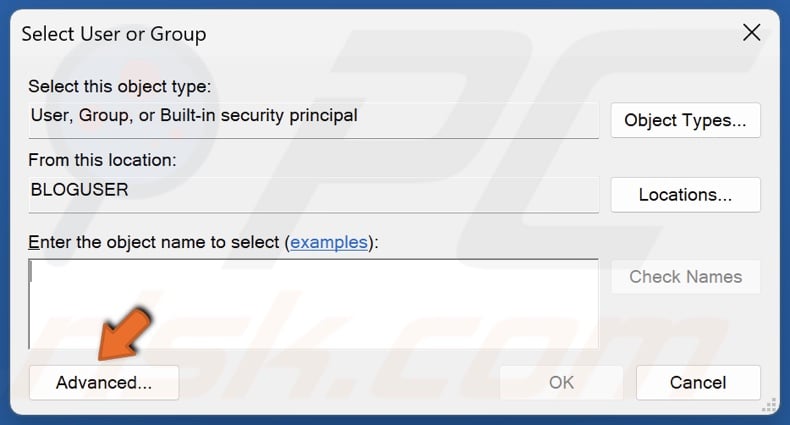
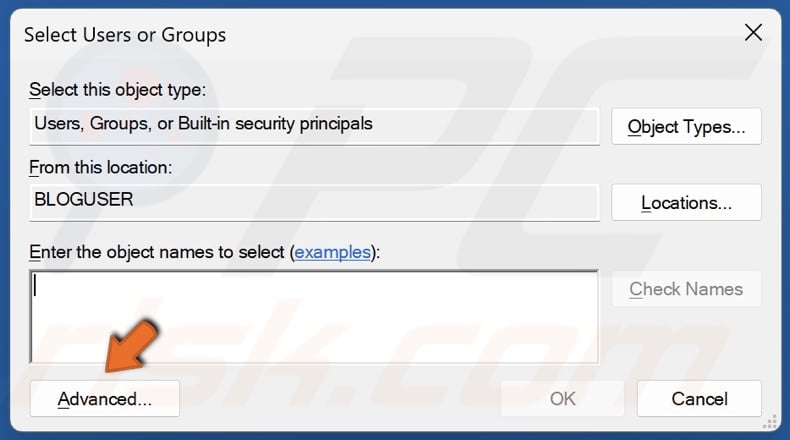
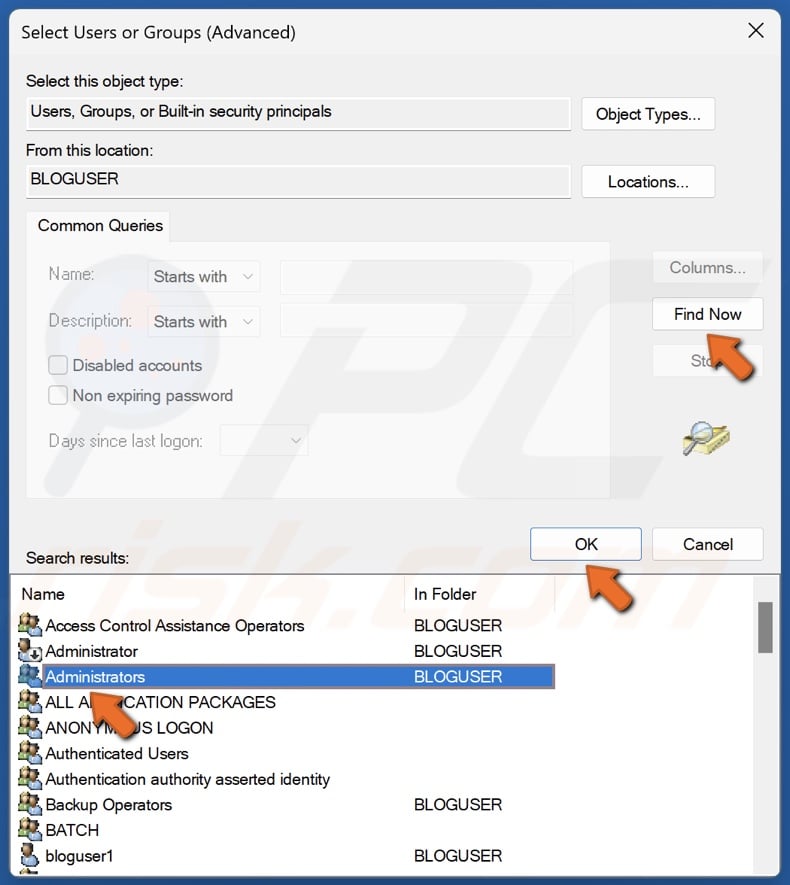
17. Click Advanced.

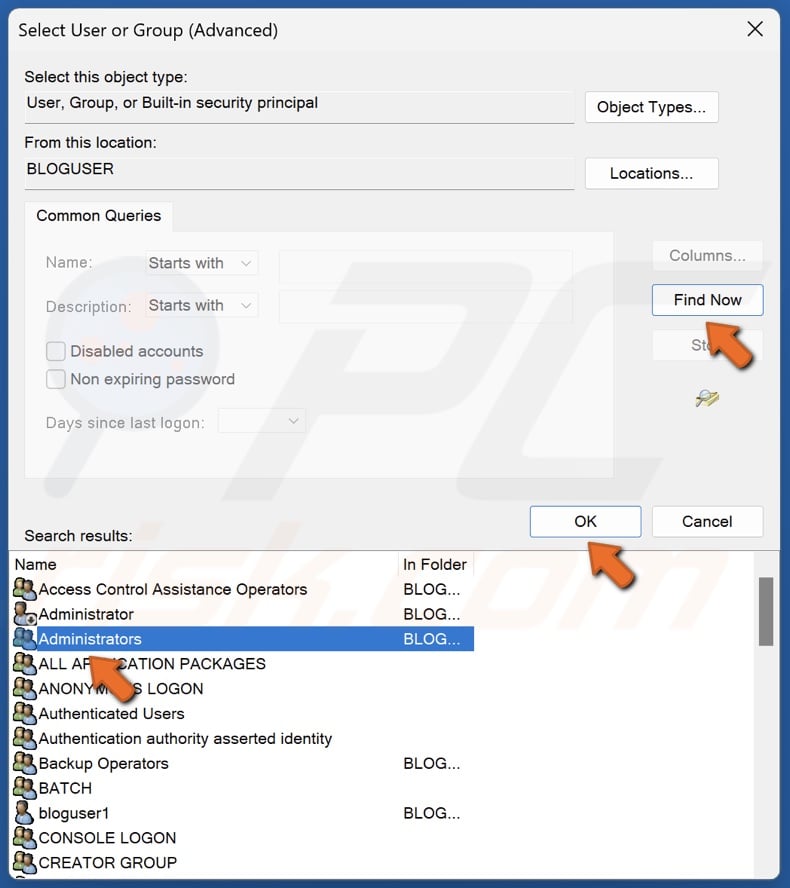
18. Click Find Now.
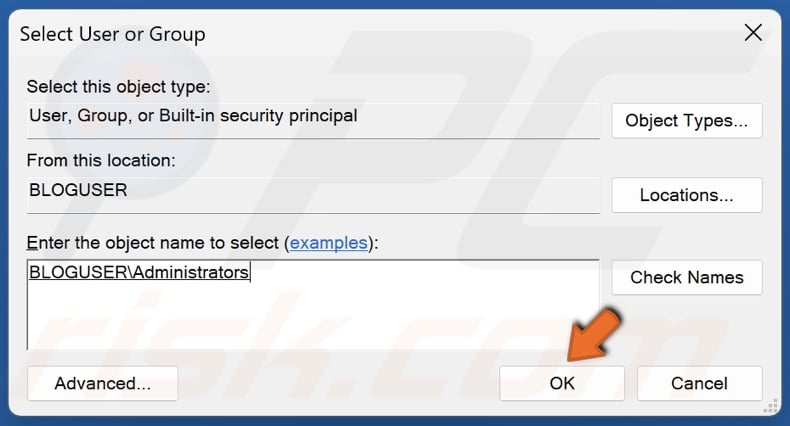
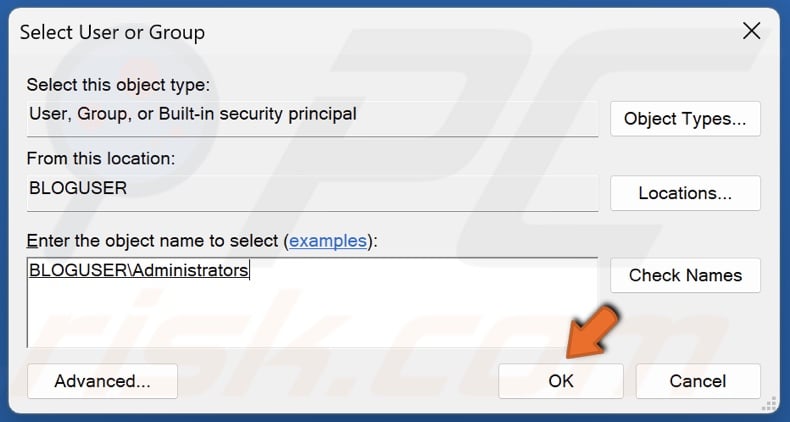
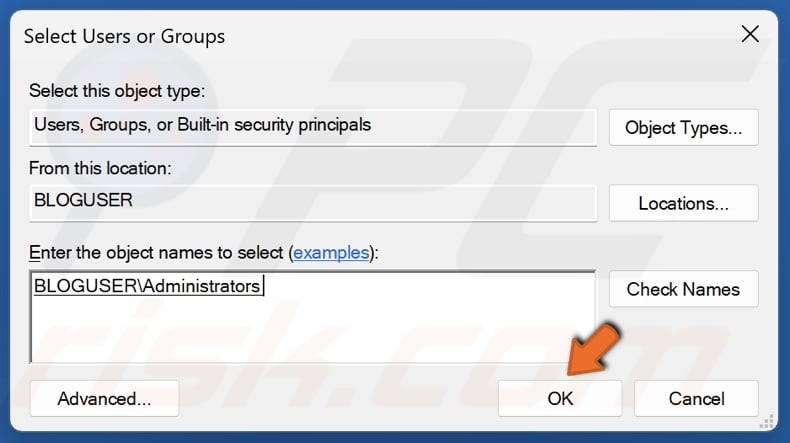
19. Select Administrators in the search results and click OK.
20. Click OK.
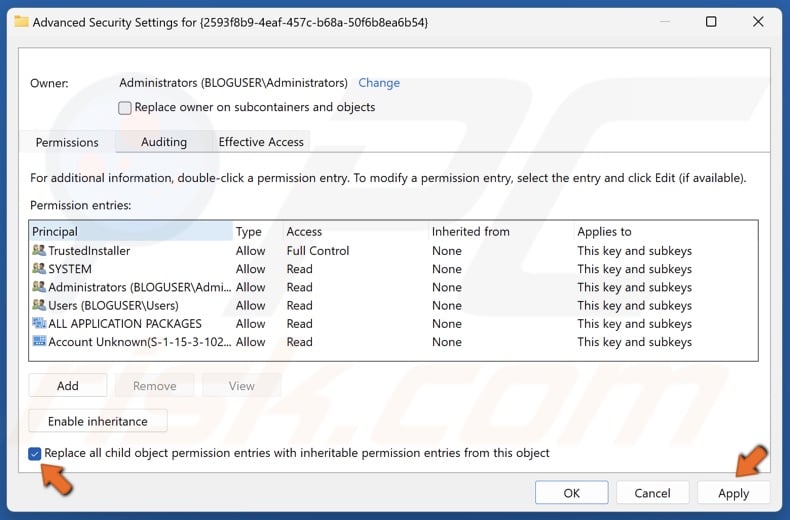
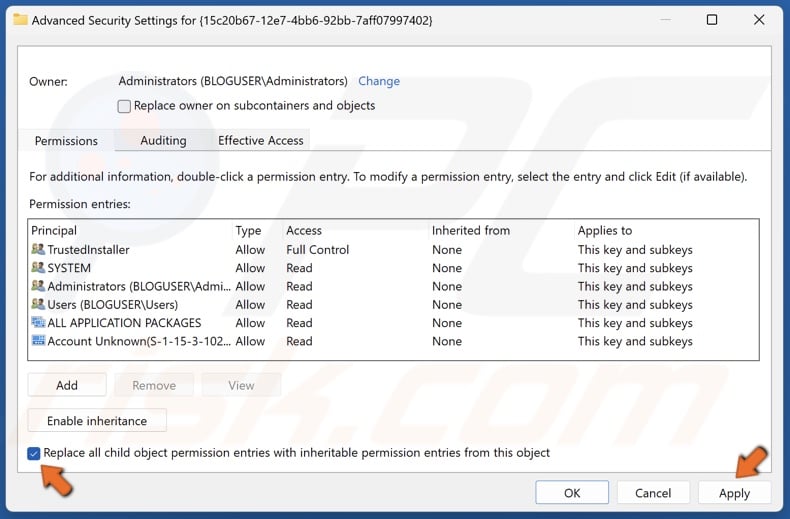
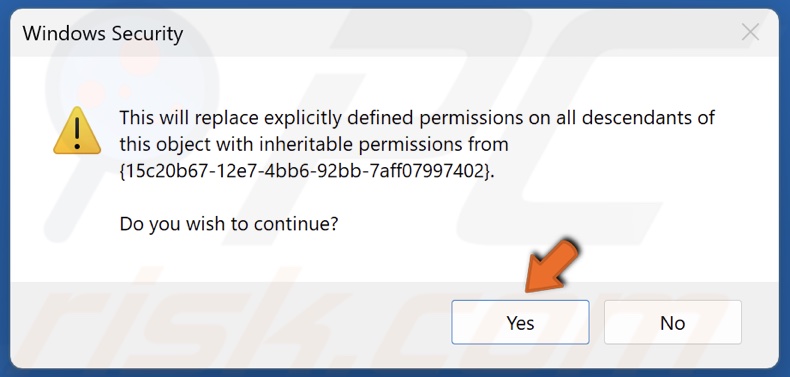
21. Mark the checkbox next to Replace all child object permission entries with inheritable permission entries from this object and click Apply.
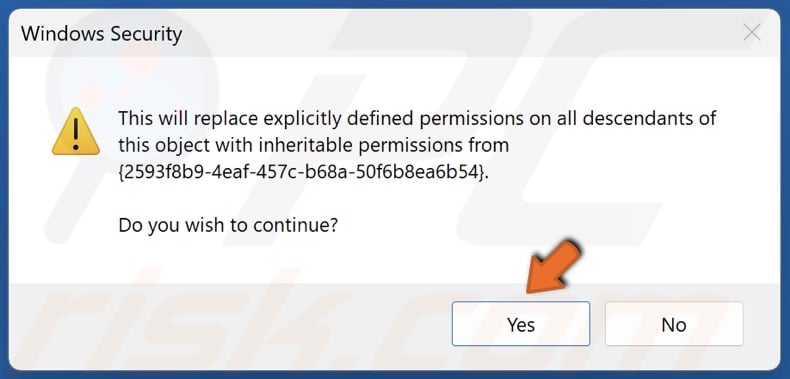
22. Click Yes when prompted.
23. Click OK when prompted.
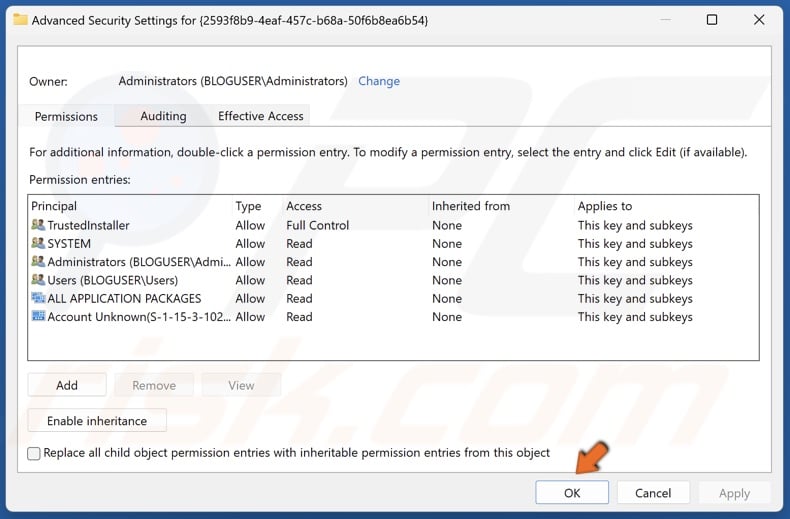
24. In Advanced Security Settings, click OK.
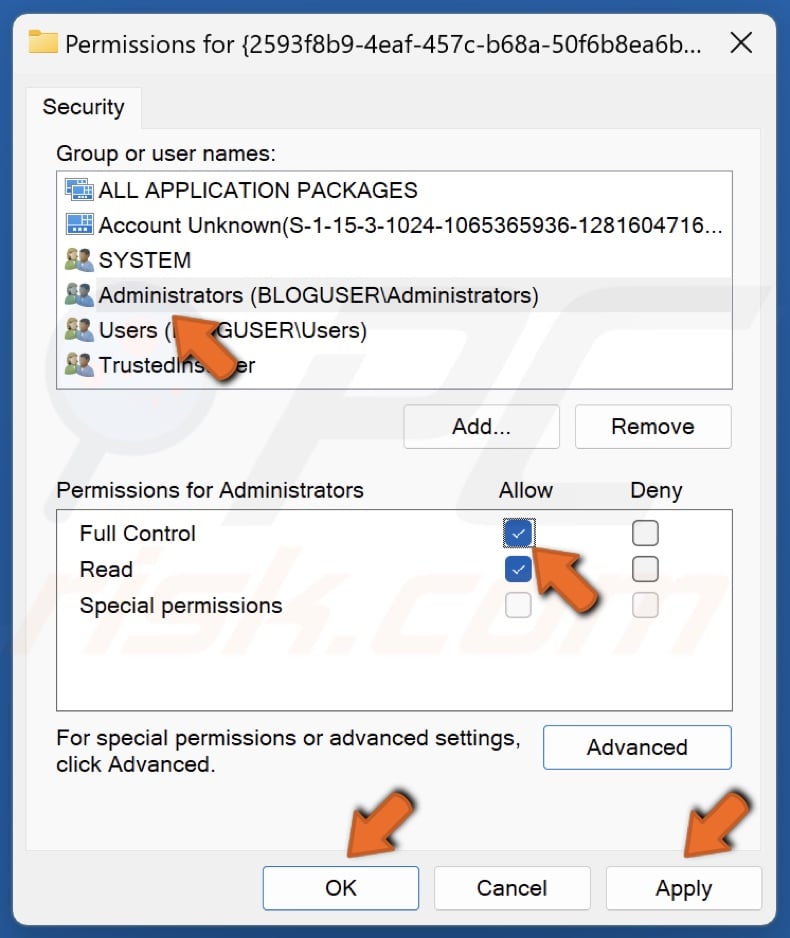
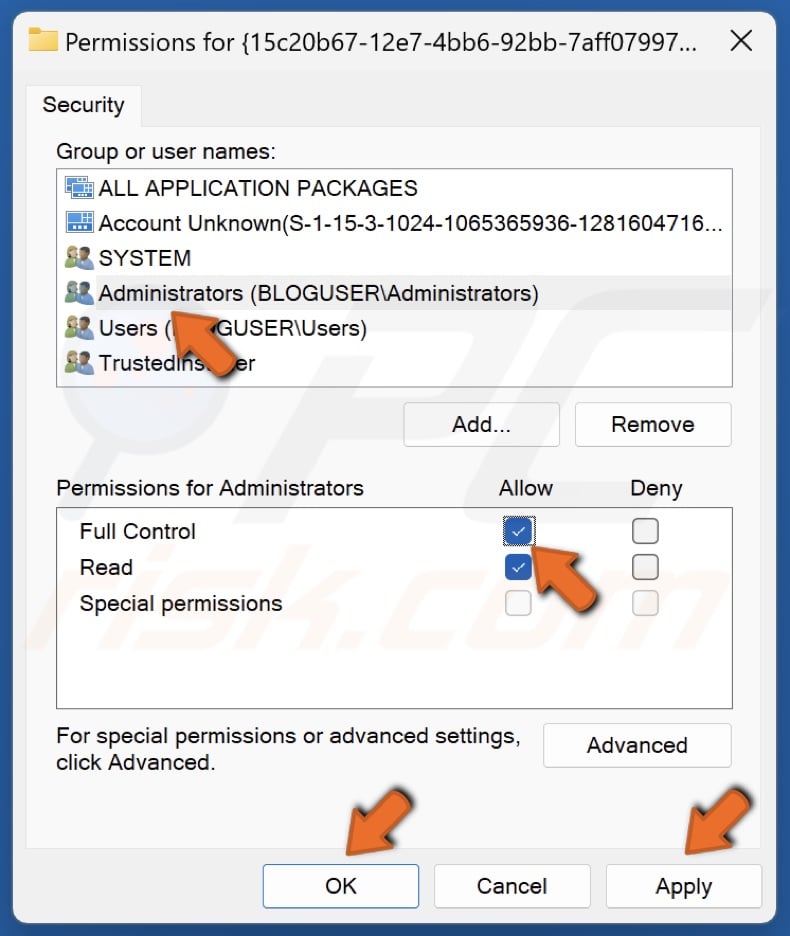
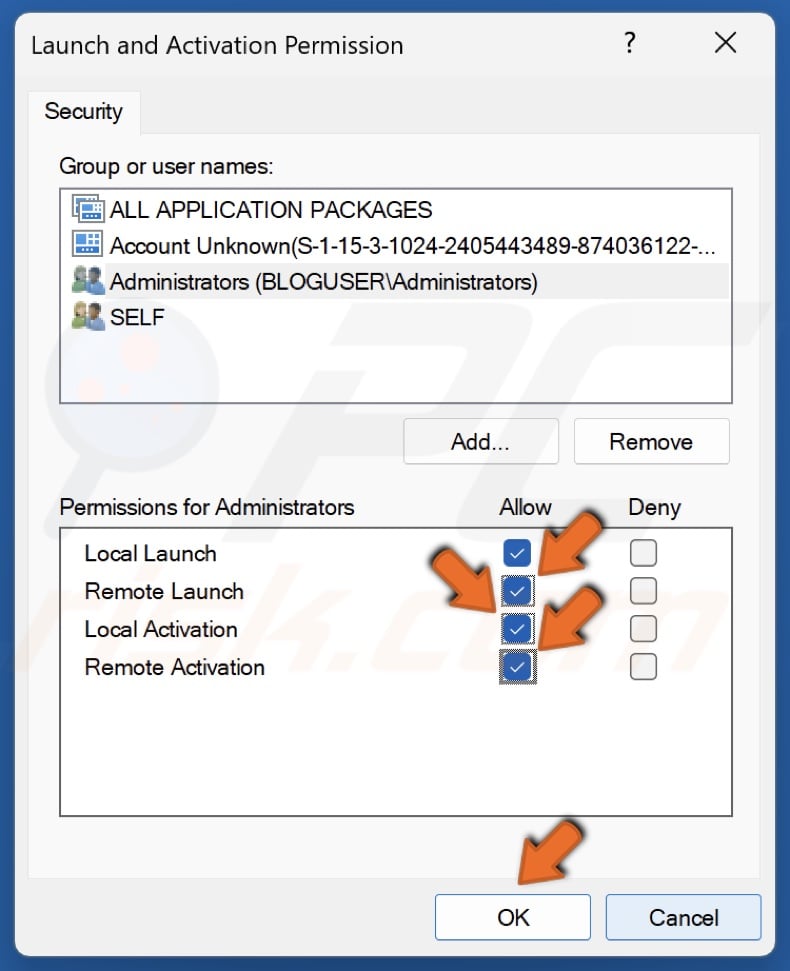
25. In the Permissions window, select Administrators.
26. In the Permissions for Administrators section, mark the Allow checkbox next to Full Control.
27. Click Apply and click OK.
28. Return to the Event Viewer window, highlight the relevant APPID, and hold down Ctrl+C keys to copy the text to the clipboard.
29. Return to the Windows Registry Editor window.
30. Navigate to:
HKEY_LOCAL_MACHINE\SOFTWARE\Classes\CLSID\
31. Click Edit in the menu bar and click Find.
32. Unmark the Values and Data checkboxes.
33. Right-click the text field and click Paste. You will paste in the APPID copied from the Event Viewer.
34. Click Find Next.
35. Right-click the relevant APPID and click Permissions.
36. In the Permissions window, click Advanced.
37. In Advanced Security Settings, click Change.
38. Click Advanced.
39. Click Find Now.
40. Select Administrators in the search results and click OK.
41. Click OK.
42. Mark the checkbox next to Replace all child object permission entries with inheritable permission entries from this object and click Apply.
43. Click Yes when prompted.
44. Click OK when prompted.

45. In Advanced Security Settings, click OK.
46. In the Permissions window, select Administrators.
47. In the Permissions for Administrators section, mark the Allow checkbox next to Full Control.
48. Click Apply and click OK.
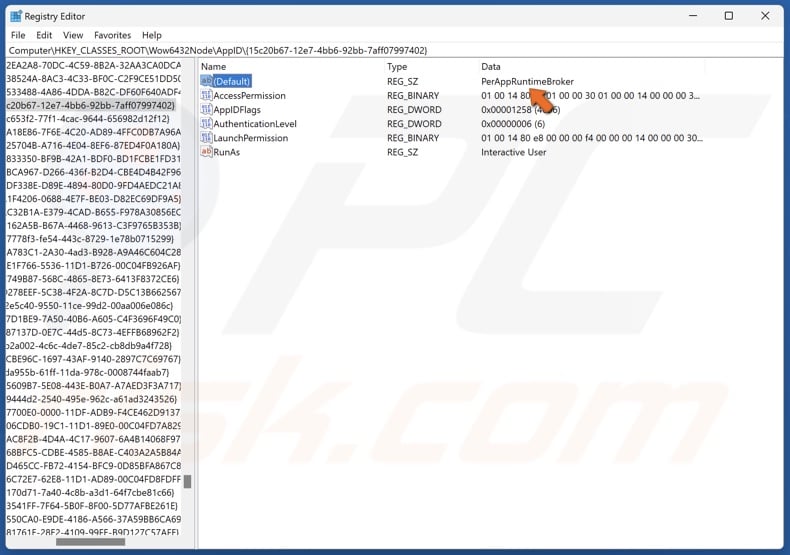
49. In the Registry Editor’s right pane, find the (Default) value. The Data line contains the name of the application/service that will be relevant moving forward.
50. Close the Windows Registry Editor.
51. Hold down Windows+R keys to open Run.
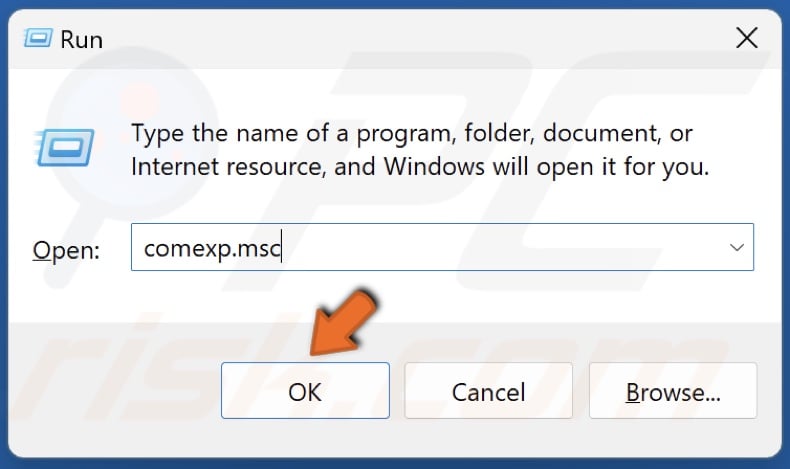
52. Type comexp.msc in Run and click OK.
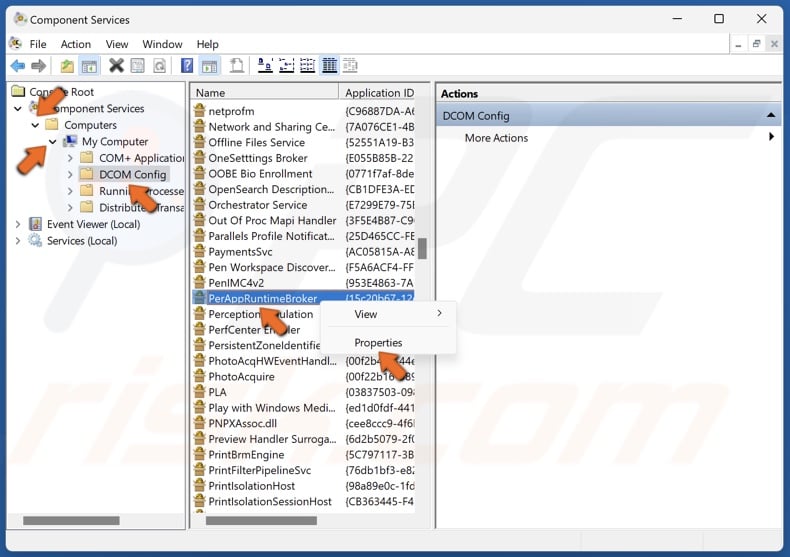
53. In Component Services, navigate to:
Computers > My Computer > DCOM Config
54. Find the application/service name you noted in the (Default) value’s Value data line of the APPID key.
55. Right-click the application/service and click Properties.
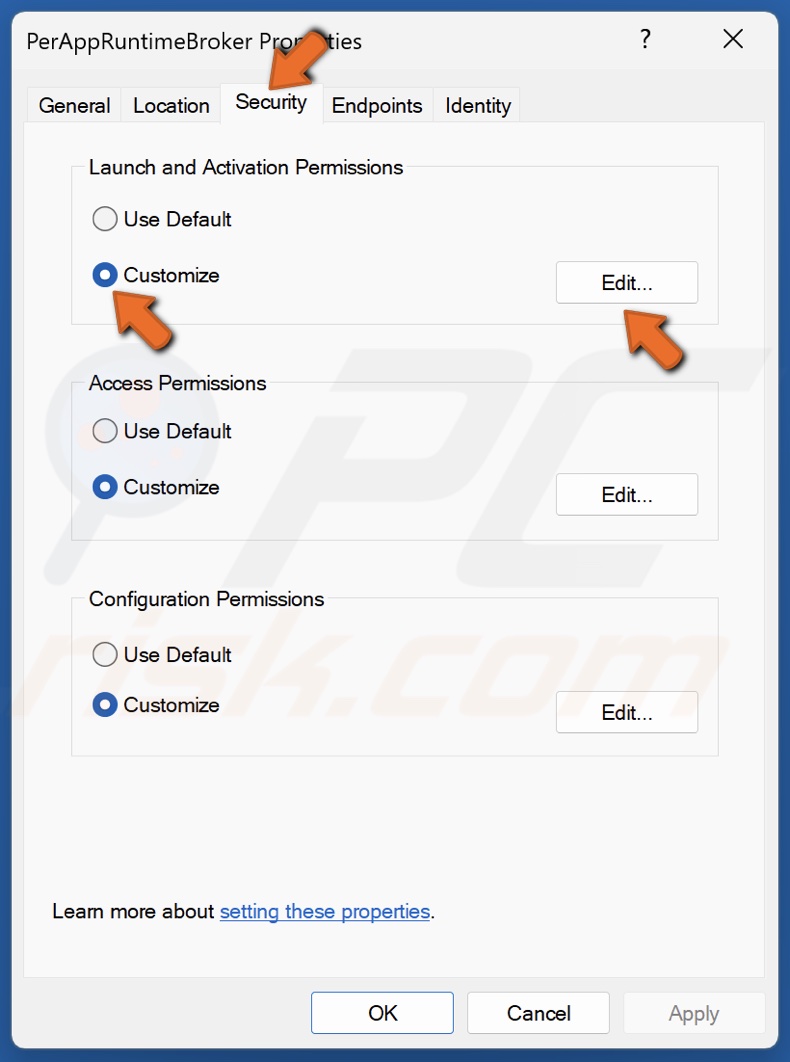
56. Select the Security tab.
57. Tick Customize and click Edit.
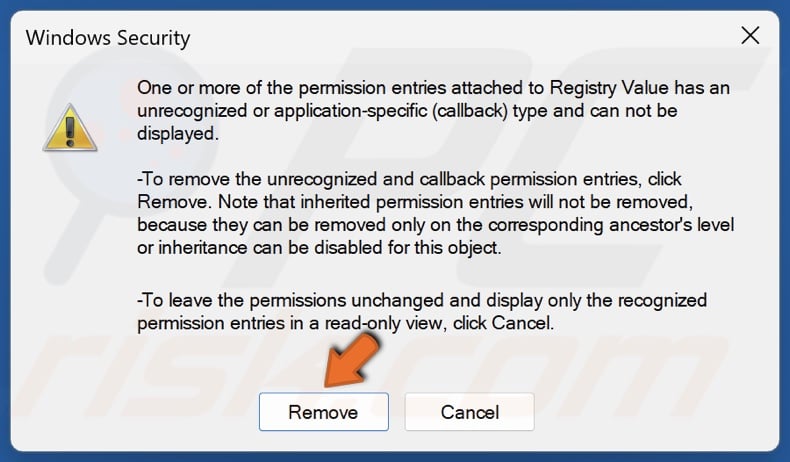
58. Click Remove when prompted.
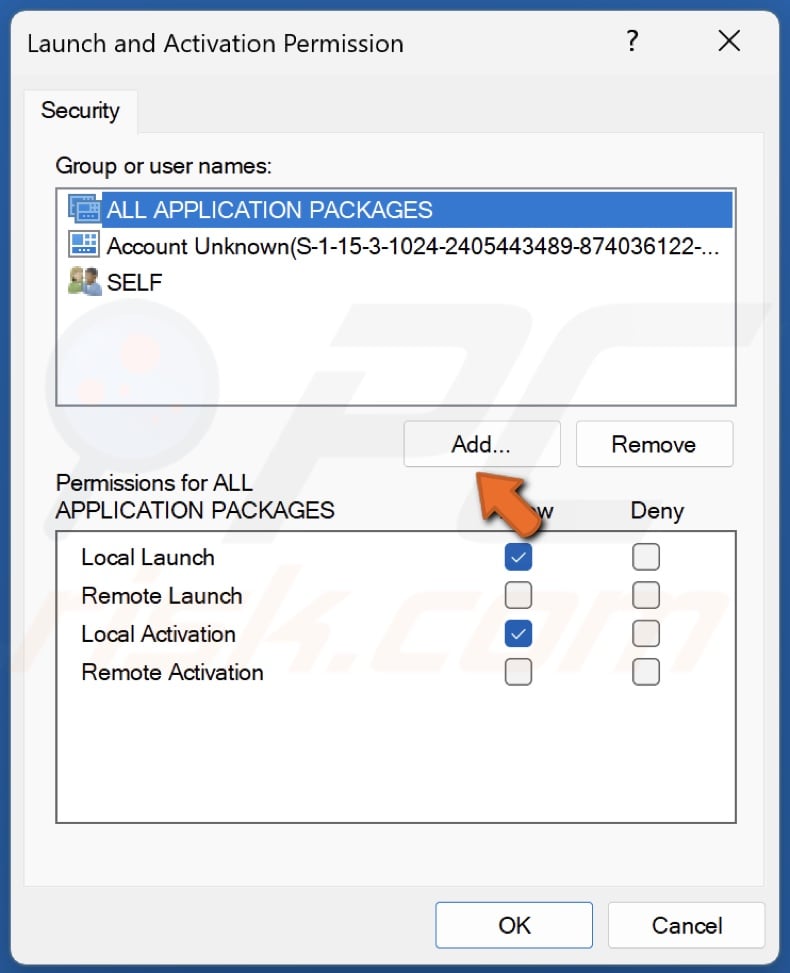
59. Click Add.
60. Click Advanced.
61. Click Find Now.
62. Select Administrators in the search results and click OK.
63. Click OK.
64. In the Permissions window, select Administrators.
65. In the Permissions for Administrators section, mark the Allow checkbox next to all options.
66. Click OK.
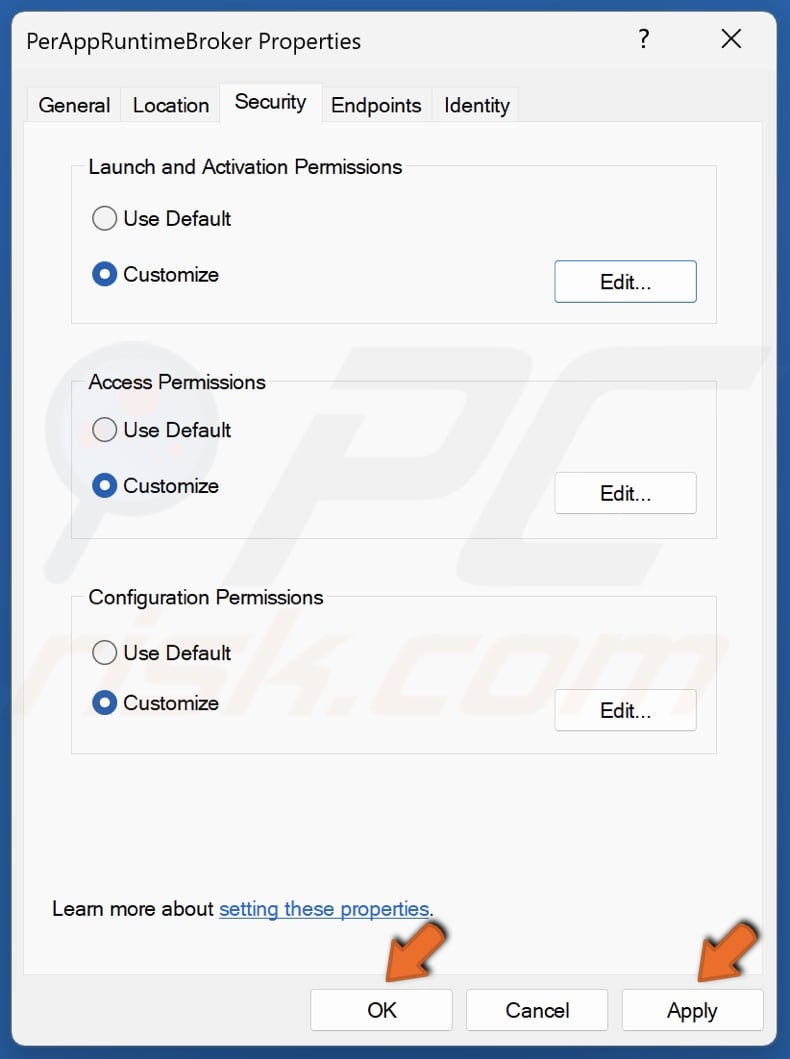
67. Click Apply and click OK.
68. Restart your PC.
Did this article help you fix DCOM Event ID 10016 error on your PC? Let us know in the comments below.
Share:

Rimvydas Iliavicius
Researcher, author
Rimvydas is a researcher with over four years of experience in the cybersecurity industry. He attended Kaunas University of Technology and graduated with a Master's degree in Translation and Localization of Technical texts. His interests in computers and technology led him to become a versatile author in the IT industry. At PCrisk, he's responsible for writing in-depth how-to articles for Microsoft Windows.
▼ Show Discussion