8 Ways to Fix Missing WiFi Icon on Windows 11

Get Free Scanner and check your computer for errors
Fix It NowTo fix found issues, you have to purchase the full version of Combo Cleaner. Free trial available. Combo Cleaner is owned and operated by Rcs Lt, the parent company of PCRisk.com read more.
How to Fix the WiFi Option Not Showing Up on Windows 11
Many Windows 11 users reported that the WiFi icon disappeared from their taskbar. Fortunately, there are ways you can fix this problem yourself. In this article, we have put together a list of the best methods to fix it.
Why is My WiFi Option Not Showing Up?
- A faulty WiFi adapter driver. Your WiFi icon may be missing due to an incompatible, corrupted, outdated, or missing WiFi adapter driver. Try updating or reinstalling the driver.
- The WiFi Adapter is disabled. Your WiFi adapter may be disabled, or the WiFi switch on your keyboard may be disabled. To enable WiFi, press the WiFi button on your keyboard. To enable your WiFi Adapter, follow the instructions in Method 2.
- Misconfigured networking settings. Misconfigured network settings may be why the WiFi option is not showing up in the taskbar. Running the Network and Internet troubleshooter or resetting your network settings may fix it.
- Misconfigured system settings. Disabled system services relevant to networking may be why your WiFi option disappeared from your taskbar. Sometimes, the networking icon may be disabled by Group Policy settings.
- A hardware-related issue. It’s possible that your WiFi adapter is defective and needs to be replaced.
Before trying our fixes, here are some tips:
- Power flush your PC. Press and hold the power button on your laptop/computer for 60 seconds. Wait for 10 seconds and power it up.
- Restart your PC. Sometimes, a simple restart can resolve WiFi-related issues.
- Ensure that your laptop’s WiFi switch is turned on.
- Ensure that your laptop’s Airplane mode is turned off.
- Restart/power-cycle your Internet router. Power cycling helps discharge residual power from the capacitors and clear all temporary configurations. Press the power button on the router or unplug it from the power outlet, wait a few minutes, and turn it on.
- Install optional Windows updates. Sometimes, optional Windows updates contain driver updates for network adapters that otherwise would not be installed.
Download Computer Malware Repair Tool
It is recommended to run a free scan with Combo Cleaner - a tool to detect viruses and malware on your device. You will need to purchase the full version to remove infections. Free trial available. Combo Cleaner is owned and operated by Rcs Lt, the parent company of PCRisk.com read more.
Video Tutorial on How to Fix WiFi Option Now Showing Up
Table of Contents:
- Introduction
- Method 1. Run the Network and Internet Troubleshooter
- Method 2. Disable and Re-Enable the WiFi Adapter
- Method 3. Update/Reinstall the WiFi Adapter Driver
- Method 4. Disable the Network Adapter Power-Saving Option
- Method 5. Set the WLAN AutoConfig Service to Start Automatically
- Method 6. Enable All Services in System Configuration
- Method 7. Enable Networking Icon in Group Policy Settings
- Method 8. Reset Your Network Settings to Default
- Video Tutorial on How to Fix WiFi Option Now Showing Up
Method 1. Run the Network and Internet Troubleshooter
Windows 11 features a built-in Network and Internet troubleshooter to scan for common network configuration problems and fix them automatically.
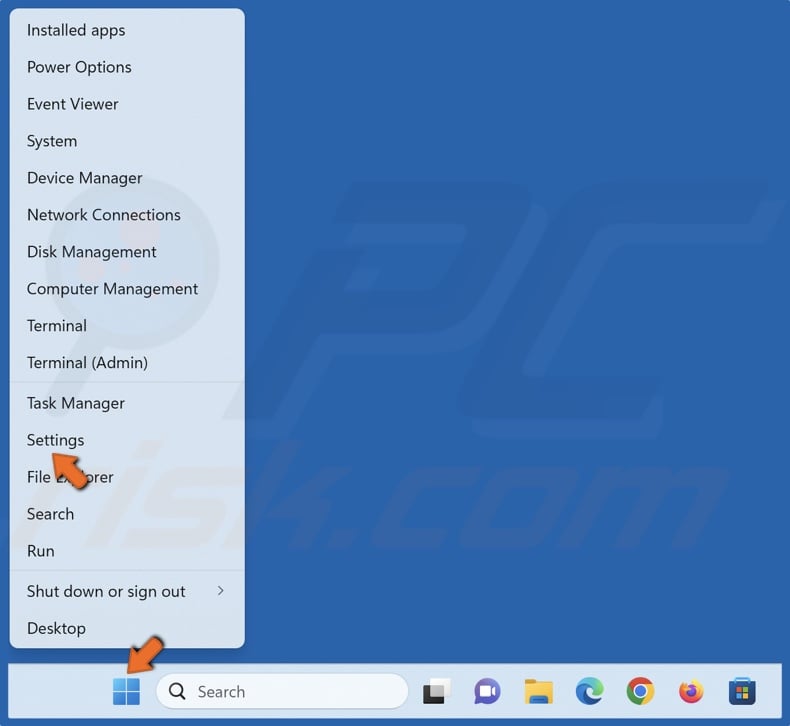
1. Right-click Start and select Settings.
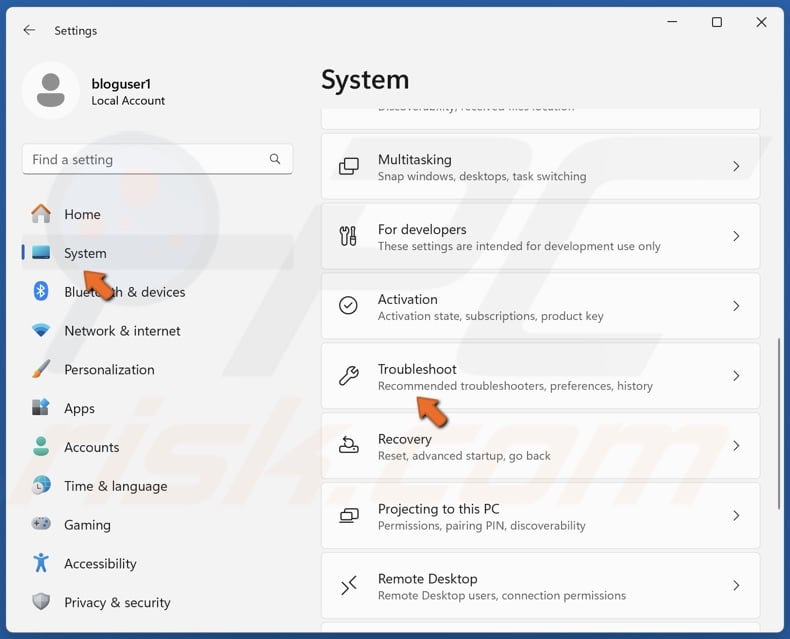
2. Select the System panel, scroll down, and click Troubleshoot.
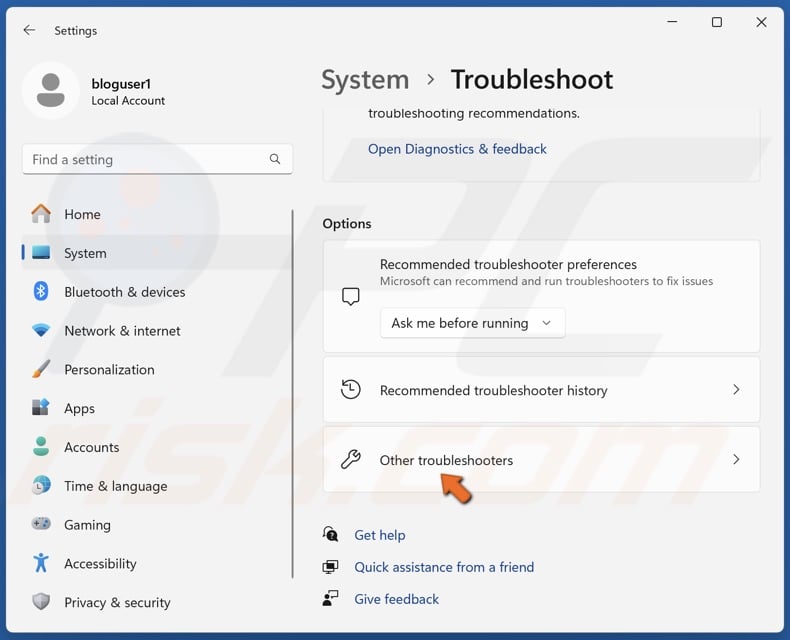
3. Select Other troubleshooters.
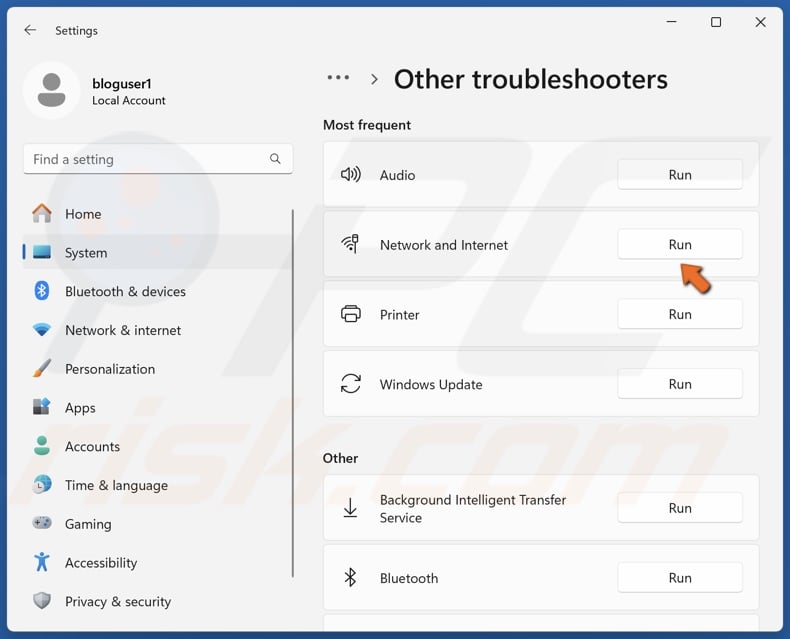
4. Click Run next to the Network and Internet troubleshooter.
Method 2. Disable and Re-Enable the WiFi Adapter
A temporary glitch in your WiFi adapter may cause the WiFi option not to show up in your taskbar. Therefore, disabling and re-enabling your WiFi adapter may fix the issue.
1. Hold down Windows+R keys to open Run.
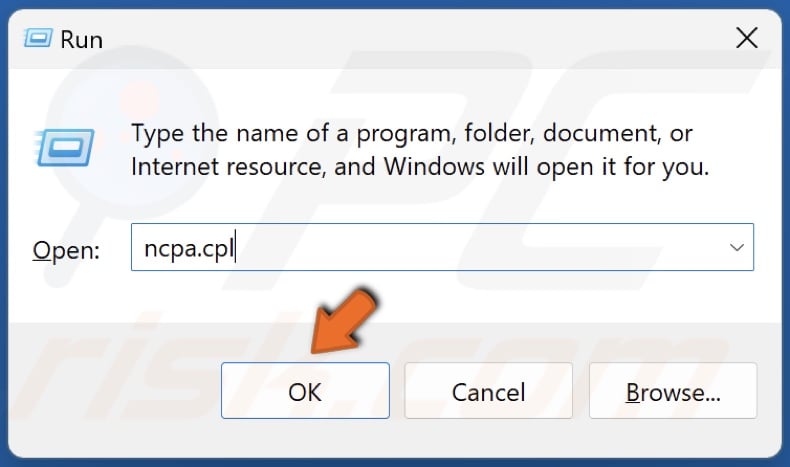
2. Type ncpa.cpl in Run and click OK.
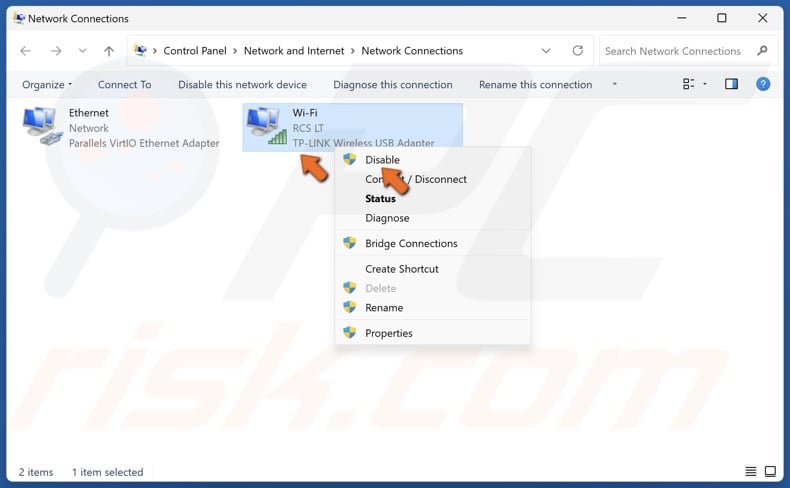
3. Right-click your WiFi adapter, click Disable, and wait a few minutes.
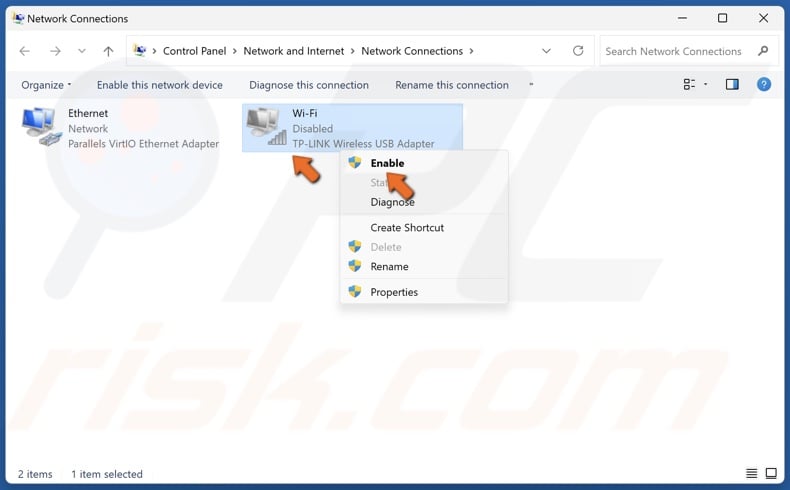
4. Then, right-click your WiFi adapter again and click Enable.
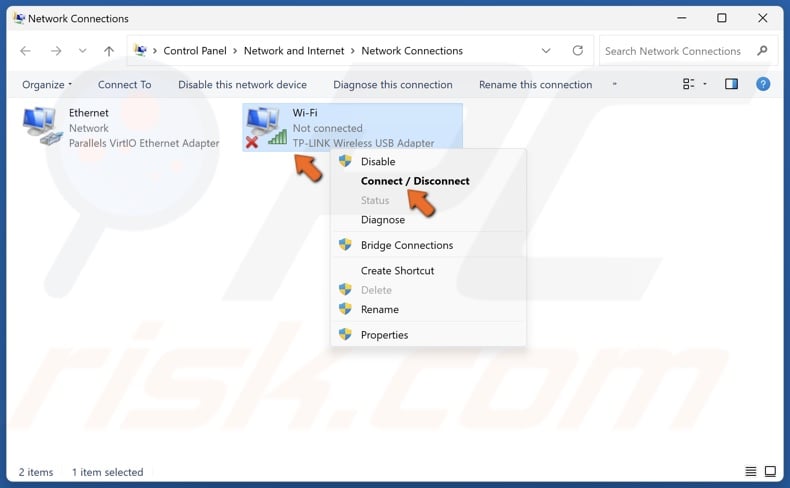
5. Right-click the WiFi adapter yet again and click Connect / Disconnect.
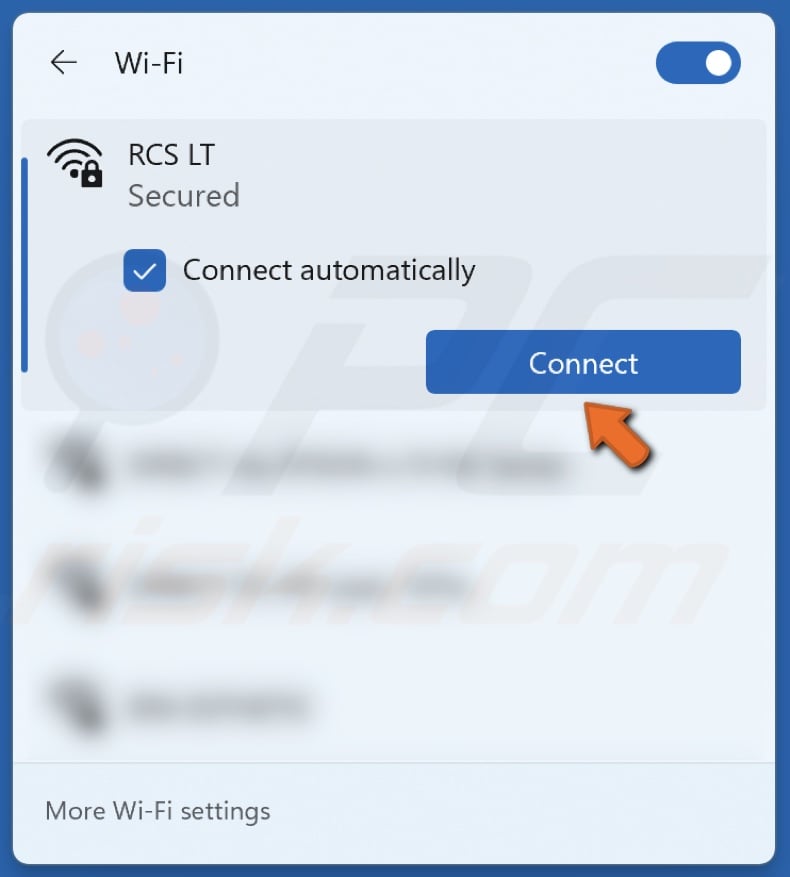
6. Enter your WiFi network password and click Next.
Method 3. Update/Reinstall the WiFi Adapter Driver
The WiFi option may not show up if you have a missing, outdated, incompatible, or corrupted network adapter driver. To fix this issue try updating the driver from the Device Manager or download the correct driver from the network adapter’s manufacturer’s website manually. You can also try to roll back or downgrade to an older driver version.
1. Right-click Start and select Device Manager.
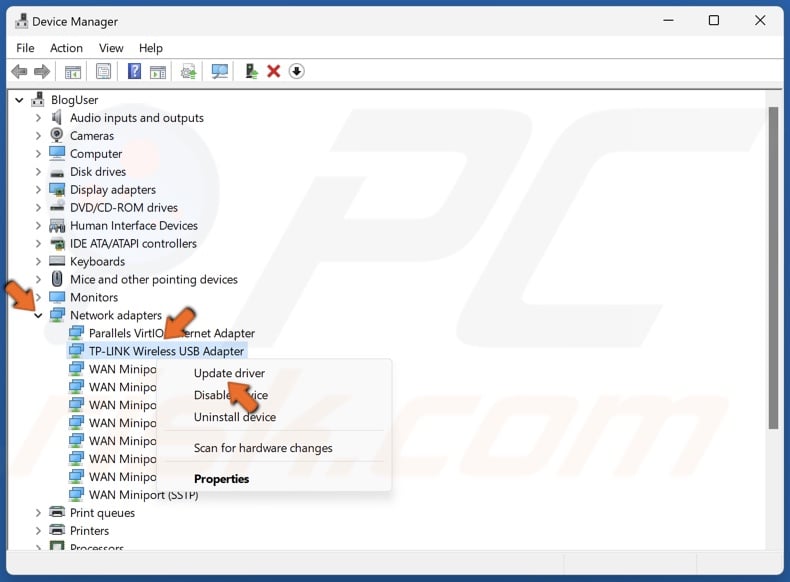
2. In the Device Manager, expand the Network adapters list and find your WiFi adapter.
3. Right-click your WiFi adapter and click Update driver.
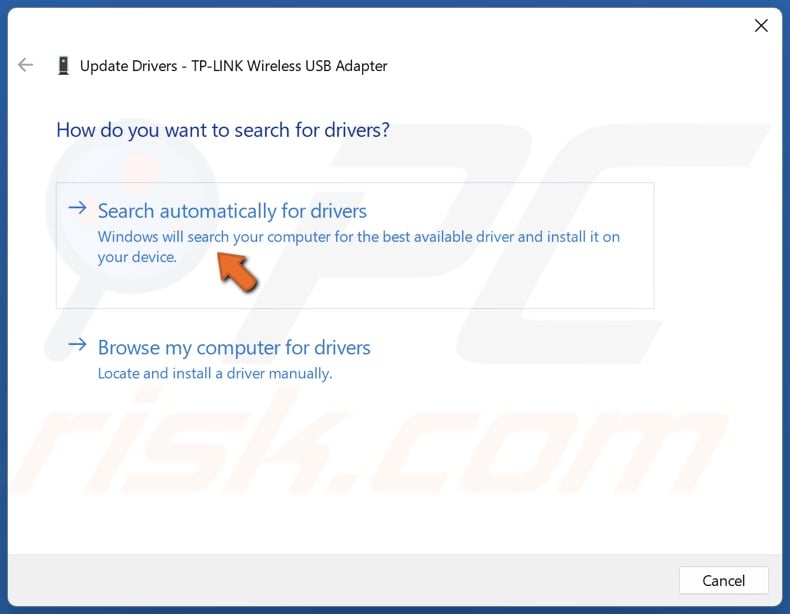
4. Click Search Automatically for drivers. Windows will install a compatible driver stored locally on your PC.
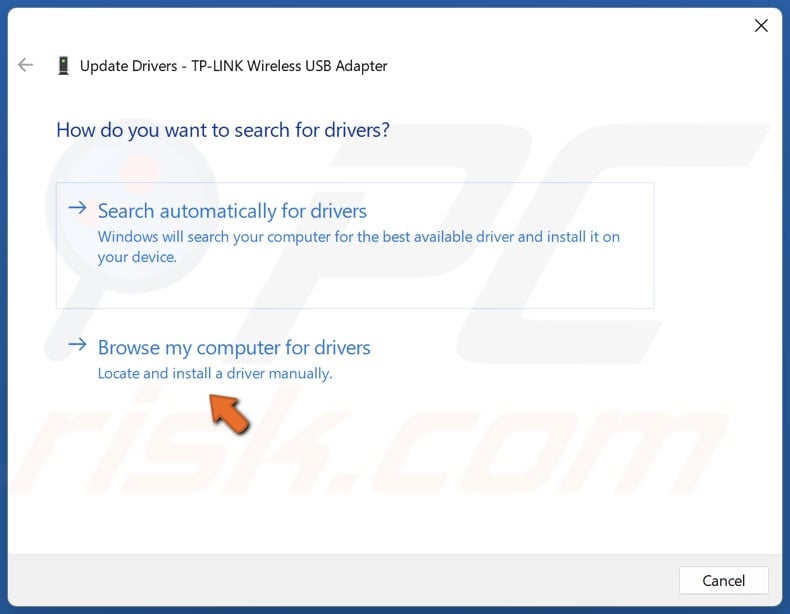
5. Alternatively, click Browse my computer for drivers.
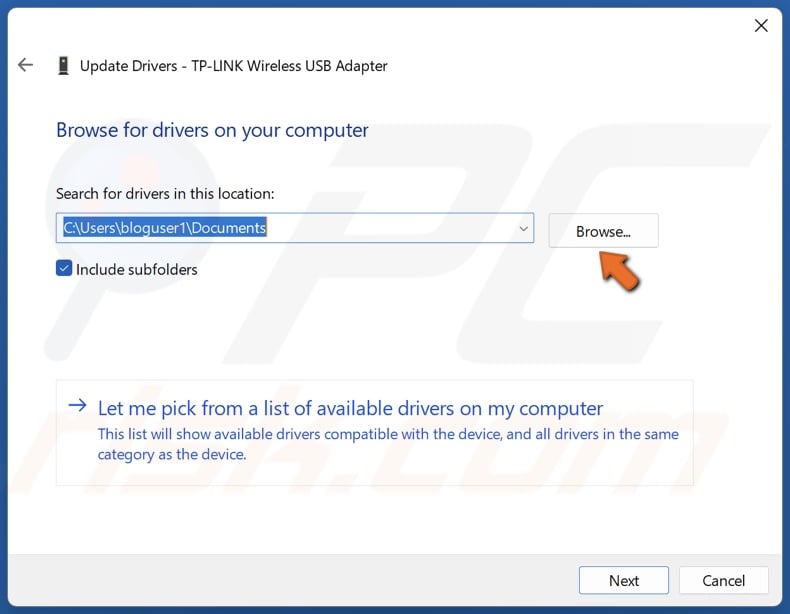
6. Click Browse and select a driver downloaded from the hardware vendor’s website.
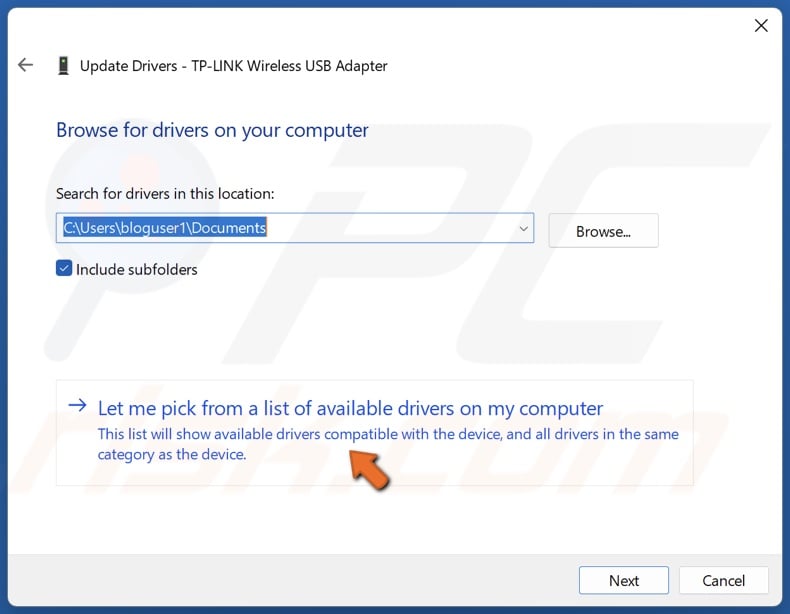
7. Alternatively, click Let me pick from a list of available drivers on my computer.
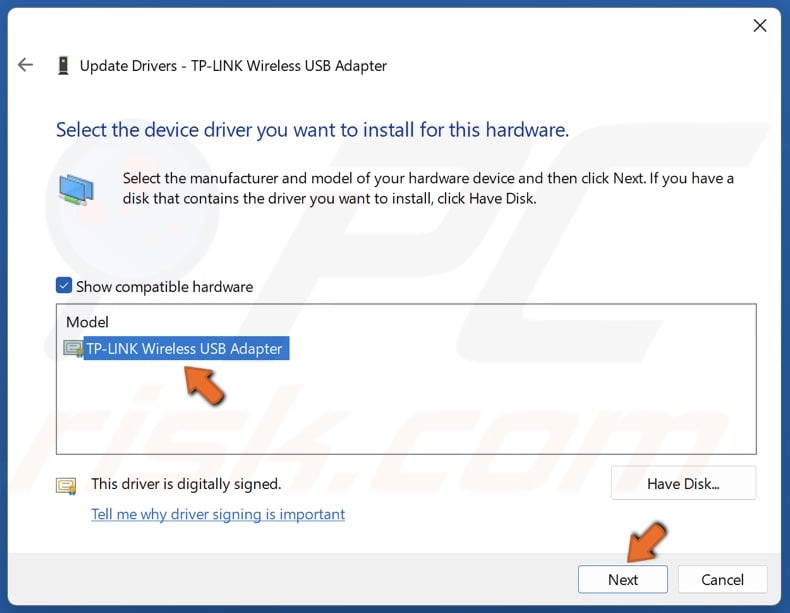
8. Choose a driver from the drivers list and click Next.
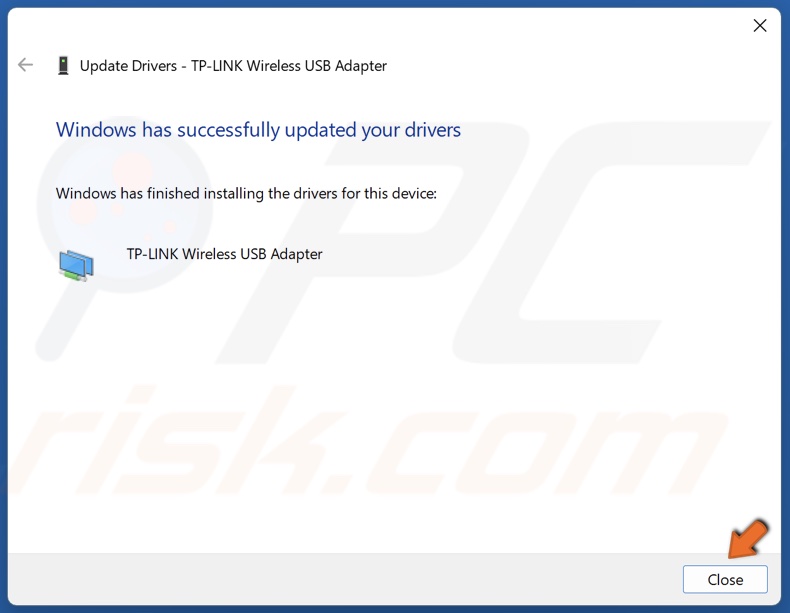
9. Click Close.
10. If updating the driver didn’t fix the issue or your WiFi adapter is not in the network adapter list, try uninstalling the adapter.
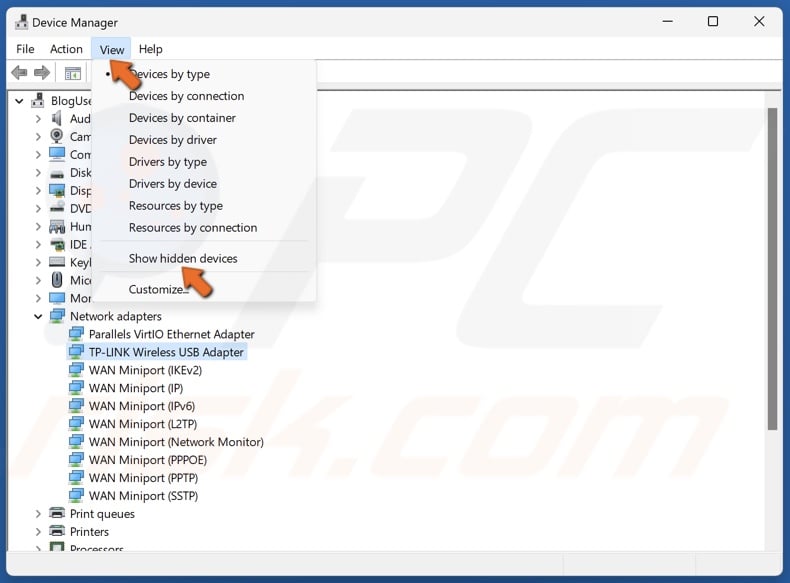
11. In the menu bar, click View and click Show hidden devices. Your network adapter should appear in the Network adapters list.
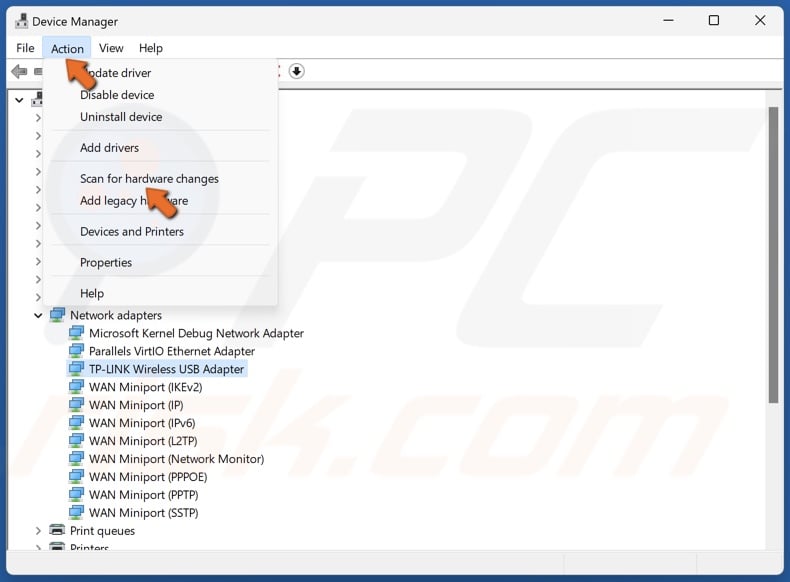
12. If it doesn't appear, click Action and click Check for hardware changes.
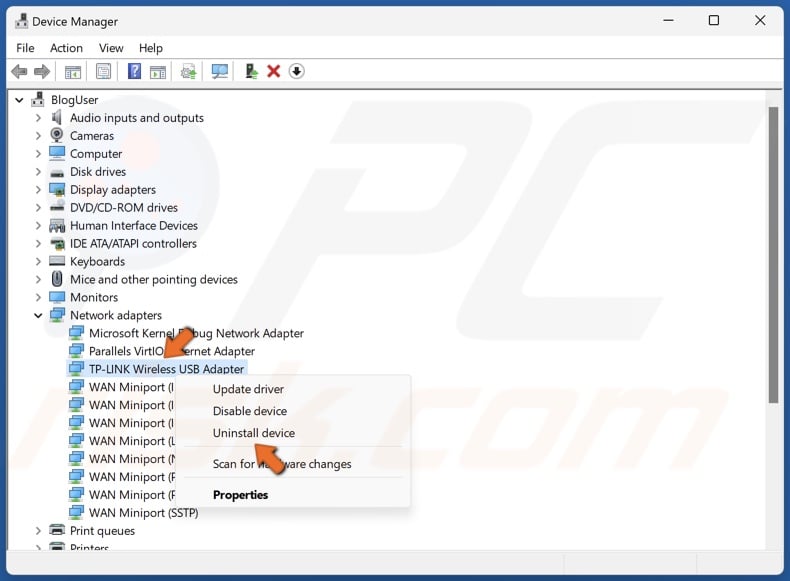
13. Right-click your WiFi adapter and click Uninstall device.
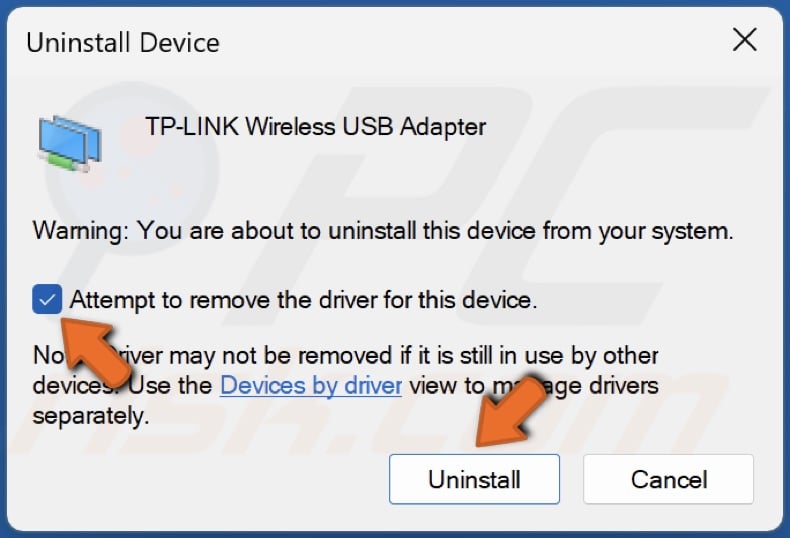
14. Mark the Attempt to remove the driver for this device checkbox and click Uninstall.
15. Close the Device Manager window.
16. Hold down Windows+R keys to open Run.
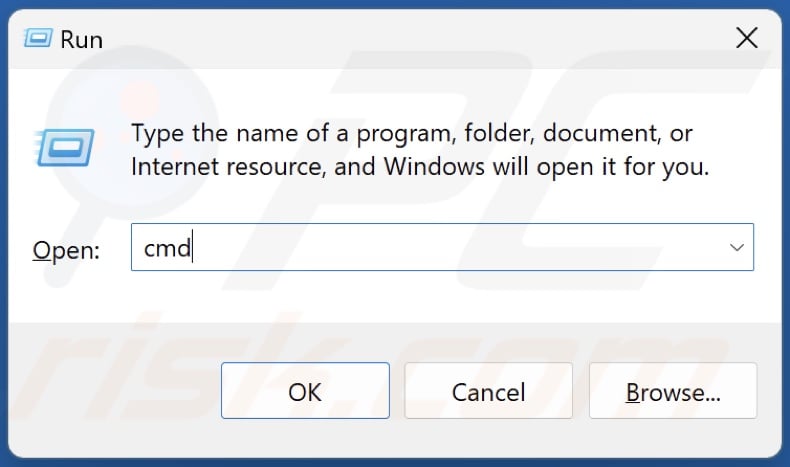
17. Type CMD in Run and hold down Ctrl+Shift+Enter keys to open Command Prompt as an administrator.
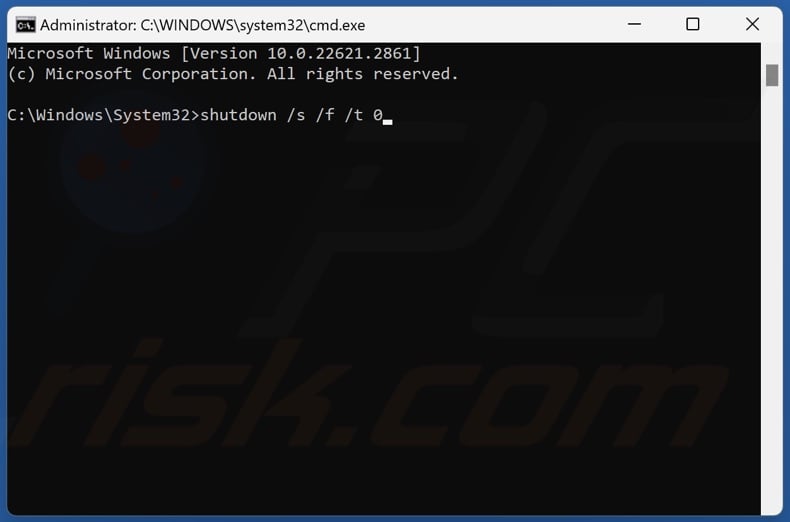
18. in Command Prompt, type in:
shutdown /s /f /t 0
19. Press Enter. This command will perform a total system shutdown since the regular shutdown through the Windows Start menu is only a partial shutdown.
20. Once your PC shuts down, press the power button to turn it on. The full shutdown and restart will allow your PC to correctly recognize and reinstall your WiFi adapter.
Method 4. Disable the Network Adapter Power-Saving Option
The Power-saving option in Windows turns off some devices and peripherals when your PC enters Sleep Mode to save battery life. However, your WiFi option can disappear because the power-saving option for your network adapter turns off your WiFi adapter when its not supposed to or fails to turn it on when your PC wakes up.
1. Right-click Start and select Device Manager.
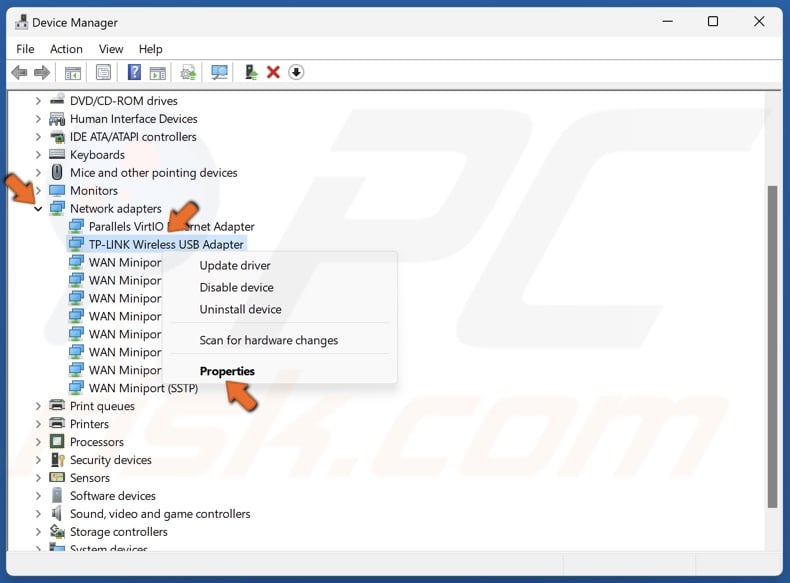
2. Expand the Network adapters list.
3. Right-click your WiFi adapter and click Properties.
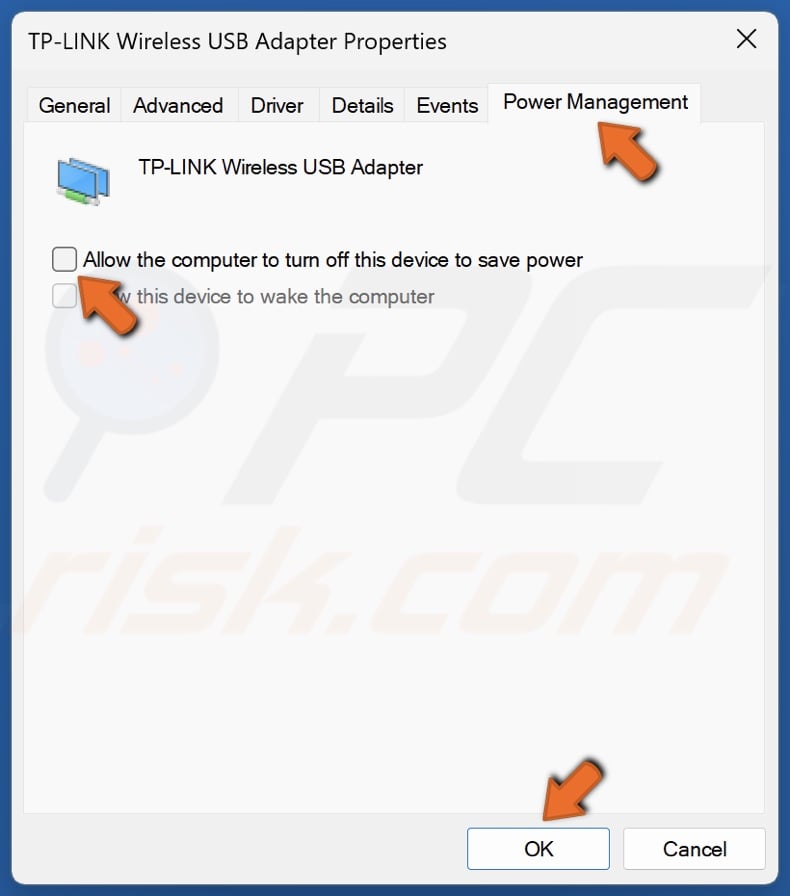
4. Select the Power Management tab.
5. Unmark the Allow the computer to turn off this device to save power checkbox.
6. Click OK.
7. Close the Device Manager and restart your PC.
Method 5. Set the WLAN AutoConfig Service to Start Automatically
The WLAN AutoConfig Service is essential to your wireless network connection. This service helps your PC discover, configure, and connect to WiFi networks. If your WiFi option is not showing up, it may be because this service is not running. The instructions below will show you how to enable it and how to keep it running.
1. Hold down Windows+R keys to open Run.
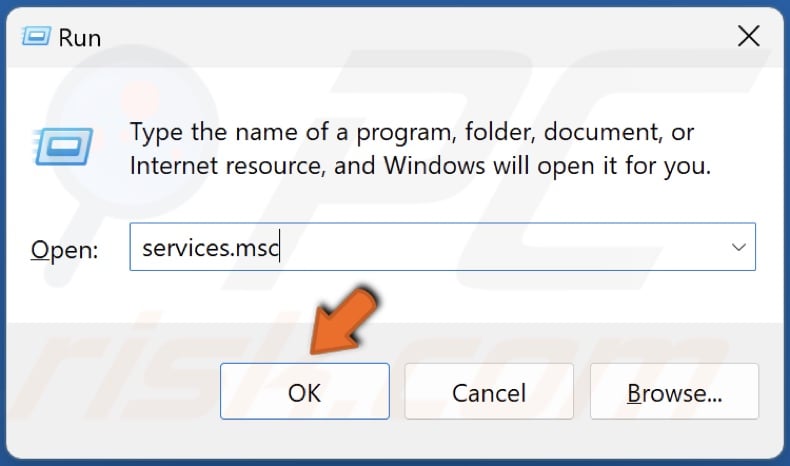
2. Type services.msc in Run and click OK.
3. In the Services window, scroll down and find WLAN AutoConfig.
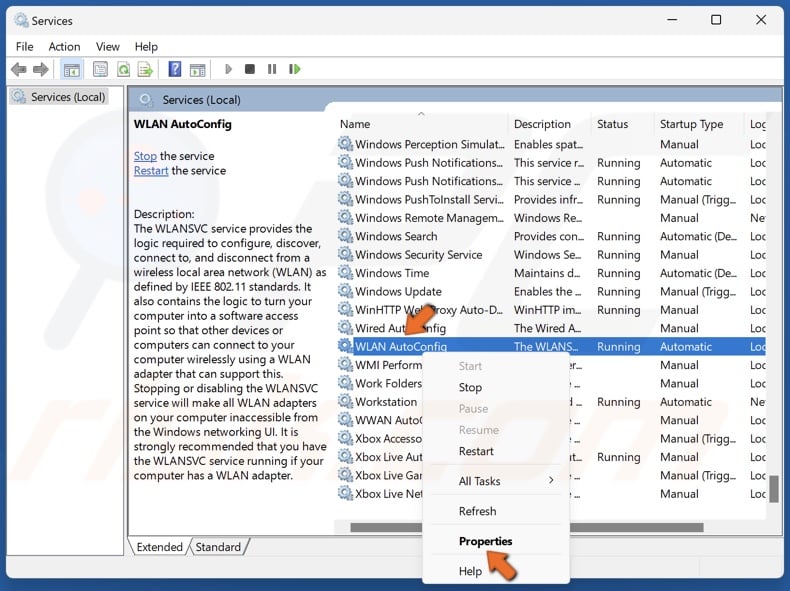
4. Right-click WLAN AutoConfig and click Properties.
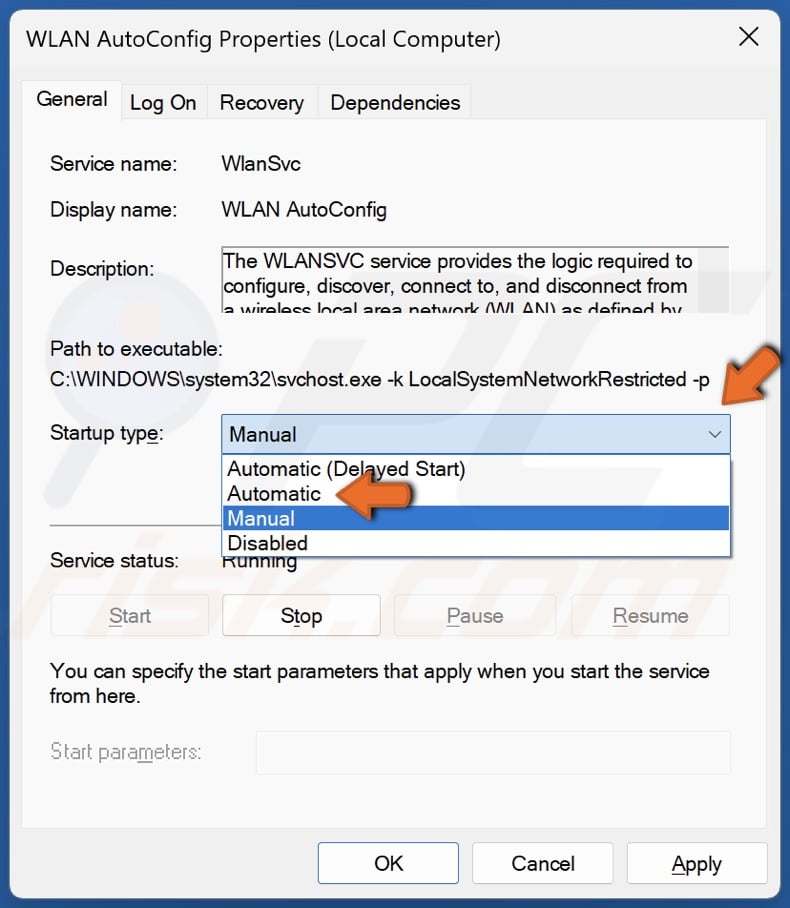
5. Open the Startup type drop-down menu and select Automatic.
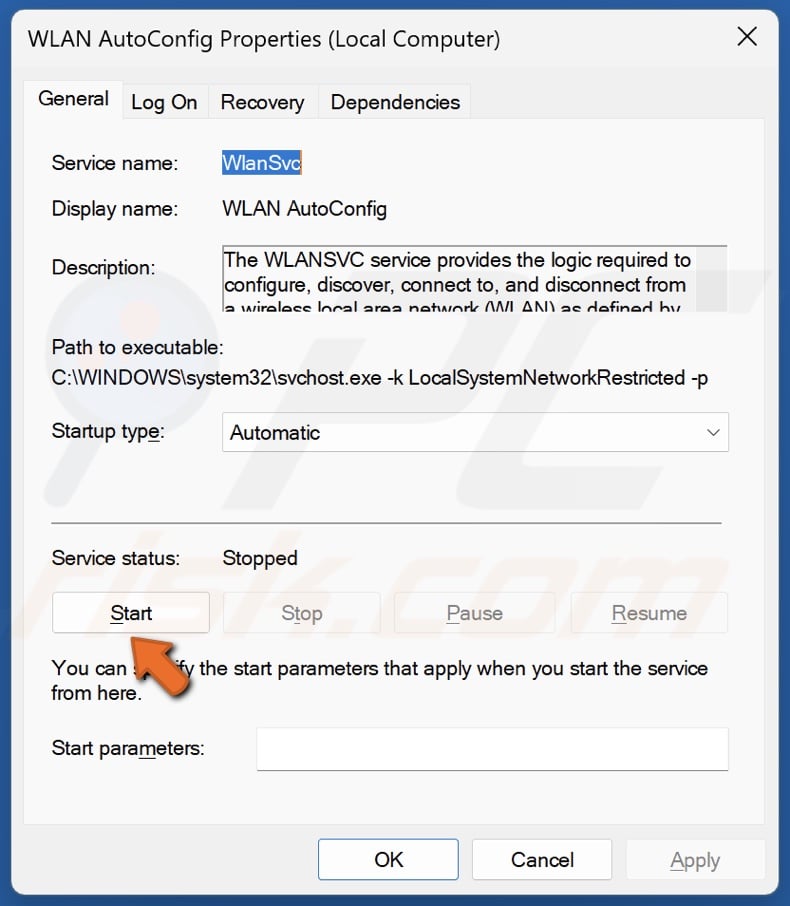
6. Click Start under the Service status section.
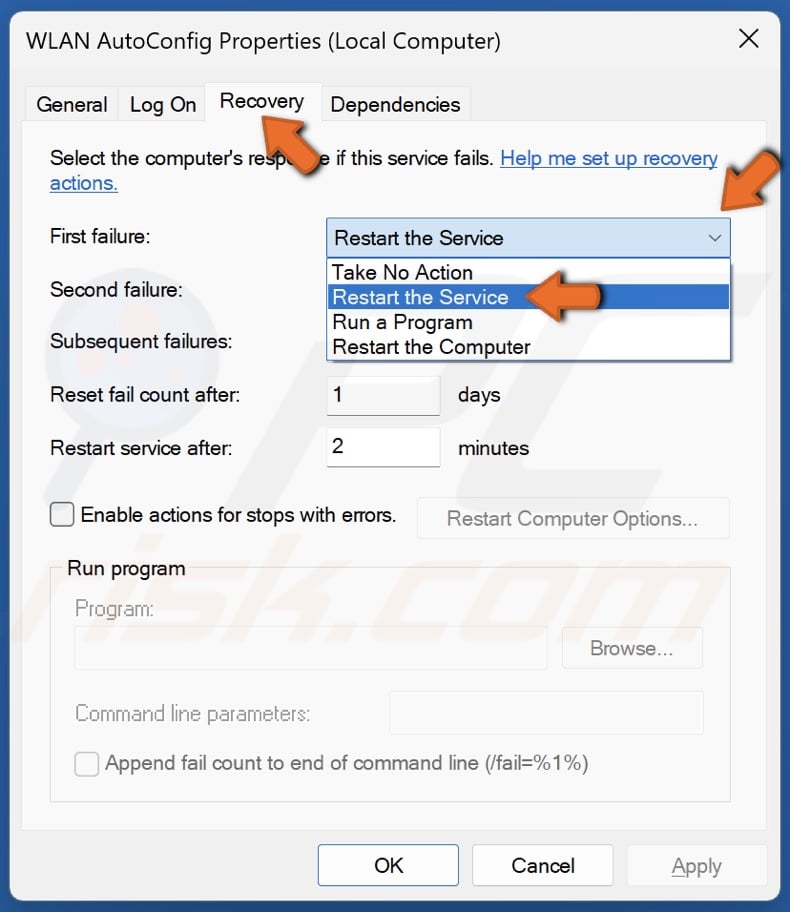
7. Then, select the Recovery tab.
8. Open the First failure drop-down menu and select Restart the Service.
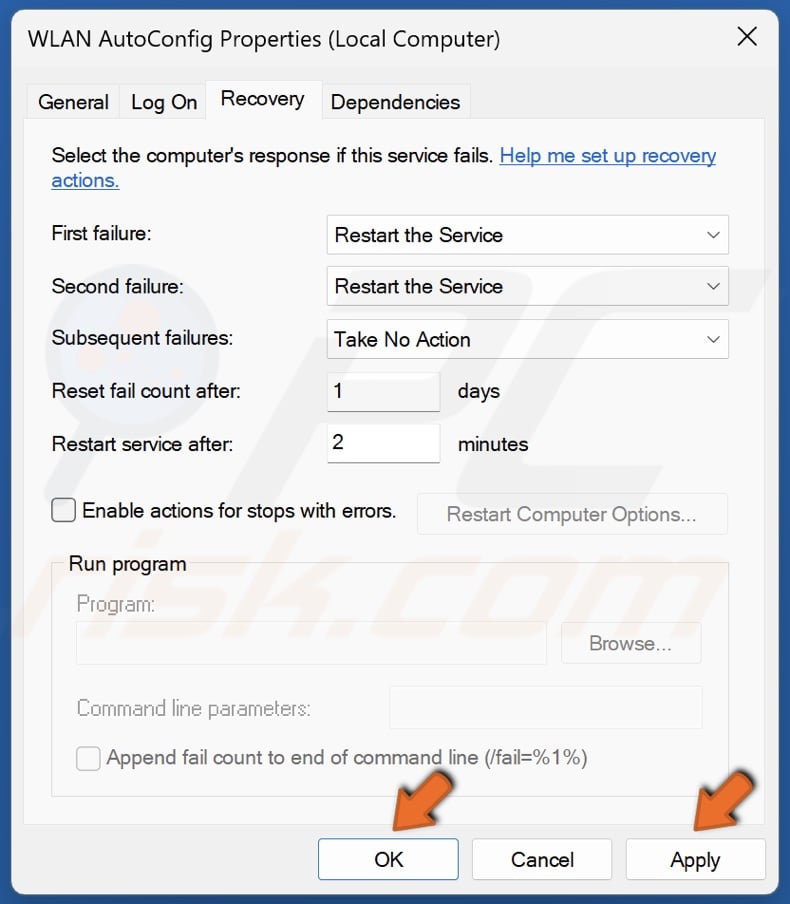
9. Click Apply and click OK.
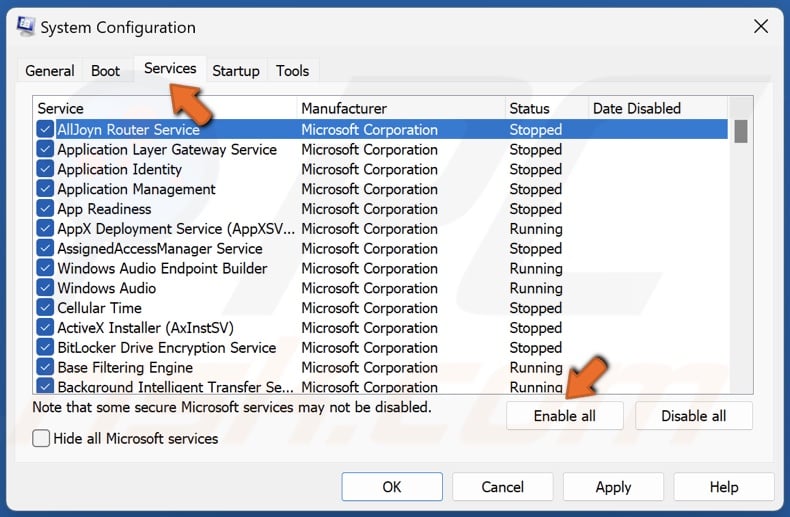
Method 6. Enable All Services in System Configuration
The System Configuration tool allows you to manage startup services. If services relevant to networking have been disabled, this may be the reason WiFi is not showing on your Windows 11 taskbar. Follow the instructions below to enable all services in System Configuration.
1. Hold down Windows+R keys to open Run.

2. Type msconfig in Run and click OK.
3. Select the Services tab in System Configuration.
4. Click Enable all.
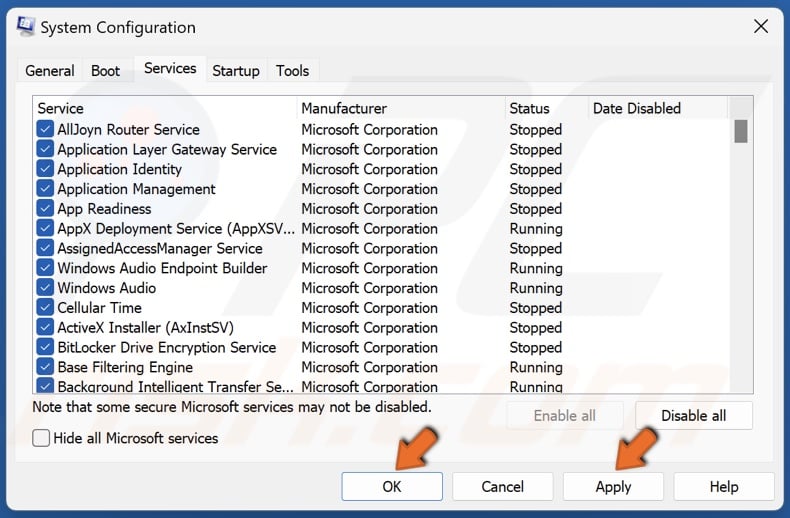
5. Click Apply and click OK.
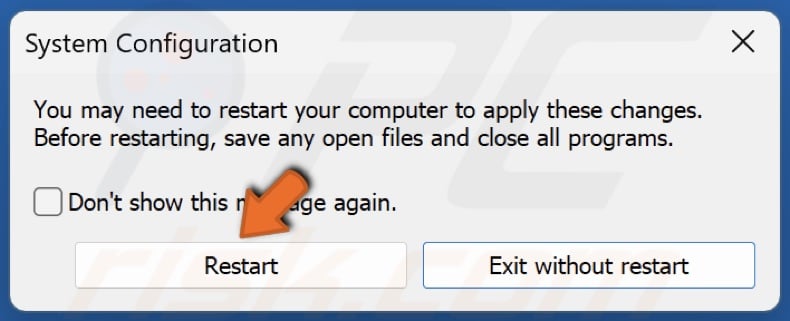
6. Click Restart when prompted.
Method 7. Enable Networking Icon in Group Policy Settings
Your WiFi icon may be disabled by Group Policy settings. The instructions below show how to enable it.
1. Hold down Windows+R keys to open Run.
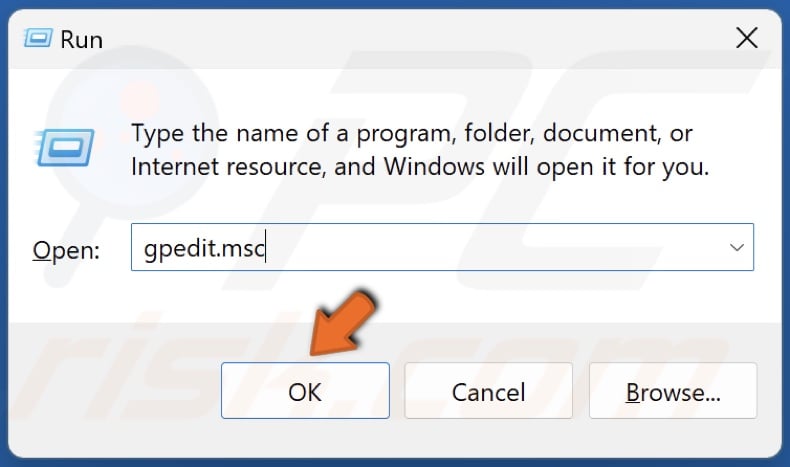
2. Type gpedit.msc in Run and click OK.
![]()
3. In the Group Policy Editor, navigate to:
User Configuration > Administrative Templates > Start Menu and Taskbar
4. Double-click the Remove the networking icon policy.
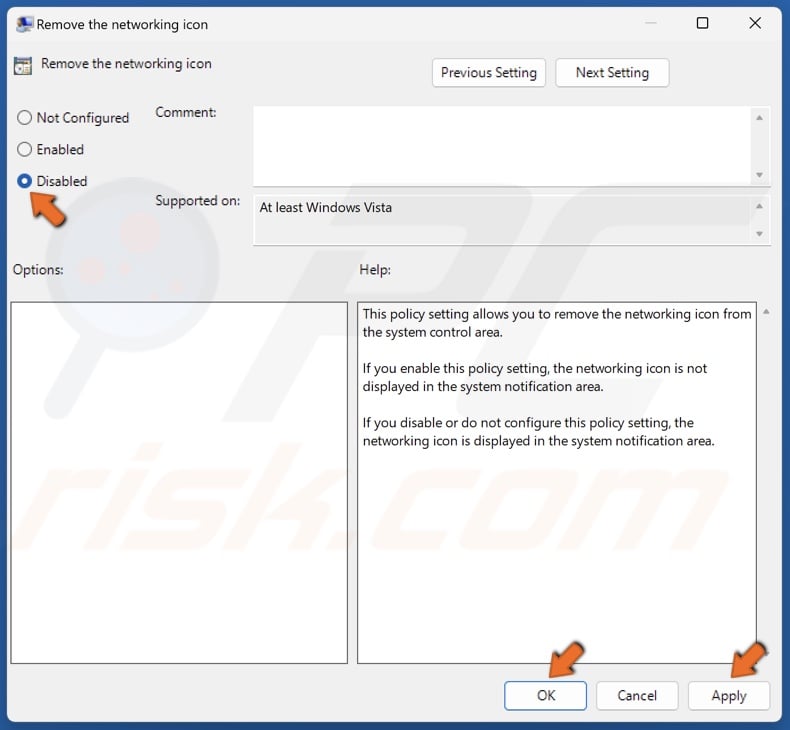
5. Tick Disabled on the left.
6. Click Apply and click OK.
Method 8. Reset Your Network Settings to Default
Your WiFi option may have disappeared due to misconfigured network settings. Since pinpointing the exact settings that were misconfigured can be difficult, you can try resetting all of your network settings. The Network reset option in Windows 11 will reset all misconfigured network settings to default and reinstall the drivers for all network adapters.
Since all your networking components will be reset to their default settings, so you will have to re-enter your WiFi connection password.
1. Right-click Start and click Settings.
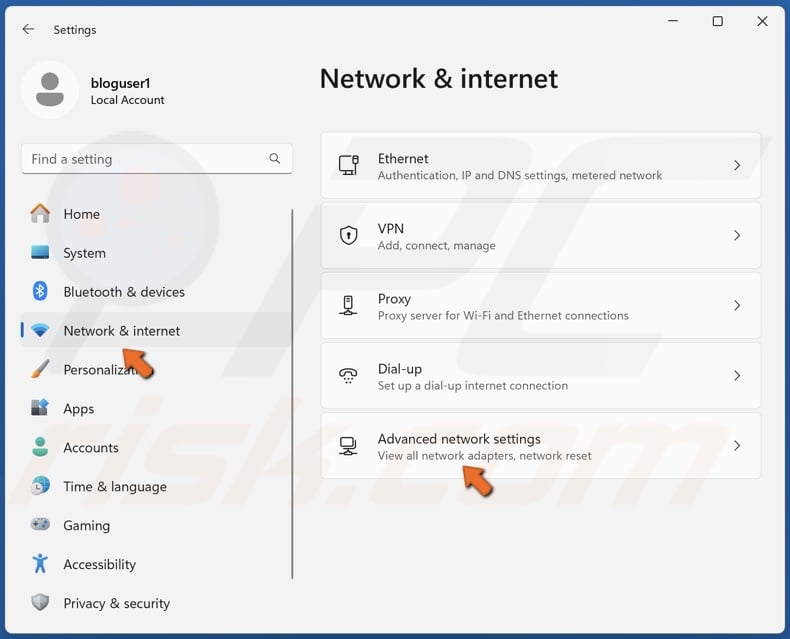
2. Select the Network & internet panel, scroll down, and click Advanced network settings.
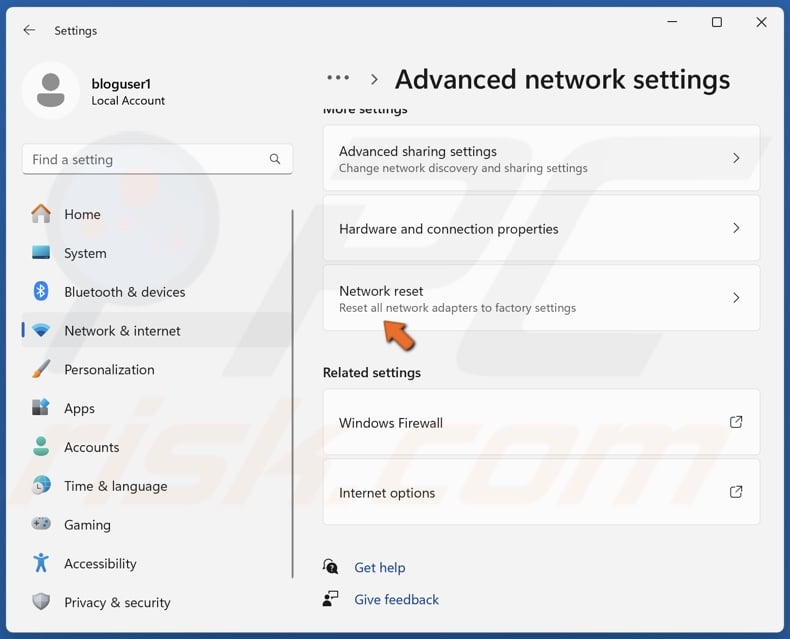
3. Select Network reset.
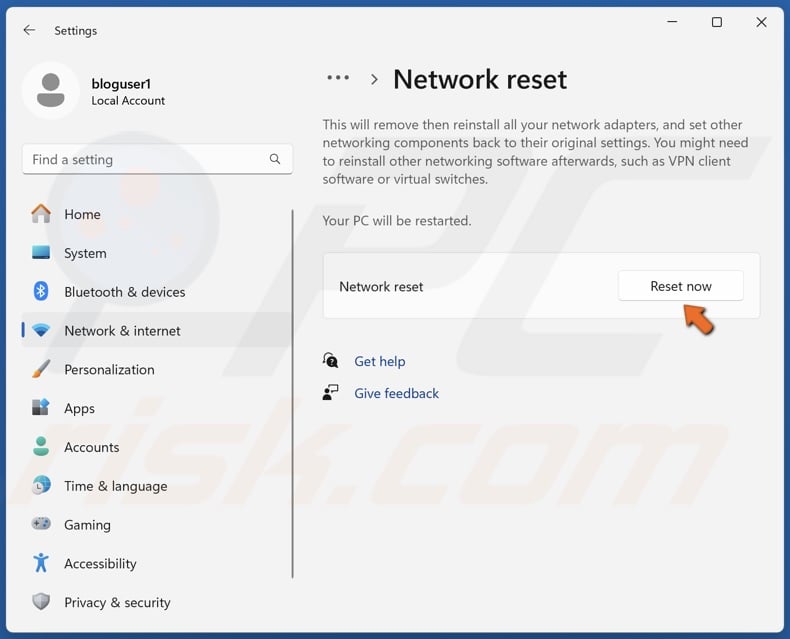
4. Click Reset now.
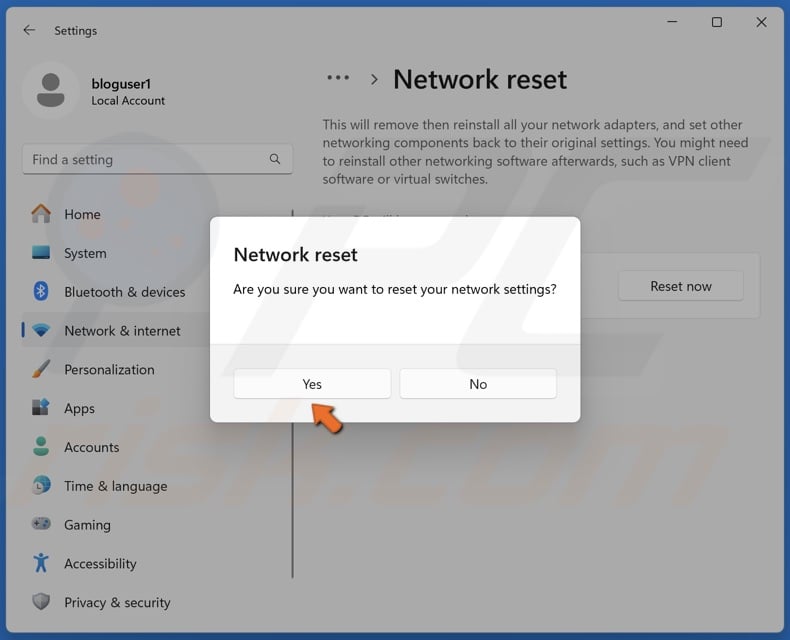
5. Click Yes to confirm the reset.
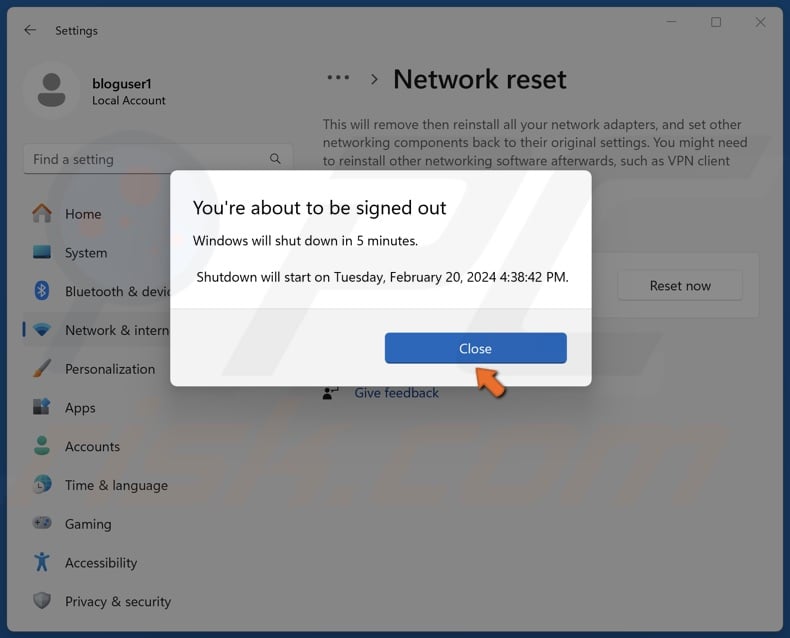
6. Click Close when prompted.
7. Restart your PC.
Did this article help you fix your WiFi icon missing from your taskbar? Let us know in the comments. If you know how to fix this issue that is not mentioned in this article, please share it with others in the comments.
Share:

Rimvydas Iliavicius
Researcher, author
Rimvydas is a researcher with over four years of experience in the cybersecurity industry. He attended Kaunas University of Technology and graduated with a Master's degree in Translation and Localization of Technical texts. His interests in computers and technology led him to become a versatile author in the IT industry. At PCrisk, he's responsible for writing in-depth how-to articles for Microsoft Windows.
▼ Show Discussion