How to Take a Screenshot on Windows 11

Get Free Scanner and check your computer for errors
Fix It NowTo fix found issues, you have to purchase the full version of Combo Cleaner. Free trial available. Combo Cleaner is owned and operated by Rcs Lt, the parent company of PCRisk.com read more.
How to Take a Screenshot on Windows 11
Sometimes, you need to save something on your screen to reference later or send it to someone else. Thankfully, Windows 11 offers several built-in features and tools to do it. This article will show you five ways to take a screenshot.

In some cases, taking desktop screenshots can be essential to your workflow. Other times, screenshots are helpful when you have a problem with your PC and you need to capture error messages to share them on forums or with friends to help troubleshoot it. Whatever the case may be, quickly taking screenshots is often necessary when using a computer.
Windows 11 provides several ways to take a screenshot, including using keyboard shortcuts and built-in Windows tools. Below, we have listed five ways to screenshot an individual window or your entire screen in Windows 11.
Video Tutorial on How to Take a Screenshot on Windows 11
Table of Contents:
- Introduction
- Method 1. Snip & Sketch
- Method 2. Snipping Tool
- Method 3. Print Screen
- Method 4. Alt+Print Screen
- Method 5. Xbox Game Bar
- Video Tutorial on How to Take a Screenshot on Windows 11
Download Computer Malware Repair Tool
It is recommended to run a free scan with Combo Cleaner - a tool to detect viruses and malware on your device. You will need to purchase the full version to remove infections. Free trial available. Combo Cleaner is owned and operated by Rcs Lt, the parent company of PCRisk.com read more.
Method 1. Snip & Sketch
The Snip & Sketch tool is more accessible than its Snipping Tool predecessor, allowing you to take and share screenshots more easily. The Snip & Sketch lets you capture an individual window on your desktop, a feature absent when it first came out.
1. Hold down Windows+Shift+S keys on your keyboard. Your screen will dim and open a menu at the top of the screen that will let you choose the type of screenshot you want to take.

2. Select between Rectangular, Freeform, Window, and Fullscreen snips and take your screenshot.
3. If you selected the Rectangular or Freeform option, outline the perimeter of the area you want to capture and take your screenshot.
The screenshots you take will be saved in the Screenshots folder in the default Pictures folder.
Method 2. Snipping Tool
The Snipping Tool has been around for a while. You can find this tool in Windows Vista, 7, 8, 8.1, 10, and 11.
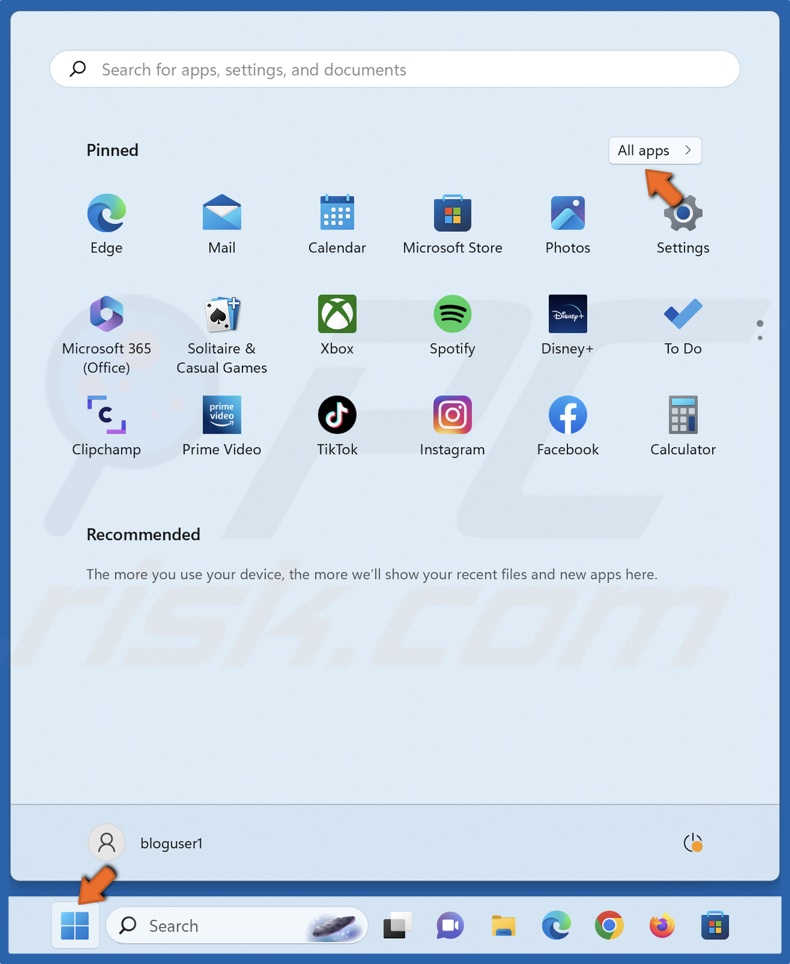
1. Open the Start menu and click All apps in the top-right corner.
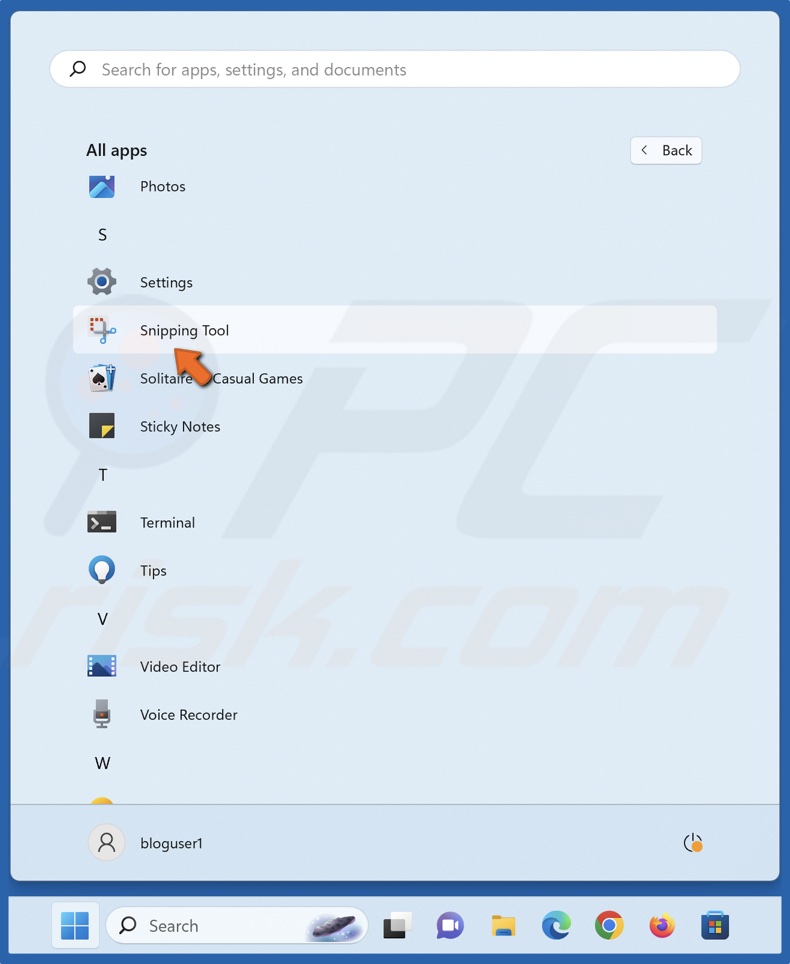
2. Scroll down and click Snipping Tool to open it.
3. Hold down Windows+Shift+S keys on your keyboard.
4. Select between Rectangular, Freeform, Window, and Fullscreen snips and take your screenshot.
The Snipping Tool has the same essential functions as the Snip & Sketch tool. The screenshots you take are saved in the Screenshots folder in the default Pictures folder.
Method 3. Print Screen
The oldest known way to take a screenshot on Windows is by pressing the Print Screen key on your keyboard. The Print Screen (sometimes labeled PrtScn) can be found on your keyboard next to the F12 key.
The Print Screen key on your keyboard lets you screenshot your entire screen. When you press the Print Screen (PrtScn) key, it will take a screenshot and save it to your clipboard. As a result, you have to open an image editing tool, such as Microsoft Paint, and paste the screenshot.
However, holding down Windows+Print Screen (PrtScn) keys will save your screenshot in the Screenshots folder in the default Pictures folder.
1. Press the Print Screen (PrtScn) key on your keyboard to take a screenshot. The entire content of your screen will be copied to the clipboard.
2. Open the Start menu and click All apps in the top-right corner.
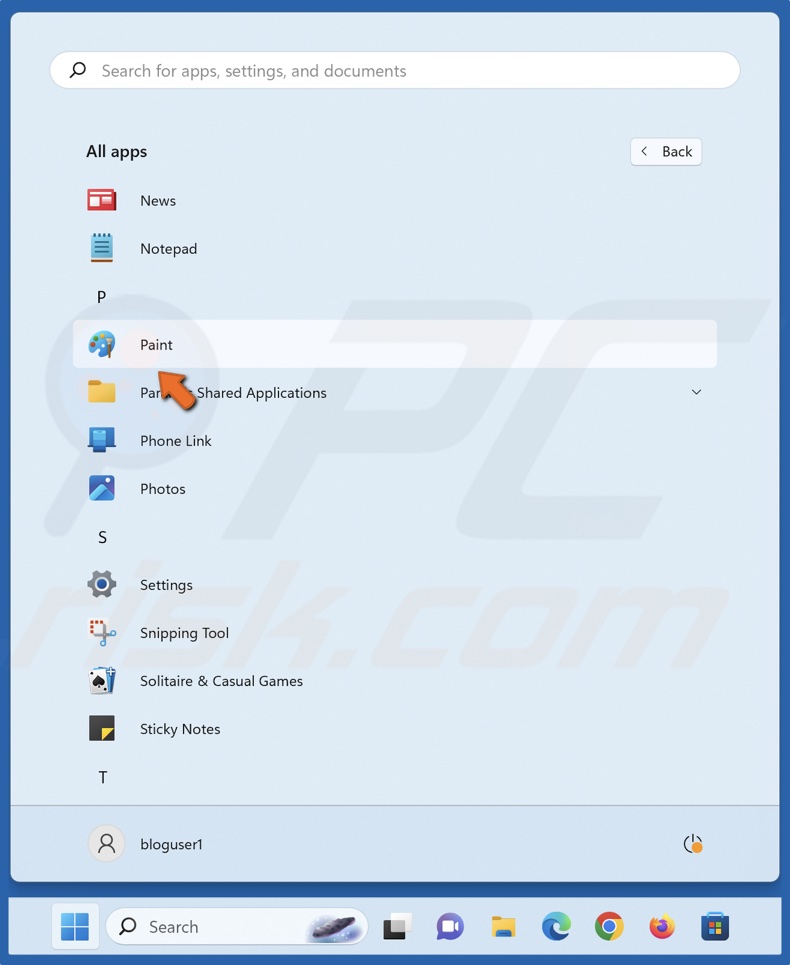
3. Scroll down and click Paint to open it.
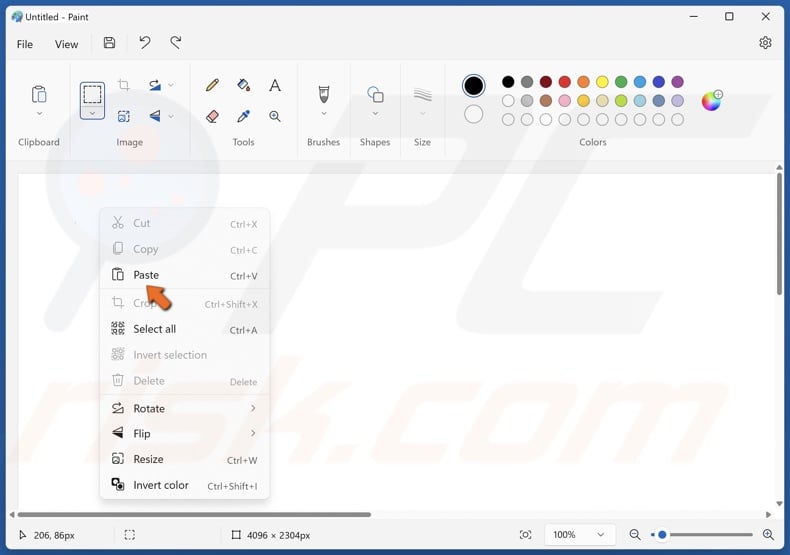
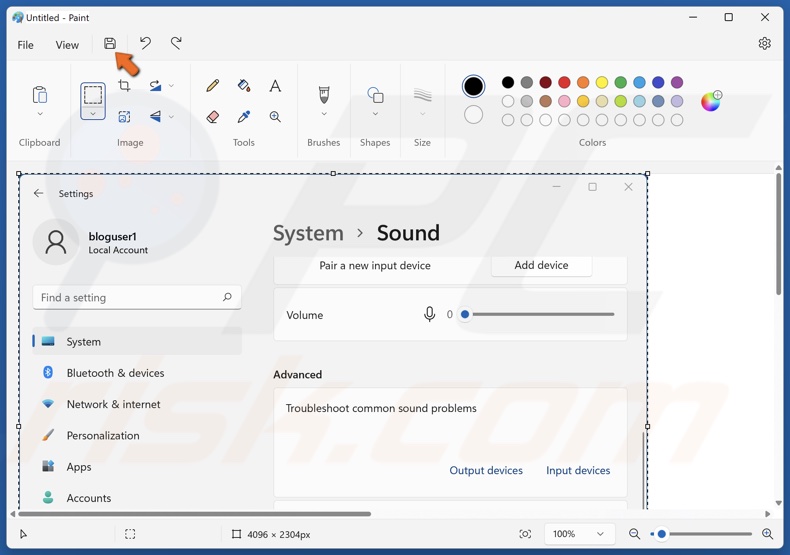
4. In the Paint app, right-click the drawing area and click Paste or hold down Ctrl+V keys.
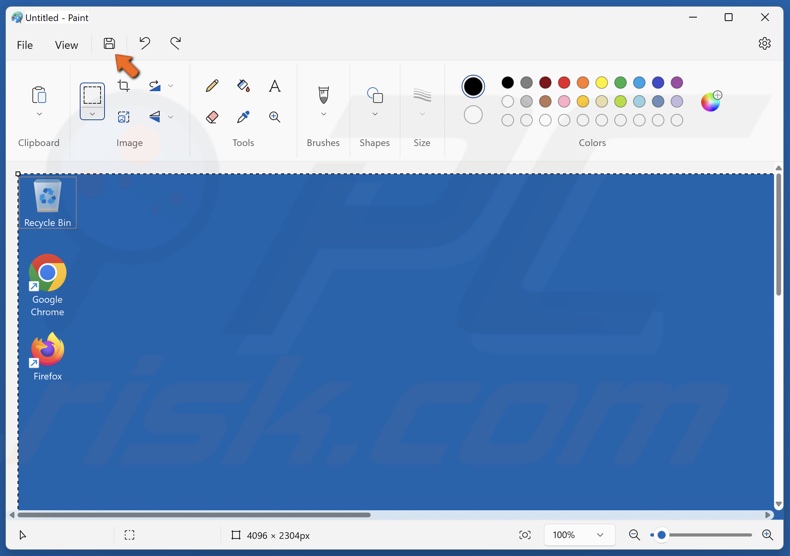
5. Click the Save button or hold down Ctrl+S keys.
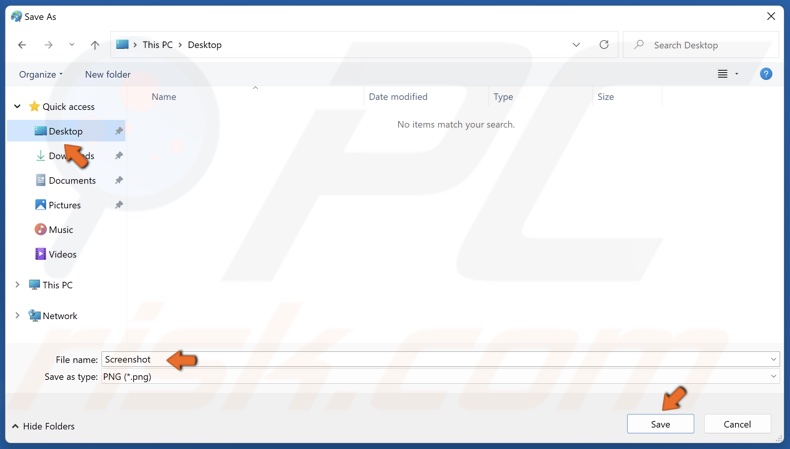
6. Enter a file name, choose where to save it, and click Save.
7. Alternatively, hold down Windows+Print Screen (PrtScn) keys on your keyboard. It will save your screenshot in the Screenshots folder in the default Pictures folder.
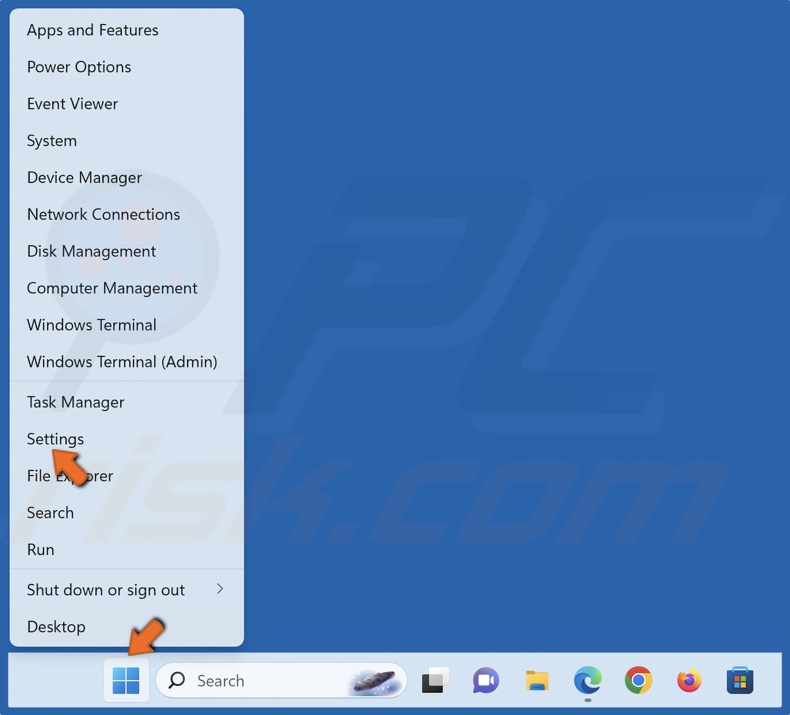
8. You can also set the Print Screen (PrtScn) key to open the Snip & Sketch tool. Right-click the Start menu and click Settings.

9. Select the Accessibility panel and click Keyboard.
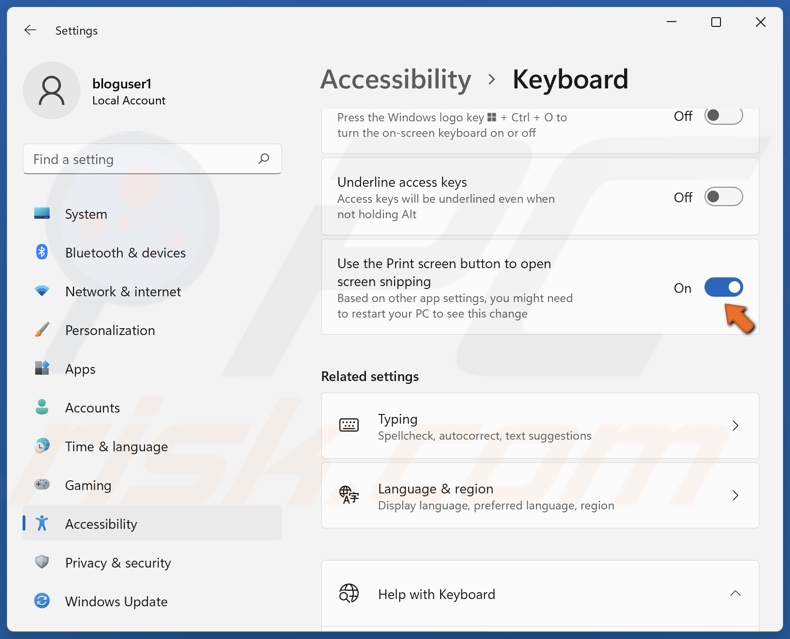
10. Scroll down and toggle on the Use the Print screen button to open screen snipping option.
On laptop computers, the Print Screen key is usually located next to the Fn keys or at the bottom next to the Spacebar key. Laptops typically require pressing the Fn key with the Print Screen key.
If your laptop keyboard doesn’t have a Print Screen key, hold down Fn+Windows+Spacebar keys. The screenshot will be saved in the Screenshots folder in the default Pictures folder.
Method 4. Alt+Print Screen
You can use the Alt+Print Screen keys on your keyboard to take a screenshot of an active window. Pressing these keys simultaneously will capture your active window and copy the screenshot to the clipboard. You will need to open MS Paint or another image editor, paste it, and then save it.
1. Hold down Alt+Print Screen (PrtScn) keys on your keyboard. It will capture a screenshot of your active window (not the entire screen) that will be copied to the clipboard.
2. Open the Start menu and click All apps in the top-right corner.
3. Scroll down and click Paint to open it.
4. In the Paint app, right-click the drawing area and click Paste or hold down Ctrl+V keys.
5. Click the Save button or hold down Ctrl+S keys.
6. Enter a file name, choose where to save it, and click Save.
Method 5. Xbox Game Bar
The Xbox Game Bar application comes with Windows 11 by default. You can use the Game Bar to capture screenshots while you’re on your desktop and while you’re in game. However, before using Xbox Game Bar, ensure it’s enabled.
1. Hold down Windows+G keys to open the Xbox Game Bar.
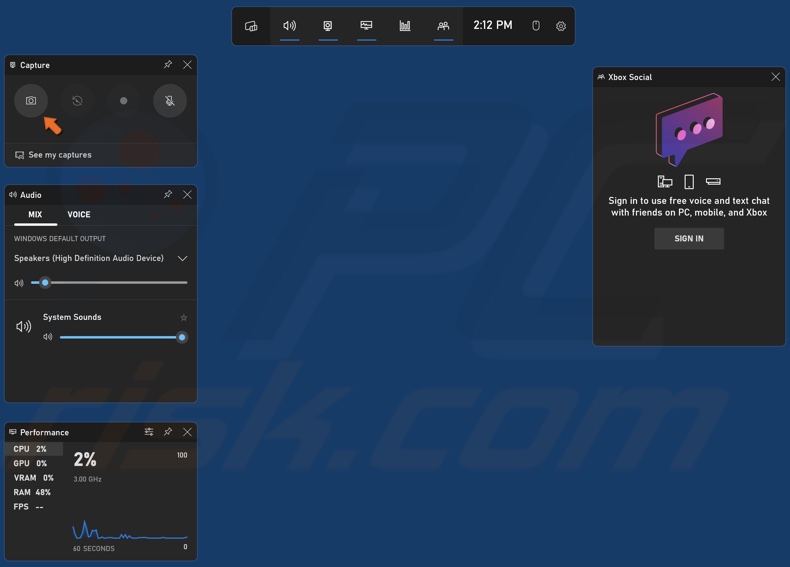
2. Click the capture button or hold down Windows+Alt+Print Screen (PrtScn) keys to take a full-screen screenshot. The screenshot will be saved in the Captures folder in the default Videos folder.
Did you find this article helpful? Leave your thoughts and suggestions in the comments section below.
Share:

Rimvydas Iliavicius
Researcher, author
Rimvydas is a researcher with over four years of experience in the cybersecurity industry. He attended Kaunas University of Technology and graduated with a Master's degree in Translation and Localization of Technical texts. His interests in computers and technology led him to become a versatile author in the IT industry. At PCrisk, he's responsible for writing in-depth how-to articles for Microsoft Windows.
▼ Show Discussion