How to Fix "Please wait for the gpsvc" Screen on Windows 11

Get Free Scanner and check your computer for errors
Fix It NowTo fix found issues, you have to purchase the full version of Combo Cleaner. Free trial available. Combo Cleaner is owned and operated by Rcs Lt, the parent company of PCRisk.com read more.
How to Fix “Please wait for the gpsvc” Screen on Windows 11
Many users report getting stuck on the “Please wait for the gpsvc” message when starting, restarting, or shutting down their PC or trying to switch user accounts. This article will describe this issue in more detail and provide several ways to fix it.
What Is GPSVC?
GPSVC (Group Policy Client Service) is a record management utility in the Windows NT group of operating systems. GPSVC controls the working environment of user and computer accounts.
When you log into Windows, several crucial background services start immediately. GPSVC is one of these essential services. GPSVC communicates with the Winlogon service via the Remote Procedure Call (RPC) service. This communication checks the Computer Configuration and User Configuration of the Group Policy Objects to load the appropriate policies.
When multiple computers are on a network, GPSVC helps manage and apply group policies the administrator sets throughout the network.
What Causes This Issue?
If your PC gets stuck on the “Please wait for the gpsvc” message screen, it means that your PC can’t detect the gpsvc.dll file needed for your operating system to run correctly. Below is a list of known causes for this issue.
- The gpsvc.dll file was deleted. The most common cause of the “Please wait for the gpsvc” screen is a missing gpsvc.dll file, which may have been moved, deleted, or corrupted. Consequently, communication between GPSVC and Winlogon is severed.
- Failed installation of software. A failed software installation may lead to the gpsvc.dll file becoming corrupt and triggering the “Please wait for the gpsvc” screen.
- Malware on your PC. If your PC has been infected with malware, it may corrupt vital system files, including the gpsvc.dll file. We recommend installing Combo Cleaner to scan your PC for malware and remove it if any is found.
- Incomplete system shutdown or reboot. This issue may also occur if your PC isn’t shut down properly. For example, if you unplugged it from the power outlet or there was a power outage.
Due to GPSVC being unable to communicate with Winlogon results in a delay when booting or shutting down the PC since it keeps searching for gpsvc.dll and asking you to wait.
Video Tutorial on How to Fix “Please wait for the gpsvc” Screen
Table of Contents:
- Introduction
- Method 1. Hold down Ctrl+Alt+Delete Keys to Shut Down Your PC
- Method 2. Run the Deployment Image & Servicing Management (DISM) and System File Checker (SFC) Scans
- Method 3. Change the DNS Server Address
- Method 4. Restart the GPSVC Service
- Method 5. Reset and Update Group Policy Settings
- Method 6. Configure the GPSVC Registry Values
- Method 7. Perform a System Restore
- Video Tutorial on How to Fix “Please wait for the gpsvc” Screen
Download Computer Malware Repair Tool
It is recommended to run a free scan with Combo Cleaner - a tool to detect viruses and malware on your device. You will need to purchase the full version to remove infections. Free trial available. Combo Cleaner is owned and operated by Rcs Lt, the parent company of PCRisk.com read more.
Method 1. Hold down Ctrl+Alt+Delete Keys to Shut Down Your PC
1. If your PC gets stuck on the “Please wait for the gpsvc” screen when shutting down, hold down Ctrl+Alt+Delete keys on your keyboard. This will open a new screen.
2. Click the Power button at the bottom-right of the screen and click Shut Down.
If your PC still doesn’t shut down, you can hold down the Power button on your PC for 5 seconds to force a hard shutdown (or reboot).
Method 2. Run the Deployment Image & Servicing Management (DISM) and System File Checker (SFC) Scans
The Deployment Image Servicing and Management (DISM) is a command-line tool that can repair a damaged/corrupted Windows image. The System File Checker (SFC) is a utility that can repair and replace corrupted Windows system files.
System File Checker (SFC) is a tool designed to identify corrupted or missing system files, including DLL files. SFC scans all protected system files and replaces corrupted files with a cached copy located in a compressed folder at %WinDir%\System32\dllcache.
1. Hold down Windows+R keys to open Run.
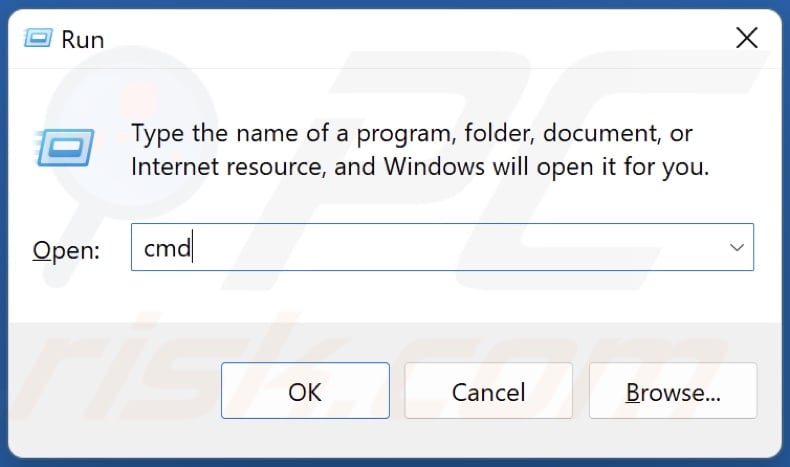
2. Type CMD in the Run dialog and hold down Ctrl+Shift+Enter keys to open Command Prompt as an administrator.
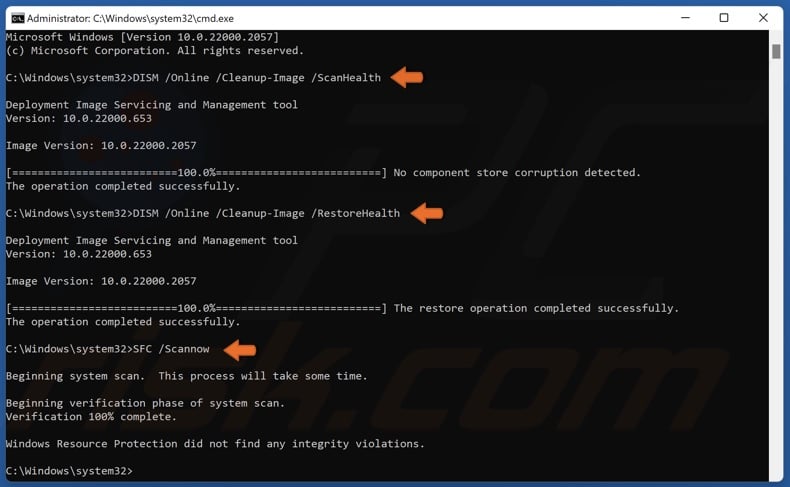
3. In the Command Prompt window, type in:
DISM /Online /Cleanup-Image /ScanHealth
4. Press Enter.
5. Type in:
DISM /Online /Cleanup-Image /RestoreHealth
6. Press Enter.
7. Type in:
SFC /Scannow
8. Press Enter.
6. Close the Command Prompt and restart your PC.
Method 3. Change the DNS Server Address
You can change your DNS server address if the problem occurs due to your network connection.
1. Hold down Windows+R keys to open Run.

2. Type ncpa.cpl in the Run dialog and click OK.
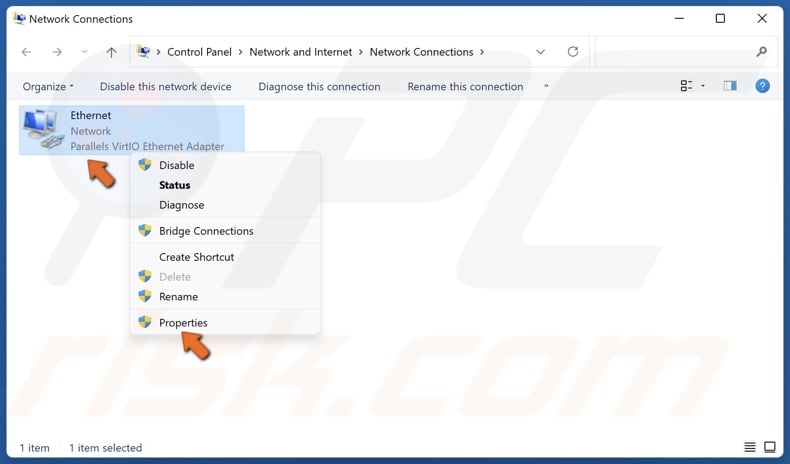
3. Right-click your network adapter and click Properties.
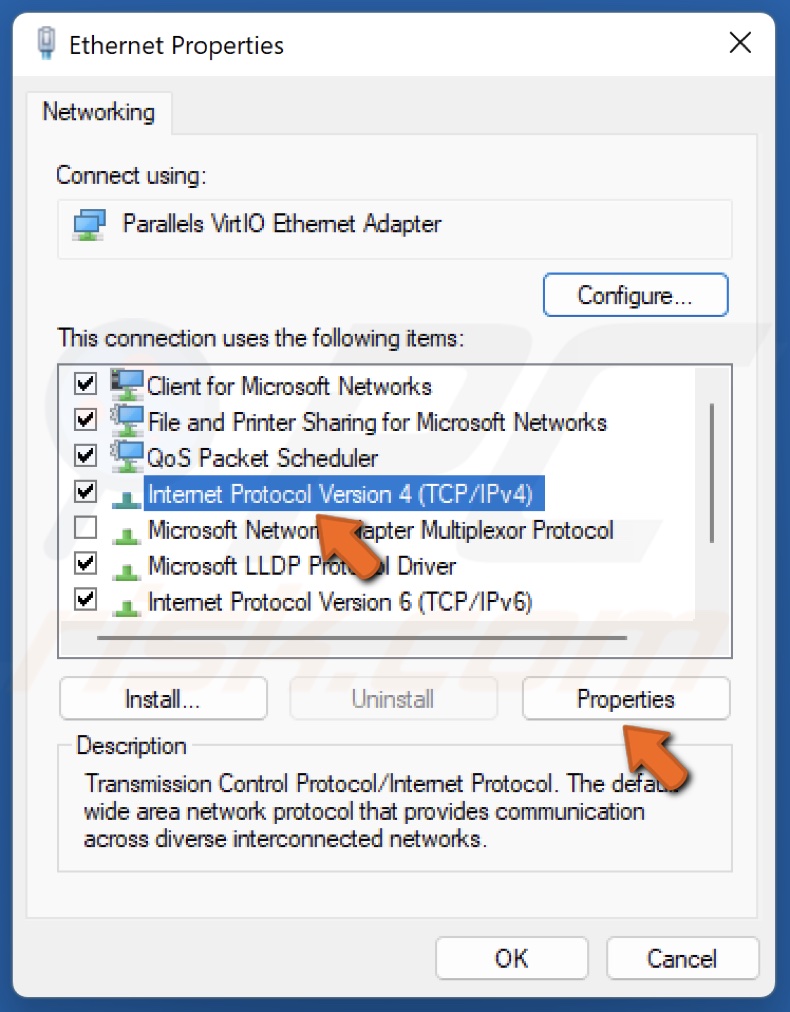
4. Select Internet Protocol Version 4 (TCP/IPv4) and click Properties.
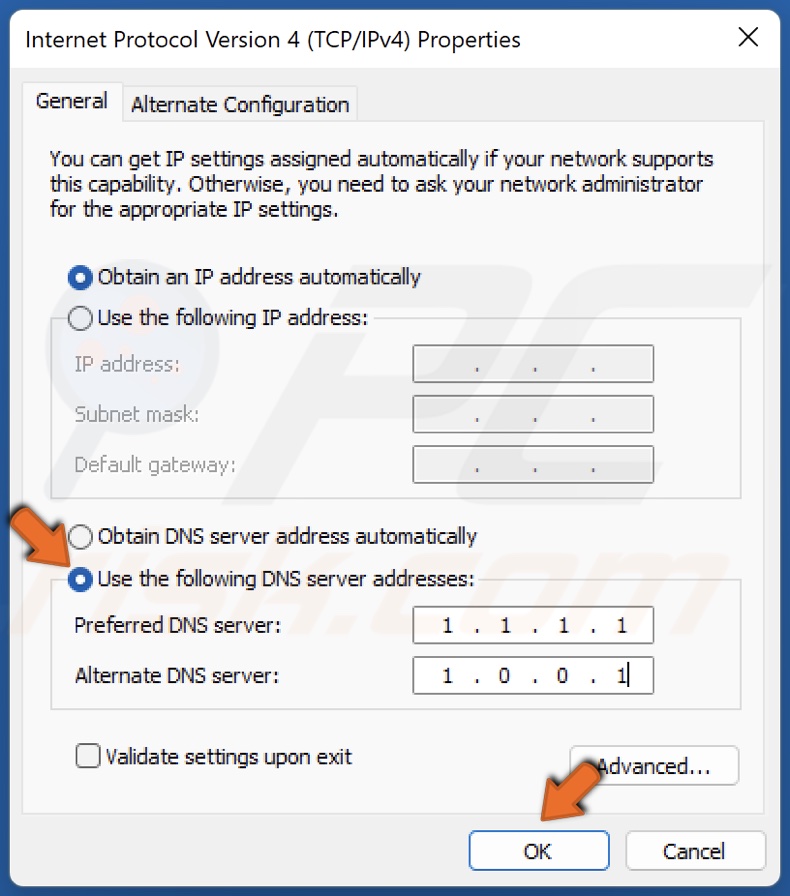
5. Tick Use the following DNS server addresses.
6. In the Preferred DNS server, type in 1.1.1.1
7. In the Alternate DNS server, type in 1.0.0.1
8. Click OK to save the settings and restart your PC.
Method 4. Restart the GPSVC Service
A third-party application may have disabled the GPSVC Service. The instructions below show how to restart it.
1. Hold down Windows+R keys to open Run.
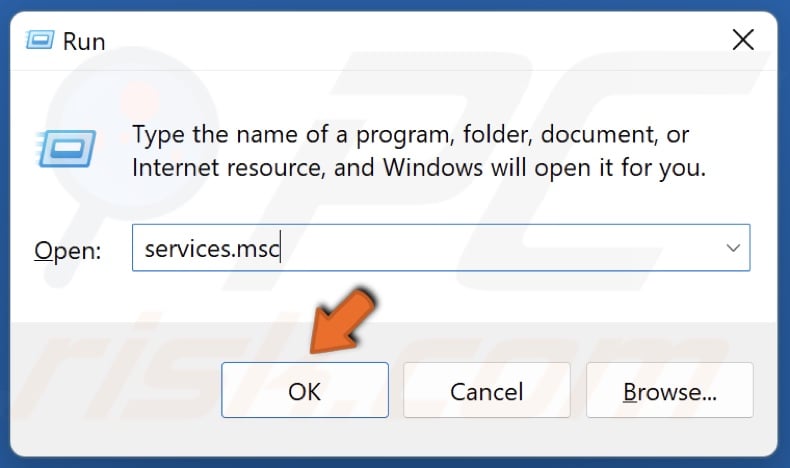
2. Type services.msc in the Run dialog and click OK.
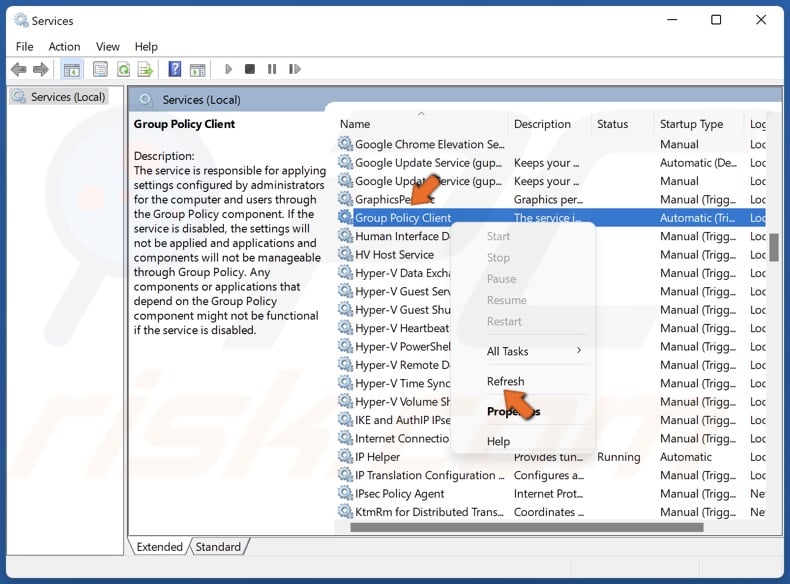
3. In the Services window, find Group Policy Client.
4. Right-click Group Policy Client and click Refresh.

5. Then, right-click Group Policy Client and click Properties.
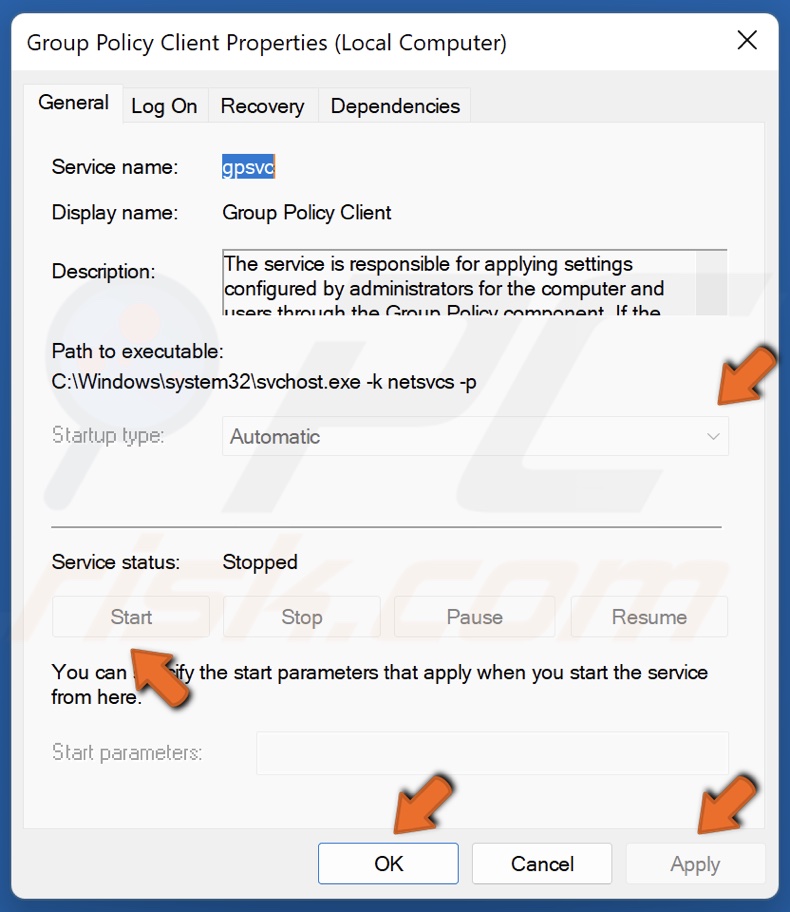
6. If it’s not grayed out, open the Startup type drop-down menu and select Automatic.
7. Click Start.
8. Click Apply and click OK.
Method 5. Reset and Update Group Policy Settings
The “Please wait for the gpsvc” may be caused by incorrectly configured Group Policy Settings. Therefore if you tampered with the Group Policy Settings, and started getting “Please wait for the gpsvc” screen, you can try resetting the Group Policy Settings to default.
1. Hold down Windows+R keys to open Run.
2. Type CMD in the Run dialog and hold down Ctrl+Shift+Enter keys to open Command Prompt as an administrator.
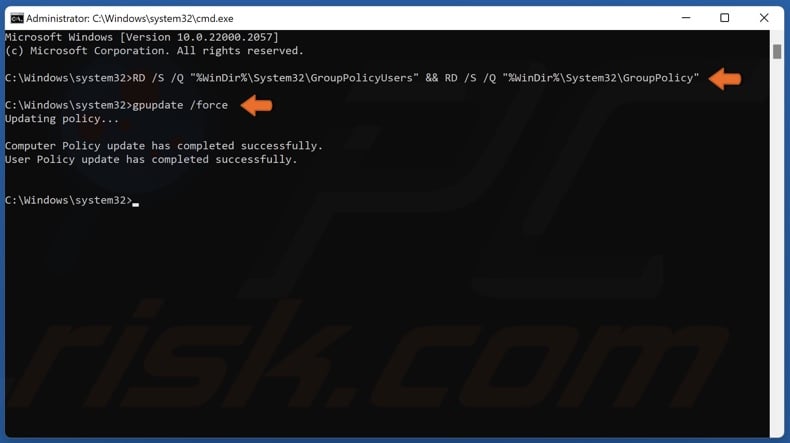
3. In the Command Prompt window, type in:
RD /S /Q "%WinDir%\System32\GroupPolicyUsers" && RD /S /Q "%WinDir%\System32\GroupPolicy"
4. Press Enter.
5. Then, type in:
gpupdate /force
6. Press Enter.
7. Close the Command Prompt and restart your PC.
Method 6. Configure the GPSVC Registry Values
If the registry keys related to GPSVC have incorrect values, they may trigger the “Please wait for the gpsvc” screen. The instructions below will show you how to configure the registry entries related to GPSVC.
1. Hold down Windows+R keys to open Run.
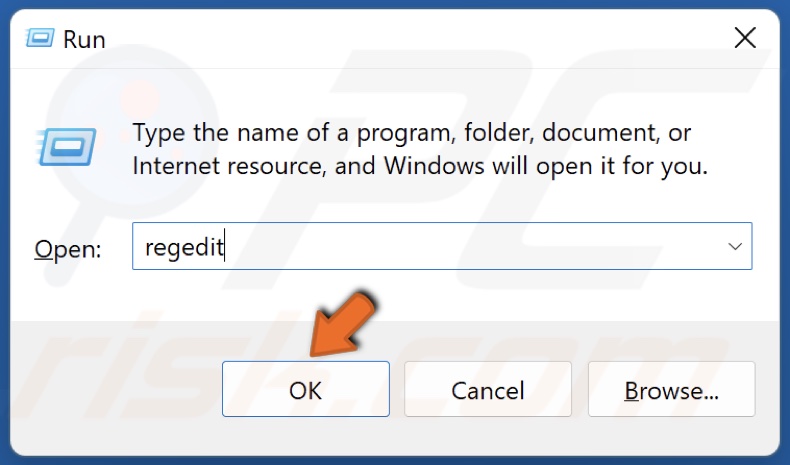
2. Type in regedit in the Run dialog and click OK.
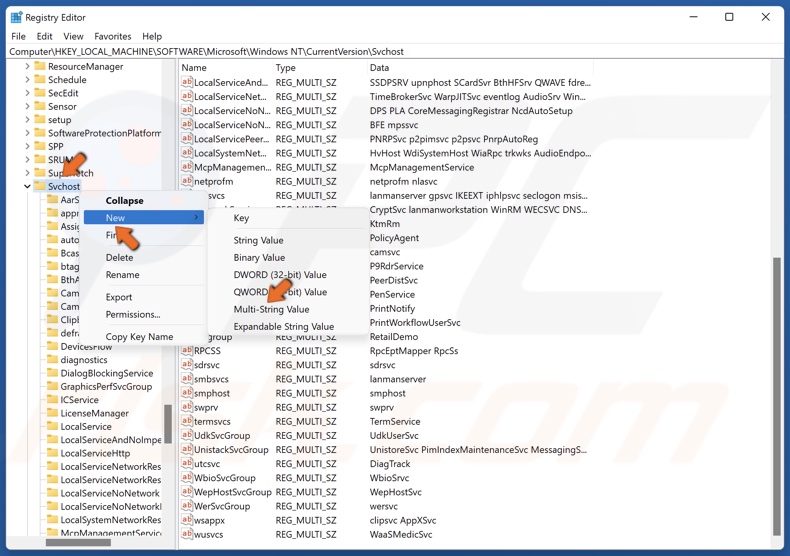
3. In the Registry Editor, navigate to:
HKEY_LOCAL_MACHINE\SOFTWARE\Microsoft\Windows NT\CurrentVersion\Svchost
4. Right-click the Svchost key, select New, and click Multi-String Value.
5. Name the new value GPSvcGroup and save it.
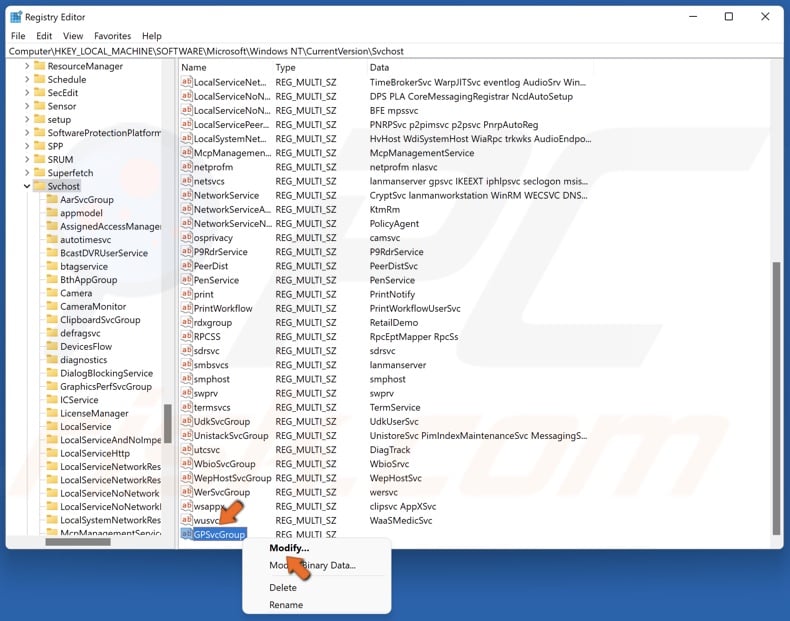
6. Right-click the GPSvcGroup value and click Modify.
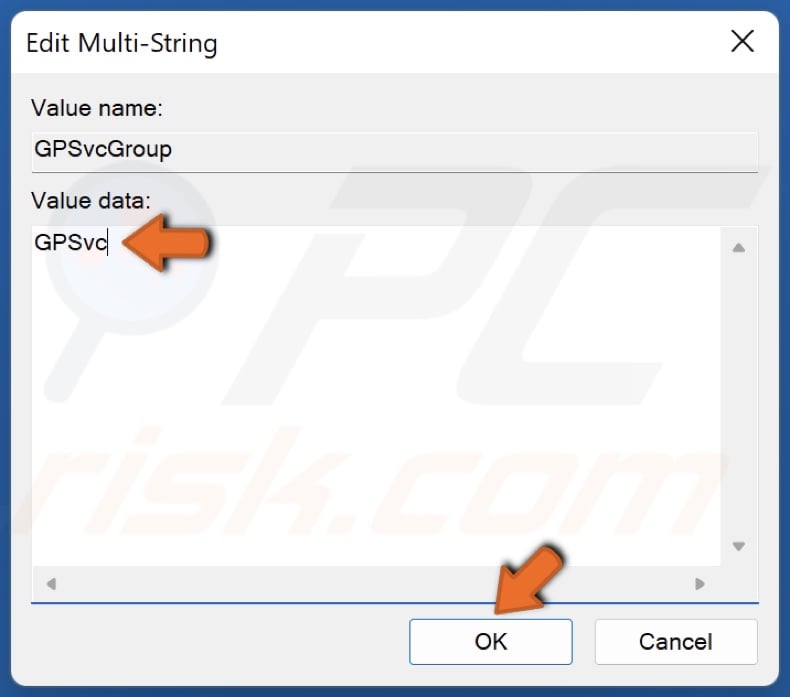
7. In the Value data line, type in GPSvc and click OK.
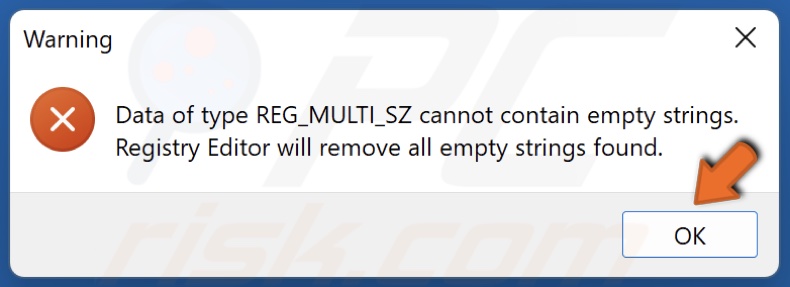
8. Click OK when prompted.
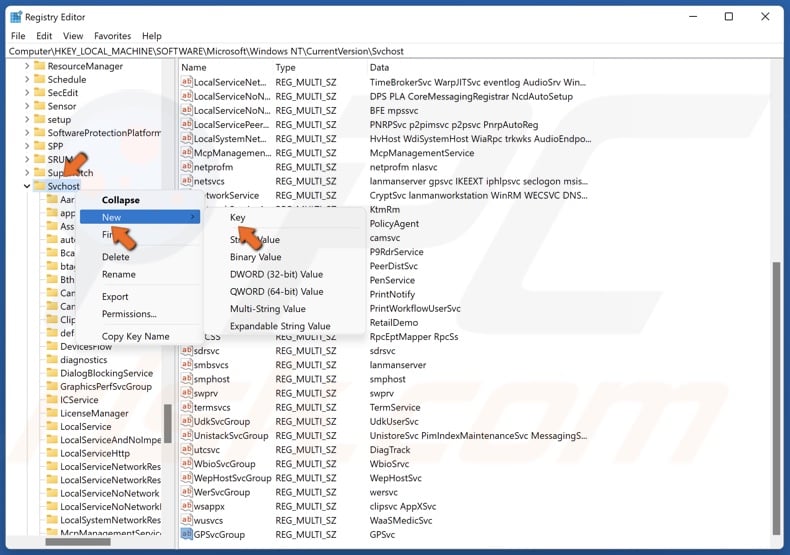
9. Right-click the Svchost key, select New, and click Key.
10. Name the new key GPSvcGroup and save it.
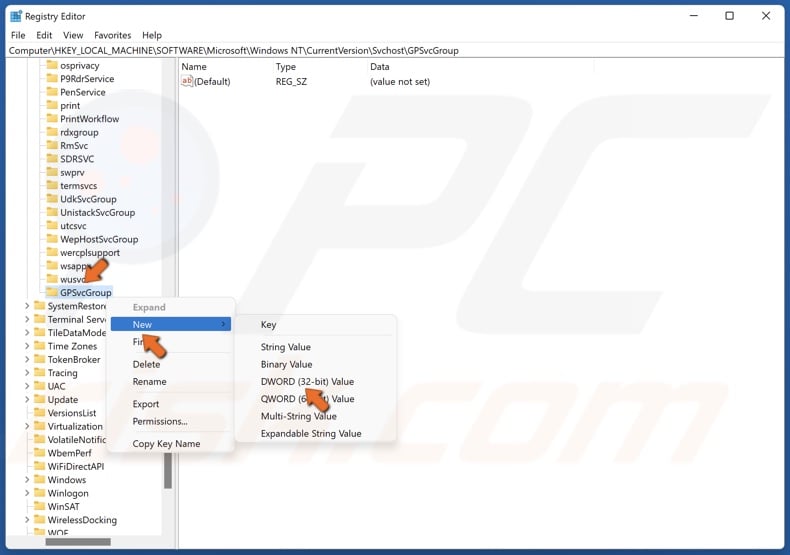
11. Right-click the GPSvcGroup key, select New, and click DWORD (32-bit) Value.
12. Name the new value AuthenticationCapabilities and save it.
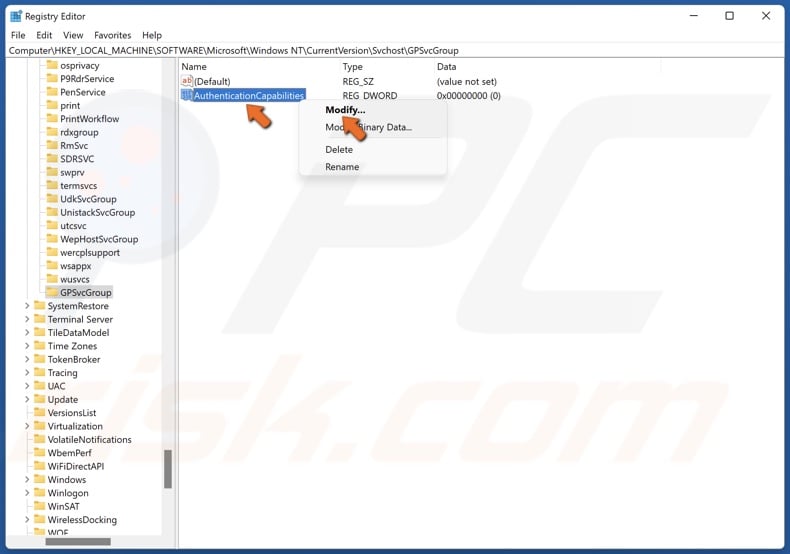
13. Right-click the AuthenticationCapabilities value and click Modify.
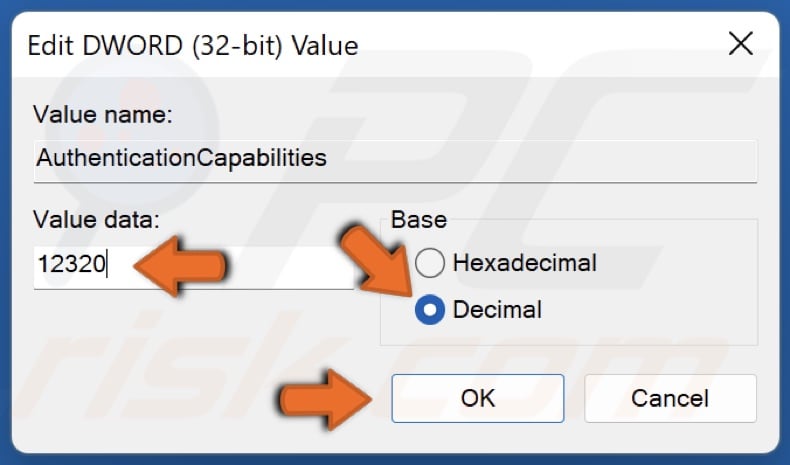
14. Tick the Decimal option, set the Value data to 12320, and click OK.
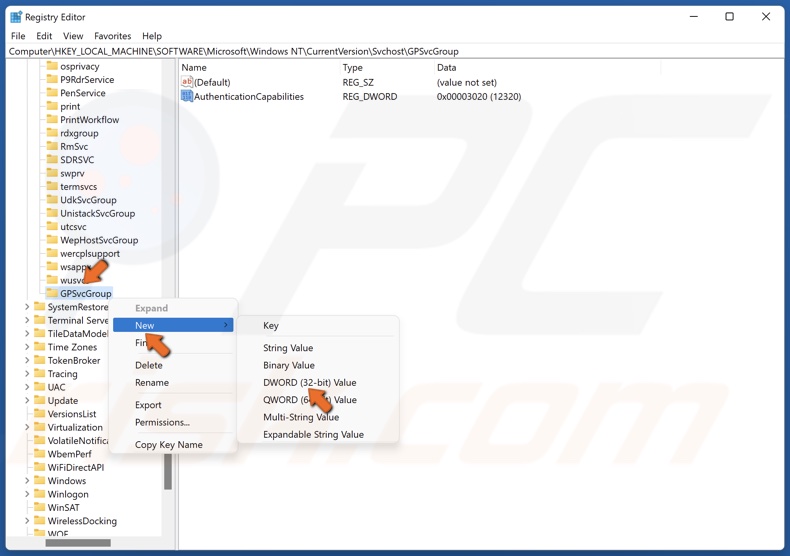
15. Right-click the GPSvcGroup key, select New, and click DWORD (32-bit) Value.
16. Name the new value CoInitializeSecurityParam and save it.
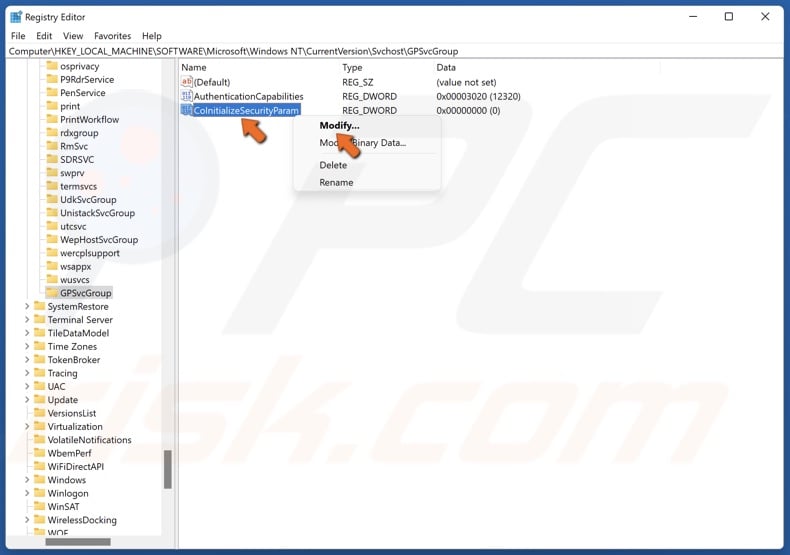
17. Right-click the CoInitializeSecurityParam value and click Modify.

18. Set the Value data to 1 and click OK.
19. Close the Registry Editor and restart your PC.
Method 7. Perform a System Restore
Reverting your system to an earlier state before your PC got stuck on the “Please wait for the gpsvc” screen using System Restore may permanently fix the issue.
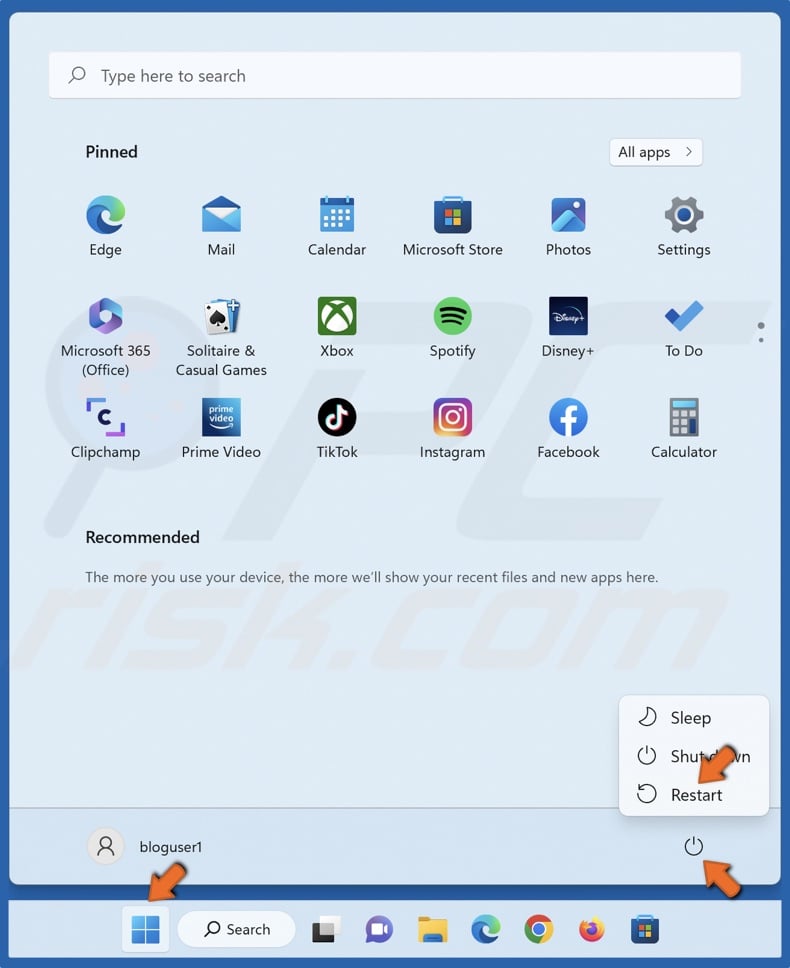
1. Open the Windows Start menu and click the Power button.
2. Hold down the Shift key on your keyboard and click Restart.
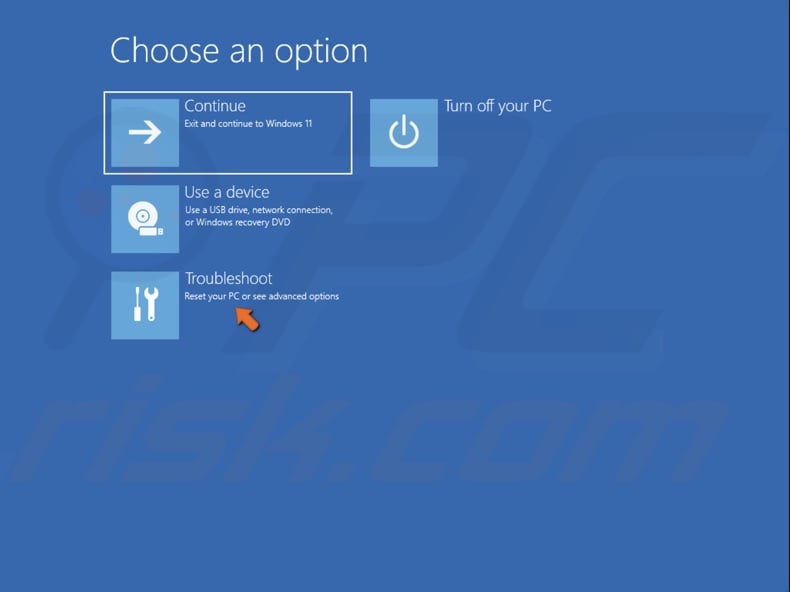
3. Select Troubleshoot.
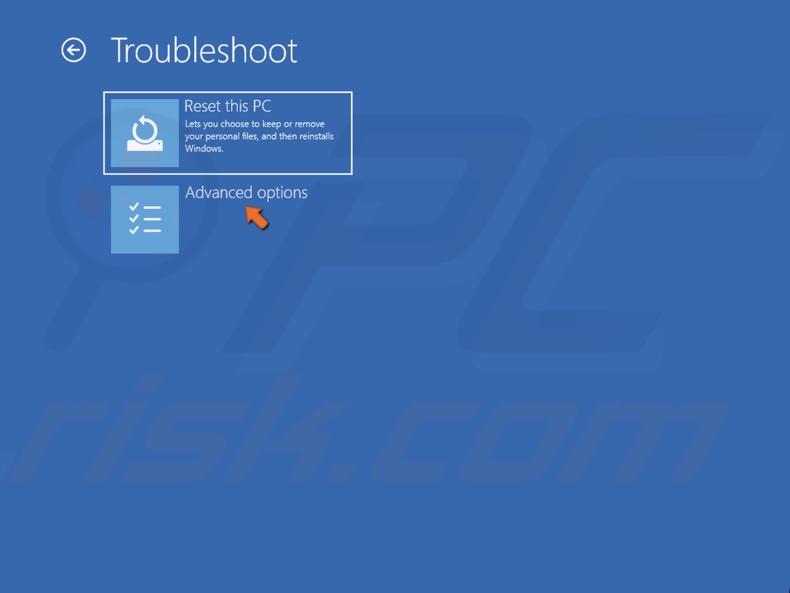
4. Select Advanced options.

5. Select System Restore.
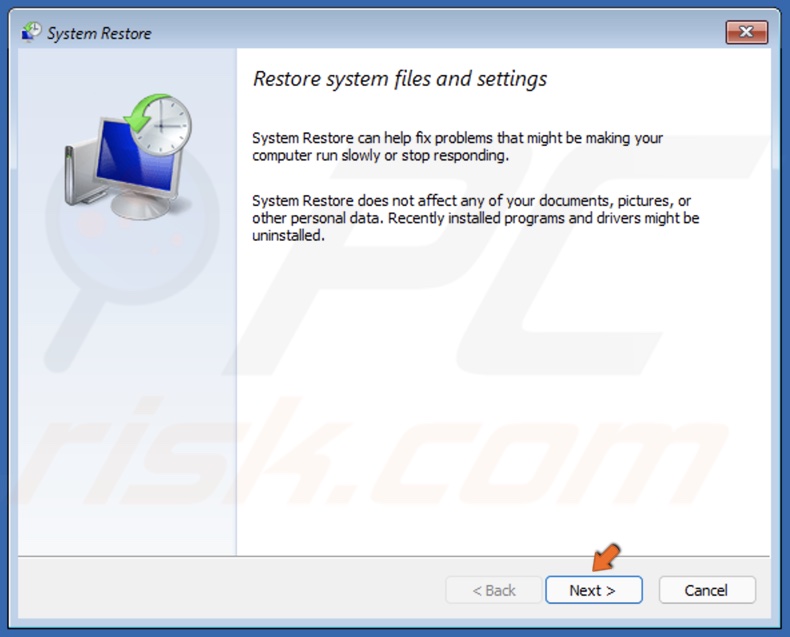
6. Click Next in the System Restore window.
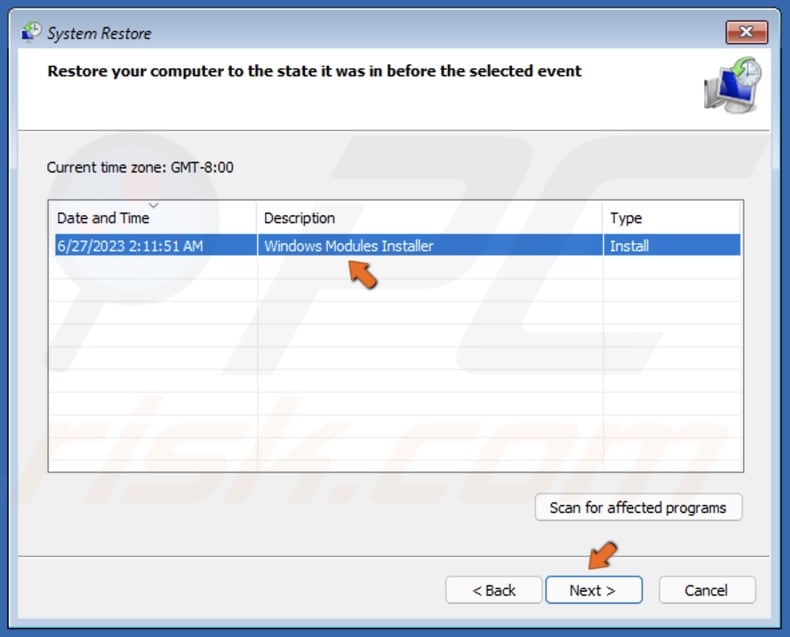
7. Select a restore point before your PC started getting stuck on the “Please wait for the gpsvc” screen and click Next.
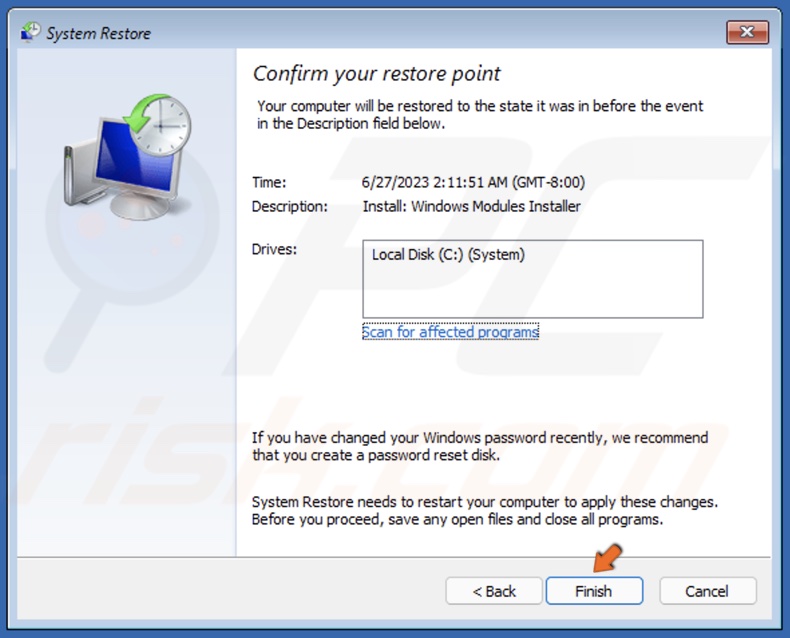
8. Click Finish.
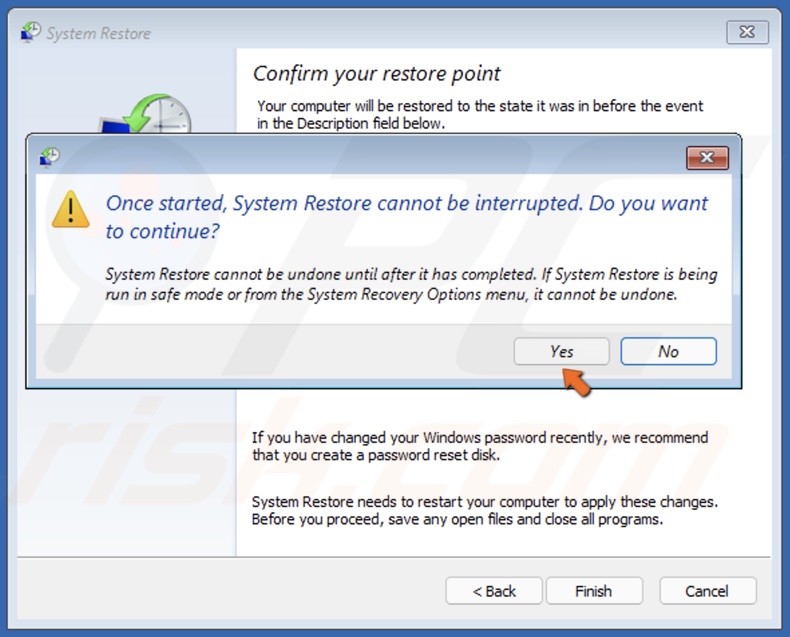
9. Click Yes to confirm.
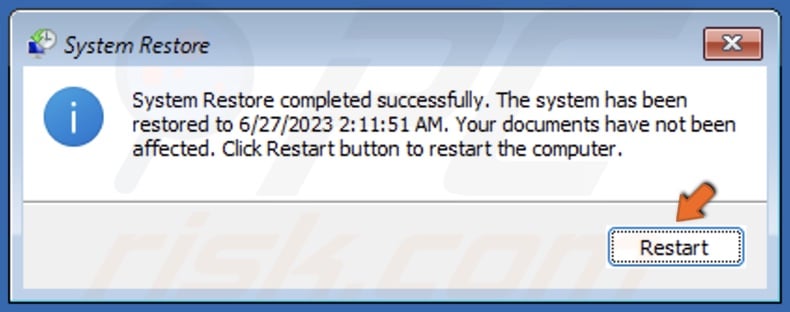
10. Click Restart once the system restore is complete.
Did This article help you fix the “Please wait for the gpsvc” screen on your PC? Let us know in the comments below. If you know how to fix this issue not mentioned in this article, please share it with others in the comments.
Share:

Rimvydas Iliavicius
Researcher, author
Rimvydas is a researcher with over four years of experience in the cybersecurity industry. He attended Kaunas University of Technology and graduated with a Master's degree in Translation and Localization of Technical texts. His interests in computers and technology led him to become a versatile author in the IT industry. At PCrisk, he's responsible for writing in-depth how-to articles for Microsoft Windows.
▼ Show Discussion