5 Ways to Fix "The Windows wireless service is not running on this computer" Error
Get Free Scanner and check your computer for errors
Fix It NowTo fix found issues, you have to purchase the full version of Combo Cleaner. Free trial available. Combo Cleaner is owned and operated by Rcs Lt, the parent company of PCRisk.com read more.
How to Fix “The Windows wireless service is not running on this computer” Error on Windows 11
Some users report getting “The Windows wireless service is not running on this computer” error when troubleshooting a wireless network connectivity issue. If you’re also getting this error, check out the troubleshooting methods below to help you fix it.
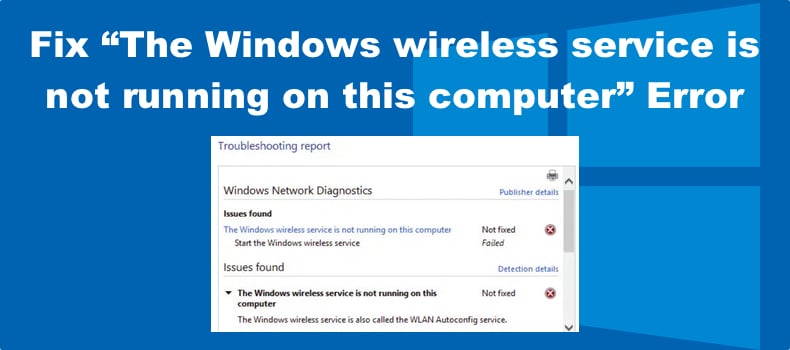
What Causes This Error?
- Your Windows version does not support the Wi-Fi adapter. Usually, “The Windows wireless service is not running on this computer” error occurs if the Windows operating system does not support the Wi-Fi adapter.
- The WLAN AutoConfig service is disabled. The WLAN AutoConfig service may not start when it’s supposed to or may have been corrupted. Configuring it to start automatically should fix the error. If the service has been corrupted, running an SFC scan will fix it.
- The Wi-Fi adapter firmware is obsolete. Sometimes, this error can occur if the Wi-Fi adapter firmware is outdated. Updating the firmware should fix the issue.
- The Wi-Fi adapter is faulty. If your system doesn’t show your wireless adapter, it may be broken or disabled. Check if your wireless network adapter is turned on.
- The Wi-Fi adapter is not set up to show Wi-Fi networks. “The Windows wireless service is not running on this computer” error will occur if your PC is not connected to the correct Wi-Fi adapter.
- The Wi-Fi network is password protected. You may get this error if you haven’t entered the password of your password-protected wireless network.
Video on How to Fix "The Windows wireless service is not running on this computer" Error
Table of Contents:
- Introduction
- Method 1. Start Windows Connection Manager and WLAN AutoConfig Services Manually
- Method 2. Update Network Adapter Driver
- Method 3. Run the System File Checker (SFC) Scan
- Method 4. Run the Winsock Reset Command
- Method 5. Reset Network Settings to Default
- Video on How to Fix "The Windows wireless service is not running on this computer" Error
Download Computer Malware Repair Tool
It is recommended to run a free scan with Combo Cleaner - a tool to detect viruses and malware on your device. You will need to purchase the full version to remove infections. Free trial available. Combo Cleaner is owned and operated by Rcs Lt, the parent company of PCRisk.com read more.
Method 1. Start Windows Connection Manager and WLAN AutoConfig Services Manually
You may get “The Windows wireless service is not running on this computer” error if the wireless service (WLAN AutoConfig) is disabled. If that’s the case, starting the service and setting it to start automatically on system startup will fix it.
1. Hold down Windows+R keys to open Run.
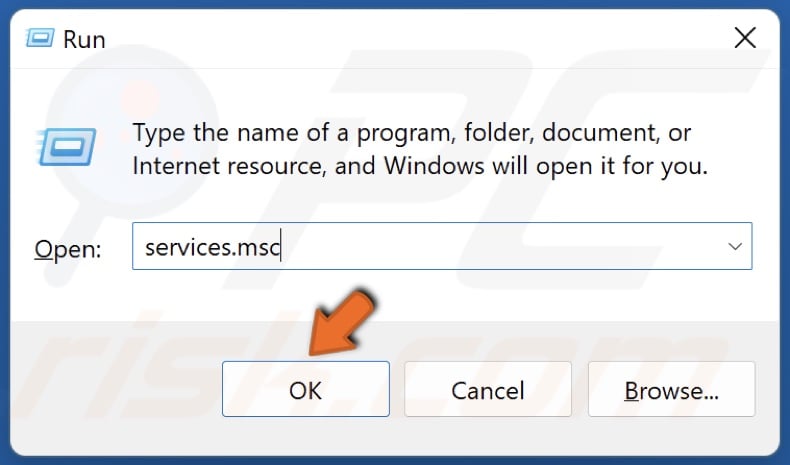
2. In the Run dialog, type in services.msc and click OK.
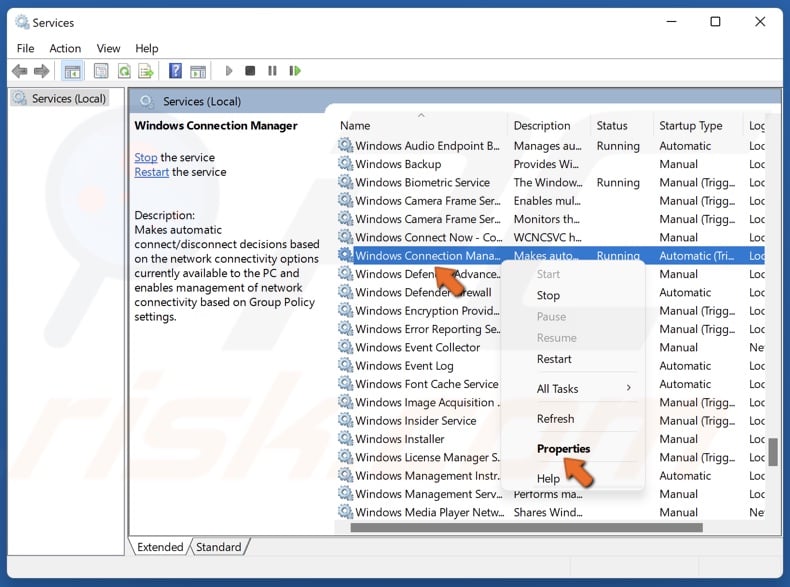
3 In the Services window, scroll down and locate Windows Connection Manager.
4. Right-click Windows Connection Manager and click Properties.
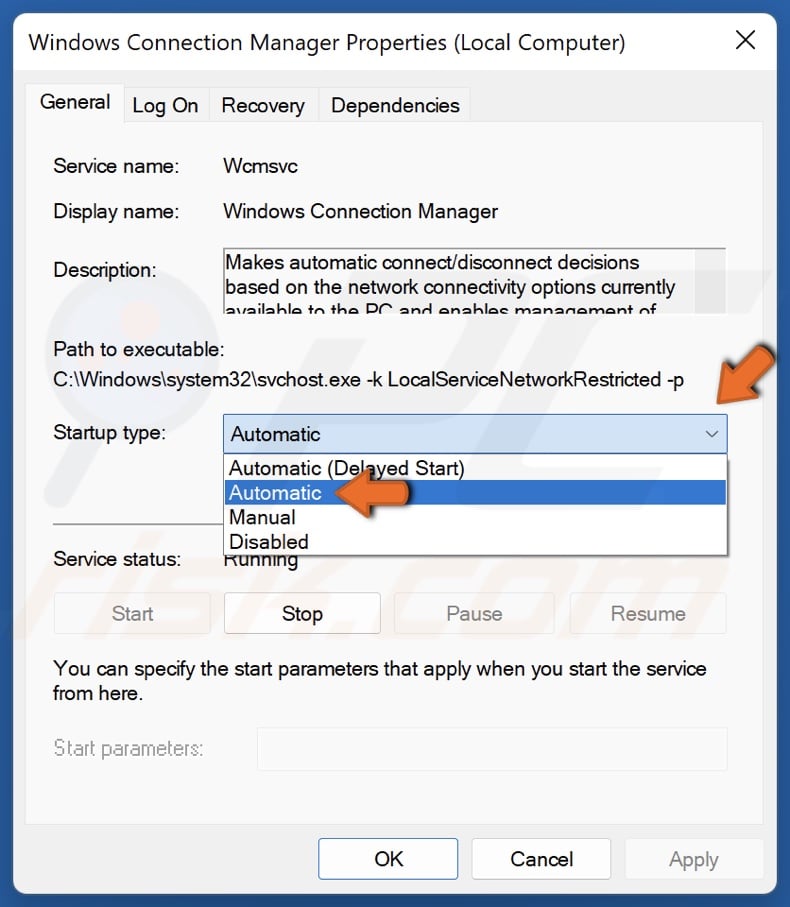
5. Open the Startup type menu and select Automatic.
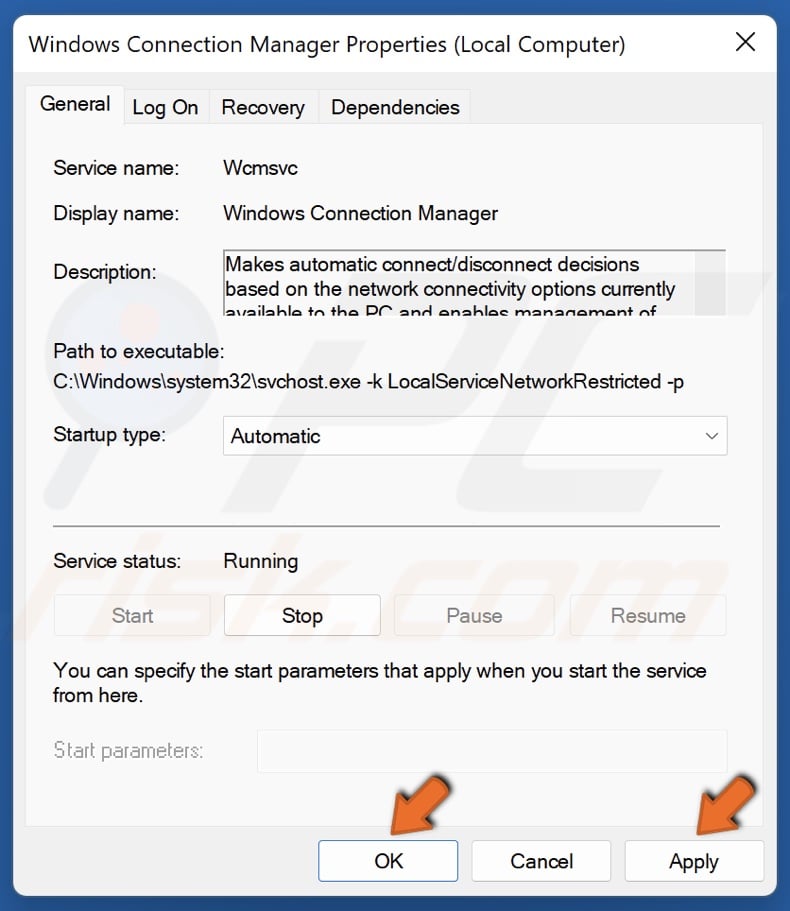
6. Click Apply and click OK.
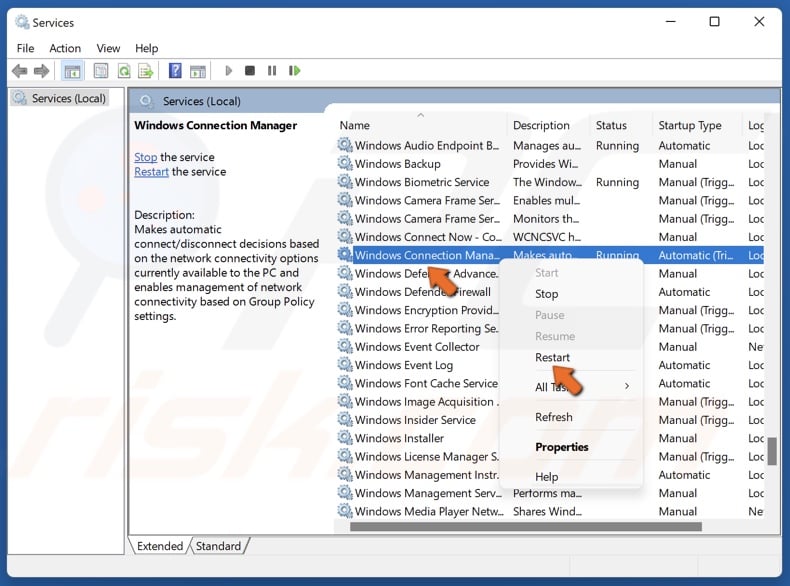
7. Right-click Windows Connection Manager and click Restart.
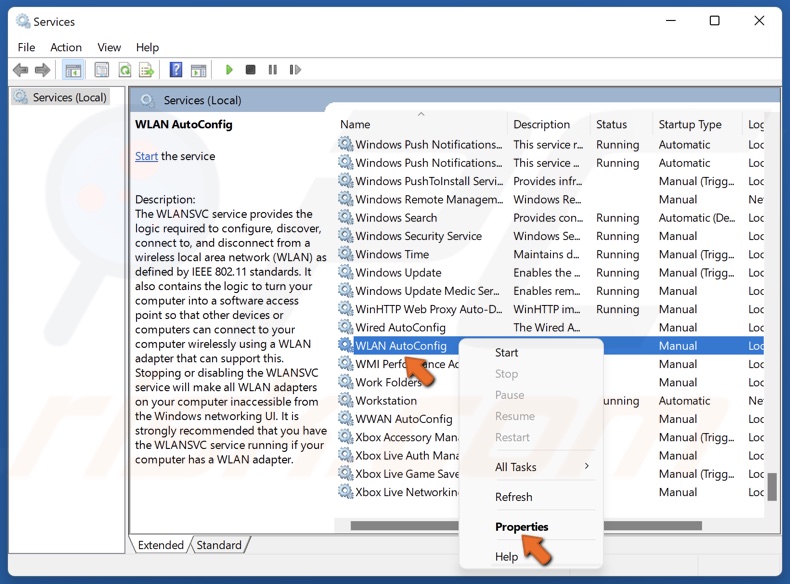
8. Then, locate WLAN AutoConfig, right-click it and click Properties.
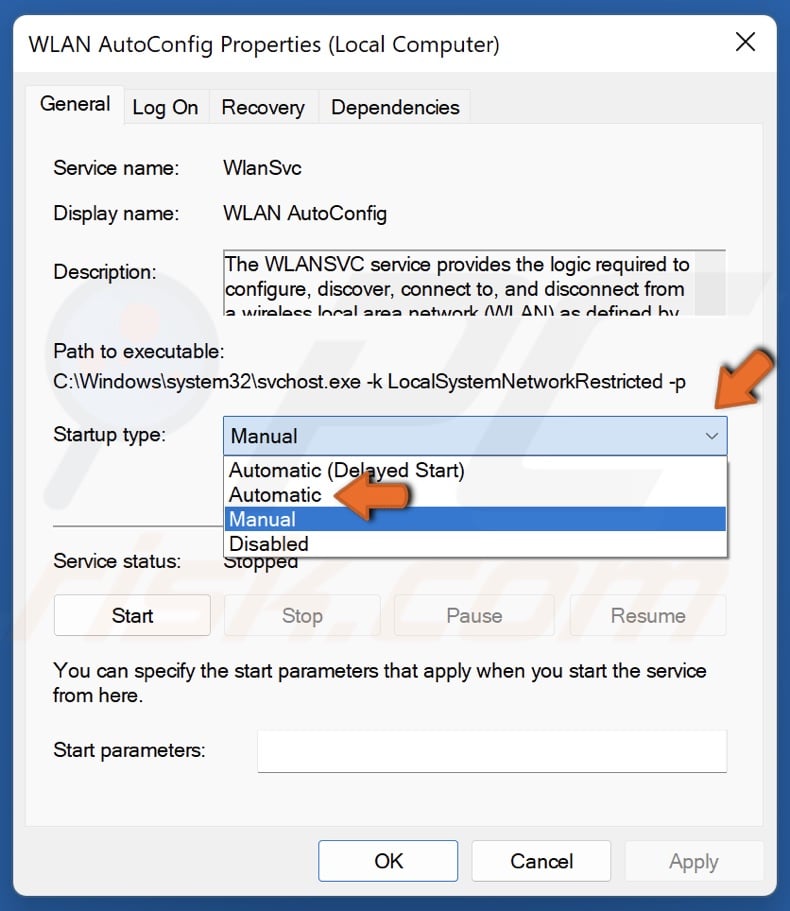
9. Open the Startup type menu and select Automatic.
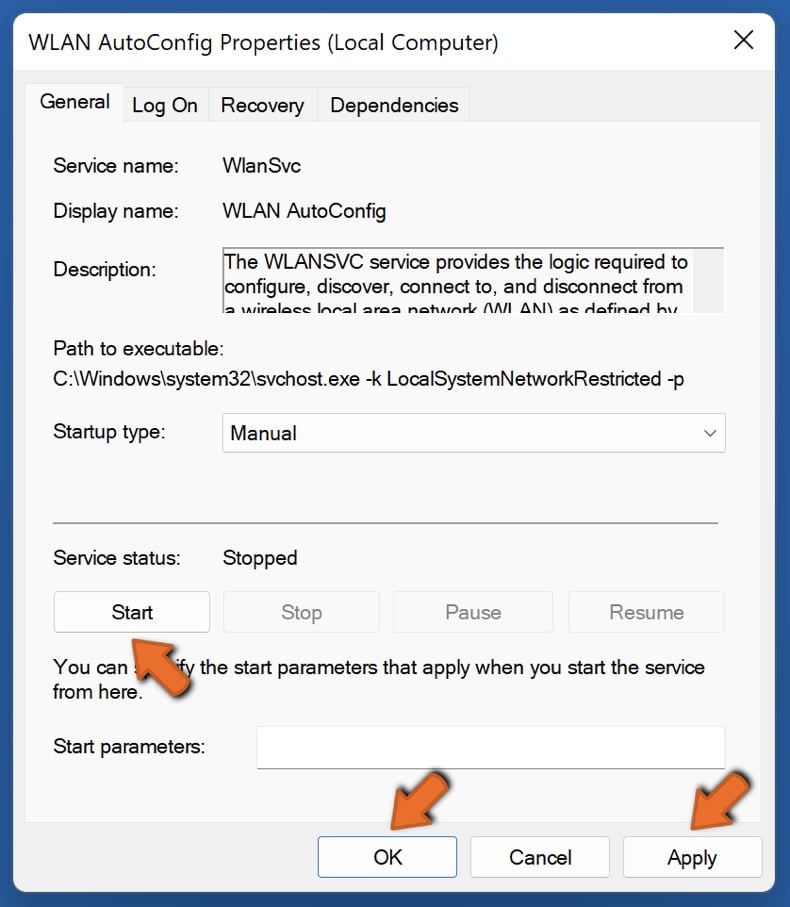
10. In the Service status section, click Start.
11. Click Apply and click OK.
12. Restart your PC.
Method 2. Update Network Adapter Driver
“Windows wireless service is not running on this computer” error message may occur if your wireless network adapter driver is obsolete. Updating the driver can fix the error.
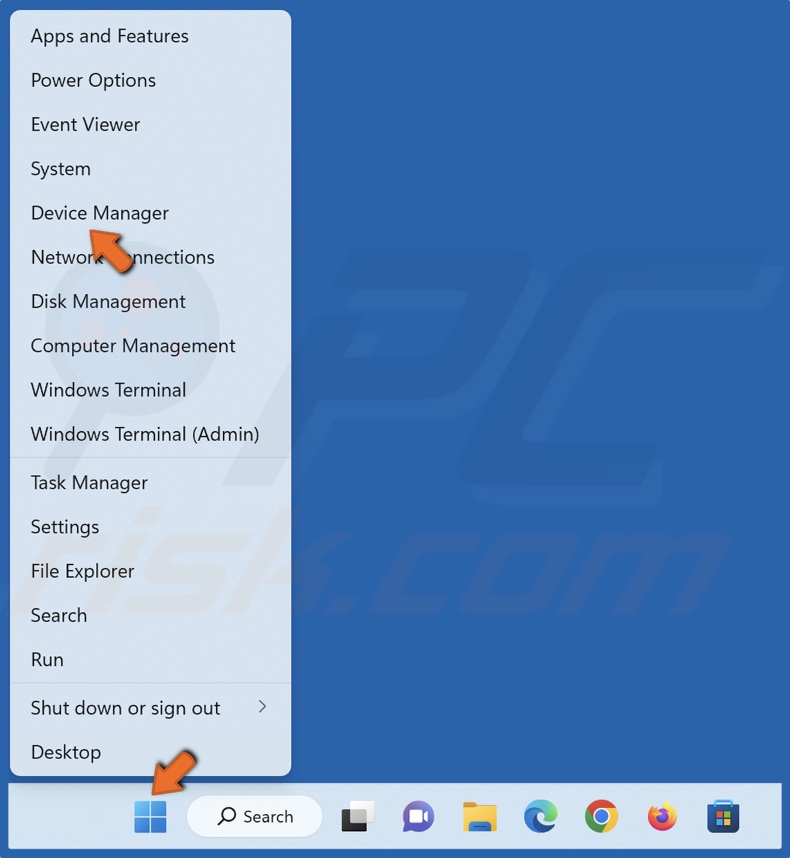
1. Right-click the Start button and click Device Manager.
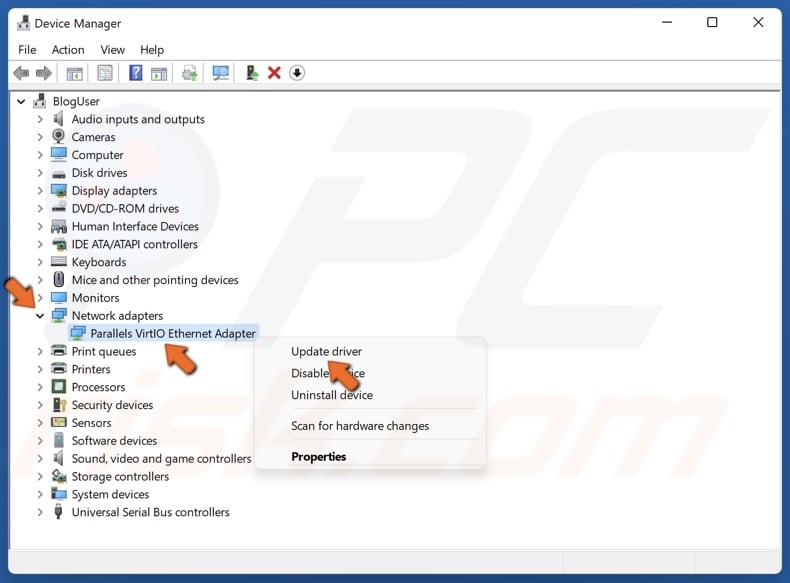
2. Expand the Network adapters list.
3. Right-click the network adapter and click Update driver.
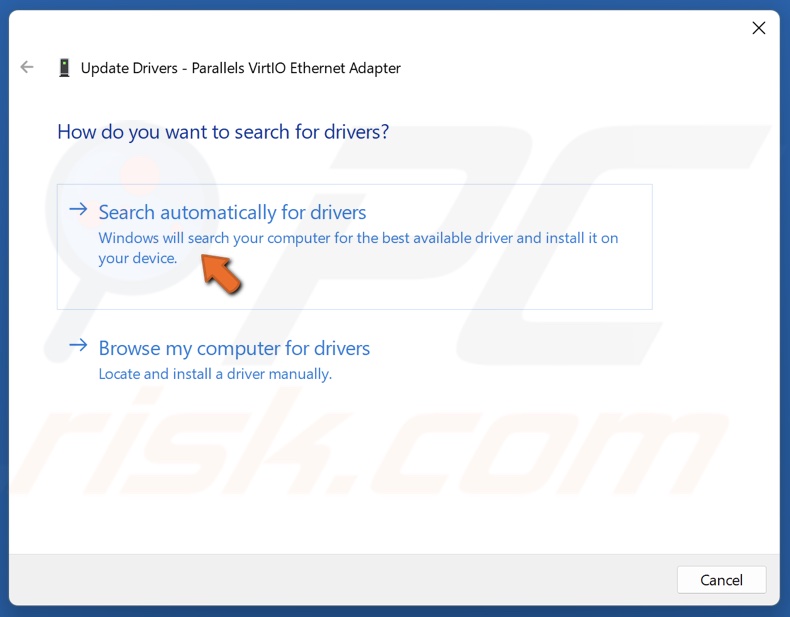
4. Select Search automatically for drivers, and Windows will install the latest available driver for your system.
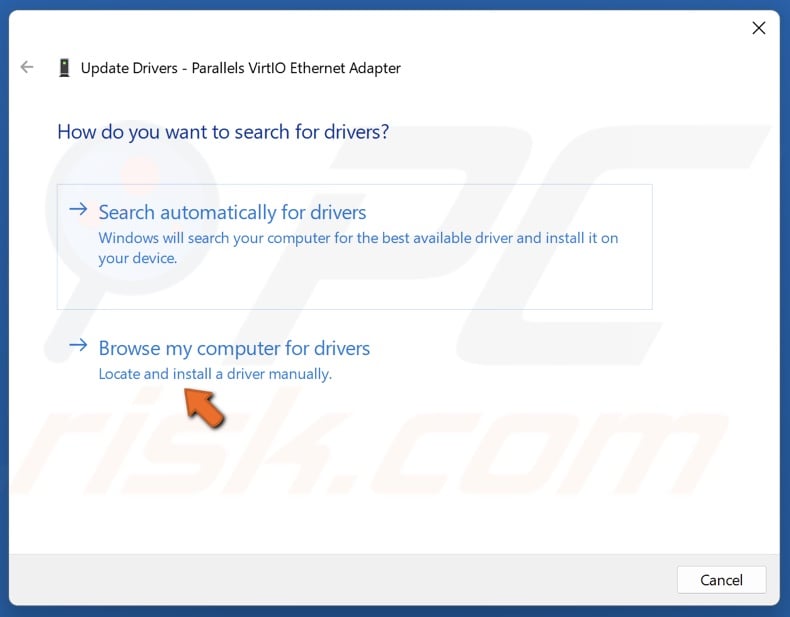
5. Alternatively, you can select Browse my computer for drivers and install the drivers downloaded from the manufacturer’s website.
Method 3. Run the System File Checker (SFC) Scan
System File Checker (SFC) is a tool designed to identify corrupted or missing system files and replace them with cached copies or download new files from Microsoft. Running an SFC scan may fix the error if corrupted system files cause it.
1. Hold down Windows+R keys to open Run.
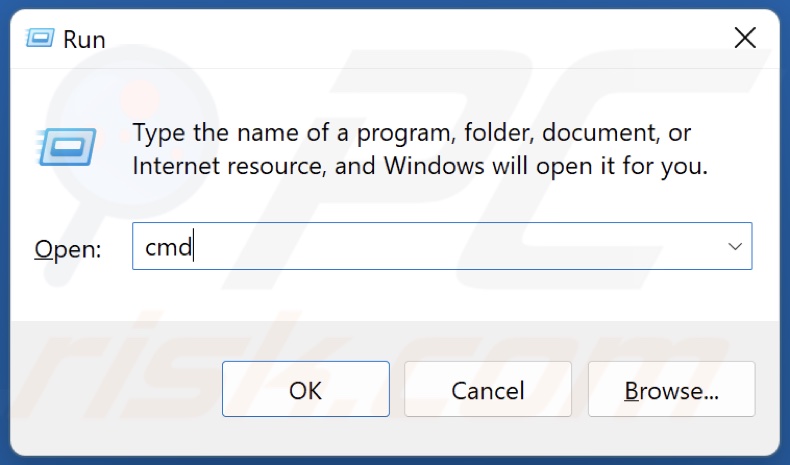
2. In the Run dialog, type in CMD and hold down Ctrl+Shift+Enter keys to open Command Prompt as an administrator.
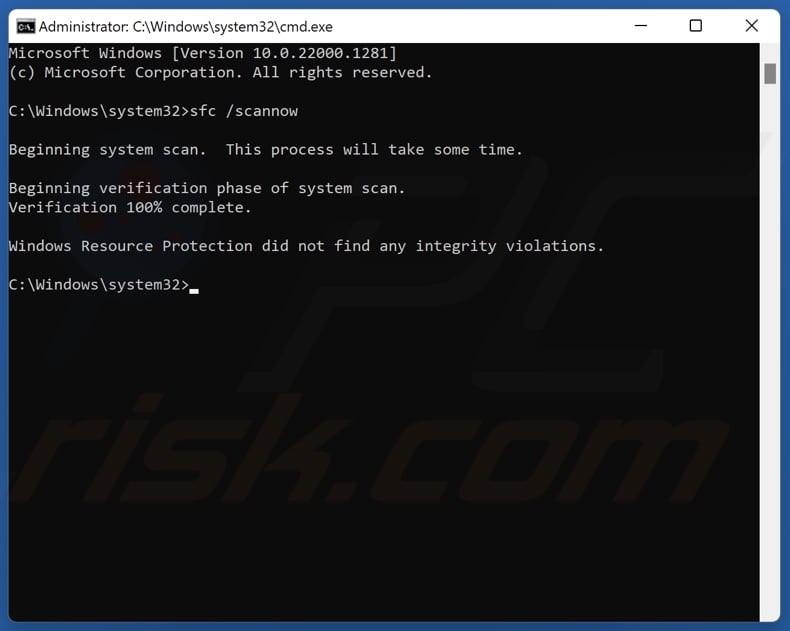
3. In the Command Prompt window, type in SFC /ScanNow and press the Enter key.
4. Restart your PC.
Method 4. Run the Winsock Reset Command
If your network settings have been misconfigured, running the netsh winsock reset command will reset all network settings that prevent you from connecting to your wireless network.
1. Hold down Windows+R keys to open Run.

2. In the Run dialog, type in CMD and hold down Ctrl+Shift+Enter keys to open Command Prompt as an administrator.
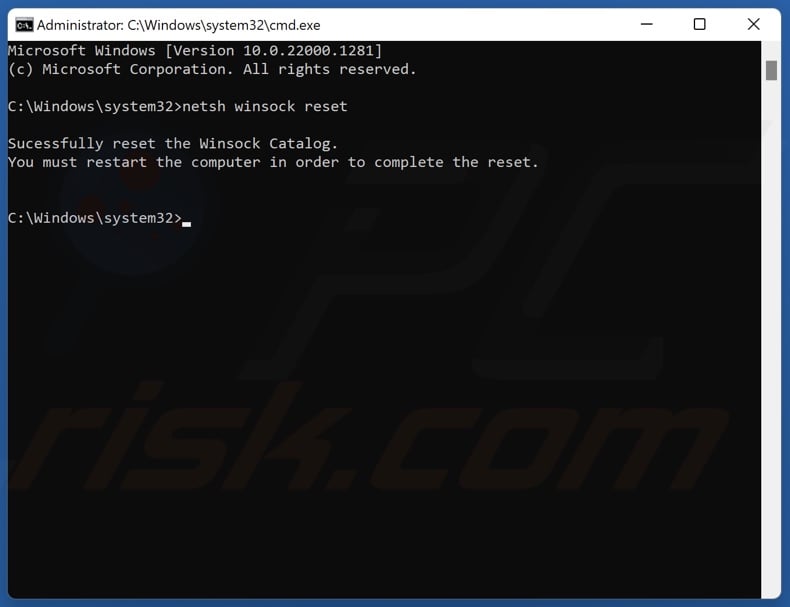
3. In the Command Prompt window, type in netsh winsock reset and press the Enter key.
4. Restart your PC.
Method 5. Reset Network Settings to Default
If your network settings have been misconfigured, resetting all of your network settings to default should fix “The Windows wireless service is not running on this computer” error. Note that you will have to re-enter your Wi-Fi connection password.
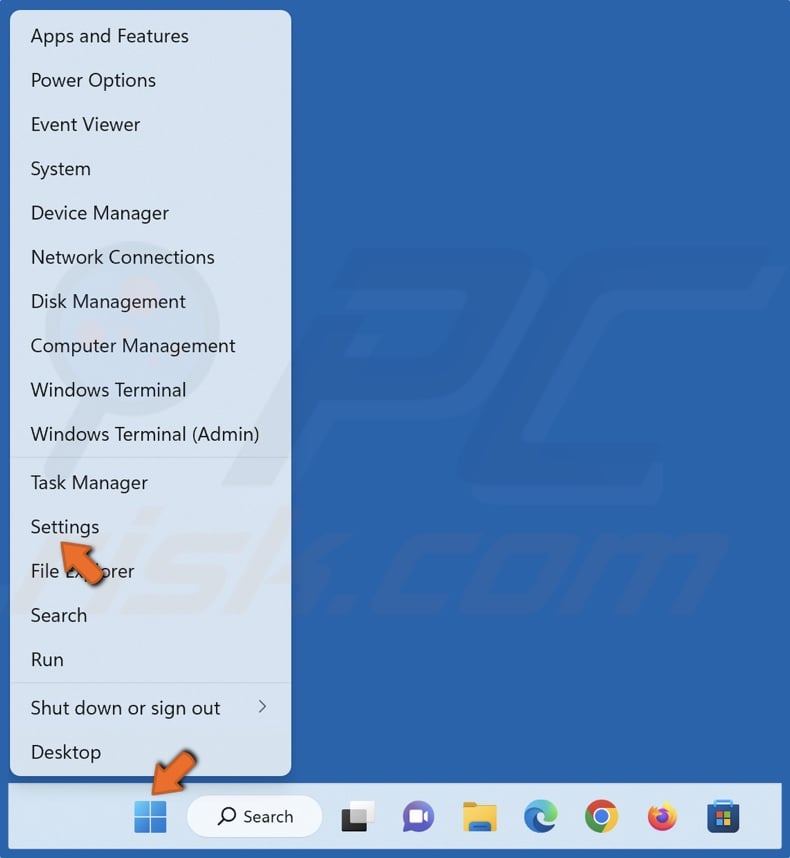
1. Right-click the Start button and click Settings.
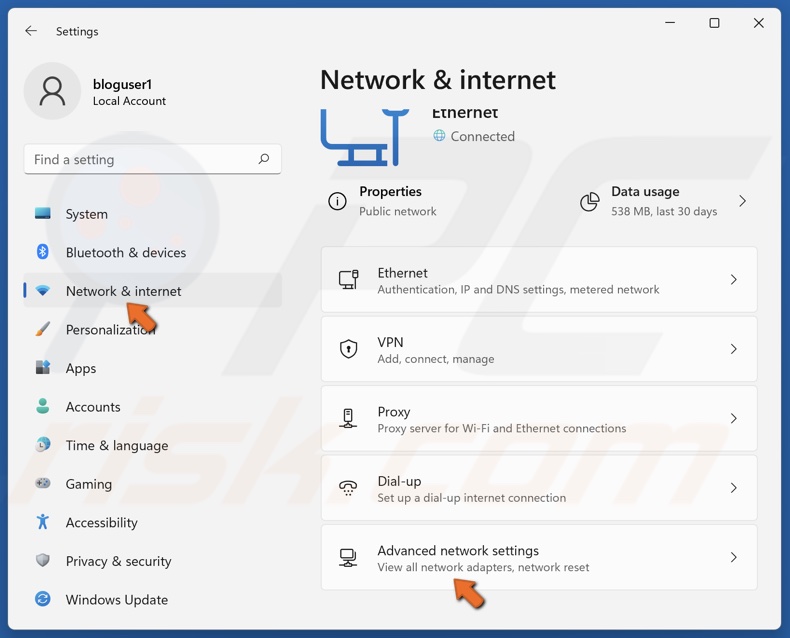
2. Select the Network & internet panel.
3. Select Advanced network settings.
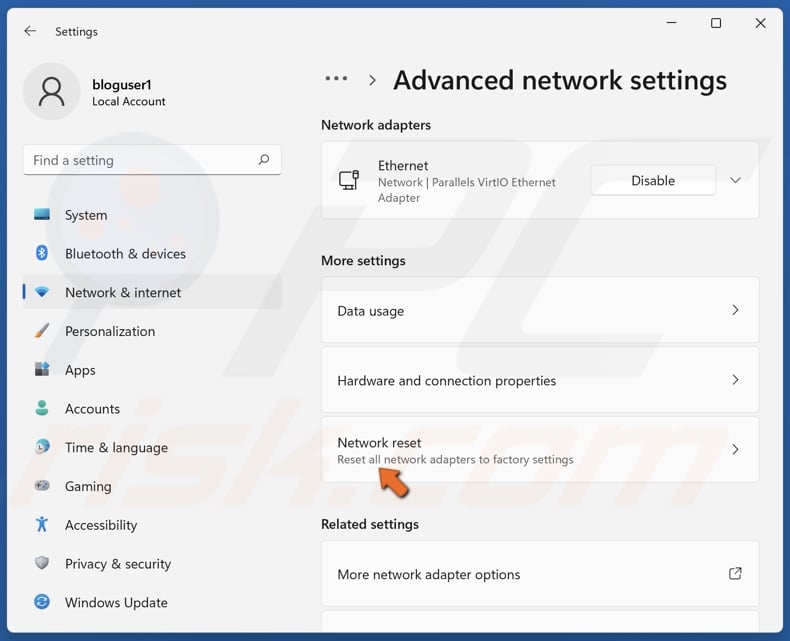
4. Select Network reset.
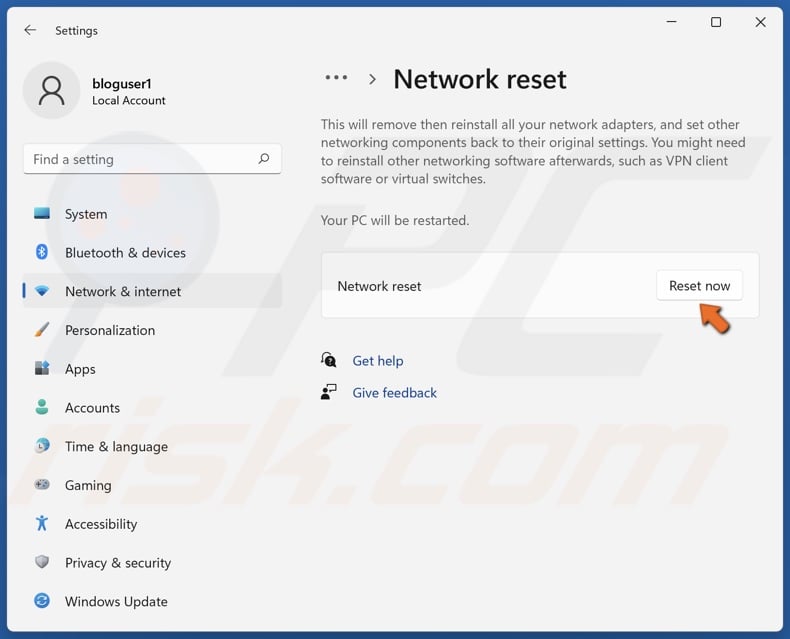
5. Then, click Reset now.
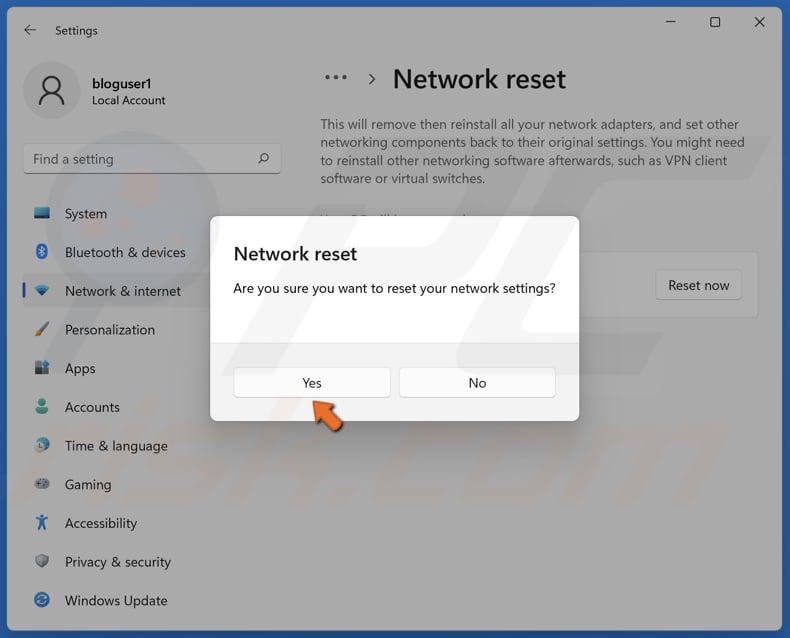
6. Click Yes to confirm the reset.
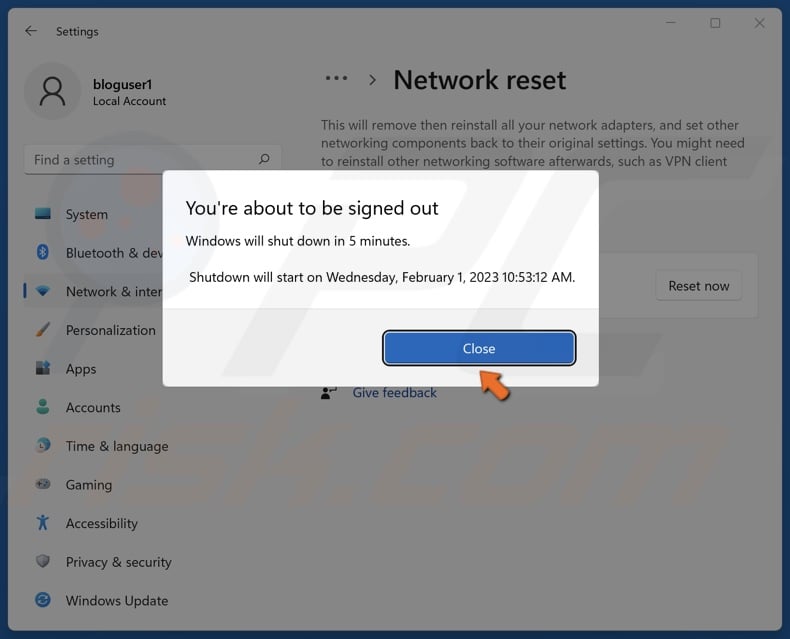
7. Click Close when prompted.
8. Restart your PC.
Did this article help you fix “The Windows wireless service is not running on this computer” error on your PC? Let us know by leaving a comment below.
Share:

Rimvydas Iliavicius
Researcher, author
Rimvydas is a researcher with over four years of experience in the cybersecurity industry. He attended Kaunas University of Technology and graduated with a Master's degree in Translation and Localization of Technical texts. His interests in computers and technology led him to become a versatile author in the IT industry. At PCrisk, he's responsible for writing in-depth how-to articles for Microsoft Windows.

▼ Show Discussion