How to Fix CS:GO Mic Not Working

Get Free Scanner and check your computer for errors
Fix It NowTo fix found issues, you have to purchase the full version of Combo Cleaner. Free trial available. Combo Cleaner is owned and operated by Rcs Lt, the parent company of PCRisk.com read more.
How to Fix Mic Not Working in CS:GO on Windows 11
CS:GO (Counter-Strike: Global Offensive) is a hugely popular multiplayer FPS that relies heavily on voice communication to get the upper hand on the adversary. Unfortunately, for many players, the mic stops working in CS:GO, but fortunately, you can fix this problem relatively easily using the instructions below.
Why is My Microphone Not Working in CS:GO?
Many CS:GO players have reported that the voice chat doesn’t work in-game. This issue can occur for multiple reasons, and we have listed the most common ones below.
- Incorrect In-Game Audio Settings. One of the most common reasons the mic stops working in CS:GO is that the voice setting reverts to disabled at random. As a result, the game doesn’t use the microphone.
- Removed Microphone Permissions. In some cases, particularly after a Windows update, applications with access to your microphone can lose it. Therefore, you have to manually grant CS:GO permission to access your microphone.
- Misconfigured Windows Audio Settings. CS:GO is configured to use your default Windows input device by default. If your Windows Audio settings have been misconfigured, you have to set the default input device for your system and CS:GO.
- A glitch in Windows Audio service. Some users reported that the issue was caused by a glitch in the Windows Audio service. Restarting this service will fix the problem.
We have compiled a list of the best-known methods to fix your mic not working in CS:GO below.
Video Tutorial on How to Fix CS:GO Mic Not Working
Table of Contents:
- Introduction
- Method 1. Adjust the Audio Settings in CS:GO
- Method 2. Allow CS:GO to Access Your Microphone
- Method 3. Disable the Xbox Game Bar and the Captures Feature
- Method 4. Set Your Microphone as the Default Device
- Method 5. Set the Correct Input Device for CS:GO
- Method 6. Restart the Windows Audio Service
- Method 7. Update/Reinstall the Audio Driver
- Method 8. Verify CS:GO Game Files
- Video Tutorial on How to Fix CS:GO Mic Not Working
Download Computer Malware Repair Tool
It is recommended to run a free scan with Combo Cleaner - a tool to detect viruses and malware on your device. You will need to purchase the full version to remove infections. Free trial available. Combo Cleaner is owned and operated by Rcs Lt, the parent company of PCRisk.com read more.
Method 1. Adjust the Audio Settings in CS:GO
Before trying any advanced solutions, you should go to the CS:GO Audio settings and make sure that everything is set up for your microphone to work correctly. Sometimes, the voice setting reverts to disabled, so checking the voice setting is the first thing you should start with.
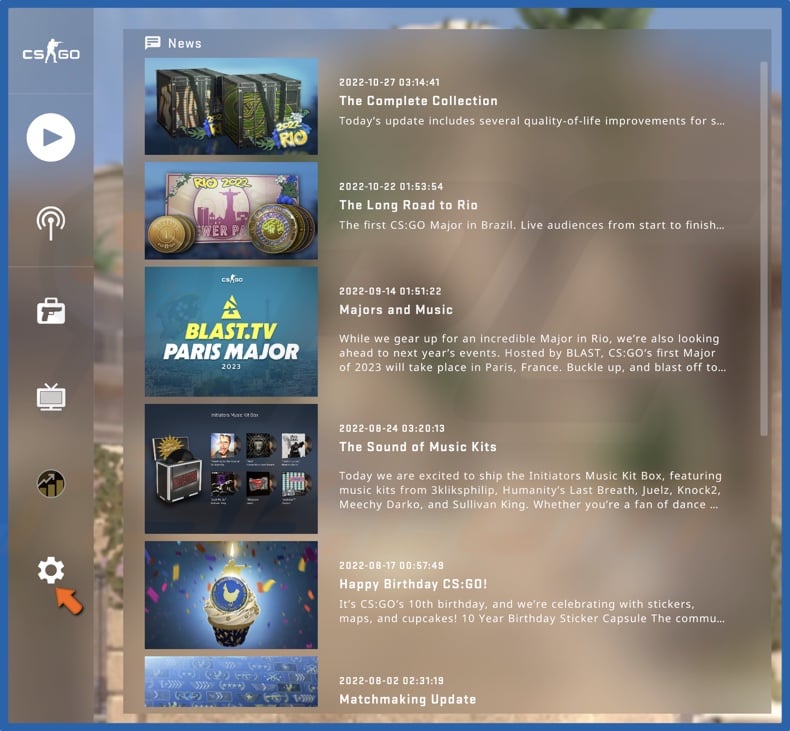
1. Launch CS:GO. Click Settings (Gear icon) in the left pane.
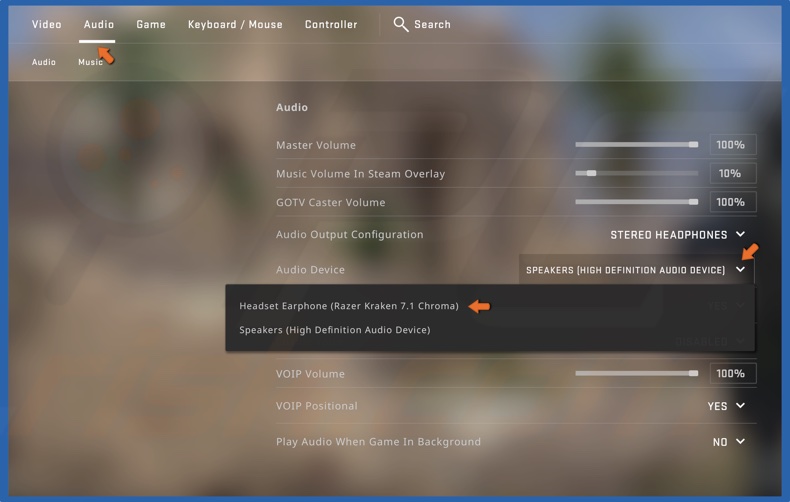
2. Select the Audio tab.
3. Open the Audio Device drop-down menu and select your default microphone.
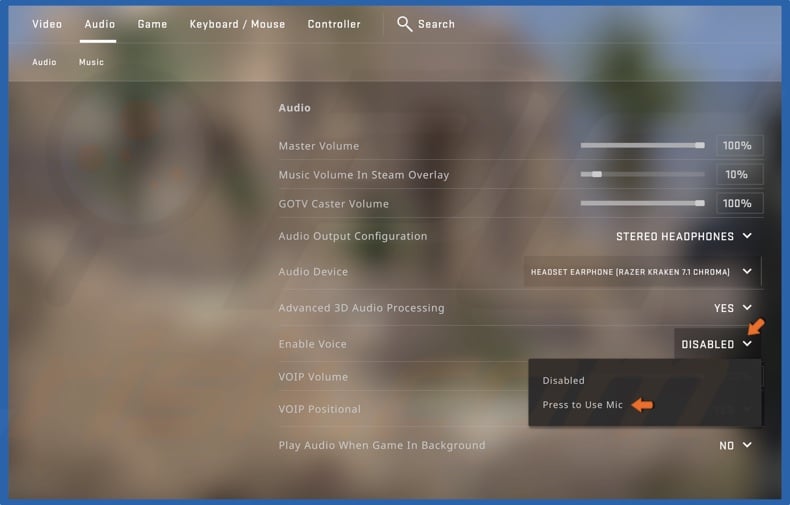
4. Open the Enable Voice drop-down menu and select Press to Use Mic.

5. Open the VOIP Positional drop-down menu and select No.
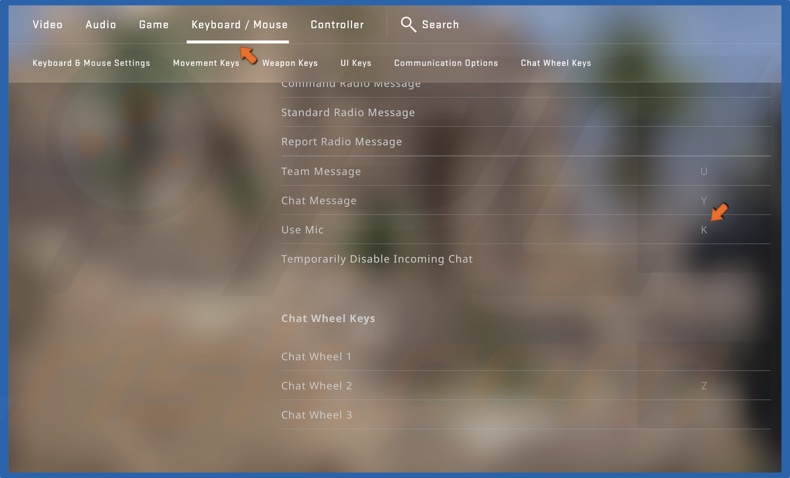
6. Select the Keyboard/Mouse tab.
7. Assign a key for Use Mic if there’s no key assigned.
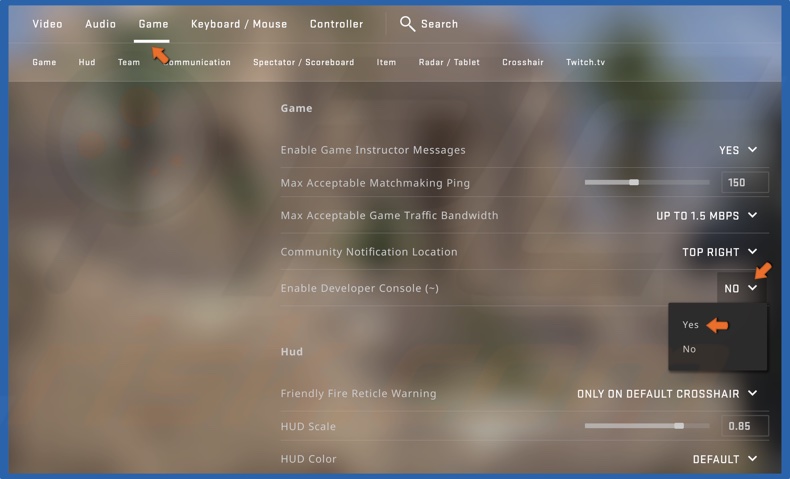
8. Select the Game tab.
9. Open the Enable Developer Console drop-down menu and select Yes.
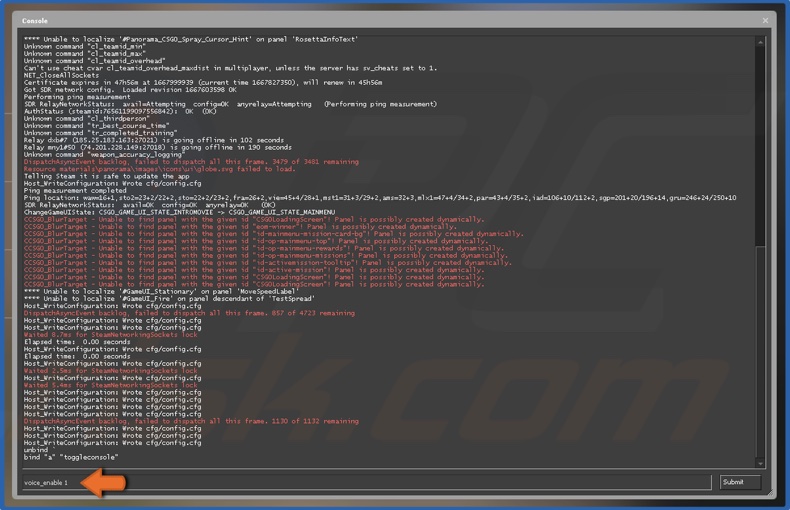
10. Press the ~ key on your keyboard to open the Developer Console.
11. In the console window, type in voice_enable 1 and press Enter.
Method 2. Allow CS:GO to Access Your Microphone
Make sure that CS:GO has access to your microphone. It’s possible that some automatic permissions were removed, preventing the game from using your microphone. The instructions below will show you how to grant CS:GO the necessary permissions to use your microphone.
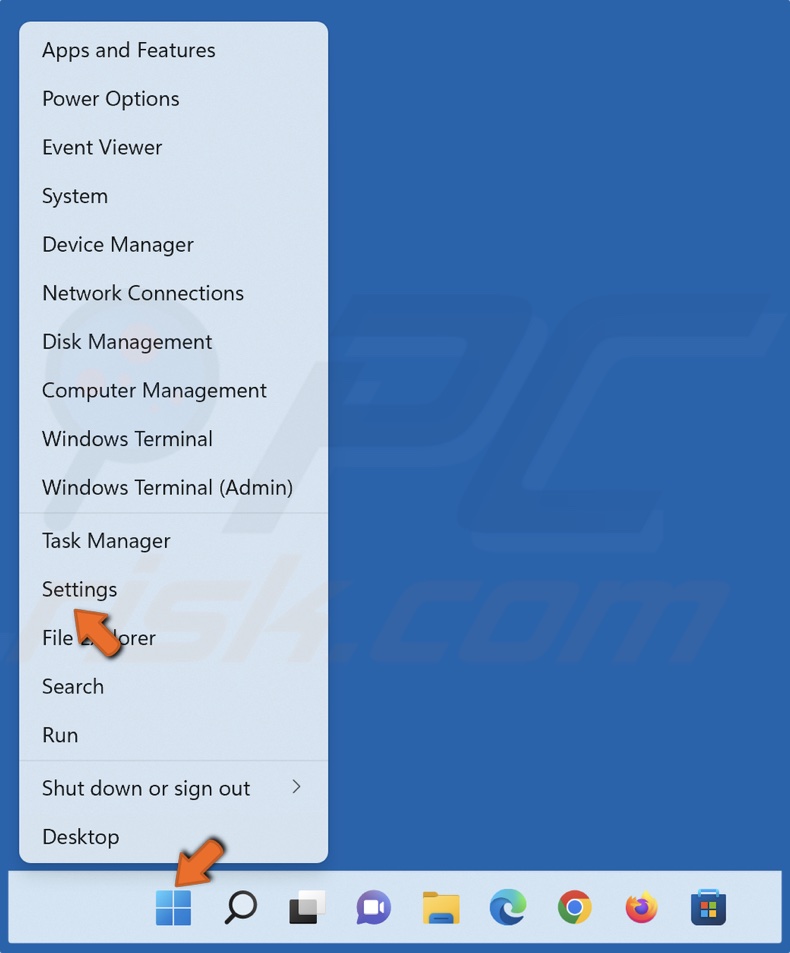
1. Right-click Start and select Settings.

2. Select the Privacy & security tab and select Microphone in the App permissions section.
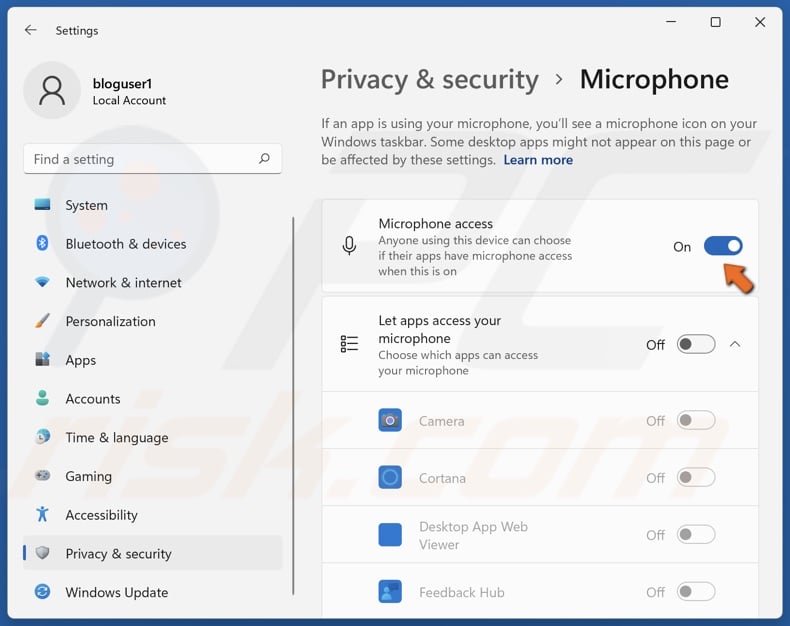
3. Toggle on Microphone access if it’s disabled.
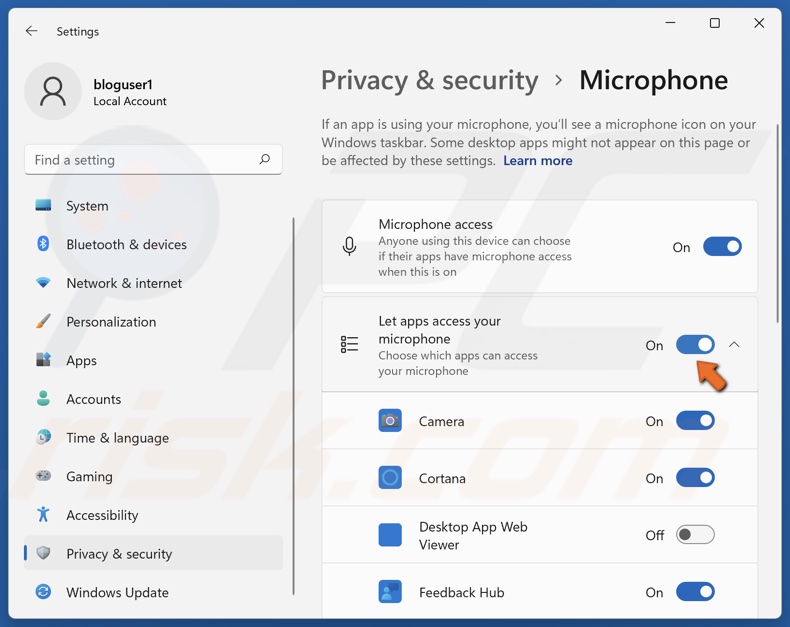
4. Toggle on Let apps access your microphone if it’s disabled.
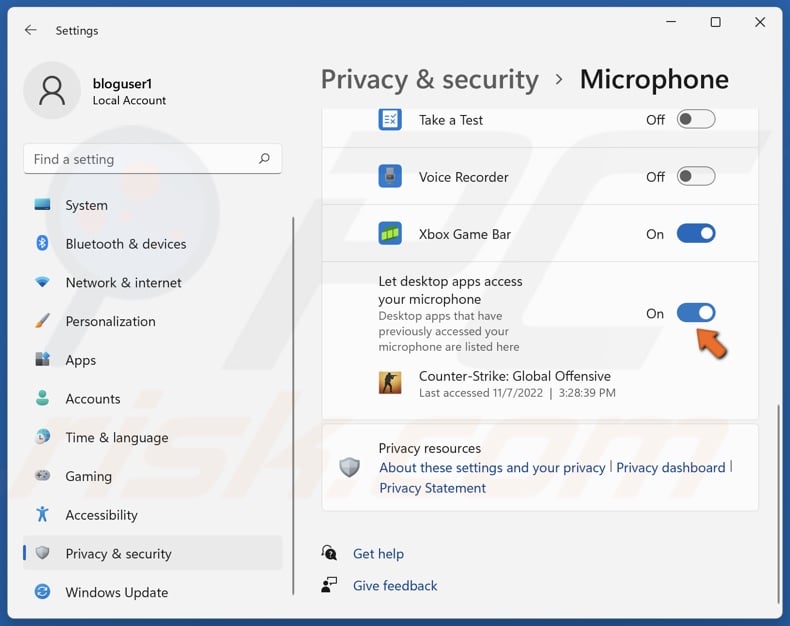
5. Toggle on Let desktop apps access your microphone if it’s disabled.
Method 3. Disable the Xbox Game Bar and the Captures Feature
The Xbox Game Bar is known to interfere with some games and cause all kinds of issues. In the case of CS:GO, it’s known to cause sound-related issues. Turning off the Xbox Game Bar may fix your microphone issue.
1. Right-click Start and select Settings.
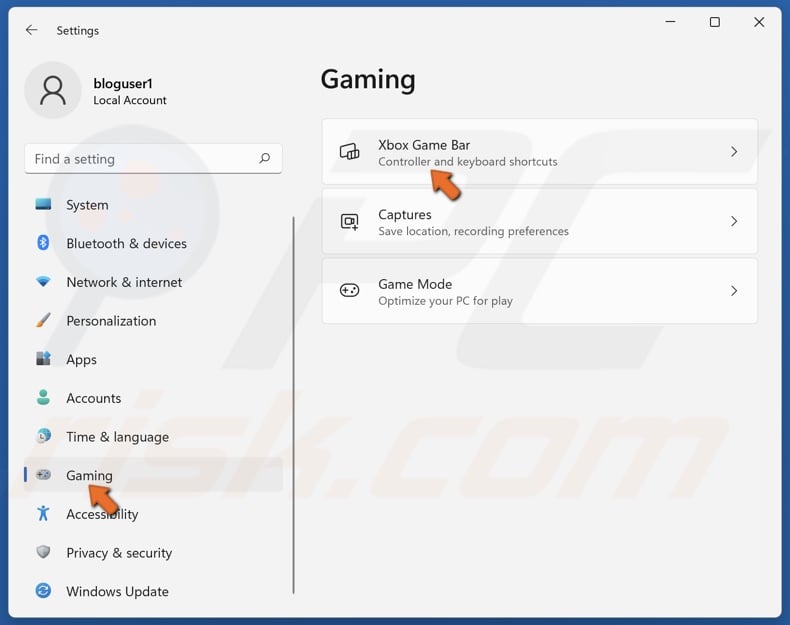
2. Select the Gaming tab and select Xbox Game Bar.

3. Toggle off the Open Xbox Game Bar using this button option.
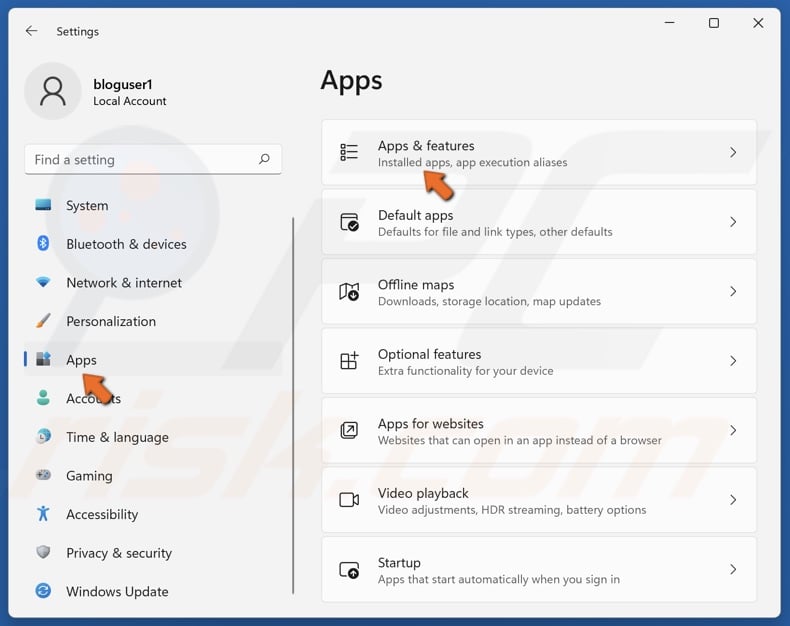
4. Then, Select the Apps tab and select Apps & features.
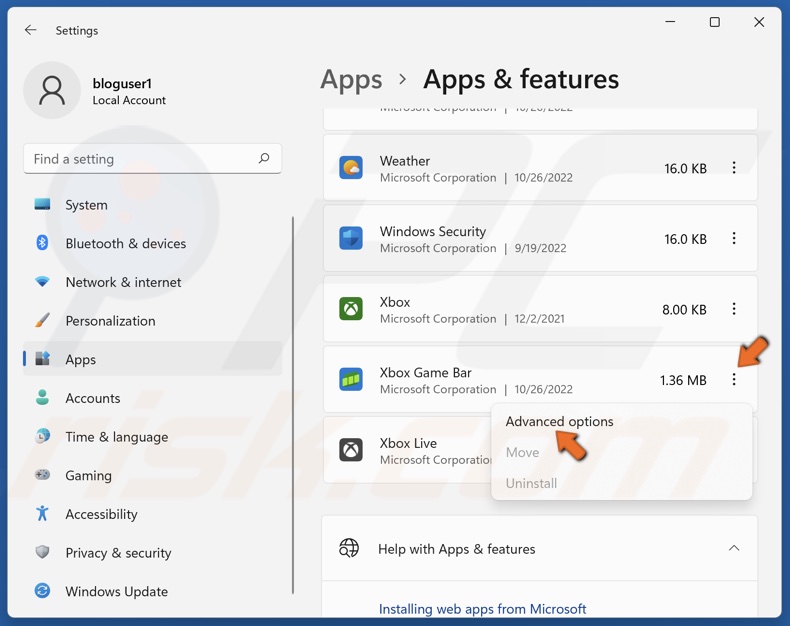
5. Click the three dots next to Xbox Game Bar and select Advanced options.

6. Open the Background apps permissions menu.
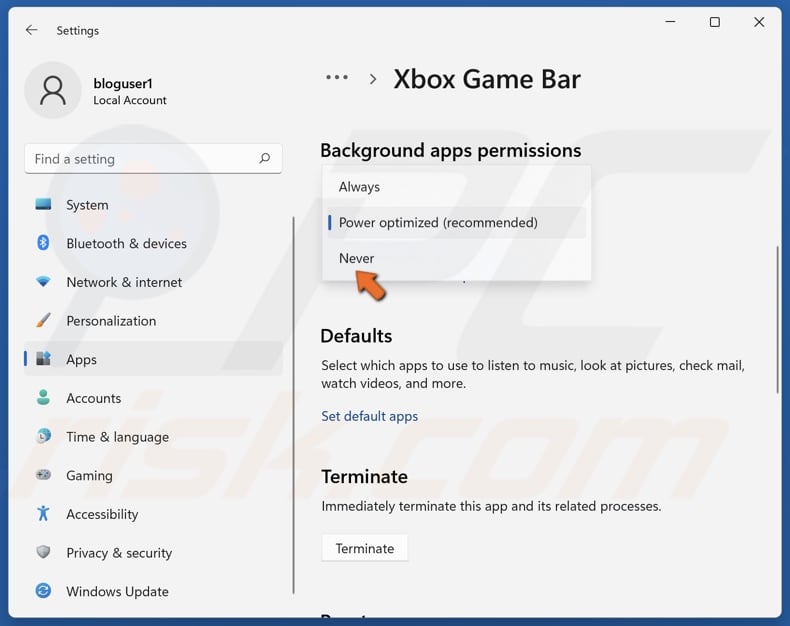
7. Select Never.
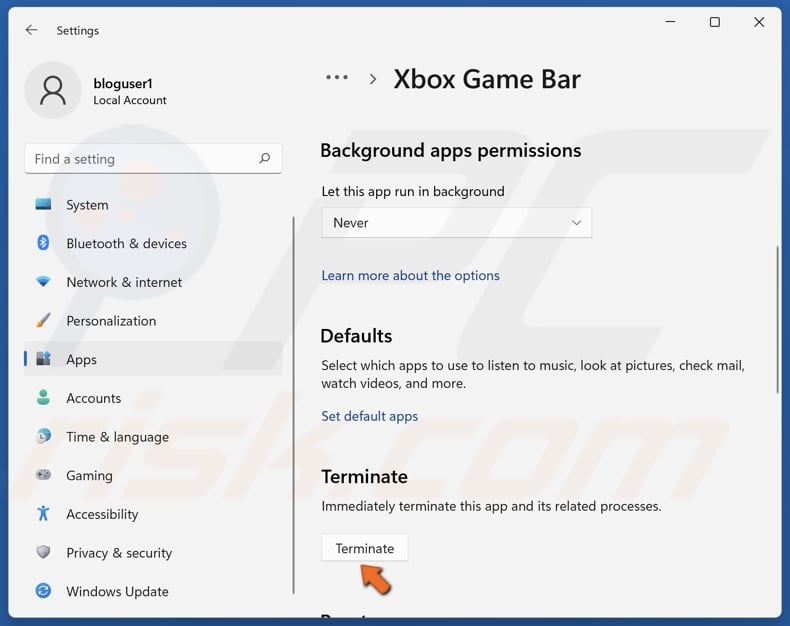
8. Then, click Terminate.
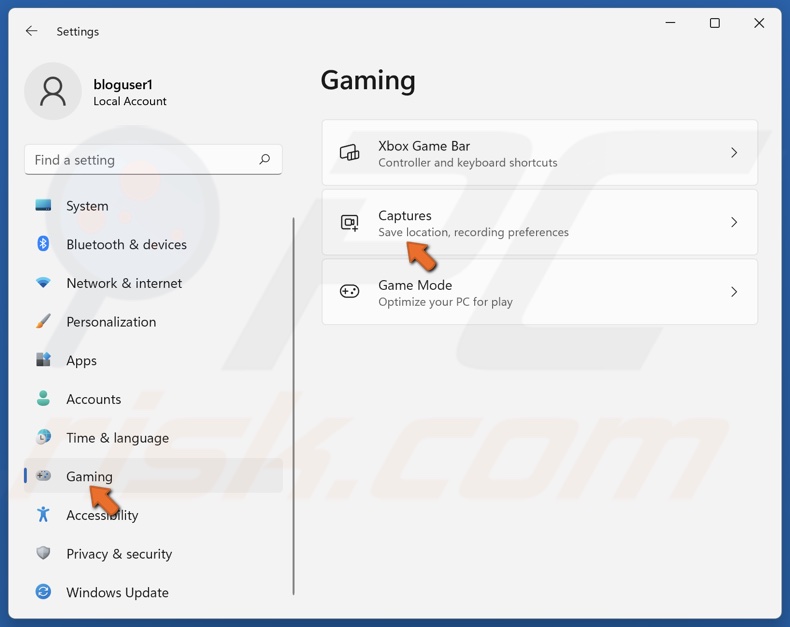
9. Select the Gaming tab again and select Captures.
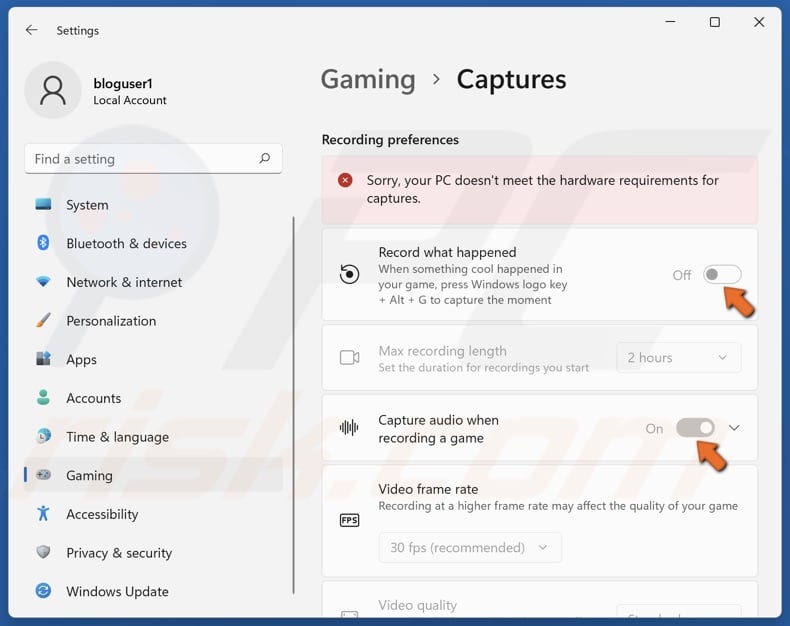
10. Toggle off Record what happened and Capture audio when recording a game.
Method 4. Set Your Microphone as the Default Device
Your default microphone settings may be misconfigured. The steps below will show you how to set your preferred microphone as the default audio input device.
1. Hold down Windows+R keys to open Run.
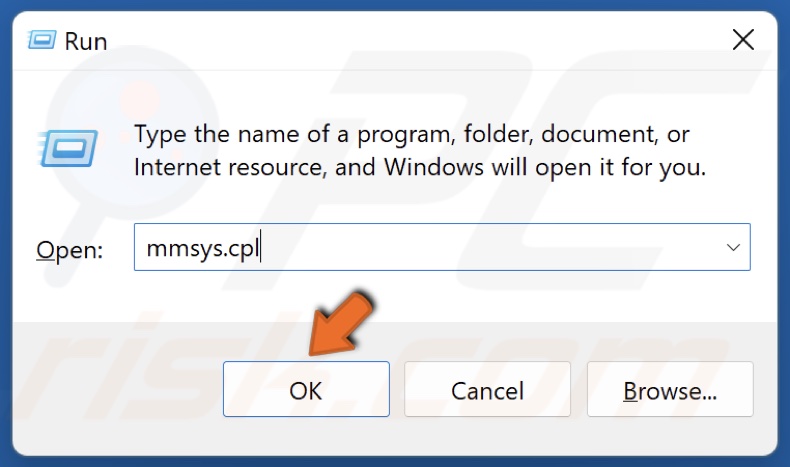
2. In the Run dialog box, type in mmsys.cpl and click OK.

3. Select the Recording tab.
4. Select your preferred audio device (microphone).
5. Then, open the default device drop-down menu and select Default device.
6. Open the default device menu again and select Default communication device.
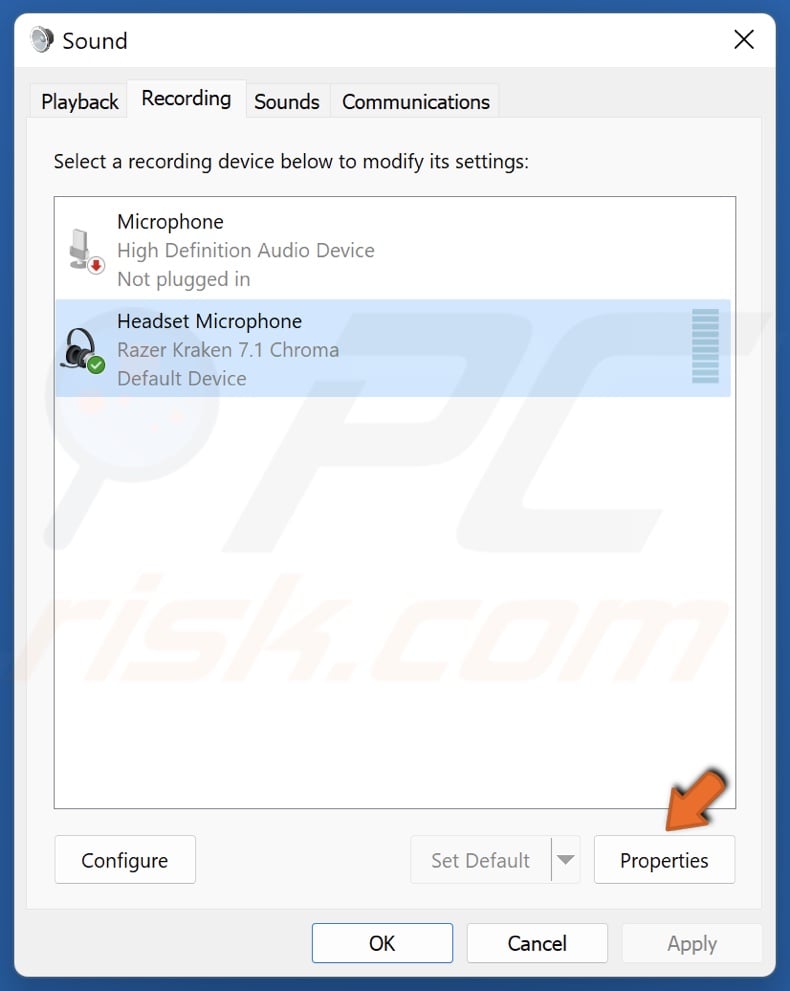
7. Then, click Properties.
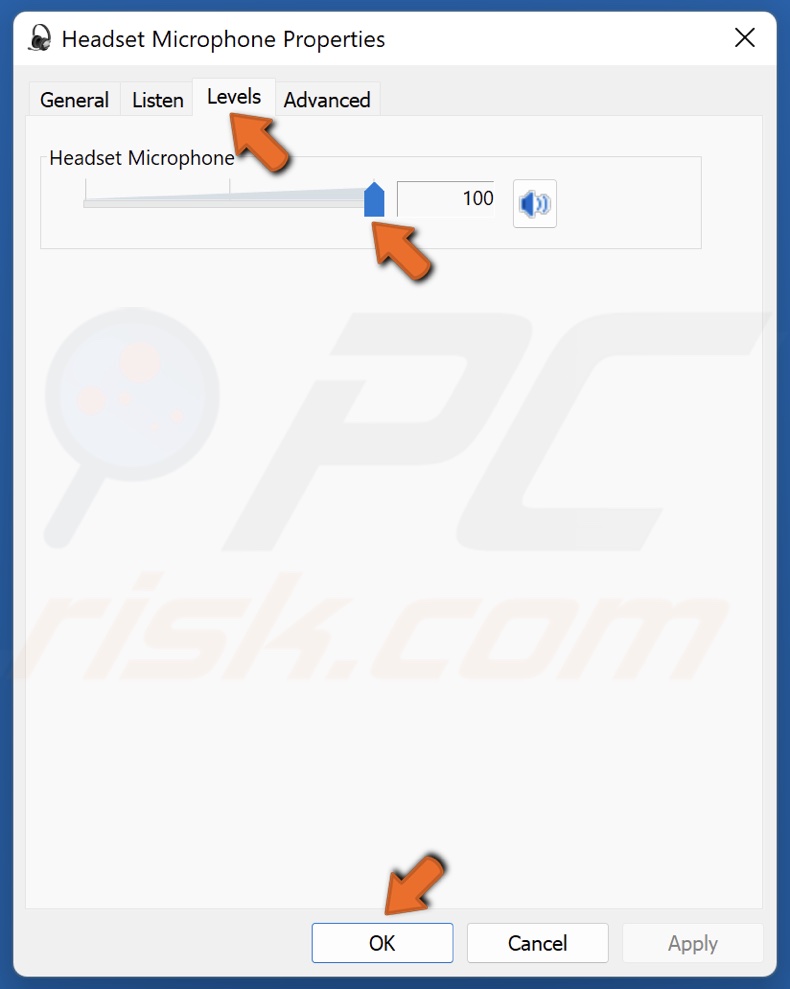
8. Select the Levels tab and set the Microphone level to high.
9. Click OK.
Method 5. Set the Correct Input Device for CS:GO
Your audio input device setting might be misconfigured. The instructions below will show you how to set the correct audio input device.
1. Right-click Start and select Settings.

2. In the System panel, select Sound.
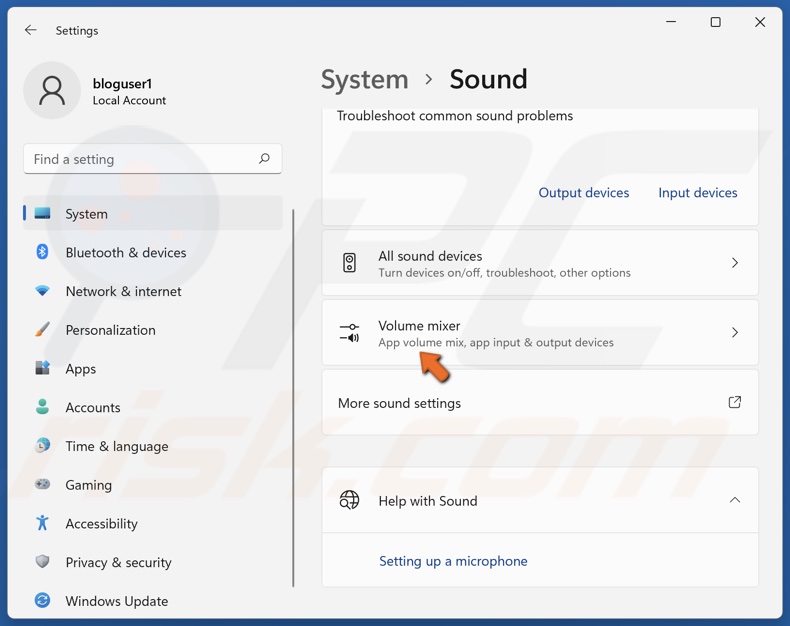
3. Scroll down to the Advanced section and select Volume mixer.
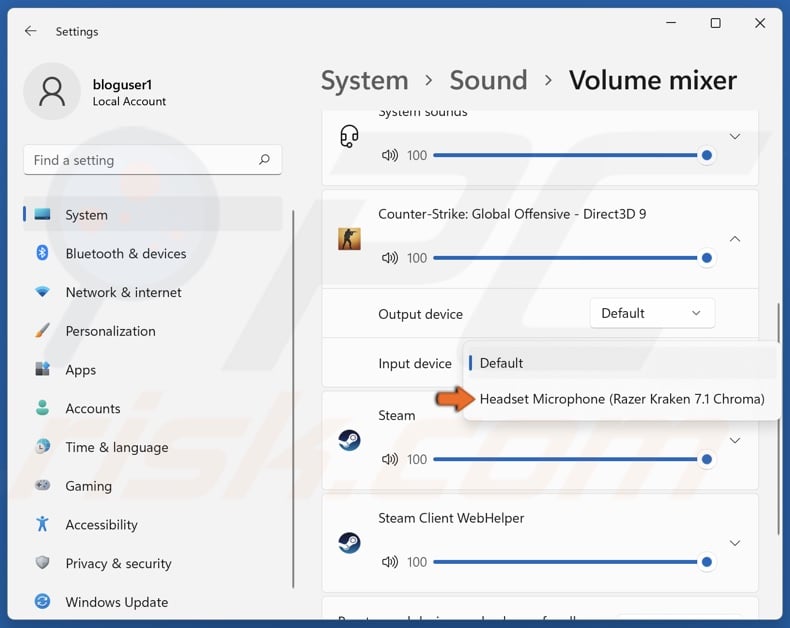
4. Scroll down to the Apps section. If you don’t see Counter-Strike: Global Offensive, launch it. The game should show up in the Apps list.
5. Open the menu next to Counter-Strike: Global Offensive, and select the correct input device (microphone).
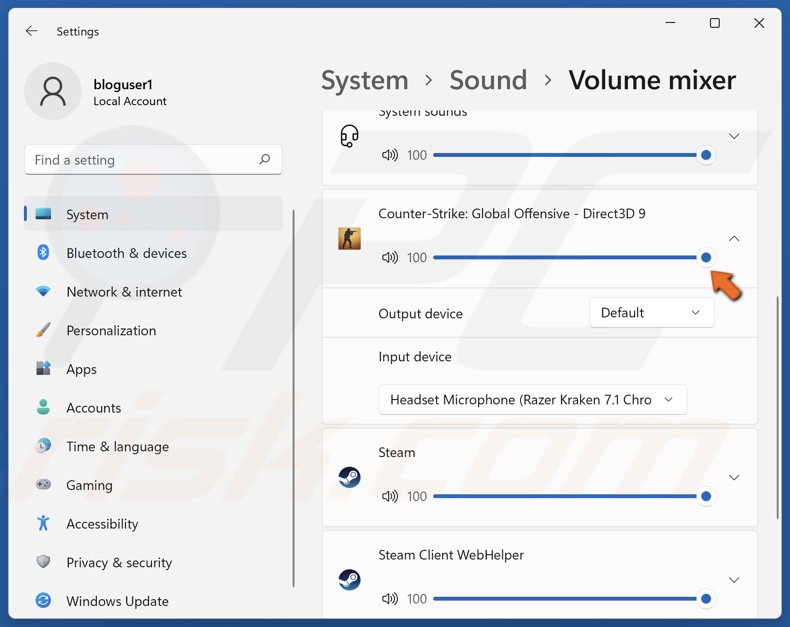
6. Set Audio Input to the max.
Method 6. Restart the Windows Audio Service
The Windows Audio service manages audio for all installed applications. The Audio service is known for running into various issues. It may work incorrectly for some applications due to a glitch, so you may fix the audio issue in CS:GO by restarting the Windows Audio service.
1. Hold down Windows+R keys to open Run.
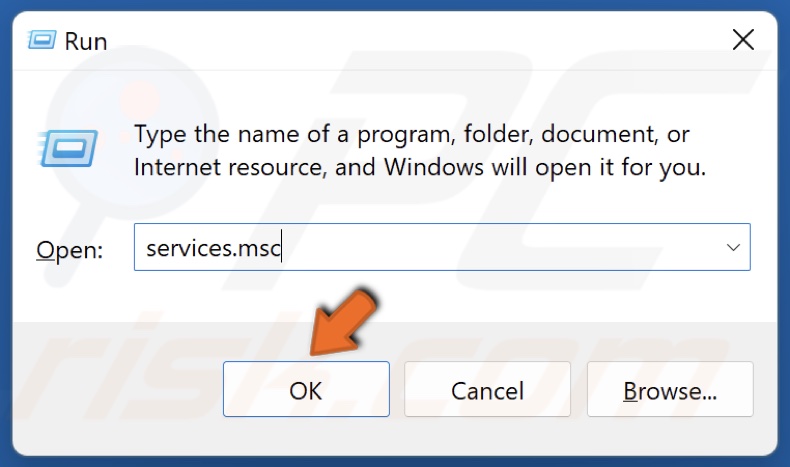
2. In the Run dialog box, type in services.msc and click OK.
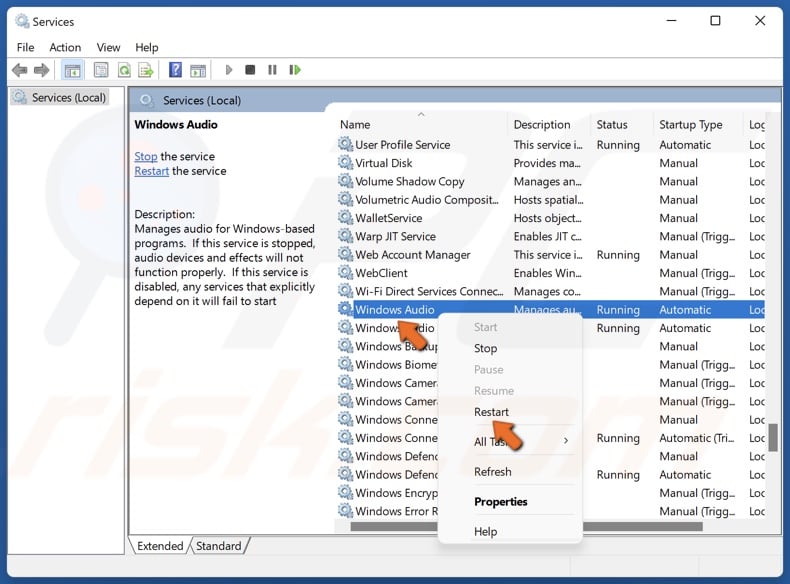
3. Scroll down and find the Windows Audio service.
4. Right-click Windows Audio and click Restart.
Method 7. Update/Reinstall the Audio Driver
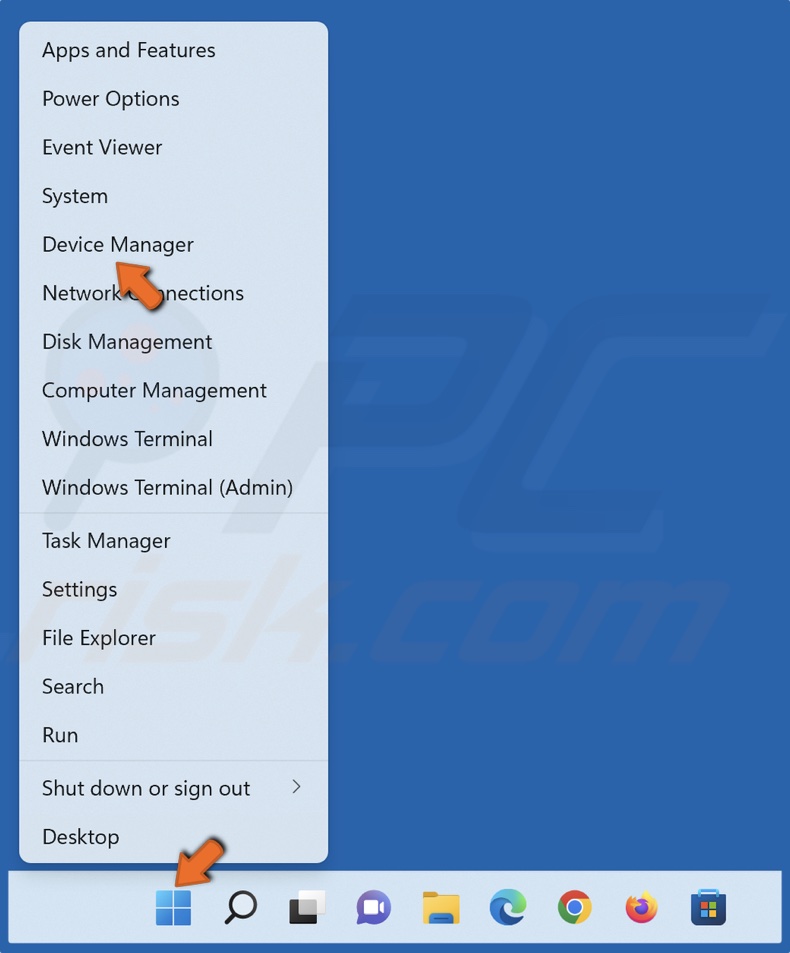
1. Right-click Start and click Device Manager.
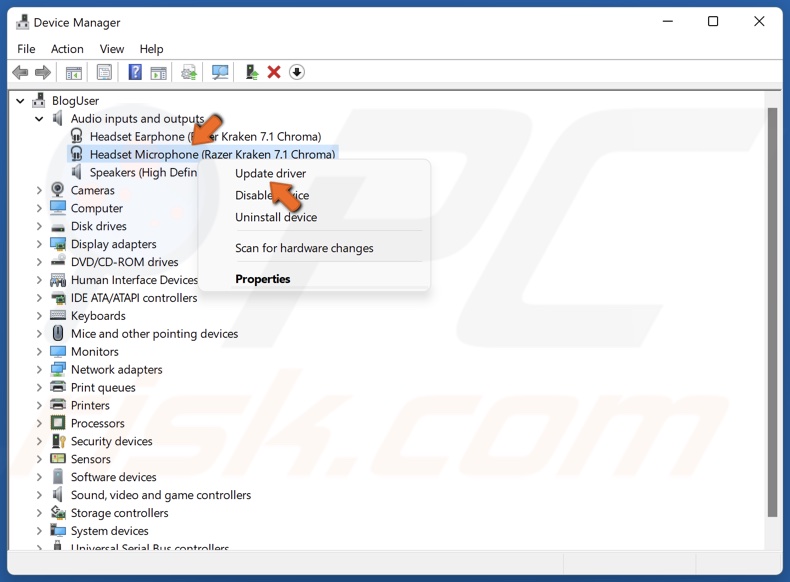
2. Expand the Audio inputs and outputs list.
3. Right-click your microphone or headset and click Update driver.

4. Click Search automatically for drivers.
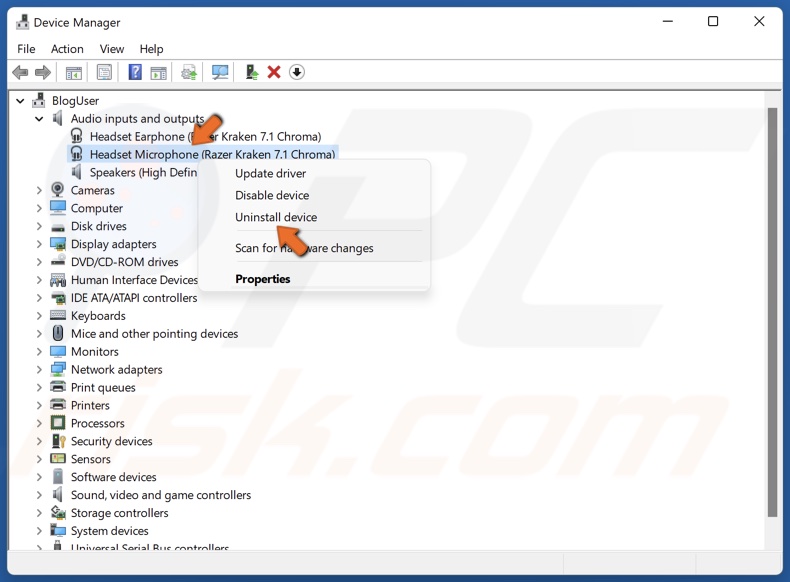
5. If updating the driver didn’t fix the issue, right-click the device and click Uninstall device.
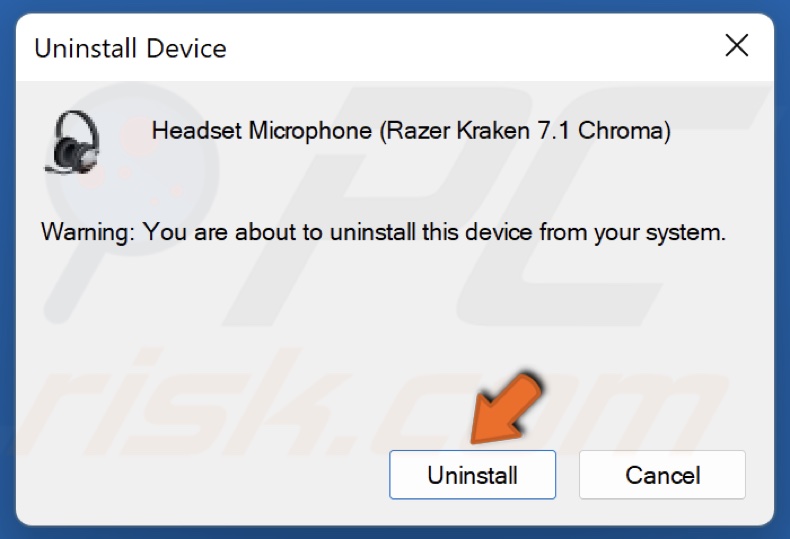
6. Click Uninstall when prompted.
7. Restart your PC. Windows will install the latest compatible driver for the device automatically.
Method 8. Verify CS:GO Game Files
If one of the above solutions helped you fix, then it’s possible that some of your CS:GO files have become corrupted. Game files can get corrupted after an update, so verifying CS:GO’s game file integrity should fix it.
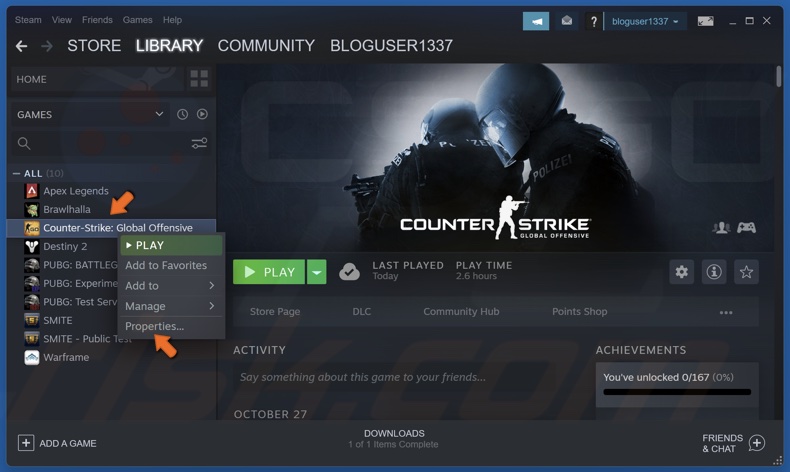
1. Open Steam. In the Library window, right-click CS:GO and select Properties.
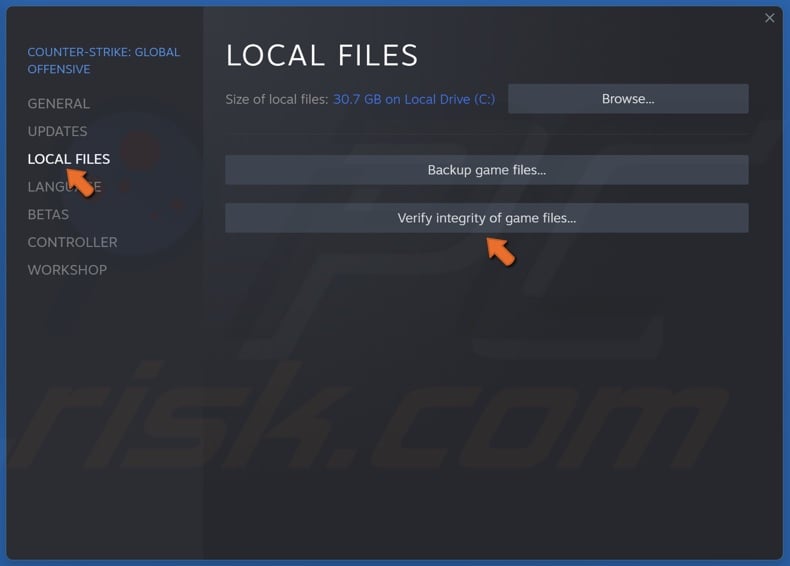
2. In the left pane, select the Local Files tab.
3. Click Verify integrity of game files. Wait for the verification process to complete.
Did this article help you fix CS:GO mic not working on your PC? Let us know in the comments below.
Share:

Rimvydas Iliavicius
Researcher, author
Rimvydas is a researcher with over four years of experience in the cybersecurity industry. He attended Kaunas University of Technology and graduated with a Master's degree in Translation and Localization of Technical texts. His interests in computers and technology led him to become a versatile author in the IT industry. At PCrisk, he's responsible for writing in-depth how-to articles for Microsoft Windows.
▼ Show Discussion