How to Fix Windows 11 Taskbar Not Working

Get Free Scanner and check your computer for errors
Fix It NowTo fix found issues, you have to purchase the full version of Combo Cleaner. Free trial available. Combo Cleaner is owned and operated by Rcs Lt, the parent company of PCRisk.com read more.
How to Fix Taskbar Not Working in Windows 11
The taskbar is an integral part of Windows operating systems. However, the taskbar in Windows 11 is prone to various issues, such as the taskbar disappearing, not showing icons, or becoming unresponsive. If you’re experiencing issues with your Windows 11 taskbar, follow the instructions in this article to fix it.
Why is My Taskbar Not Working?
Many users reported that their taskbar stopped working after upgrading to Windows 11 from Windows 10 and previous versions. While many of the initial issues have been ironed out, some users still experience problems with the taskbar.
- The taskbar often stops working due to a glitch in the Windows Explorer service. Restarting Windows Explorer usually fixes it.
- Sometimes, the taskbar may stop working due to a faulty Windows update. You may fix the issue by uninstalling all recent updates installed before your taskbar stopped working. Update KB5006674 is known to cause problems with the taskbar.
- Sometimes, Windows services don’t properly start causing the taskbar not to work. Restarting your PC should fix this.
- Corrupted system files might be the reason your taskbar stopped working. Running DISM and SFC scans will help you repair them.
We’ve compiled a list of troubleshooting methods known to fix the Windows 11 taskbar not working.
Video Guide on How to Fix Windows 11 Taskbar Not Working
Table of Contents:
- Introduction
- Method 1. Restart the Windows Explorer Service
- Method 2. Run the Deployment Image & Servicing Management (DISM) and System File Checker (SFC) Scans
- Method 3. Reinstall UWP (Universal Windows Platform)
- Method 4. Create a XAML Value in Windows Registry
- Method 5. Delete the IRIS Service
- Video Guide on How to Fix Windows 11 Taskbar Not Working
Download Computer Malware Repair Tool
It is recommended to run a free scan with Combo Cleaner - a tool to detect viruses and malware on your device. You will need to purchase the full version to remove infections. Free trial available. Combo Cleaner is owned and operated by Rcs Lt, the parent company of PCRisk.com read more.
Method 1. Restart the Windows Explorer Service
The taskbar may get stuck and become unresponsive due to a glitch. A common solution to this issue is to restart the Windows Explorer service, which is responsible for running UI components such as the taskbar.
1. Hold down Ctrl+Shift+Esc keys to open Task Manager.
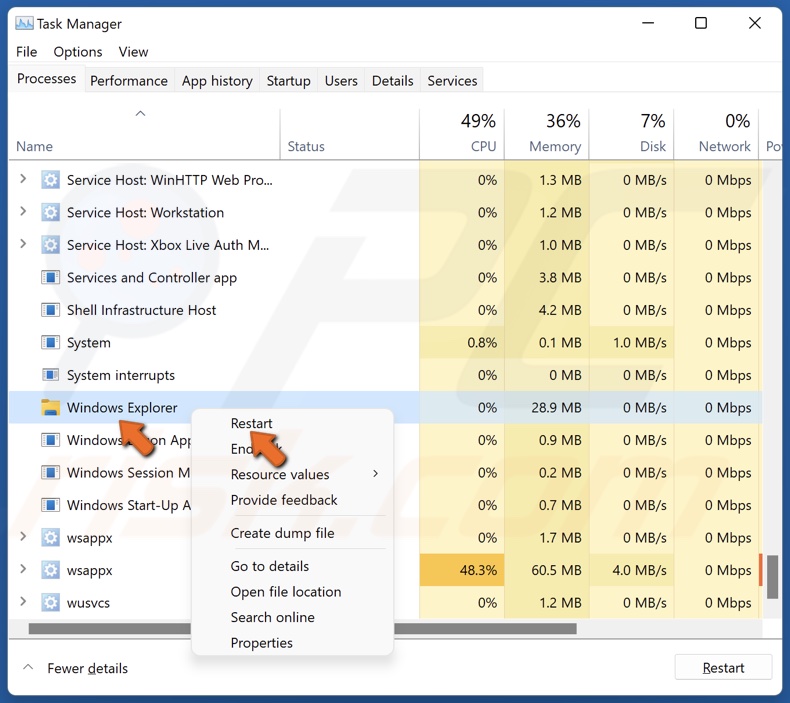
2. In the processes tab, right-click Windows Explorer and click Restart.
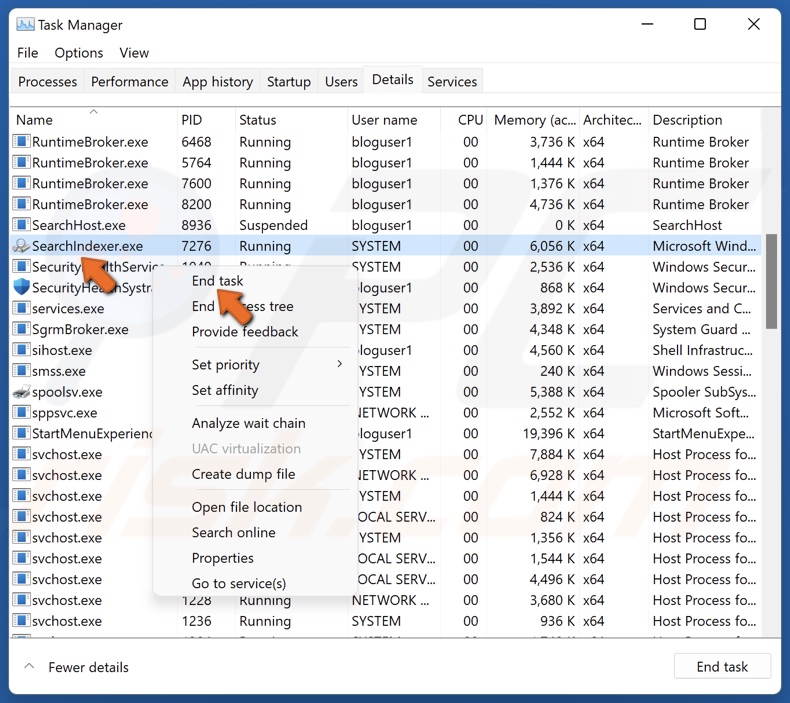
3. Then, click the Details tab.
4. Locate the following services:
ShellExperienceHost.exe
SearchIndexer.exe
SearchHost.exe
RuntimeBroker.exe
5. Right-click each of them and click End task.
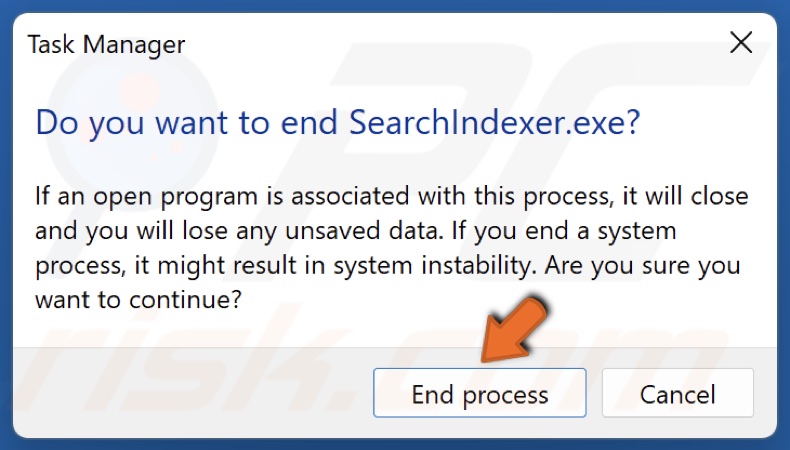
6. Click End process to confirm the action. The services will restart automatically.
7. Close the Task Manager.
Method 2. Run the Deployment Image & Servicing Management (DISM) and System File Checker (SFC) Scans
The Deployment Image Servicing and Management (DISM) is a command-line tool designed to prepare, modify, and repair system images, while the System File Checker (SFC) is intended to identify corrupted or missing system files and download new files from Microsoft. Note that running these tools will take some time.
1. Hold down Ctrl+Shift+Esc keys to open Task Manager.
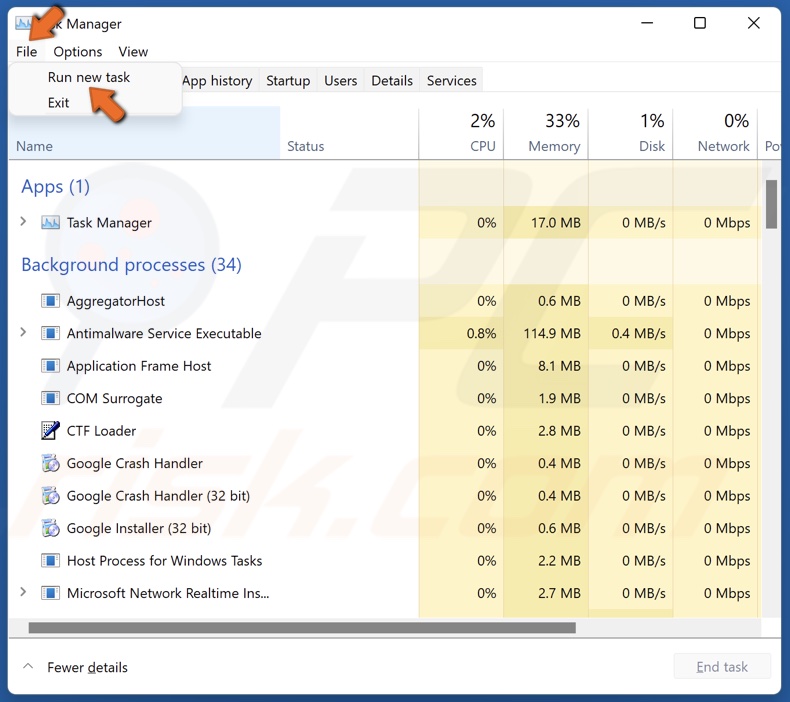
2. In the toolbar, click File and click Run new task.

3. In the Create new task window, type in CMD, mark Create this task with administrative privileges and click OK.
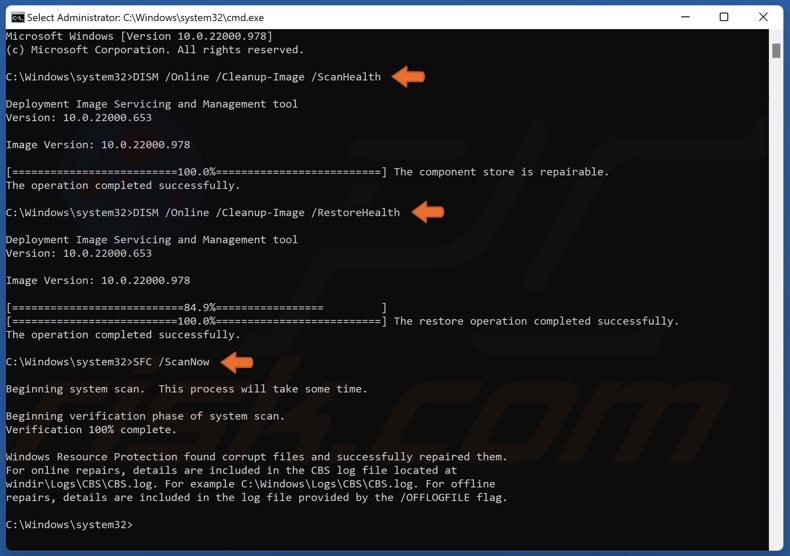
4. In the Comand Prompt window, type in DISM /Online /Cleanup-Image /ScanHealth and press Enter.
5. Type in DISM /Online /Cleanup-Image /RestoreHealth and press Enter.
6. Then, type in SFC /ScanNow and press Enter.
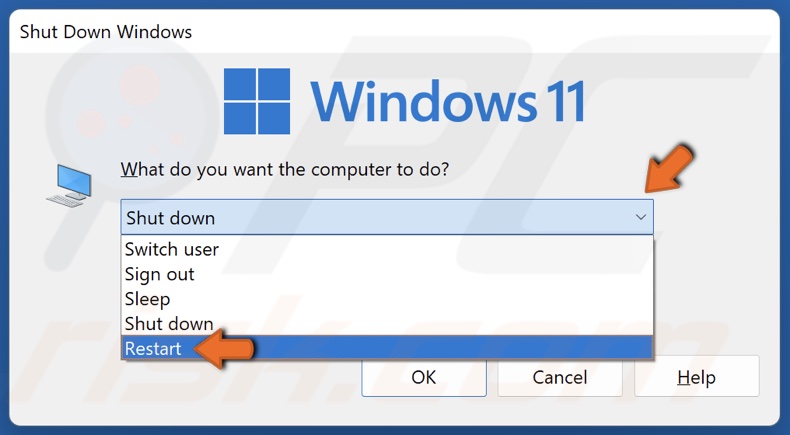
7. Hold down Alt+F4 keys to open Shown Down Windows and select Restart.
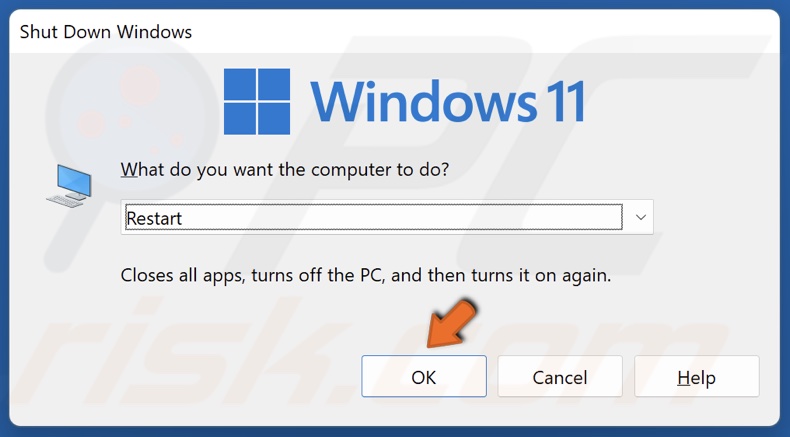
8. Click OK.
Method 3. Reinstall UWP (Universal Windows Platform)
Reinstalling UWP (Universal Windows Platform) can help you fix your Windows taskbar not working, particularly if the taskbar has disappeared. The instructions below will show you how to reinstall UWP using Windows PowerShell.
1. Hold down Ctrl+Shift+Esc keys to open Task Manager.
2. In the toolbar, click File and click Run new task.
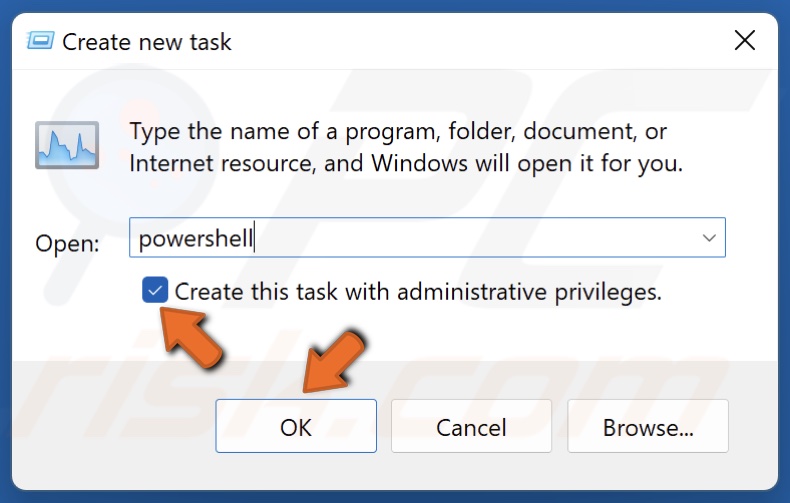
3. In the Create new task window, type in PowerShell, mark Create this task with administrative privileges and click OK.
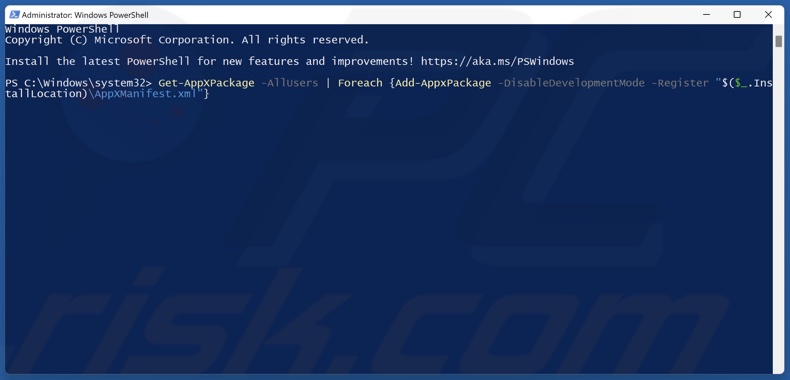
4. In the PowerShell window, type in the following command:
Get-AppXPackage -AllUsers | Foreach {Add-AppxPackage -DisableDevelopmentMode -Register "$($_.InstallLocation)\AppXManifest.xml"}
5. Press Enter to execute the command.
6. Hold down Alt+F4 keys to open Shut Down Windows and select Restart.
7. Click OK.
Method 4. Create a XAML Value in Windows Registry
You might fix the taskbar not working by creating XAML (Extensible Application Markup Language) value in the Windows Registry Editor.
1. Hold down Ctrl+Shift+Esc keys to open Task Manager.
2. In the toolbar, click File and click Run new task.
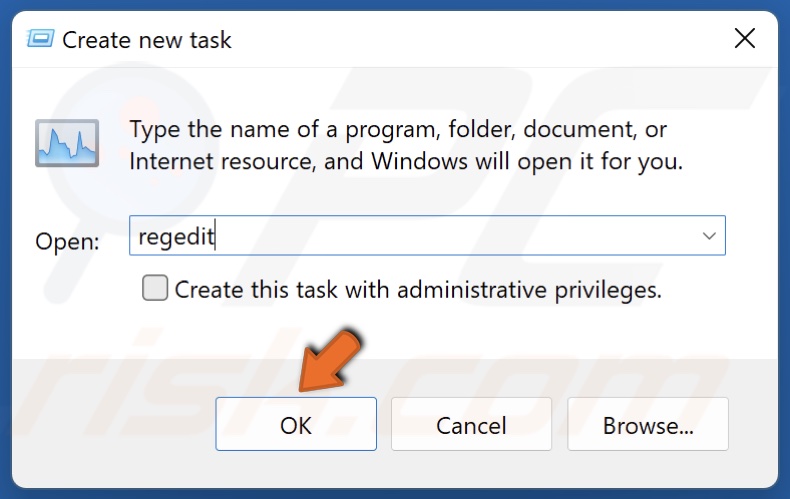
3. In the Create new task window, type in Regedit, and click OK.
4. In the Registry Editor, navigate to the following location:
HKEY_CURRENT_USER\Software\Microsoft\Windows\CurrentVersion\Explorer\Advanced
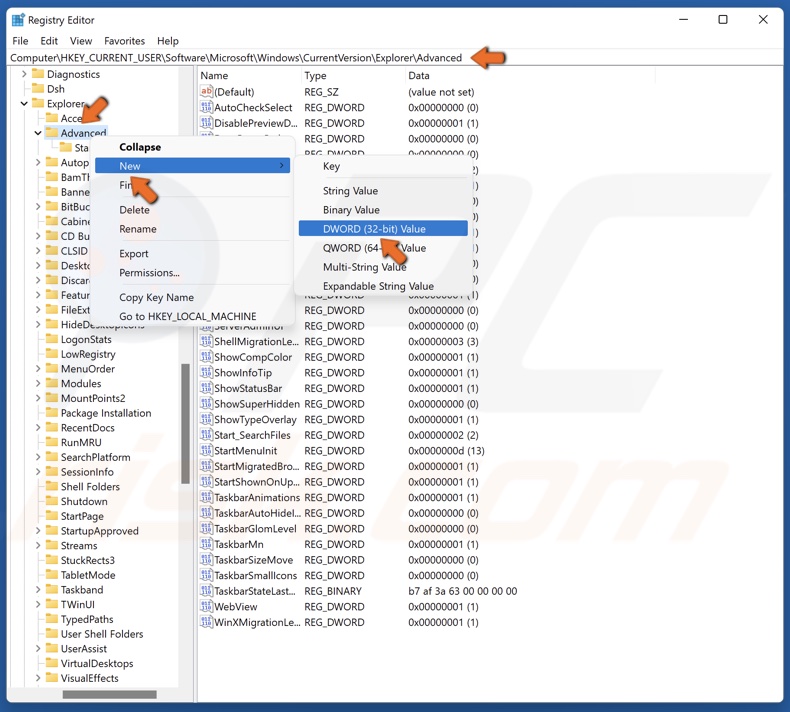
5. Right-click the Advanced folder, click New, and select DWORD (32-bit) Value.
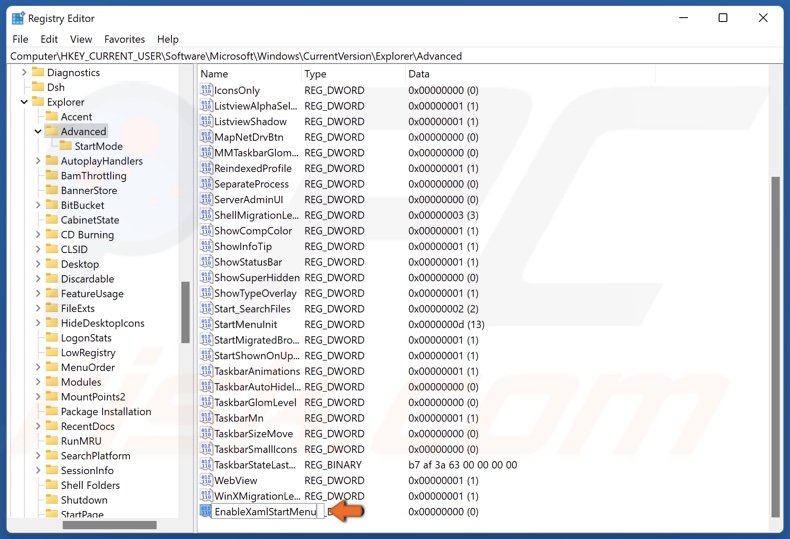
6. Name the new file EnableXamlStartMenu and save the new name.
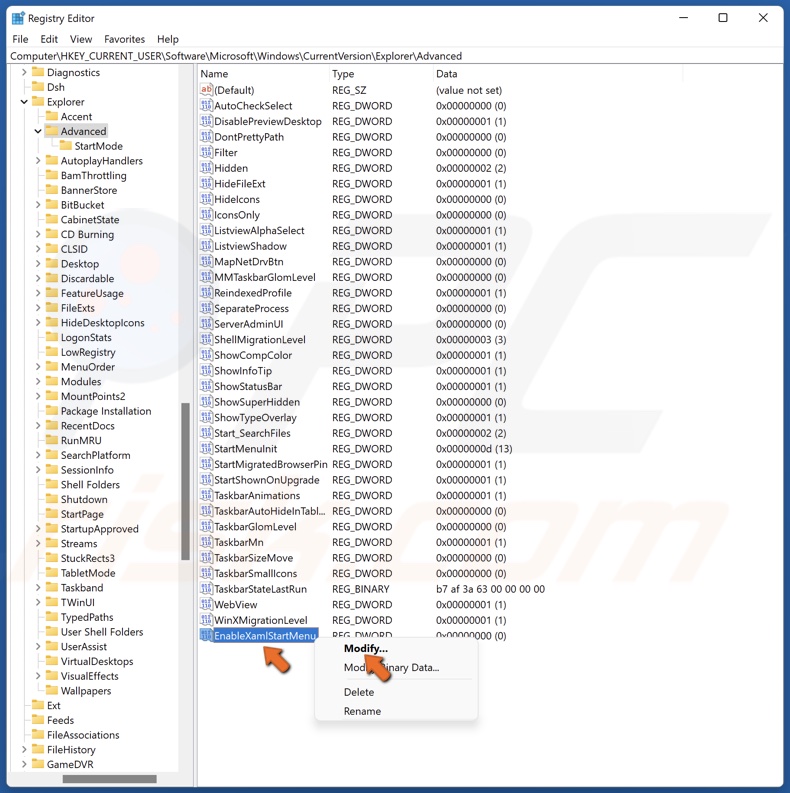
7. Right-click EnableXamlStartMenu and click Modify.
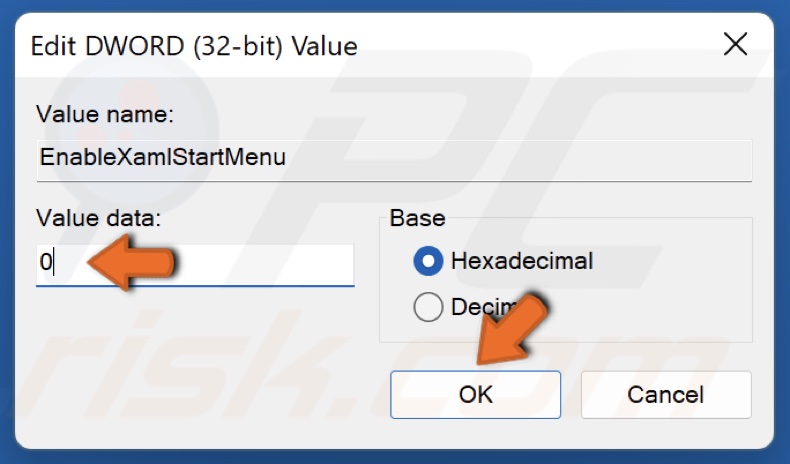
8. In the Value data line, type in 0 and click OK.
9. Hold down Alt+F4 keys to open Shut Down Windows and select Restart.
10. Click OK.
Method 5. Delete the IRIS Service
Deleting the IRIS service is an official fix Microsoft issued when the issue started occurring in September 2021 due to a buggy update. This fix still seems to work for most users.
1. Hold down Ctrl+Shift+Esc keys to open Task Manager.
2. In the toolbar, click File and click Run new task.
3. In the Create new task window, type in CMD, mark Create this task with administrative privileges and click OK.

4. In the Command Prompt window, type in the following command:
reg delete HKCU\SOFTWARE\Microsoft\Windows\CurrentVersion\IrisService /f && shutdown -r -t 0
5. Press the Enter key to execute the command.
6. Your PC will restart automatically. The taskbar should work after your system boots up.
Did this article help you fix your Windows 11 taskbar not working? Let us know by leaving a comment.
Share:

Rimvydas Iliavicius
Researcher, author
Rimvydas is a researcher with over four years of experience in the cybersecurity industry. He attended Kaunas University of Technology and graduated with a Master's degree in Translation and Localization of Technical texts. His interests in computers and technology led him to become a versatile author in the IT industry. At PCrisk, he's responsible for writing in-depth how-to articles for Microsoft Windows.
▼ Show Discussion