Fix Windows Update Error 0x800f0831 on Windows 11

Get Free Scanner and check your computer for errors
Fix It NowTo fix found issues, you have to purchase the full version of Combo Cleaner. Free trial available. Combo Cleaner is owned and operated by Rcs Lt, the parent company of PCRisk.com read more.
How to Fix Windows Update Error 0x800f0831 on Windows 11
On Windows 11, error code 0x800f0831 primarily occurs when installing a cumulative update. This article will discuss the causes of this error and provide you with ways to fix it.
Many Windows 11 users have reported getting this error when installing KB5008212, KB5005190, and KB5005033 updates.
What Causes 0x800f0831?
Our research has revealed that this error can occur for multiple reasons, which are listed below.
- Corrupted Windows Update components. If some core Windows Update components are missing or have been corrupted, the service may fail to install the update.
- Limited disk space. If your system disk has little to no storage left, Windows has no free space to save the update files and trigger the 0x800f0831 error.
- Software conflicts. Sometimes, this error can occur due to the Windows Update service conflicting with a third-party application, such as a VPN app, antivirus, or firewall software. Disabling or removing such software should fix the error. Boot up Windows 11 in Clean Boot Mode and try updating Windows
- A previous update is not installed. In some cases, this error occurs when an update requires the manifest of a prior update package.
- Windows Update is offline. The error can occur if Windows Update servers are down or experience other problems.
Video Instructions on How to Fix Windows Update Error 0x800f0831
Table of Contents:
- Introduction
- Method 1. Run the Windows Update Troubleshooter
- Method 2. Run the Deployment Image & Servicing Management (DISM) Scan
- Method 3. Run the System File Checker (SFC) Scan
- Method 4. Clear Windows Update Cache Folder
- Method 5. Reset Windows Update Components
- Video Instructions on How to Fix Windows Update Error 0x800f0831
Download Computer Malware Repair Tool
It is recommended to run a free scan with Combo Cleaner - a tool to detect viruses and malware on your device. You will need to purchase the full version to remove infections. Free trial available. Combo Cleaner is owned and operated by Rcs Lt, the parent company of PCRisk.com read more.
Method 1. Run the Windows Update Troubleshooter
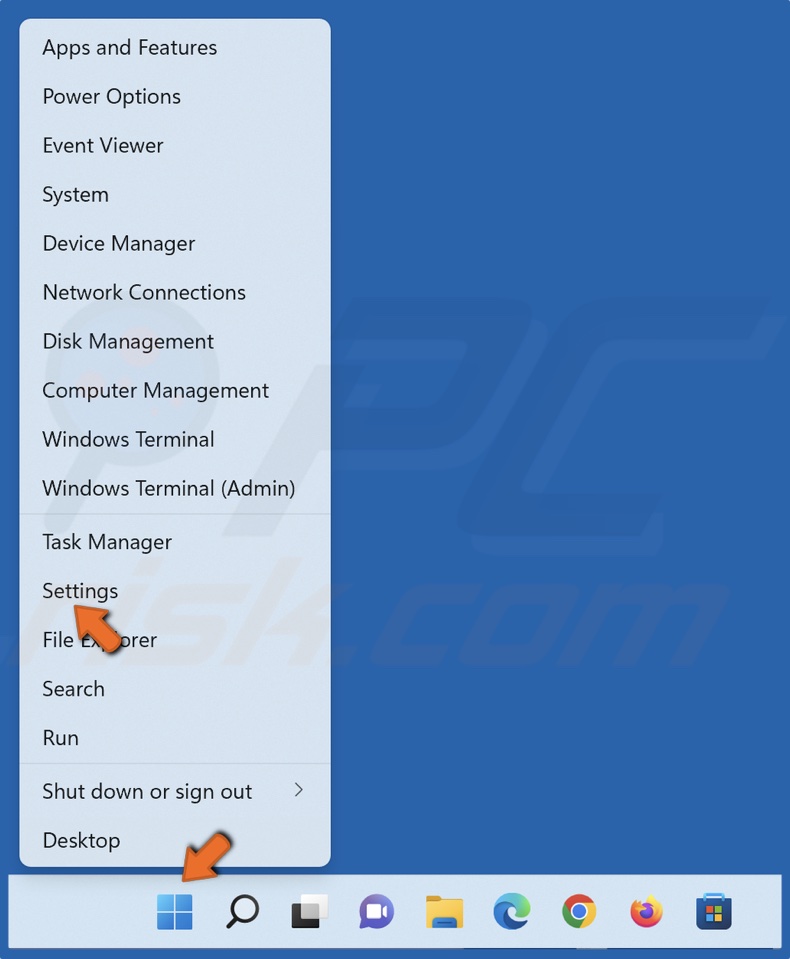
1. Right-click Start and select Settings.
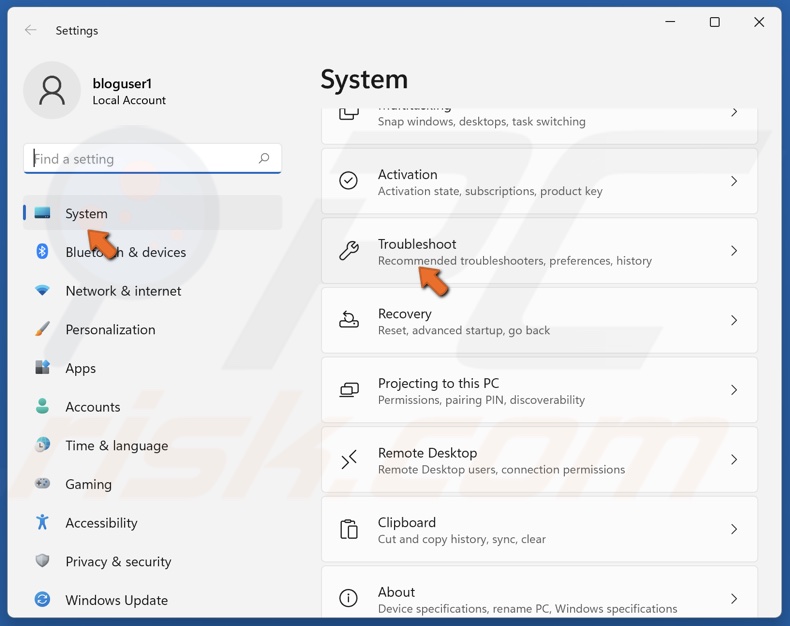
2. In the System panel, scroll down and click Troubleshoot.
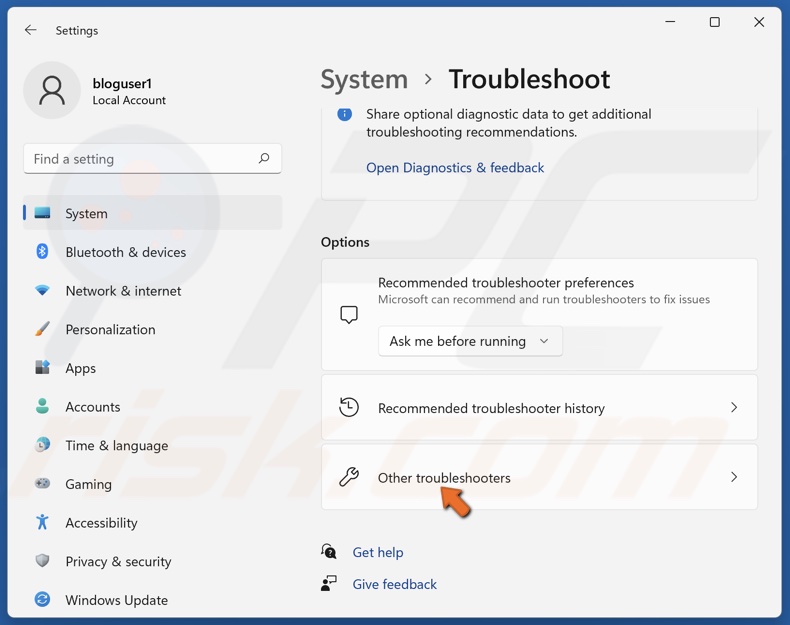
3. Select Other troubleshooters.
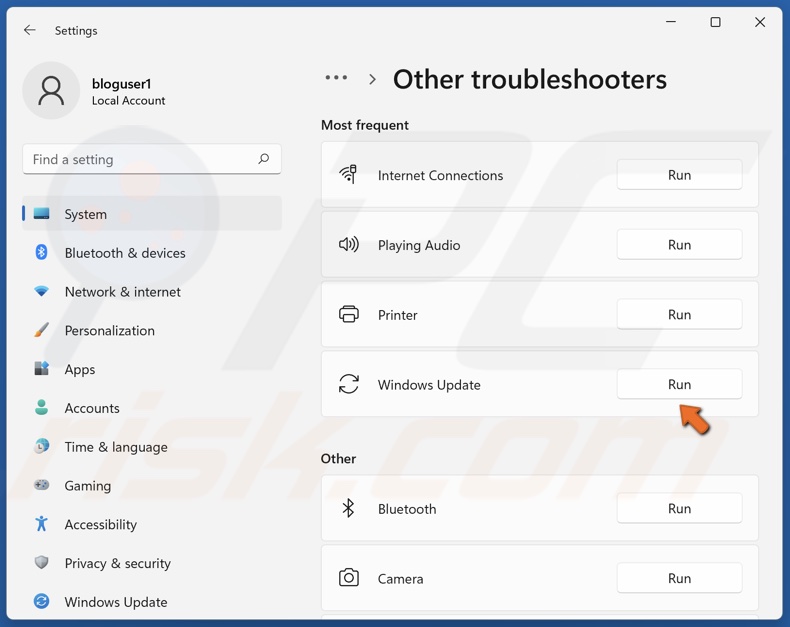
4. Run the Windows Update troubleshooter.
5. Apply the proposed fixes and restart your PC.
Method 2. Run the Deployment Image & Servicing Management (DISM) Scan
1. Hold down Windows+R keys to open Run.
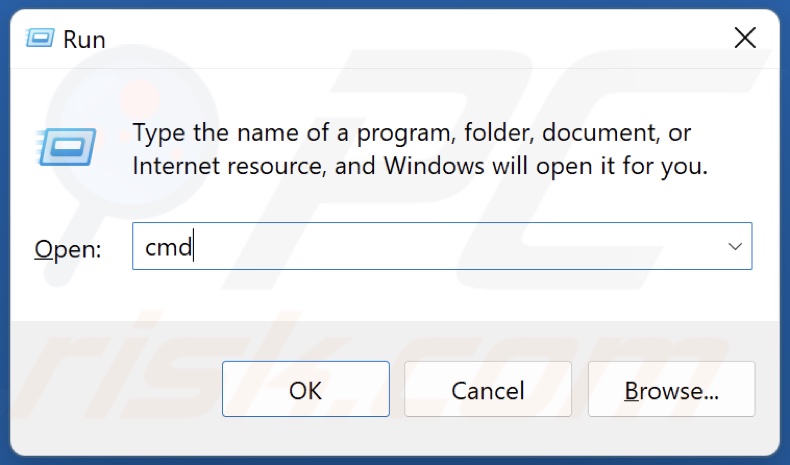
2. In the Run dialog box, type in CMD and hold down Ctrl+Shift+Enter keys to open the Command Prompt as an administrator.
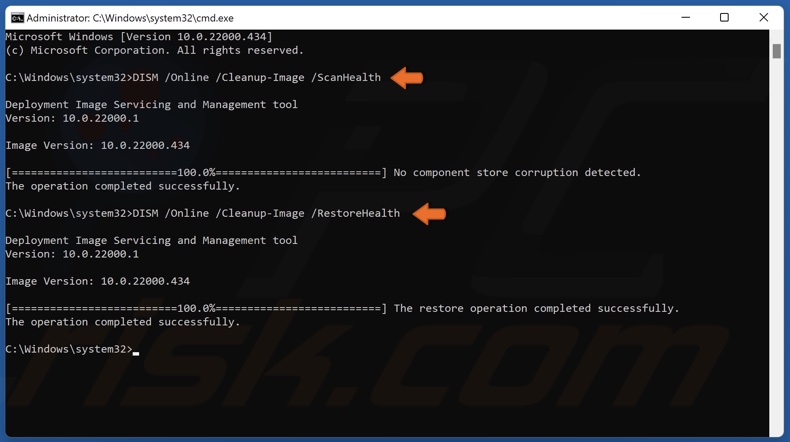
3. In the Comand Prompt window, type in DISM /Online /Cleanup-Image /ScanHealth and press Enter.
4. Type in DISM /Online /Cleanup-Image /RestoreHealth and press Enter.
5. Restart your PC once the scan is complete.
Method 3. Run the System File Checker (SFC) Scan
1. Hold down Windows+R keys to open Run.
2. In the Run dialog box, type in CMD and hold down Ctrl+Shift+Enter keys to open the Command Prompt as an administrator.
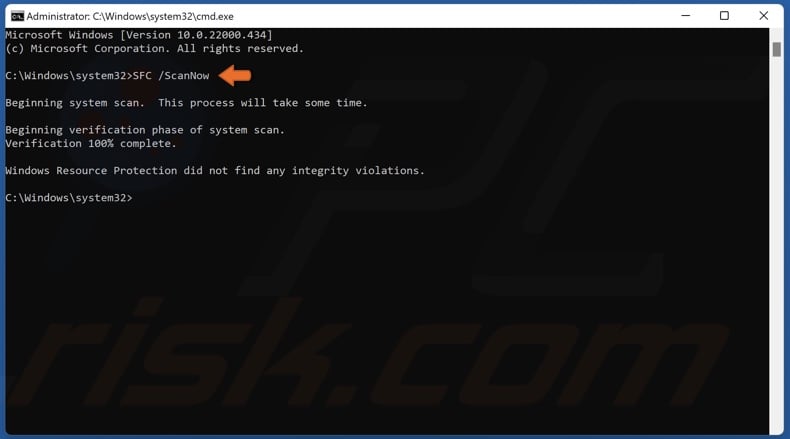
3. In the Command Prompt window, type in SFC /ScanNow and press Enter.
4. Restart your PC once the scan is complete.
Method 4. Clear Windows Update Cache Folder
1. Hold down Windows+R keys to open Run.
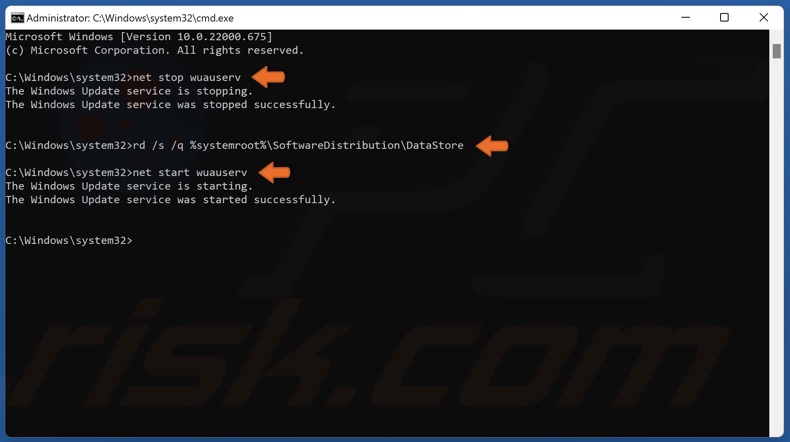
2. In the Run dialog box, type in CMD and hold down Ctrl+Shift+Enter keys to open the Command Prompt as an administrator.
3. In the Command prompt window, type in net stop wuauserv and press the Enter key.
4. Type in rd /s /q %systemroot%\SoftwareDistribution and press Enter.
5. Then, type in net start wuauserv and press Enter.
Method 5. Reset Windows Update Components
1. Hold down Windows+R keys to open Run.
2. In the Run dialog box, type in CMD and hold down Ctrl+Shift+Enter keys to open the Command Prompt as an administrator.
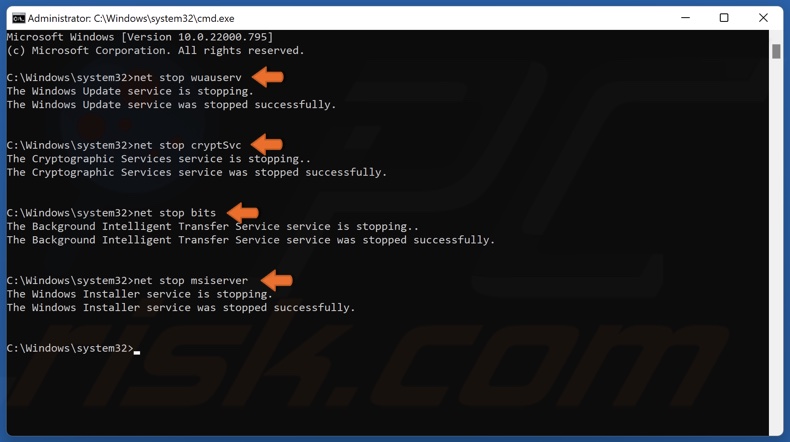
3. In the Command Prompt window, type in the commands below, and press the Enter key after entering each one:
- net stop wuauserv
- net stop cryptSvc
- net stop bits
- net stop msiserver
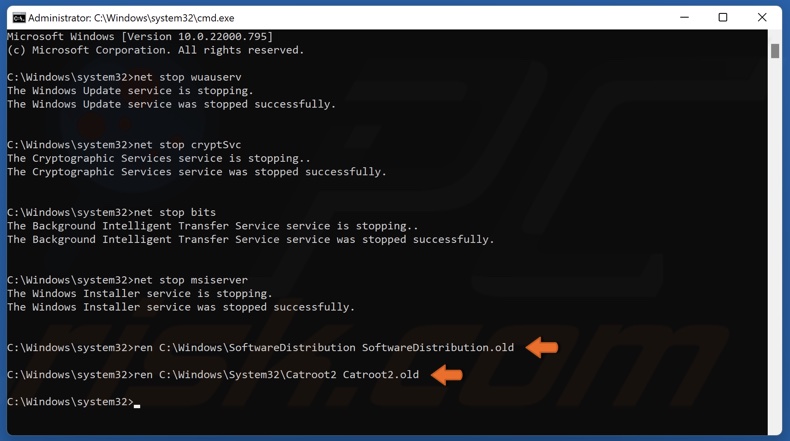
4. Then, type in ren C:\Windows\SoftwareDistribution SoftwareDistribution.old and press Enter.
5. Type in ren C:\Windows\System32\catroot2 Catroot2.old and press Enter.
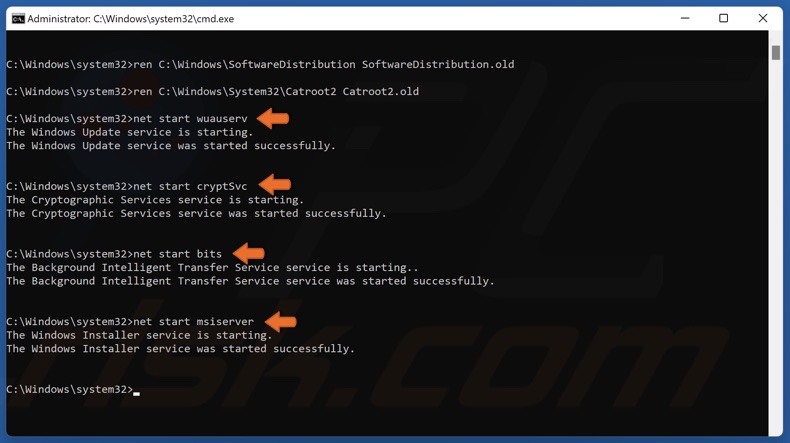
6. Type in the commands below, and press the Enter key after entering each one to restart the stopped services:
- net start wuauserv
- net start cryptSvc
- net start bits
- net start msiserver
7. Try updating Windows.
Did this article help? Let us know by commenting below.
Share:

Rimvydas Iliavicius
Researcher, author
Rimvydas is a researcher with over four years of experience in the cybersecurity industry. He attended Kaunas University of Technology and graduated with a Master's degree in Translation and Localization of Technical texts. His interests in computers and technology led him to become a versatile author in the IT industry. At PCrisk, he's responsible for writing in-depth how-to articles for Microsoft Windows.
▼ Show Discussion