How to Boot into Safe Mode on Windows 11
Get Free Scanner and check your computer for errors
Fix It NowTo fix found issues, you have to purchase the full version of Combo Cleaner. Free trial available. Combo Cleaner is owned and operated by Rcs Lt, the parent company of PCRisk.com read more.
How to Start/Boot Windows 11 in Safe Mode
If you run Windows 11 and want to boot it in safe mode to troubleshoot issues, this guide will show you how to do it.

Safe mode starts the operating system in a limited state, disabling all unnecessary operating system components. Safe mode is useful when dealing with hardware, driver, and software-related issues.
There are three main Safe Mode options available:
- Safe Mode starts Windows with the minimum set of drivers and services.
- Safe Mode with Networking includes additional drivers and services needed for networking services to function.
- Safe Mode with Command Prompt is the same as basic Safe Mode, except that Command Prompt is launched when starting Windows rather than Explorer.
Microsoft created an automatic failover feature for when Windows doesn’t boot up properly. Windows automatically enters an advanced startup troubleshooting mode if it fails to start twice in a row.
If you’re seeing a blank or black screen, hold down the power button for 10 seconds to turn off your device. Then, press the power button to turn it on. When you see the device’s manufacturer’s logo, press and hold the power button again to turn off the device. Then, turn it back on again. You may have to repeat this procedure two or three times to trigger Windows Automatic Repair.
There are several ways to manually start Windows 11 in safe mode. See the different methods provided below and select the most convenient one.
Video Guide on How to Boot Into Safe Mode on Windows 11
Table of Contents:
- Introduction
- Method 1. Boot into Safe Mode Using the Shift+Restart Combination
- Method 2. Boot into Safe Mode via Settings Menu
- Method 3. Boot into Safe Mode via System Configuration
- Method 4. Boot into Safe Mode Using Command Prompt
- Video Guide on How to Boot Into Safe Mode on Windows 11
Download Computer Malware Repair Tool
It is recommended to run a free scan with Combo Cleaner - a tool to detect viruses and malware on your device. You will need to purchase the full version to remove infections. Free trial available. Combo Cleaner is owned and operated by Rcs Lt, the parent company of PCRisk.com read more.
Method 1. Boot into Safe Mode Using the Shift+Restart Combination

1. Open the Start menu.
2. Click the Power button, press and hold the Shift key and click Restart. Your computer will restart.

3. Select Troubleshoot.

4. Select Advanced options.

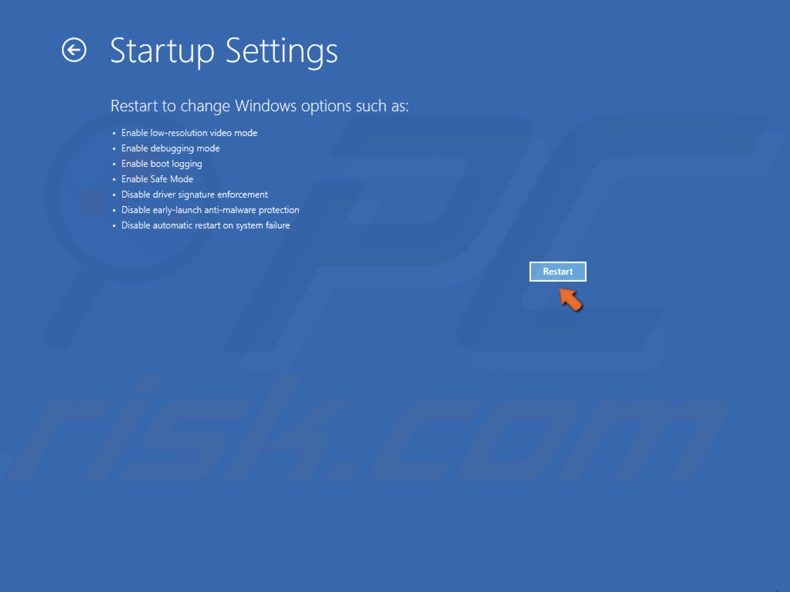
5. Select Startup Settings.

6. Click Restart.

7. Press F4 to Enable Safe Mode. Press F5 to Enable Safe Mode with Networking. Press F6 to Enable Safe Mode with Command Prompt.
Boot into Safe Mode from the Sign-in Screen
If your PC is PIN or password-protected, the procedure is similar.

1. Click the Power button on the lower-right corner of the screen.
2. Press and hold the Shift key and click Restart. The rest of the procedure is the same as shown previously.

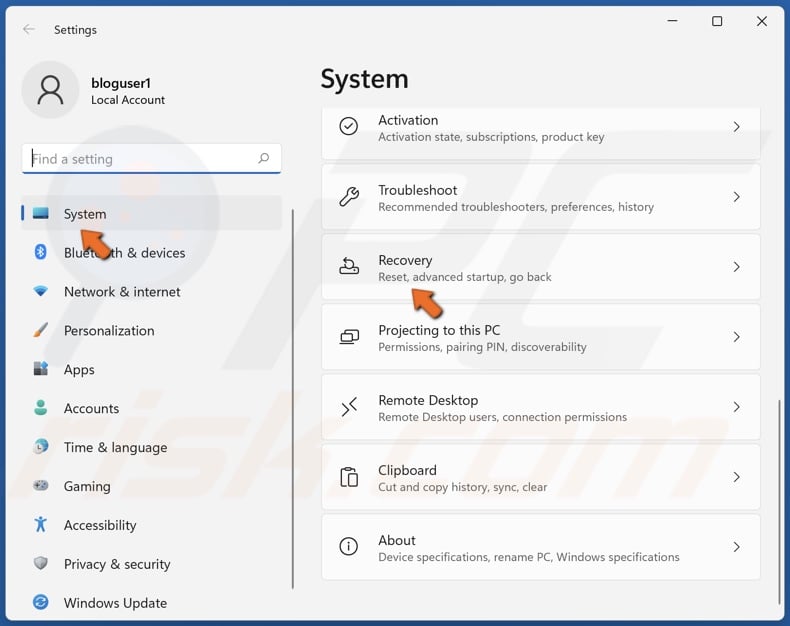
1. Right-click the Start menu button and click Settings.

2. In the System section, click Recovery.

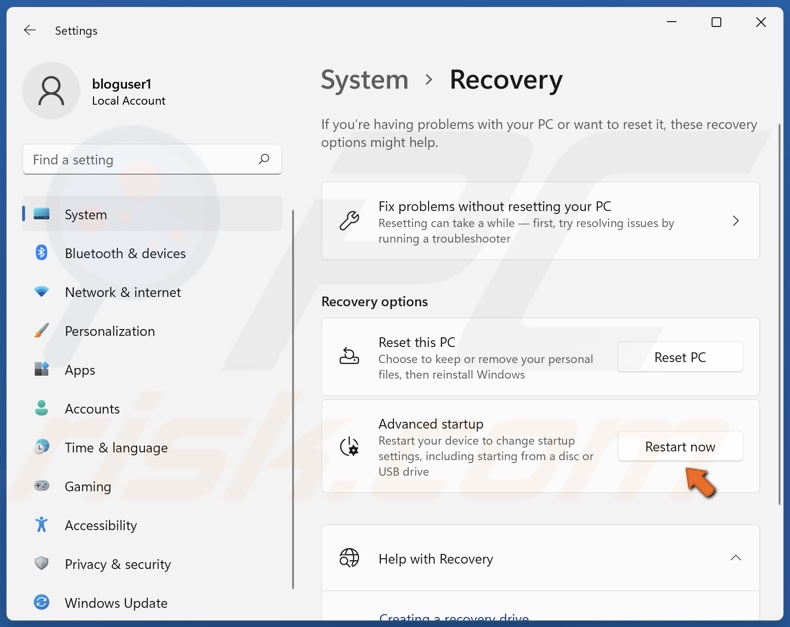
3. In the Recovery options window, click Restart now next to Advanced startup.

4. Click Restart now again and Windows will load the recovery environment.

5. Select Troubleshoot.

6. Select Advanced options.

7. Select Startup Settings.

8. Click Restart.

9. Press F4 to Enable Safe Mode. Press F5 to Enable Safe Mode with Networking. Press F6 to Enable Safe Mode with Command Prompt.
Method 3. Boot into Safe Mode via System Configuration
1. Hold down Windows+R keys to open Run.

2. In the Run dialog box, type in msconfig and click OK.

3. In the System Configuration window, select the Boot tab.
4. Then, mark the Safe boot checkbox, click Apply and click OK.

5. Click Restart when prompted. Alternatively, click Exit without restarting to restart manually later.
6. To launch Windows 11 to normal mode, unmark the Safe boot checkbox in the System Configuration window.
Method 4. Boot into Safe Mode Using Command Prompt
1. Hold down Windows+R keys to open Run.

2. In the Run dialog box, type in CMD and click OK.

3. In the Command Prompt window, type in shutdown.exe /r /o and press the Enter key.

4. Select Troubleshoot.

5. Select Advanced options.

6. Select Startup Settings.

7. Click Restart.

8. Press F4 to Enable Safe Mode. Press F5 to Enable Safe Mode with Networking. Press F6 to Enable Safe Mode with Command Prompt.
Share:

Rimvydas Iliavicius
Researcher, author
Rimvydas is a researcher with over four years of experience in the cybersecurity industry. He attended Kaunas University of Technology and graduated with a Master's degree in Translation and Localization of Technical texts. His interests in computers and technology led him to become a versatile author in the IT industry. At PCrisk, he's responsible for writing in-depth how-to articles for Microsoft Windows.

▼ Show Discussion