ERR_CONNECTION_REFUSED: 5 Ways to Fix It

Get Free Scanner and check your computer for errors
Fix It NowTo fix found issues, you have to purchase the full version of Combo Cleaner. Free trial available. Combo Cleaner is owned and operated by Rcs Lt, the parent company of PCRisk.com read more.
How to Fix ERR_CONNECTION_REFUSED Error in Google Chrome
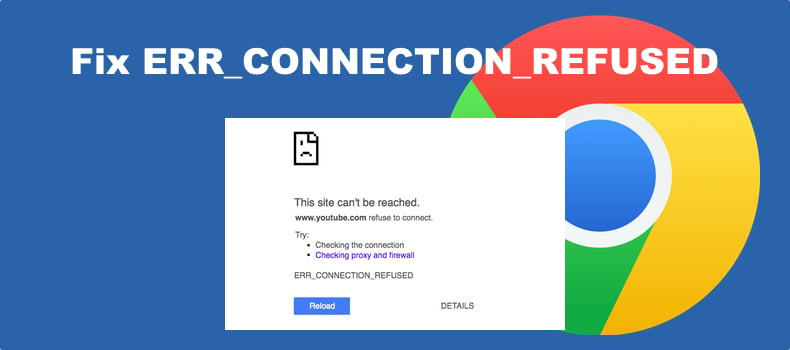
ERR_CONNECTION_REFUSED is a network connection error you may get when trying to visit a website. This article contains several guides to help you fix it.
What Is ERR_CONNECTION_REFUSED?
In Google Chrome, the ERR_CONNECTION_REFUSED error is also known by other variations, including "127.0.0.1 refused to connect," "This site can't be reached," and "localhost refused to connect."
This error doesn't tell you whether the connection issue has something to do with the website you're trying to visit, your Internet connection, web browser, or DNS settings. However, the error code indicates that the server rejected the attempted connection.
What Causes ERR_CONNECTION_REFUSED?
You may experience this error due to several reasons outlined below.
- The website is down (server-side problem)
- Outdated browser extensions
- The server was blocked by Windows Defender Firewall
- Proxy settings, proxy server issues.
- Expired web browser cache
- Obsolete DNS cache
- Conflicting network settings
How to Fix the ERR_CONNECTION_REFUSED Error
In most cases, this error code is shown due to misconfiguration and technical problems on the client-side. We've compiled a list of proven methods to fix the ERR_CONNECTION_REFUSED error.
Note: Before applying the fixes provided below, check the status of the website to which you can't connect, check if your Internet connection is working, and try restarting your router.
Video Guide on How to Fix ERR_CONNECTION_REFUSED
Table of Contents:
- Introduction
- Solution 1. Clear the Google Chrome Cache
- Solution 2. Disable Google Chrome Extensions
- Solution 3. Perform a DNS Flush
- Solution 4. Change Your DNS Server Address
- Solution 5. Renew DHCP (Dynamic Host Configuration Protocol) Lease
- Solution 6. Temporarily Disable Windows Defender Firewall
- Video Guide on How to Fix ERR CONNECTION REFUSED
Download Computer Malware Repair Tool
It is recommended to run a free scan with Combo Cleaner - a tool to detect viruses and malware on your device. You will need to purchase the full version to remove infections. Free trial available. Combo Cleaner is owned and operated by Rcs Lt, the parent company of PCRisk.com read more.
Method 1. Clear the Google Chrome Cache
1. Open Google Chrome.
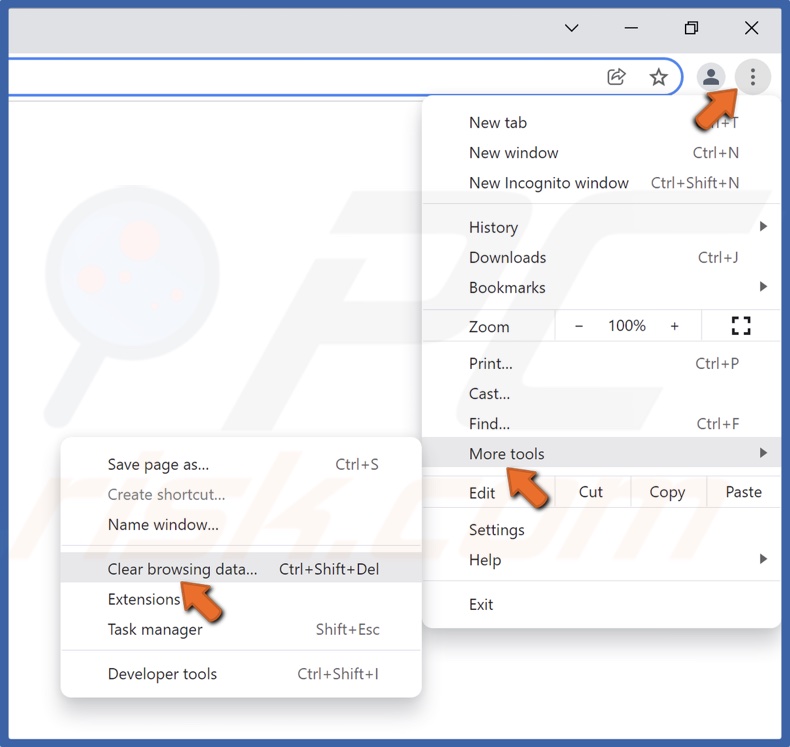
2. At the top-right corner, click More, select More tools, and click Clear browsing data.
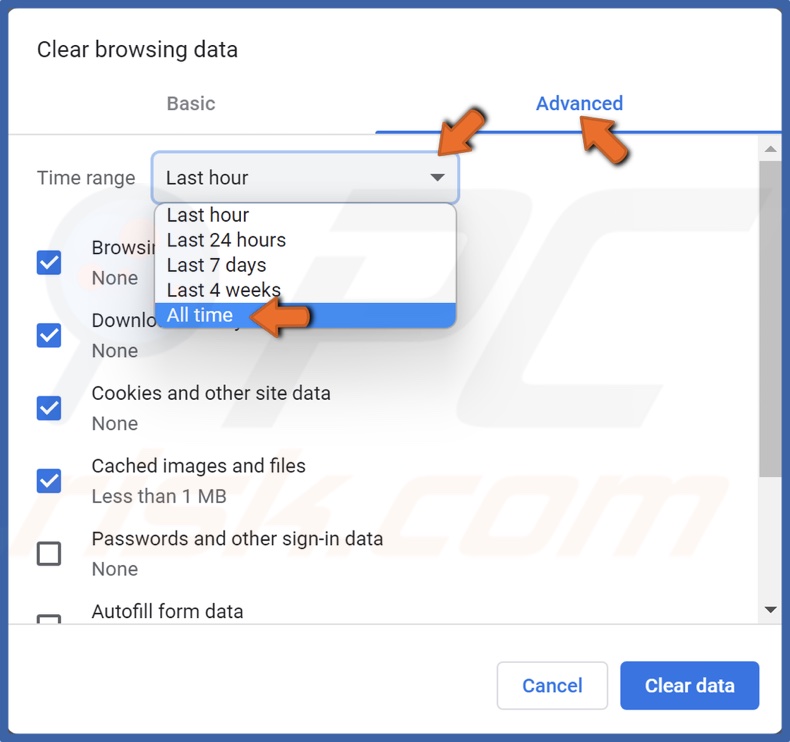
3. Select Advanced.
4. Then, open the Time range drop-down menu and select All time.
5. Then, tick the checkboxes next to Cookies and other site data, and Cached images and files. You might want to keep your Passwords and sign-in data, so we don't recommend selecting it.
6. Click Clear data.
Method 2. Disable Google Chrome Extensions
1. Open Google Chrome.
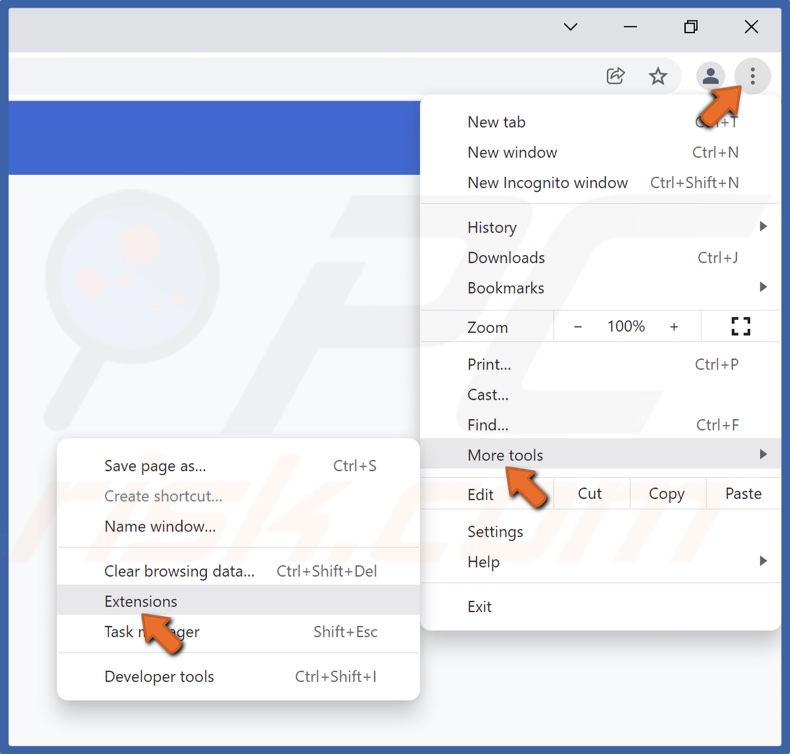
2. At the top-right corner, click More, select More tools, and click Extensions.
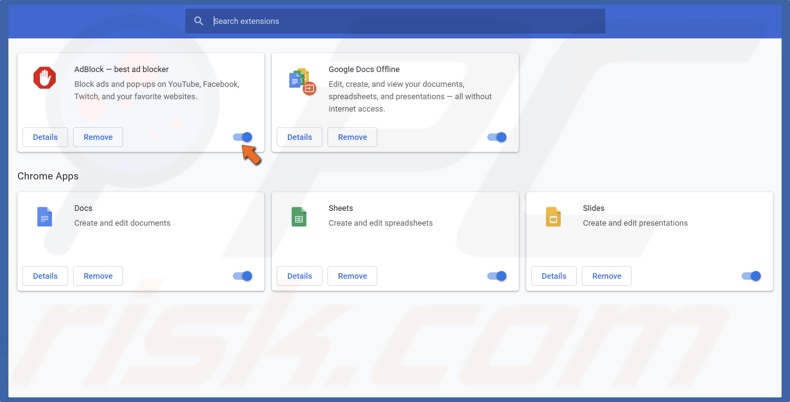
3. Then, disable an extension by toggling the slider next to it.
Method 3. Perform a DNS Flush
1. Hold down Windows+R keys to open Run.
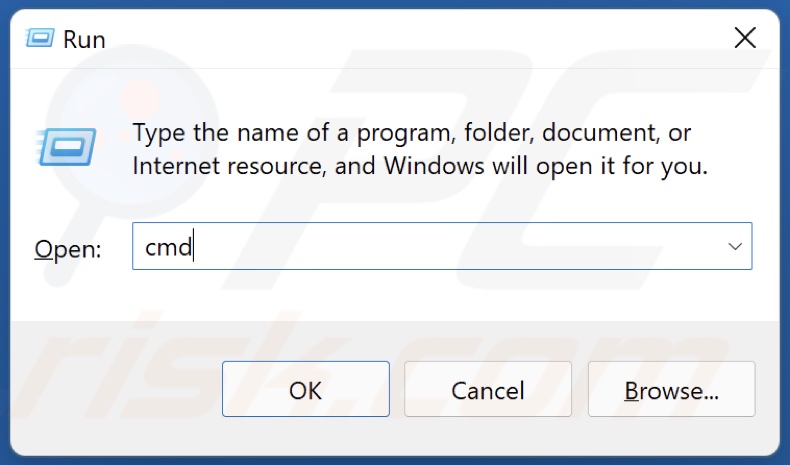
2. In the Run dialog box, type in CMD and hold down Ctrl+Shift+Enter keys to open the elevated Command Prompt.
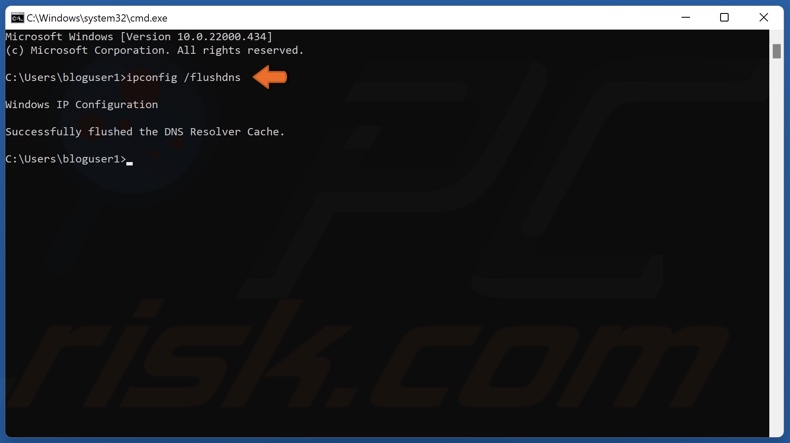
3. In the Command Prompt window, type in ipconfig /flushdns and press the Enter key. Running this command will clear the DNS cache files and reset the DNS resolver cache.
4. Close the Command Prompt.
Method 4. Change Your DNS Server Address
1. Hold down Windows+R keys to open Run.

2. In the Run dialog box, type in ncpa.cpl and click OK.
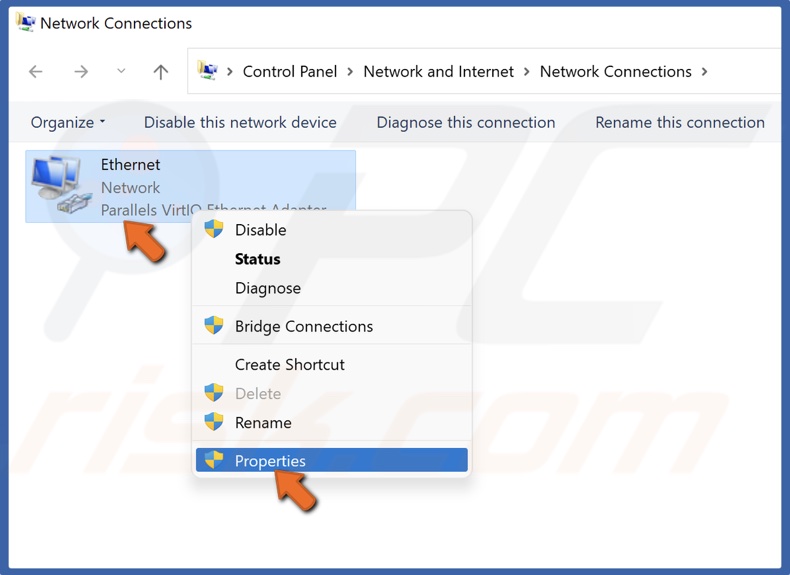
3. Right-click your network adapter and click Properties.
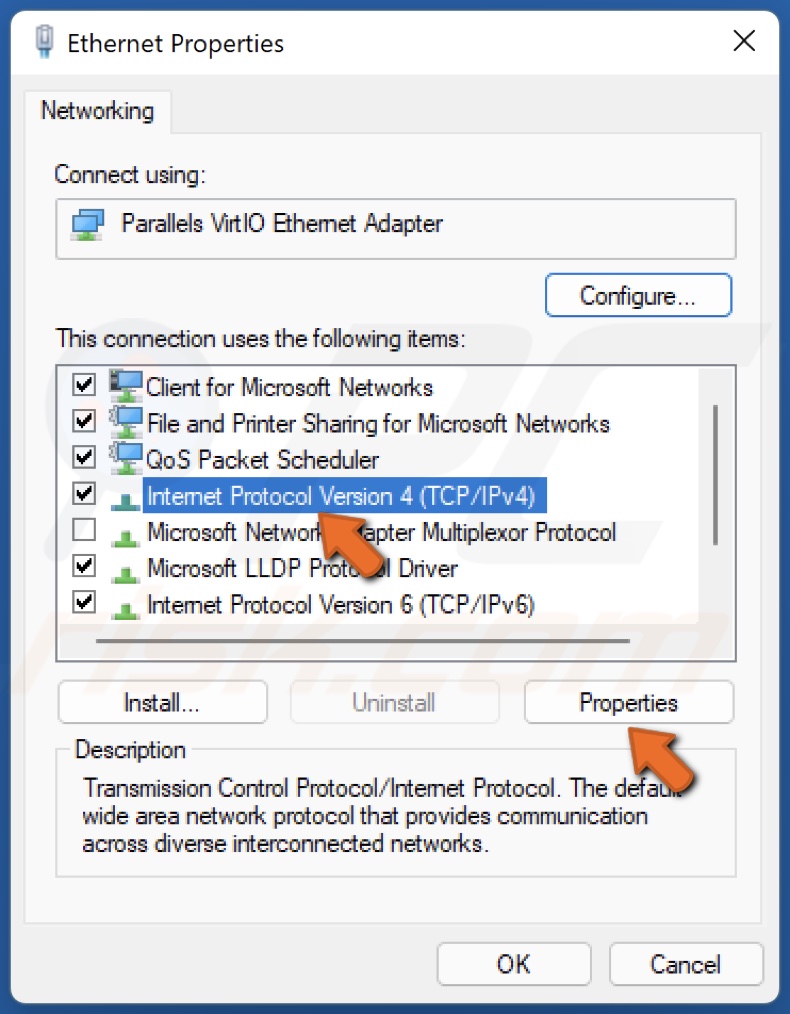
4. Select Internet Protocol Version 4 (TCP/IPv4) and click Properties.
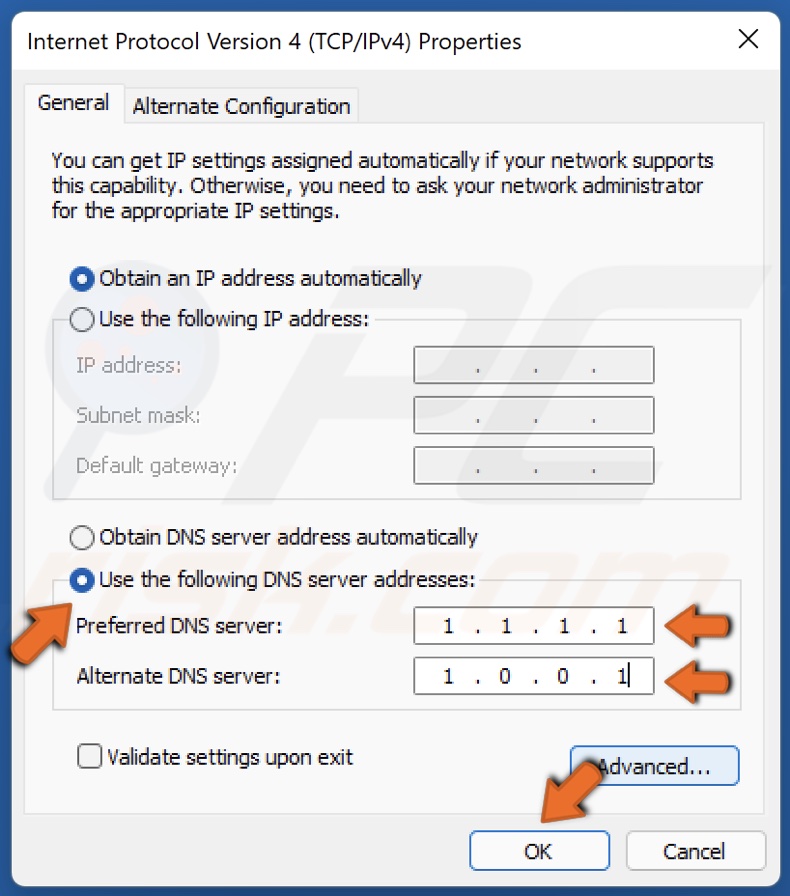
5. Tick the Use the following DNS server addresses option.
6. Enter the following addresses (or your preferred DNS addresses):
- In the Preferred DNS server, type in 1.1.1.1
- In the Alternate DNS server, type in 1.0.0.1
7. Click OK to save settings.
8. Restart your PC for the changes to take effect.
Method 5. Renew DHCP (Dynamic Host Configuration Protocol) Lease
1. Hold down Windows+R keys to open Run.
2. In the Run dialog box, type in CMD and hold down Ctrl+Shift+Enter keys to open the elevated Command Prompt.
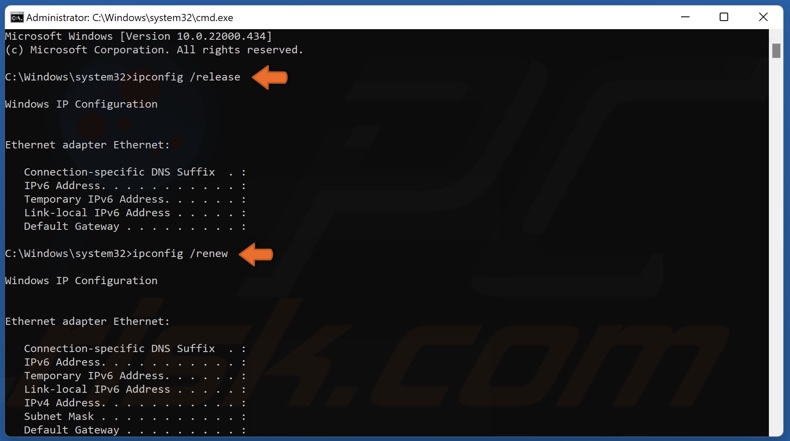
3. In the Command Prompt window, type in ipconfig /release and press Enter.
4. Then, type in ipconfig /renew and press Enter.
Method 6. Temporarily Disable Windows Defender Firewall
1. Hold down Windows+R keys to open Run.
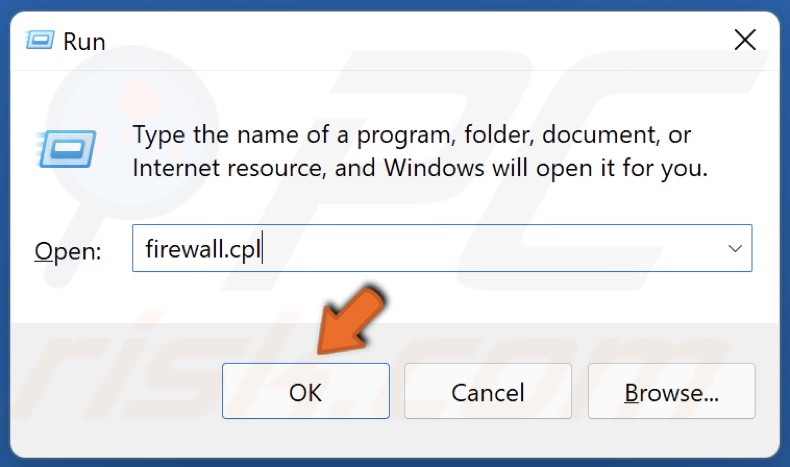
2. In the Run dialog box, type in firewall.cpl and click OK to open Windows Defender Firewall settings.
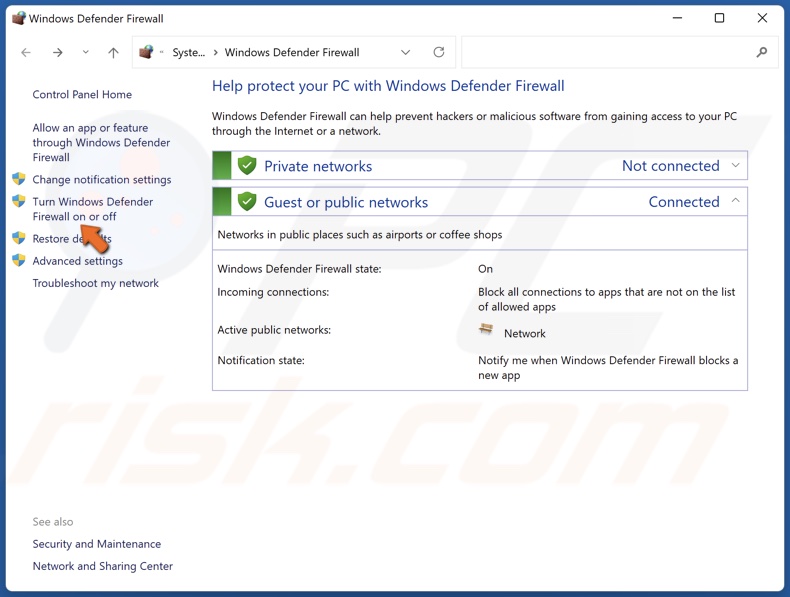
3. Click Turn Windows Defender Firewall on or off.
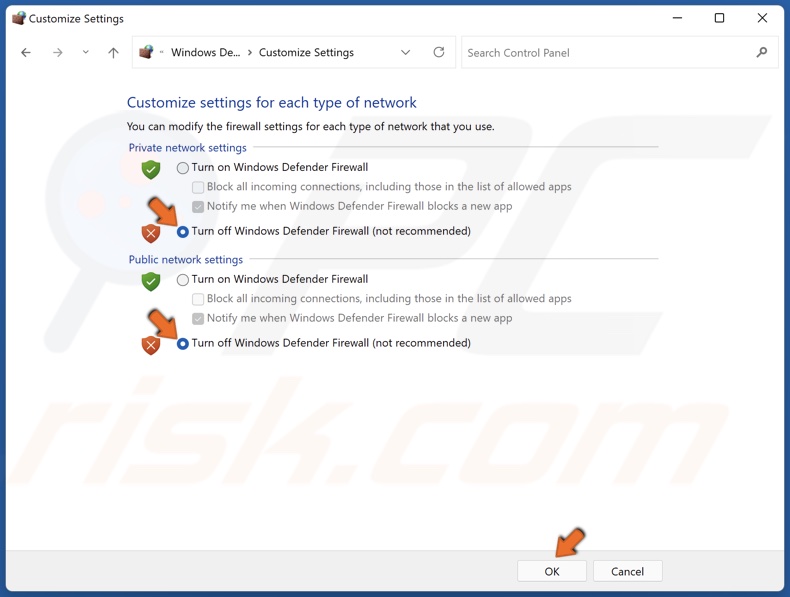
4. Tick the Turn off Windows Defender Firewall checkboxes for both private and public networks.
5. Click OK.
Share:

Rimvydas Iliavicius
Researcher, author
Rimvydas is a researcher with over four years of experience in the cybersecurity industry. He attended Kaunas University of Technology and graduated with a Master's degree in Translation and Localization of Technical texts. His interests in computers and technology led him to become a versatile author in the IT industry. At PCrisk, he's responsible for writing in-depth how-to articles for Microsoft Windows.
▼ Show Discussion