IRQL_NOT_LESS_OR_EQUAL: 7 Ways to Fix It

Get Free Scanner and check your computer for errors
Fix It NowTo fix found issues, you have to purchase the full version of Combo Cleaner. Free trial available. Combo Cleaner is owned and operated by Rcs Lt, the parent company of PCRisk.com read more.
How to Fix the IRQL_NOT_LESS_OR_EQUAL Error in Windows 10
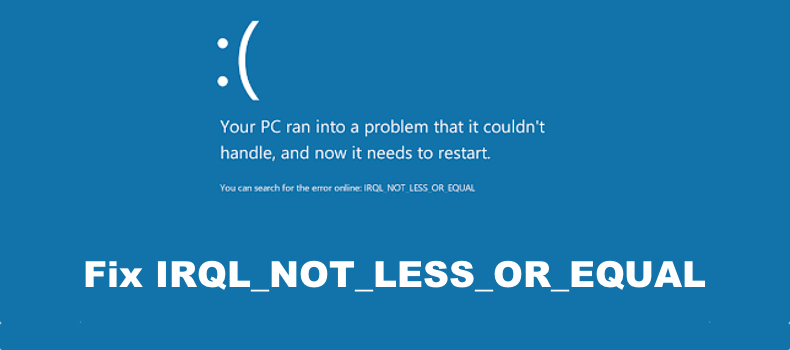
IRQL_NOT_LESS_OR_EQUAL is a Blue Screen of Death (BSoD) error that occurs when your PC experiences a critical error from which it cannot recover. This article provides methods to fix the underlying issues causing this error.
IRQL_NOT_LESS_OR_EQUAL refers to an Interruption ReQuest Line (IRQL) that is used to signal events that require attention or response.
What Is IRQL_NOT_LESS_OR_EQUAL
IRQL_NOT_LESS_OR_EQUAL indicates that Windows 10 or a kernel-mode driver accessed paged memory at an invalid address while at a raised interrupt request level (IRQL). In other words, this error occurs when a system process or device driver does not have the required rights to access memory.
This error is triggered by kernel-mode device drivers that use improper addresses. The driver may have a bad memory pointer or a pagebility problem.
What Causes This Error
- Corrupt system files. To fix corrupted system files, run SFC and DISM scans.
- Incompatible device drivers. If the IRQL_NOT_LESS_OR_EQUAL started occurring after updating a driver, try rolling it back or uninstalling it.
- Graphics card drivers. Buggy graphics card drivers, particularly Nvidia GeForce graphics drivers are known to cause this error. Updating the drivers should fix the error.
- Faulty hardware. You can check if a device is malfunctioning, you can see error reports in Reliability Monitor. Disconnect the faulty device and see if that fixes the error. This error often occurs due to bad or overclocked (Random-access memory) RAM.
- Damaged/incomplete software or update installation. Use Reliability Monitor to check for installation failure messages. Uninstall or reinstall the software.
In addition, RQL_NOT_LESS_OR_EQUAL can occur due to an overheating or overclocked CPU. Therefore, check for cooling issues and downclock the CPU and see if that fixes this error.
Video Guide on How to Fix the IRQL_NOT_LESS_OR_EQUAL Error
Table of Contents:
- Introduction
- Solution 1. Run the Reliability Monitor
- Solution 2. Run the Windows Memory Diagnostic
- Solution 3. Run the Hardware and Devices Troubleshooter
- Solution 4. Roll Back, Update or Uninstall Device Drivers
- Solution 5. Run CHKDSK Scan
- Solution 6. Run the Deployment Image & Servicing Management (DISM) Scan
- Solution 7. Run the System File Checker (SFC) Scan
- Video Guide on How to Fix the IRQL_NOT_LESS_OR_EQUAL Error
Download Computer Malware Repair Tool
It is recommended to run a free scan with Combo Cleaner - a tool to detect viruses and malware on your device. You will need to purchase the full version to remove infections. Free trial available. Combo Cleaner is owned and operated by Rcs Lt, the parent company of PCRisk.com read more.
Solution 1. Run the Reliability Monitor
1. Hold down Windows+R keys to open Run.
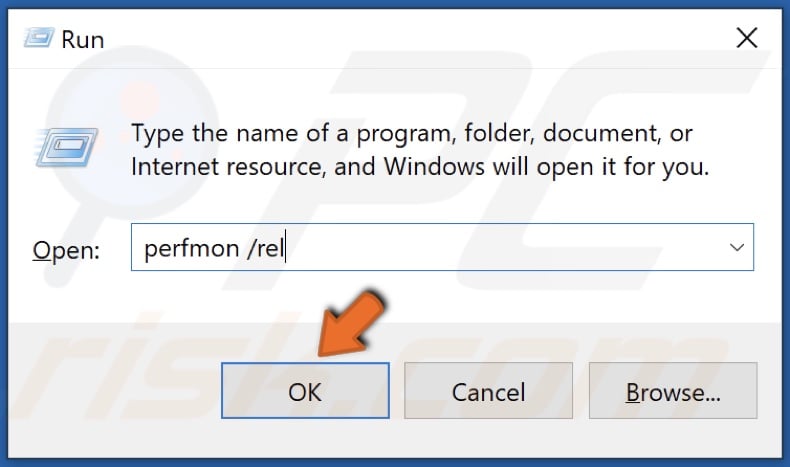
2. In the Run dialog box, type in perfmon /rel and click OK.
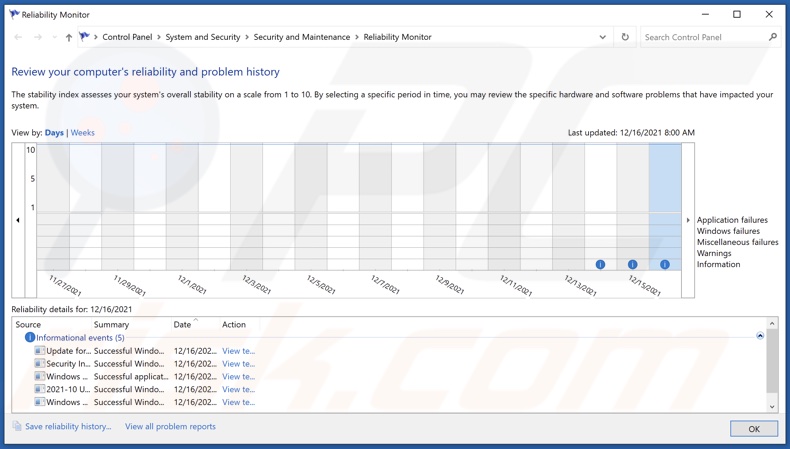
3. Once in the Reliability Monitor, look for software and driver installation and hardware failure messages to determine the cause for IRQL_NOT_LESS_OR_EQUAL.
4. You may fix this error by reinstalling the problematic software or removing or replacing the faulty hardware.
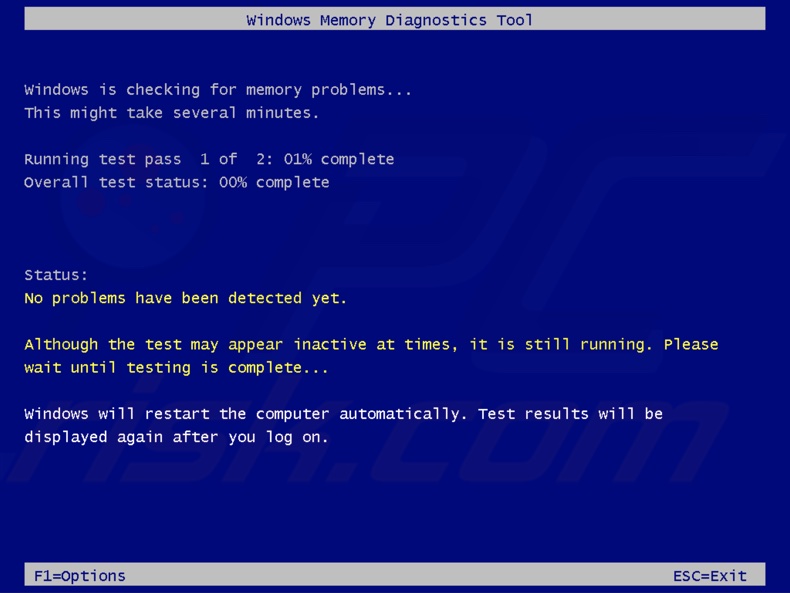
Solution 2. Run the Windows Memory Diagnostic
1. Hold down Windows+R keys to open Run.

2. In the Run dialog box, type in mdsched.exe and click OK.
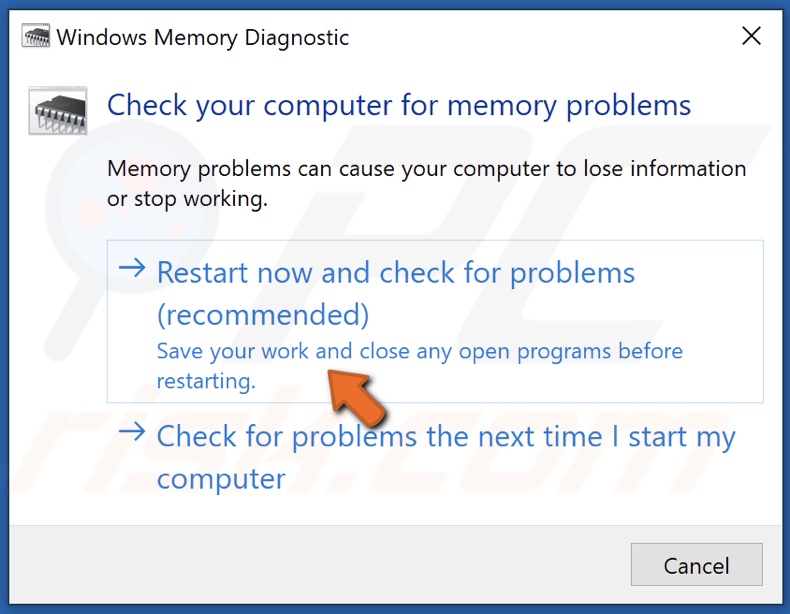
3. Click Restart now and check for problems (recommended).
4. Press the F1 key to open advanced options.
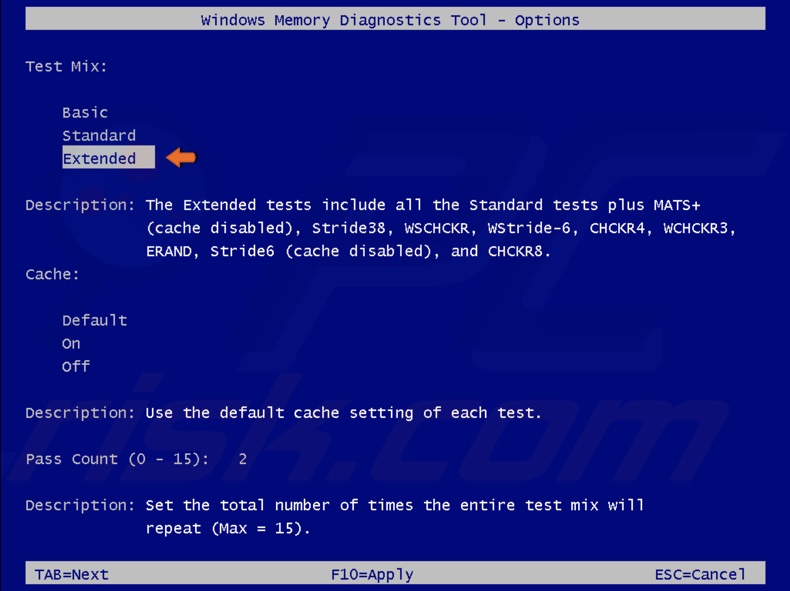
5. Select Extended using the arrow keys on your keyboard, and press F10.
6. The Windows Memory Diagnostics Tool will scan your (Random-access memory) RAM. The scan can't fix your faulty RAM stick but will let you know if your RAM has problems.
7. If a RAM stick(s) is bad, remove it or replace it with a known good one.
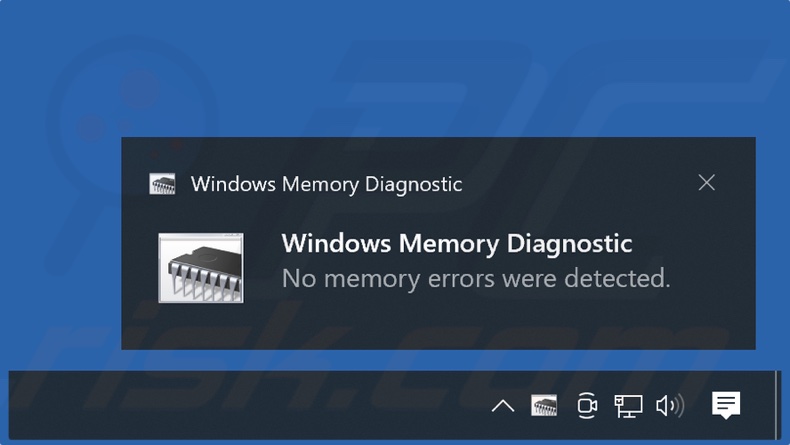
8. The scan results will be shown once your PC boots up.
Solution 3. Run the Hardware and Devices Troubleshooter
1. Hold down Windows+R keys to open Run.
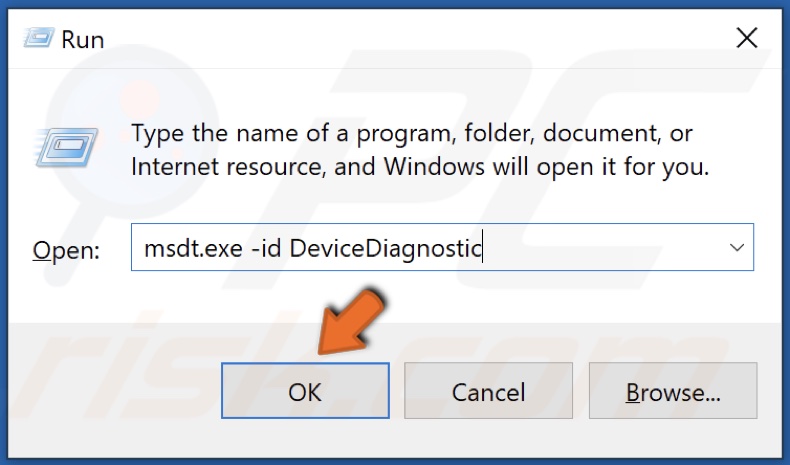
2. In the Run dialog box, type in msdt.exe -id DeviceDiagnostic and click OK.
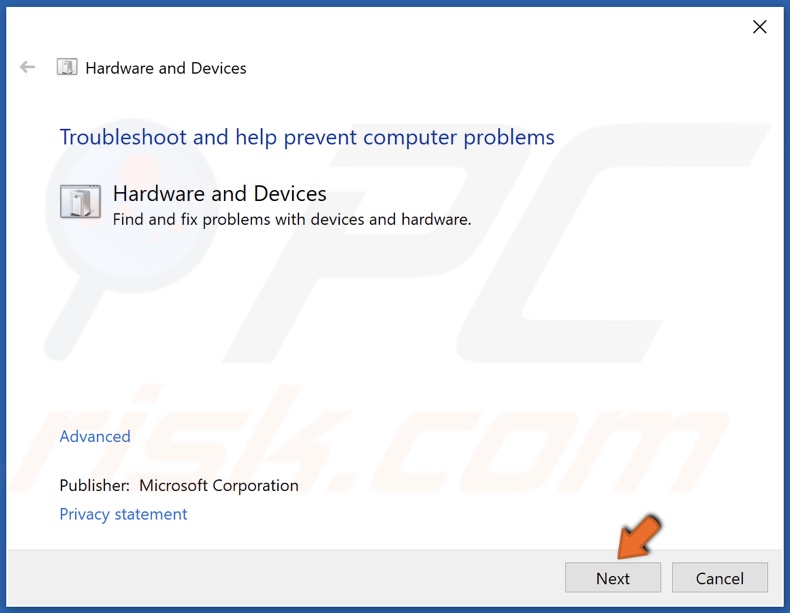
3. Then, click Next in the Hardware and Device troubleshooter window.
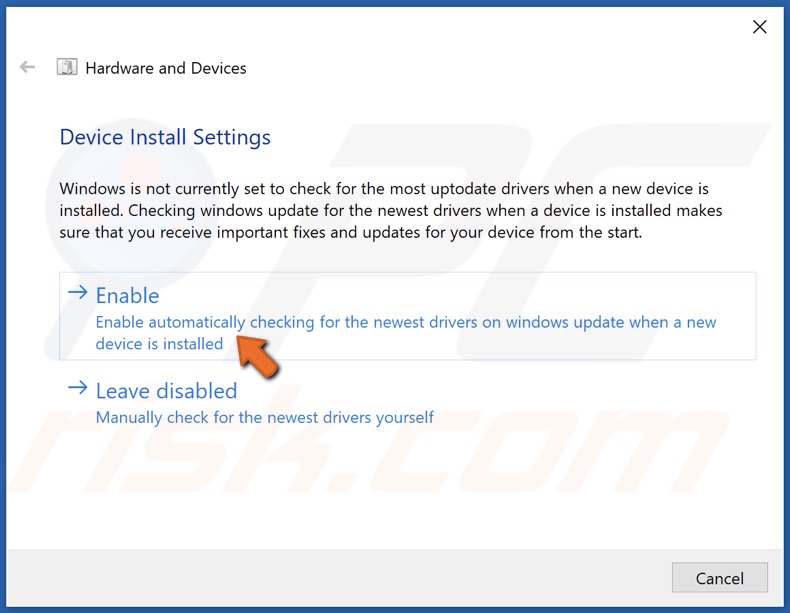
4. Apply the suggested fixes.
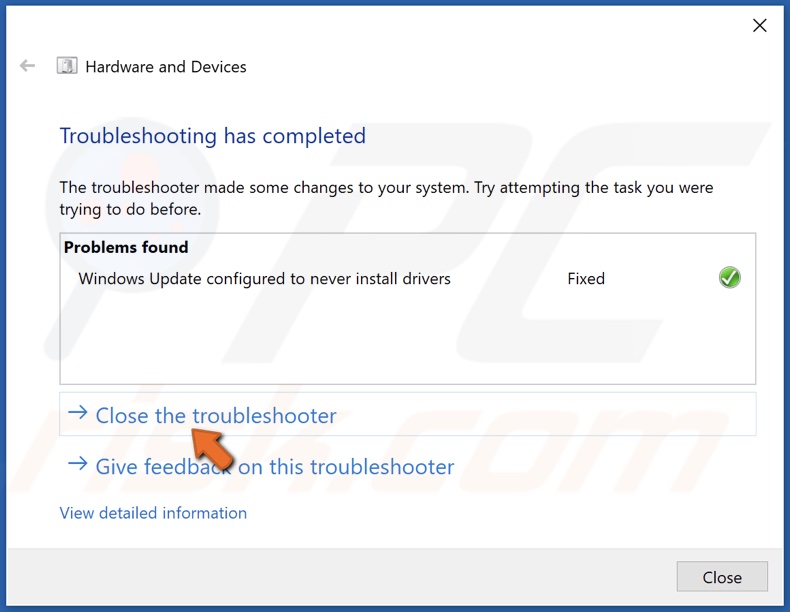
5. Click Close the troubleshooter.
Solution 4. Roll Back, Update or Uninstall Device Drivers
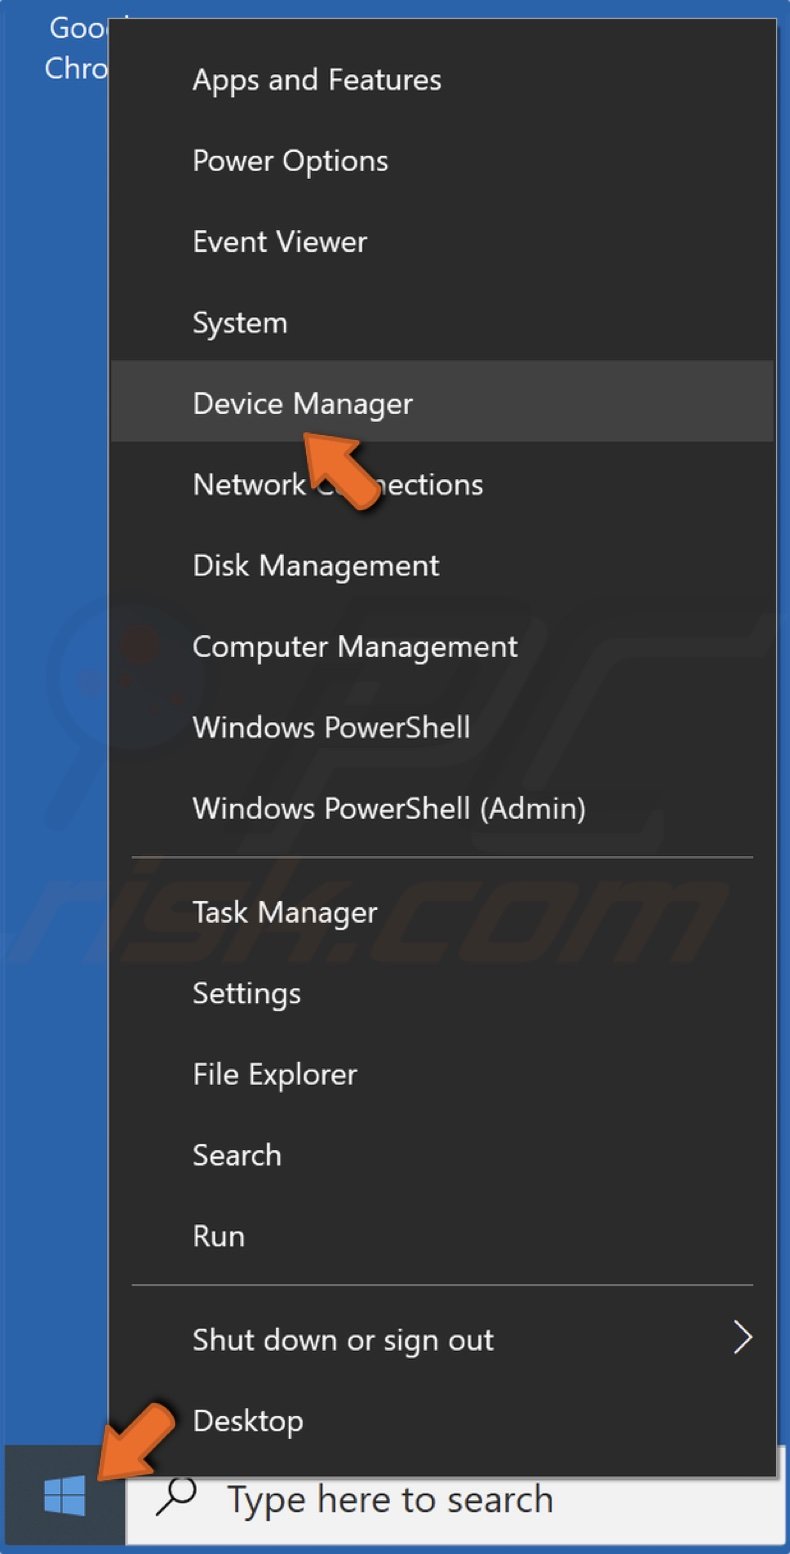
1. Right-click the Start button and select Device Manager.
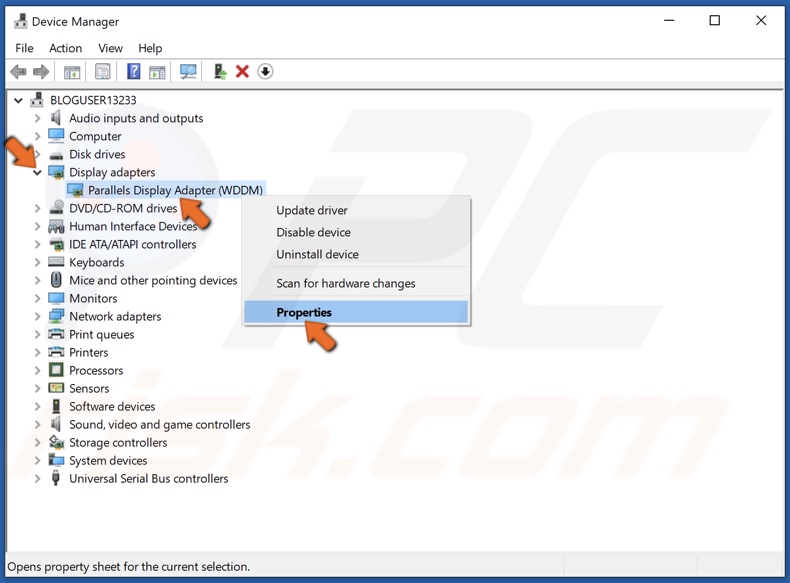
2. For the purposes of this article, we will use the display adapter. Expand the Display adapters list.
3. Select your display adapter (graphics card), right-click it, and click Properties.
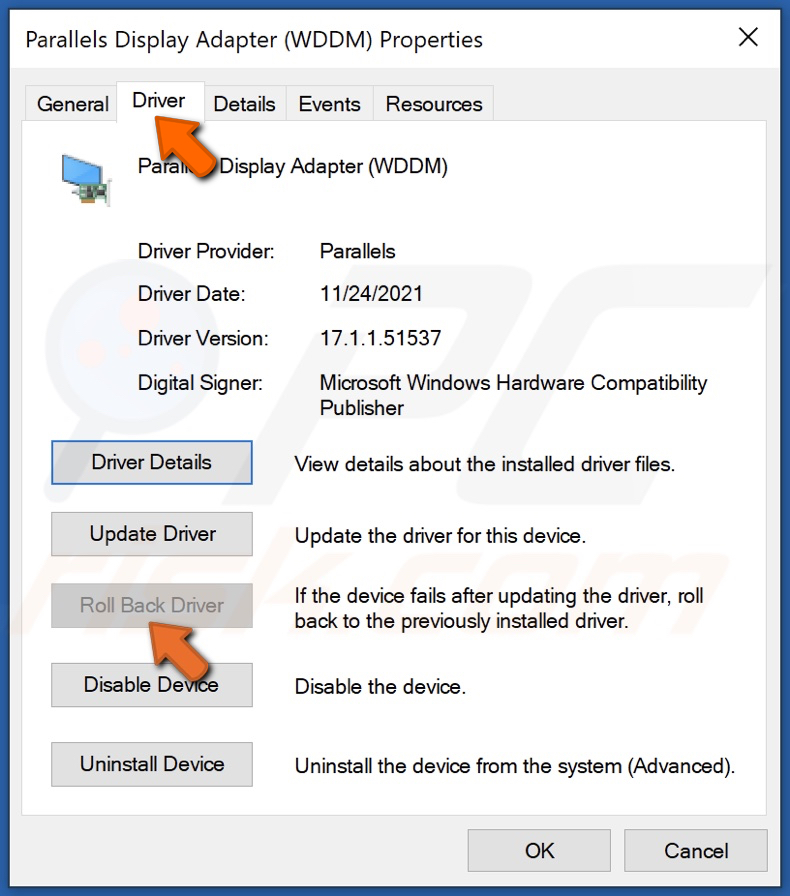
4. Select the Driver tab.
5. To go back to an older driver version, click Roll Back Driver.
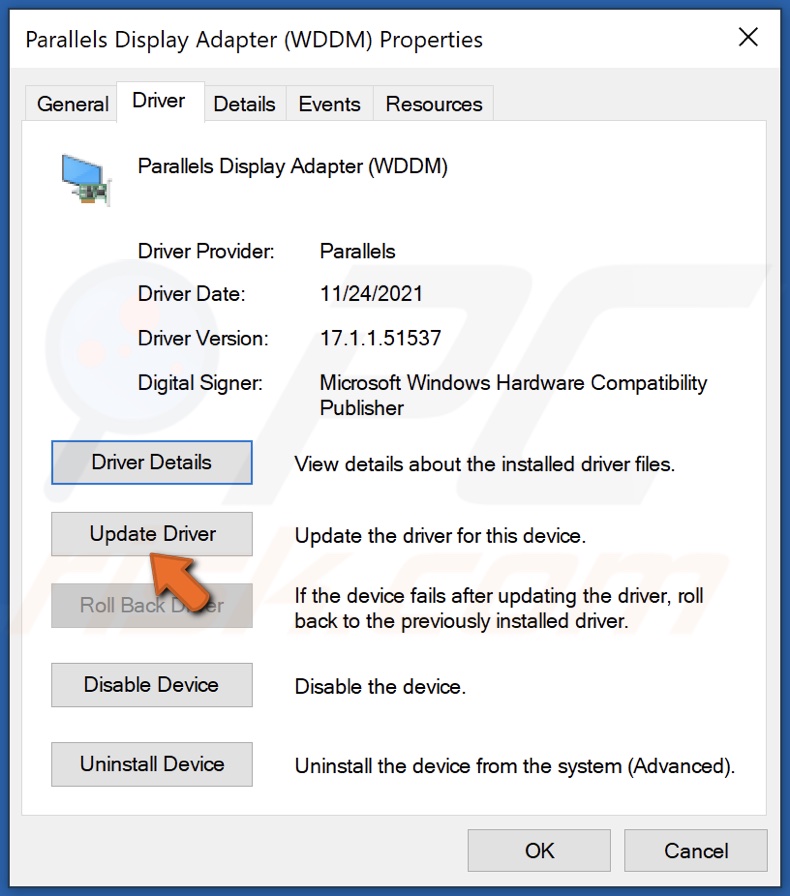
6. If rolling back the driver doesn't fix the issue, click Update Driver.
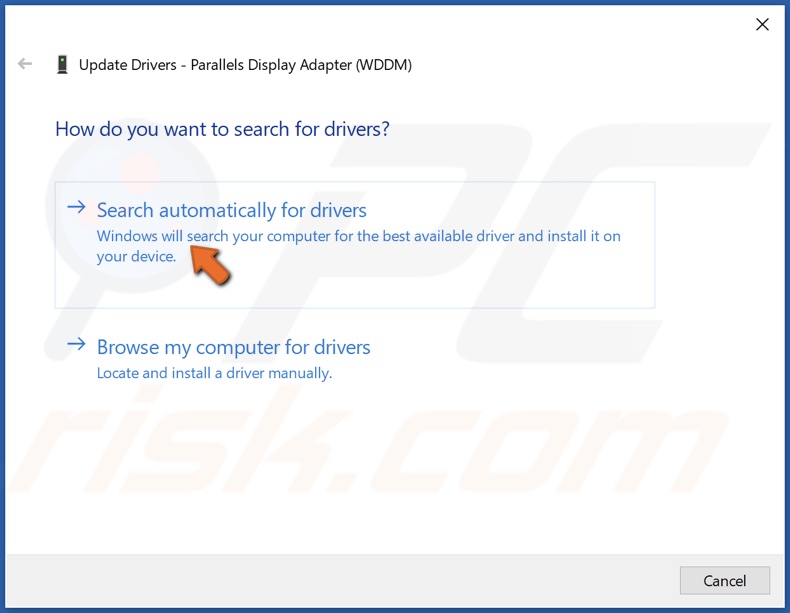
7. Select Search automatically for drivers.
8. Windows will download and install the drivers.
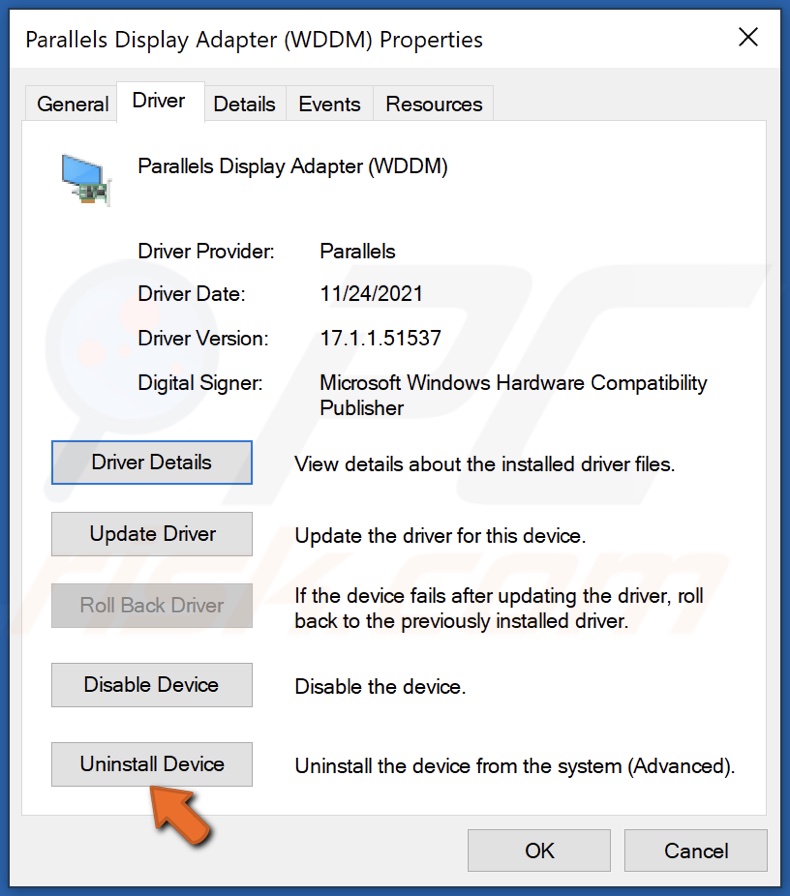
9. If you're still experiencing the error, click Uninstall Device.
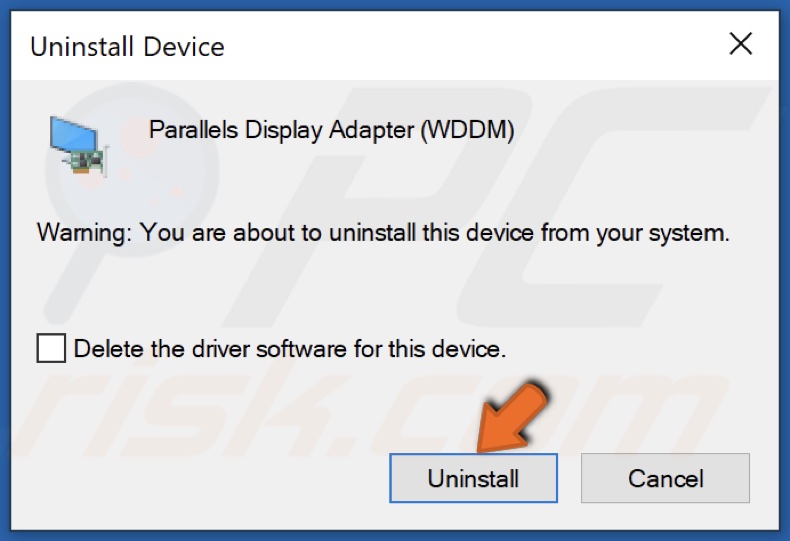
10. Click Uninstall to confirm the action.
11. Restart your PC, and Windows will automatically download the correct device driver once the computer boots up.
Solution 5. Run CHKDSK Scan
1. Hold down Windows+R keys to open Run.
2. In the Run dialog box, type in CMD and hold down Ctrl+Shift+Enter keys to open the elevated Command Prompt.

3. In the Command Prompt Window, type in chkdsk C: /r and hit Enter. Here, C is the system drive. If your system drive uses another letter, such as D, type in D instead of C.
4. Type in Y or Yes if that volume is being used by another process and hit Enter.
5. Then, close the Command Prompt and restart your PC. The scan will begin during the restart.
6. Wait for the scan to complete.
Solution 6. Run the Deployment Image & Servicing Management (DISM) Scan
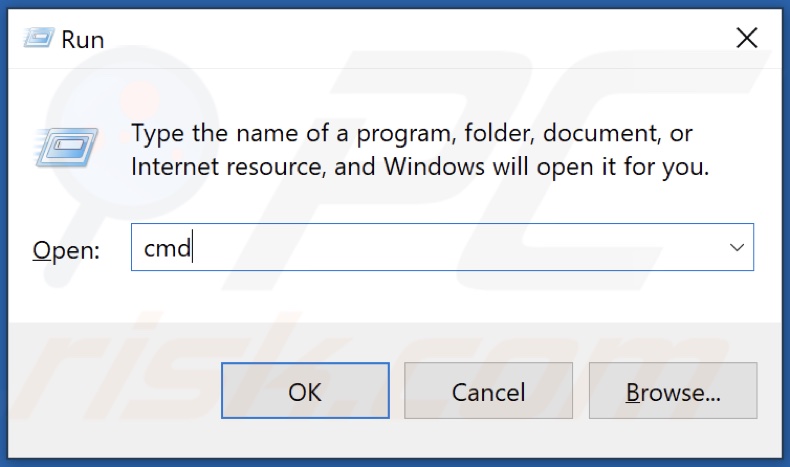
1. Hold down Windows+R keys to open Run.
2. In the Run dialog box, type in CMD and hold down Ctrl+Shift+Enter keys to open the elevated Command Prompt.
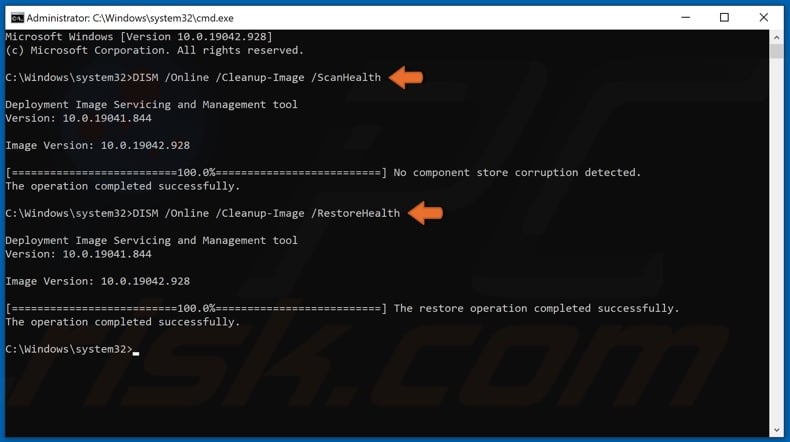
3. In the Command Prompt window, type in DISM /Online /Cleanup-Image /ScanHealth and hit Enter.
4. Then, type in the DISM /Online /Cleanup-Image /RestoreHealth and hit Enter.
5. Once the scan is complete, restart your PC.
Solution 7. Run the System File Checker (SFC) Scan
1. Hold down Windows+R keys to open Run.
2. In the Run dialog box, type in CMD and hold down Ctrl+Shift+Enter keys to open the elevated Command Prompt.
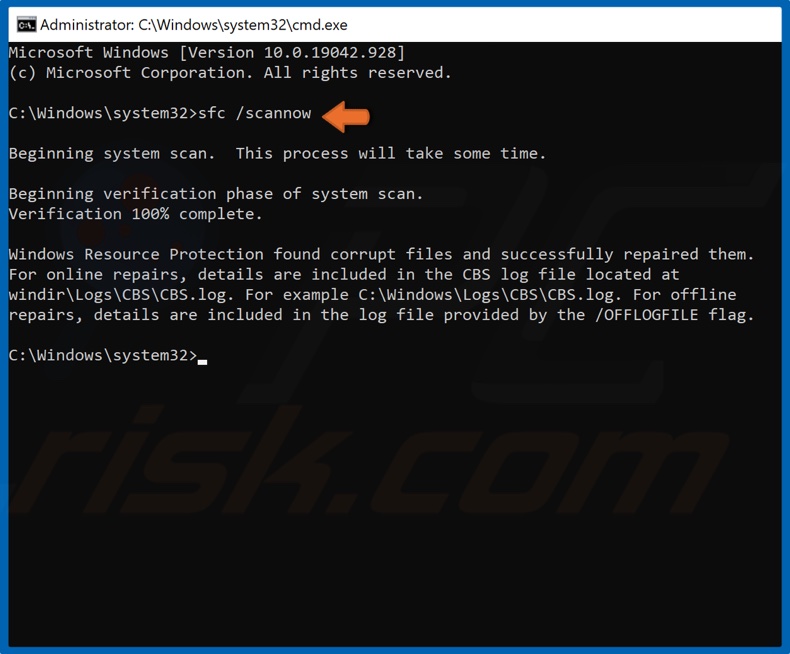
3. In the Command Prompt window, type in SFC /ScanNow and hit Enter.
4. Once the scan is complete, restart your PC.
Share:

Rimvydas Iliavicius
Researcher, author
Rimvydas is a researcher with over four years of experience in the cybersecurity industry. He attended Kaunas University of Technology and graduated with a Master's degree in Translation and Localization of Technical texts. His interests in computers and technology led him to become a versatile author in the IT industry. At PCrisk, he's responsible for writing in-depth how-to articles for Microsoft Windows.
▼ Show Discussion