How to Fix "Remote access to the server is not enabled" on Windows 11

Get Free Scanner and check your computer for errors
Fix It NowTo fix found issues, you have to purchase the full version of Combo Cleaner. Free trial available. Combo Cleaner is owned and operated by Rcs Lt, the parent company of PCRisk.com read more.
How to Fix "Remote access to the server is not enabled" on Windows 11
Remote Desktop (RDP) is a Windows feature that allows users to remotely connect and use other computers. If you're experiencing the "Remote access to the server is not enabled" error when trying to connect to a remote desktop, read this article to fix it.

The full error message states:
Remote Desktop can’t connect to the remote computer for one of these reasons:
1) Remote access to the server is not enabled
2) The remote computer is turned off
3) The remote computer is not available on the network
What Causes the "Remote access to the server is not enabled" Error?
This error may occur for several reasons, but the most common are outlined below.
- Windows Update. The Remote Desktop feature may become corrupted after updating or upgrading Windows since some new files may interfere with Remote Desktop.
- Antivirus software. Antivirus software may prevent Remote Desktop from connecting to the Internet. In such a case, the solution is to temporarily disable your antivirus program.
- Public network profile. Your PC may block Remote Desktop if you have a public network profile or a network group.
Other less common reasons include wrong login credentials and Internet connectivity issues.
If you experience the "Remote access to the server is not enabled" error on Windows 11, follow the guides provided below to fix it. The fixes will work on Windows 10 as well.
Video on How to Fix the "Remote Desktop can't connect to the remote computer" Error
Table of Contents:
- Introduction
- Solution 1. Allow Remote Desktop Through Windows Firewall
- Solution 2. Allow Remote Desktop Connections
- Solution 3. Add the Remote Computer's IP Address to Your hosts File
- Solution 4. Change Network Properties
- Solution 5. Enable Network Discovery
- Video on How to Fix the "Remote Desktop can't connect to the remote computer" Error
Download Computer Malware Repair Tool
It is recommended to run a free scan with Combo Cleaner - a tool to detect viruses and malware on your device. You will need to purchase the full version to remove infections. Free trial available. Combo Cleaner is owned and operated by Rcs Lt, the parent company of PCRisk.com read more.
Solution 1. Allow Remote Desktop Through Windows Firewall
1. Hold down Windows+R keys to open Run.
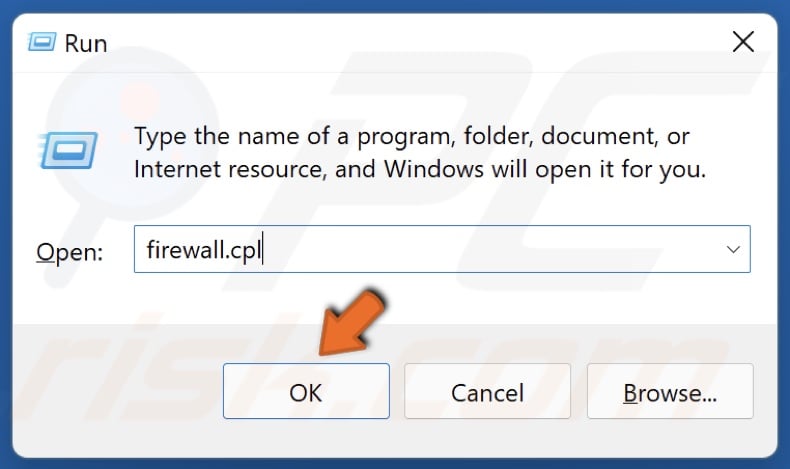
2. In the Run dialog box, type in firewall.cpl and click OK.
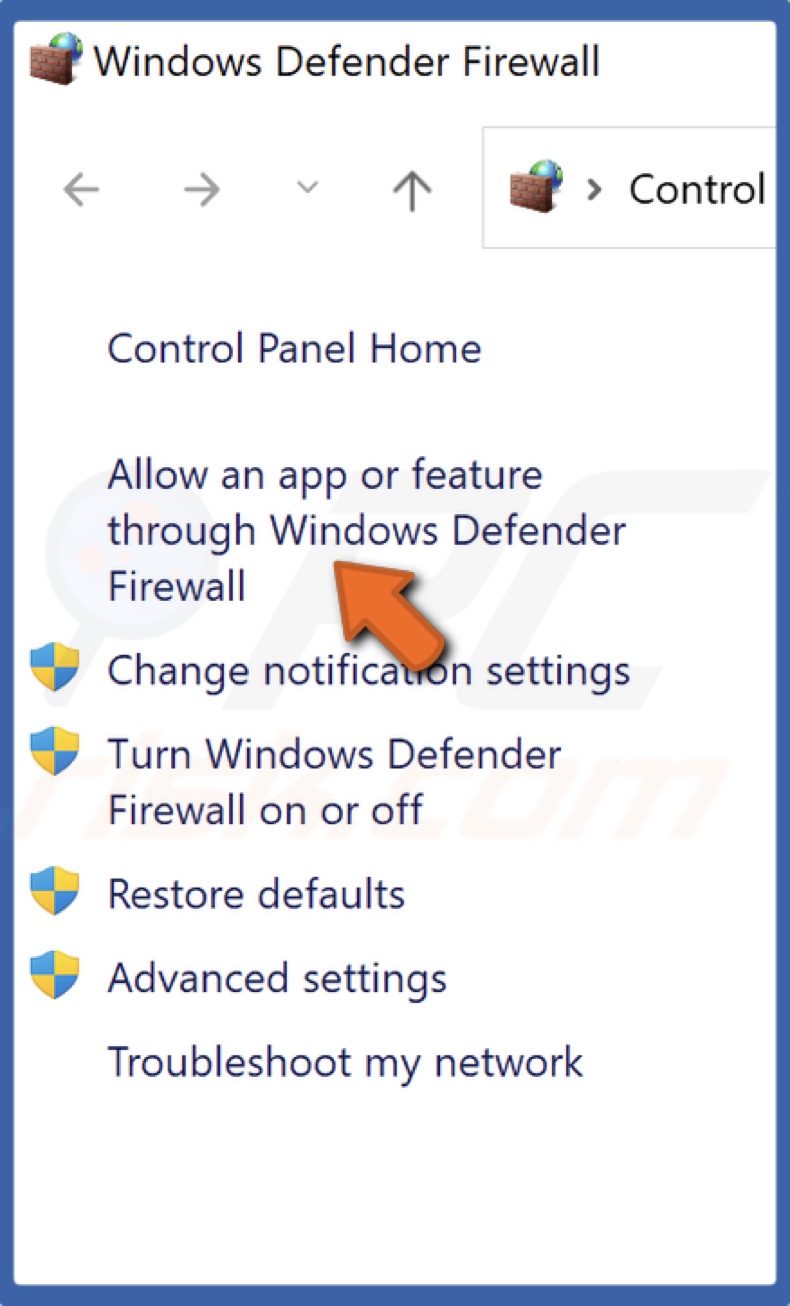
3. In the left pane, select Allow an app or feature through Windows Defender Firewall.
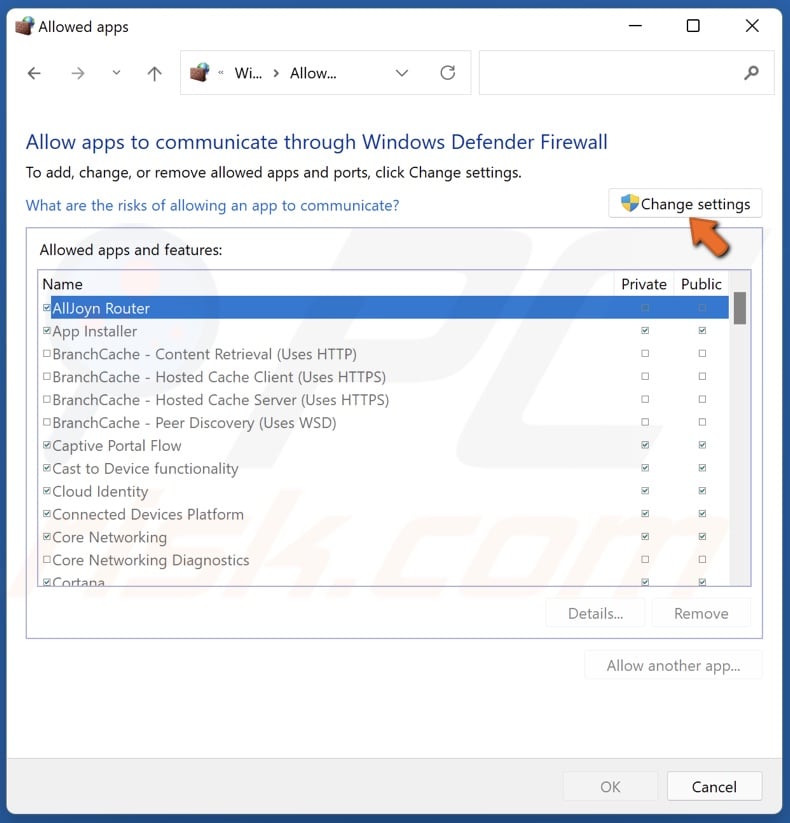
4. Click Change settings.
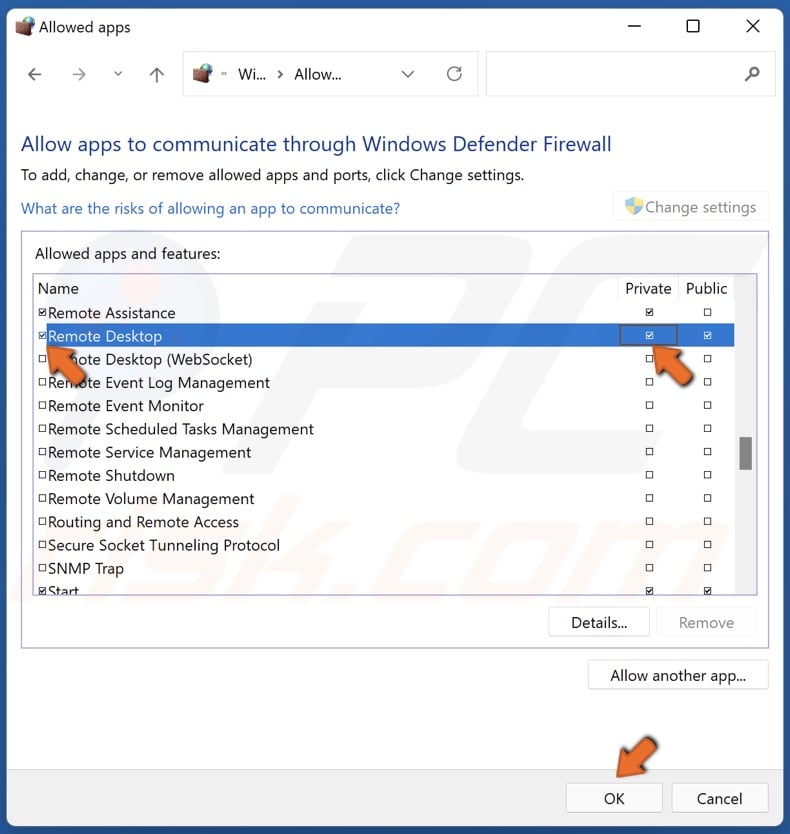
5. Mark the checkbox next to Remote Desktop to allow it through the firewall.
6. Then, Mark the checkbox in the Private column.
7. Click OK to save the changes.
Solution 2. Allow Remote Desktop Connections
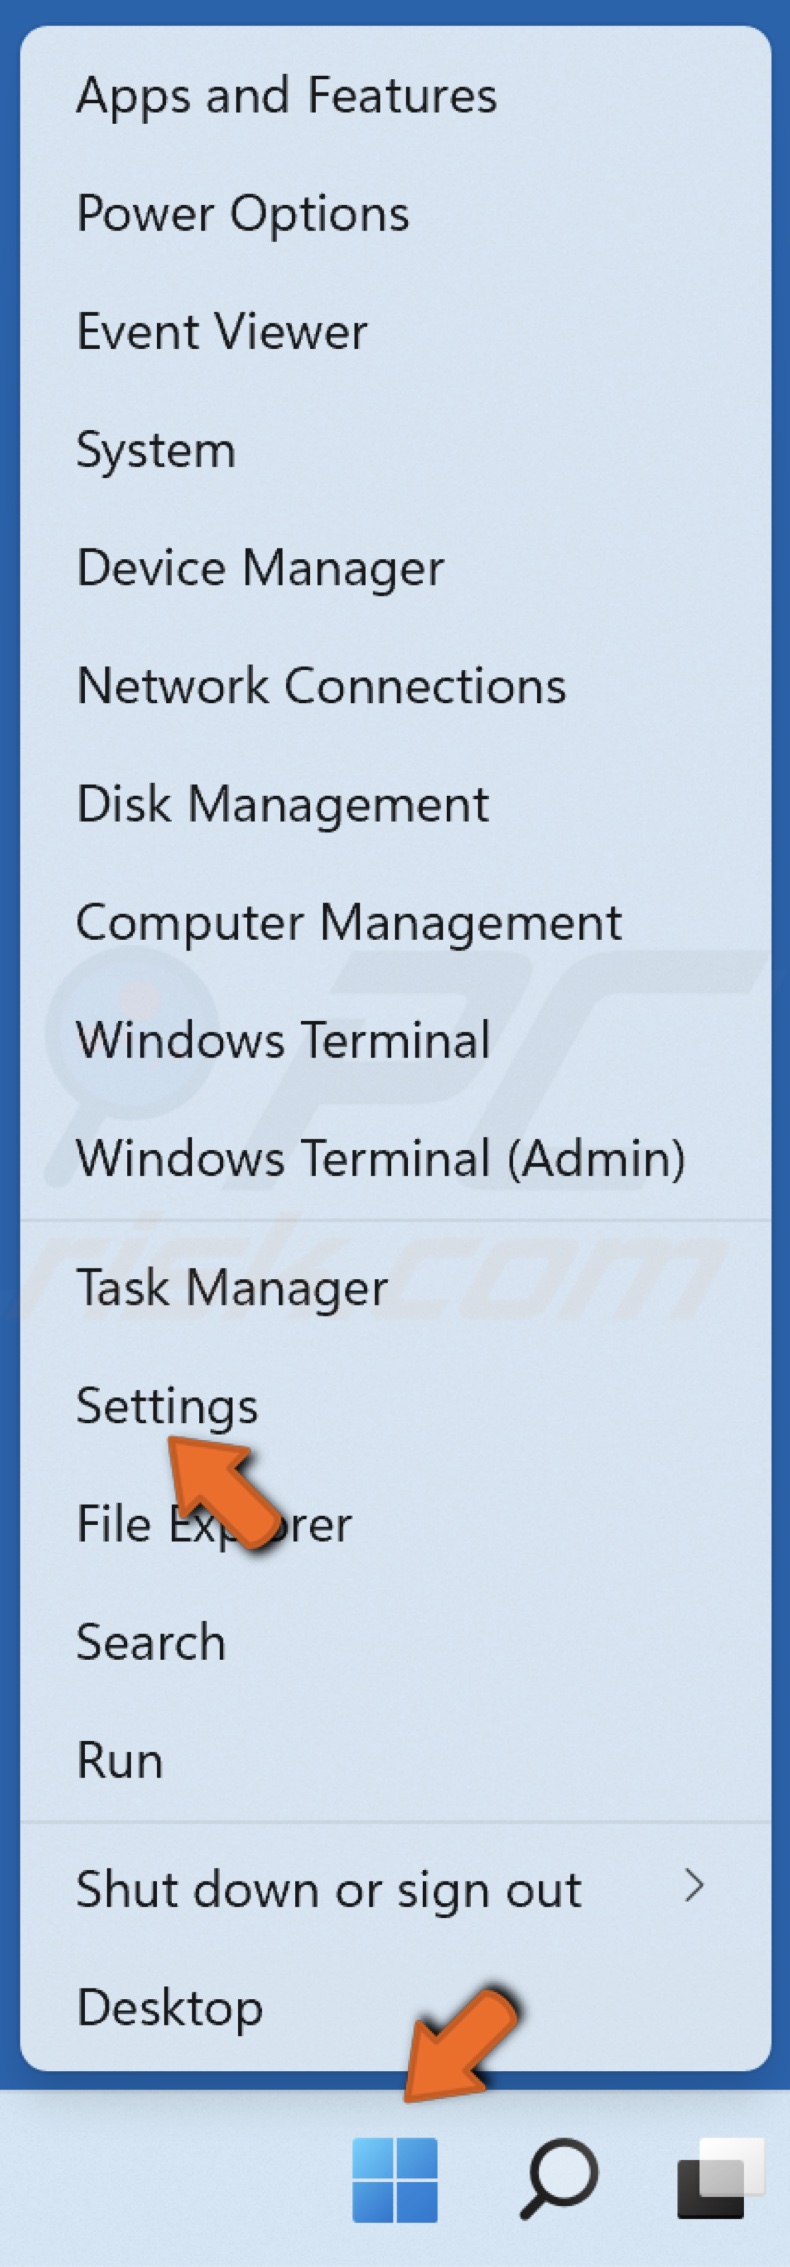
1. Right-click the Start menu and click Settings.
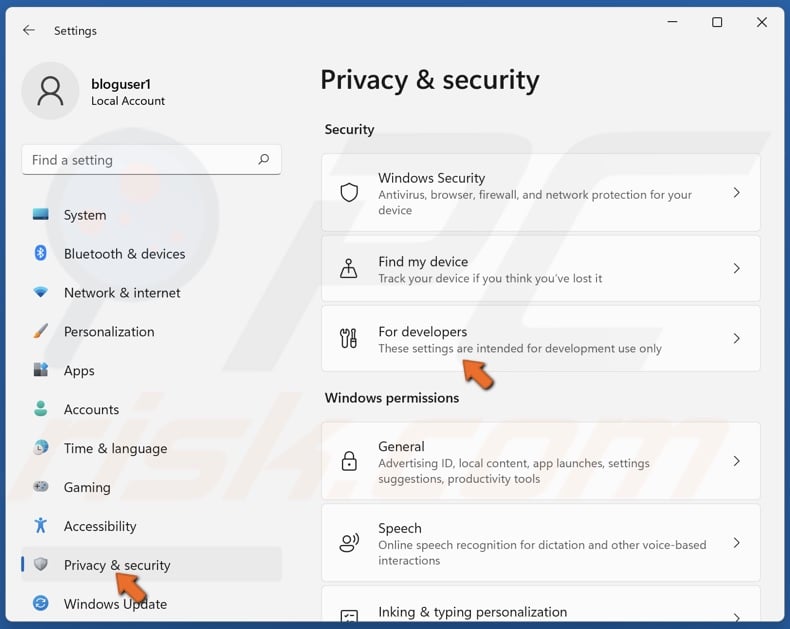
2. In the left pane, select Privacy and security.
3. Select For developers.
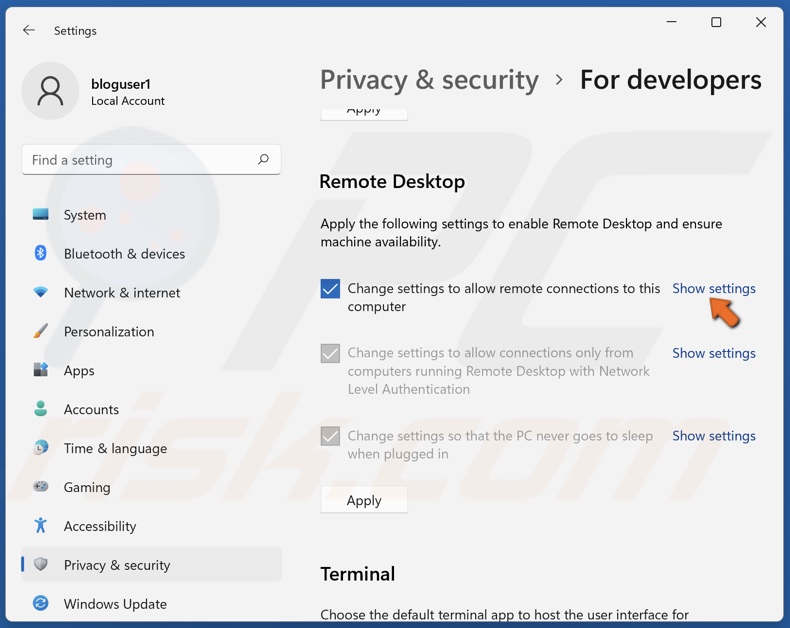
4. Under the Remote Desktop section, next to Change settings to allow remote connections to this computer, click Show settings.
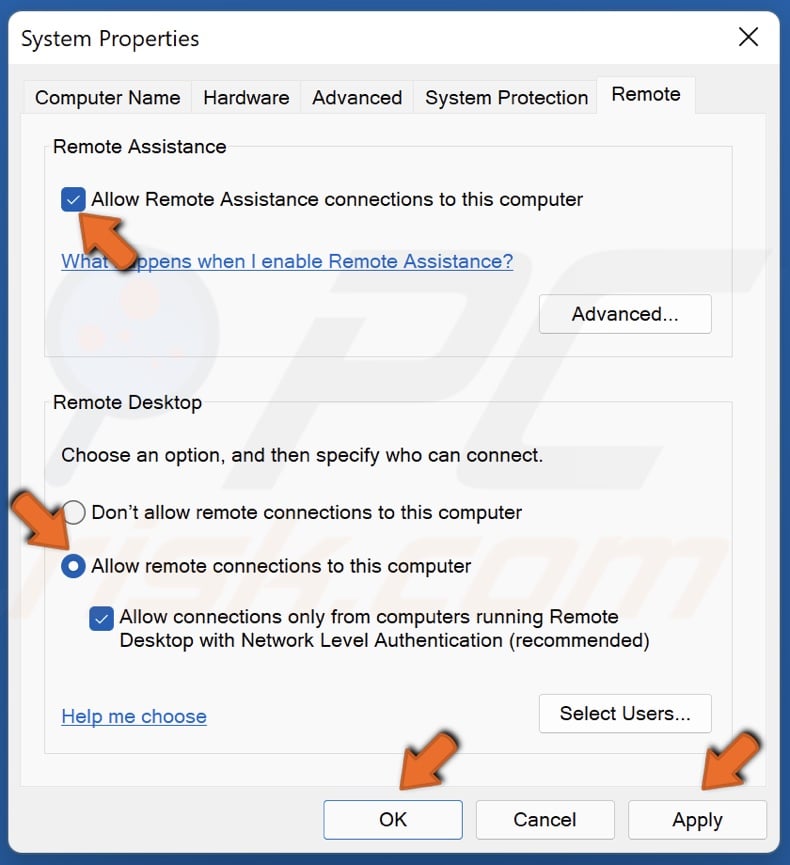
5. Mark the Allow Remote Assistance connections to this computer option, and then mark the Allow remote connections to this computer option.
6. Click Apply and click OK.
Solution 3. Add the Remote Computer's IP Address to Your hosts File
1. Hold down Windows+R keys to open Run.
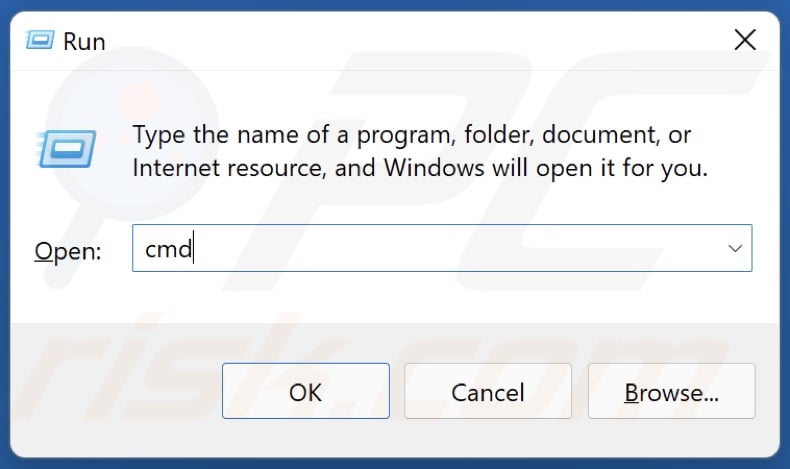
2. In the Run dialog box, type in CMD and hold down Ctrl+Shift+Enter keys to open the elevated Command Prompt.
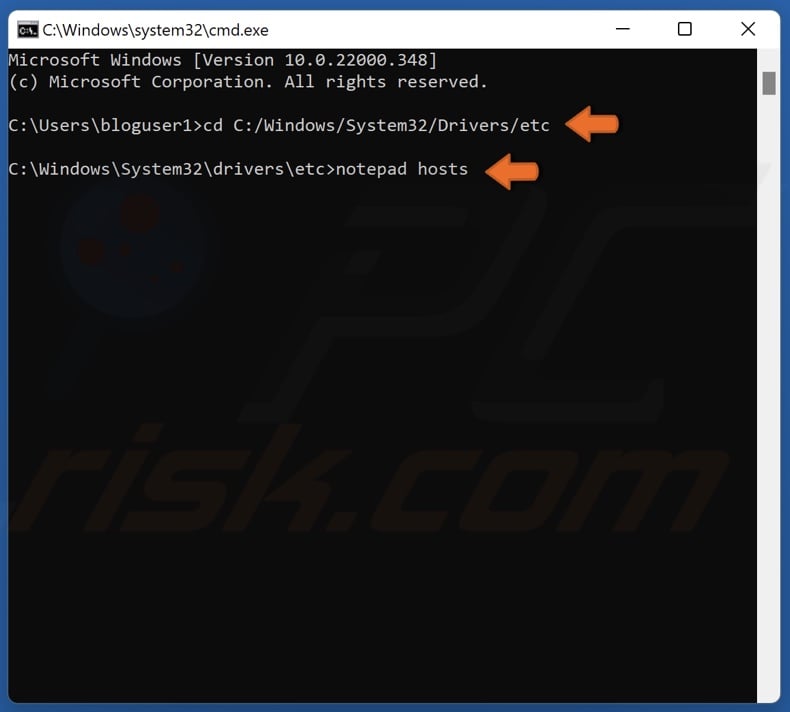
3. In the Command Prompt Window, type in cd C:/Windows/System32/Drivers/etc and hit the Enter key.
4. Then, type in notepad hosts and hit Enter. The hosts file will open in notepad.
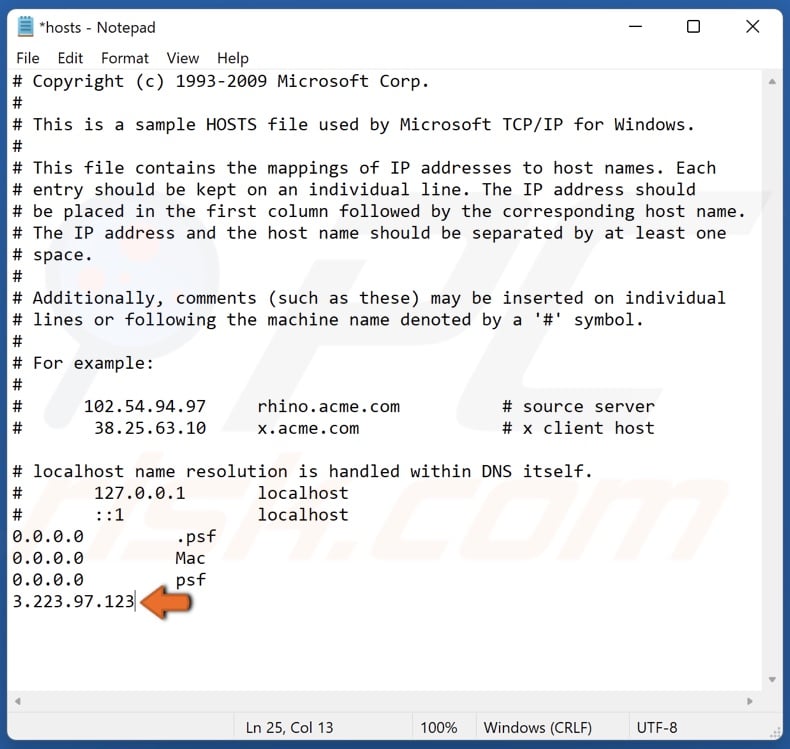
5. Add the IP address of the remote computer to the end of the file.
6. Hold down Ctrl+S to save the changes and close Notepad.
Solution 4. Change Network Properties
1. Right-click Start and click Settings.
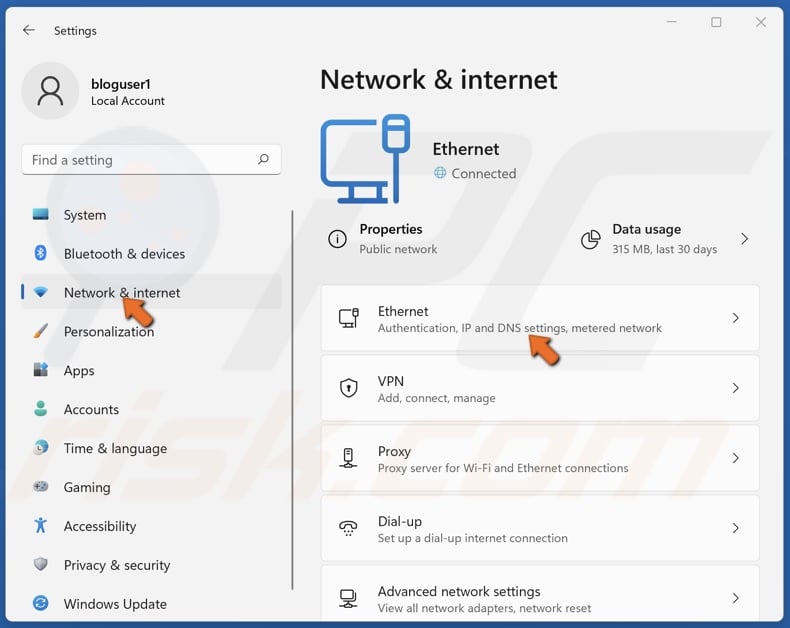
2. In the left pane, select Network & internet.
3. In the right pane, select Ethernet.
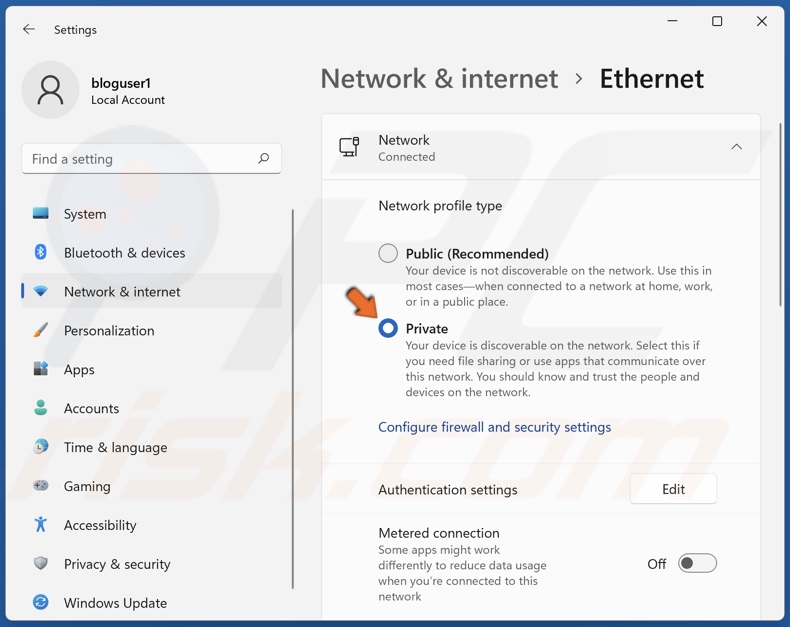
4. Under the Network profile type, select Private and close the Settings window.
Solution 5. Enable Network Discovery
1. Right-click Start and click Settings.
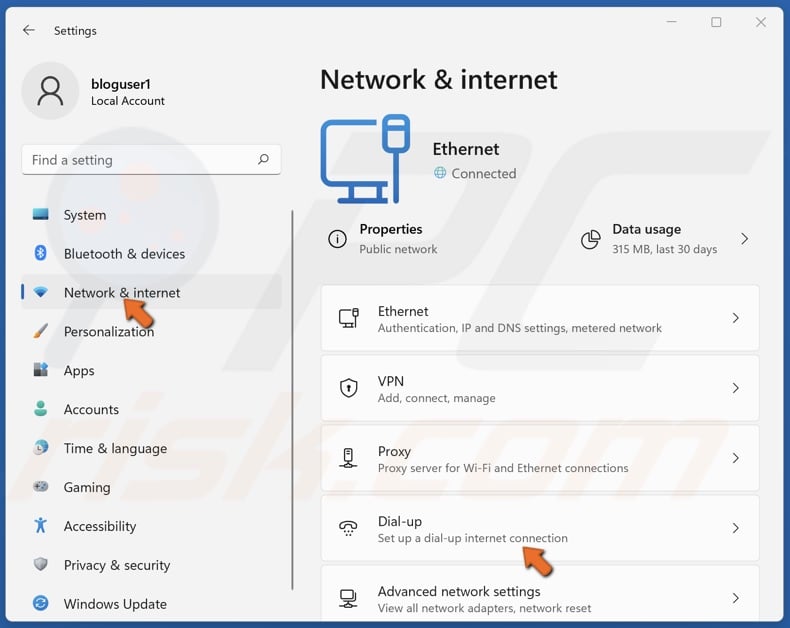
2. In the left pane, select Network & internet.
3. In the right pane, select Dial-up.
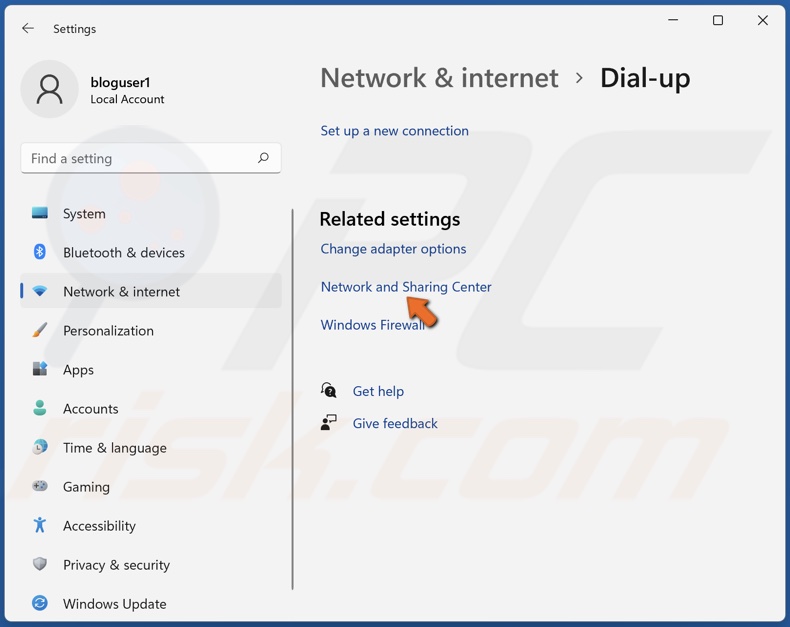
4. Select Network and Sharing Center.
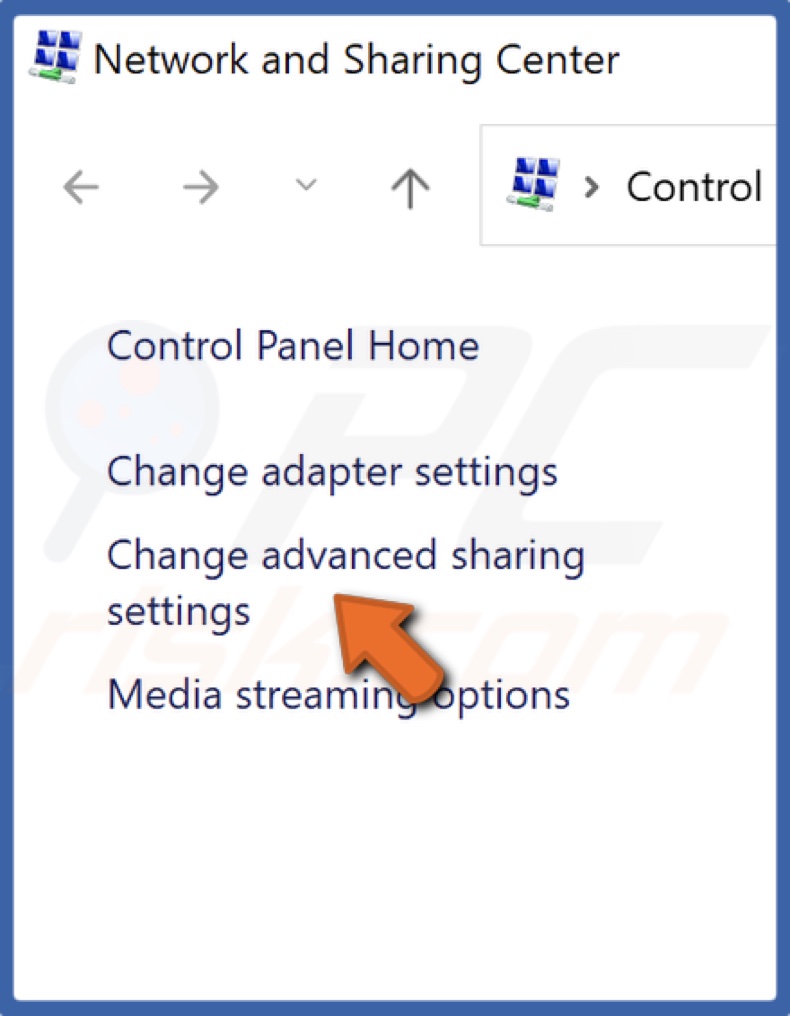
5. Click Change advanced sharing settings.
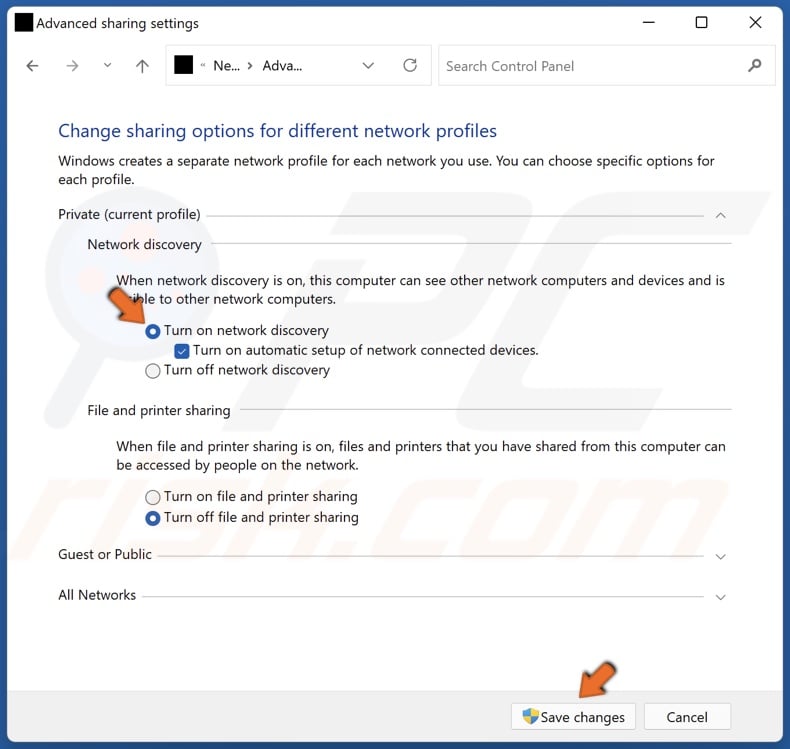
6. Tick the Turn on network discovery option.
7. Click Save changes.
Share:

Rimvydas Iliavicius
Researcher, author
Rimvydas is a researcher with over four years of experience in the cybersecurity industry. He attended Kaunas University of Technology and graduated with a Master's degree in Translation and Localization of Technical texts. His interests in computers and technology led him to become a versatile author in the IT industry. At PCrisk, he's responsible for writing in-depth how-to articles for Microsoft Windows.
▼ Show Discussion