How to Fix Steam "1 file failed to validate and will be reacquired" Error
Get Free Scanner and check your computer for errors
Fix It NowTo fix found issues, you have to purchase the full version of Combo Cleaner. Free trial available. Combo Cleaner is owned and operated by Rcs Lt, the parent company of PCRisk.com read more.
Getting "1 file failed to validate and will be reacquired" Message in Steam? Here are 5 Ways You Can Fix That
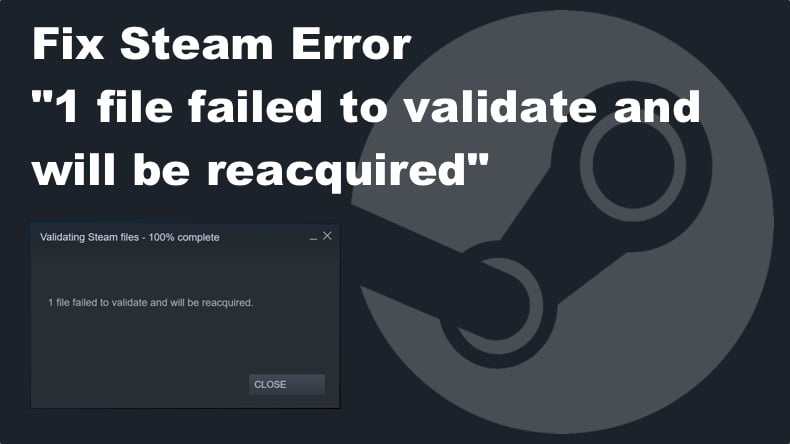
Many Steam users are having trouble launching their games due to game file validation issues. Attempting to validate game files results in the "X file(s) failed to validate and will be reacquired" error. This troubleshooting guide includes our top picks for fixing this error.
What Causes Game Cache Verification to Fail?
Typically, Steam fails to validate game files when a game has installed mods. Mods may come into conflict with the Steam client and trigger the verification error. Secondly, Steam may fail to validate the game cache if it previously updated some files incorrectly.
Any changes made to a file will cause a change in the file's hash. The "file failed to validate and will be reacquired" error message indicates that game files on your PC don't match those stored in the Steam repository.
The "file failed to validate and will be reacquired" error often occurs in Steam's own Counter-Strike Global Offensive and many other games, most notably, PUBG, Fallout New Vegas, Fallout 76, Elder Scrolls Skyrim, Borderlands 2, Terraria, and others.
How to Fix "1 file failed to validate and will be reacquired" Error?
Before trying any of our fixes, disable or uninstall any mods that might cause file verification to fail. Also, disconnect any game controllers and close related software.
Furthermore, if you're using a third-party anti-virus program, add Steam to its exceptions list or disable it temporarily and check if the issue is fixed.
Disable other software known to interfere with Steam, including VPNs, third-party firewall programs, peer-to-peer (P2P) clients & file-sharing software, IP filtering and blocking programs, download accelerators, and download management programs. Also, update your graphics card drivers.
Video Guide on How to Fix Steam "1 file failed to validate and will be reacquired" Error
Table of Contents:
- Introduction
- Solution 1. End All Steam Processes
- Solution 2. Clean Boot Windows
- Solution 3. Run a Check Disk (CHKDSK) Scan
- Solution 4. Delete the Steam Configuration File
- Solution 5. Turn Off Windows Defender Firewall
- Video Guide on How to Fix Steam "1 file failed to validate and will be reacquired" Error
Download Computer Malware Repair Tool
It is recommended to run a free scan with Combo Cleaner - a tool to detect viruses and malware on your device. You will need to purchase the full version to remove infections. Free trial available. Combo Cleaner is owned and operated by Rcs Lt, the parent company of PCRisk.com read more.
Solution 1. End All Steam Processes
1. Hold down Ctrl+Shift+Esc keys to open Task Manager.
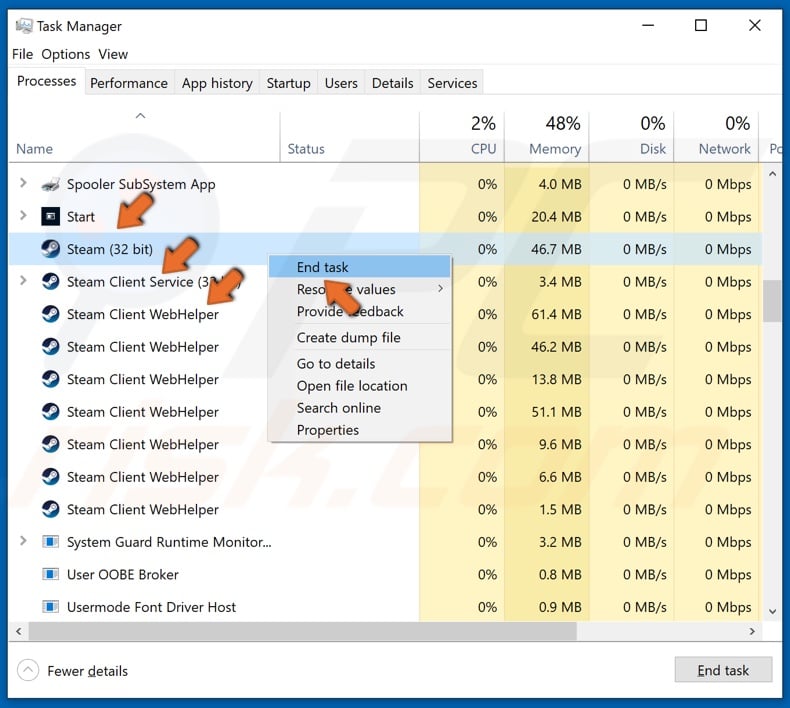
2. While in the Processes tab, scroll through the processes list and locate all Steam processes, including Steam, Steam Client WebHelper, and Steam Client Service.
3. Select and right-click each Steam-related process and click End task. Make sure that no Steam processes are running.
4. Then, launch Steam again and validate the game files.
Solution 2. Clean Boot Windows
1. Hold down Windows+R keys to open Run.
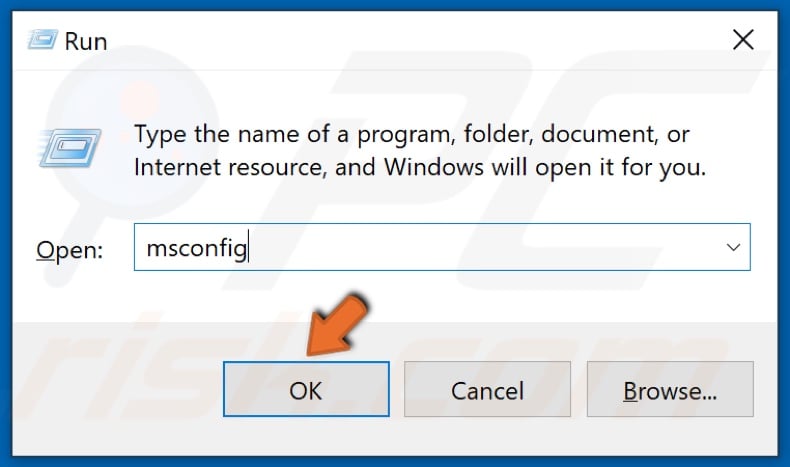
2. In the Run dialog box, type in MSConfig and click OK.
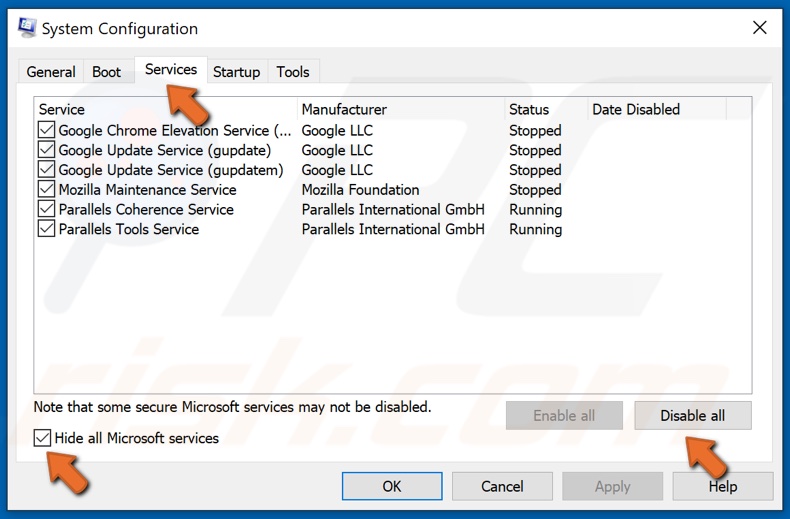
3. In the resulting System Configuration window, select the Services tab.
4. Then, mark the Hide all Microsoft services checkbox at the bottom left corner of the window.
5. Click Disable all.
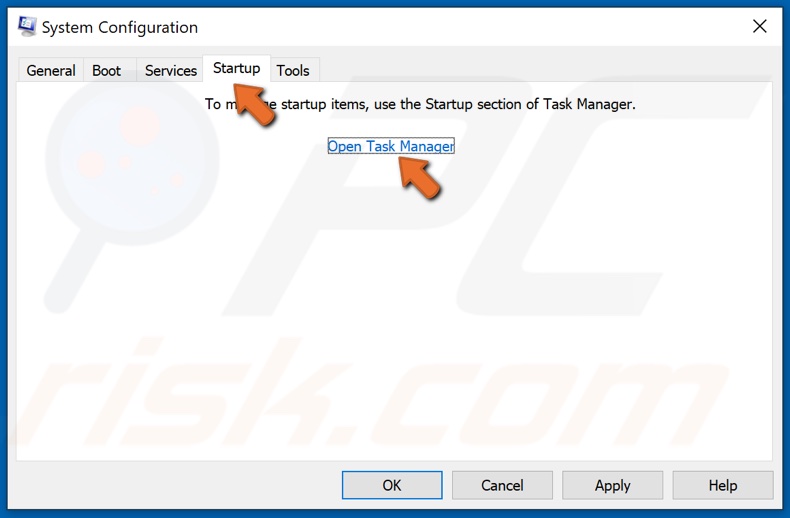
6. Then, Navigate to the Startup tab.
7. Click Open Task Manager.
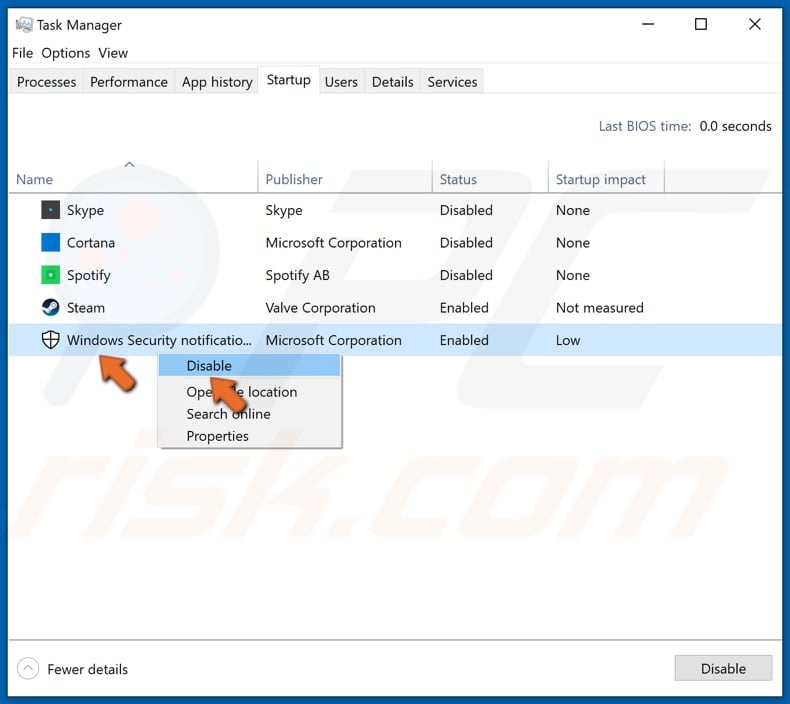
8. Right-click each application, and click Disable.
9. Close the Task Manager.
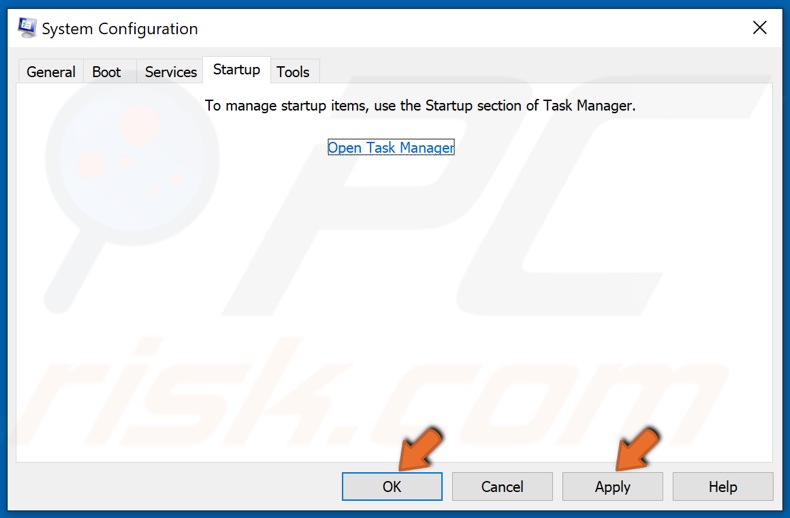
10. In the System Configuration window, click Apply and click OK.
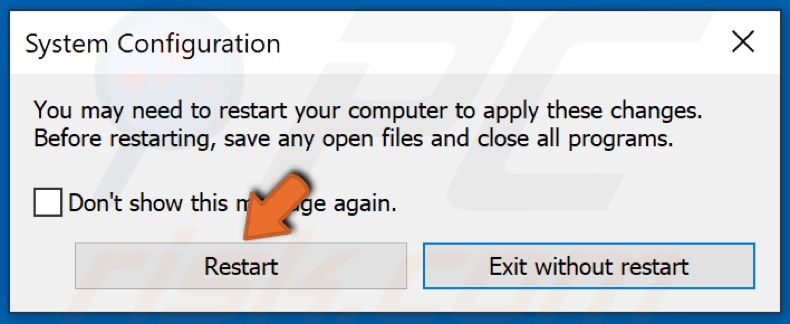
11. Click Restart when prompted.

12. After the restart, Steam might throw an error and ask to install the Steam service. Click Install Service.
13. Open Steam and verify the game files. Then, Launch the game and check if the issue was fixed.
14. If you need to revert to normal boot, here's what you have to do.
15. Hold down Windows+R keys to open Run.

16. In the Run dialog box, type in MSConfig and click OK.
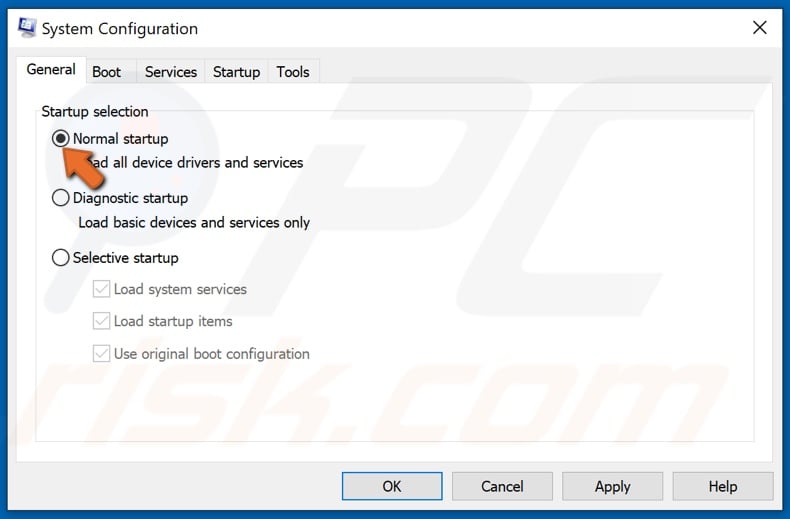
17. In the General tab, select Normal startup.
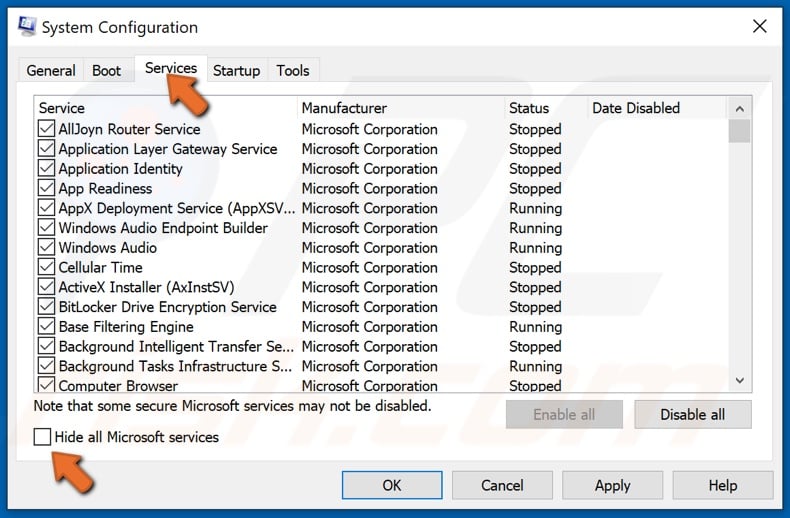
18. Then, go to the Services tab and ensure that the Hide all Microsoft services option is unchecked.

19. Lastly, go to the Startup tab and click Open Task Manager.
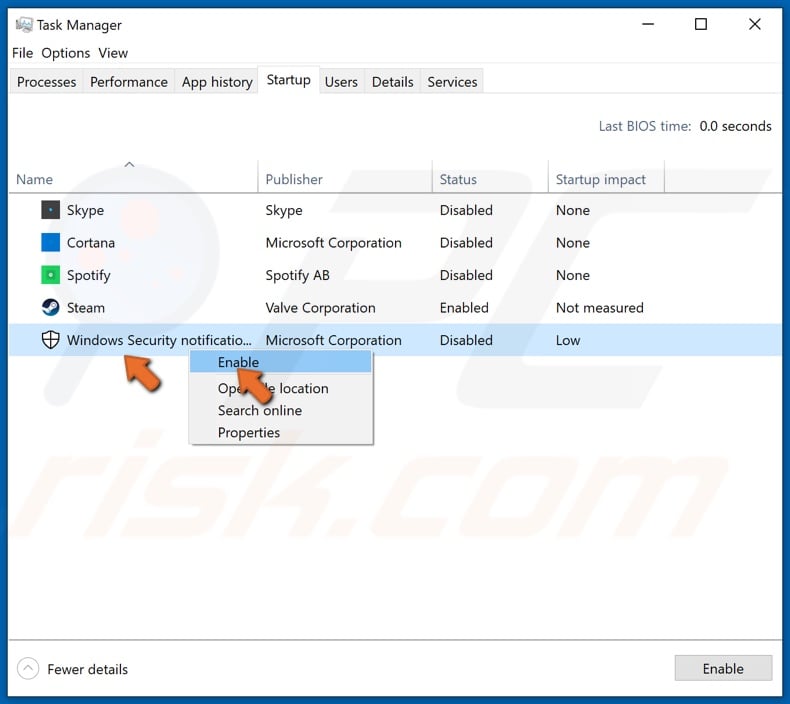
20. Select and enable the previously disabled applications.
21. Close the Task Manager.

22. In the System Configuration window, click Apply and click OK.

23. Click Restart when prompted.
Solution 3. Run a Check Disk (CHKDSK) Scan
Before going through the steps of this solution, open Steam, right-click the game that's having validation issues and click Verify integrity of game files. Run the verification process twice.
1. Hold down Windows+R keys to open Run.
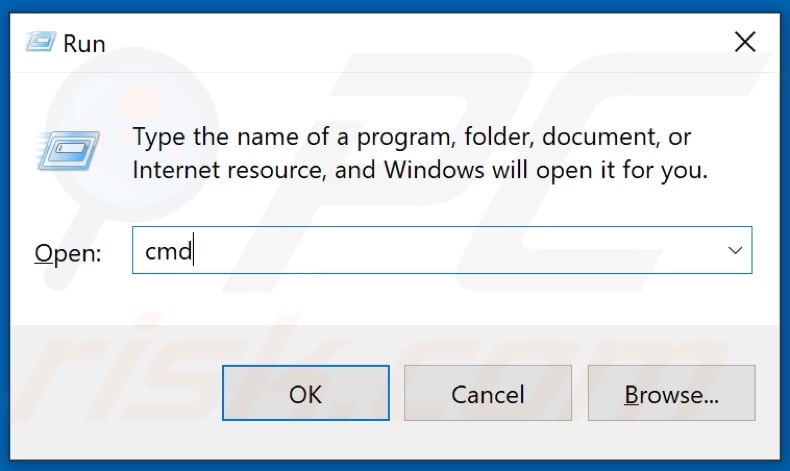
2. In the Run dialog box, type in CMD and hold down Ctrl+Shift+Enter keys to open the elevated Command Prompt.
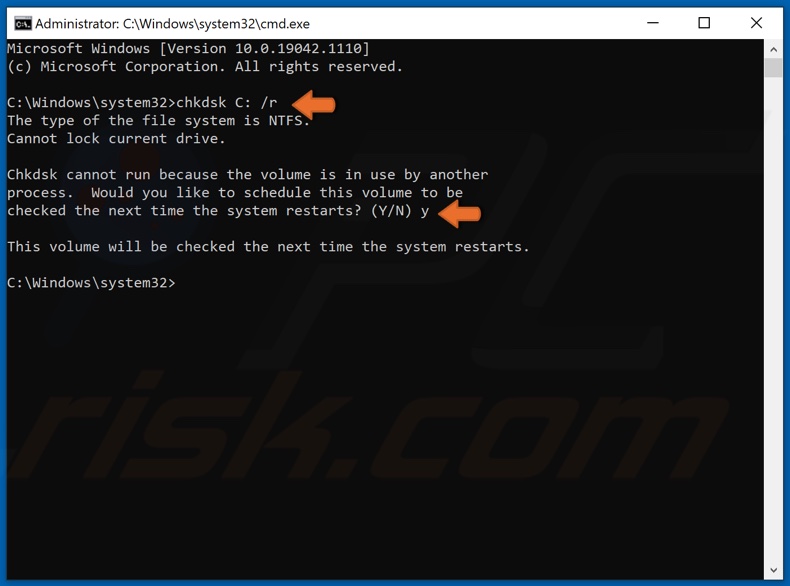
3. In the Command Prompt Window, type in chkdsk C: /r and hit Enter. Here, C is the system drive. If your system drive uses another letter, such as D, then type in D instead of C.
4. Type in Y or Yes if that volume is being used by another process.
5. Then, close the Command Prompt and restart your PC. The scan will begin during the restart.
6. Wait for the scan to complete.
Solution 4. Delete the Steam Configuration File
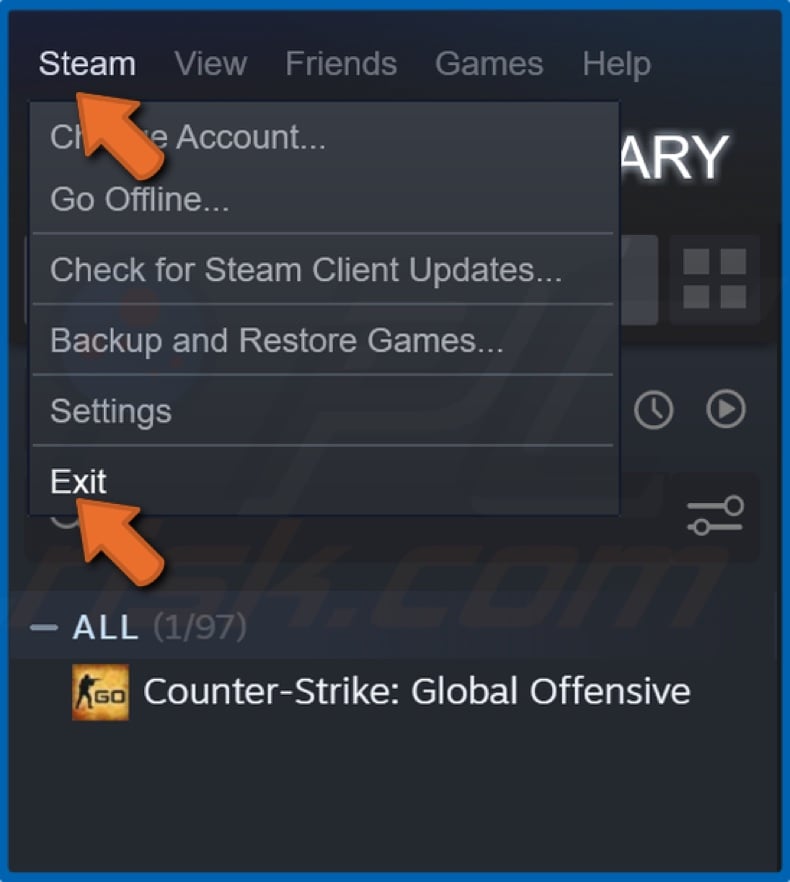
1. Open Steam, open the Steam drop-down menu in the toolbar and click Exit.
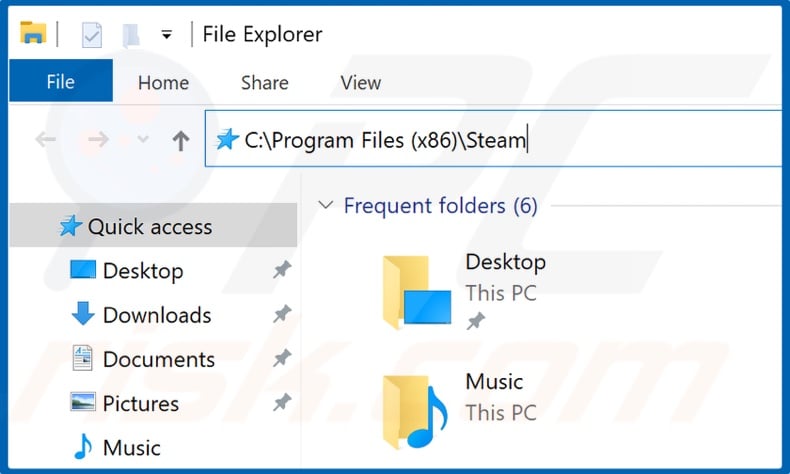
2. Hold down Windows+E keys to open File Explorer.
3. Then, navigate to the Steam directory. In the File Explorer's address box, type in C:\Program Files (x86)\Steam and hit Enter.
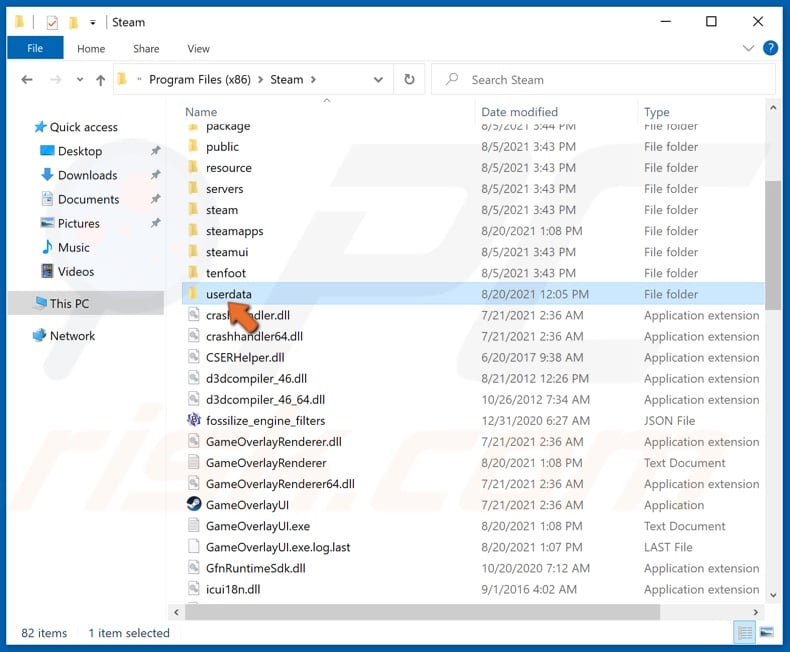
4. Access the userdata folder.
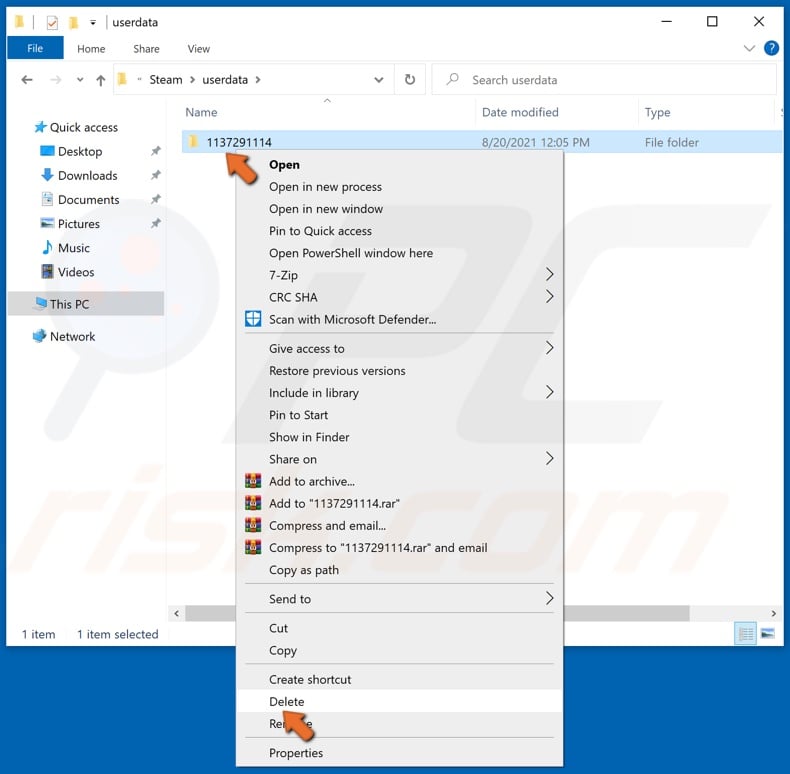
The userdata folder contains Steam IDs. If you have only one user account, then there will only be one folder.
5. Select and right-click your Steam ID folder and click Delete.
6. Launch Steam. Steam will automatically detect that the configuration file is missing and will download a new file automatically.
Solution 5. Turn Off Windows Defender Firewall
Note that turning off the Windows Firewall should only be done as a temporary solution because turning off the Firewall will leave your computer open to threats.
1. Hold down Windows+R keys to open the Run dialog box.
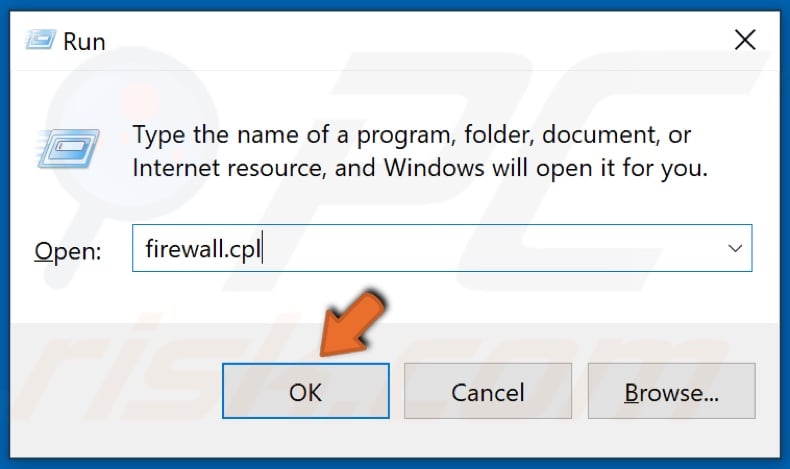
2. In the Run dialog box, type in firewall.cpl and click OK to open Windows Defender Firewall settings.
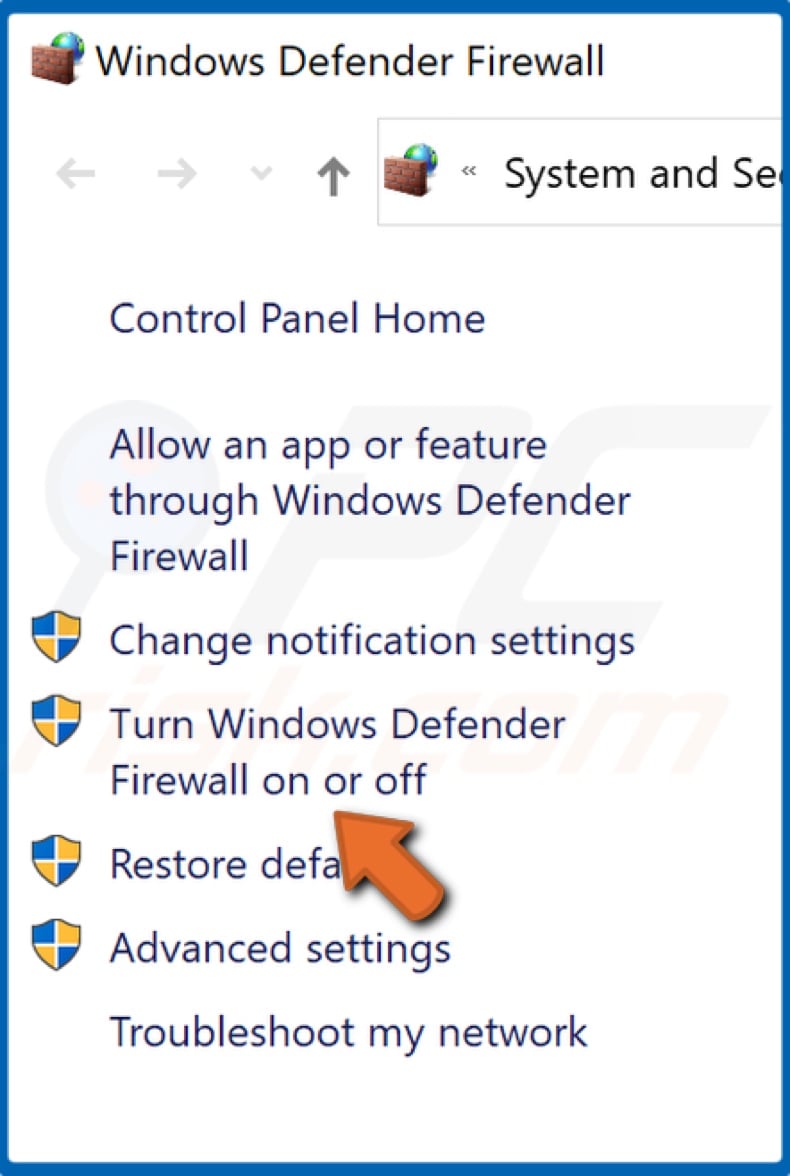
3. Click Turn Windows Defender Firewall on or off.
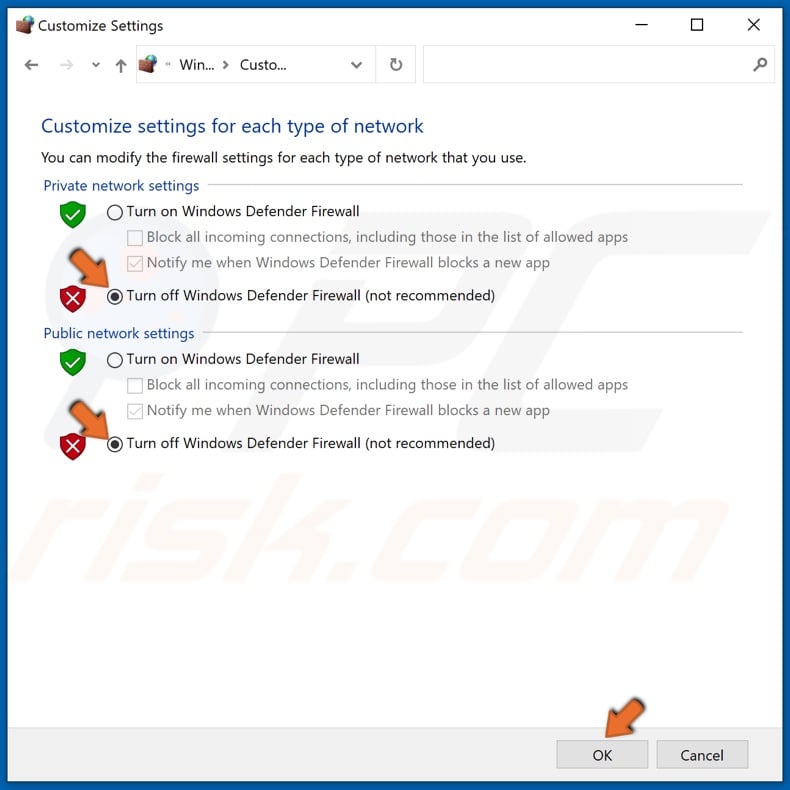
4. Tick the Turn off Windows Defender Firewall checkboxes for both Private and Public networks.
5. Click OK.
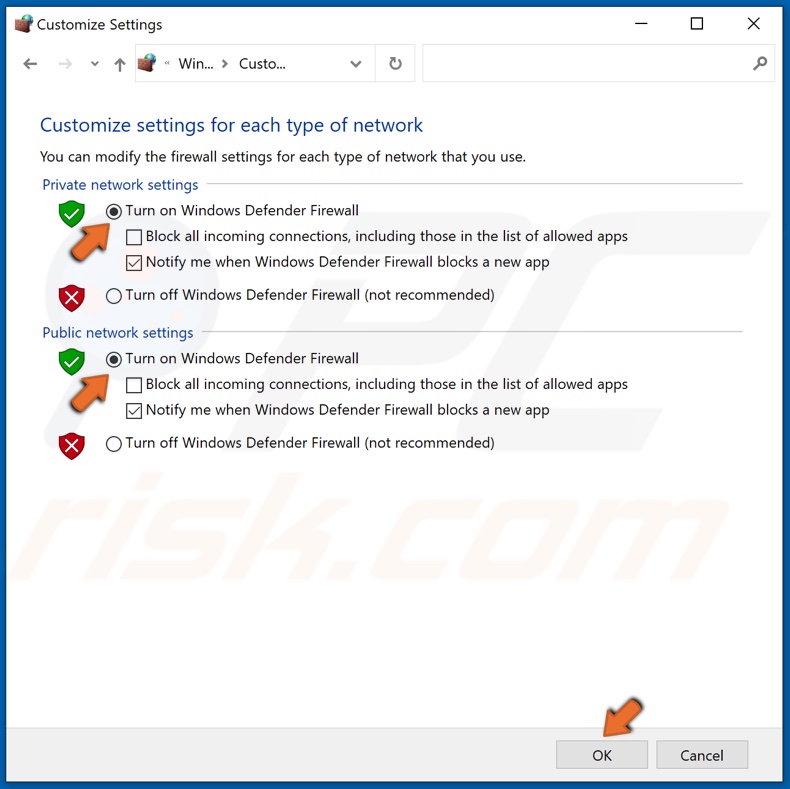
6. To turn Windows Defender Firewall back on, tick the Turn on Windows Defender Firewall checkboxes for both Private and Public networks, and click OK.
Share:

Rimvydas Iliavicius
Researcher, author
Rimvydas is a researcher with over four years of experience in the cybersecurity industry. He attended Kaunas University of Technology and graduated with a Master's degree in Translation and Localization of Technical texts. His interests in computers and technology led him to become a versatile author in the IT industry. At PCrisk, he's responsible for writing in-depth how-to articles for Microsoft Windows.

▼ Show Discussion