Fix Windows Update Error 0xc19001e2
Get Free Scanner and check your computer for errors
Fix It NowTo fix found issues, you have to purchase the full version of Combo Cleaner. Free trial available. Combo Cleaner is owned and operated by Rcs Lt, the parent company of PCRisk.com read more.
7 Ways to Fix Windows Update Error 0xC19001e2 in Windows 10
If you're getting error 0xC19001e2 when trying to update Windows 10, it may be because a pre-install script failed to execute. Luckily, you can fix this error using one or several of our proposed fixes.
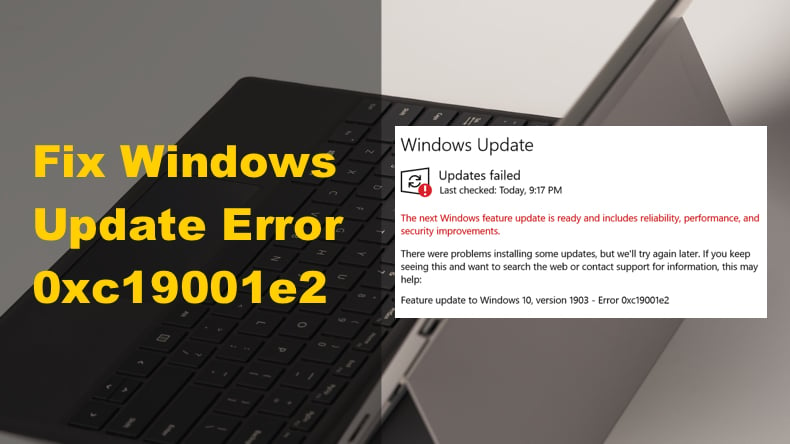
What is Windows Update Error 0xC19001e2?
Error 0xC19001e2 is also known as error MOSETUP_E_PREINSTALL_SCRIPT_FAILED, and it's an error code that occurs when a pre-install script fails to execute or returns an error. The pre-install script may not run due to a Windows Update glitch or corrupted system files.
Many users got this error when trying to update Windows 10 to version 1903 and later version 1909. So many got messages saying "Feature Update to Windows 10, Version 1903 – Error 0xC19001e2" and "There was a problem running pre-install.cmd scripts."
Users often get this error when installing Windows 10 Insider Preview updates. Sometimes the update installation can reach 100%, then stall and result in error 0xC19001e2.
Windows users recently started getting error 0xC19001e2 when updating Windows 10 from version 2004 to version 20H2 (October 2020 update.) So, many people got a message saying, "Feature Update to Windows 10, Version 20H2 – Error 0xc19001e2."
Video Guide on How to Fix Windows Update Error 0xc19001e2
Table of Contents:
- Introduction
- Solution 1. Run Windows Update Troubleshooter
- Solution 2. Perform Disk Cleanup
- Solution 3. Clear Windows Update Cache Folder
- Solution 4. Run the Deployment Imaging and Servicing Management (DISM) Scan
- Solution 5. Run the System File Checker (SFC) Scan
- Solution 6. Reset Windows Update Components
- Solution 7. Update Windows 10 Using Media Creation Tool
- Video Guide on How to Fix Windows Update Error 0xc19001e2
Download Computer Malware Repair Tool
It is recommended to run a free scan with Combo Cleaner - a tool to detect viruses and malware on your device. You will need to purchase the full version to remove infections. Free trial available. Combo Cleaner is owned and operated by Rcs Lt, the parent company of PCRisk.com read more.
Solution 1. Run Windows Update Troubleshooter
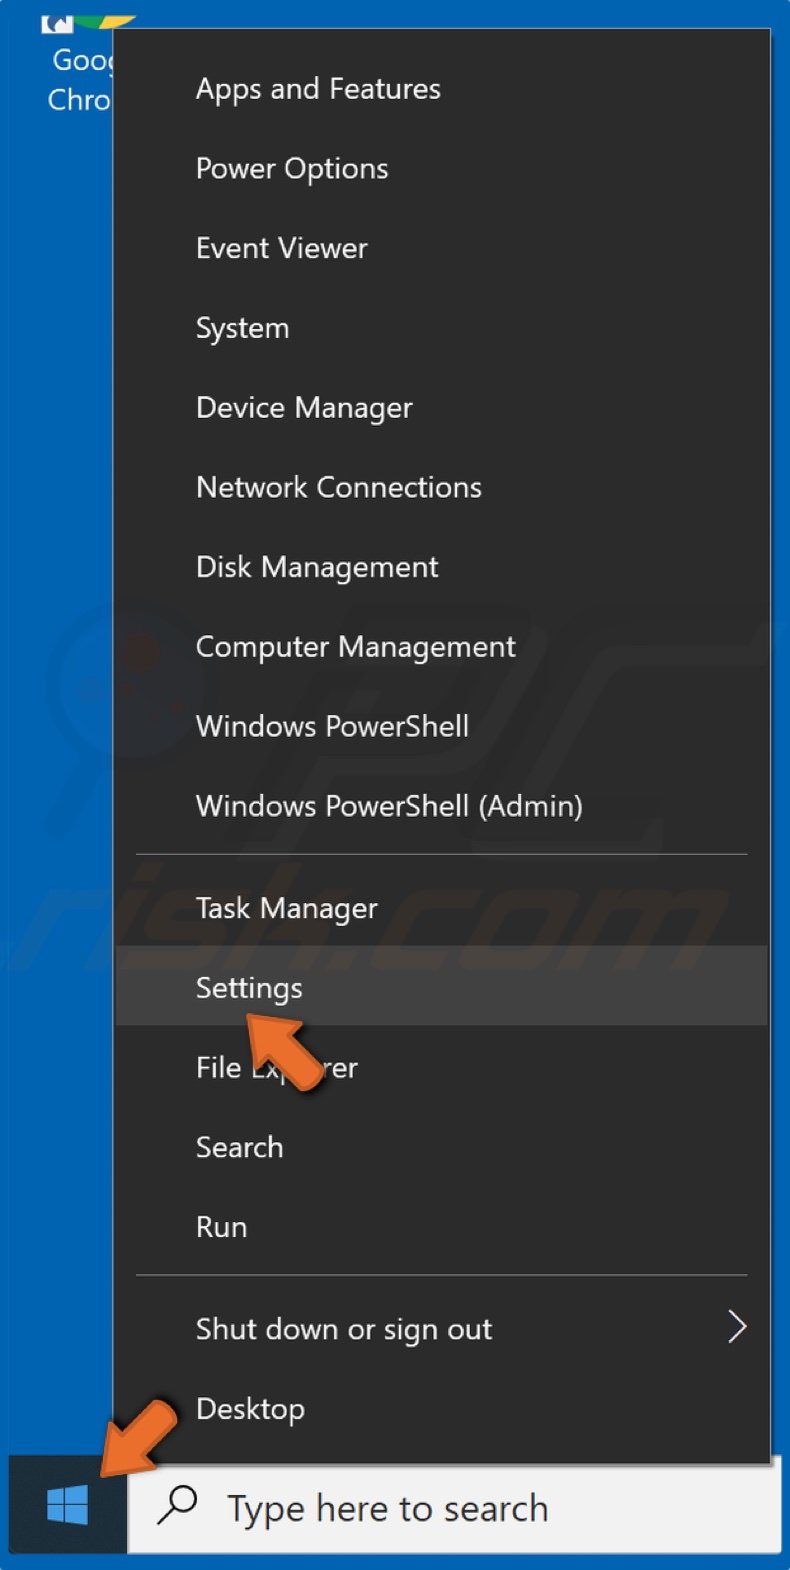
1. Right-click the Start Menu button and click Settings.
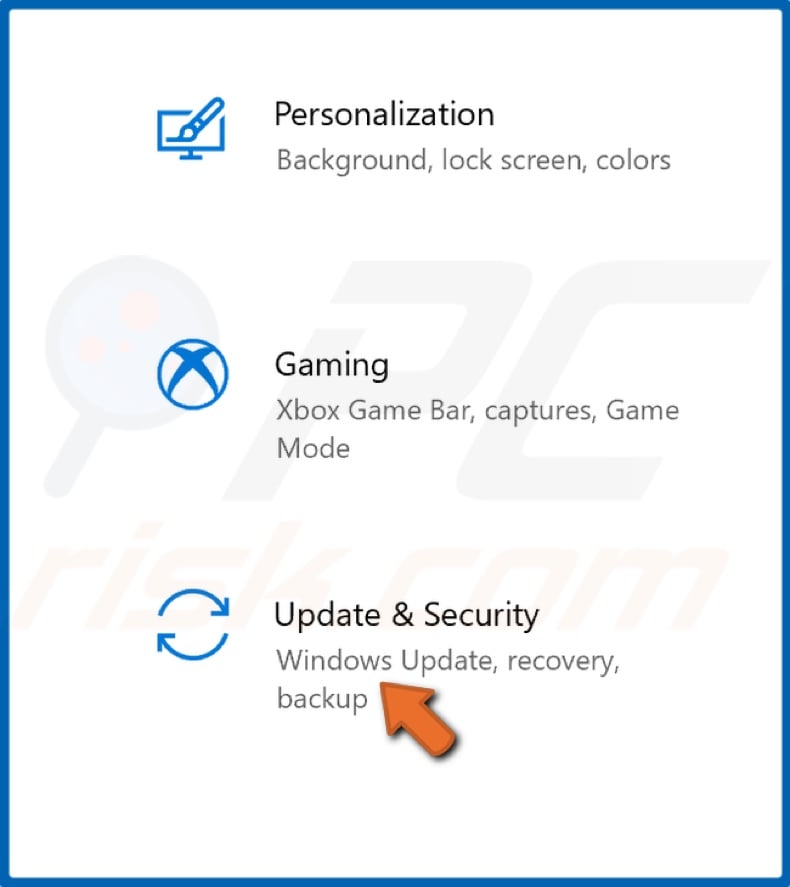
2. Go to Update & Security.
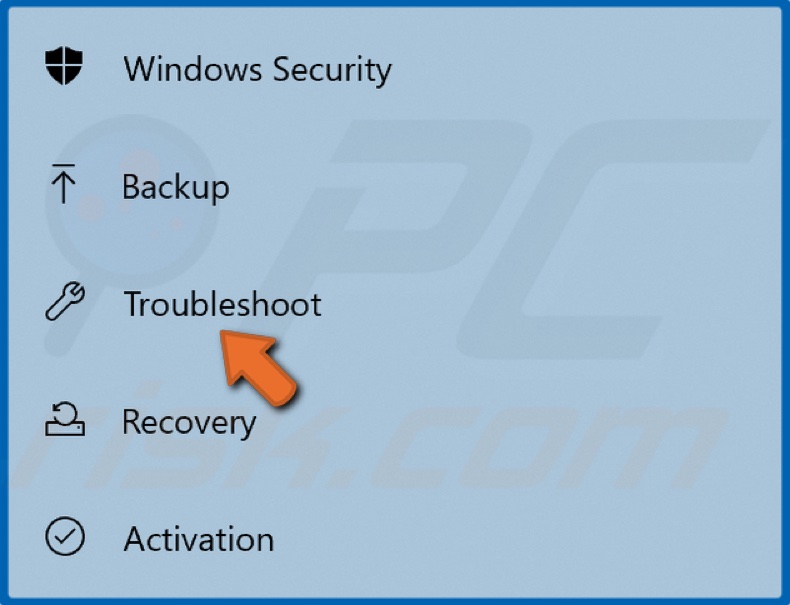
3. Select Troubleshoot in the left pane.
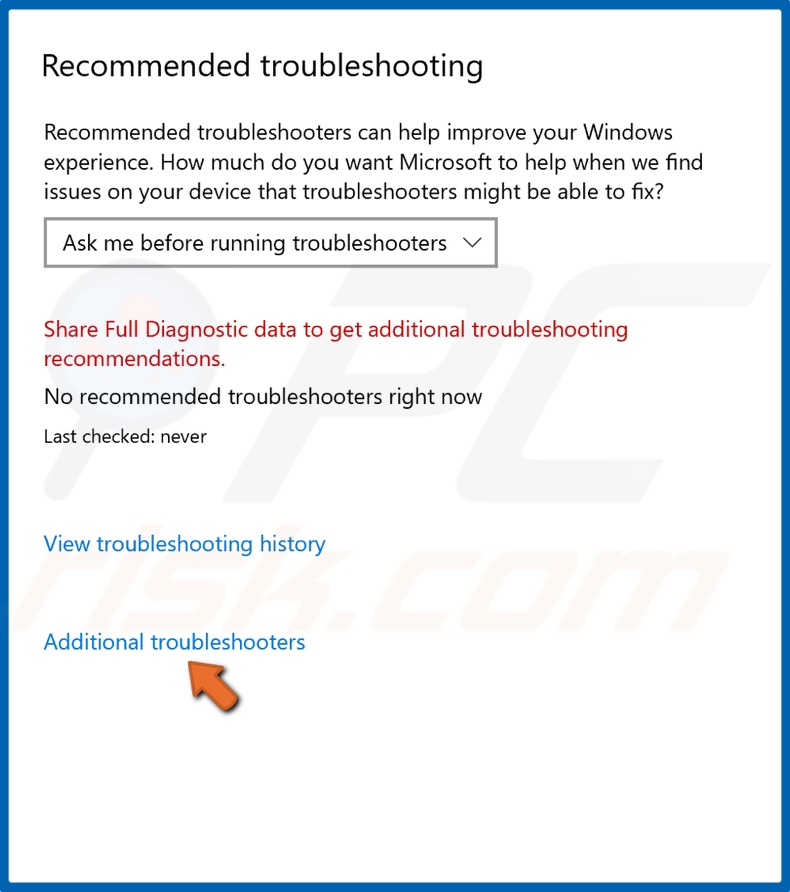
4. Then, click Additional troubleshooters.
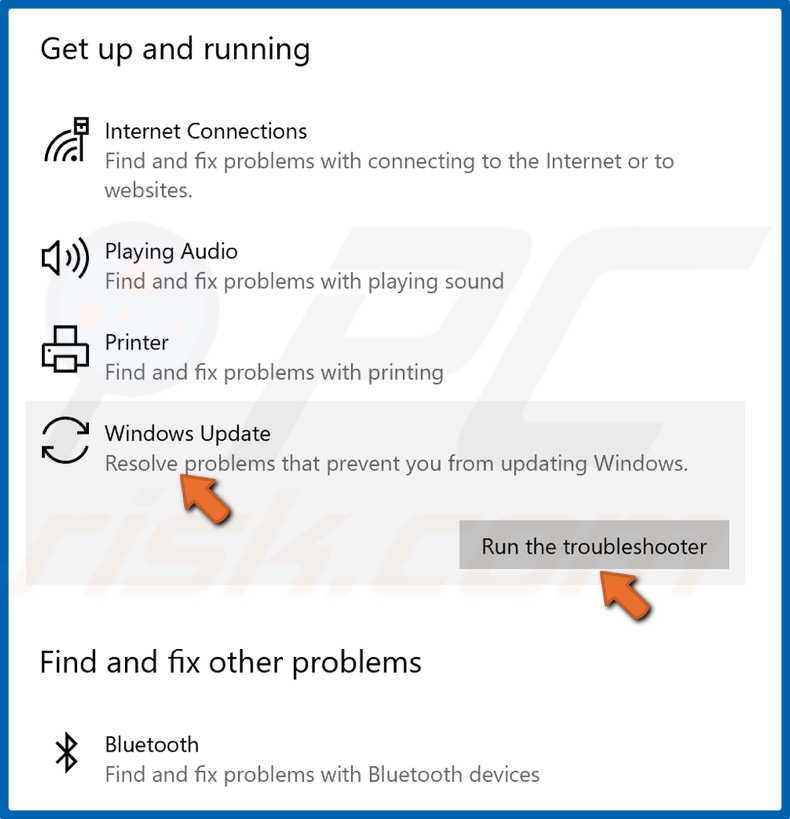
5. Choose Windows Update and then click Run the troubleshooter.
6. The troubleshooter will identify the issues and apply fixes automatically.
Solution 2. Perform Disk Cleanup
1. Hold down Windows+R keys to open Run.
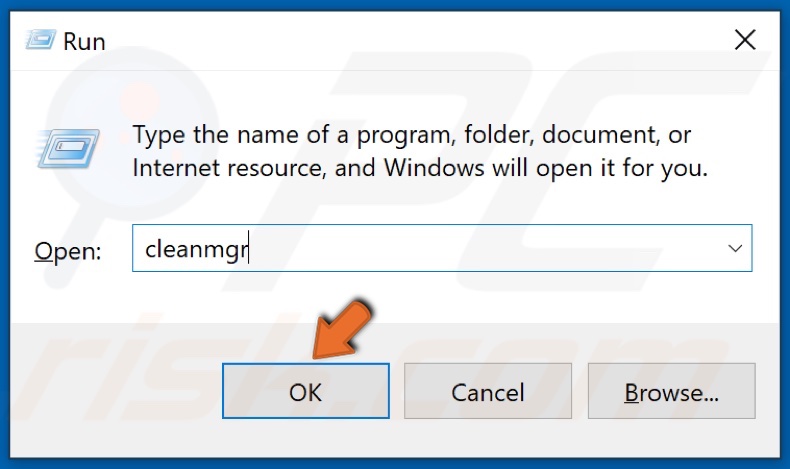
2. In the Run dialog box, type in cleanmgr and click OK.
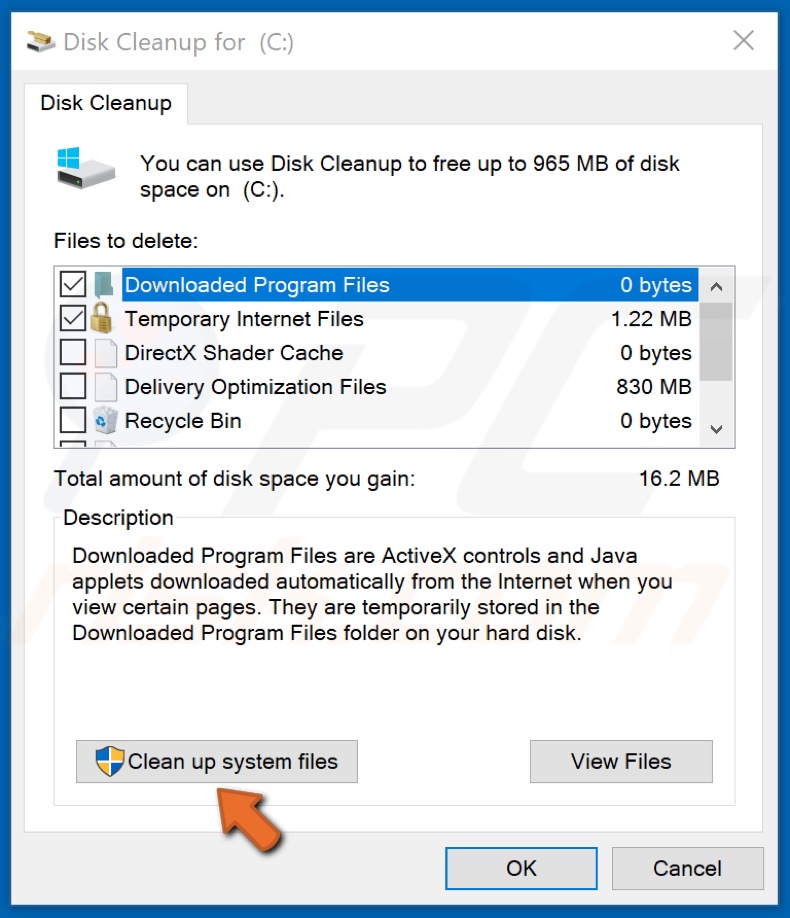
3. Click Clean Up System Files.
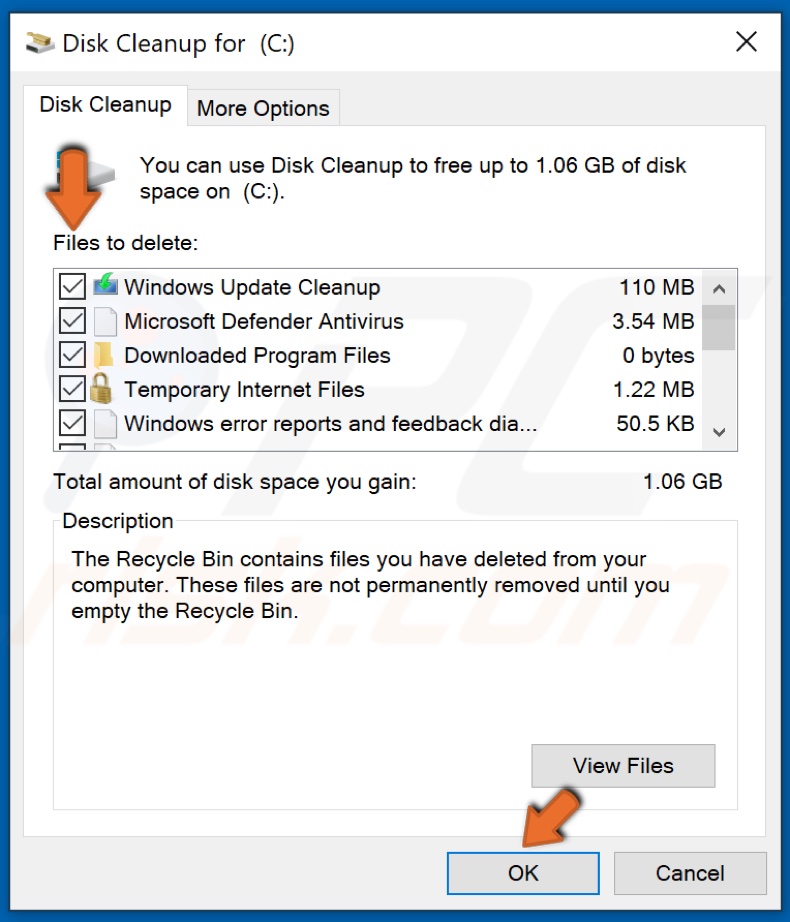
4. Mark the checkboxes of the locations you want to be cleaned and click OK.
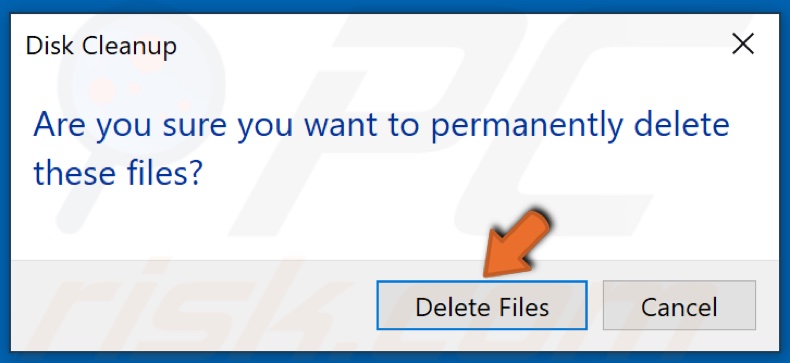
5. Click Delete Files.
6. Wait for the unnecessary files to be deleted.
Solution 3. Clear Windows Update Cache Folder
1. Hold down Windows+R keys to open Run.
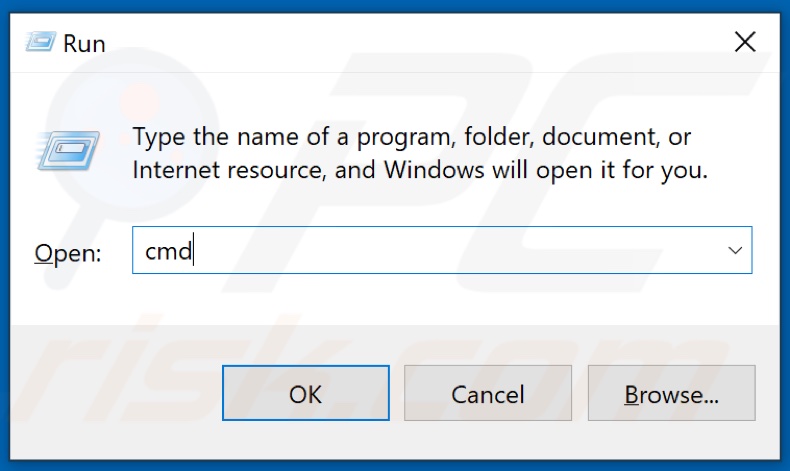
2. In the Run dialog box, type in CMD and hold down Ctrl+Shift+Enter keys to open the elevated Command Prompt.
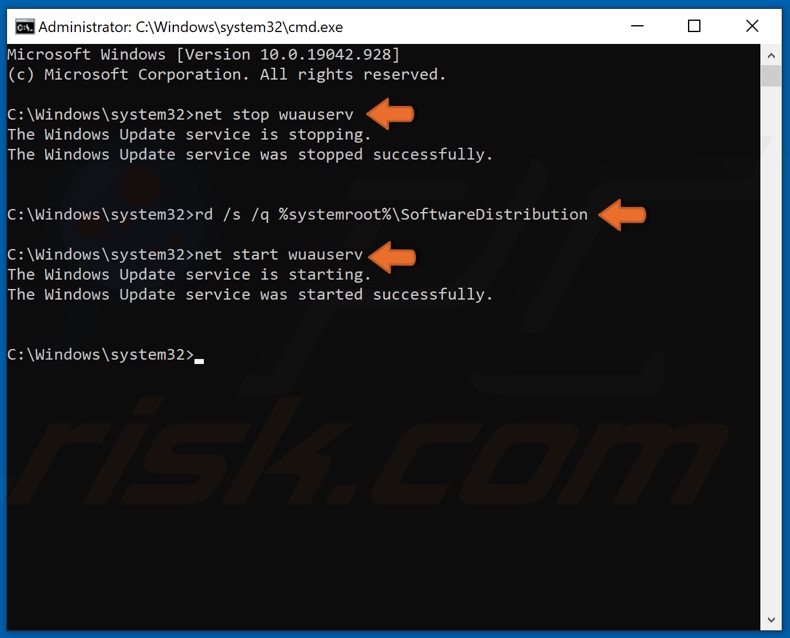
3. In the Command Prompt window, type in net stop wuauserv and press the Enter key.
4. Then, type in rd /s /q %systemroot%\SoftwareDistribution and press Enter.
5. Type in net start wuauserv and press Enter.
6. Close the Command Prompt.
Solution 4. Run the Deployment Imaging and Servicing Management (DISM) Scan
1. Hold down Windows+R keys to open Run.

2. In the Run dialog box, type in CMD and hold down Ctrl+Shift+Enter keys to open the elevated Command Prompt.
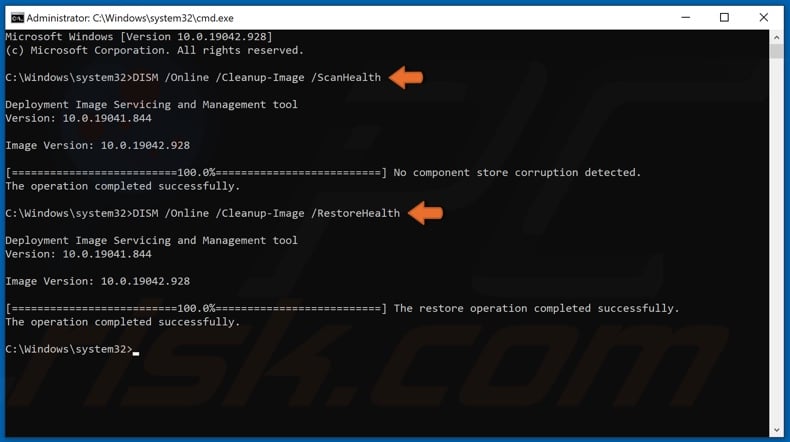
3. In the Command Prompt window, type in DISM /Online /Cleanup-Image /ScanHealth and press the Enter key.
4. Then, type in DISM /Online /Cleanup-Image /RestoreHealth and press Enter.
5. Close the Command Prompt and restart your PC.
Solution 5. Run the System File Checker (SFC) Scan
1. Hold down Windows+R keys to open Run.

2. In the Run dialog box, type in CMD and hold down Ctrl+Shift+Enter keys to open the elevated Command Prompt.
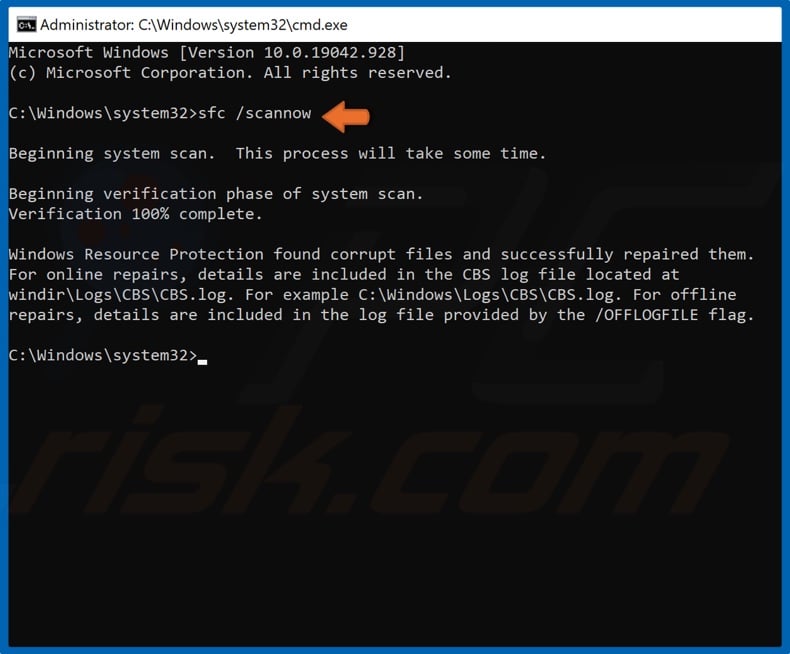
3. In the Command Prompt window, type in SFC /ScanNow and press the Enter key.
4. Then, close the Command Prompt and restart your PC.
Solution 6. Reset Windows Update Components
1. Hold down Windows+R keys to open Run.

2. In the Run dialog box, type in CMD and hold down Ctrl+Shift+Enter keys to open the elevated Command Prompt.
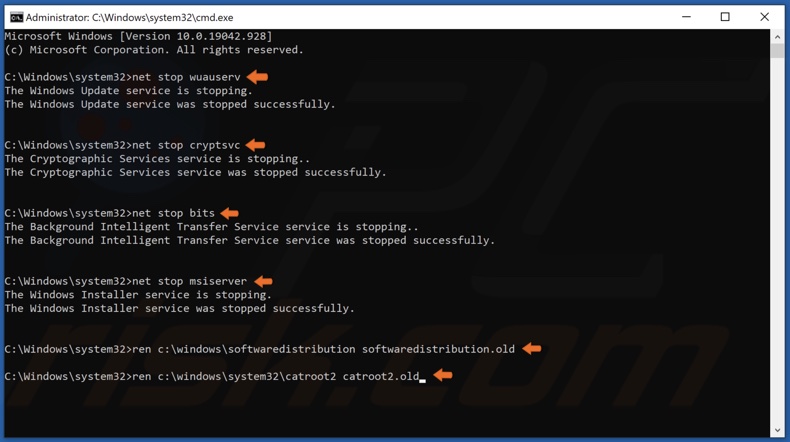
3. In the Command Prompt window, type in the commands below, and press the Enter key after entering each one:
- net stop wuauserv
- net stop cryptSvc
- net stop bits
- net stop msiserver
4. Then, type in ren C:\Windows\SoftwareDistribution SoftwareDistribution.old and press Enter.
5. Type in ren C:\Windows\System32\catroot2 Catroot2.old and press Enter.
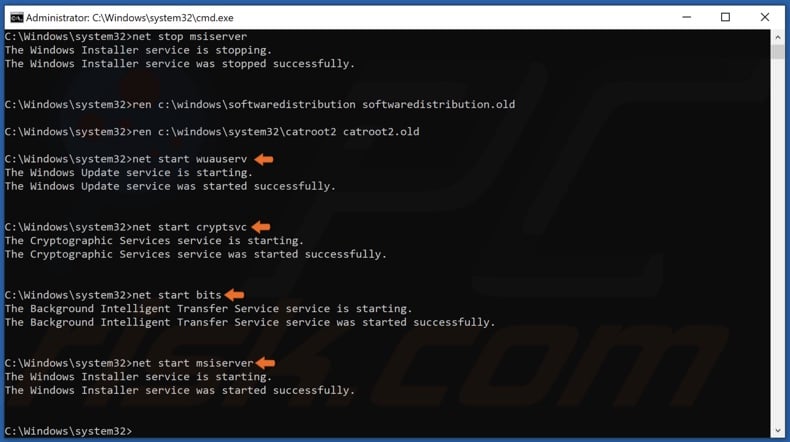
6. Type in the commands listed below, and press Enter after entering each one:
- net start wuauserv
- net start cryptSvc
- net start bits
- net start msiserver
7. Close the Command Prompt
Solution 7. Update Windows 10 Using Media Creation Tool
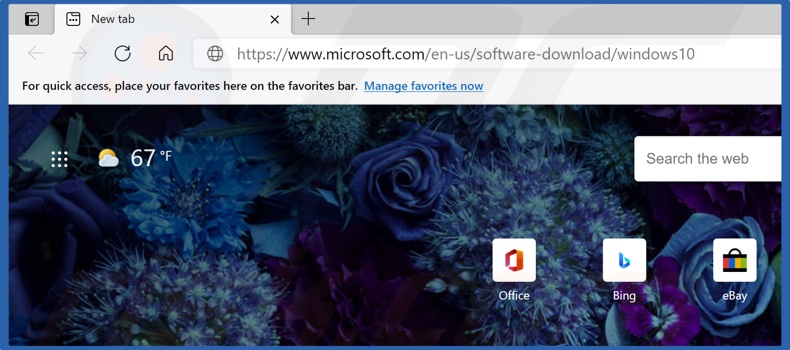
1. Open your web browser and go to the Media Creation Tool download page.
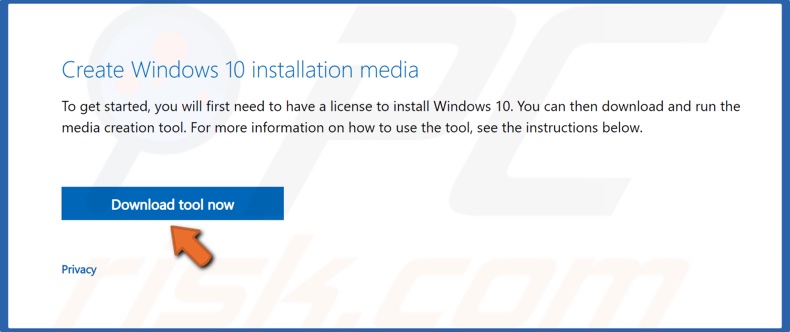
2. Click the Download tool now button to get the Media Creation Tool.
3. Once downloaded, run the Media Creation Tool (MediaCreationTool21H1.exe) executable file.
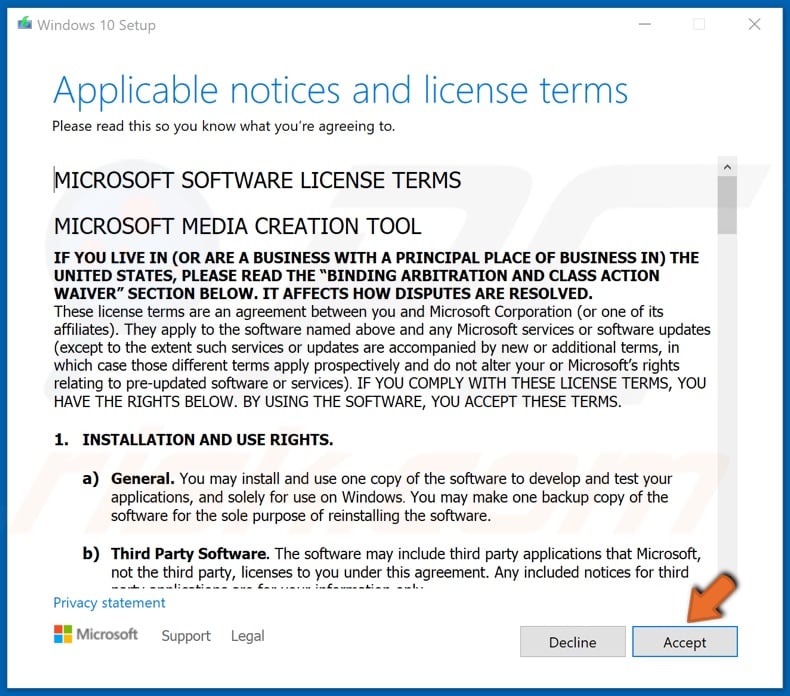
4. Accept the license agreement.
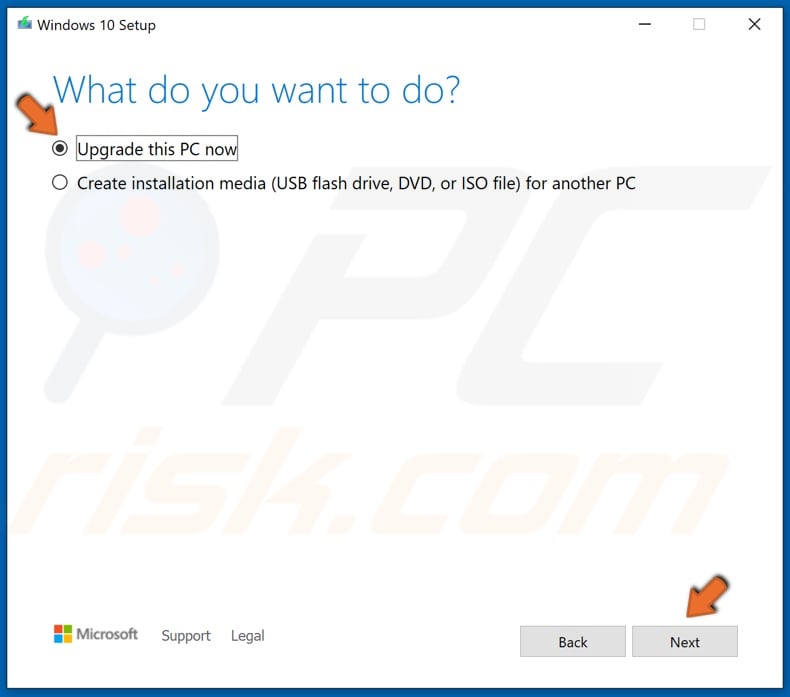
5. Select Upgrade this PC now and click Next.
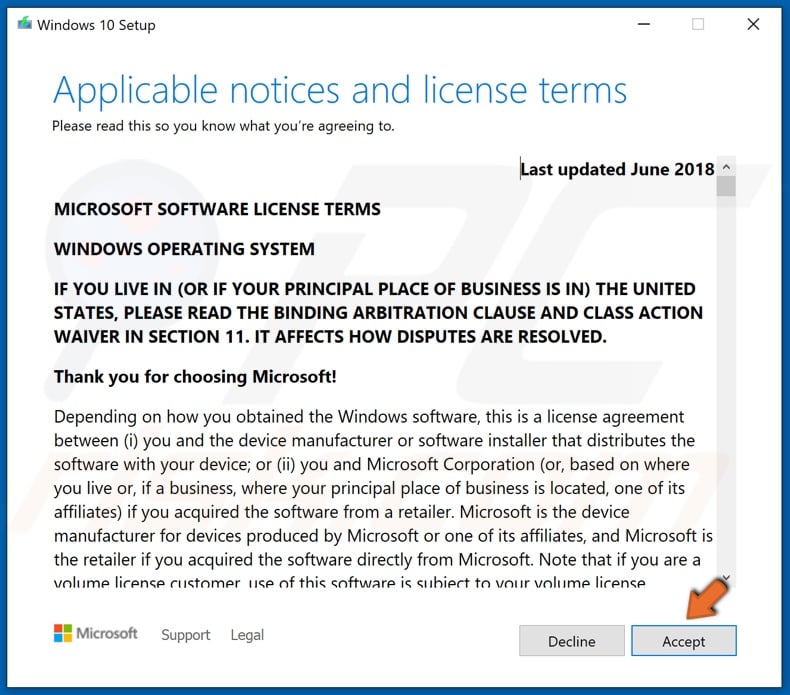
6. Then, Accept the Windows 10 license agreement.
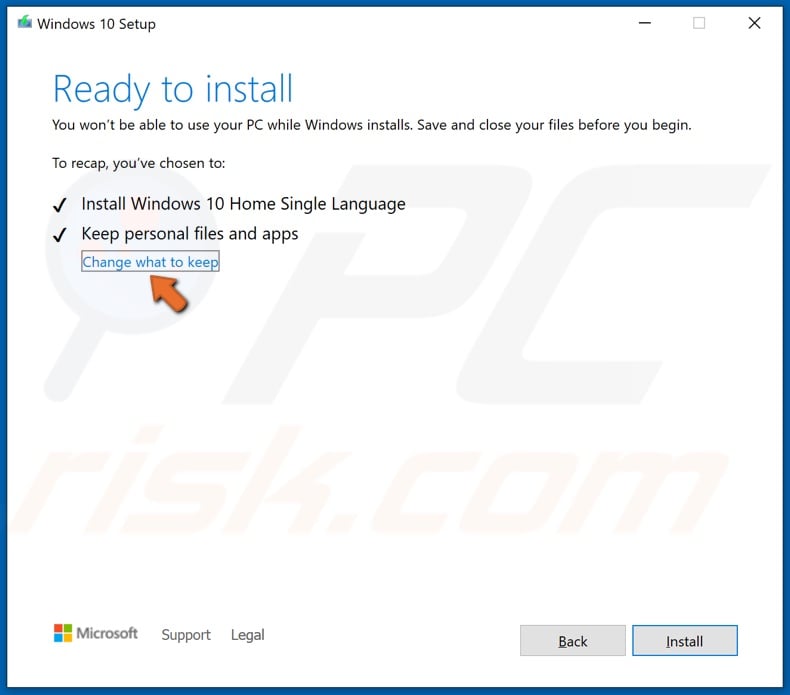
7. You may keep your personal files and apps, but if you want a clean Windows 10 installation, click the Change what to keep button to customize the installation settings.
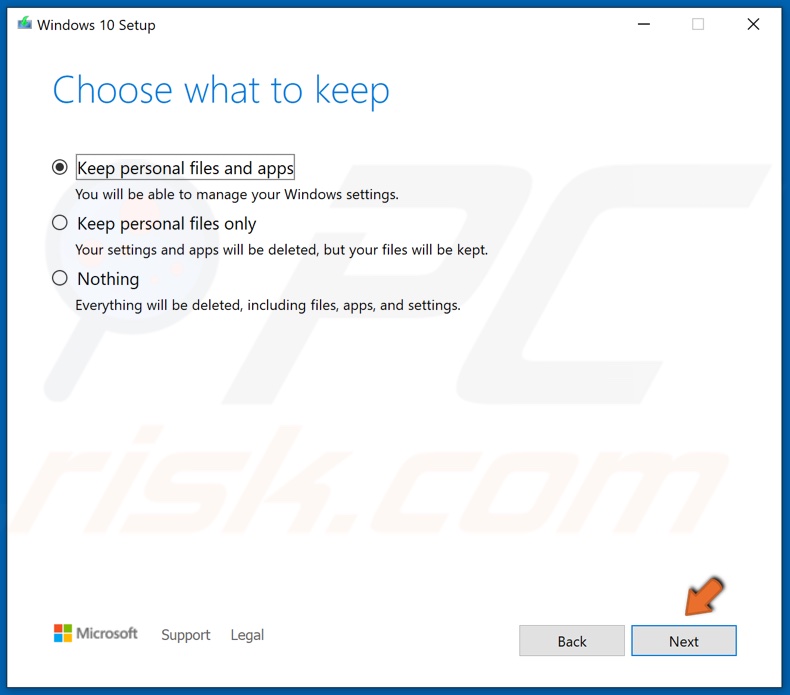
8. Click Next.
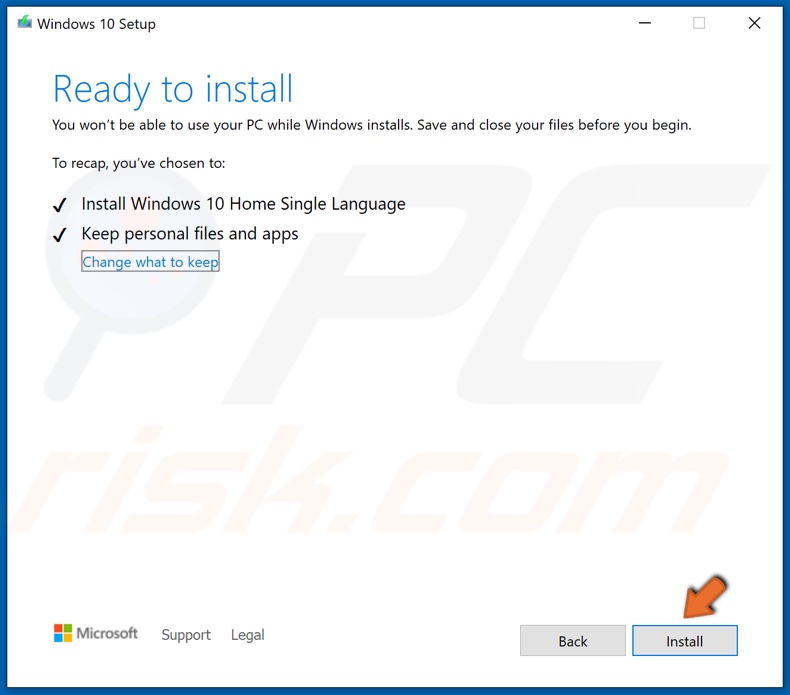
9. Click Install, and the setup will begin upgrading Windows 10.
Share:

Rimvydas Iliavicius
Researcher, author
Rimvydas is a researcher with over four years of experience in the cybersecurity industry. He attended Kaunas University of Technology and graduated with a Master's degree in Translation and Localization of Technical texts. His interests in computers and technology led him to become a versatile author in the IT industry. At PCrisk, he's responsible for writing in-depth how-to articles for Microsoft Windows.

▼ Show Discussion