How to Fix Modern Setup Host High CPU and Disk Usage

Get Free Scanner and check your computer for errors
Fix It NowTo fix found issues, you have to purchase the full version of Combo Cleaner. Free trial available. Combo Cleaner is owned and operated by Rcs Lt, the parent company of PCRisk.com read more.
How to Fix Modern Setup Host High CPU/Disk Usage in Windows 10
Modern Setup Host (SetupHost.exe) is a Windows process that runs in the background while installing major updates. The problem is that Modern Setup Host has a tendency to cause high CPU and Disk usage. This article is dedicated to helping you fix this issue.

Why Modern Setup Host Causes High CPU/Disk Usage?
Modern Setup Host may consume a lot of your CPU or Disk resources, due to several reasons.
- It may consume close to 100% CPU or Disk resources if Windows downloads a significant update onto a hard drive with a slow read/write speed.
- Modern Setup Host may overload your CPU or Disk is if other resource-intensive tasks run concurrently with SetupHost.exe, thus slowing it down.
- It may cause high CPU or Disk resource consumption if your computer has been infected with malware disguised as SetupHost.exe.
- High CPU/Disk usage may occur due to corrupted or conflicting temporary files on your PC.
- SetupHost.exe may cause high resource usage if Windows Update becomes stuck due to a bug.
In some cases, resource-hogging can be so bad that it causes SetupHost.exe to crash. As a result, you get a "Modern Setup Host has stopped working" error message.
Video Guide on How to Fix Modern Setup Host High CPU and Disk Usage
Table of Contents:
- Introduction
- Solution 1. Run Windows Update Troubleshooter
- Solution 2. Disable Suggestions, App Control, and Background Apps
- Solution 3. Run Deployment Imaging and Servicing Management (DISM) Scan
- Solution 4. Run System File Checker (SFC) Scan
- Solution 5. Clear the SoftwareDistribution Folder
- Video Guide on How to Fix Modern Setup Host High CPU and Disk Usage
Download Computer Malware Repair Tool
It is recommended to run a free scan with Combo Cleaner - a tool to detect viruses and malware on your device. You will need to purchase the full version to remove infections. Free trial available. Combo Cleaner is owned and operated by Rcs Lt, the parent company of PCRisk.com read more.
Solution 1. Run Windows Update Troubleshooter
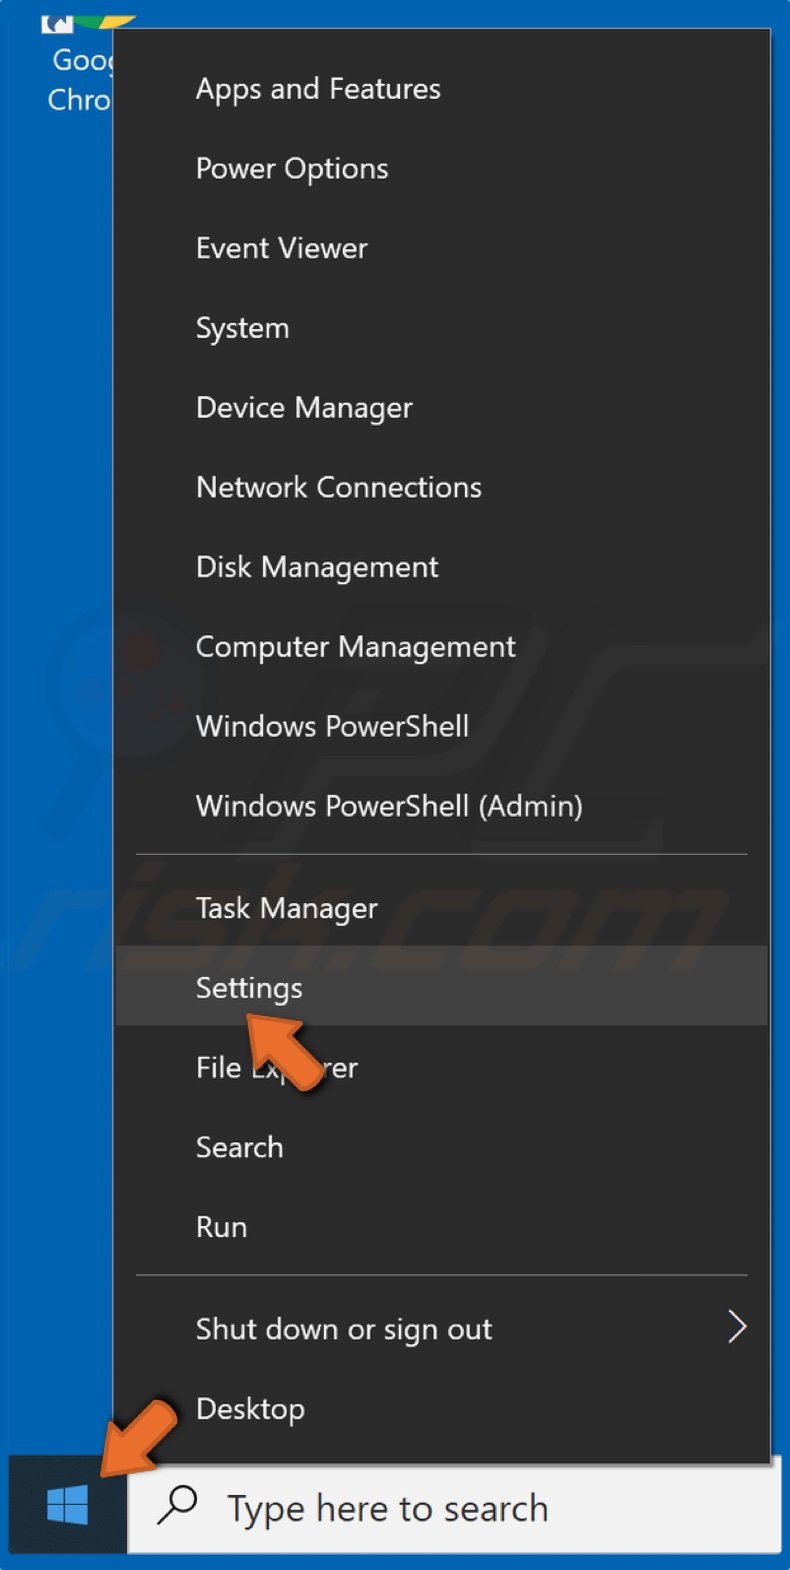
1. Right-click the Start button and select Settings.
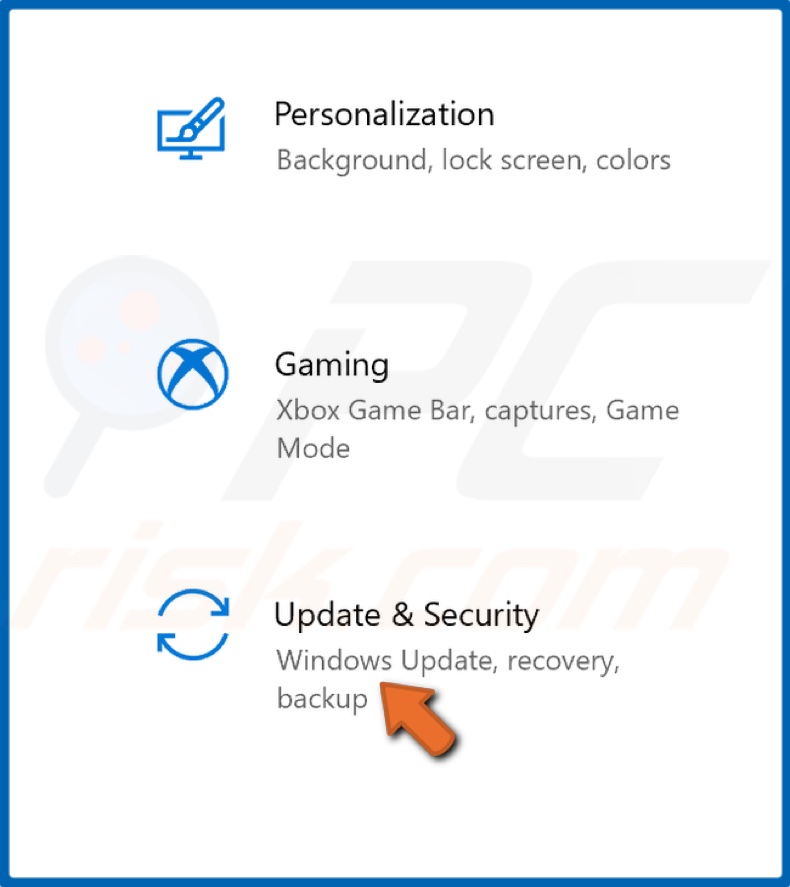
2. Go to Update & Security.
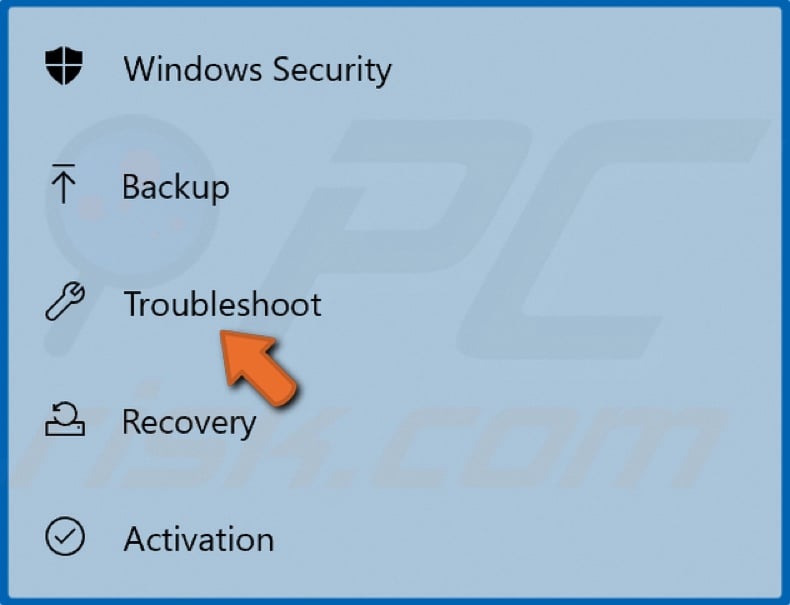
3. Select Troubleshoot.
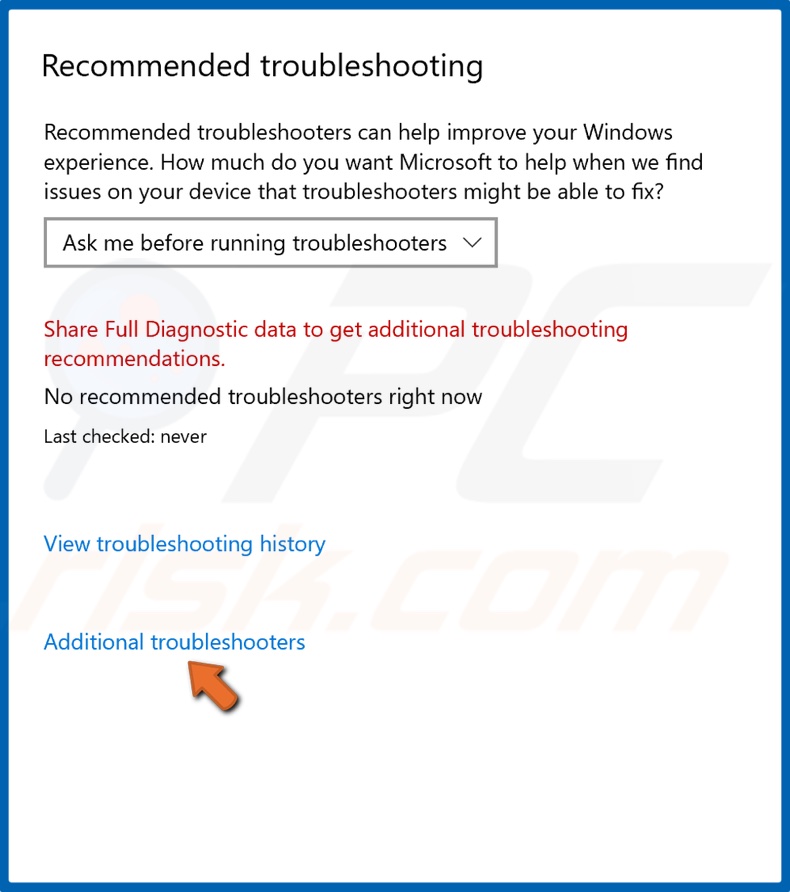
4. Then, click Additional troubleshooters.
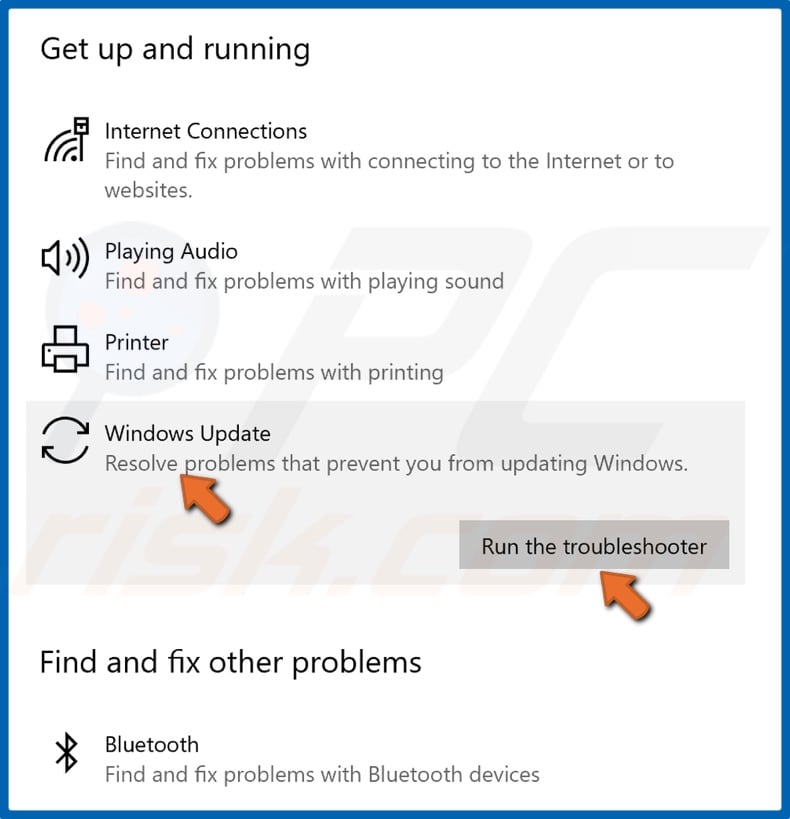
5. Select Windows Update and click Run the troubleshooter.
6. Windows Update troubleshooter will identify the issue and apply a fix automatically.
Solution 2. Disable Suggestions, App Control, and Background Apps
1. Right-click the Start button and select Settings.
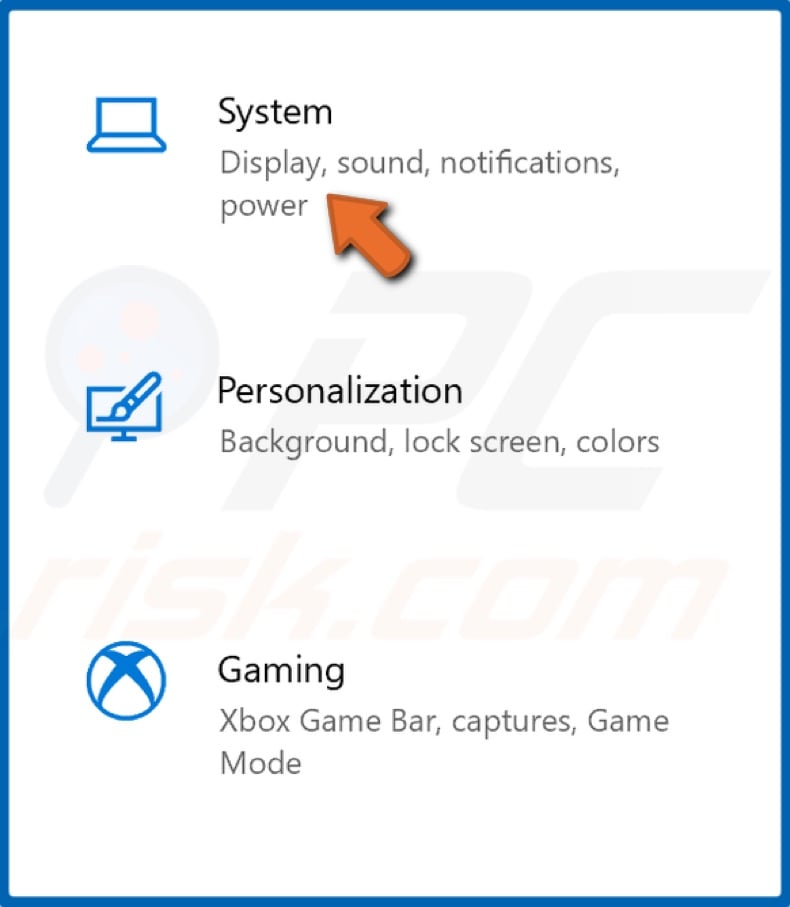
2. Select System.
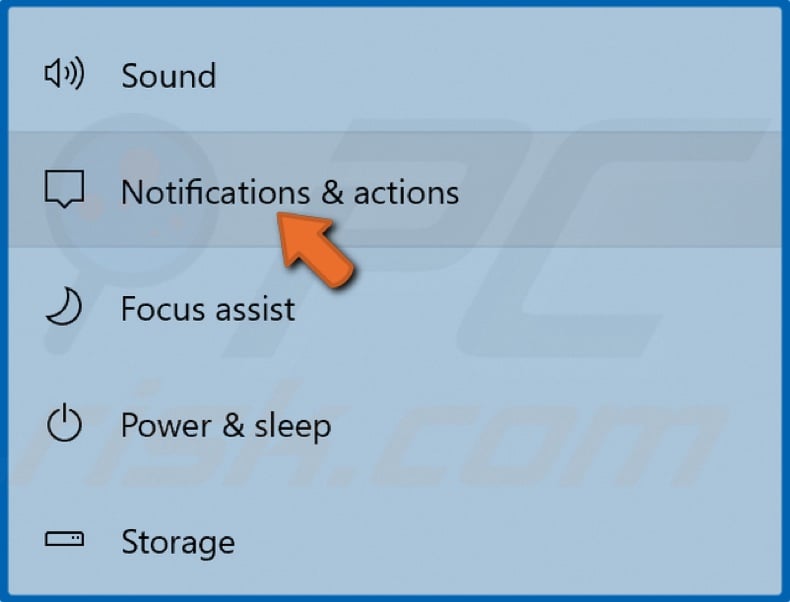
3. Then, select Notifications & actions in the left pane.
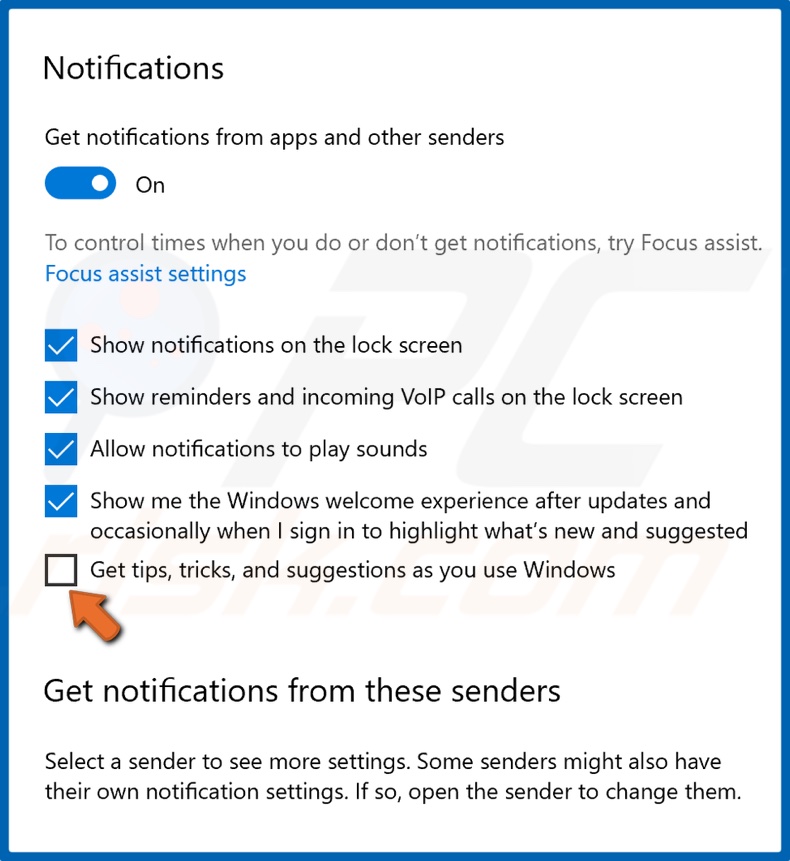
4. Uncheck the checkbox next to Get tips, tricks, and suggestions as you use Windows.
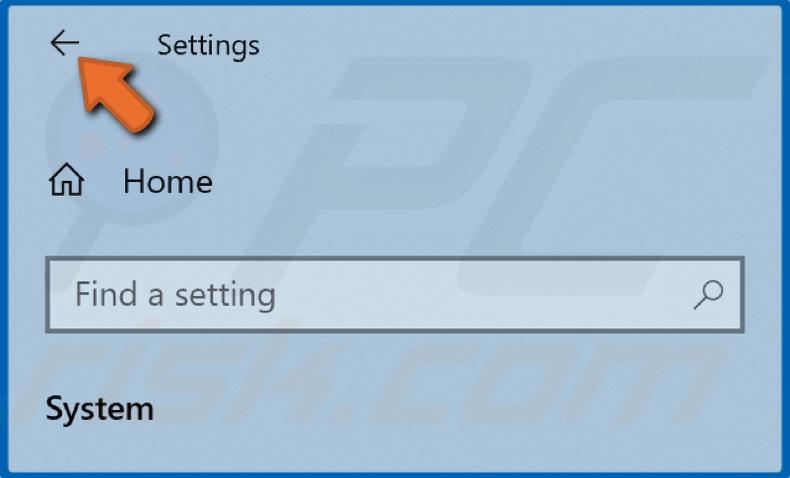
5. Then, click the Back button to go back to the main Settings window.
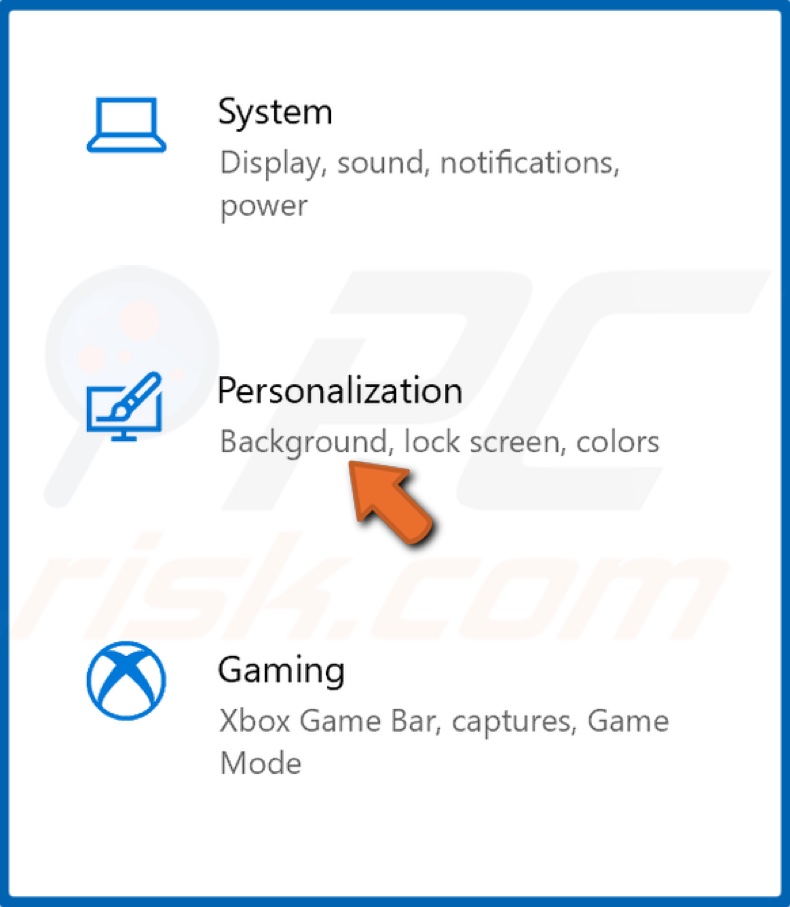
6. Select Personalization.

7. Select Start in the left pane.
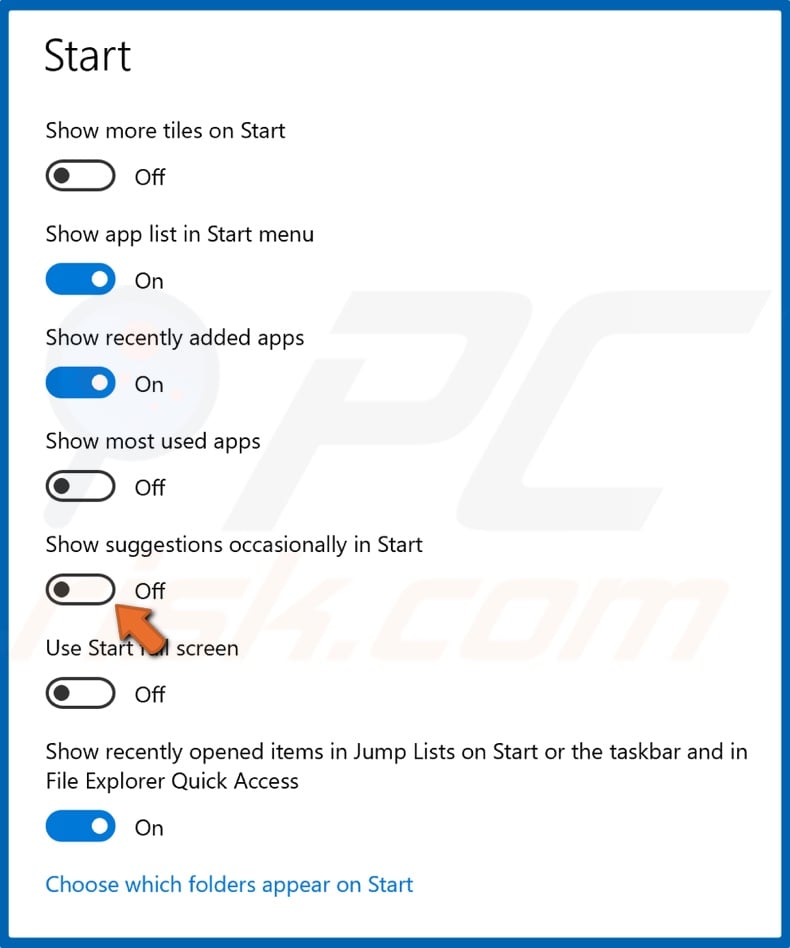
8. Toggle off the Show suggestions occasionally in Start option.
9. Then, click the Back button to go back to the main Settings window.
10. Select Update & Security.
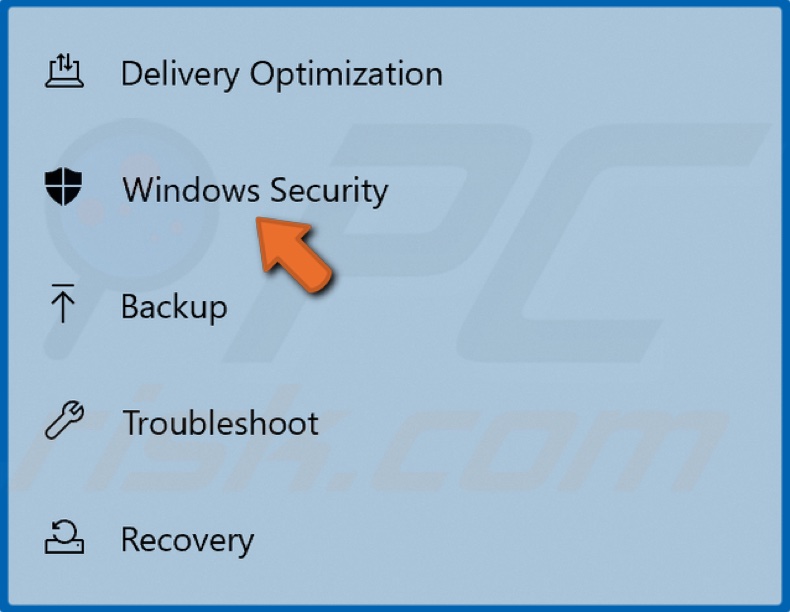
11. Then, select Windows Security in the left pane.
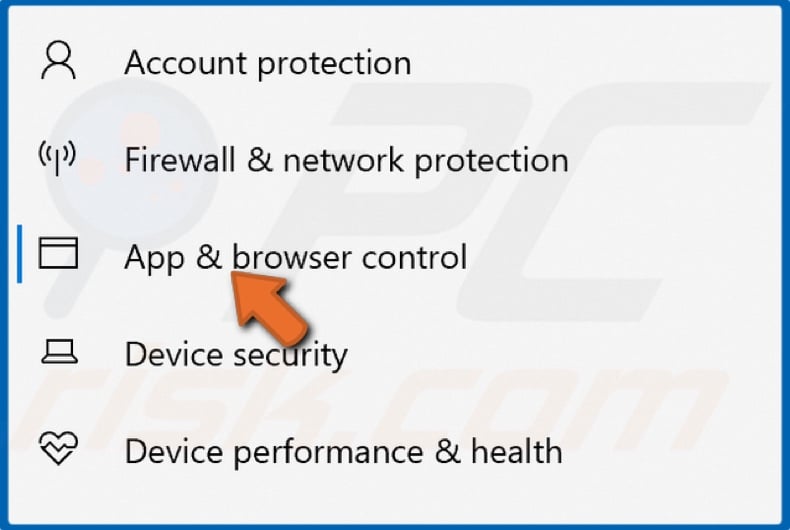
12. Select App & browser control.
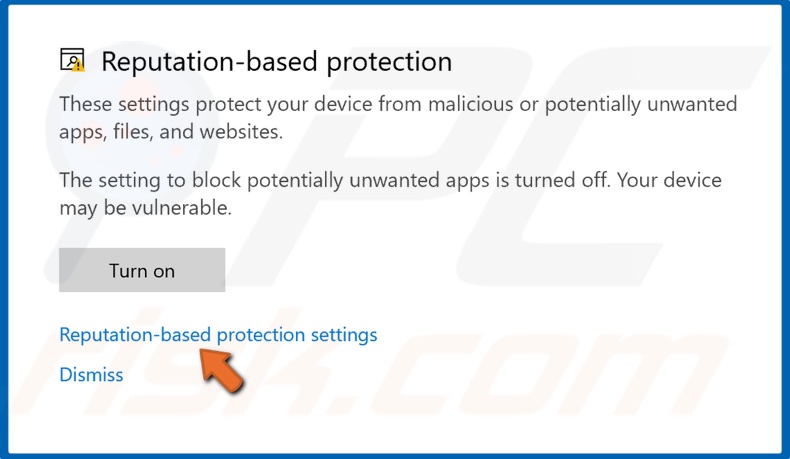
13. In the resulting Windows Security window, click Reputation-based protection settings.

14. Toggle off Microsoft Defender SmartScreen for apps and files, Microsoft Edge, and Microsoft Store apps.
15. Close the Windows Security window.
16. Click the Back button to go back to the main Settings window for the last time.
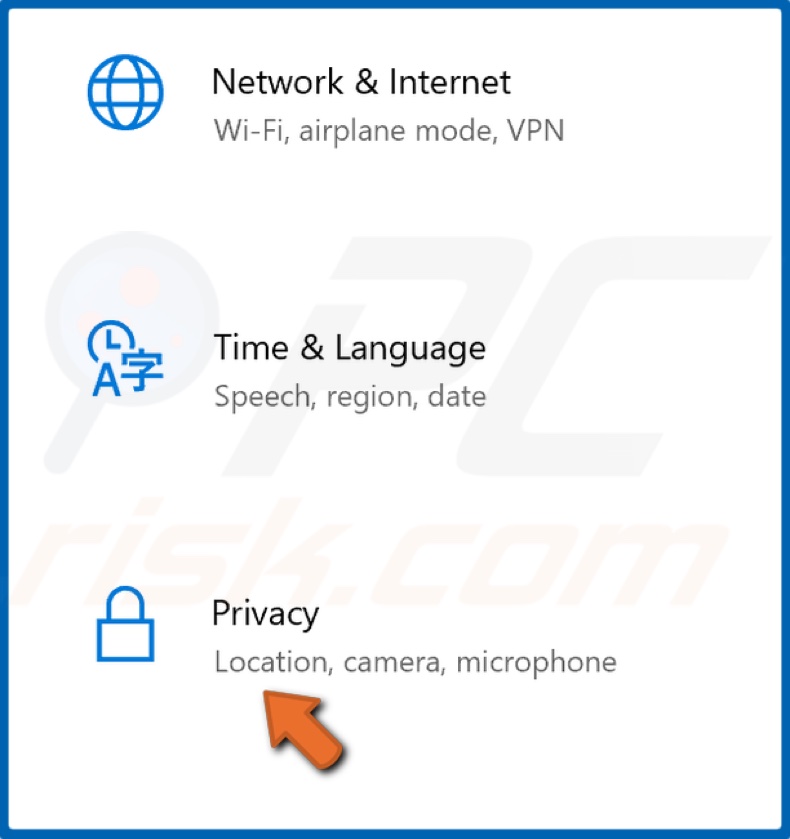
17. Select Privacy.
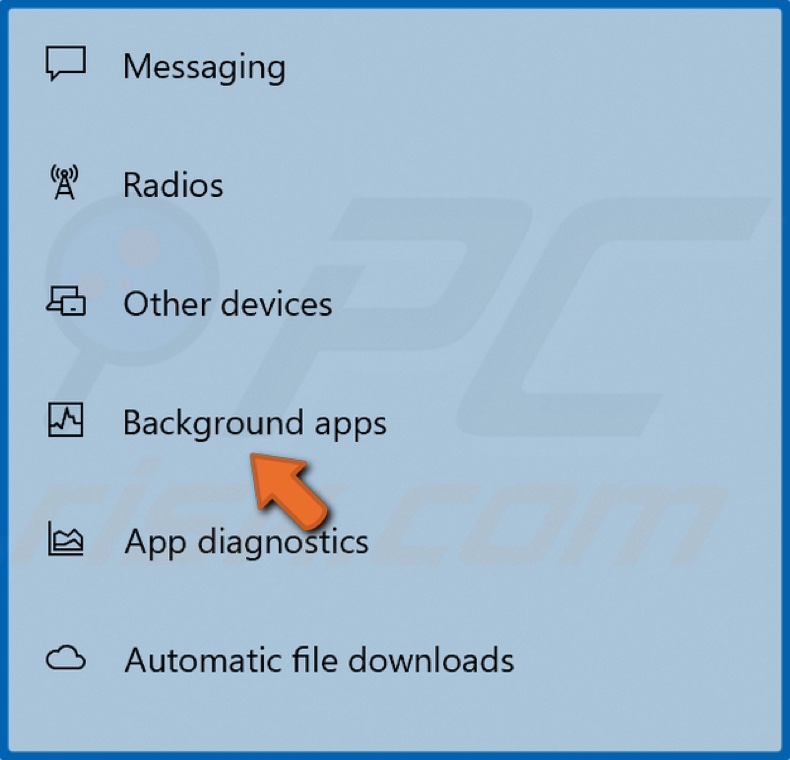
18. Select Background apps in the left pane.

19. Scroll through the apps list and toggle off all of the apps you think are unnecessary.
20. Close the Settings window.
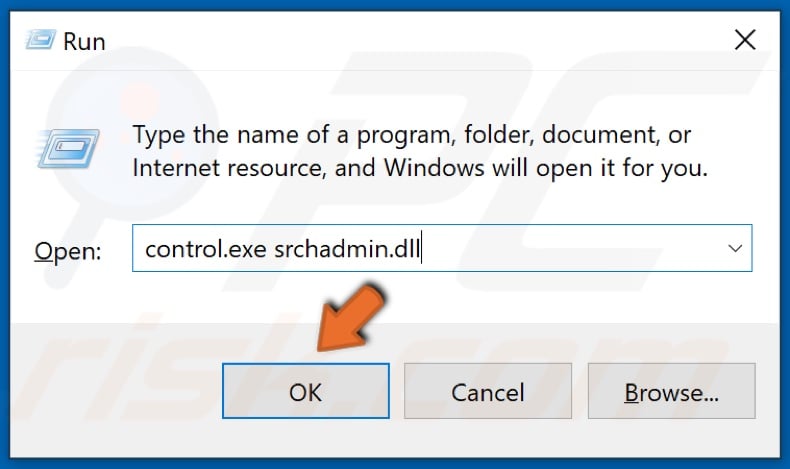
21. Hold down Windows+R keys to open Run.
22. In the Run dialog box, type in control.exe srchadmin.dll and click OK.
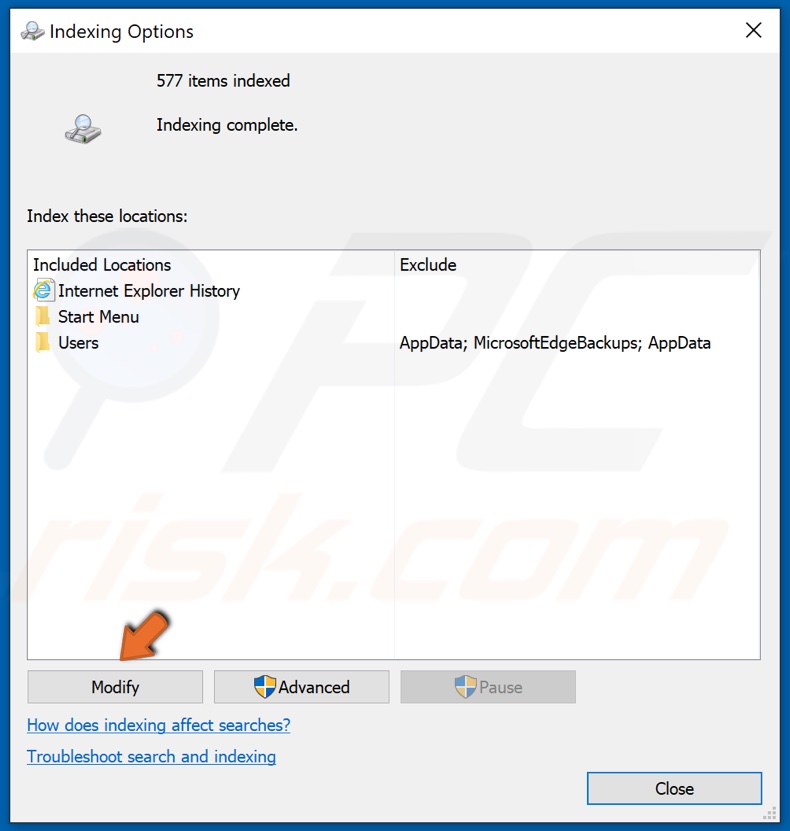
23. Click Modify.
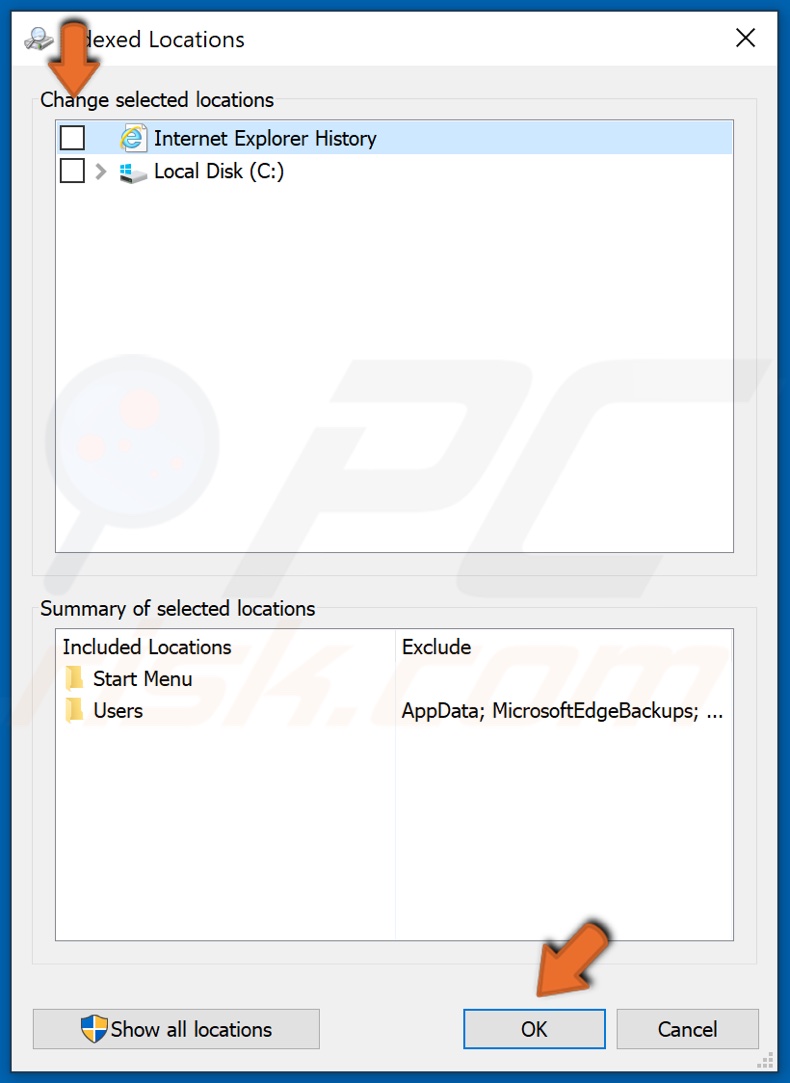
24. Uncheck the options in the top section of the window and click OK.

25. Close the Indexing options window.
Solution 3. Run Deployment Imaging and Servicing Management (DISM) Scan
1. Hold down Windows+R keys to open Run.
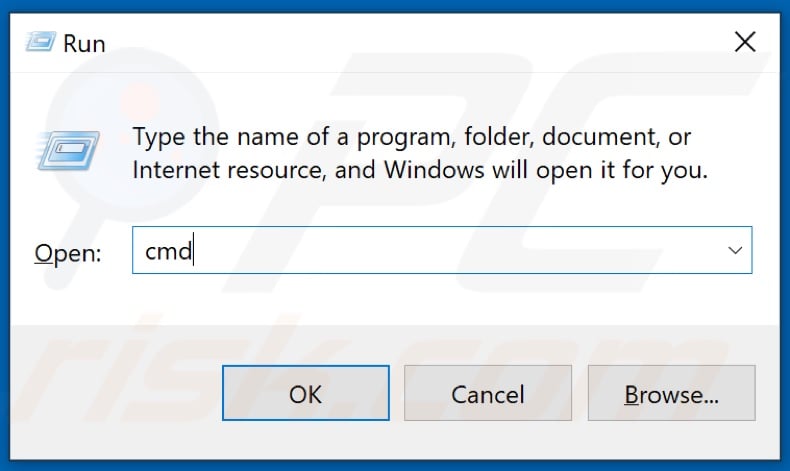
2. In the Run dialog box, type in CMD and hold down Ctrl+Shift+Enter keys to open the elevated Command Prompt.
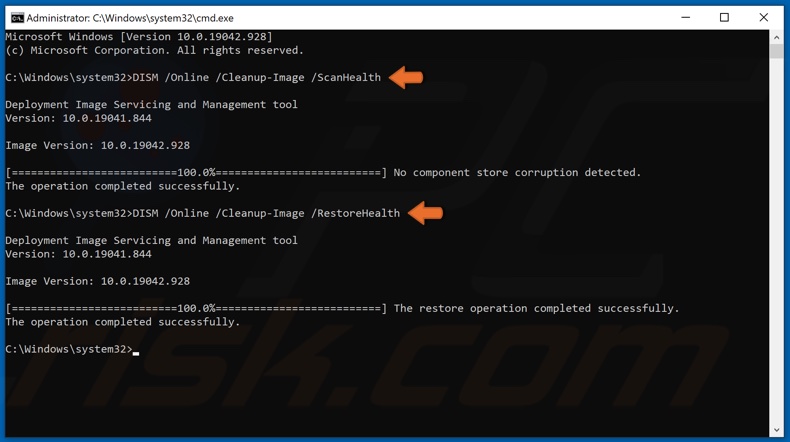
3. First, type in DISM /Online /Cleanup-Image /ScanHealth in the Command Prompt window and press the Enter key.
4. Then, type in DISM /Online /Cleanup-Image /RestoreHealth and press the Enter key.
5. Close the Command Prompt and restart your PC.
Solution 4. Run System File Checker (SFC) Scan
1. Hold down Windows+R keys to open Run.
2. In the Run dialog box, type in CMD and hold down Ctrl+Shift+Enter keys to open the elevated Command Prompt.
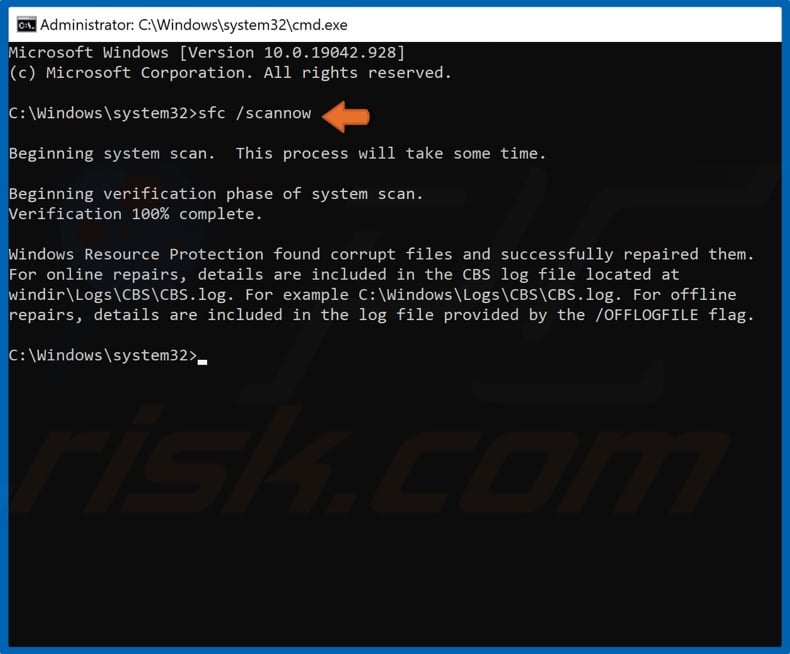
3. Then, in the Command Prompt window, type in SFC /ScanNow and press the Enter key.
4. Then, close the Command Prompt and restart your PC.
Solution 5. Clear the SoftwareDistribution Folder
1. Hold down Windows+R keys to open Run.
2. In the Run dialog box, type in CMD and hold down Ctrl+Shift+Enter keys to open the elevated Command Prompt.
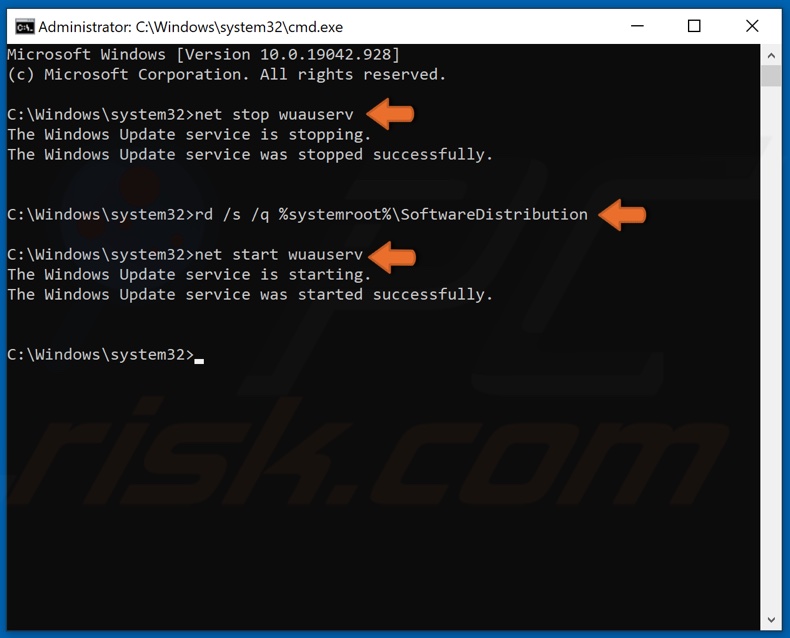
3. First, in the Command Prompt window, type in net stop wuauserv, and press the Enter key.
4. Then, type in rd /s /q %systemroot%\SoftwareDistribution and press the Enter key.
5. Lastly, type in net start wuauserv and press Enter.
6. Close the Command Prompt.
Share:

Rimvydas Iliavicius
Researcher, author
Rimvydas is a researcher with over four years of experience in the cybersecurity industry. He attended Kaunas University of Technology and graduated with a Master's degree in Translation and Localization of Technical texts. His interests in computers and technology led him to become a versatile author in the IT industry. At PCrisk, he's responsible for writing in-depth how-to articles for Microsoft Windows.
▼ Show Discussion