5 Ways to Fix Microsoft Compatibility Telemetry High CPU and Disk Usage
Get Free Scanner and check your computer for errors
Fix It NowTo fix found issues, you have to purchase the full version of Combo Cleaner. Free trial available. Combo Cleaner is owned and operated by Rcs Lt, the parent company of PCRisk.com read more.
How to Fix Microsoft Compatibility Telemetry (CompatTelRunner.exe) High CPU and Disk Usage
Microsoft Compatibility Telemetry is a Windows system service responsible for collecting and sending usage and performance data to Microsoft. The problem is that some Windows 10 users have noticed that CompatTelRunner.exe causes high CPU and Disk usage. This article is dedicated to helping you fix this issue.
Even today, CompatTelRunner.exe is found in Windows 7 (with the latest updates), Windows 8.1, and Windows 10. It’s been known to cause high resource consumption in all three operating systems.
CompatTelRunner.exe is generally not CPU resource-intensive, but it may spike CPU and/or Disk usage to 100% for up to 20 minutes at startup. Also, some users have even reported encountering performance issues and application crashes.
The good news is that you can stop and disable Microsoft Compatibility Telemetry’s process at any time. You can disable the service from Scheduled Tasks, which is responsible for launching CompatTelRunner.exe on system startup.
Alternatively, you can disable the process using the Group Policy Editor or the Windows Registry Editor. All three methods achieve the same result.
Video Guide on How to Fix Microsoft Compatibility Telemetry High CPU and Disk Usage
Table of Contents:
- Introduction
- Solution 1. Switch Feedback and Diagnostics to Basic
- Solution 2. Disable Microsoft Compatibility Telemetry Using Task Scheduler
- Solution 3. Disable Microsoft Compatibility Telemetry Using Group Policy Editor
- Solution 4. Disable Telemetry Using Windows Registry Editor
- Solution 5. Disable Connected User Experiences and Telemetry Service
- Video Guide on How to Fix Microsoft Compatibility Telemetry High CPU and Disk Usage
Download Computer Malware Repair Tool
It is recommended to run a free scan with Combo Cleaner - a tool to detect viruses and malware on your device. You will need to purchase the full version to remove infections. Free trial available. Combo Cleaner is owned and operated by Rcs Lt, the parent company of PCRisk.com read more.
Solution 1. Switch Feedback and Diagnostics to Basic
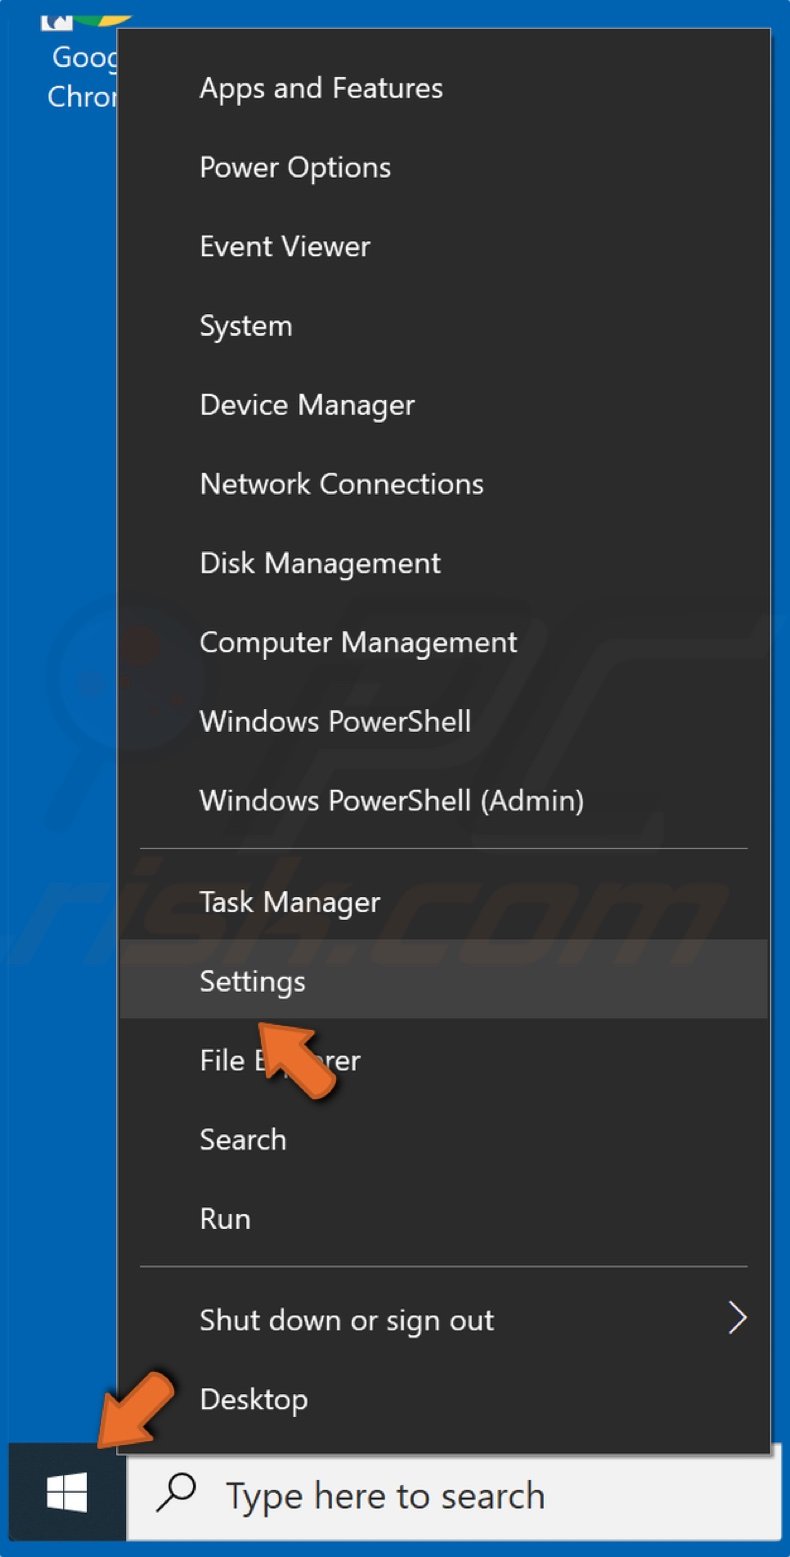
1. Right-click the Start Menu button and click Settings.

2. then, select Privacy.
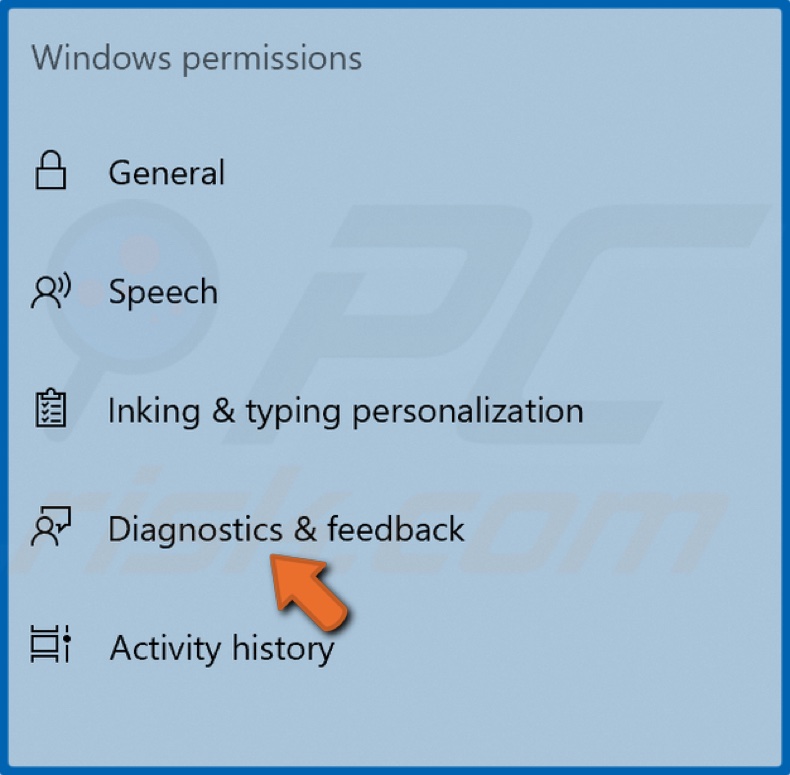
3. In the left pane, select Diagnostics & feedback.
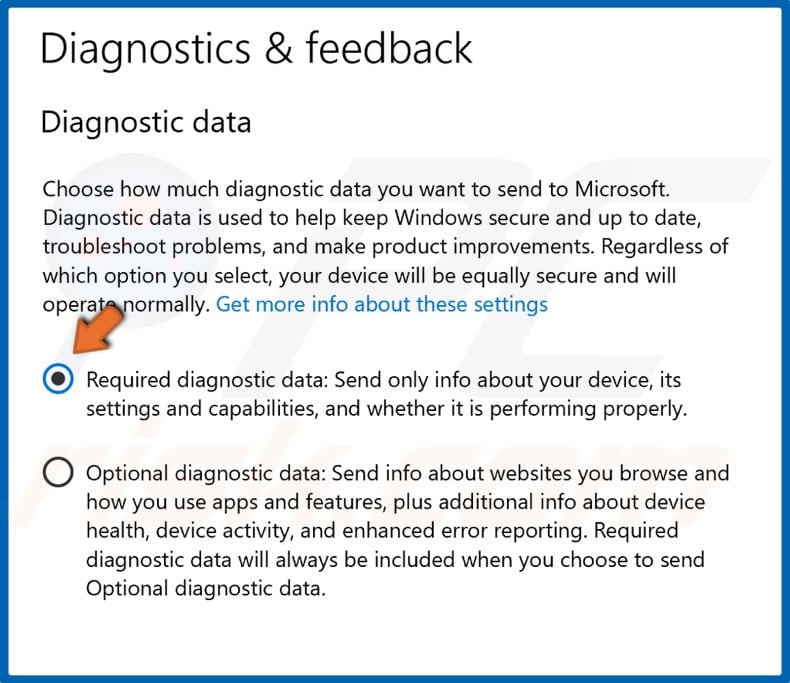
4. If the Optional diagnostic data is selected, select Required diagnostic data.
5. Close the Settings window.
Solution 2. Disable Microsoft Compatibility Telemetry Using Task Scheduler
Instead of removing CompatTelTunner.exe, the easier thing to do is disable it from the Task Scheduler responsible for launching CompatTelTunner.exe on system startup.
1. Hold down Windows+R keys to open Run.
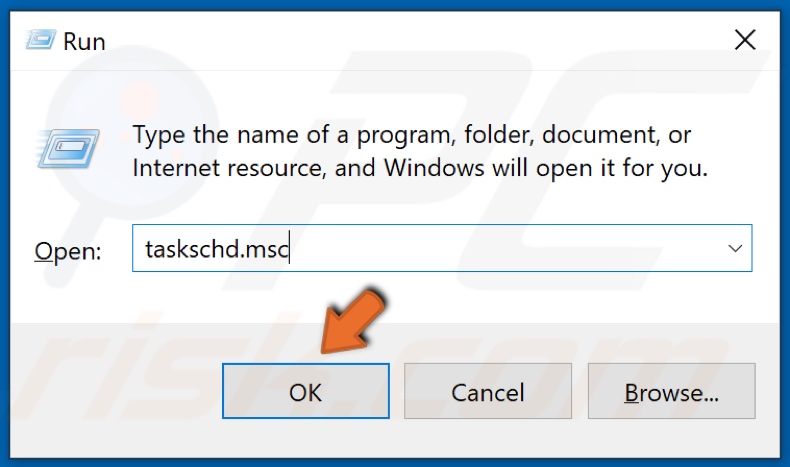
2. In the Run dialog box, type in taskschd.msc and click OK.
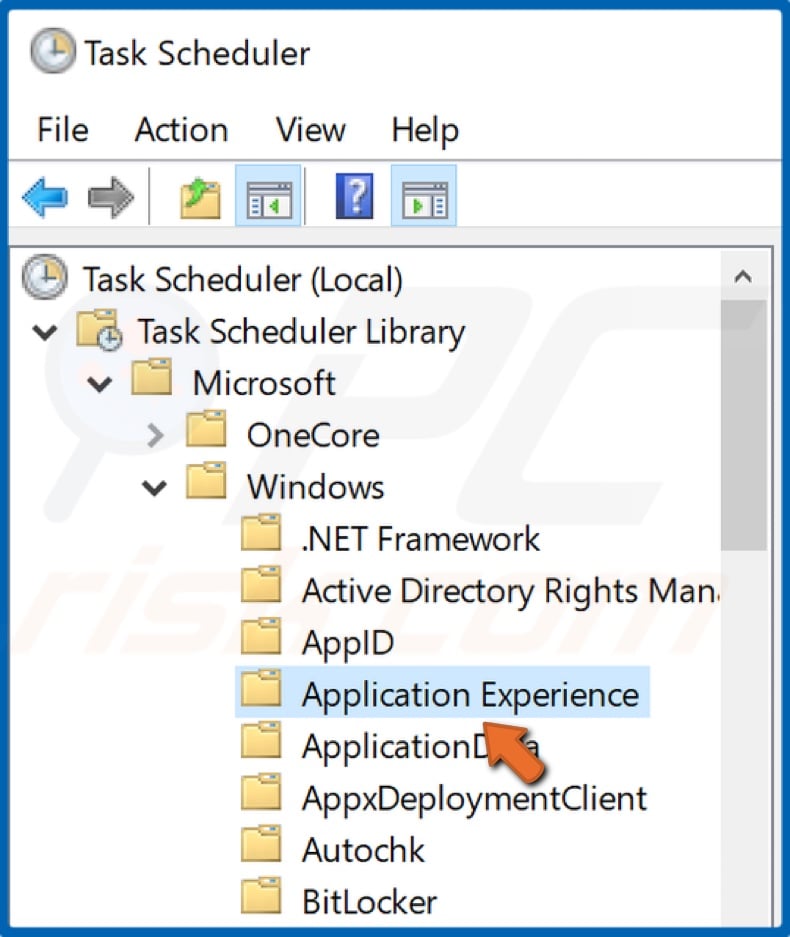
3. Then, navigate to Library/Microsoft/Windows/Application Experience.
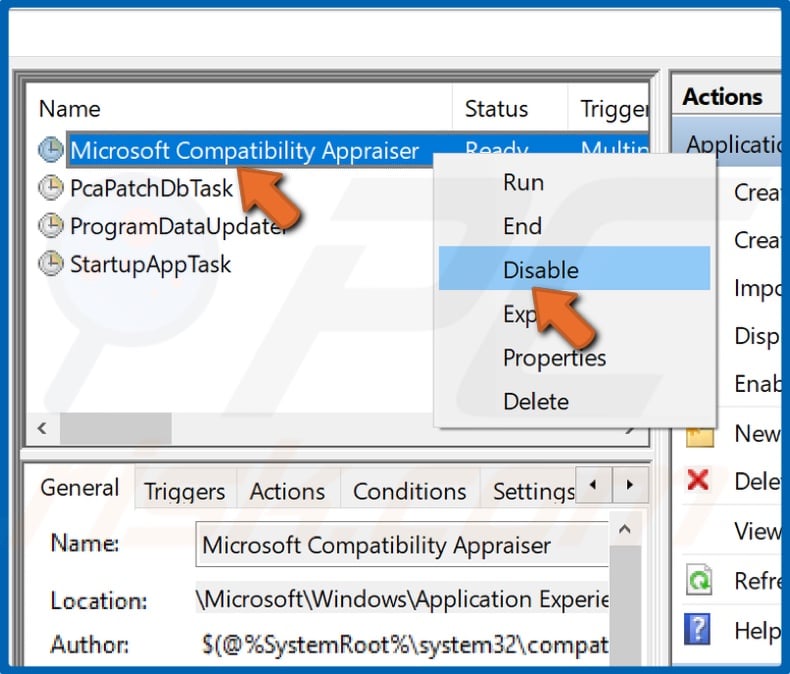
4. In the right pane, find a task called Microsoft Compatibility Appraiser.
5. Right-click Microsoft Compatibility Appraiser and select Disable.
6. Close the Task Scheduler and restart your PC.
Solution 3. Disable Microsoft Compatibility Telemetry Using Group Policy Editor
1. Hold down Windows+R keys to open Run.
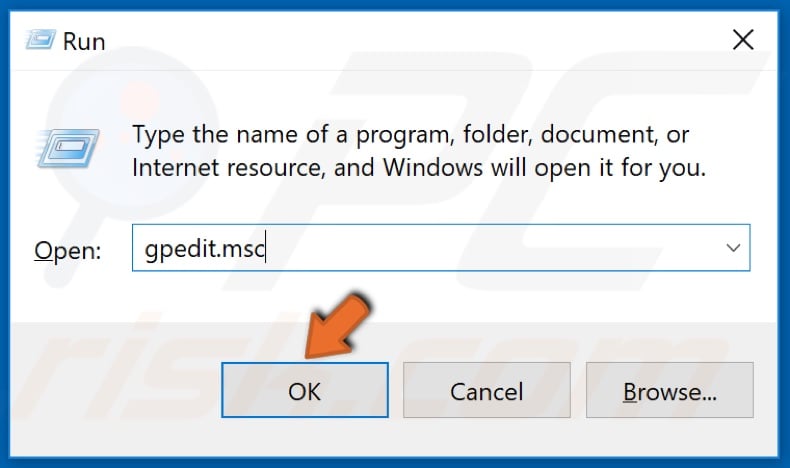
2. In the Run dialog box, type in gpedit.msc and click OK.
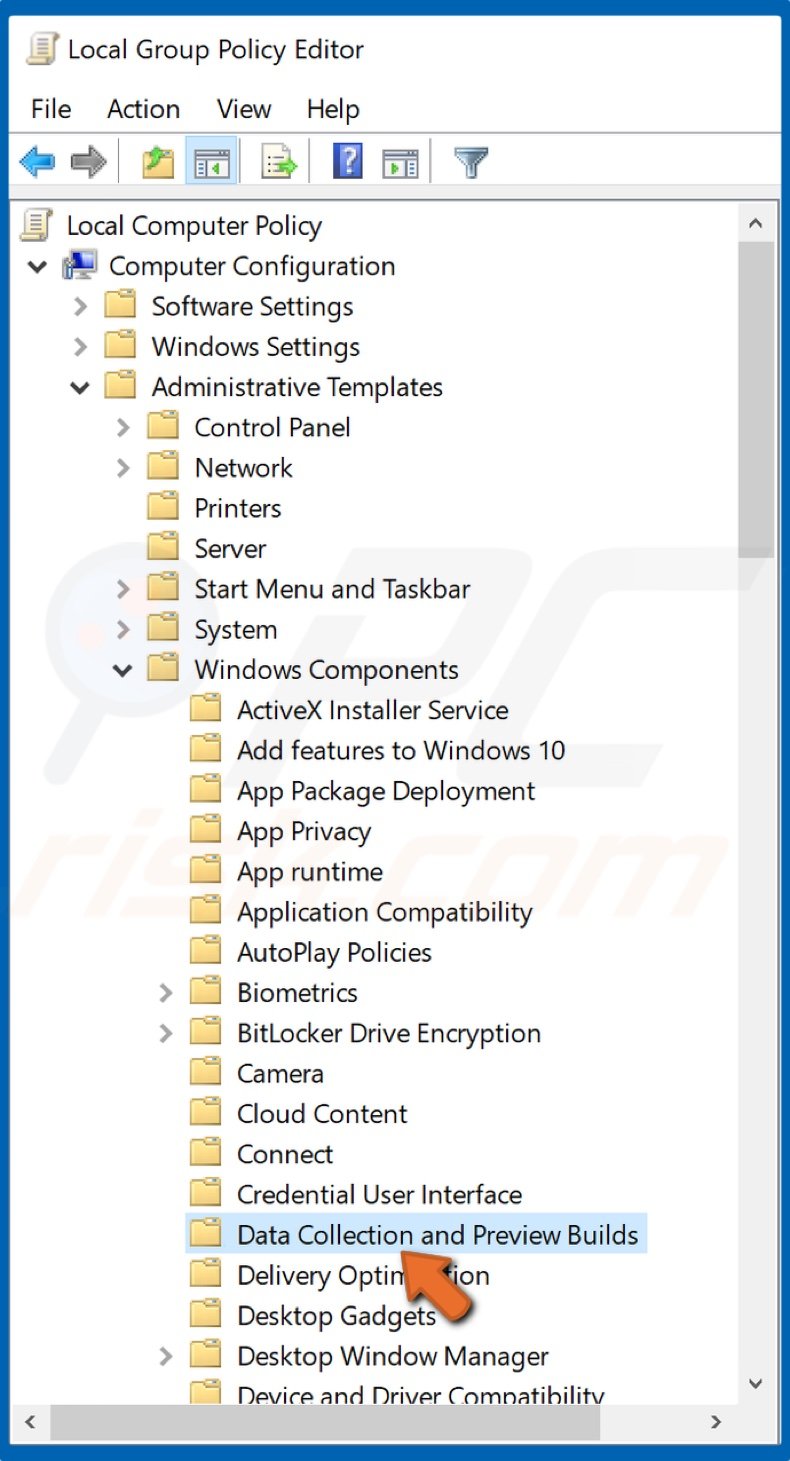
3. Then, navigate to Computer Configuration/Administrative Templates/Windows Components/Data Collection and Preview Builds.
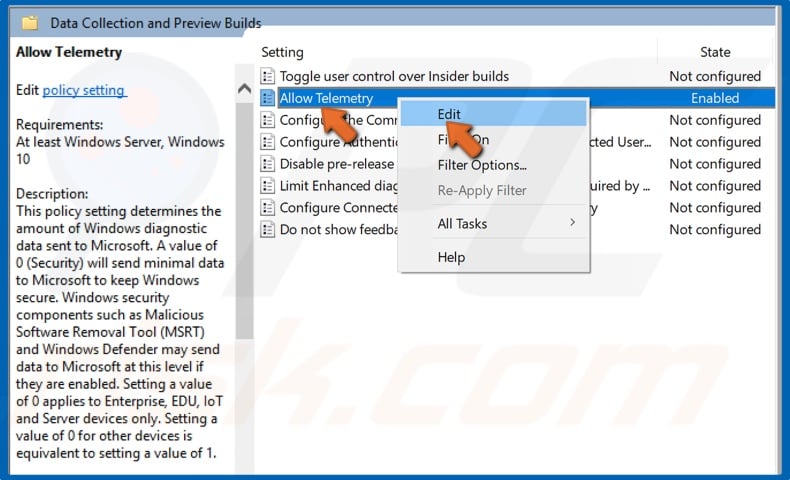
4. Right-click Allow Telemetry and select Edit.
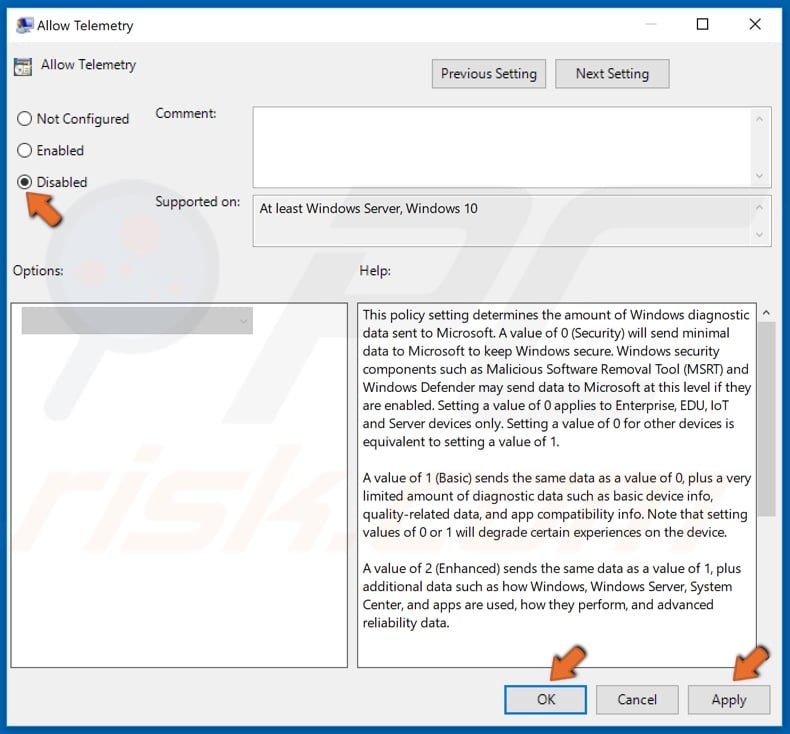
5. Select Disabled. Then, click Apply and click OK.
6. Close the Group Policy Editor and restart your PC.
Solution 4. Disable Telemetry Using Windows Registry Editor
1. Hold down Windows+R keys to open Run.
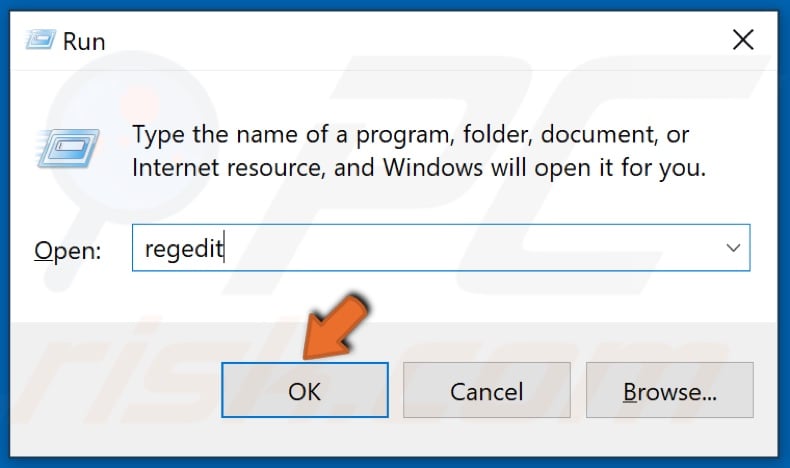
2. In the Run dialog box, type in regedit and click OK.
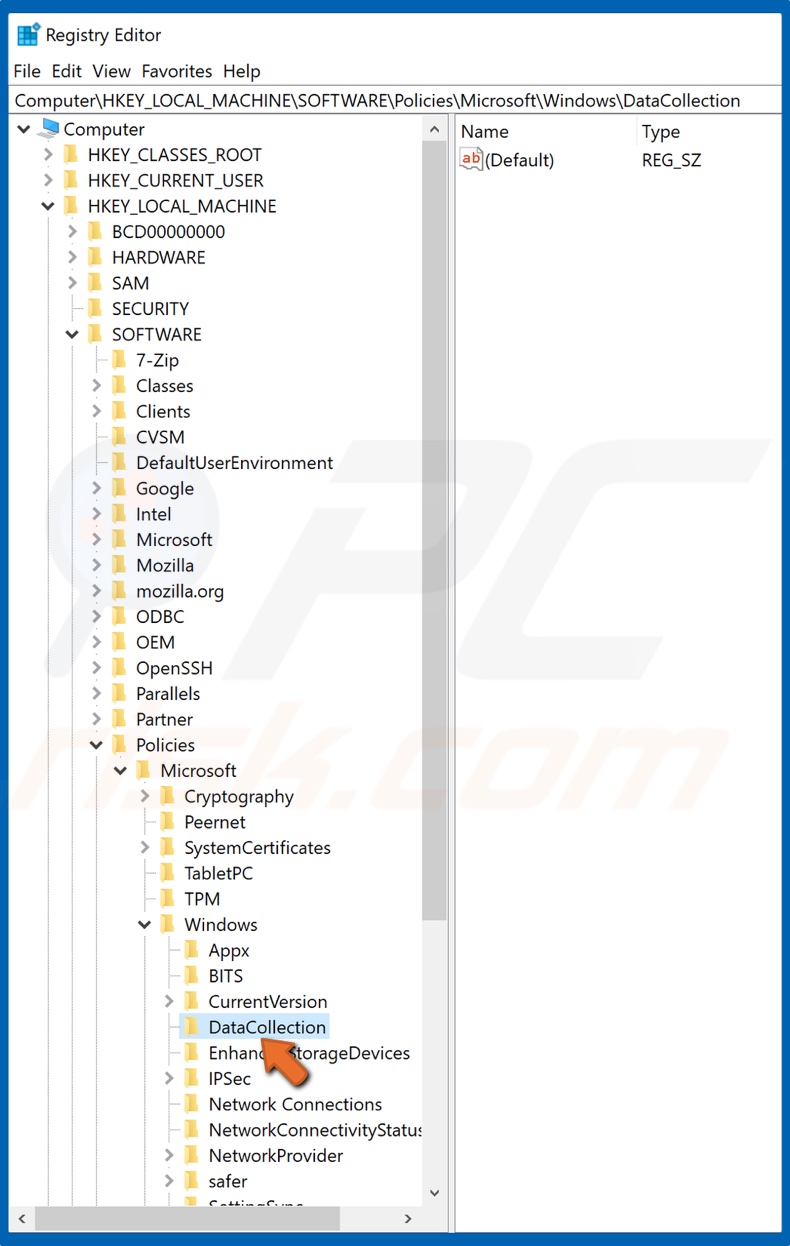
3. Then, navigate to HKEY_LOCAL_MACHINE/SOFTWARE/Policies/Microsoft/Windows/DataCollection.
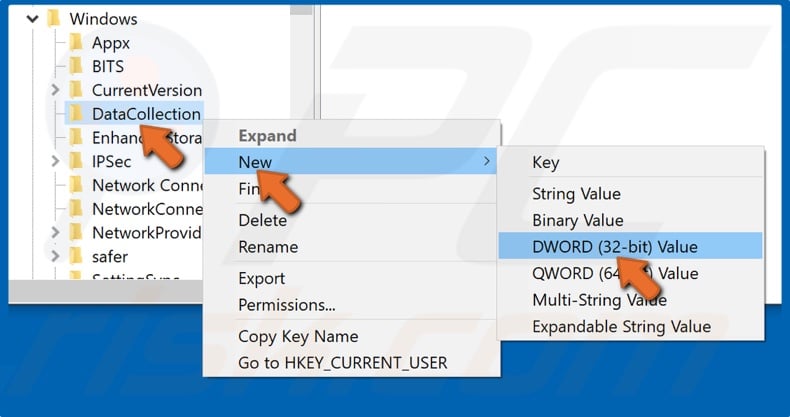
4. Right-click DataCollection and select New, and then select DWORD (32-bit value).
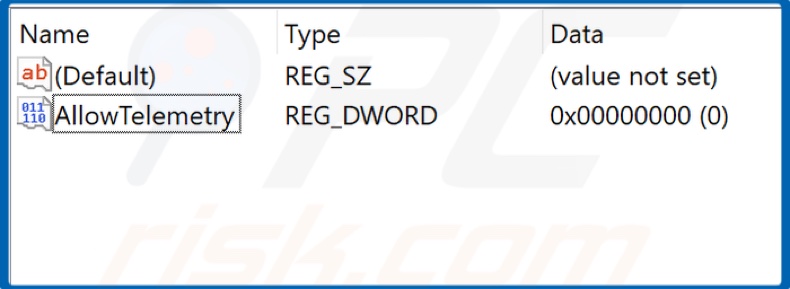
5. Name the new value AllowTelemetry.
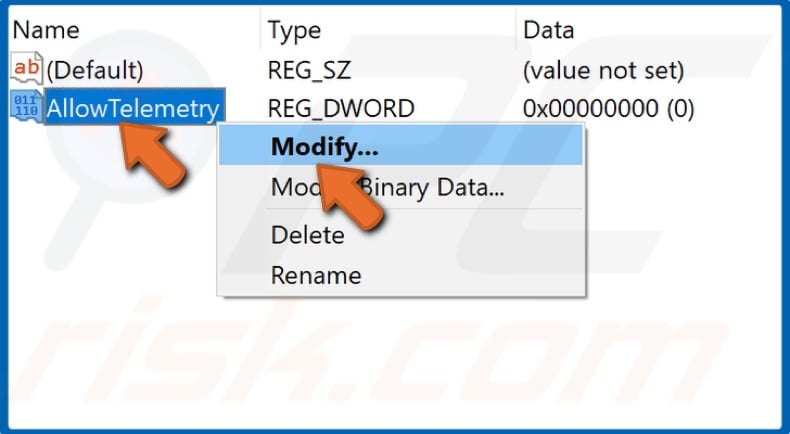
6. Then, right-click AllowTelemetry and click Modify.
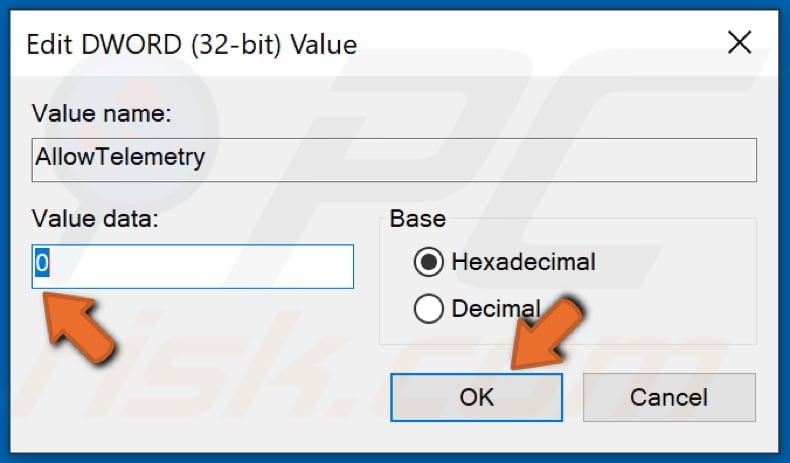
7. Change the Value data from 1 to 0 and click OK.
8. Close the Windows Registry Editor and restart your PC.
Solution 5. Disable Connected User Experiences and Telemetry Service
Connected User Experiences and Telemetry is a background Windows service that automatically sends data to Microsoft. Specifically, this service sends diagnostic and usage information to Microsoft servers. Therefore, disabling it may fix high CPU or Disk usage by CompatTelRunner.exe.
1. Hold down Windows+R keys to open Run.
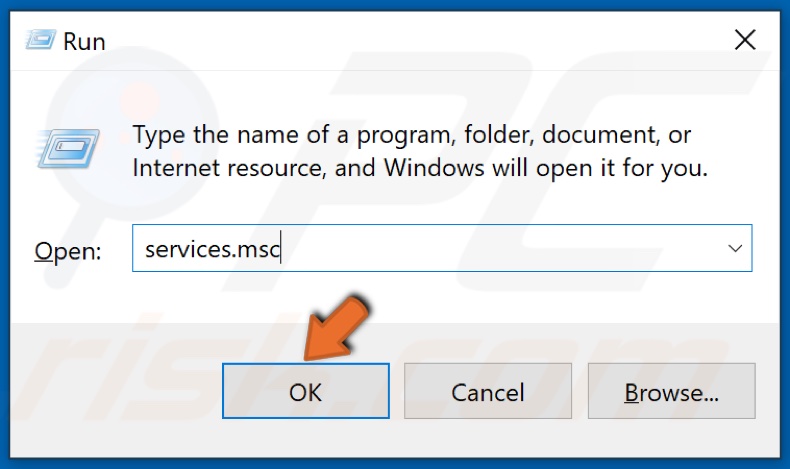
2. In the Run dialog box, type in services.msc and click OK.
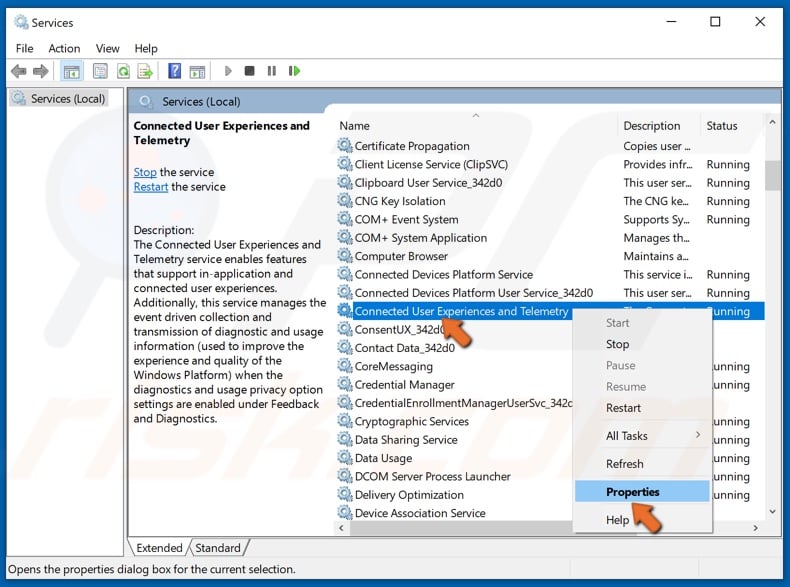
3. Scroll through the services list and locate the Connected User Experiences and Telemetry service.
4. Right-click Connected User Experiences and Telemetry and click Properties.
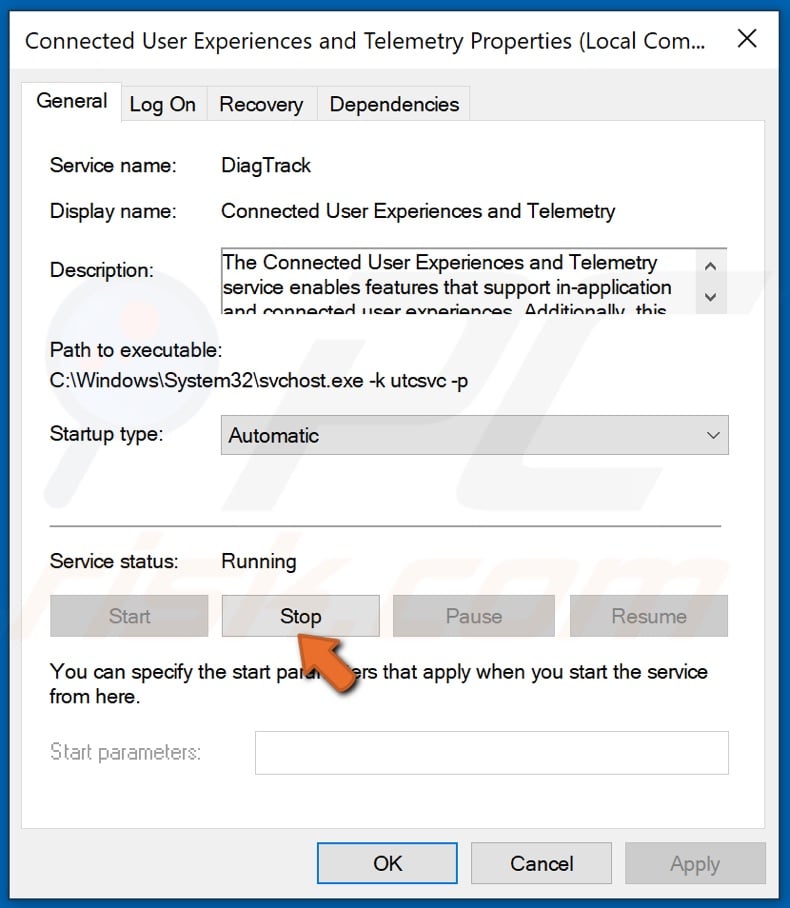
5. Under the Service status section, click the Stop button.
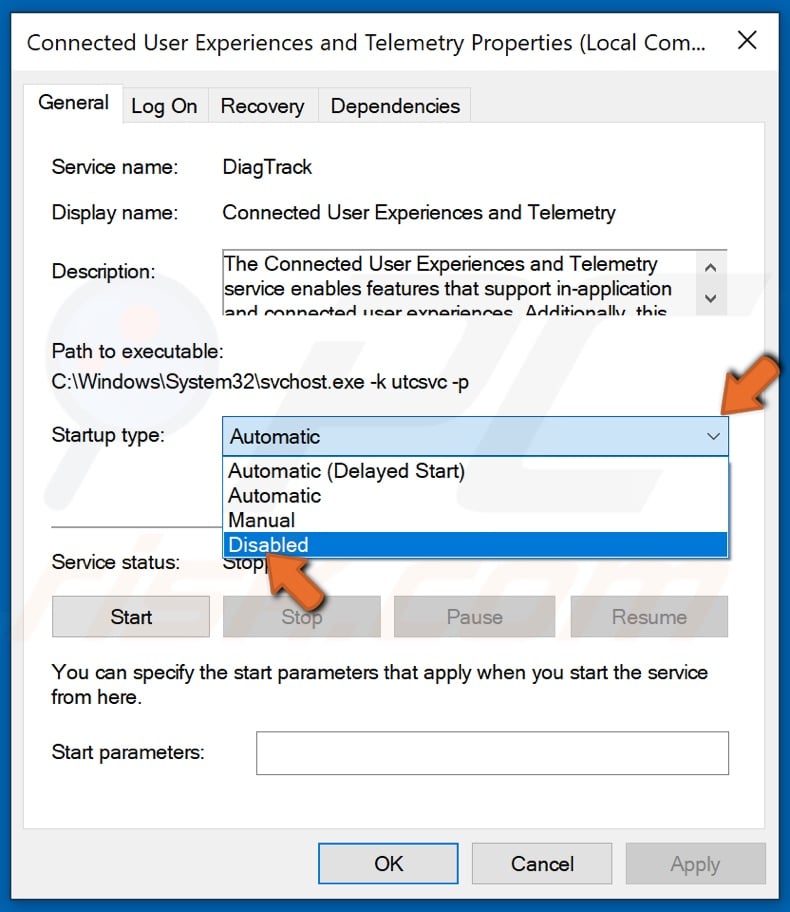
6. Then, Under Startup type, open the drop-down menu and select Disabled.
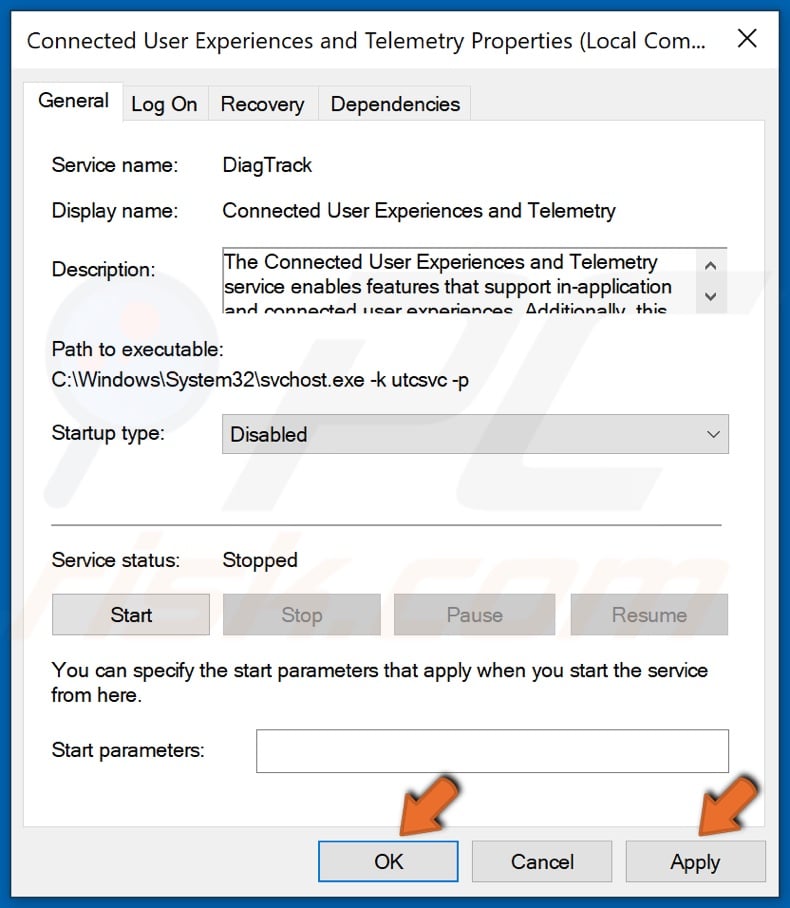
7. Click Apply and click OK.
8. Close the Services window.
Share:

Rimvydas Iliavicius
Researcher, author
Rimvydas is a researcher with over four years of experience in the cybersecurity industry. He attended Kaunas University of Technology and graduated with a Master's degree in Translation and Localization of Technical texts. His interests in computers and technology led him to become a versatile author in the IT industry. At PCrisk, he's responsible for writing in-depth how-to articles for Microsoft Windows.

▼ Show Discussion