Fix Windows Update Error 0x800f0984
Get Free Scanner and check your computer for errors
Fix It NowTo fix found issues, you have to purchase the full version of Combo Cleaner. Free trial available. Combo Cleaner is owned and operated by Rcs Lt, the parent company of PCRisk.com read more.
5 Ways to Fix Windows Update Error 0x800f0984
When trying to update Windows 10, you might get an error code 0x800f0984. This error occurs when some system files on your PC become corrupted. Fortunately, error 0x800f0984 is easily fixable.
The Windows Update service makes updating your computer a breeze. If Windows Update runs into trouble, it will most likely fail to install some updates. Then, it will throw an error code that can give you some idea of what might be wrong.
Windows Update error code 0x800f0984 means PSFX_E_MATCHING_BINARY_MISSING(Matching component directory exists but binary missing).
What Causes Error 0x800f0984
As previously mentioned, error 0x800f0984 occurs when some system files become corrupt. In addition, this error may also occur due to internal or external Windows components conflicting with each other.
Most recently, this error started occurring when trying to install Windows 10 cumulative update KB5001330, released on April 13, 2021, for Windows versions 20H2 and 2004. Previously, many users encountered this same error when trying to install Windows 10 cumulative update KB5000842.
We have compiled a list of potential fixes that are known to fix this error. See the instructions below on how to employ these fixes.
Video Guide on How to Fix Windows Update Error 0x800f0984
Table of Contents:
- Introduction
- Solution 1. Run the Windows Update Troubleshooter
- Solution 2. Clear the SoftwareDistribution Folder
- Solution 3. Run the System File Checker (SFC) Scan
- Solution 4. Run the Deployment Image & Servicing Management (DISM) Scan
- Solution 5. Reset Windows 10 Using the Recovery Tool
- Video Guide on How to Fix Windows Update Error 0x800f0984
Download Computer Malware Repair Tool
It is recommended to run a free scan with Combo Cleaner - a tool to detect viruses and malware on your device. You will need to purchase the full version to remove infections. Free trial available. Combo Cleaner is owned and operated by Rcs Lt, the parent company of PCRisk.com read more.
Solution 1. Run the Windows Update Troubleshooter
Before doing anything else, try running the Windows Update Troubleshooter, which was specifically designed to resolve Windows Update-related issues. The troubleshooter detects issues related to the Windows Update service and applies a fix or multiple fixes automatically.
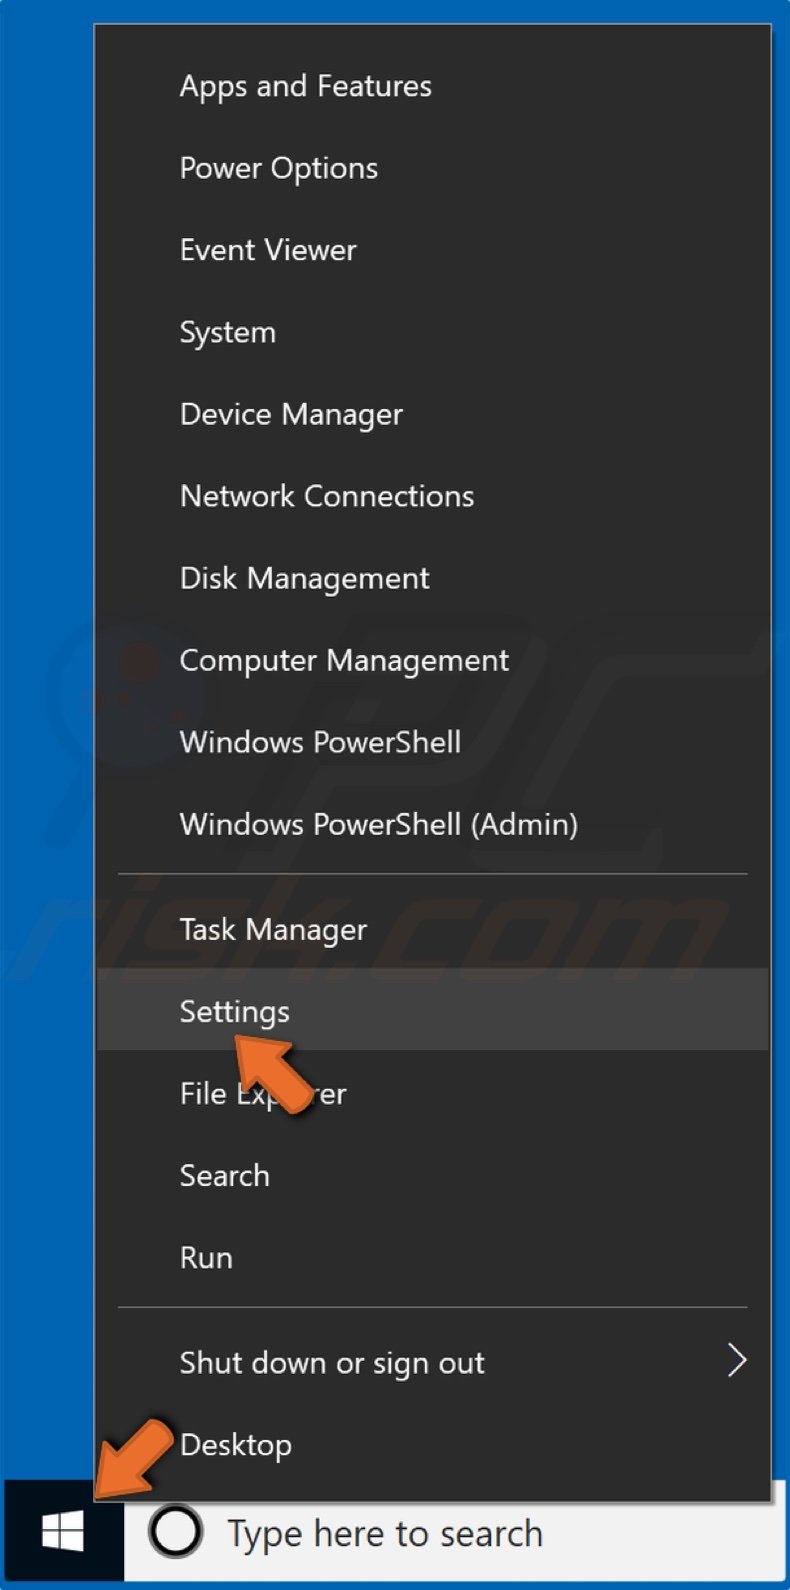
1. Right-click the Start Menu button and click Settings.
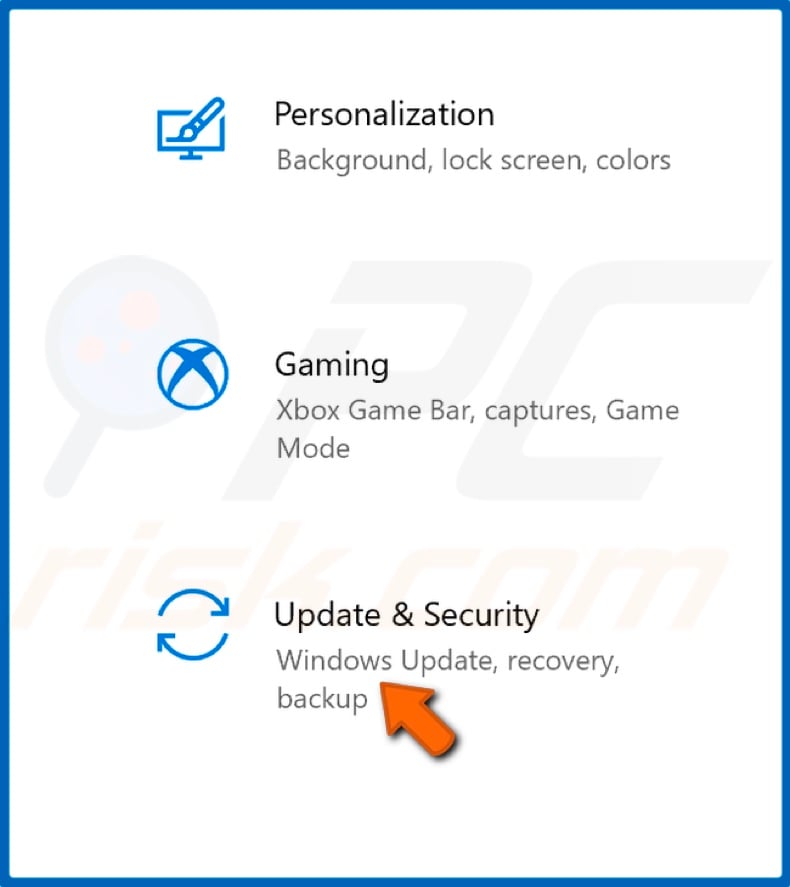
2. Select Update & Security.
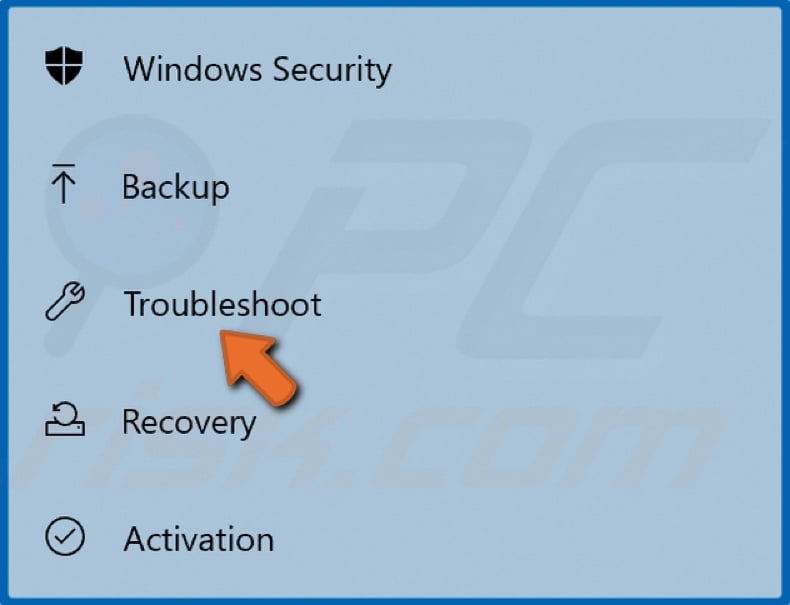
3. Then, select Troubleshoot.
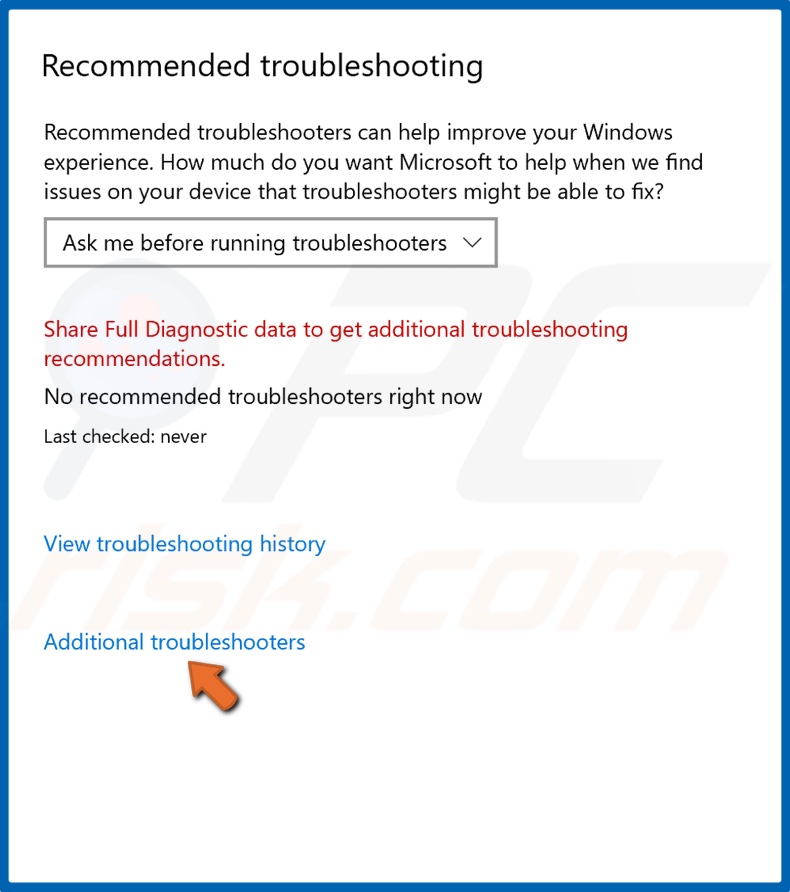
4. Click Additional troubleshooters.
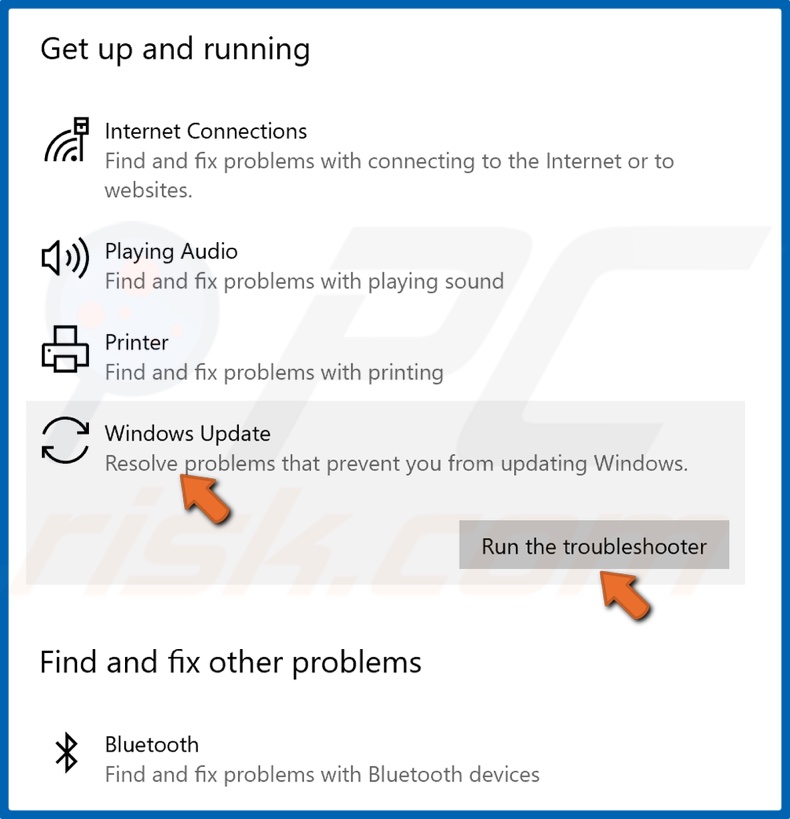
5. Select Windows Update and click Run the troubleshooter.
Solution 2. Clear the SoftwareDistribution Folder
The SoftwareDistribution folder is used to store temporary files that are usually from Windows Updates. If the Windows Update Service isn't working correctly and throws errors, it's a good idea to delete the contents of the SoftwareDistribution folder. The guide below will show you how to clear this folder using only the Command Prompt.
1. Hold down Windows+R keys to open the Run dialog box.
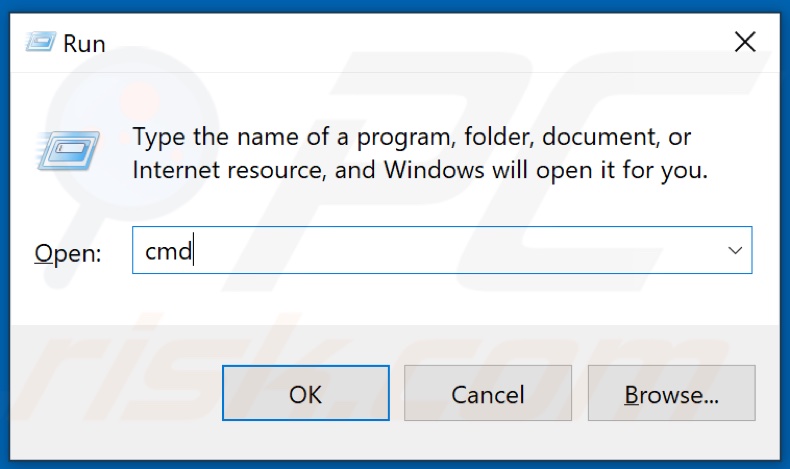
2. Type in CMD in the dialog box and hold down Ctrl+Shift+Enter keys to open the elevated Command Prompt.
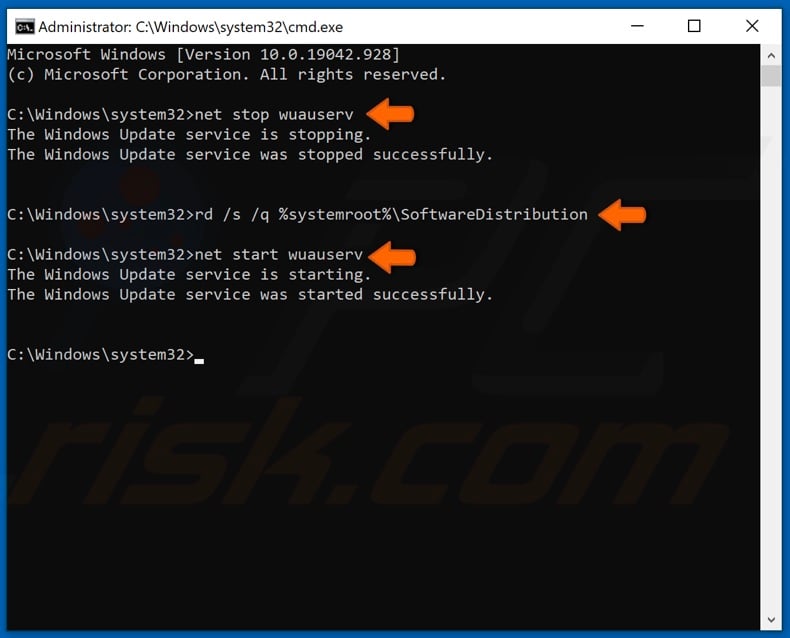
3. In the Command Prompt window, type in net stop wuauserv to stop Windows Update Service.
4. Then, type in rd /s /q %systemroot%\SoftwareDistribution to clear the Update cache folder.
5. Lastly, type in net start wuauserv to restart the Windows Update Service.
Solution 3. Run the System File Checker (SFC) Scan
The System File Checker (SFC) scan is another tool that can help fix error 0x800f0984, provided that the error occurred as a result of a corrupt or broken kernel file in Windows.
1. Hold down Windows+R keys to open the Run dialog box.

2. In the Run dialog box, type in CMD and hold down Ctrl+Shift+Enter keys to open the elevated Command Prompt.
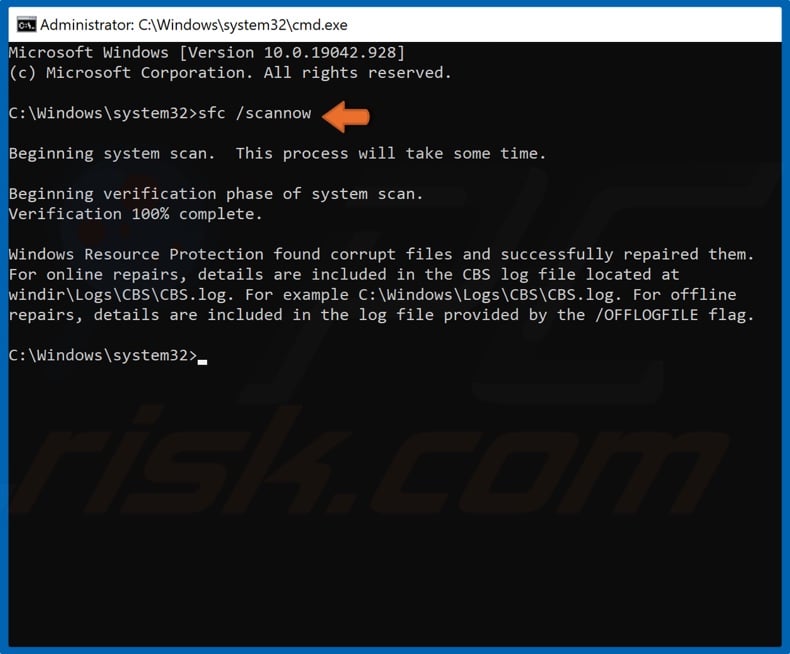
3. In the Command Prompt window, type in SFC /Scannow and hit the Enter key to start the scan.
4. Restart your PC and try updating Windows.
Solution 4. Run the Deployment Image & Servicing Management (DISM) Scan
DISM is a command-line tool designed to repair any damaged or corrupt Windows image or setup.
1. Hold down Windows+R keys to open the Run dialog box.

2. In the Run dialog box, type in CMD and hold down Ctrl+Shift+Enter keys to open the elevated Command Prompt.
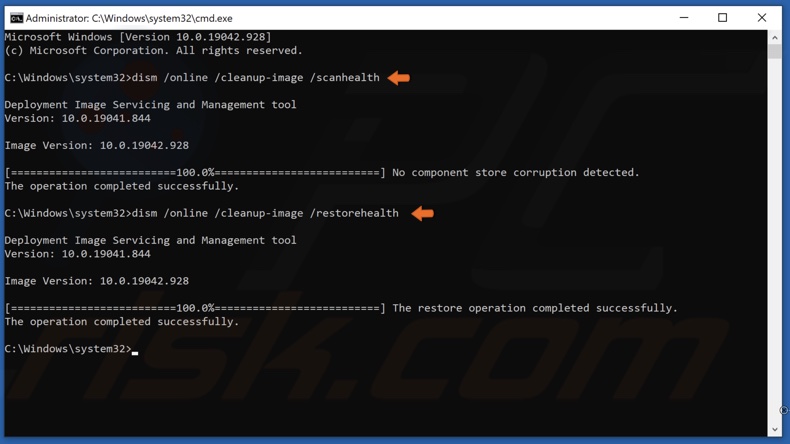
3. In the Comand Prompt window, type in DISM /Online /Cleanup-Image /ScanHealth and hit the Enter key.
4. Then, type in DISM /Online /Cleanup-Image /RestoreHealth and hit the Enter key.
Solution 5. Reset Windows 10 Using the Recovery Tool
If your Windows 10 computer's system files were severely damaged or corrupt, then you can try resetting it. The reset process will allow you to keep all your personal files but replace any damaged files and will Windows Update work again.

1. Right-click the Start Menu button and select Settings.

2. Select Update & Security.
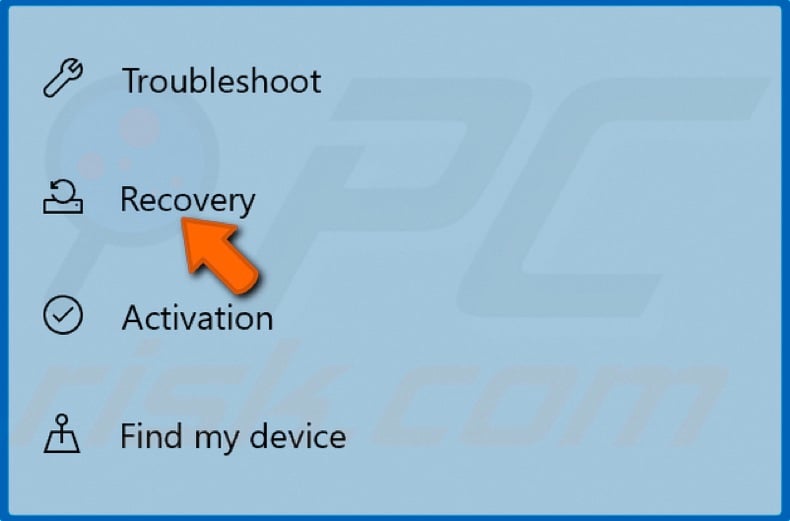
3. Click Recovery located on the left side of the window.
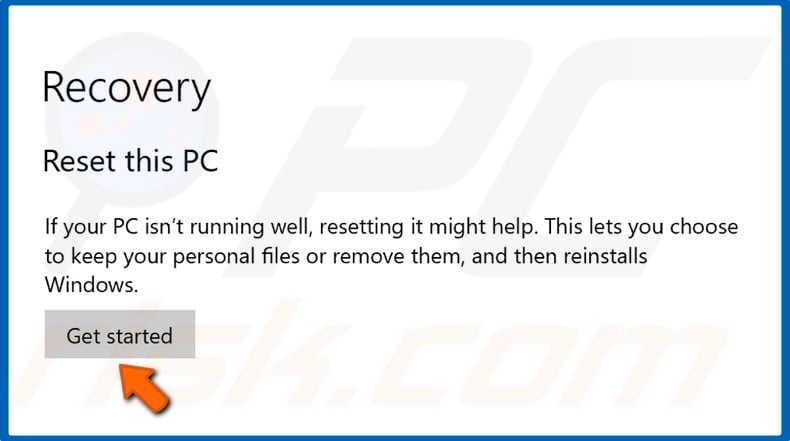
4. Click Get Started.
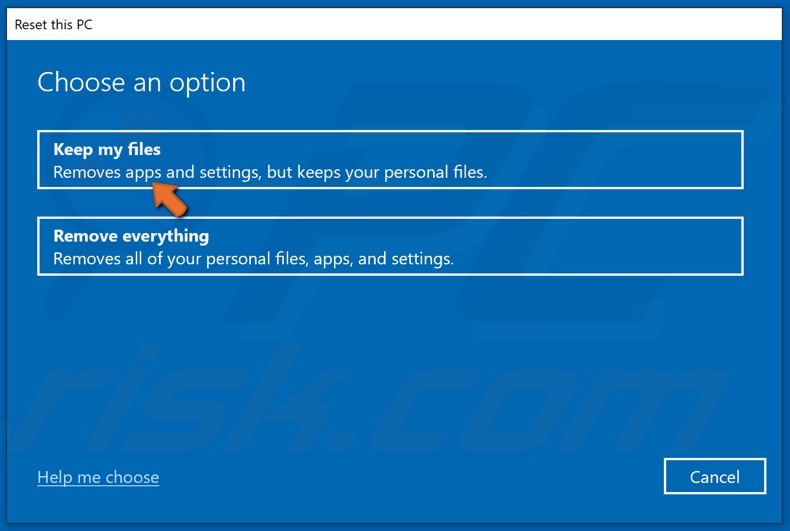
5. Select Keep My Files.
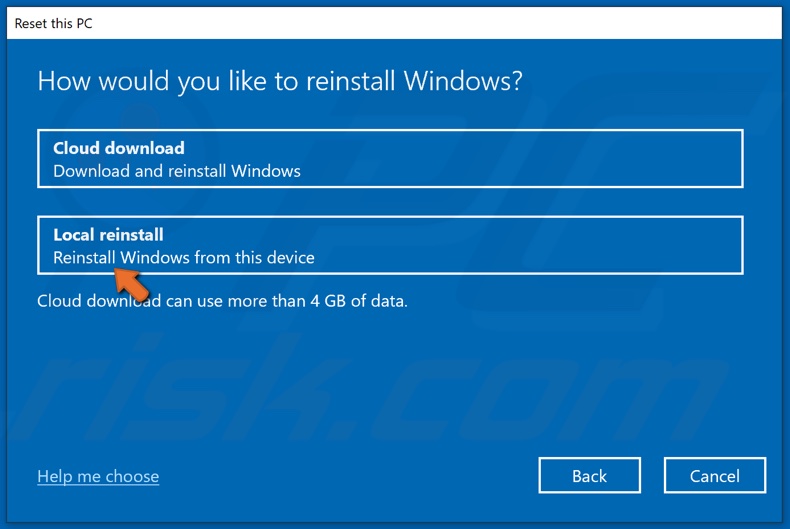
6. Select Local reinstall.
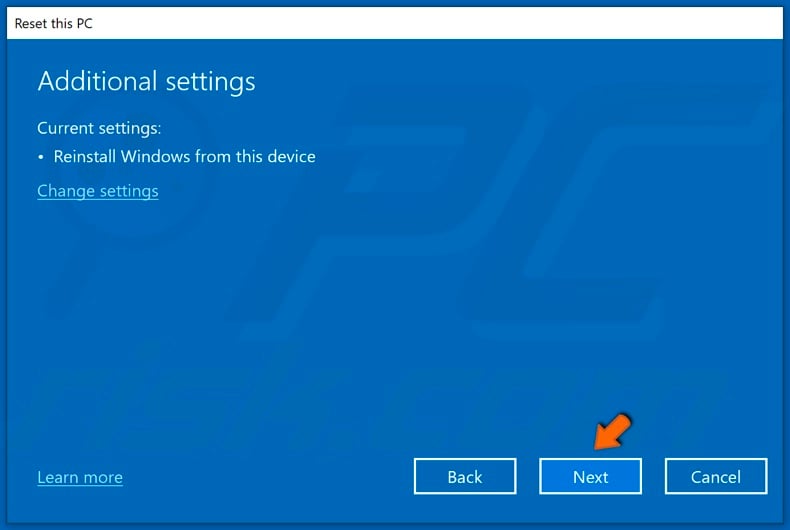
7. Click Next.
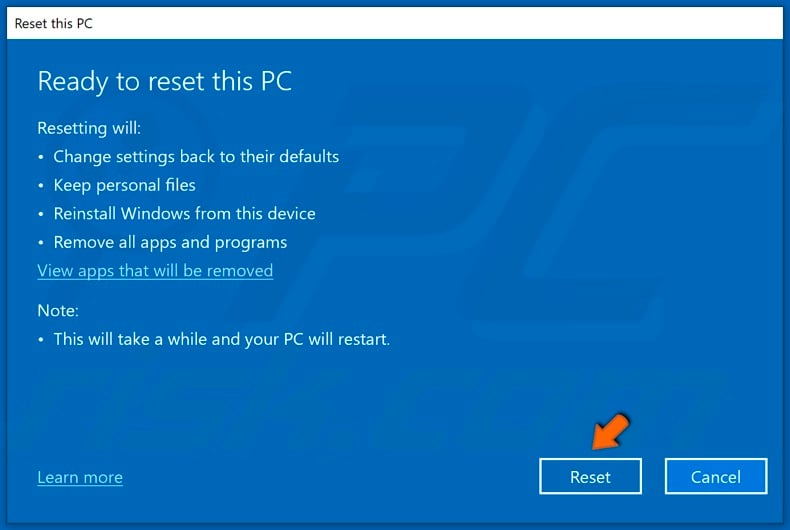
8. Click Reset.
9. Wait for the resetting process to complete.
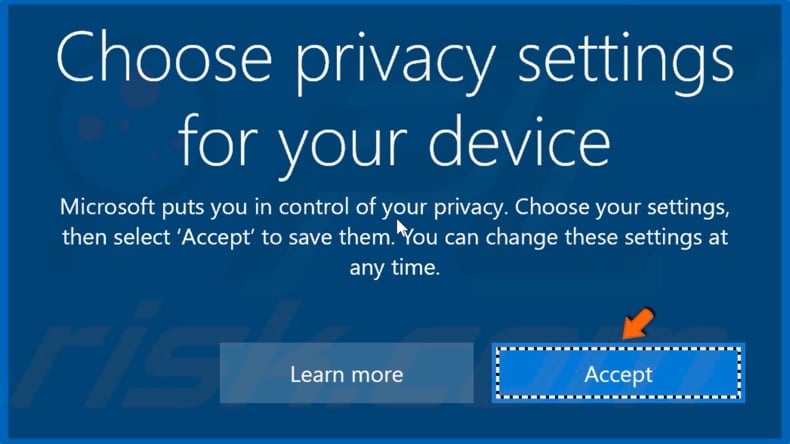
10. Click Accept.
11. You may have to set the display resolution manually once the reset process is complete.
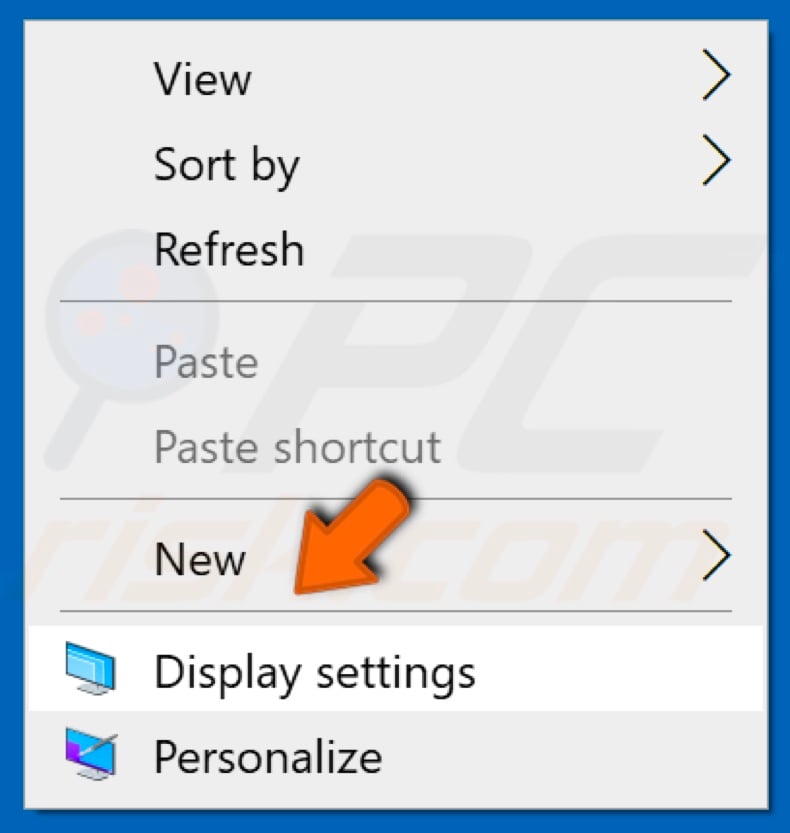
12. To do that, right-click anywhere on the desktop and click Display Settings.
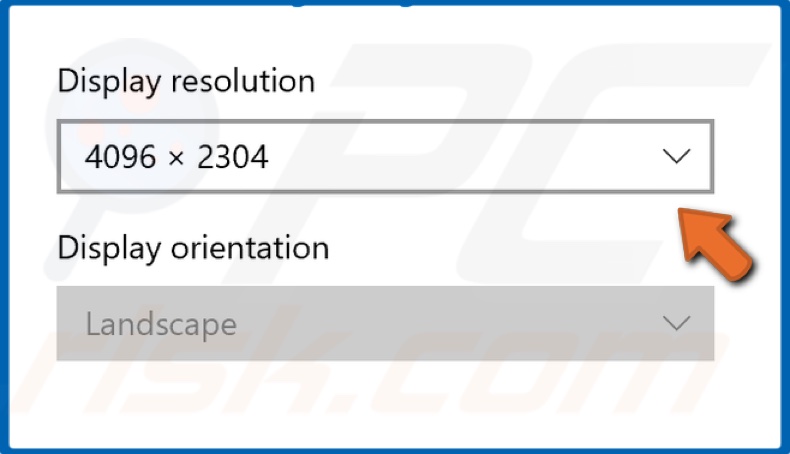
13. Go to the Display Resolution dropdown menu.
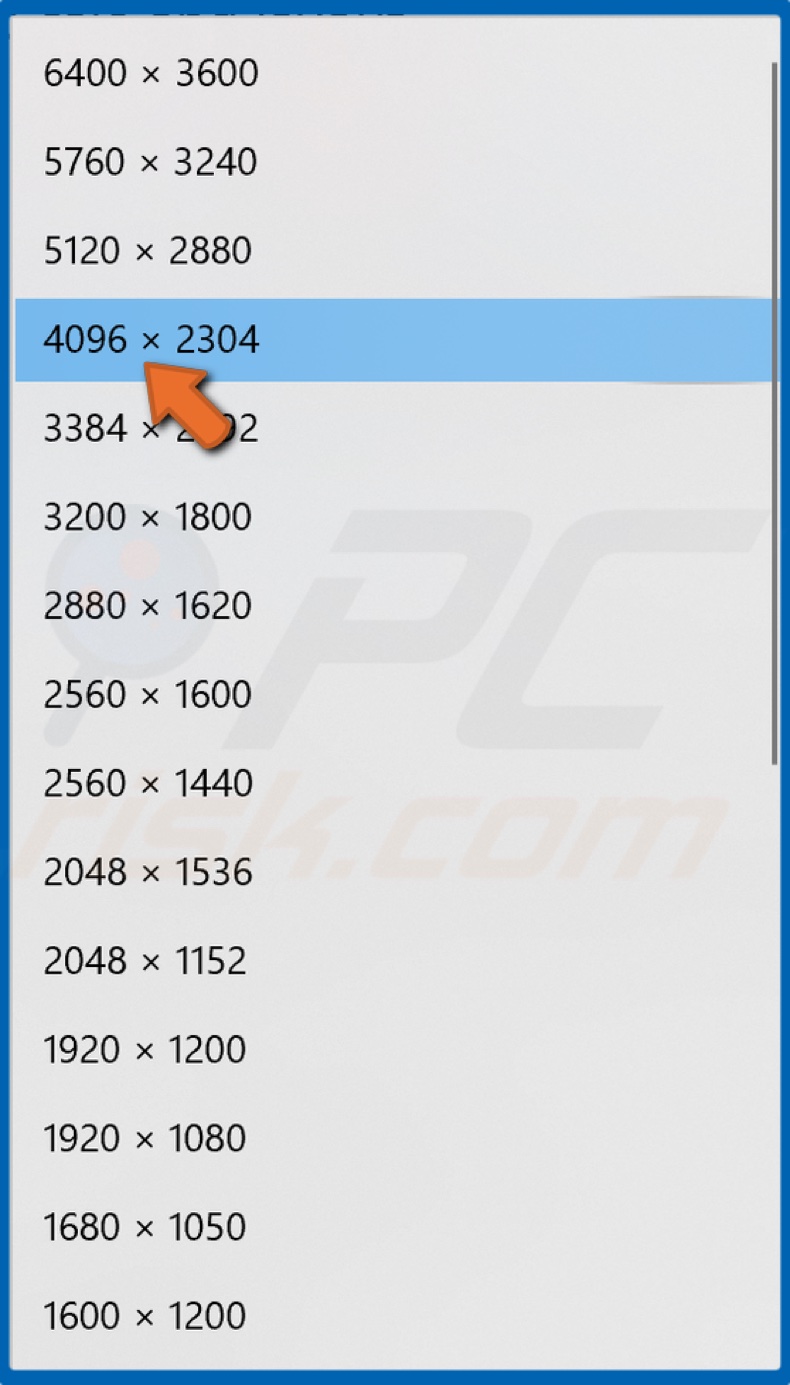
14. Select your preferred resolution.
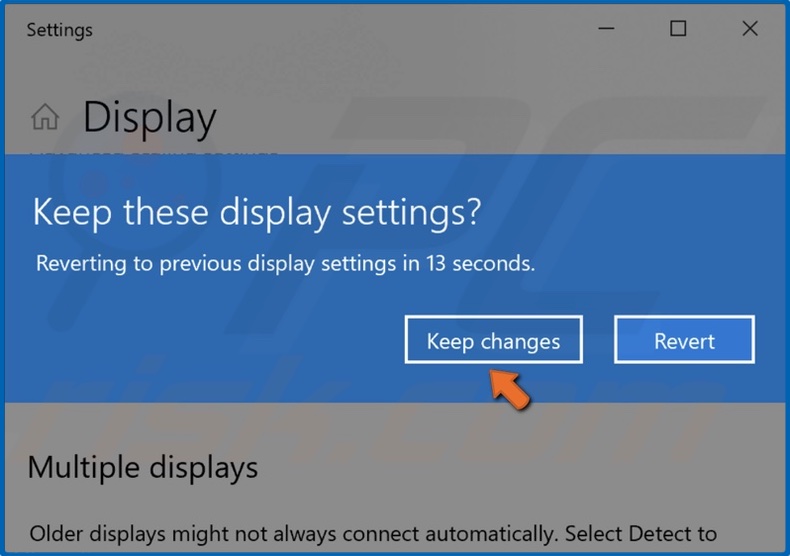
15. The resolution will be changed. Click Keep changes.
Share:

Rimvydas Iliavicius
Researcher, author
Rimvydas is a researcher with over four years of experience in the cybersecurity industry. He attended Kaunas University of Technology and graduated with a Master's degree in Translation and Localization of Technical texts. His interests in computers and technology led him to become a versatile author in the IT industry. At PCrisk, he's responsible for writing in-depth how-to articles for Microsoft Windows.

▼ Show Discussion