Fix Windows Update Error 0x80070005
Get Free Scanner and check your computer for errors
Fix It NowTo fix found issues, you have to purchase the full version of Combo Cleaner. Free trial available. Combo Cleaner is owned and operated by Rcs Lt, the parent company of PCRisk.com read more.
How to Fix Windows Update Error Code 0x80070005 in Windows 10
Many Windows 10 users are having trouble updating Windows 10 due to error code 0x80070005, also known as the "Access Denied" error. This error results in Windows Update being aborted.
Windows Update error code 0x80070005 occurs when the system doesn't have the necessary permissions to change specific settings of Windows. These permissions relate to file and registry permissions, which are required when updating Windows. These file or registry permissions may have been modified by malware, triggering the error.
Incorrect settings in the Local Group Policy Management utility are a likely cause for this error as well. The error may also occur if the system or user doesn't have the required files for the update to be carried out.
Other reasons why 0x80070005 may occur include the system being unable to locate dependent DLL files, corrupted registry files, critical system files such as SYS, OCX, INF are missing.
This error causes Windows Update to terminate the update process. As a result of the failure, your system may become slow, cause abrupt system restarts, crashes, and cause the infamous Blue Screen of Death (BSOD) error.
Video Guide on How to Fix Windows Update Error 0x80070005
Table of Contents:
- Introduction
- Solution 1. Run Windows Update Troubleshooter
- Solution 2. Use Windows 10 Update Assistant
- Solution 3. Clean Windows Update Cache Folder
- Solution 4. Run regsvr32 quartz.dll in Command Prompt
- Solution 5. Run a System File Checker (SFC) Scan
- Solution 6. Run Deployment Image & Servicing Management (DISM) Scan
- Solution 7. Reset Windows Update Components Manually
- Video Guide on How to Fix Windows Update Error 0x80070005
Download Computer Malware Repair Tool
It is recommended to run a free scan with Combo Cleaner - a tool to detect viruses and malware on your device. You will need to purchase the full version to remove infections. Free trial available. Combo Cleaner is owned and operated by Rcs Lt, the parent company of PCRisk.com read more.
Solution 1. Run Windows Update Troubleshooter
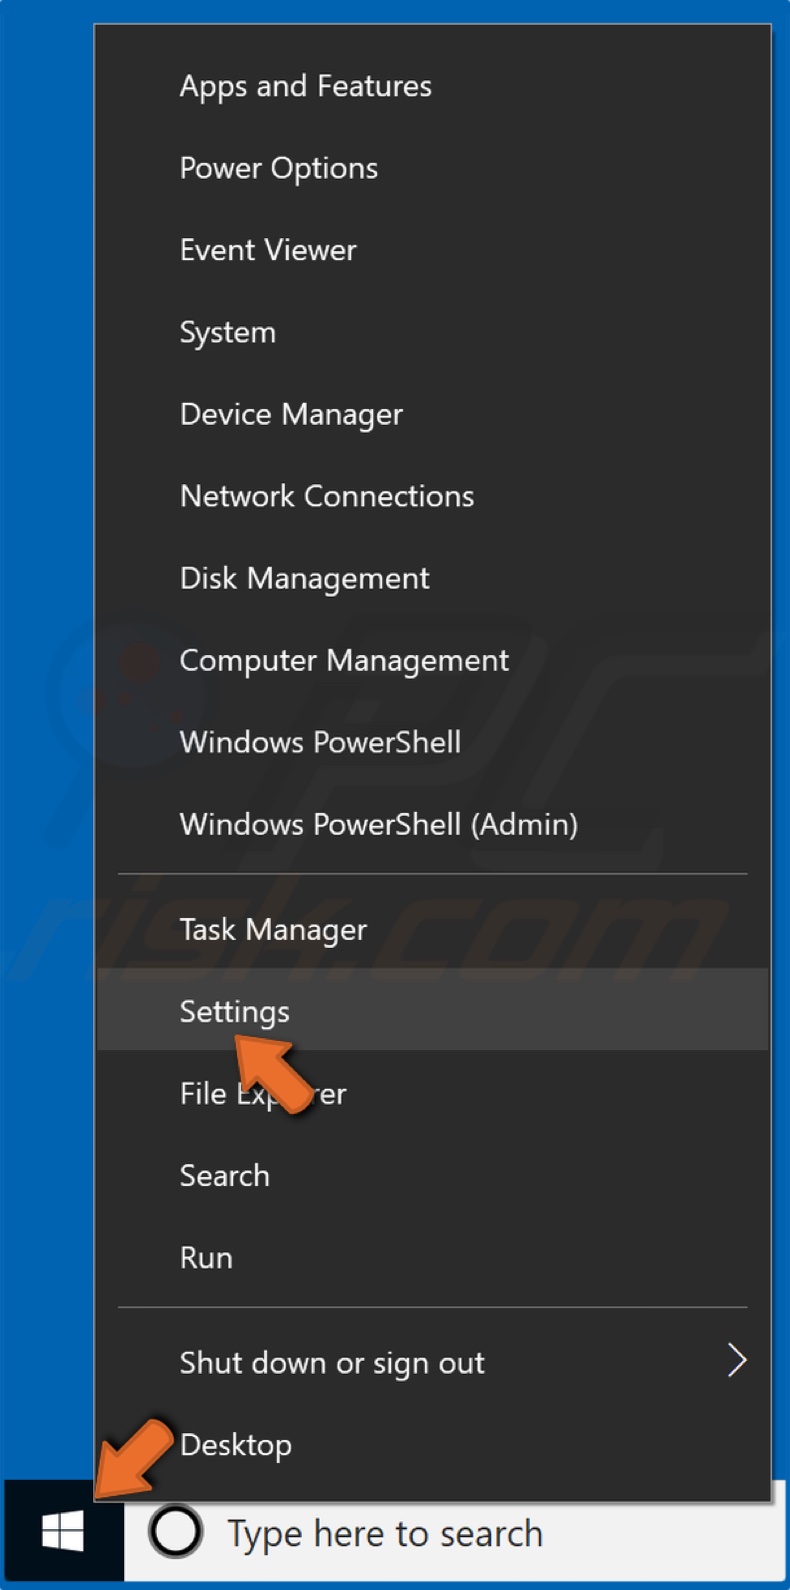
1. Right-click the Start button and click Settings.
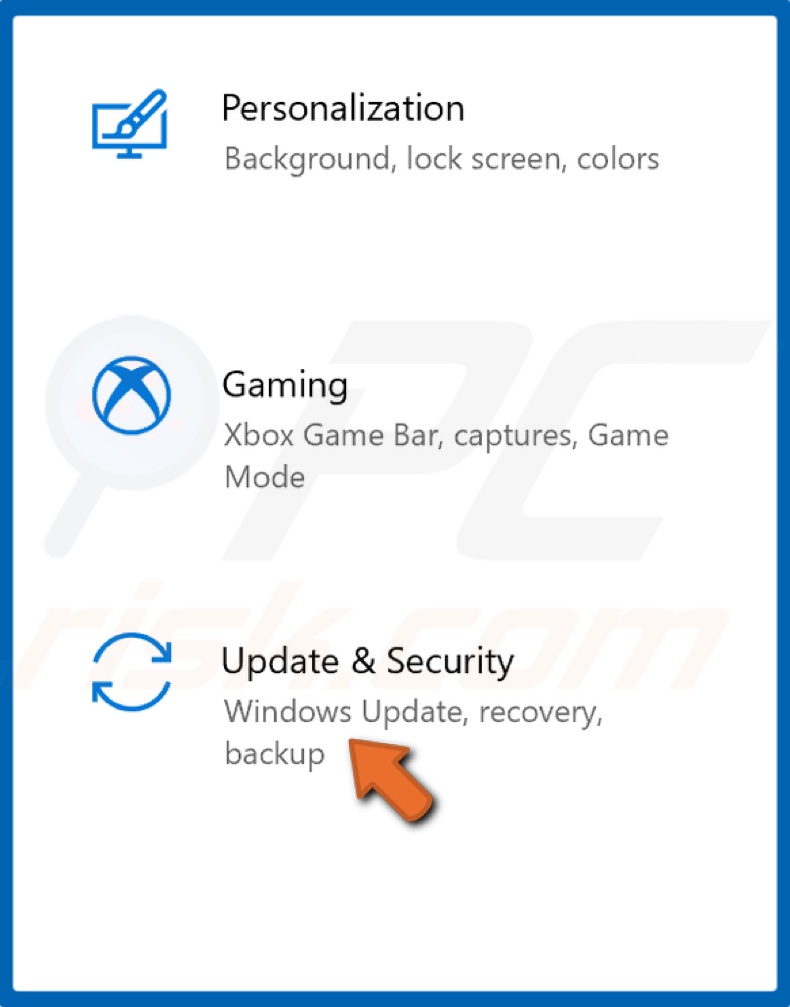
2. Select Update & Security.
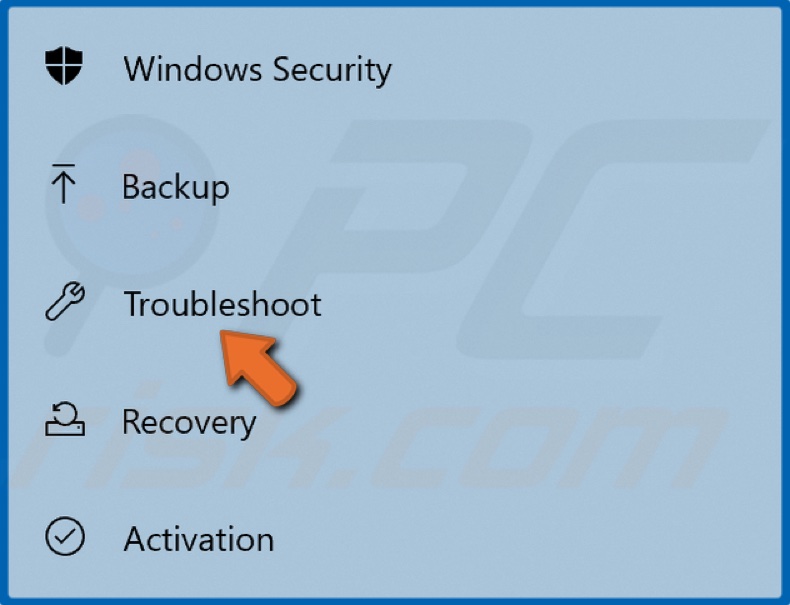
3. In the left pane, select Troubleshoot.
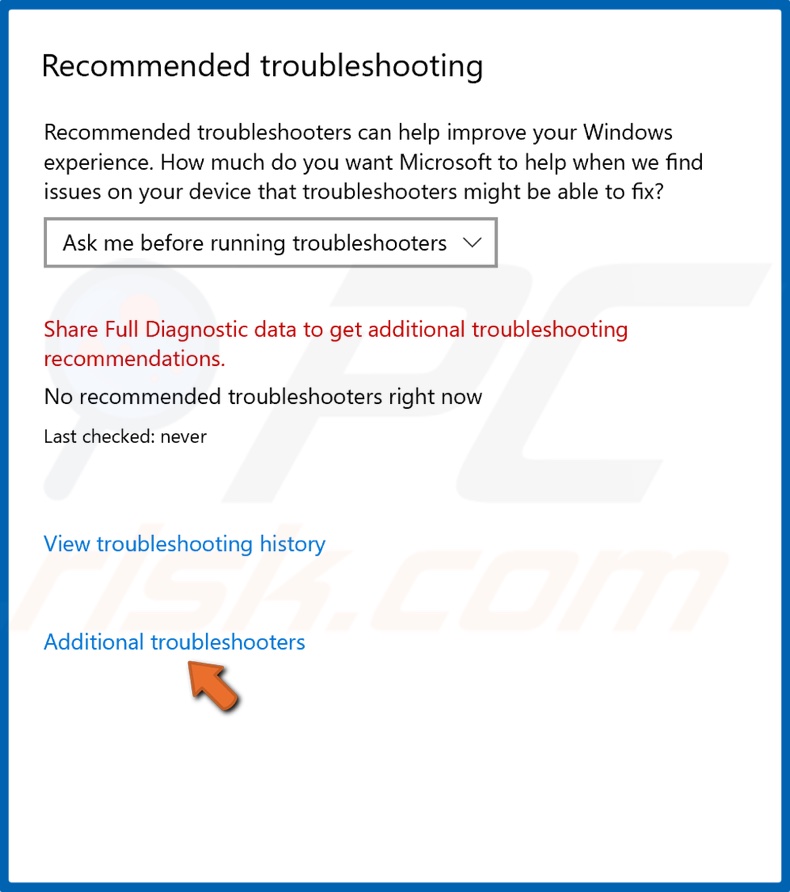
4. Click Additional troubleshooters.
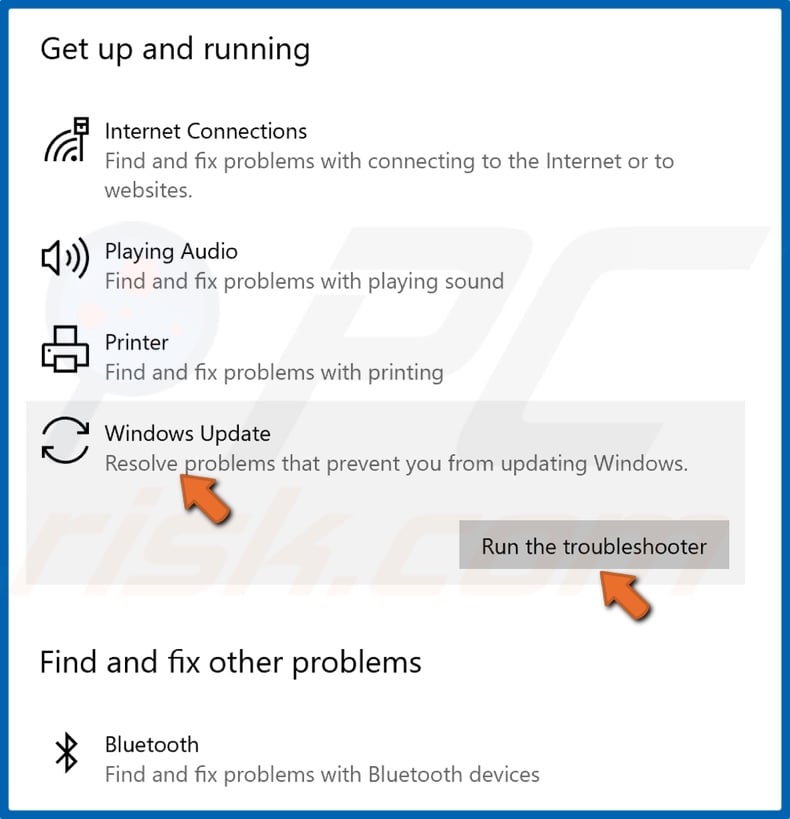
5. Click Windows Update and click Run the troubleshooter.
Solution 2. Use Windows 10 Update Assistant
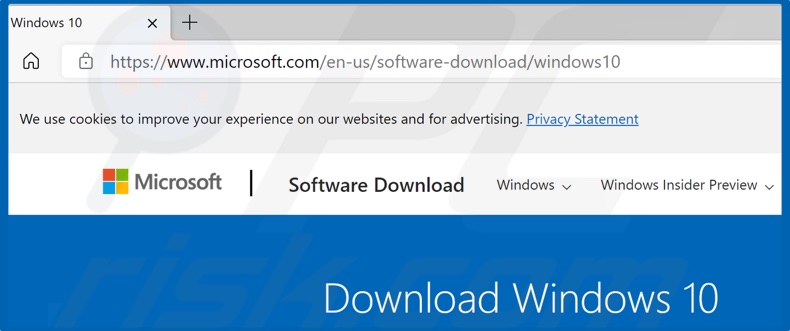
1. Open your web browser and go to the Windows 10 Update Assistant download page.
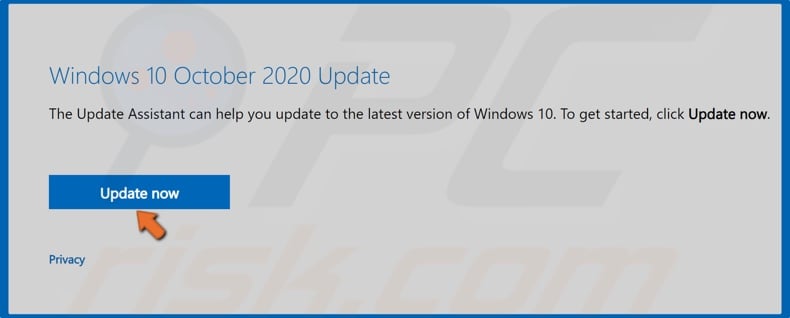
2. Click Update now to download the Windows 10 Update Assistant.
3. Then, run the Update Assistant.
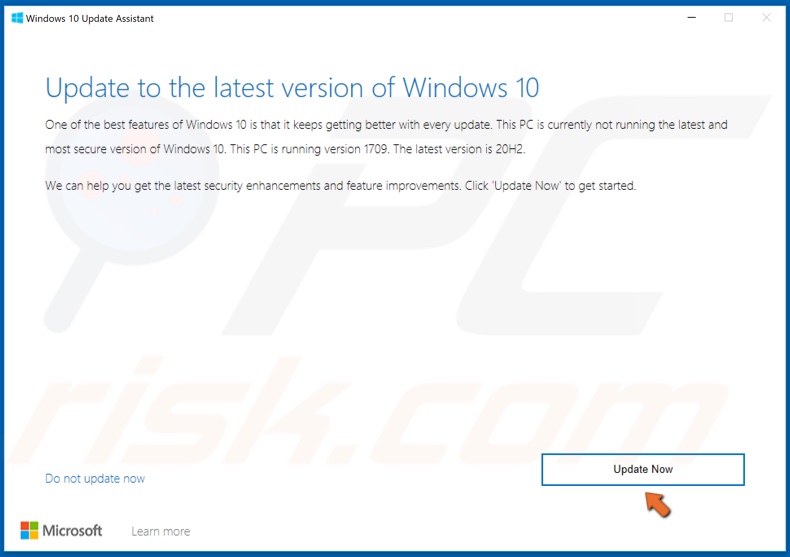
4. The Windows 10 Update Assistant will check your Windows version. Click Update Now.
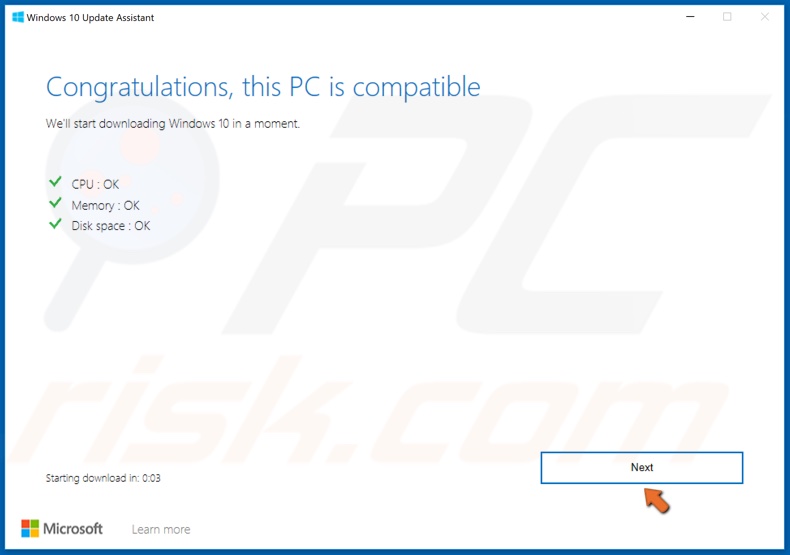
5. Then, click Next.
6. Wait for Windows to update. Take note that the update process may take a while.
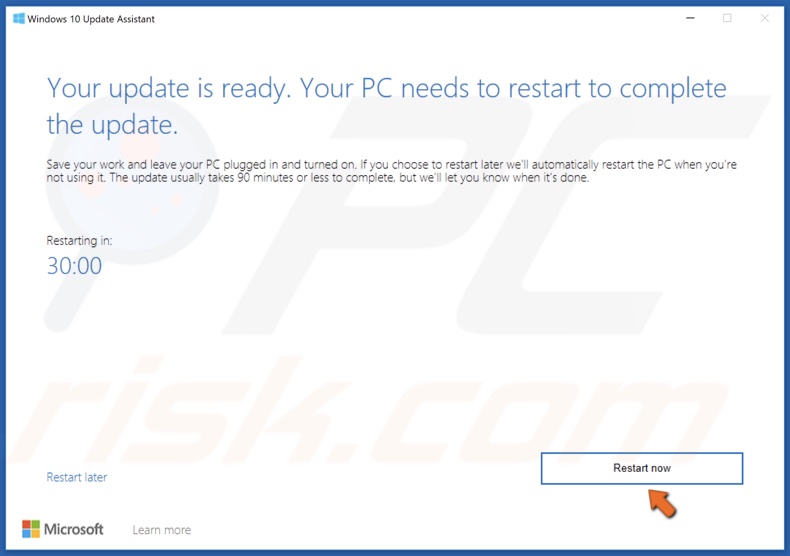
7. Click Restart now when prompted.
Solution 3. Clean Windows Update Cache Folder
1. Hold down Windows+R keys to open the Run dialog box.
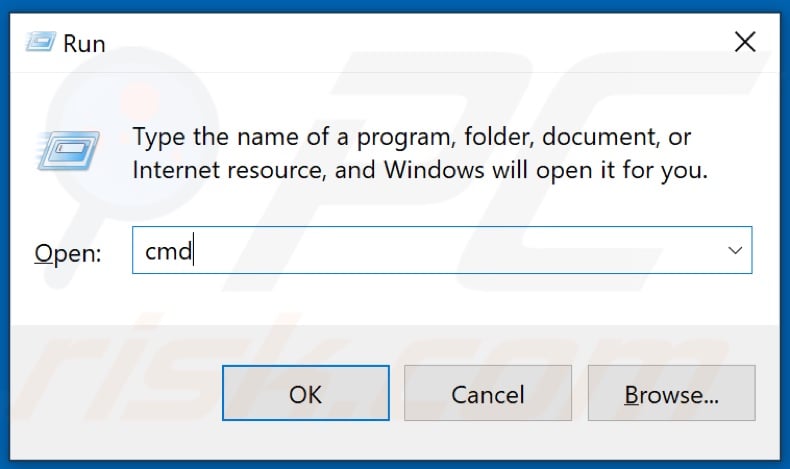
2. Type in CMD in the dialog box and hold down Shift+Ctrl+Enter keys to open the elevated Command Prompt.
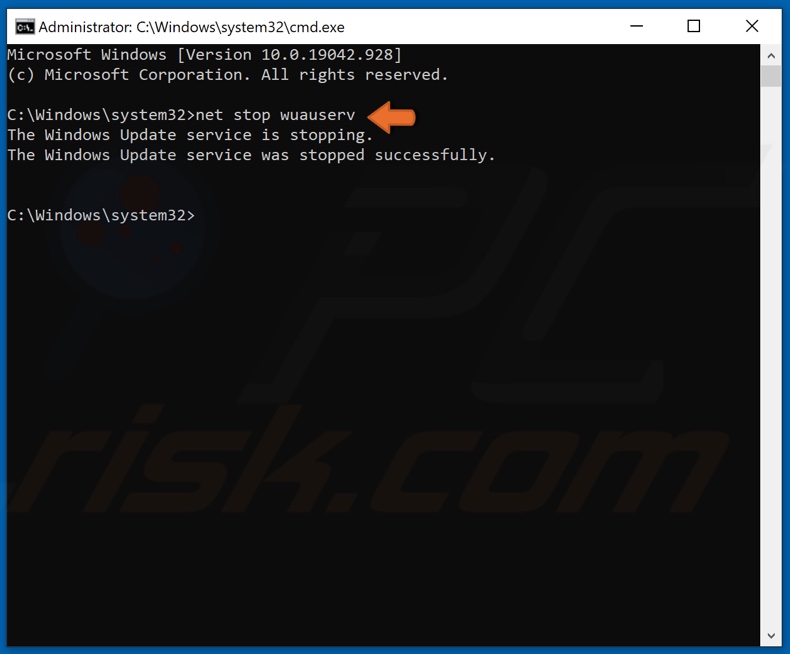
3. In the Command Prompt window, type in net stop wuauserv to stop Windows Update Service. Keep the Command prompt window open.
5. Then, hold down Windows+R keys to open the Run dialog box.
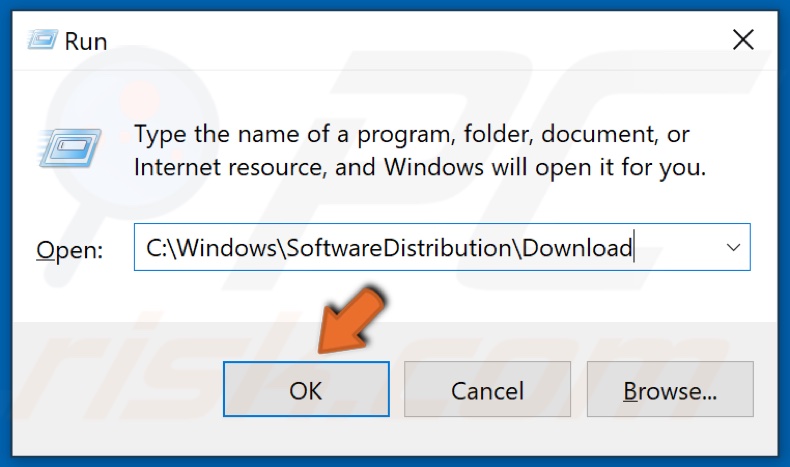
6. Type in C:\Windows\SoftwareDistribution\Download and click OK.
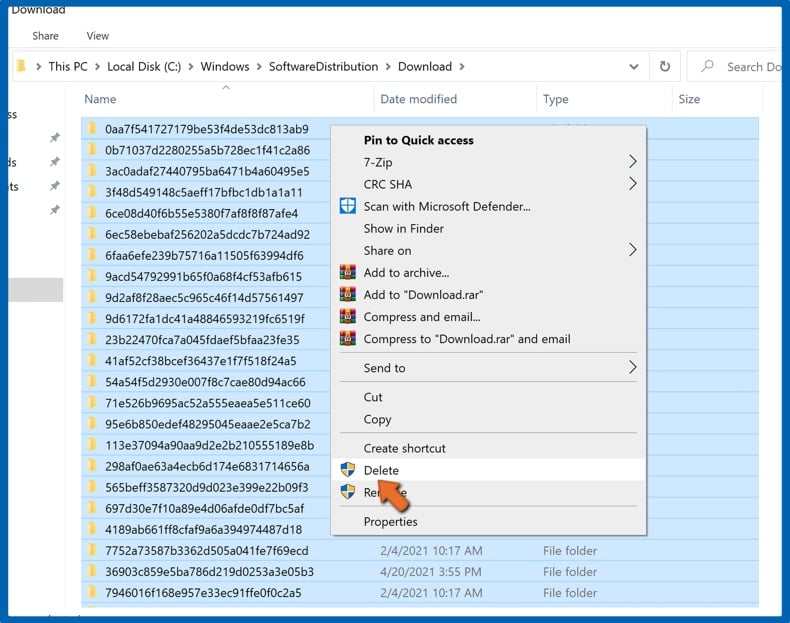
7. Hold down Ctrl+A to select all files in the folder. Right-click the selection and click Delete.
8. Go back to the Command Prompt window.
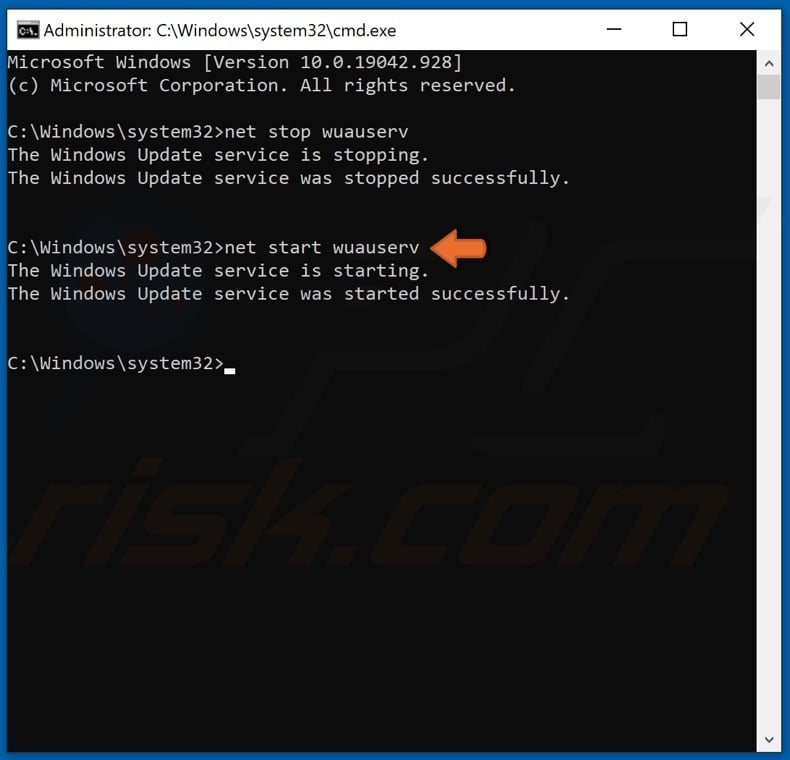
9. In the Command prompt window, type in net start wuauserv to restart Windows Update Service.
10. Reboot your PC and try updating Windows.
Solution 4. Run regsvr32 quartz.dll in Command Prompt
1. Hold down Windows+R keys to open the Run dialog box.

2. Type in CMD in the dialog box and hold down Shift+Ctrl+Enter keys to open the elevated Command Prompt.
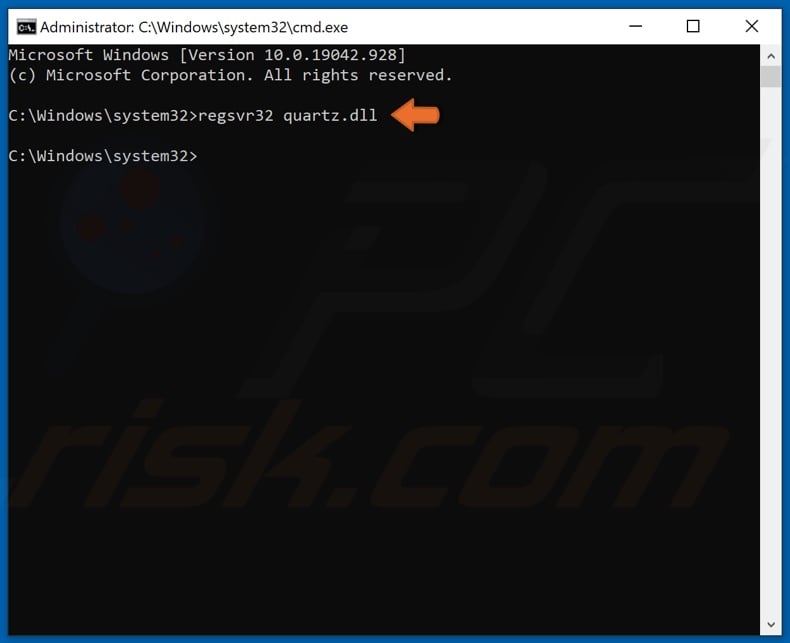
3. Type in regsvr32 quartz.dll in the Command Prompt window and hit the Enter key.
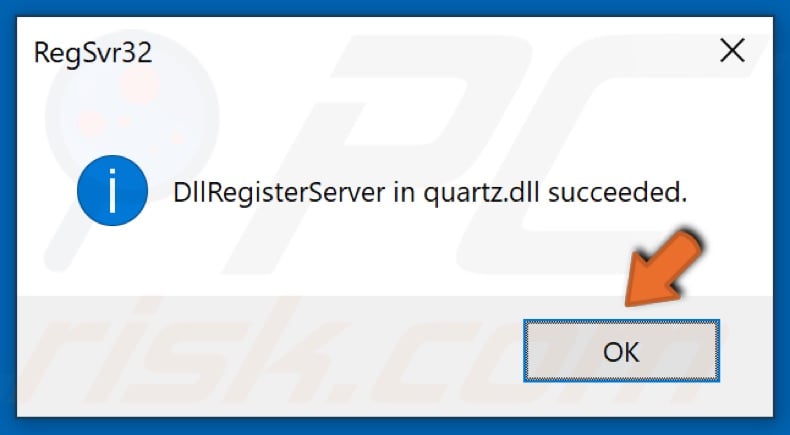
4. Click OK when prompted.
5. Then, try updating Windows.
Solution 5. Run a System File Checker (SFC) Scan
1. Hold down Windows+R keys to open the Run dialog box.

2. Type in CMD in the dialog box and hold down Shift+Ctrl+Enter keys to open the elevated Command Prompt.
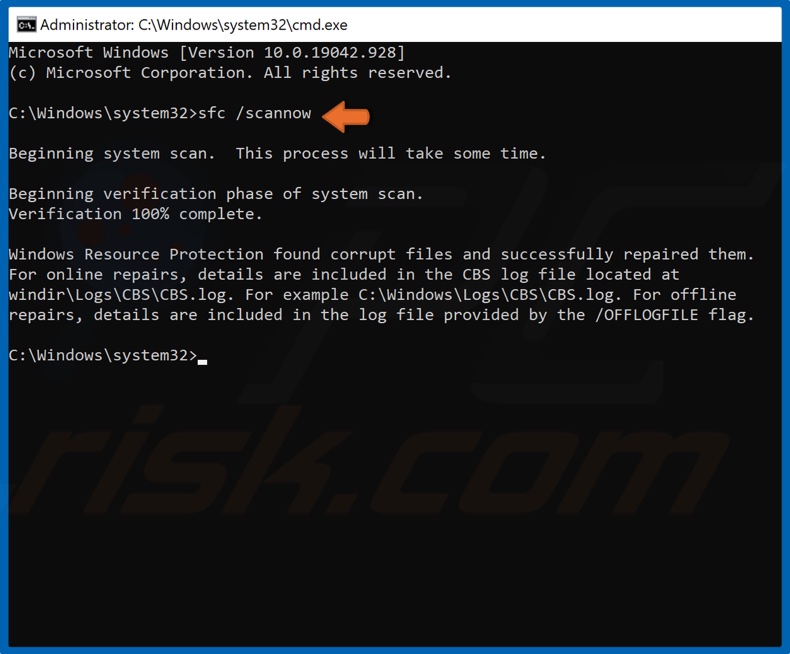
3. Type in the sfc /scannow command in the Command prompt and hit the Enter key.
4. Once the scan has been completed, restart your PC and try updating Windows.
Solution 6. Run Deployment Image & Servicing Management (DISM) Scan
1. Hold down Windows+R keys to open the Run dialog box.

2. Type in CMD in the dialog box and hold down Shift+Ctrl+Enter keys to open the elevated Command Prompt.
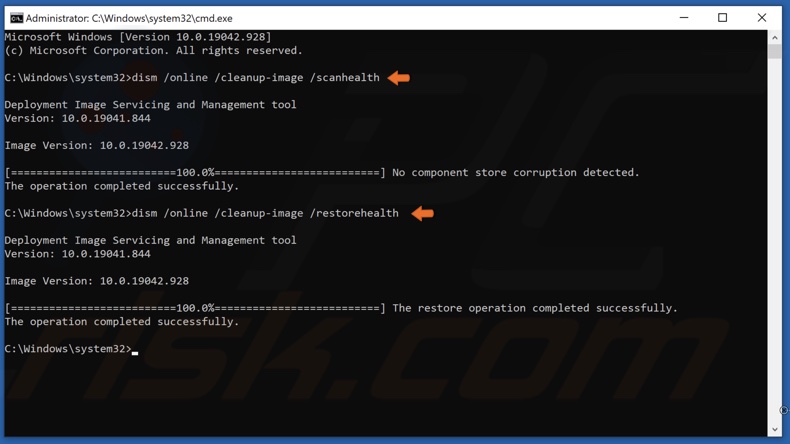
3. Type in DISM /Online /Cleanup-Image /ScanHealth and hit the Enter key.
4. Then, type in DISM /Online /Cleanup-Image /RestoreHealth and hit the Enter key.
5. Once the process has been completed, try updating Windows 10.
Solution 7. Reset Windows Update Components Manually
1. Hold down Windows+R keys to open the Run dialog box.

2. Type in CMD in the dialog box and hold down Shift+Ctrl+Enter keys to open the elevated Command Prompt.
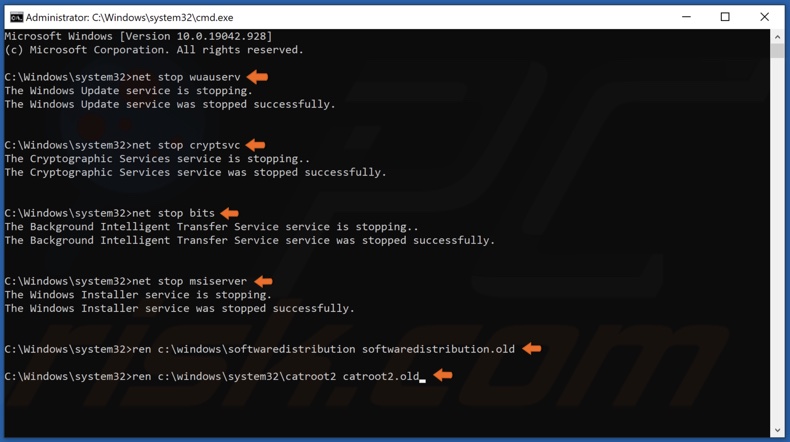
3. Type in the commands listed below, and hit Enter after entering each one:
- net stop wuauserv
- net stop cryptSvc
- net stop bits
- net stop msiserver
After the services have been disabled, rename the SoftwareDistribution and Catroot2.
4. Type in ren C:\Windows\SoftwareDistribution SoftwareDistribution.old and hit Enter.
5. Then, type in ren C:\Windows\System32\catroot2 Catroot2.old and hit Enter.
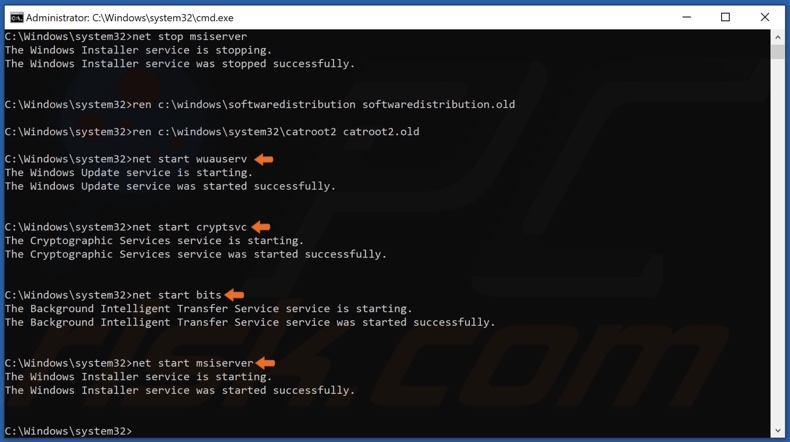
6. Type in the commands listed below, and hit Enter after entering each one:
- net start wuauserv
- net start cryptSvc
- net start bits
- net start msiserver
7. Once the process has been completed, try updating Windows 10.
Share:

Rimvydas Iliavicius
Researcher, author
Rimvydas is a researcher with over four years of experience in the cybersecurity industry. He attended Kaunas University of Technology and graduated with a Master's degree in Translation and Localization of Technical texts. His interests in computers and technology led him to become a versatile author in the IT industry. At PCrisk, he's responsible for writing in-depth how-to articles for Microsoft Windows.

▼ Show Discussion