Fix Windows Update Error 0x80070490
Get Free Scanner and check your computer for errors
Fix It NowTo fix found issues, you have to purchase the full version of Combo Cleaner. Free trial available. Combo Cleaner is owned and operated by Rcs Lt, the parent company of PCRisk.com read more.
4 Ways to Fix Windows Update Error Code 0x80070490
Error code 0x80070490 occurs when a process in the System Component Store or Component-based Servicing (CBS) becomes corrupted. In this article, we will discuss the causes and effects of Error 0x80070490 and provide verified fixes.
This error may occur during a system update via Windows Update (WU) or by installing an update using the KB file. There have been confirmed cases of this error occurring when installing Windows cumulative updates in particular.
It's also worth mentioning that this error will prevent you from installing InPlace upgrades, including the Media Creation Tool, mounted ISO, and bootable USB drive.
It can also occur while updating an app downloaded from the Microsoft Store. In addition, you may get this error when trying to buy an app from the Microsoft Store.
What Causes Error 0x80070490?
This error can occur if files belonging to Component-Based Servicing (CBS) or System Component Store become corrupt. Other reasons for this error include corrupted Windows Registry files and disabled services required by Windows Update.
Third-party antivirus programs may also cause this error by preventing Windows Update from performing its tasks. So, before you attempt to use any of the provided fixes, you should temporarily disable your antivirus software and try installing updates.
The error code 0x80070490 stands for E_ELEMENT_NOT_FOUND, which means that an item required to install the update could not be found in the package. This, in turn, means that the update package has been corrupted.
We've included several methods that could help you fix this error. The fixes were composed with Windows 10 in mind, but some might apply to Windows 8.1 and Windows 7.
Video Guide on How to Fix Windows Update Error 0x80070490
Table of Contents:
- Introduction
- Method 1. Run the Windows Update Troubleshooter
- Method 2. Run a System File Checker (SFC) Scan
- Method 3. Run Deployment Image & Servicing Management (DISM)
- Method 4. Reset Windows Update Components Manually
- Video Guide on How to Fix Windows Update Error 0x80070490
Download Computer Malware Repair Tool
It is recommended to run a free scan with Combo Cleaner - a tool to detect viruses and malware on your device. You will need to purchase the full version to remove infections. Free trial available. Combo Cleaner is owned and operated by Rcs Lt, the parent company of PCRisk.com read more.
Method 1. Run the Windows Update Troubleshooter
If your PC is running Windows 10, you can run its built-in Windows Update troubleshooter. The troubleshooter is dedicated to resolving various problems, including Windows Update-related issues.
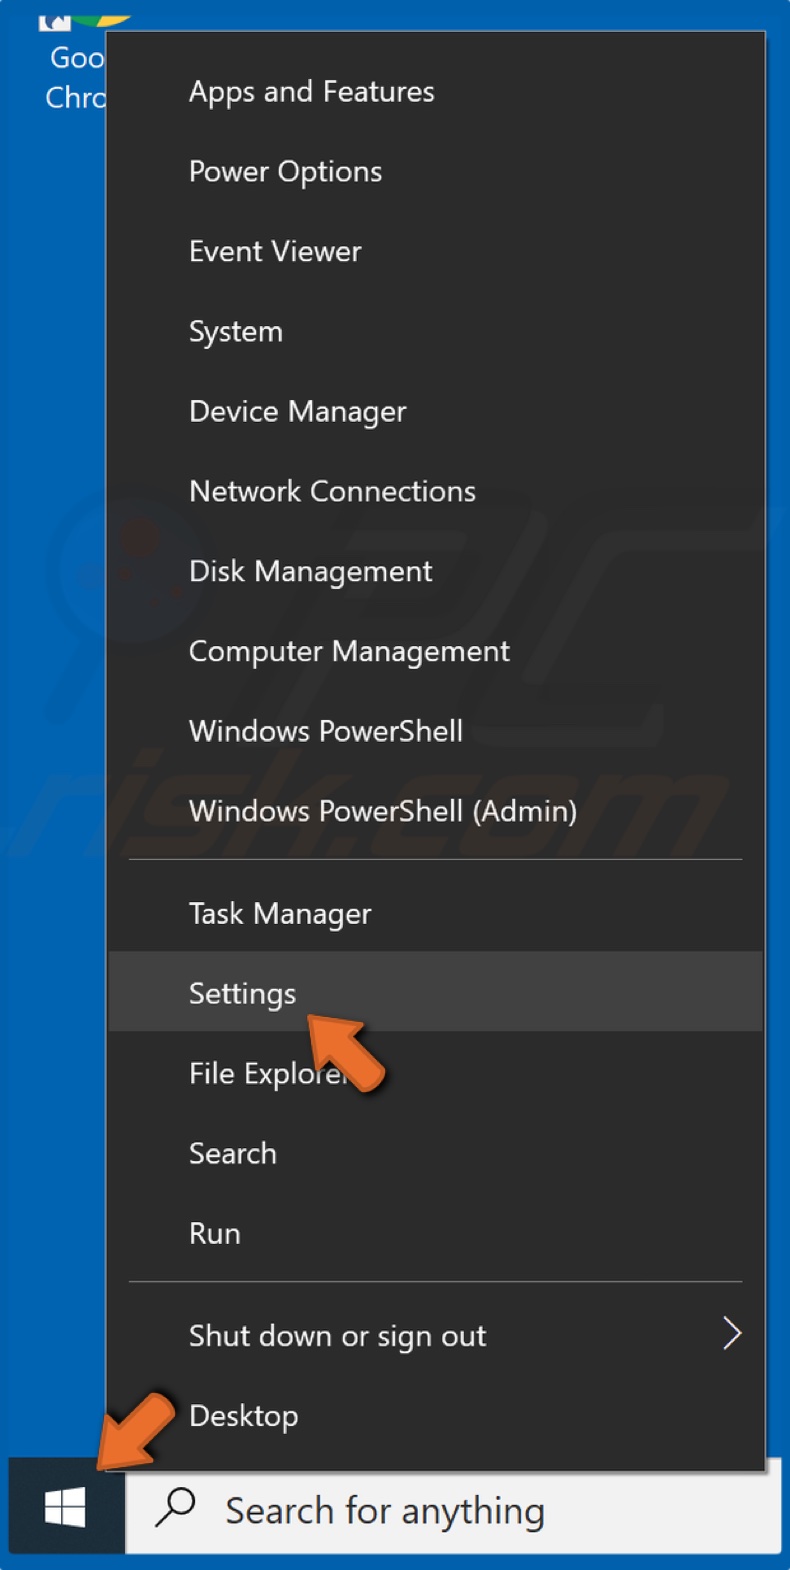
1. Right-click the Start Menu and click Settings.
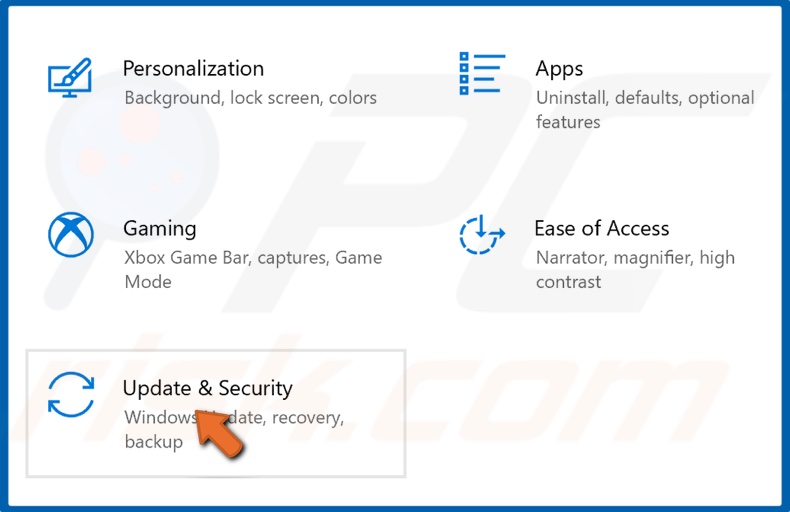
2. Select Update & Security.
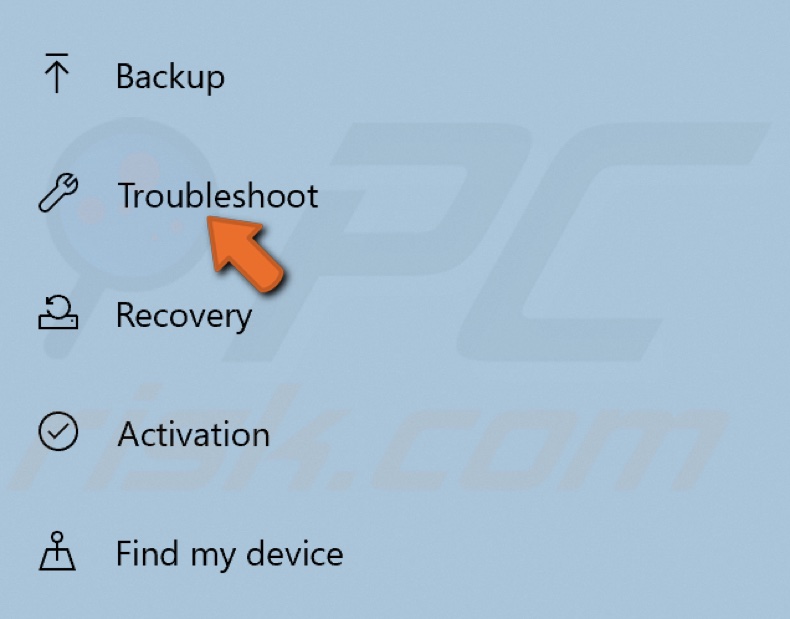
3. Click Troubleshoot.

4. Click Additional troubleshooters.
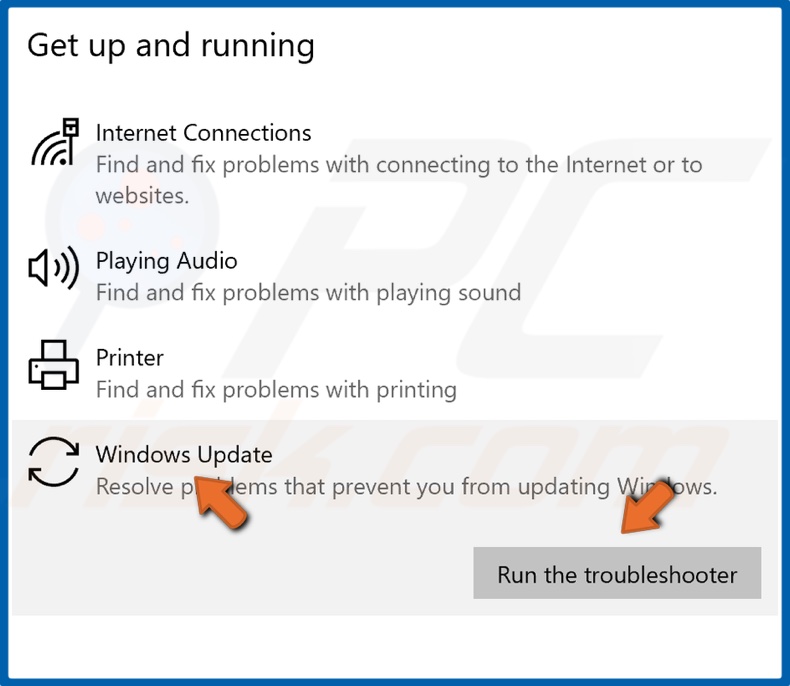
5. Select Windows Update and click Run the troubleshooter.
6. If the troubleshooter detects an issue, it will select and apply a fix automatically.
Method 2. Run a System File Checker (SFC) Scan
The Windows System File Checker is a built-in tool ideal for resolving issues regarding corrupted files. The System File Checker scans the registry and then attempts to repair corrupted registry files if it finds any. You can perform the scan by opening the Command Prompt with administrative privileges and executing the "sfc /scannow" command.
1. Hold down Windows+R keys to open the Run dialog box.
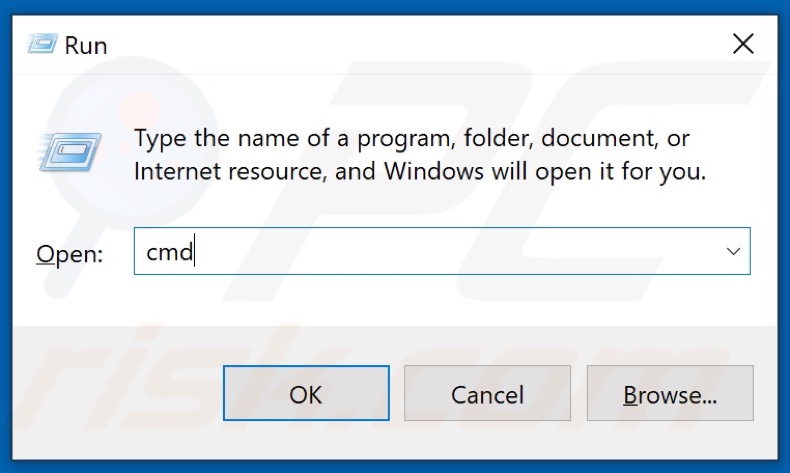
2. Type in CMD in the dialog box and simultaneously hold down Shift+Ctrl+Enter keys to open Command Prompt with administrative privileges.
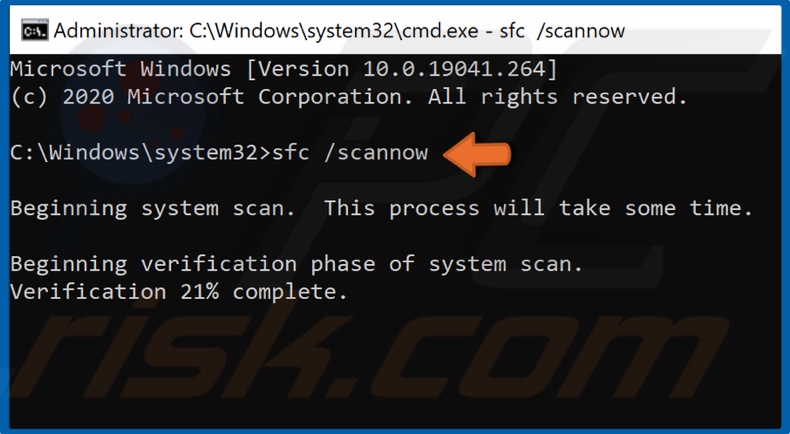
3. Type in the sfc /scannow command in the Command Prompt and hit the Enter key to start the scan.
4. Once the scan has been completed, restart your PC and try updating Windows.
If you still get Error 0x80070490, move to the next method.
Method 3. Run Deployment Image & Servicing Management (DISM)
If the Component-Based Servicing (CBS) has been corrupted, executing the DISM command might fix it.
1. Hold down Windows+R keys to open the Run dialog box.

2. Type in CMD in the dialog box and then simultaneously hold down Shift+Ctrl+Enter keys to open Command Prompt with administrative privileges.
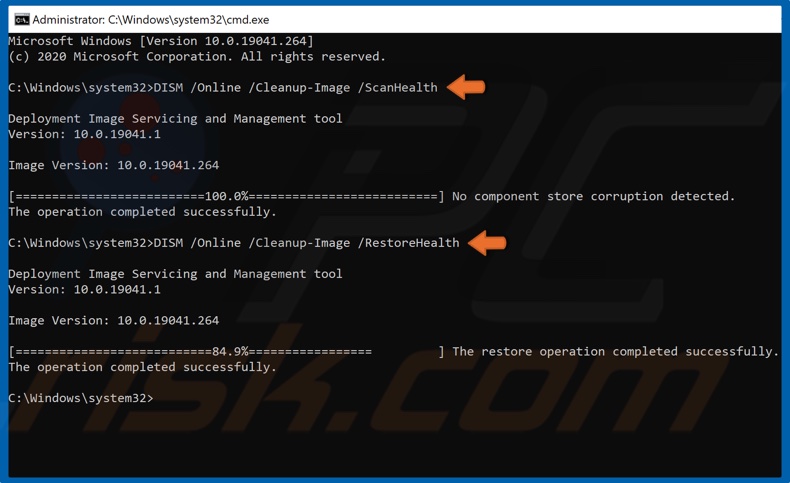
3. Type in DISM /Online /Cleanup-Image /ScanHealth and hit Enter. This parameter will scan the component store for corruption.
4. Type in the DISM /Online /Cleanup-Image /RestoreHealth command and hit Enter.
5. Once the process has been completed, try updating Windows 10.
Method 4. Reset Windows Update Components Manually
By resetting the Windows Update Components, you may successfully remove damaged files, preventing Windows from installing updates. The reset process involves disabling key Windows Update services (BITS, Cryptographic, MSI Installer, and Windows Update services) via Command Prompt.
After disabling the services, you have to rename SoftwareDistribution and Catroot2 folders to trigger Windows to recreate necessary update components.
The SoftwareDistribution and Catroot2 folders are essential for Windows Update processes as Catroot2 stores Windows update package signatures. Renaming Catroot2 will trigger Windows to create a new folder, thus eliminating corrupted files from the update process.
1. Hold down Windows+R keys to open the Run dialog box.

2. Type in CMD in the dialog box and simultaneously hold down Shift+Ctrl+Enter keys to open Command Prompt with administrative privileges.
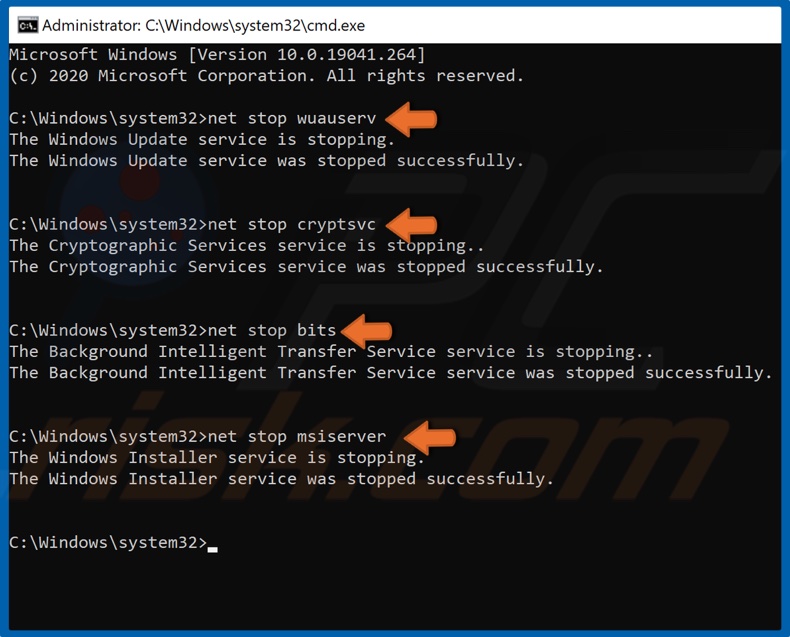
3. Here, you will have to stop BITS, Cryptographic, MSI Installer, and Windows Update services. Type in the following commands and hit Enter after entering each command:
- net stop wuauserv
- net stop cryptSvc
- net stop bits
- net stop msiserver
Once the services have been disabled, you can rename the SoftwareDistribution and Catroot2 via Command Prompt.
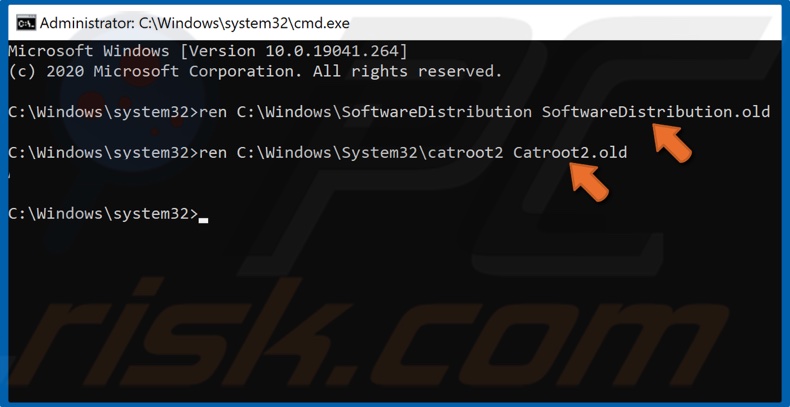
4. Type in ren C:\Windows\SoftwareDistribution SoftwareDistribution.old and hit Enter.
5. Then, type in ren C:\Windows\System32\catroot2 Catroot2.old and hit Enter.
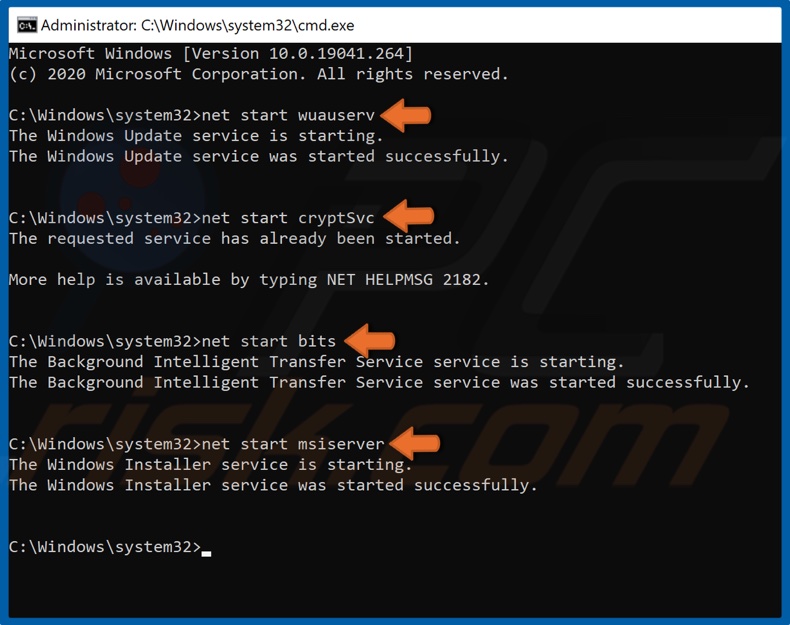
6. Lastly, restart BITS, Cryptographic, MSI Installer, and Windows Update services. Type in the following commands and hit Enter after entering each command:
- net start wuauserv
- net start cryptSvc
- net start bits
- net start msiserver
7. Close the Command Prompt, and try updating windows 10.
Share:

Rimvydas Iliavicius
Researcher, author
Rimvydas is a researcher with over four years of experience in the cybersecurity industry. He attended Kaunas University of Technology and graduated with a Master's degree in Translation and Localization of Technical texts. His interests in computers and technology led him to become a versatile author in the IT industry. At PCrisk, he's responsible for writing in-depth how-to articles for Microsoft Windows.

▼ Show Discussion