4 Ways to Fix Windows 10 Updates Not Installing
Get Free Scanner and check your computer for errors
Fix It NowTo fix found issues, you have to purchase the full version of Combo Cleaner. Free trial available. Combo Cleaner is owned and operated by Rcs Lt, the parent company of PCRisk.com read more.
How to Fix Windows 10 Updates Not Installing
Microsoft has changed the way updates are installed for Windows 10. Users can no longer select which updates, patches, driver software, and feature updates to install. Unfortunately, sometimes, Windows 10 updates won't install. This article is dedicated to helping you fix this problem.
As polished as Windows 10 appears, some users still experience problems with it. Windows 10 not updating is among the most frequent issues that users encounter.
In some cases, updates can be enabled, and Windows has accumulated pending updates but won't download or install them even though Windows Update says updates are available.
Why Won't My Windows Update?
Windows 10 updates won't install for various reasons, including a poor Internet connection, corrupted system files, corrupted SoftwareDistribution folder, stopped Windows update-related background services, etc. Also, using a proxy can prevent Windows from downloading updates as well.
Since there can be multiple reasons why your Windows updates remain in limbo, we have compiled a list of methods to help fix updates not installing.
Video Tutorial on How to Fix Windows 10 Updates Not Installing
Table of Contents:
- Introduction
- Method 1. Run Windows Update Troubleshooter
- Method 2. Start All Windows Update Services Manually
- Method 3. Rename SoftwareDistribution Folder
- Method 4. Reset Windows 10 Using Recovery
- Video Tutorial on How to Fix Windows 10 Updates Not Installing
Download Computer Malware Repair Tool
It is recommended to run a free scan with Combo Cleaner - a tool to detect viruses and malware on your device. You will need to purchase the full version to remove infections. Free trial available. Combo Cleaner is owned and operated by Rcs Lt, the parent company of PCRisk.com read more.
Method 1. Run Windows Update Troubleshooter
If Windows 10 updates won't install, you may fix it by running the Windows Update Troubleshooter, designed to resolve all update-related problems.
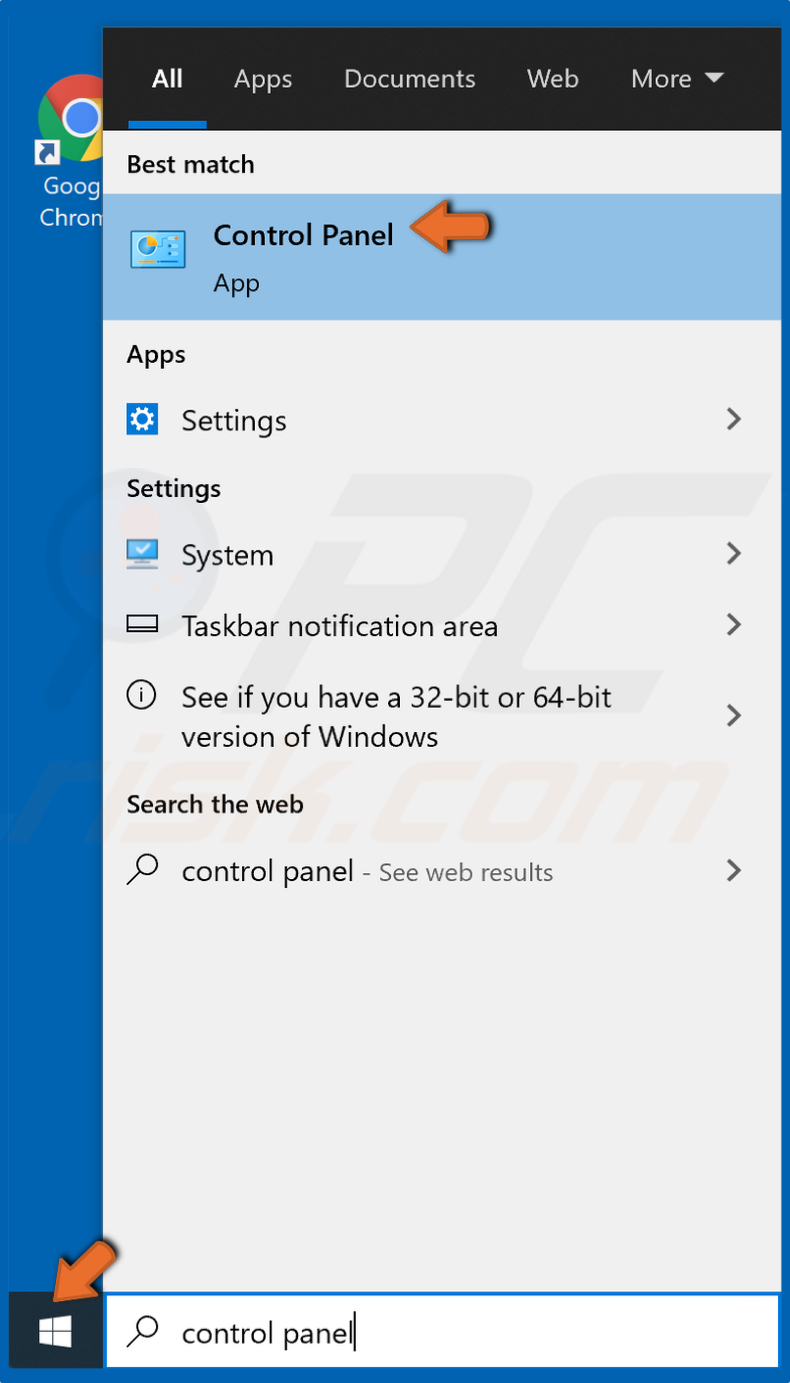
1. Open the Start Menu, type Control Panel, and click the result.
![]()
2. Select the Large Icons view to reveal the Troubleshooting menu.
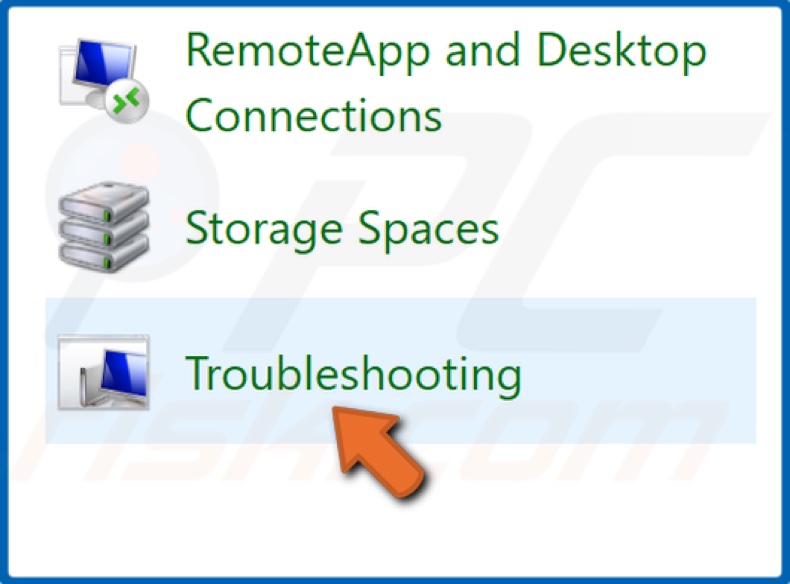
3. Click Troubleshooting.
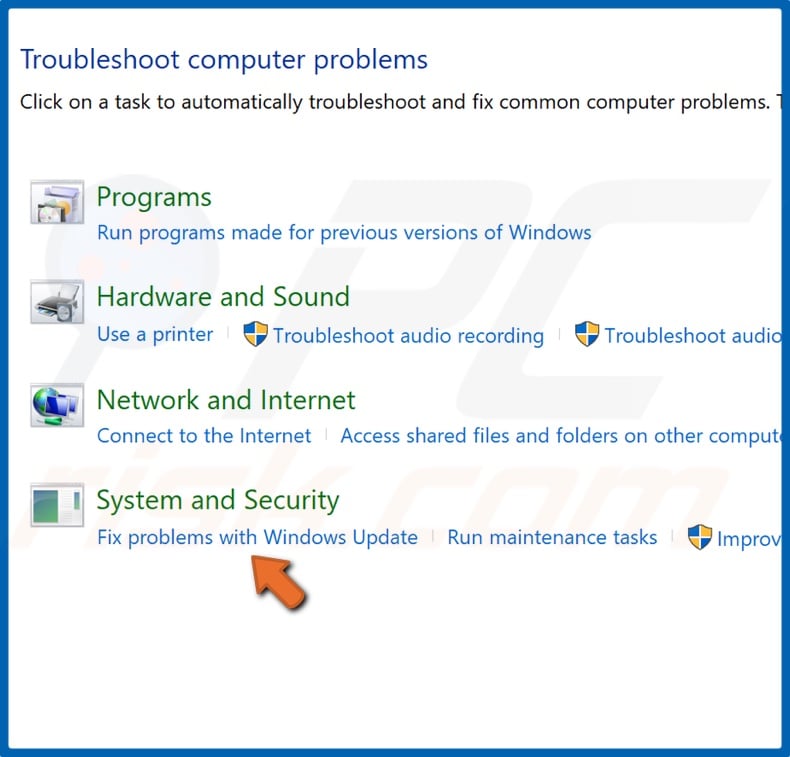
4. then, click Fix problems with windows update.
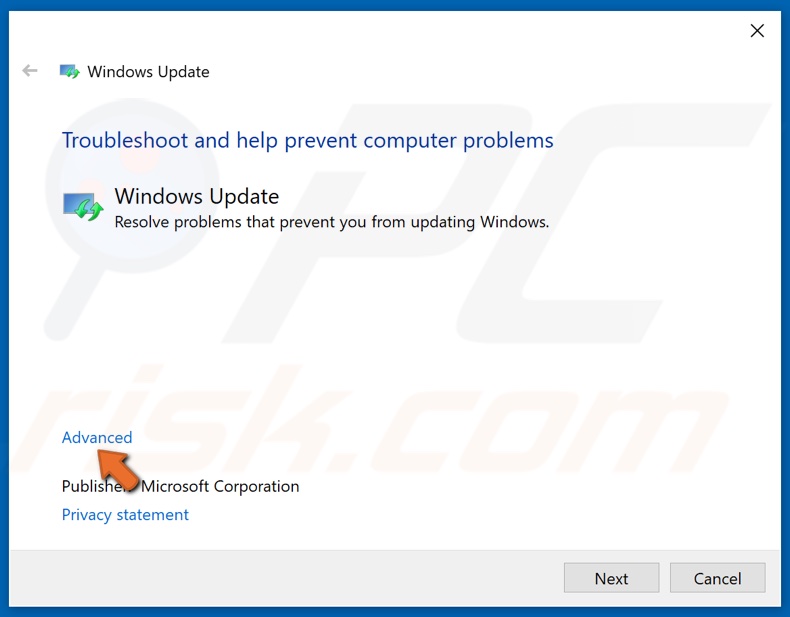
5. Click Advanced.
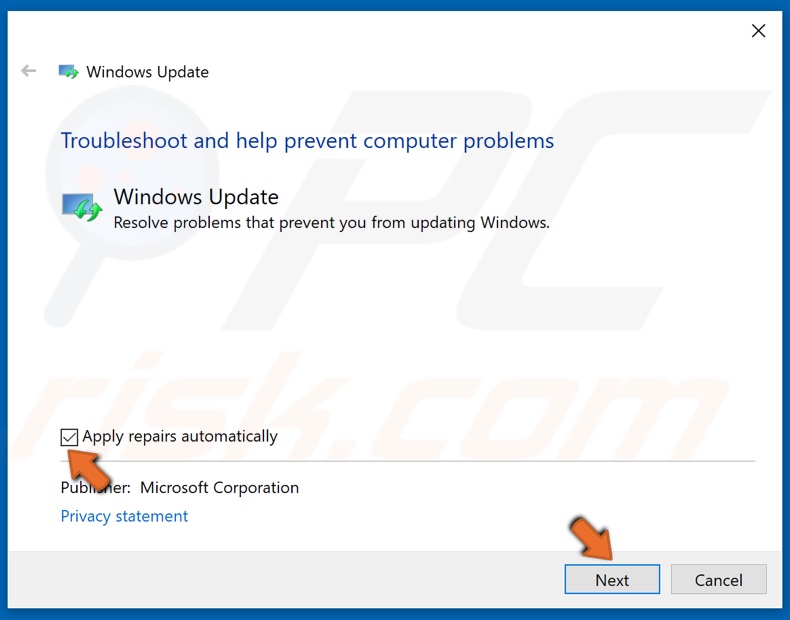
6. Check the Apply repairs automatically checkbox if it's unchecked and click Next.
7. If the troubleshooter detects any problems, it will prompt you to apply the fix or skip it.
8. Click Apply fix, and the issue will be resolved.
Method 2. Start All Windows Update Services Manually
If one or more of the Windows Update-related services have been stopped, then the updater will be unable to initiate the download of updates. Therefore, you ought to start these services to resolve the issue.
1. Simultaneously hold down Windows+R keys to open Run.
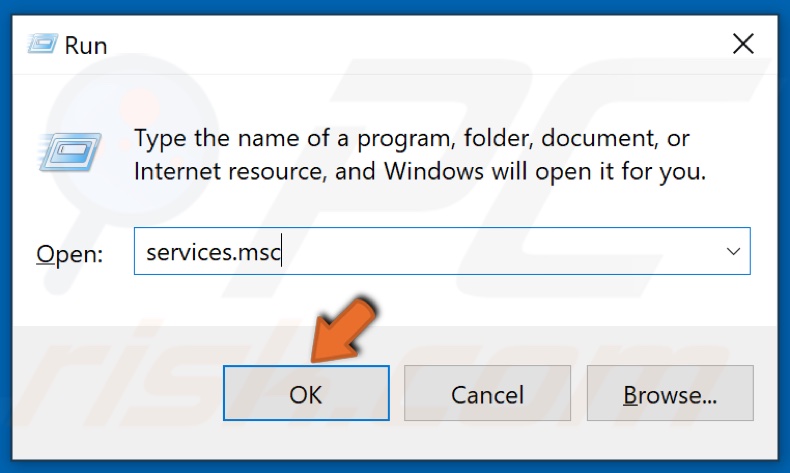
2. Type in services.msc and click OK.
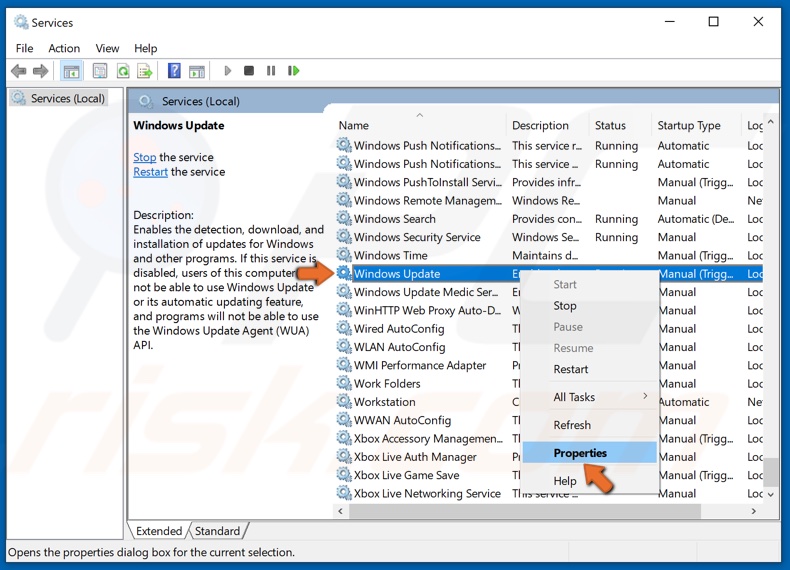
3. Locate the Windows Update service, right-click it, and click Properties.
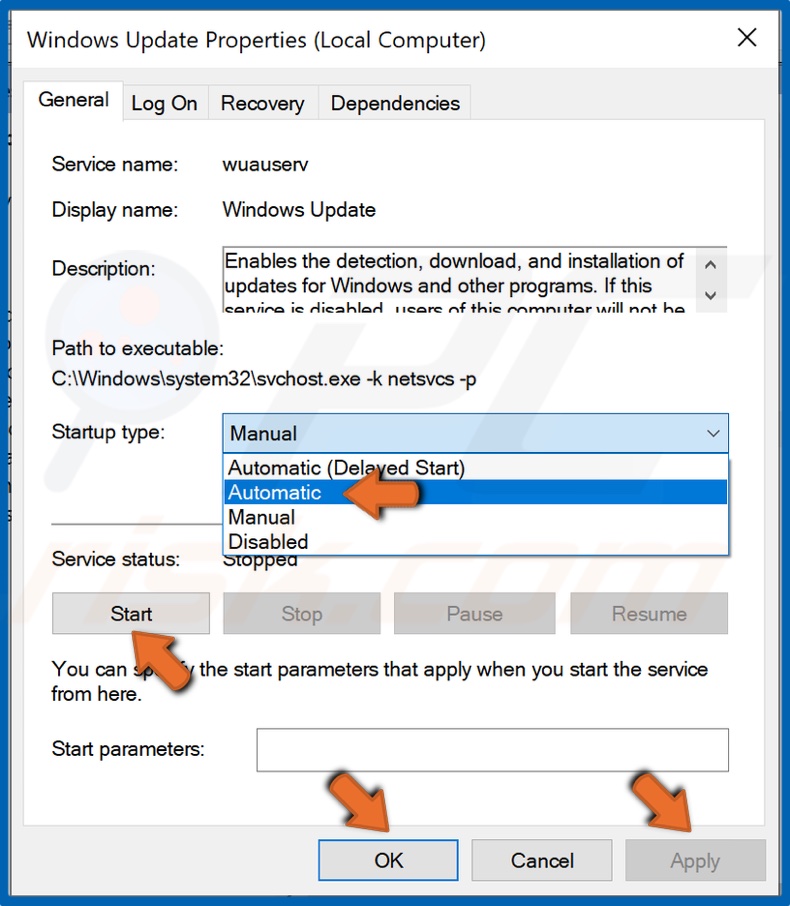
4. Open the Startup type drop-down menu and select Automatic.
5. If the service is stopped, click Start under the Service status menu.
6. Click Apply and click OK.
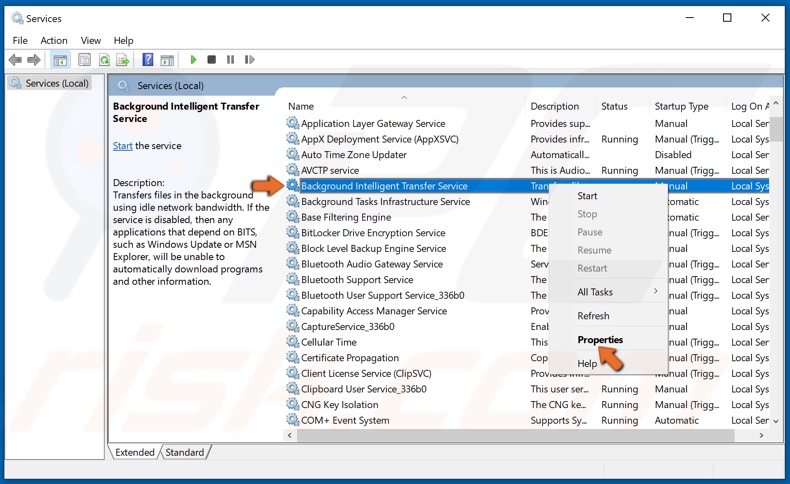
7. Then, locate the Background Intelligent Transfer Service (BITS), right-click it, and click Properties.
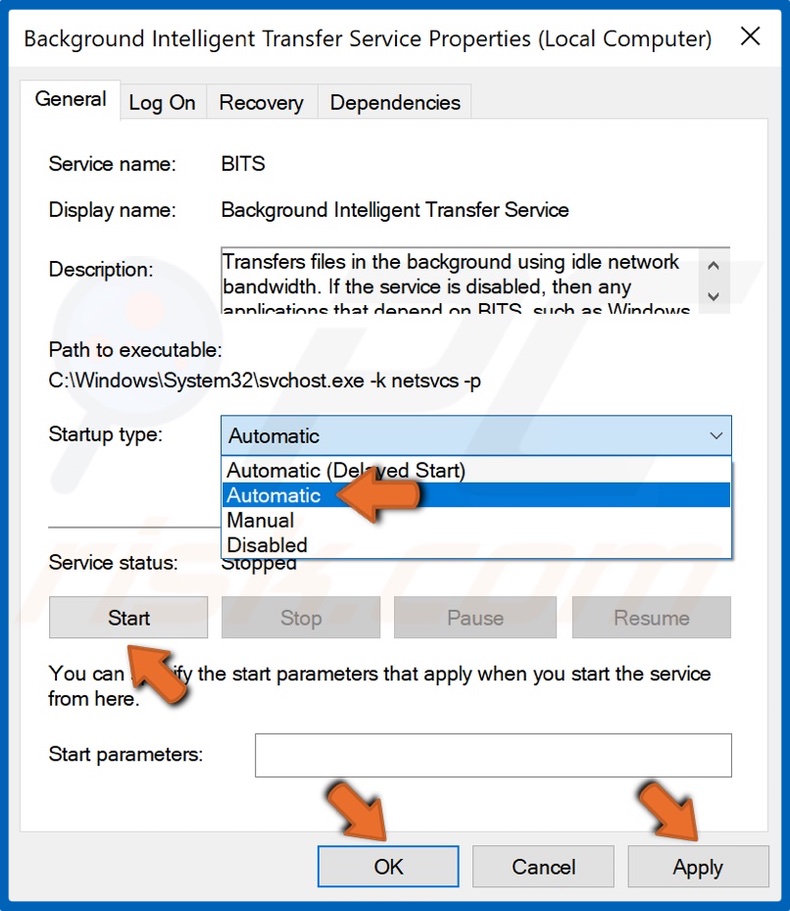
8. Open the Startup type drop-down menu and select Automatic.
9. If the service is stopped, click Start under the Service status menu.
10. Click Apply and click OK.
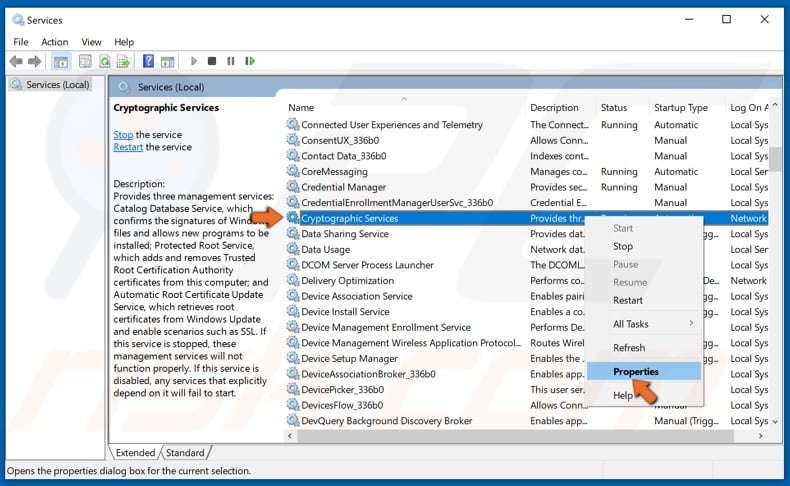
11. Finally, locate the Cryptographic Services, right-click it, and click Properties.
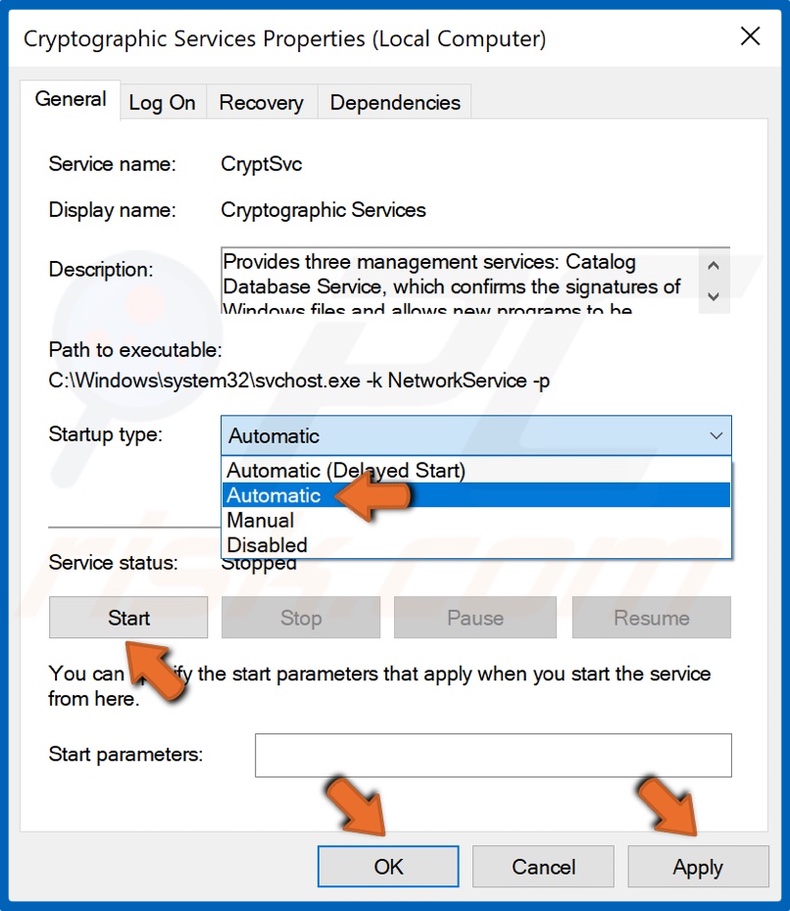
12. Open the Startup type drop-down menu and select Automatic.
13. If the service is stopped, click Start under the Service status menu.
14. Click Apply and click OK.
Method 3. Rename SoftwareDistribution Folder
If the first two solutions described above didn't fix Windows 10 updates not installing, you could fix the issue via an elevated Command prompt. This method is for fixing the SoftwareDistribution folder if it is corrupted.
1. Simultaneously hold down Windows+R keys to open Run.
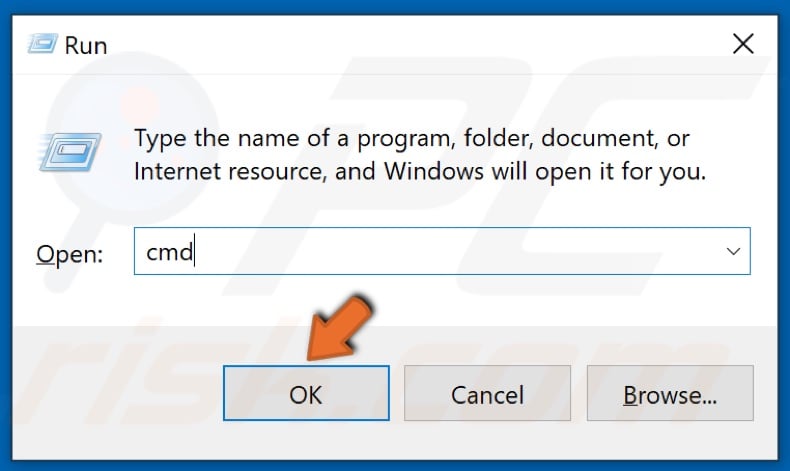
2. Type in CMD and simultaneously hold down Shift+Ctrl+Enter to open the Command prompt with administrative privileges.
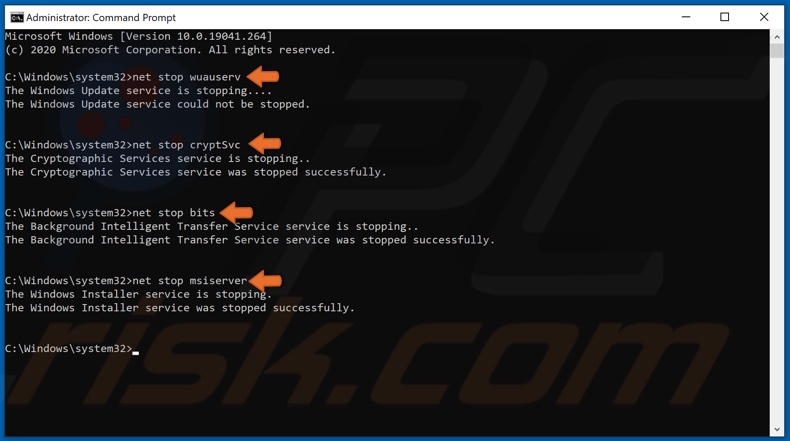
3. Enter the following commands and press Enter after typing in each individual one. Executing these commands will stop Windows Update-related services.
- net stop wuauserv
- net stop cryptSvc
- net stop bits
- net stop msiserver

4. Then, enter the following two commands to rename SoftwareDistribution and hit Enter after typing in each individual command.
- ren C:\Windows\SoftwareDistribution SoftwareDistribution.old
- ren C:\Windows\System32\catroot2 catroot2.old
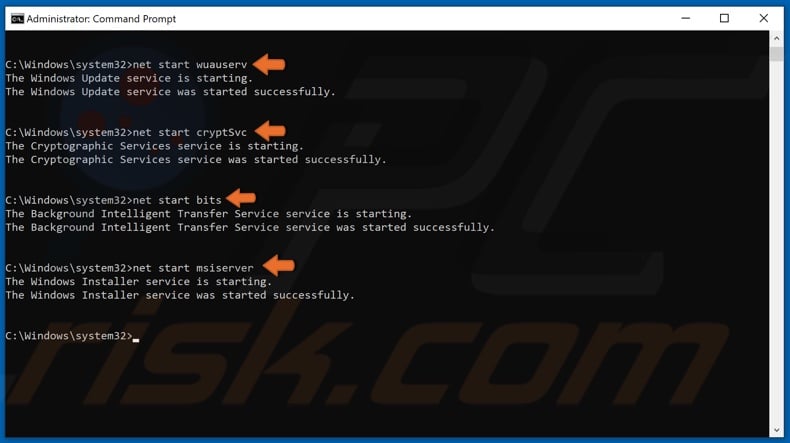
5. Finally, enter the following commands and press Enter after typing in each individual one. Executing these commands will start Windows Update-related services.
- net start wuauserv
- net start cryptSvc
- net start bits
- net start msiserver
6. Reboot your PC.
Method 4. Reset Windows 10 Using Recovery
If a Windows update won't install, you might be able to fix this problem by resetting Windows 10. Note that using this method will allow you to keep all of your files but will remove all of the applications you've installed.
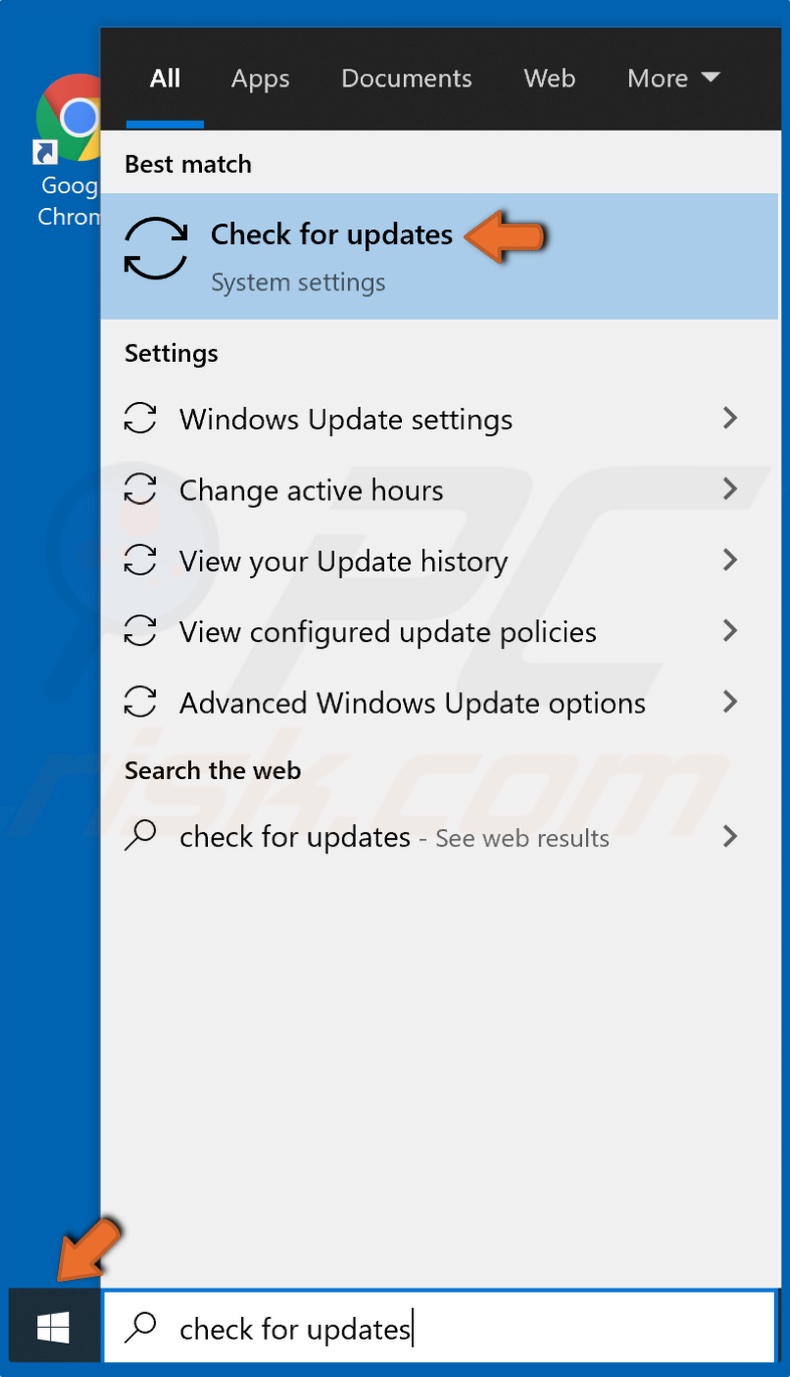
1. Open the Start menu, type Check for Updates, and click the result.
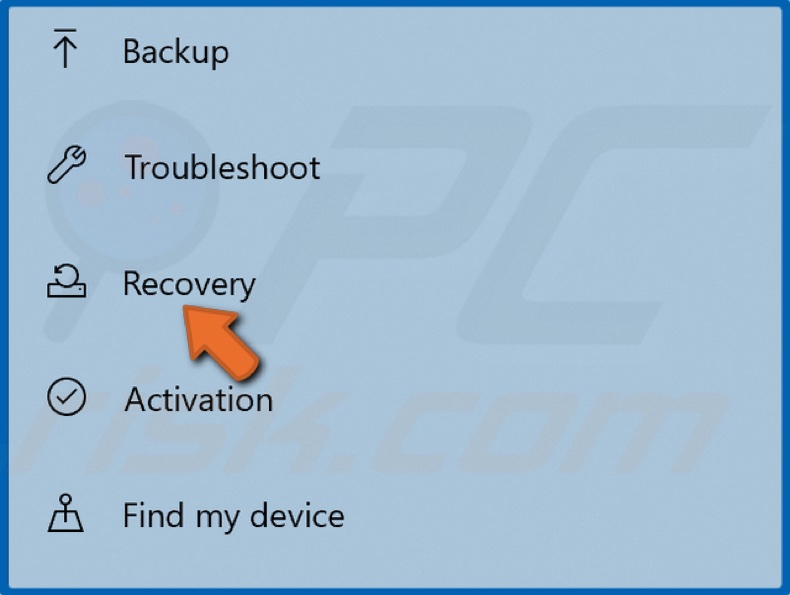
2. Click Recovery located on the left side of the window.
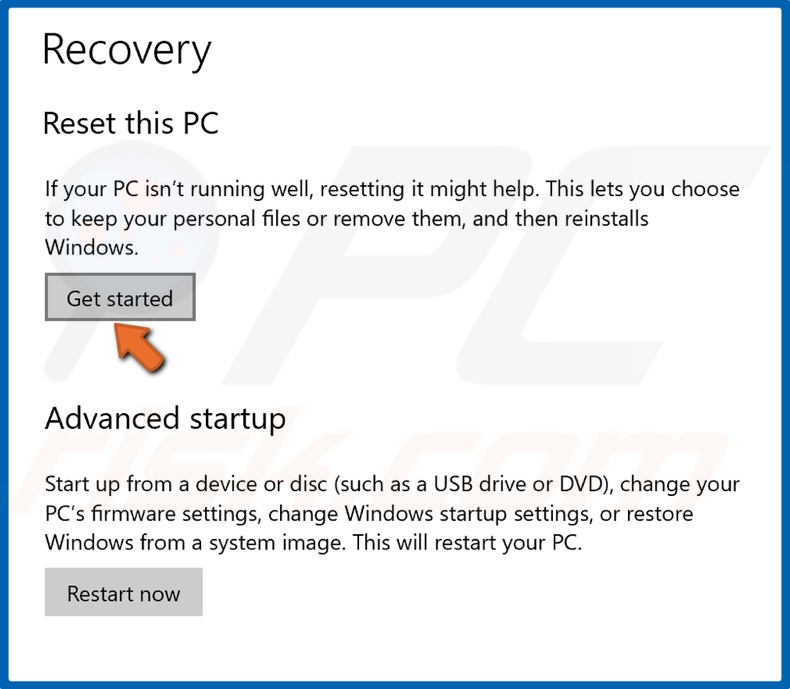
3. Click Get Started.
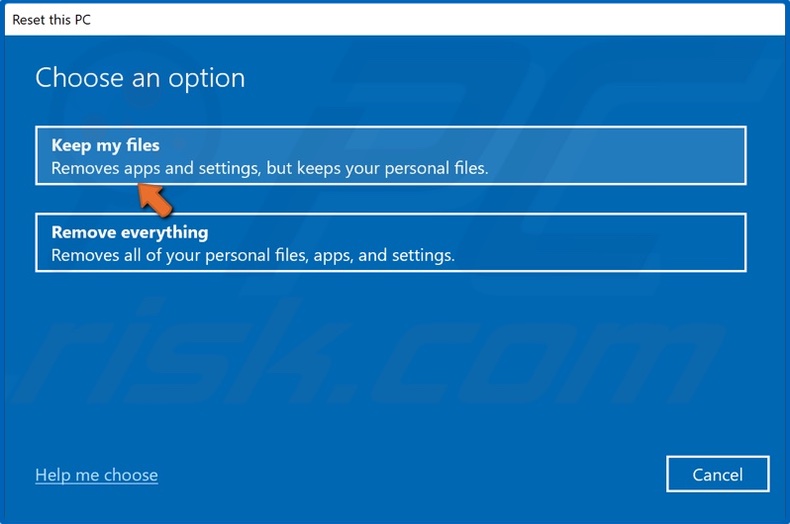
4. Select Keep My Files.
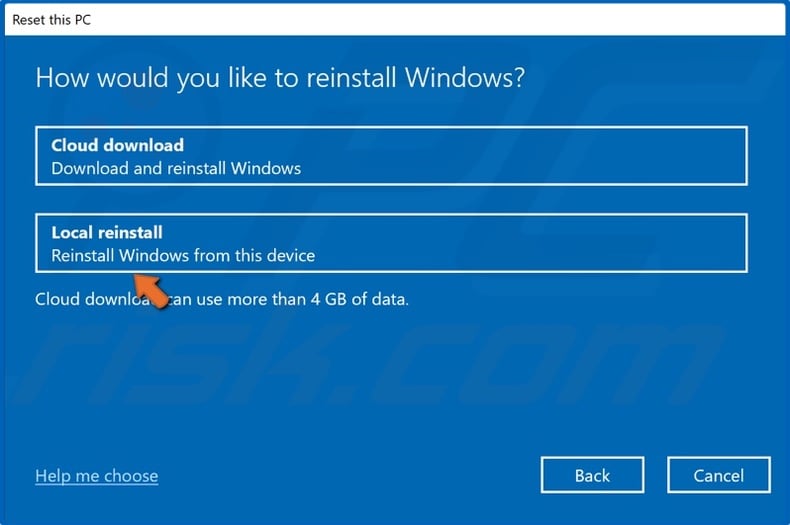
5. Select Local reinstall.
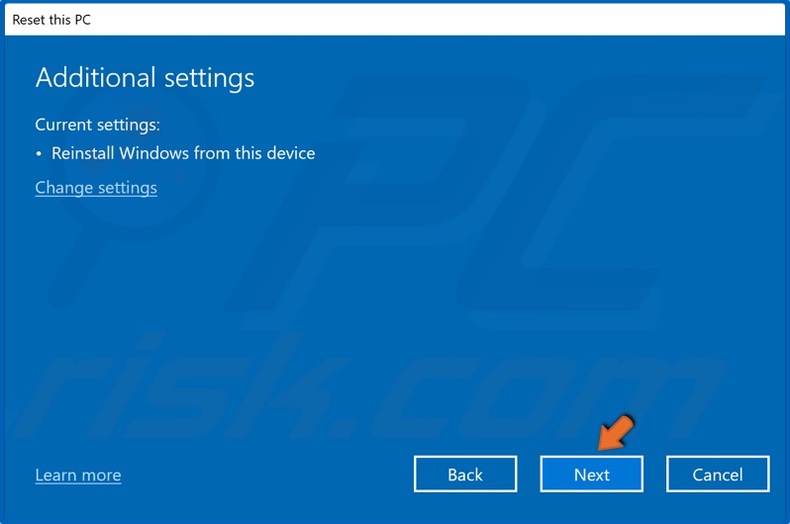
6. Click Next.
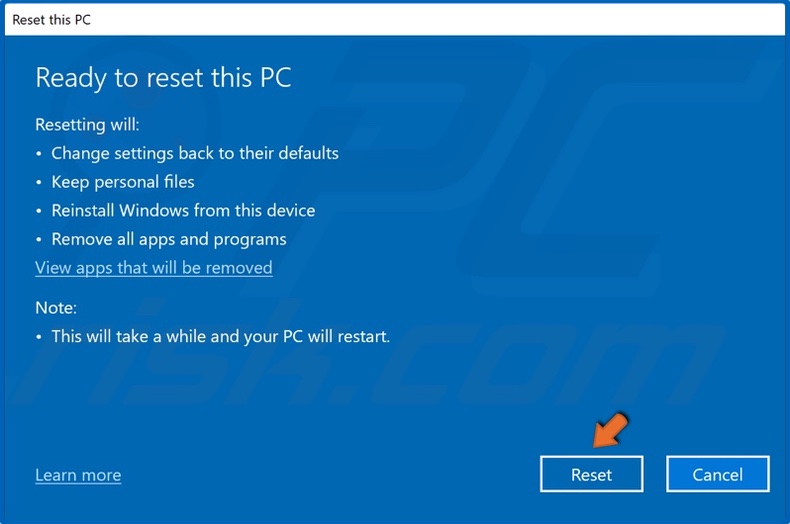
7. Click Reset.
8. Wait for the resetting process to complete. This process will take a while, so be patient.
Did this article help you fix Windows 10 updates not installing? Comment below to let us know.
Share:

Rimvydas Iliavicius
Researcher, author
Rimvydas is a researcher with over four years of experience in the cybersecurity industry. He attended Kaunas University of Technology and graduated with a Master's degree in Translation and Localization of Technical texts. His interests in computers and technology led him to become a versatile author in the IT industry. At PCrisk, he's responsible for writing in-depth how-to articles for Microsoft Windows.

▼ Show Discussion