System Interrupts 100% CPU Usage: 9 Ways to Fix It

Get Free Scanner and check your computer for errors
Fix It NowTo fix found issues, you have to purchase the full version of Combo Cleaner. Free trial available. Combo Cleaner is owned and operated by Rcs Lt, the parent company of PCRisk.com read more.
How to Fix System Interrupts High CPU Usage in Windows 10
The System Interrupts process (also known as 'Interrupts') is a Microsoft Windows component. This process sometimes causes high CPU usage, and this article is dedicated to helping you fix it.
Hardware interrupts are a standard way for hardware and the CPU to communicate. For example, hardware components on your computer require attention and monitoring. However, not all CPU resources are dedicated to monitoring signals from any one particular hardware component. Interruption signals are sent to the CPU.
Suppose an interrupt has a high (or higher) priority than the process currently being serviced. In that case, the CPU suspends the current process, deals with the higher priority interrupt, and then resumes the original process.
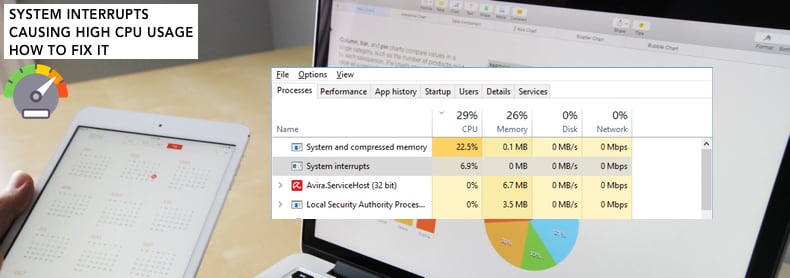
The System Interrupts process should not use too much CPU power (usually, up to five percent). However, some users have reported excessive CPU usage by this process. Sometimes, System Interrupts can even cause 100% CPU usage.
High CPU usage caused by System Interrupts usually means that a hardware driver is not working correctly or has an issue with the hardware itself. Read the guide below for several possible solutions.
Video Showing How to Fix System Interrupts High CPU Usage:
Table of Contents:
- Introduction
- Restart Your Computer
- Check for Windows Updates
- Check Your Disk for Errors
- Unplug External Devices
- Update Device Drivers
- Disable Audio Enhancements
- Disable Wake on Magic Packet
- Update BIOS
- Disable Fast Startup
- Video Showing How to Fix System Interrupts High CPU Usage
Download Computer Malware Repair Tool
It is recommended to run a free scan with Combo Cleaner - a tool to detect viruses and malware on your device. You will need to purchase the full version to remove infections. Free trial available. Combo Cleaner is owned and operated by Rcs Lt, the parent company of PCRisk.com read more.
Restart Your Computer
First, we recommend that you restart your computer (if you have not done so already). This may sound trivial, but many problems are solved by this simple step. Try a restart before looking at more complex solutions.
If you have restarted your computer and the problem with high CPU usage caused by System Interrupts persists, you should check that you have the latest Windows updates installed.
Check For Windows Updates
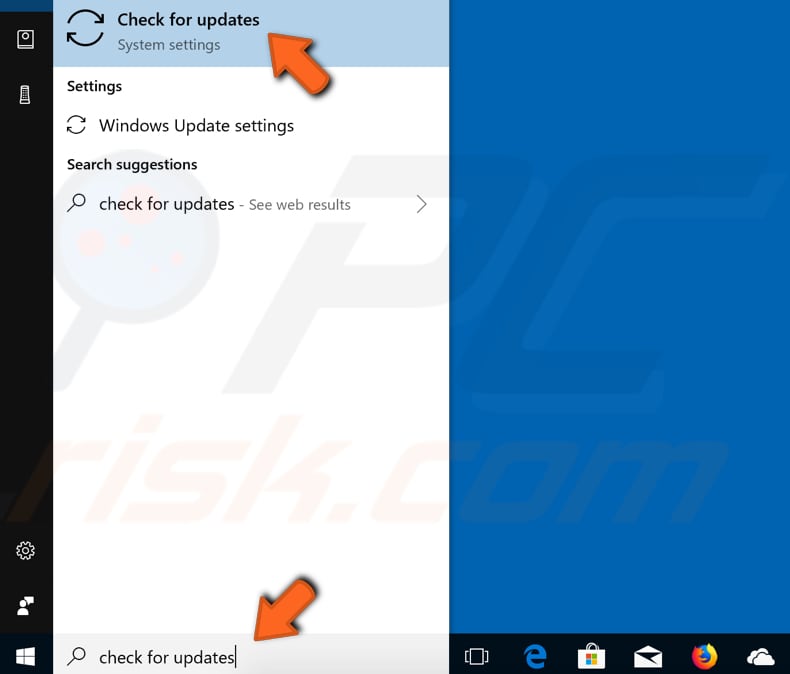
Update your current version of Windows. Checking for updates for the whole Windows operating system might help. Type "check for updates" in Search and click the "Check for updates" result.
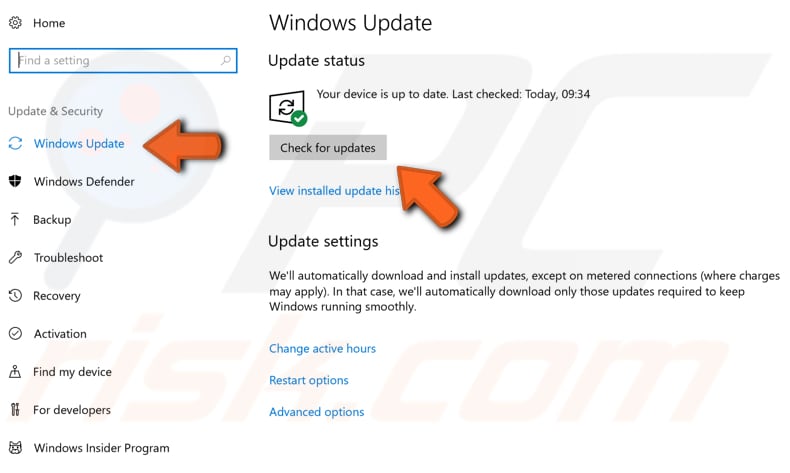
You should be automatically directed to the Windows Update section. Click "Check for updates". Windows will start checking for updates. If there are updates available, install them and check for updates once more (just to ensure that you have the latest updates on your operating system).
After the updates are installed, restart your computer and see if the problem with high CPU usage caused by System Interrupts persists.
Check Disk For Errors
If updating the operating system does reduce high CPU usage caused by System Interrupts, check the disk for errors (it is always a good idea to periodically check hard disks for errors). A built-in Windows tool checks the integrity of disks - it examines them and corrects many common errors. You can run this tool from the command line or through a graphical interface.
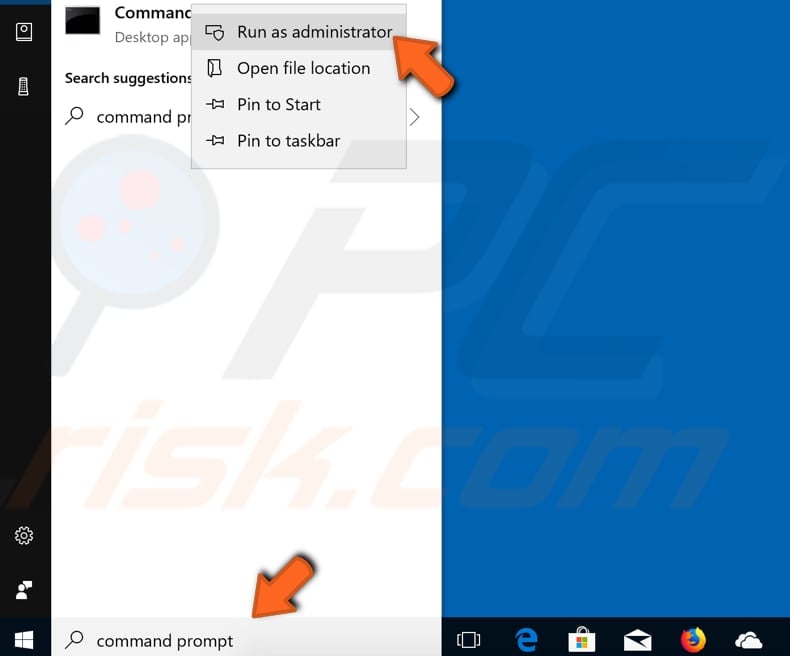
This guide describes how to run it through Command Prompt (running it from the command line). To open Command Prompt, type "command prompt" and right-click on the "Command Prompt" result. Select "Run as administrator" from the drop-down menu.
Type the "chkdsk C: /f" command in the Command Prompt window and press Enter on your keyboard. Replace "C" with the letter of your hard drive if it is not the C: drive you want to scan (or the Windows operating system is on another drive). The "chkdsk C: /f" command detects and repairs logical issues affecting your drive.
To repair physical issues, also run the "chkdsk C: /r" command. You can run both commands at once by typing "chkdsk C: /f /r" (Windows will need to restart the computer to finish the scan). The disk checking process can take some time, depending on the computer power and size of the hard drive. Be patient and wait until it completes.
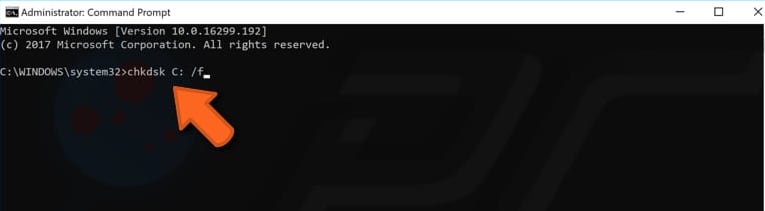
NOTE: If you see a message stating that Chkdsk cannot run because the volume is in use by another process, and you are asked if you would like to schedule the volume to be checked the next time the system restarts, press the "Y" key on your keyboard. The disk will be checked for errors after the restart.
Unplug External Devices
As mentioned, System Interrupts causing high CPU usage are due to hardware or driver problems. We recommend that you unplug your external devices individually while Task Manager is open and showing CPU usage by System Interrupts.
Unplug external devices and peripherals such as the mouse, keyboard, microphone, webcam, etc., one by one and check if the System Interrupts process starts to behave normally. If normal behavior resumes after unplugging a specific external device, you will know which device is causing the problem.
Update Device Drivers
If you know which device is causing the problem, you might need to update the associated driver. If the appropriate driver is not installed, the device might not function properly.
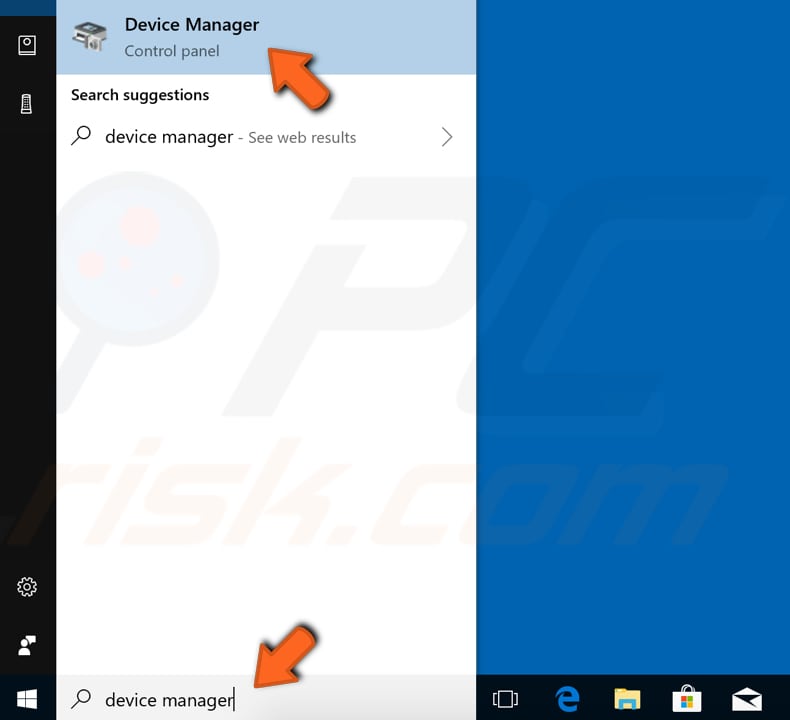
To update drivers, open Device Manager by right-clicking the Start button and selecting the "Device Manager" result from the contextual menu, or type "device manager" in Search and click the "Device Manager" result.
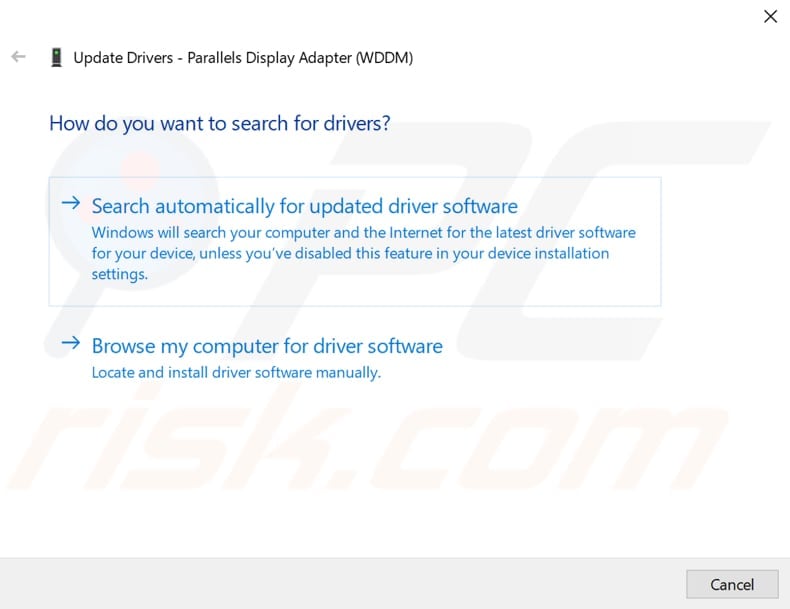
In Device Manager, you will see a list of devices connected to your computer. If you know which hardware drivers are causing the problem, update those drivers only. If you are not sure, look for devices marked with yellow exclamation marks and update those. Expand the device category, right-click the device, and select "Update driver" from the drop-down menu.

You will be asked to search for updated driver software automatically or to browse your computer for driver software. If you select the first option, Windows will search your computer and the Internet for the latest driver software for your device.
If you select the second option, you must locate and install drivers manually. Using this option requires having previously downloaded the driver on your computer or USB flash drive and is a long process since you must manually download the latest drivers for all devices by visiting the device manufacturer's official websites. We recommend that you select the first option and follow the instructions.
If updating drivers does not solve the problem with high CPU usage caused by System Interrupts, reinstall them. Follow the same steps as above, but select "Uninstall device" rather than "Update driver". Ensure that you check the "Delete the driver software for this device" checkbox (if there is one). Restart the computer. Windows will automatically install any missing drivers the next time you start Windows.
You can also use third-party software to update drivers automatically. In this case, we recommend Snappy Driver Installer (SDI), a powerful free driver updater for Windows . You can download Snappy Driver Installer from here.
Disable Audio Enhancements
There are many different sound drivers, some of which use software enhancements designed to improve audio quality. If, however, they are not working correctly, they might cause high CPU usage.
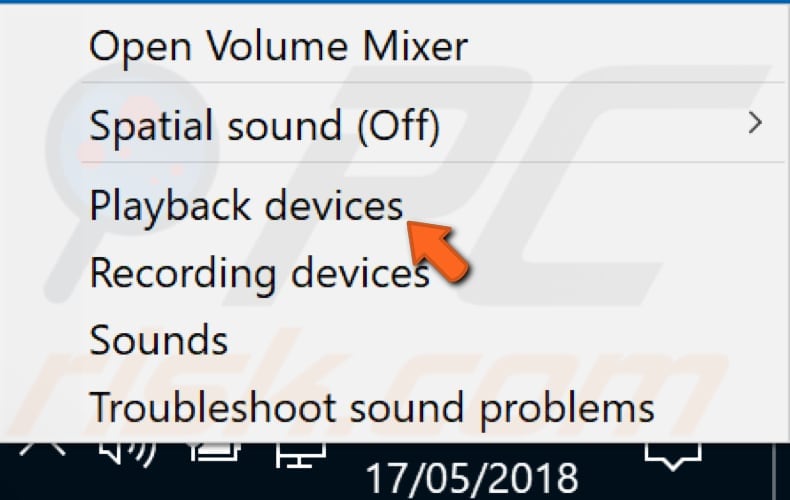
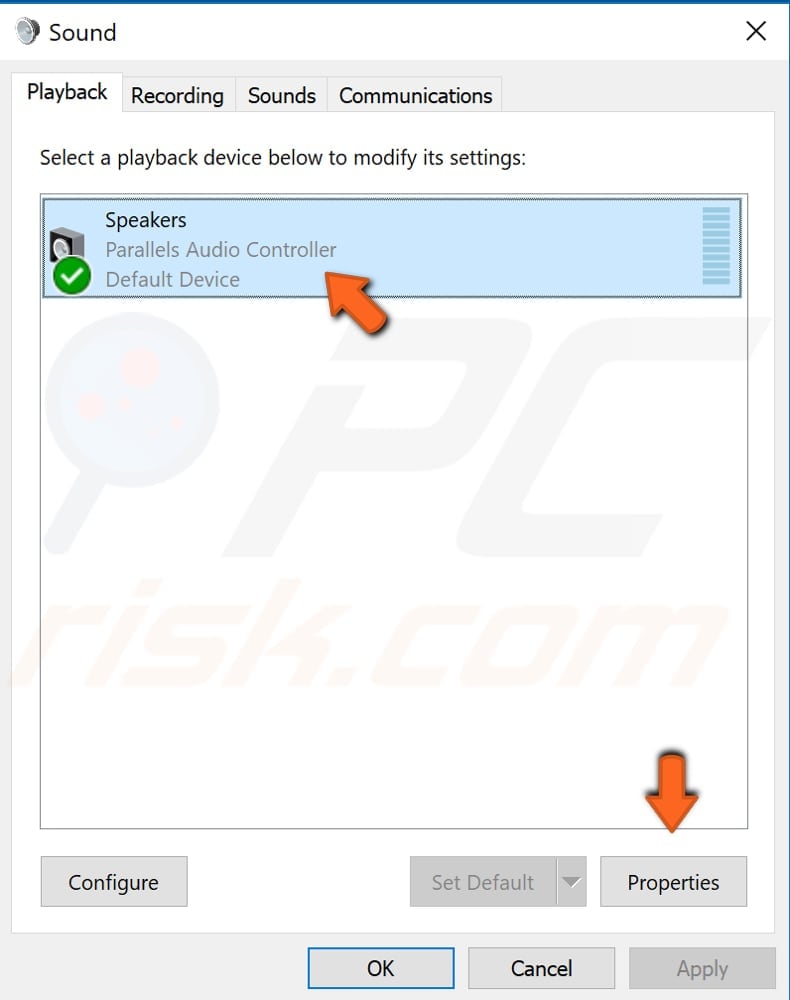
To disable sound enhancements, right-click the speaker icon in the Taskbar and select the "Playback devices" option from the contextual menu.
The Sound window will appear, and you will be automatically directed to the Playback tab. Select the default audio device that you use for playing audio and click "Properties".
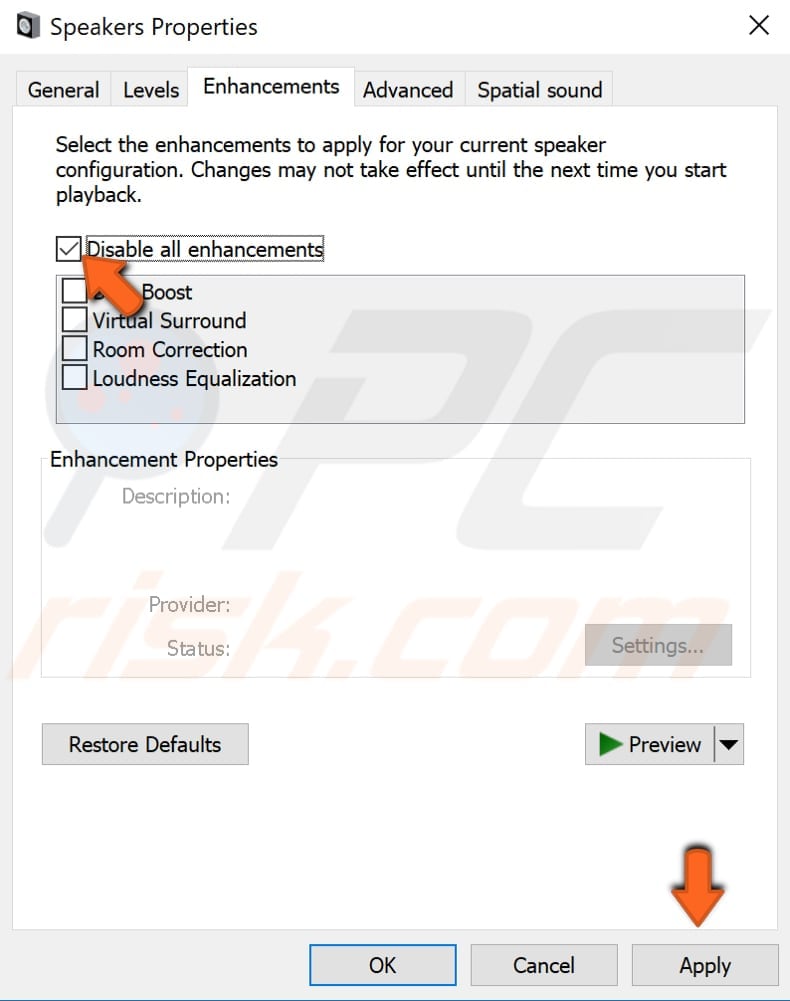
In the Speakers Properties window, select the "Enhancements" tab and ensure that none of the enhancements are enabled, or simply tick the "Disable all enhancements" checkbox and click "Apply" to save the changes.
Disable Wake on Magic Packet
Wake on Magic Packet is a Windows feature that gives the network adapter privilege to 'wake up' your computer upon transmission of data. This data packet is known as Wake on Magic Packet. The feature uses interrupts that can cause high CPU usage.
To disable this feature, open Device Manager and select your Ethernet or Wi-Fi network adapter, right-click it and select "Properties". In the Properties window, find the "Advanced" tab and select it. You will see a list of properties available for the network adapter.
To change Wake on Magic Packet settings, scroll down until you find this feature and select it. Then set its value to "Disabled" on the right side of the Properties window. Save the changes and restart your computer. See if this solves the problem and if the System Interrupts CPU usage is back to normal.
Update BIOS
BIOS (Basic Input Output System) is software stored on a small memory chip on the motherboard. You might need to access the BIOS to change how the device works or assist in troubleshooting a problem. Updating the BIOS might help to solve the problem if you cannot find other causes.
The hardware responsible for interrupts may be having problems, and thus updating BIOS might fix the problem. Bear in mind that updating the BIOS is a procedure for advanced users and, if not performed properly, can cause permanent hardware damage.
To update the BIOS, go to the motherboard manufacturer's website and download the latest BIOS version for the motherboard. There should be a manual describing how to update the BIOS - ensure that you read this carefully. If you do not know how to update the BIOS, find an expert to avoid damage to your computer.
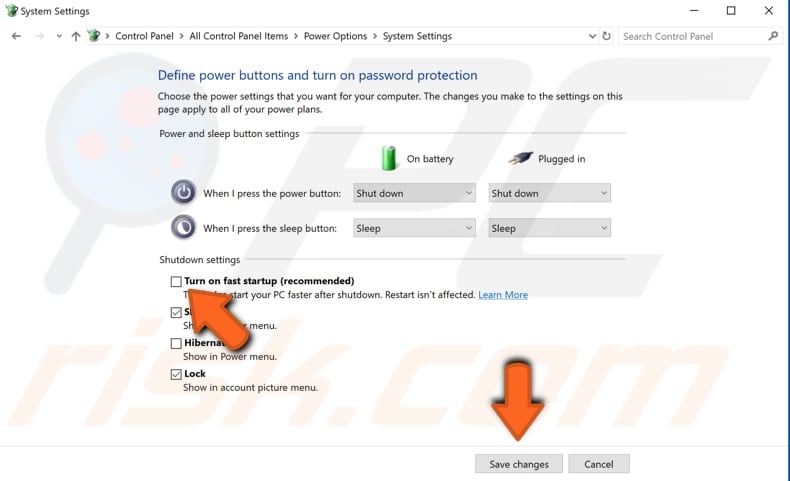
Disable Fast Startup
Fast startup is a feature on Windows 10 (and also Windows 8) that provides a faster boot time when starting up the computer. It is a useful feature and one that most people use without knowing. Some people disable the feature immediately when they receive a new computer with the Windows operating system.
With Fast Startup enabled, shutting down the computer may seem like you are completely shutting it down, but this is not entirely true since it moves into a state between hibernation and shutdown. Leaving Fast Startup enabled should not harm your PC since it is a Windows feature, but this could be why System Interrupts is causing high CPU usage.
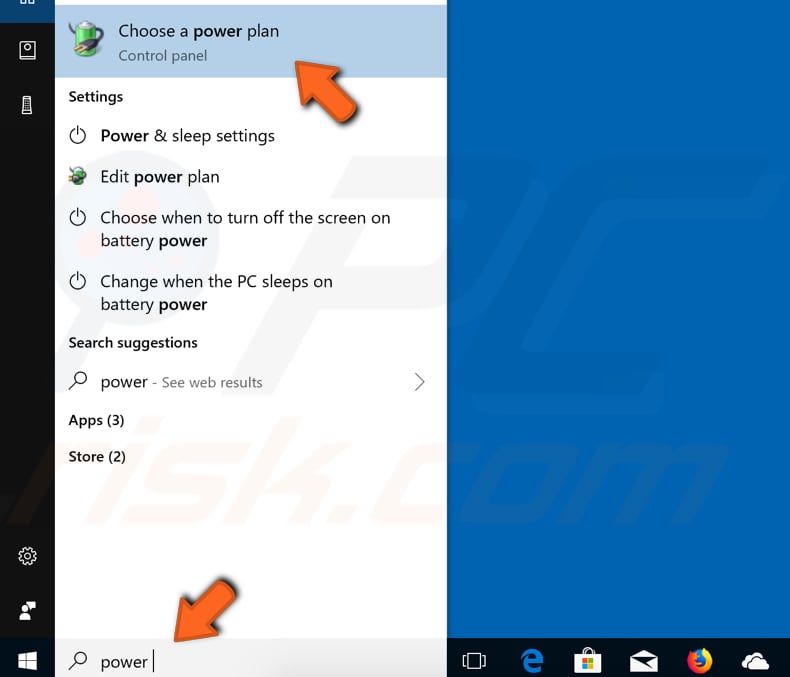
To disable Fast Startup, go to Search and type "power". Click on the "Choose power plan" result to open it.
In the Power Options window, click "Choose what the power button do".
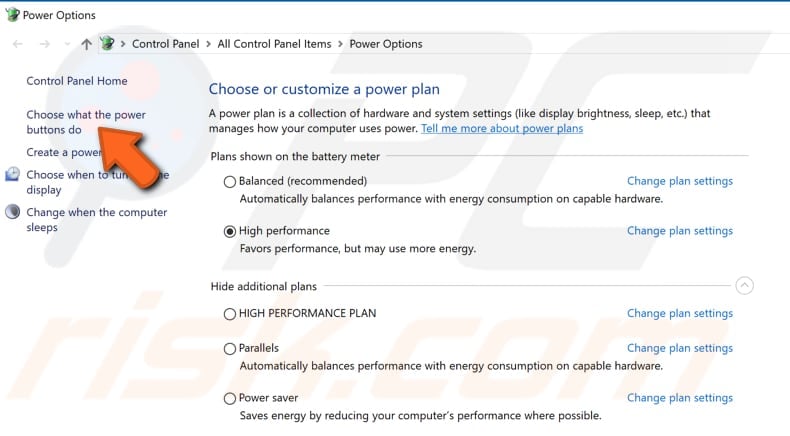
Click on "Change settings that are currently unavailable" and then uncheck the "Turn on fast startup (recommended)" option if it is enabled. Click "Save changes" to save the changes made, restart your computer, and see if System Interrupts is still causing high CPU usage.
If the problem persists, you can re-enable Fast Startup if needed.
We hope that this guide was helpful and you could reduce the high CPU usage caused by System Interrupts, and it is now back to normal. If you know of other solutions to this problem not mentioned in our guide, please share them with us by leaving a comment below.
Share:

Rimvydas Iliavicius
Researcher, author
Rimvydas is a researcher with over four years of experience in the cybersecurity industry. He attended Kaunas University of Technology and graduated with a Master's degree in Translation and Localization of Technical texts. His interests in computers and technology led him to become a versatile author in the IT industry. At PCrisk, he's responsible for writing in-depth how-to articles for Microsoft Windows.
▼ Show Discussion