How to Fix Ntoskrnl.exe High CPU and Disk Usage

Get Free Scanner and check your computer for errors
Fix It NowTo fix found issues, you have to purchase the full version of Combo Cleaner. Free trial available. Combo Cleaner is owned and operated by Rcs Lt, the parent company of PCRisk.com read more.
How to Fix High Ntoskrnl.exe High CPU/Disk Usage on Windows 10
Ntoskrnl.exe is an integral part of Windows and is, among other things, responsible for memory and process management. Sometimes, ntoskrnl.exe may cause high CPU and Disk usage, and this article is dedicated to helping you fix that.

When a program or a process uses too many Disk or CPU resources, it might not be functioning properly. Sometimes Windows users have problems with the ntoskrnl.exe process taking too many Disk or CPU resources.
To work correctly, Windows runs various processes in the background, including ntoskrnl.exe (Windows NT operating system kernel), which is also known as the kernel image. It is a fundamental part of the operating system responsible for various system services such as memory and process management, hardware virtualization, etc. The process also provides the kernel and executive layers of the Windows NT kernel space.
You may find it odd that a process that manages memory is the cause of excessive usage. When a program or a process takes too many CPU or Disk resources and slows down the computer, you can usually close it or end the process. This is not the case with ntoskrnl.exe, since it is an important part of the Windows operating system - closing it could lead to more serious problems.
To address the ntoskrnl.exe CPU/Disk usage problem, read the guide below for possible solutions.
Video Showing How to Fix Ntoskrnl.exe High CPU/Disk Usage:
Table of Contents:
- Introduction
- Edit Windows Registry
- Improve Windows Performance
- Disable Startup Programs
- Defragment Your Hard Drive
- Scan Your System for Viruses
- Disable Runtime Broker
- Disable Superfetch
- Perform SFC and DISM Scans
- Video Showing How to Fix Ntoskrnl.exe High CPU/Disk Usage
Download Computer Malware Repair Tool
It is recommended to run a free scan with Combo Cleaner - a tool to detect viruses and malware on your device. You will need to purchase the full version to remove infections. Free trial available. Combo Cleaner is owned and operated by Rcs Lt, the parent company of PCRisk.com read more.
Edit Windows Registry
Windows Registry is a collection of databases of configuration settings in Microsoft Windows operating systems. It stores much of the information and settings for software programs, hardware devices, user preferences, operating system configurations, and much more. Many of the options exposed in the registry are not accessible elsewhere in Windows.
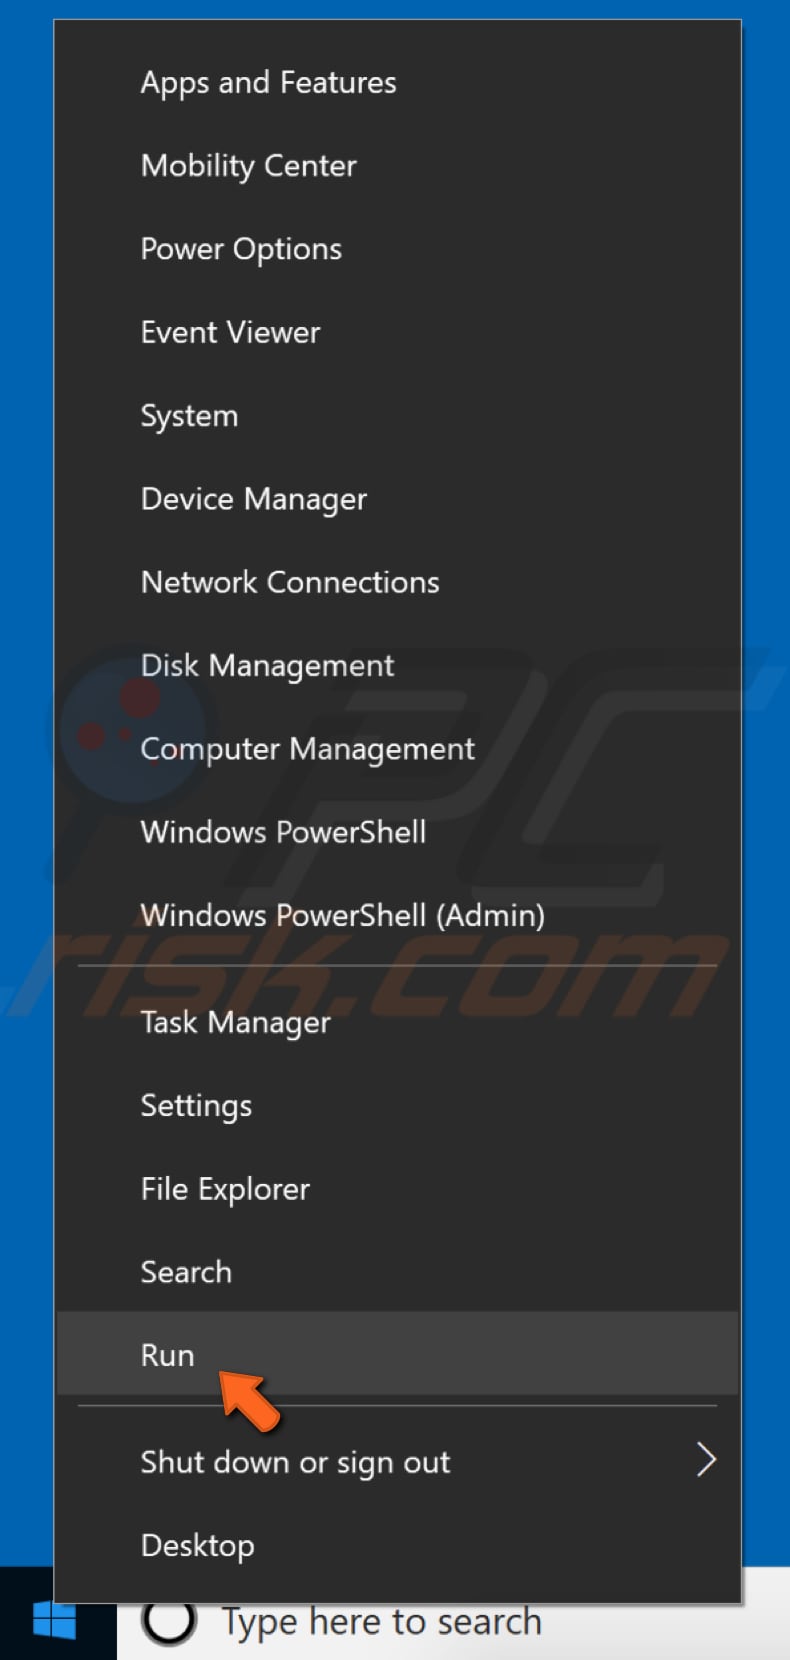
To edit the registry, you will need to use Windows Registry Editor. To open Registry Editor, right-click the Start button and select "Run" from the contextual menu.
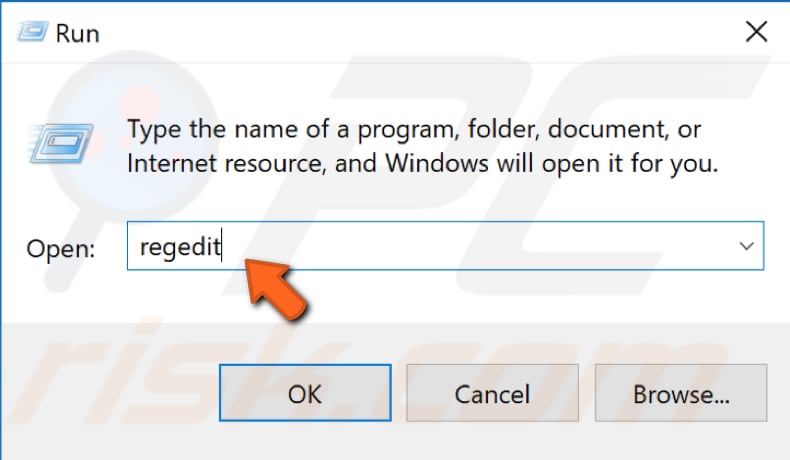
In the Run dialog box, type "regedit" and click "OK" or press Enter on the keyboard - this will open Registry Editor.
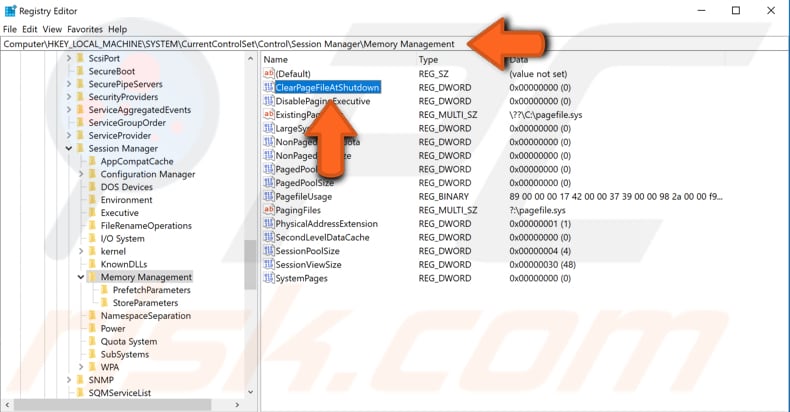
Now go to "HKEY_LOCAL_MACHINE\SYSTEM\CurrentControlSet\Control\Session Manager\Memory Management". You can simply copy and paste this path into Registry Editor's bar or go to it manually by expanding directories.
Click the "Memory Management" folder icon. You will see a list of registry files on the right pane. Find "ClearPageFileAtShutdown" and double-click it.
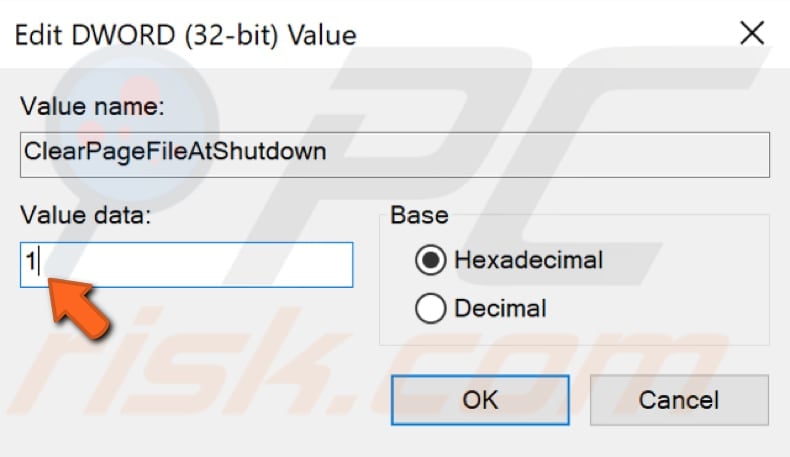
In the Edit DWORD (32-bit) Value window, change "Value data" to 1. Click "OK" to save changes and see if this solves the problem with the ntoskrnl.exe process using too much CPU or Disk.
Improve Windows Performance
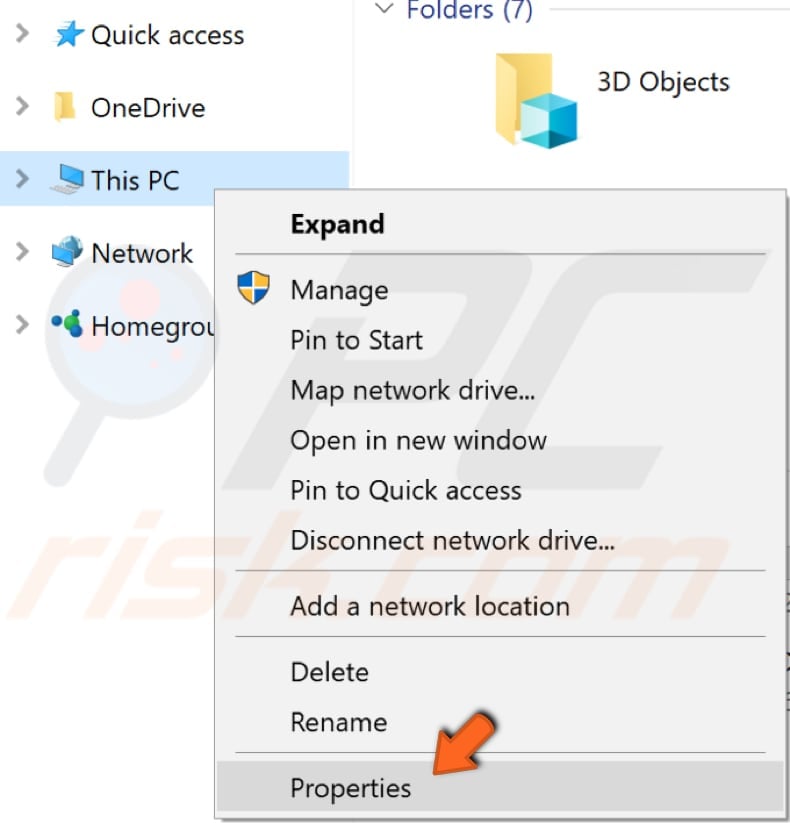
Adjust Windows 10 for best performance. Right-click the This PC (formerly "My Computer") icon and select "Properties" from the contextual menu. If you are not sure where to find it, open File Explorer - you should see it on the left pane of the window.
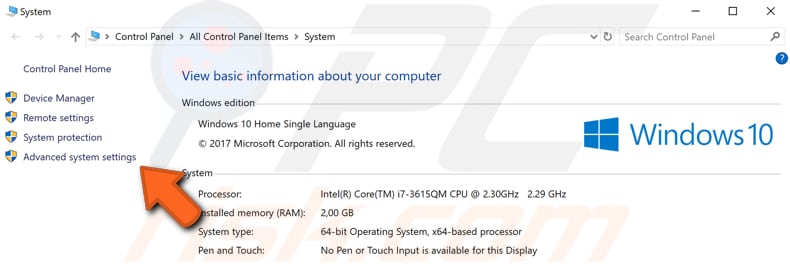
The System Properties window will appear. Find and click "Advanced system settings".
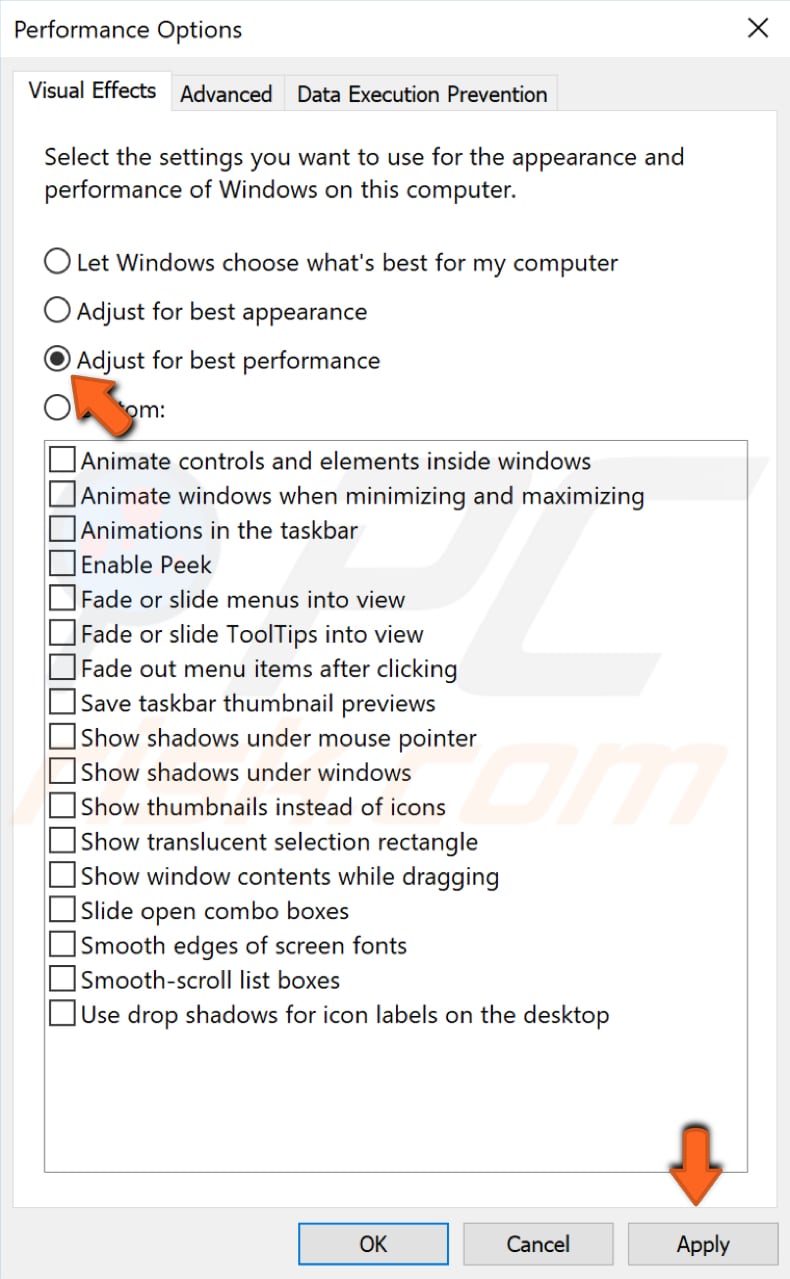
On the Advanced tab, find "Settings..." under Performance and click it.

Select the "Adjust for best performance" option in the Performance Options window and click "Apply" to save the changes. Restart the computer and see if this solves the problem with the ntoskrnl.exe process using too much CPU or Disk.
Disable Startup Programs
When you start Windows using a normal startup operation, several applications and services start automatically and then run in the background.
These programs include basic system processes, antivirus software, system utility applications, and other previously installed software. These applications and services can cause software conflicts and slow down the computer by taking too many resources.
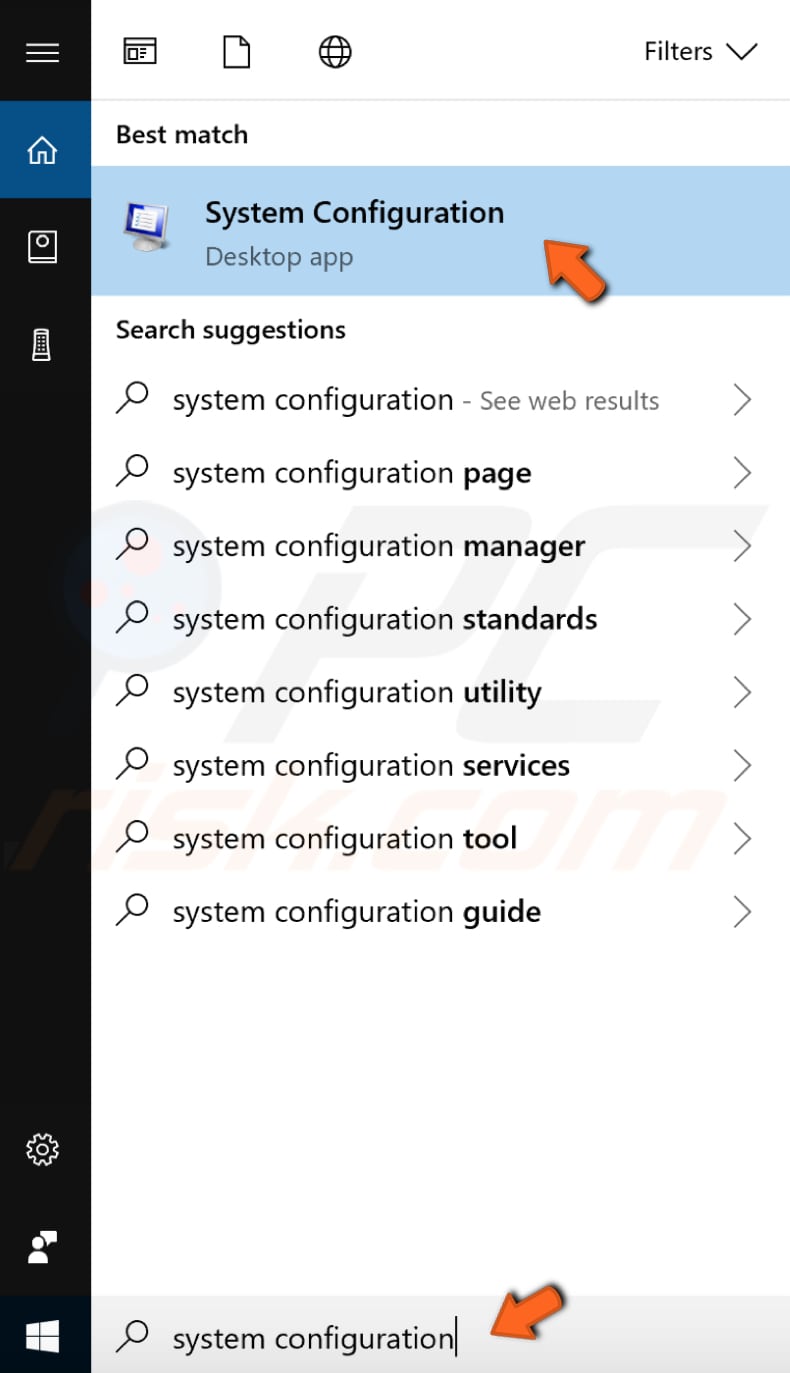
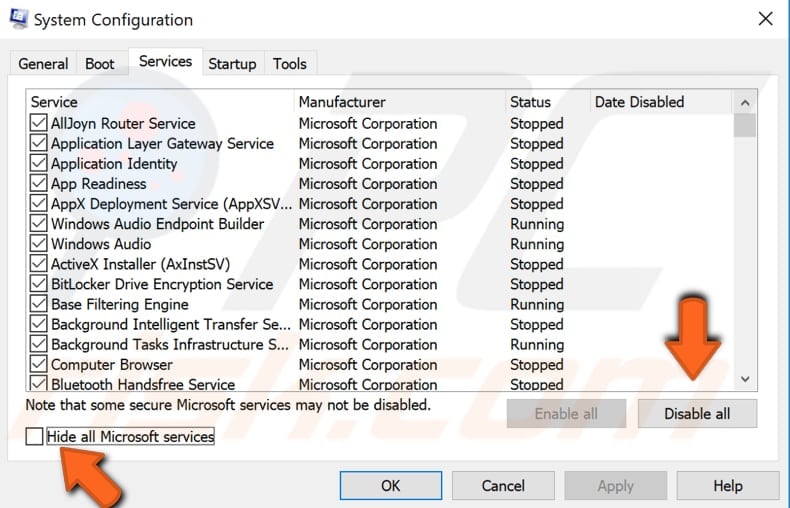
To disable startup programs, type "system configuration" in Search and click the "System Configuration" result.
In the System Configuration window, click the "Services" tab and mark the "Hide all Microsoft services" checkbox. Then, click "Disable all".
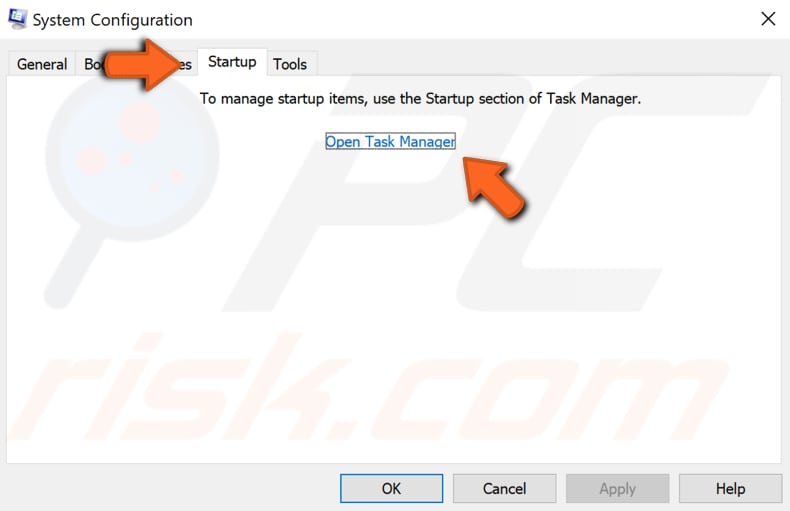
Click the "Startup" tab and click "Open Task Manager".
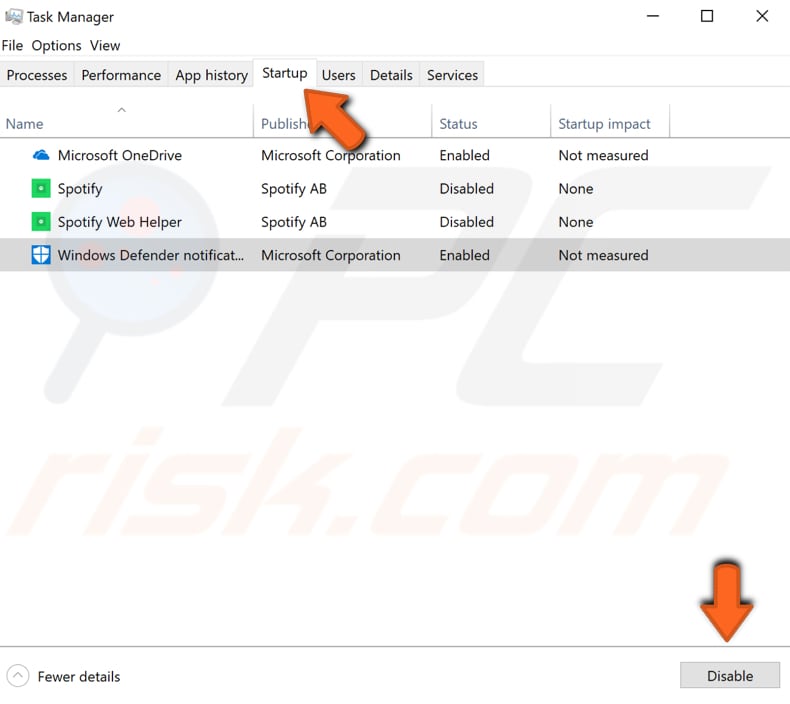
Under the Task Manager Startup tab, select the first application and click "Disable" to disable it. Disable all applications one by one, repeating this step. Once you have disabled all programs, close Task Manager and click "OK" in the System Configuration Startup tab.
Restart the computer to see if this solves the problem with the ntoskrnl.exe process using too much CPU or Disk.
Defragment Your Hard Drive
The ntoskrnl.exe process might use too many CPU or Disk resources if the hard drive requires defragmentation. The built-in Windows feature 'Defragment and Optimize Drives' optimizes your drives to help the system run more efficiently (or analyzes them to determine if they require optimization).
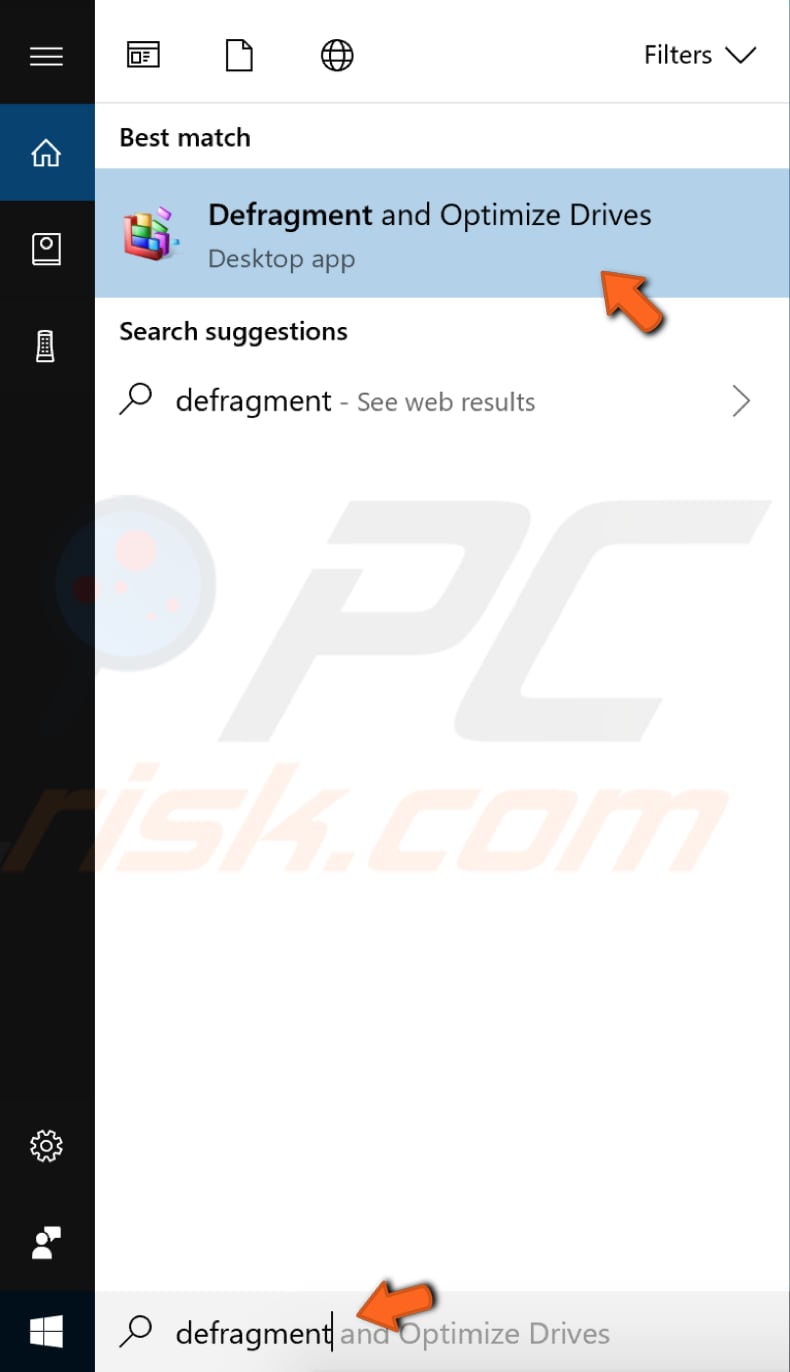
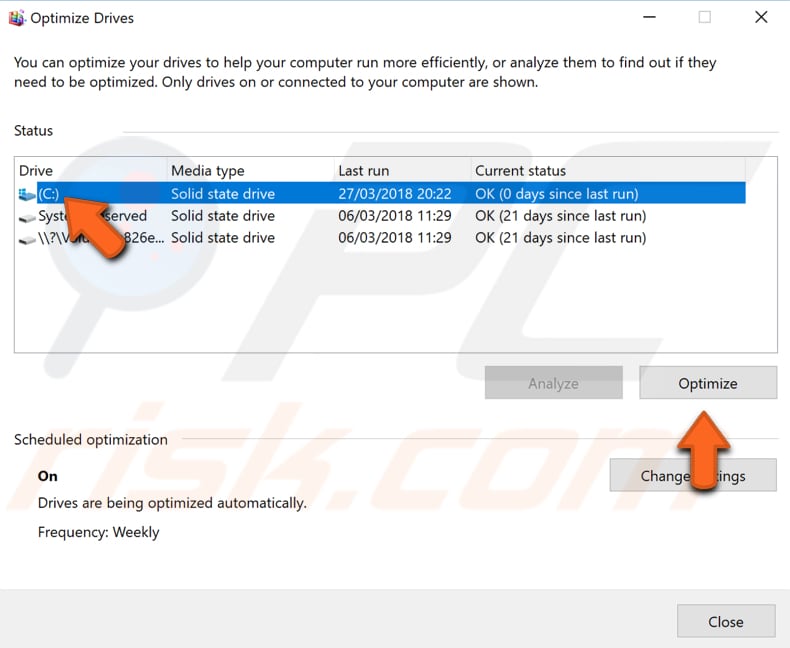
To launch the defragmentation tool, type "defragment" in Search and click the "Defragment and Optimize Drives" result.
You will see a list of drives connected to the computer. Select the hard drive and click "Optimize". The optimization process should take a while. Wait for it to finish.
Then, restart the computer and see if this solves the problem with the ntoskrnl.exe process using too much CPU or Disk.
Scan Your System for Viruses
Malware can cause various issues on computers, including problems with high CPU or Disk usage. Perform a full system scan and see if it detects any malware on the computer. You can use Windows Defender (a built-in antivirus program) that protects computers from viruses, spyware, and other malicious software.
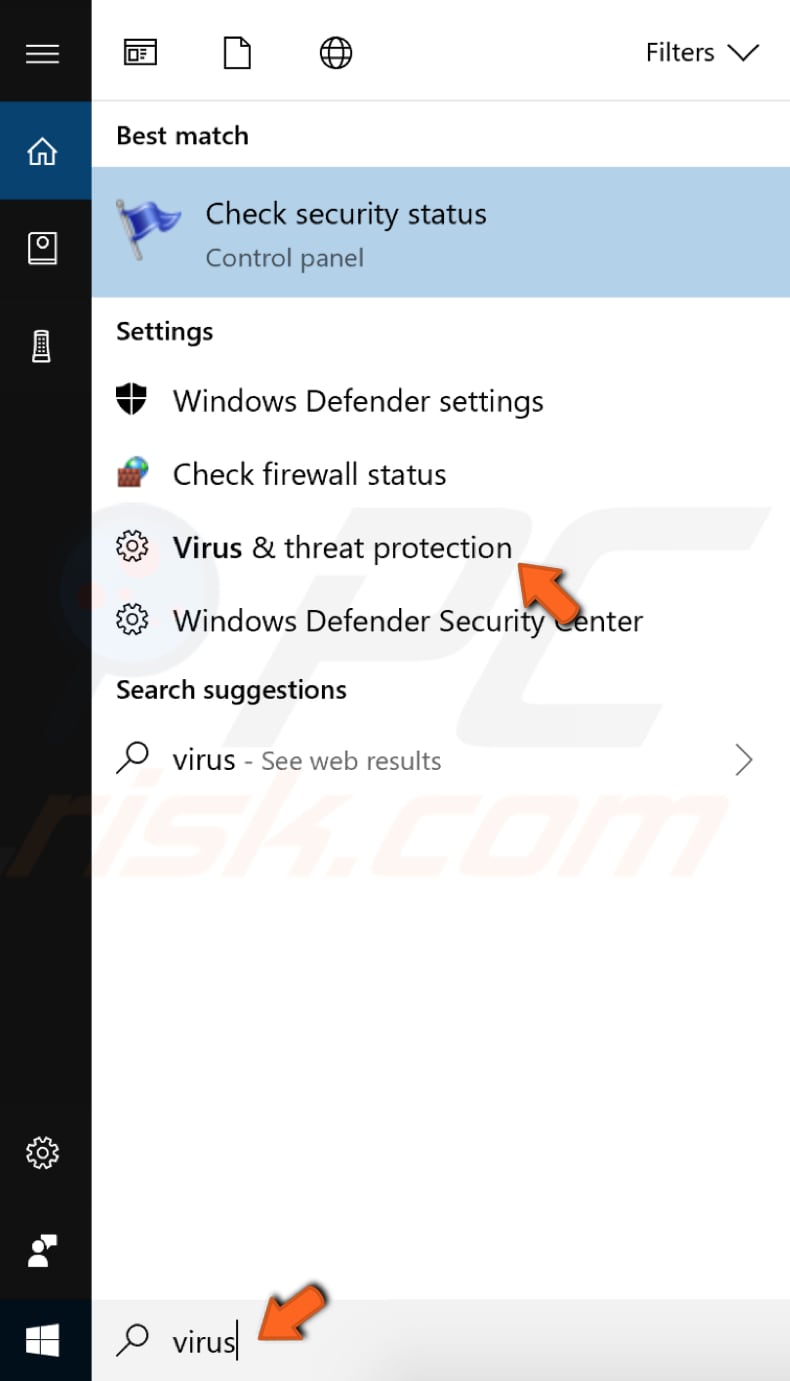
Alternatively, you can use other third-party antivirus software. To run a full system scan using Windows Defender, type "virus" in Search and click the "Virus & threat protection" result.
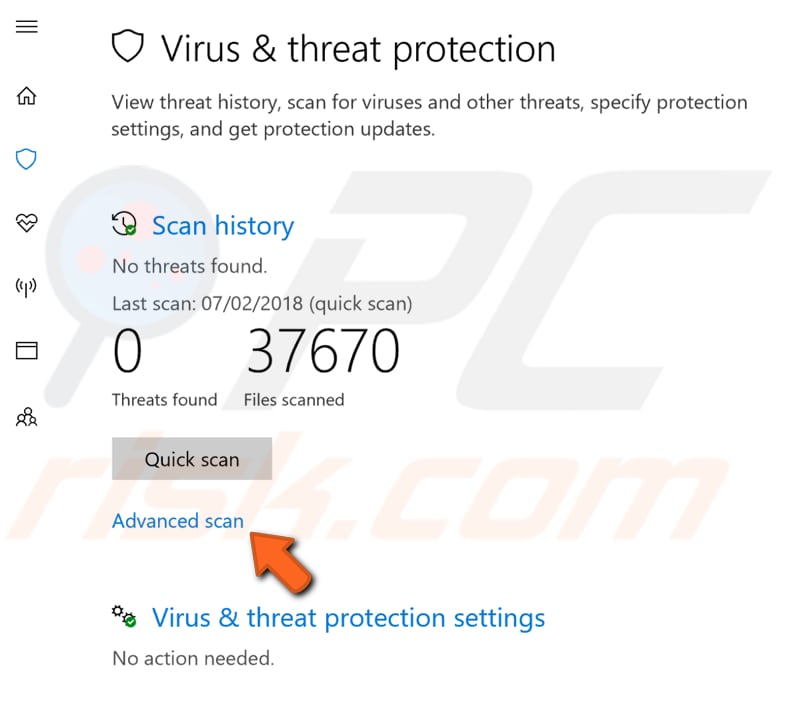
In the Virus & threat protection window, click "Advanced scan".
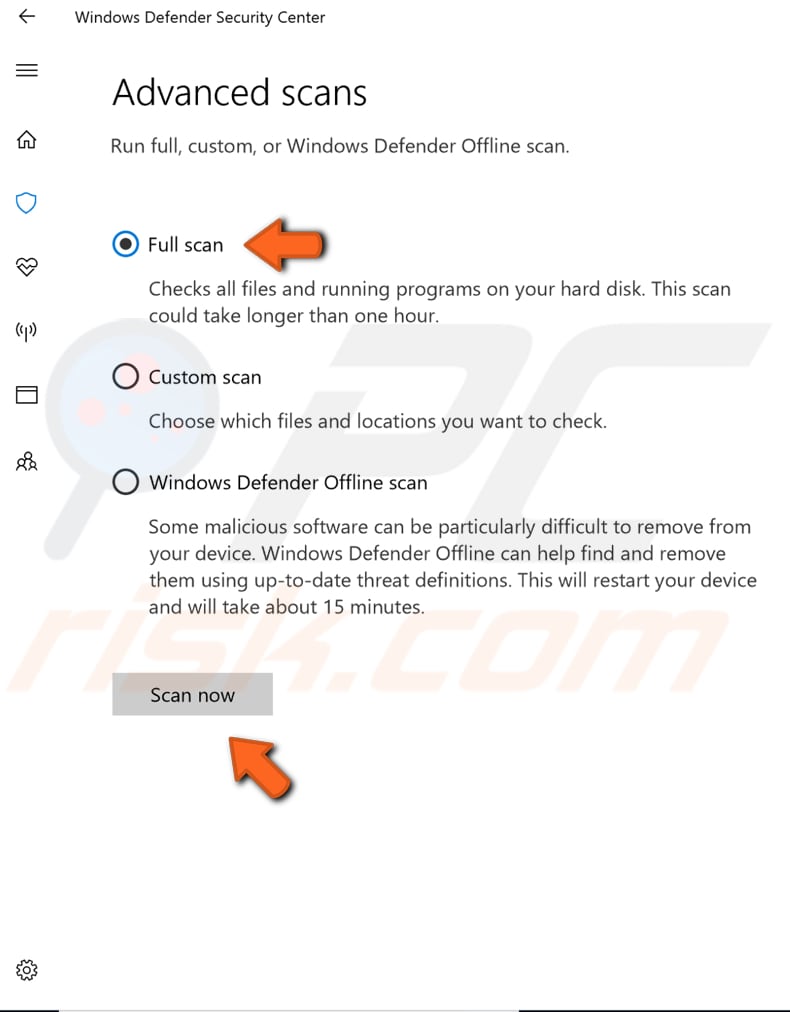
Select "Full scan" and click "Scan now". This will start scanning your system for malware. If there are any viruses found, delete them and see if the problem is fixed.
You can choose another virus and malware scanner from our Top anti-malware list. The list consists of well-known top spyware removers and will help you choose the right software for your computer's protection. You can find the list by clicking this link.
Disable Runtime Broker
Runtime Broker is a Microsoft Windows process that first appeared in Windows 8 and is still present in Windows 10. This process determines whether the universal apps from the Microsoft Store are declaring all of their permissions (such as being able to access the microphone or location).
To disable it, go to Settings and click "System".

In System settings, select the "Notifications & actions" section and disable "Get tips, tricks, and suggestions as you use Windows" and "Get notifications from apps and other senders" features.
Restart the computer and see if this solves the problem with the ntoskrnl.exe process using too much CPU or Disk.

Disable Superfetch
Superfetch is a Windows service that is intended to speed up application launching and improve system responsiveness. It caches data so that it can be immediately available to your application.
Superfetch achieves this by preloading frequently used programs into RAM so that they are not required to be called from the hard drive. This can sometimes affect performance and slow down the system.
To disable Superfetch, open the Run dialog box by typing "run" in Search and clicking on the "Run" result. Alternatively, you can use the Windows key + R keyboard shortcut to open it. In the Run dialog box, type "services.msc" and press Enter on the keyboard or click "OK".

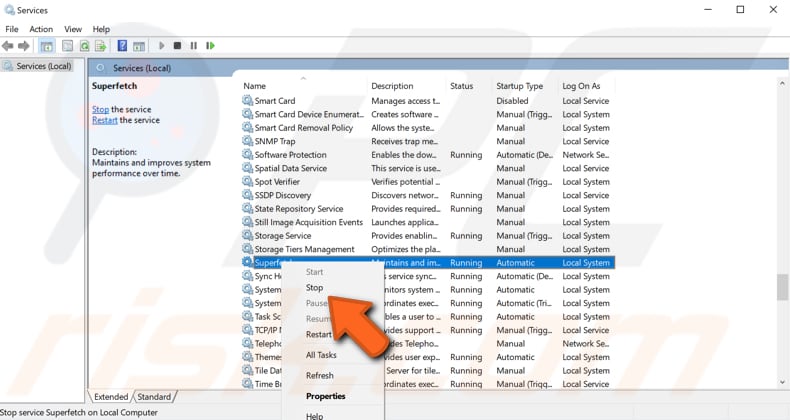
In the Services window, you will see a list of local services. Scroll down to find "Superfetch" and right-click it. Select "Stop" from the drop-down menu to stop the Superfetch service. Restart the computer for the changes to take effect.
After disabling the Superfetch service and restarting the computer, the CPU and Disk usage should return to normal. If this does not solve the problem with the ntoskrnl.exe process, you might want to re-enable the Superfetch service: repeat the steps, but select "Start" where you previousy selected "Stop".
If you want to disable the Superfetch service permanently, right-click it and select "Properties". In the Superfetch Properties (Local Computer) window, set "Startup type" to "Disabled", click "Stop" and "Apply" to save the changes.
If you want to re-enable it, change it from "Disabled" to "Automatic", click "Stop", and then "Apply".

Perform SFC and DISM Scans
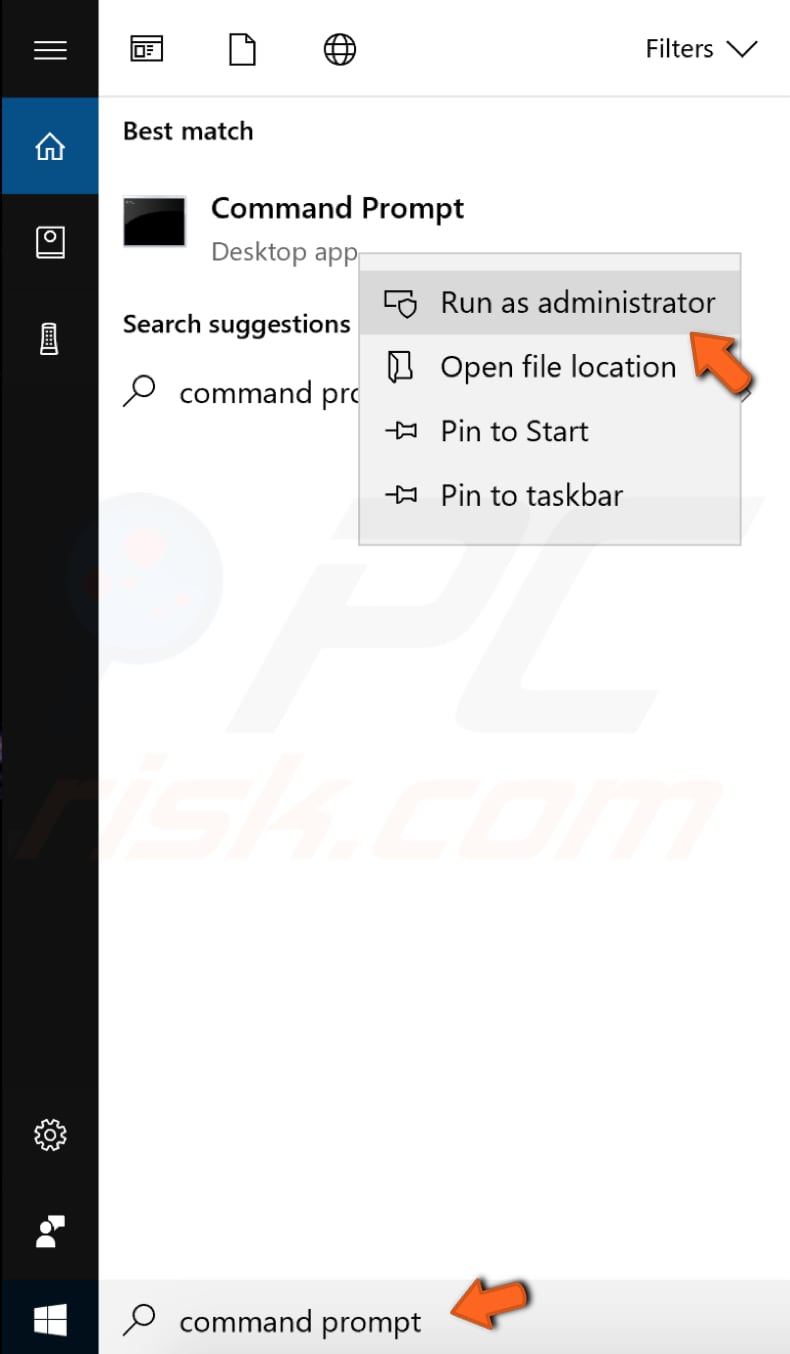
System File Checker (SFC) is a utility in Windows that allows users to scan for corruptions in Windows system files and restore corrupted files. To run it, open Command Prompt by typing "command prompt" in Search and then right-click on "Command Prompt".
Select "Run as administrator" from the drop-down menu to run Command Prompt with administrator privileges.
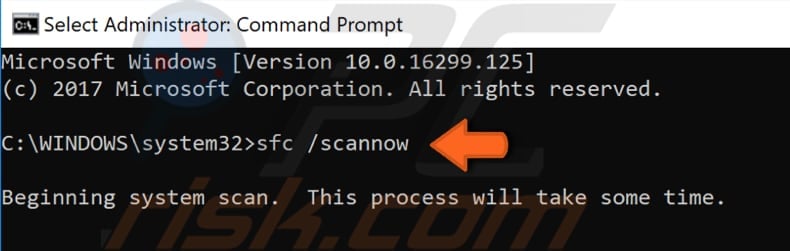
You must run an elevated Command Prompt to be able to perform an SFC scan.
Type "sfc /scannow" in the Command Prompt window and press Enter on the keyboard to execute this command. System File Checker will start and take some time to complete the scan.
Wait for the scanning process to complete and then restart the computer.
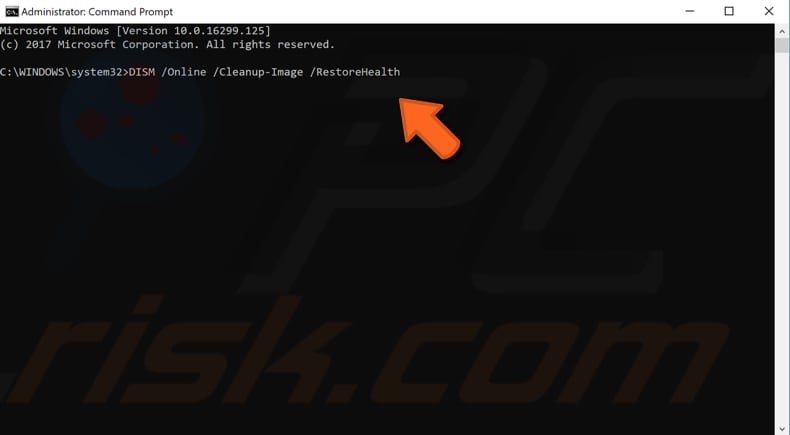
If the SFC scan does not solve the problem with the ntoskrnl.exe process using too much CPU or Disk, or for some reason you could not run the SFC scan, try to run a Deployment Image Servicing and Management (DISM) scan and then try to run the SFC scan again.
A DISM scan can be used to repair and prepare Windows images, including the Windows Recovery Environment, Windows Setup, and Windows PE.
To run a DISM scan, open Command Prompt as administrator and type this command: "DISM /Online /Cleanup-Image /RestoreHealth". Press Enter on the keyboard to execute it.
We hope that one of these solutions solves the problem and your CPU/Disk usages return to normal.
If you know of other methods that solve the ntoskrnl.exe process using too many CPU or Disk resources, please share them with us by leaving a comment in the section below.
Share:

Rimvydas Iliavicius
Researcher, author
Rimvydas is a researcher with over four years of experience in the cybersecurity industry. He attended Kaunas University of Technology and graduated with a Master's degree in Translation and Localization of Technical texts. His interests in computers and technology led him to become a versatile author in the IT industry. At PCrisk, he's responsible for writing in-depth how-to articles for Microsoft Windows.
▼ Show Discussion