FIX: Windows 10 Keeps Freezing

Get Free Scanner and check your computer for errors
Fix It NowTo fix found issues, you have to purchase the full version of Combo Cleaner. Free trial available. Combo Cleaner is owned and operated by Rcs Lt, the parent company of PCRisk.com read more.
Windows 10 Keeps Freezing? Here's How You Can Fix That
Windows 10 tends to start freezing randomly after installing the Fall Creators Update. This article is dedicated to helping you address this issue.

The Fall Creators Update was the fourth major Windows 10 update after it was launched. It offered a so-called Fluent Design which added usability improvements, such as smoother transitions and easier resizing.
Improvements were made to the Action Center, which allows Windows users to deal with notifications easier. Changes were made to Cortana settings and visual design, allowing users to search on the web without having an open browser.
After Windows 10 Creators Update, you can see your GPU performance information in Task Manager, adjust your security settings using two additional features: Exploit Protection and Controlled Folder Access. One of the most useful new features introduced is Hyper-V (for Professional and Enterprise editions of Windows).
However, after updating to the Fall Creators Update, many Windows users noticed that the operating system started to freeze randomly. There is no single reason for this problem as there can be many. But one of the most common reasons seems to be incompatible drivers.
If your Windows is freezing when you log in to Windows, when booting the operating system, playing games, etc., then you are at the right place. In this guide, we will show you several methods that could solve the problem.
Video Showing How to Prevent Windows 10 From Freezing:
Table of Contents:
- Introduction
- Update Your Drivers
- Run System File Checker
- Run Windows Memory Diagnostic Tool
- Check Your Hard Drive for Errors
- Disable Fast Startup
- Increase Virtual Memory
- Adjust Your Power Plan
- Turn Off Link State Power Management
- Video Showing How to Prevent Windows 10 From Freezing
Download Computer Malware Repair Tool
It is recommended to run a free scan with Combo Cleaner - a tool to detect viruses and malware on your device. You will need to purchase the full version to remove infections. Free trial available. Combo Cleaner is owned and operated by Rcs Lt, the parent company of PCRisk.com read more.
Update Your Drivers
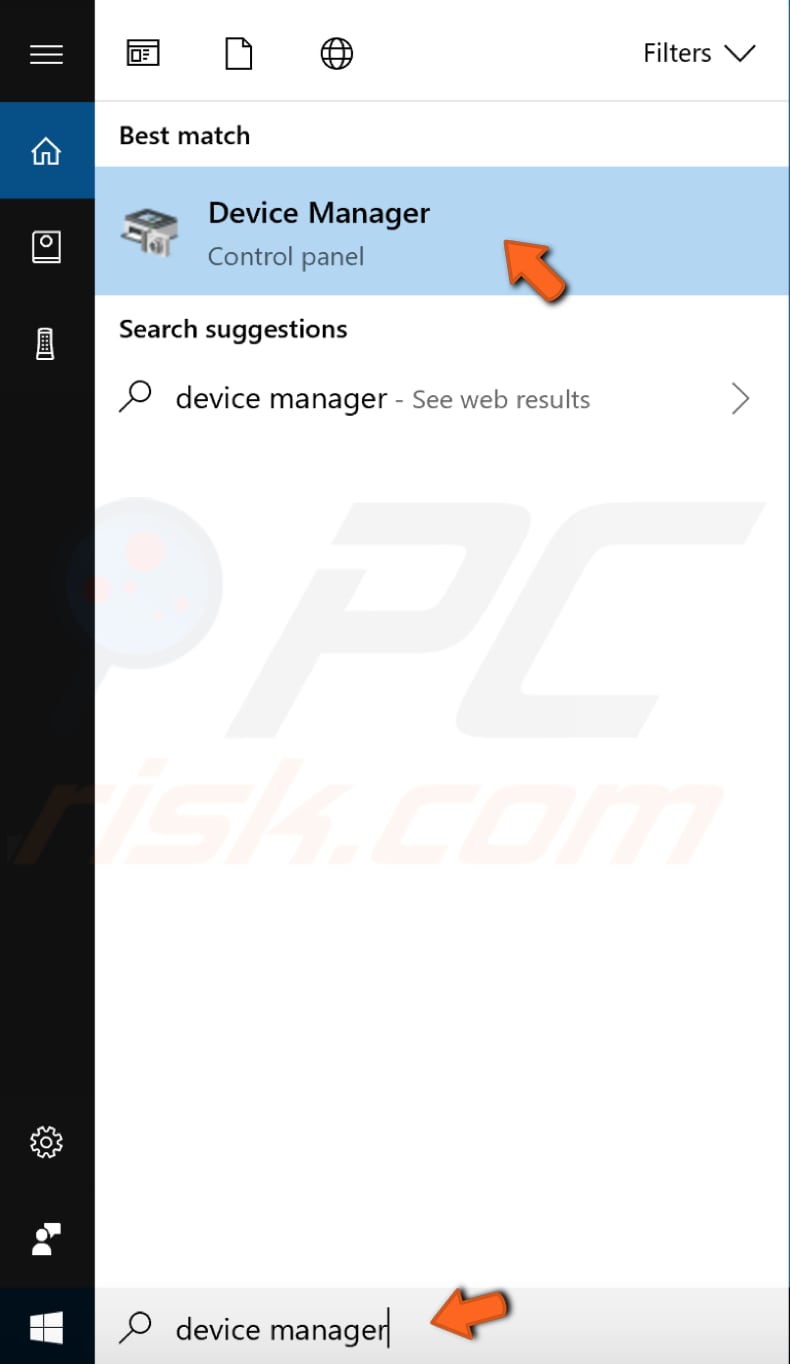
As we mentioned in the introduction, one of the reasons why Windows is freezing could be incompatible drivers. To update your drivers manually, type "device manager" in Search and click the "Device Manager" result.
In the Device Manager window, you will see a list of hardware attached to your computer. Find the device which drivers you want to update and expand it, right-click your device and select "Update driver" from the contextual menu. We recommend you start with the Video/Graphics drivers.

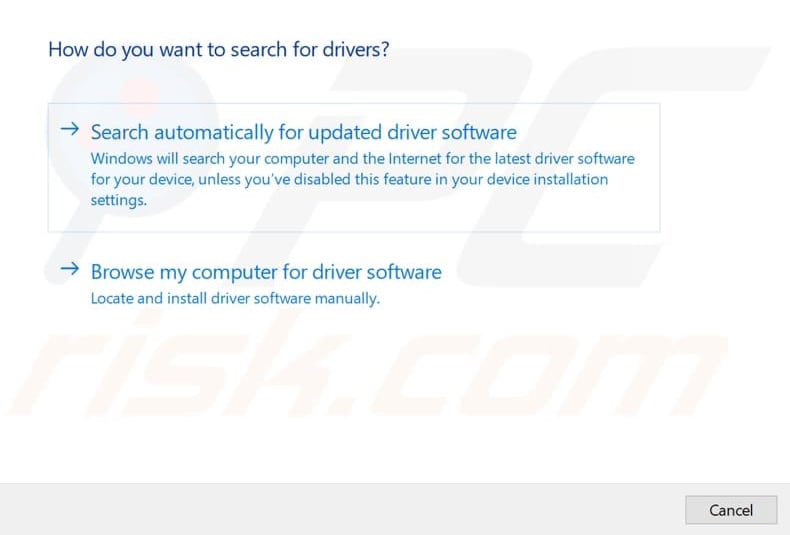
You will be asked if you want to search for updated driver software automatically or to browse your computer for driver software. If you select the first option, then Windows will search your computer and the Internet for the latest driver software for your device.
If you choose the second option, then you will have to locate and install the drivers manually. Using this option requires having a downloaded driver on your computer or USB flash drive.
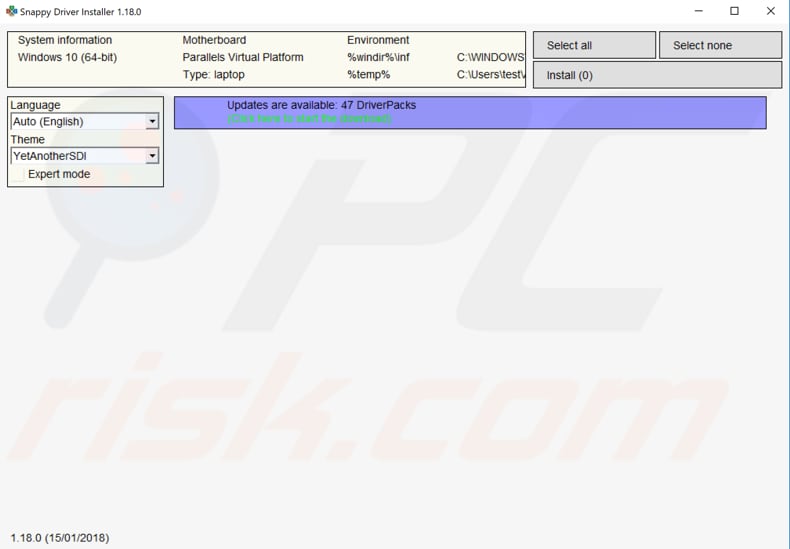
To update your drivers automatically, we recommend you to use third-party software such as Snappy Driver Installer. You will need a computer with a working internet connection to download it. You can download Snappy Driver Installer from here.
Run System File Checker
System File Checker (SFC) is a utility in Windows that allows users to scan for corruptions in Windows system files and restore corrupted files. This guide describes how to run the System File Checker tool (SFC.exe) to check your system files and repair missing or corrupted system files (including .DLL files). If a Windows Resource Protection (WRP) file is missing or is corrupted, Windows may not behave as expected. For example, some Windows functions may not work, or Windows may crash.
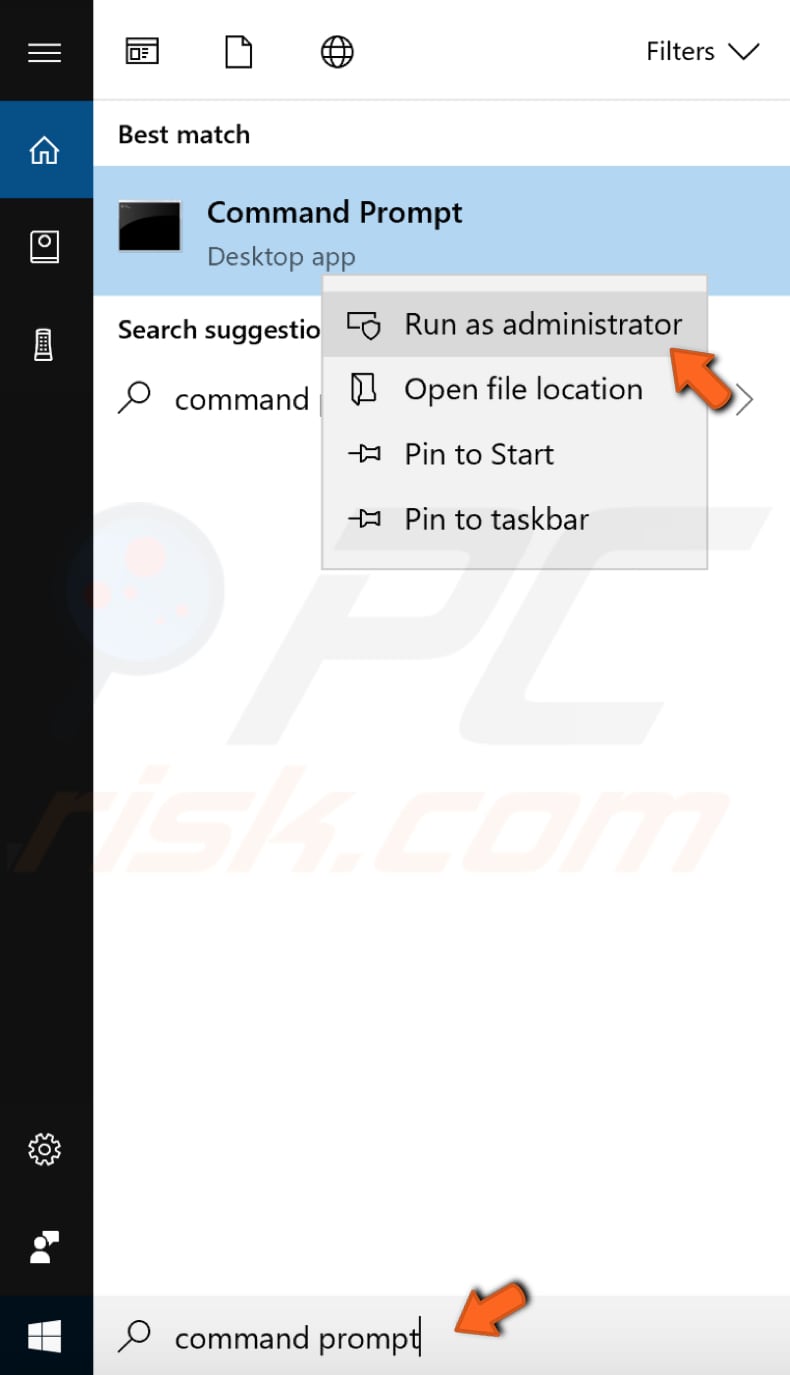
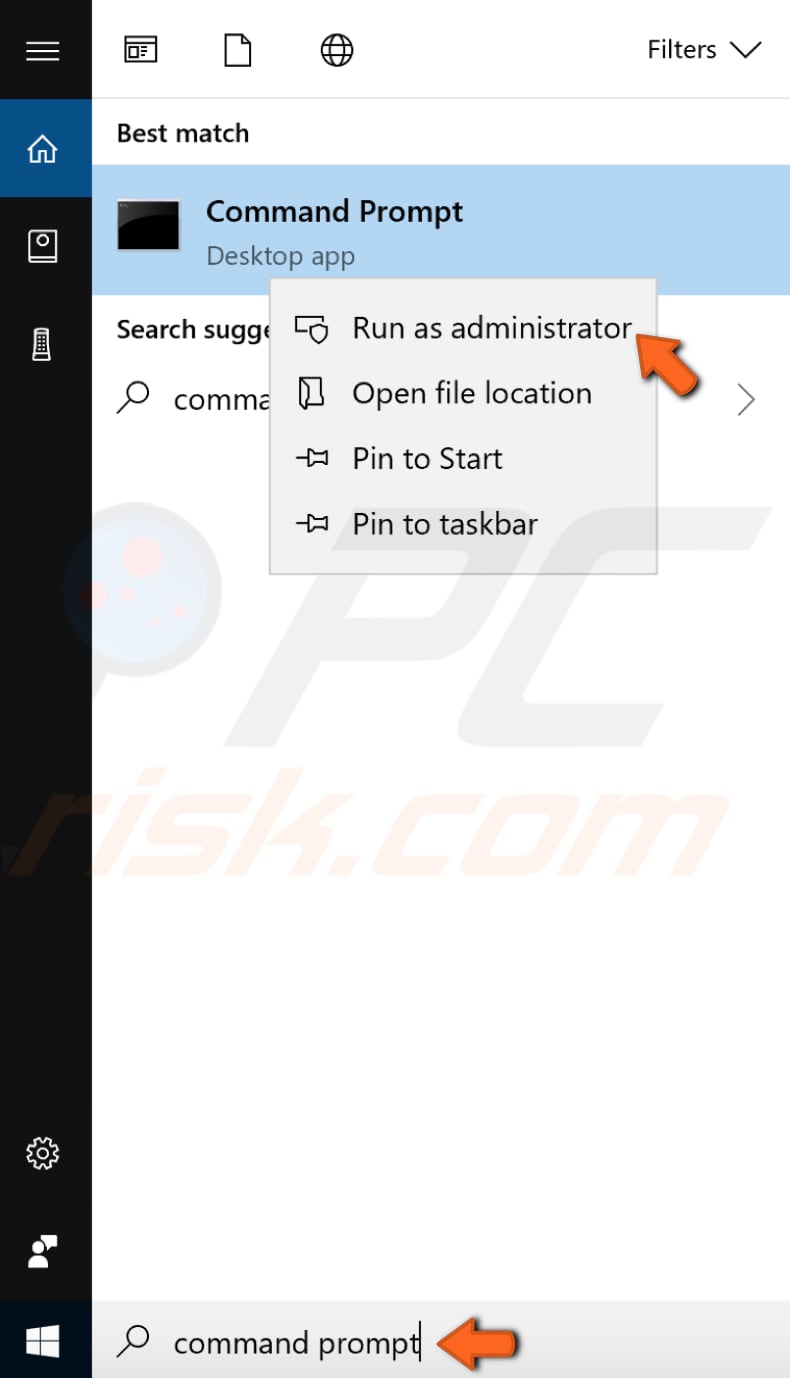
To run it, you need to open Command Prompt first. To open it, type "command prompt" in Search and then right-click on the "Command Prompt", select "Run as administrator" from the drop-down menu to run Command Prompt with administrator privileges.
You must run an elevated Command Prompt to be able to perform an SFC scan.
In Command Prompt window, type "sfc /scannow" and press Enter on your keyboard to execute this command. System File Checker will start, and it should take some time to complete the scan.
Wait for the scanning process to complete and restart your computer to see if your Windows 10 runs properly/without freezing randomly.

Run Windows Memory Diagnostic Tool
Windows Memory Diagnostic is a comprehensive memory test but is also very easy to use. To launch the Windows Memory Diagnostic Tool, you need to type "mdsched" (or "memory diagnostic") in Search and click on "Windows Memory Diagnostic".
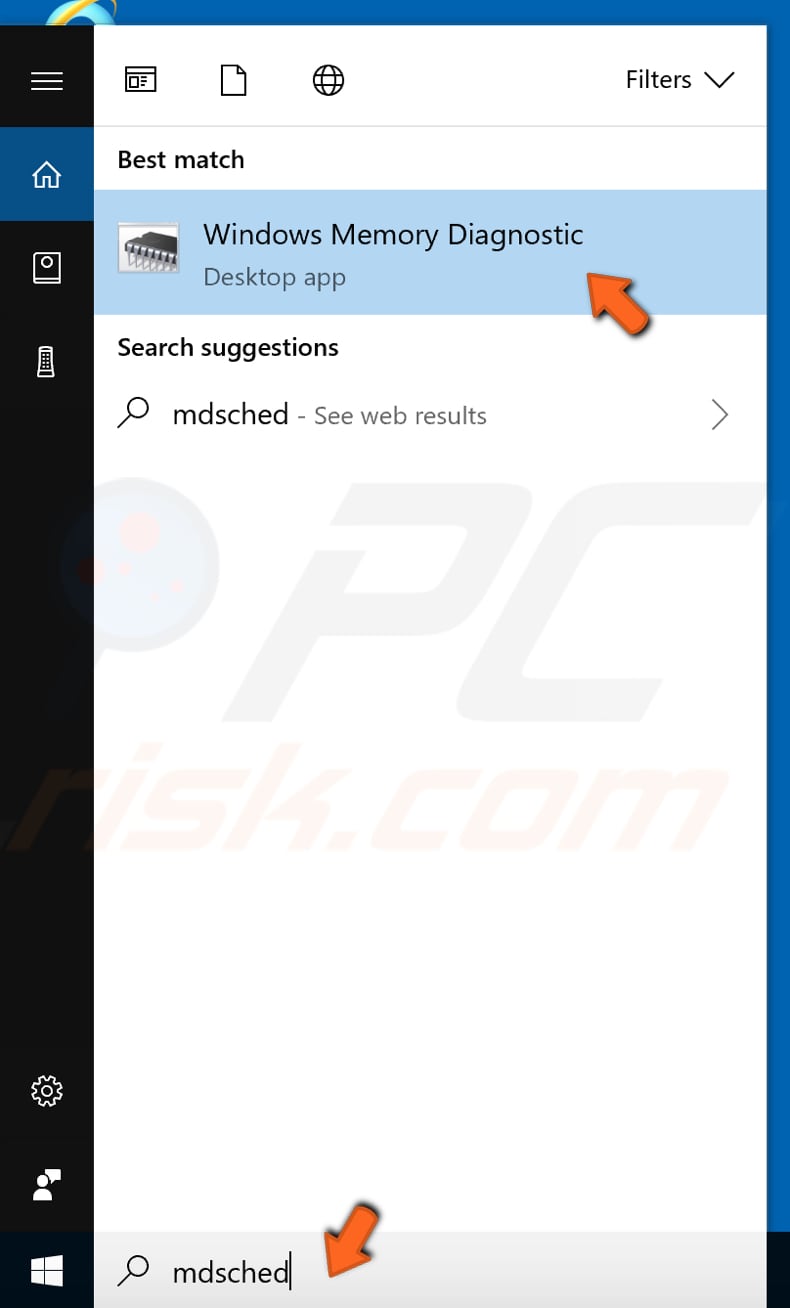
To run diagnostics, you will need to restart your computer. You will be asked if you want to restart now or run it the next time you start your computer. When you restart your computer Windows Memory Diagnostic Tool will start automatically.

Check Your Hard Drive for Errors
It is always a good idea to periodically check your disk for errors. There is a built-in Windows tool to check the integrity of disks. It examines disks and corrects many types of common errors. You can run this tool from the command line or through a graphical interface.
To run it from the command line, open Command Prompt, type "command prompt" and right-click on the "Command Prompt" result, select "Run as administrator" from the drop-down menu.
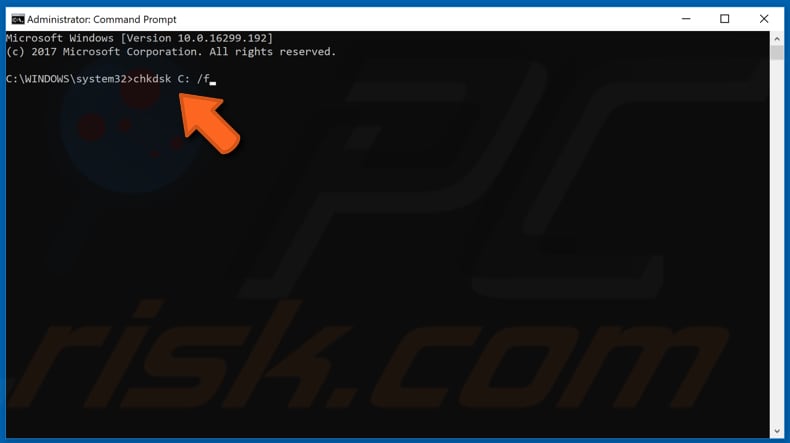
In the Command Prompt window, type the "chkdsk C: /f" command and press Enter on your keyboard. Replace "C" with the letter of your hard drive if it is not the C: drive you want to scan (or your Windows operating system is on another drive) on your computer.
The "chkdsk C: /f" command detects and repairs logical issues affecting your drive. To repair physical issues, run the "chkdsk C: /r" command as well.
Disable Fast Startup
Fast startup is a feature on Windows 10 (and Windows 8) that provides a shorter boot time when starting your computer. However, some people disable it immediately when they receive a new computer with the Windows operating system.
With the fast startup feature enabled, shutting down your computer might seem like you are completely shutting it down, but this is not entirely true since it moves into a state between hibernation and shutdown.
Leaving fast startup enabled should not harm your PC since it is a Windows feature, but this could be why Windows 10 is freezing. To fix the problem, you could disable this feature to see if it helps.
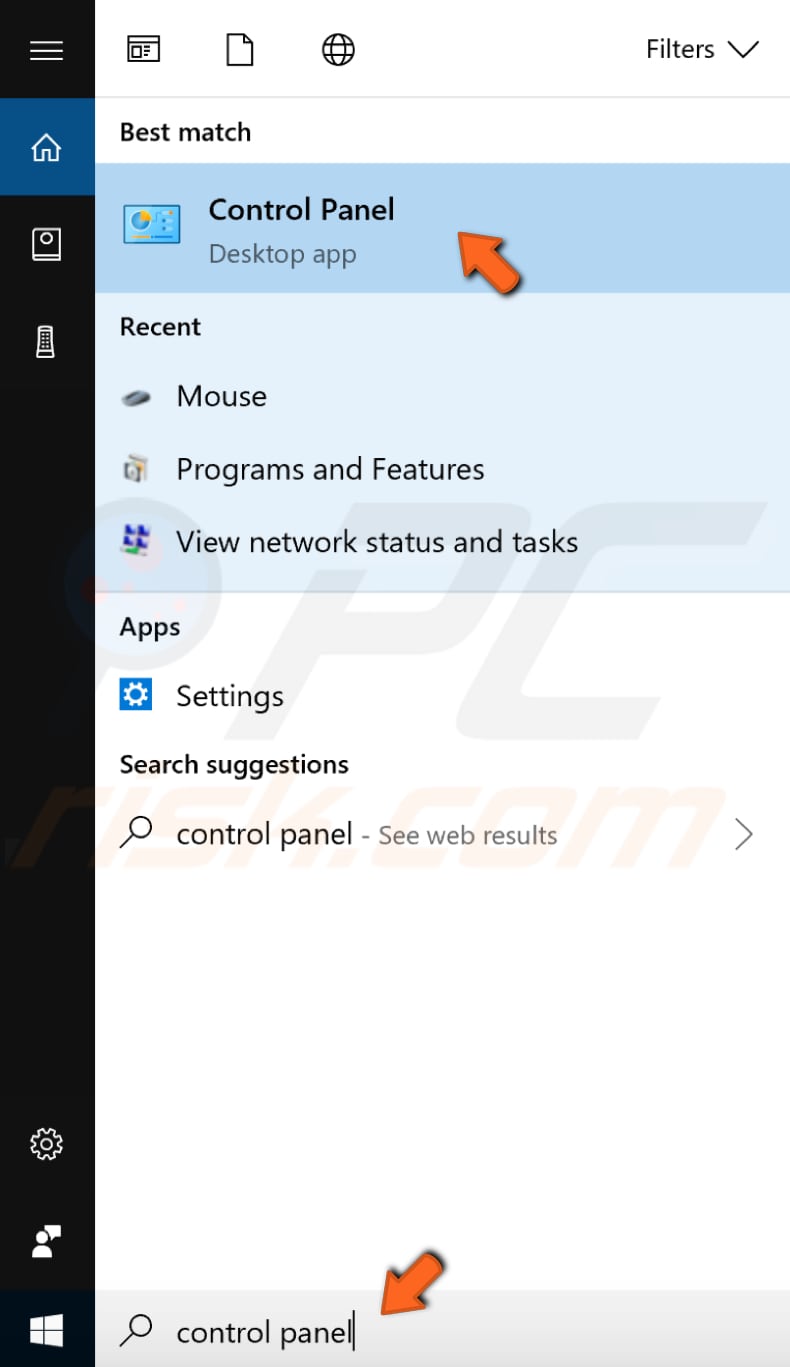
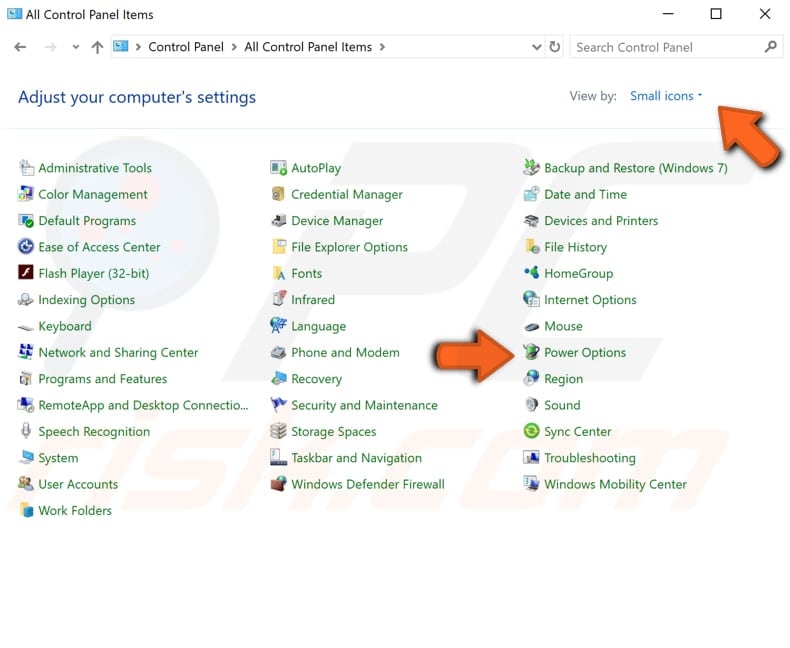
To disable this feature, go to Search and type "control panel". Click on the "Control Panel" result to open it.
In Control Panel, set "View by:" to "Small icons", find "Power options" and click it.
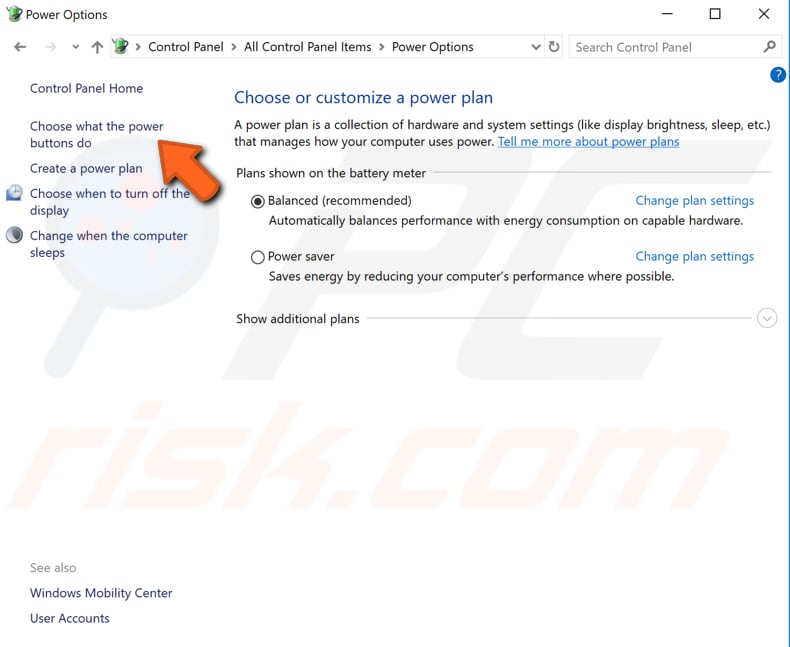
In the Power Options window, click "Choose what the power button does".
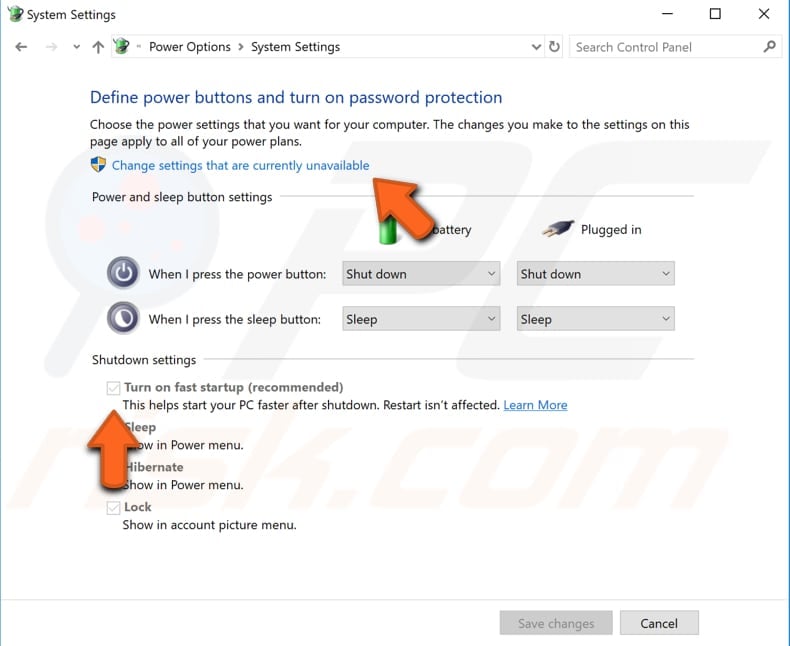
Click on "Change settings that are currently unavailable" and then uncheck the "Turn on fast startup (recommended)" option if it is enabled. Click "Save changes" to save the changes made and see if this fixes the problem.
Increase Virtual Memory
When your system runs out of physical RAM memory (Random Access Memory), that is where Virtual Memory comes in. Virtual Memory combines the RAM with TEMP storage on your hard disk to compensate RAM. Increasing Virtual Memory could solve the problem.
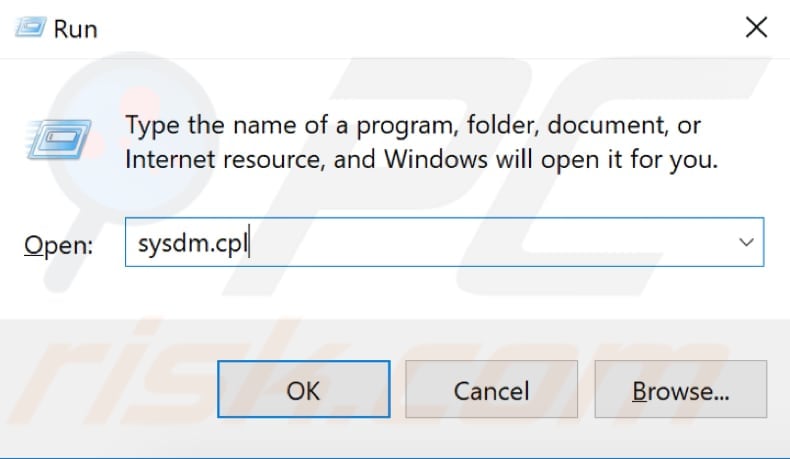
To increase Virtual Memory, open the Run dialog box by pressing Win (Windows key) + R or typing "run" in Search and clicking the Run result. When the Run dialog box is open, type "sysdm.cpl" and click "OK" or press Enter on your keyboard.
In the System Properties window, select the "Advanced" tab and click "Settings..." under Performance.
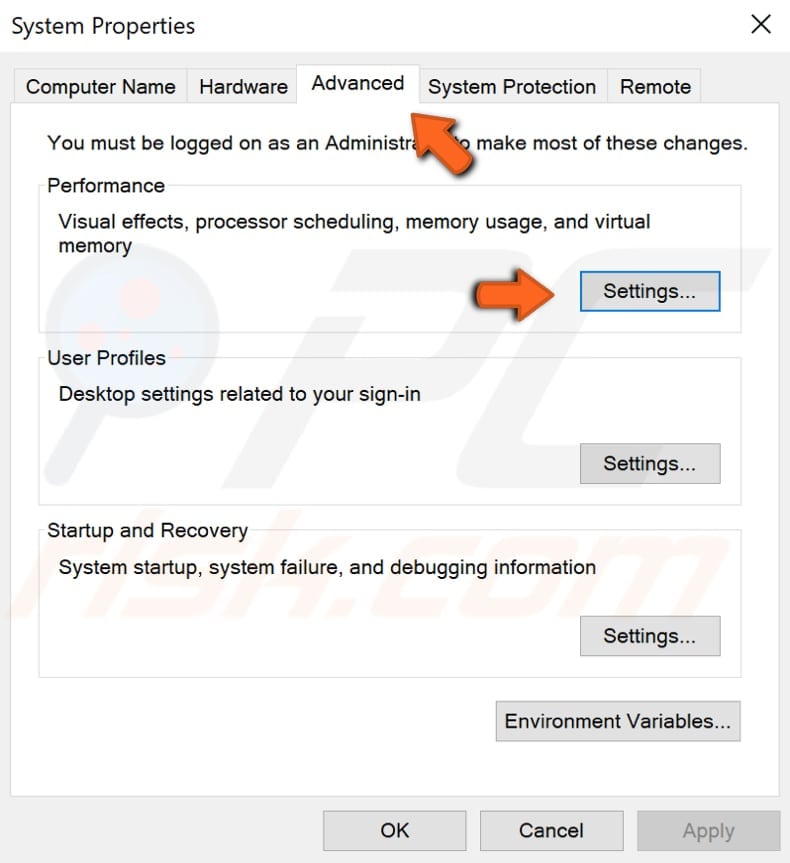
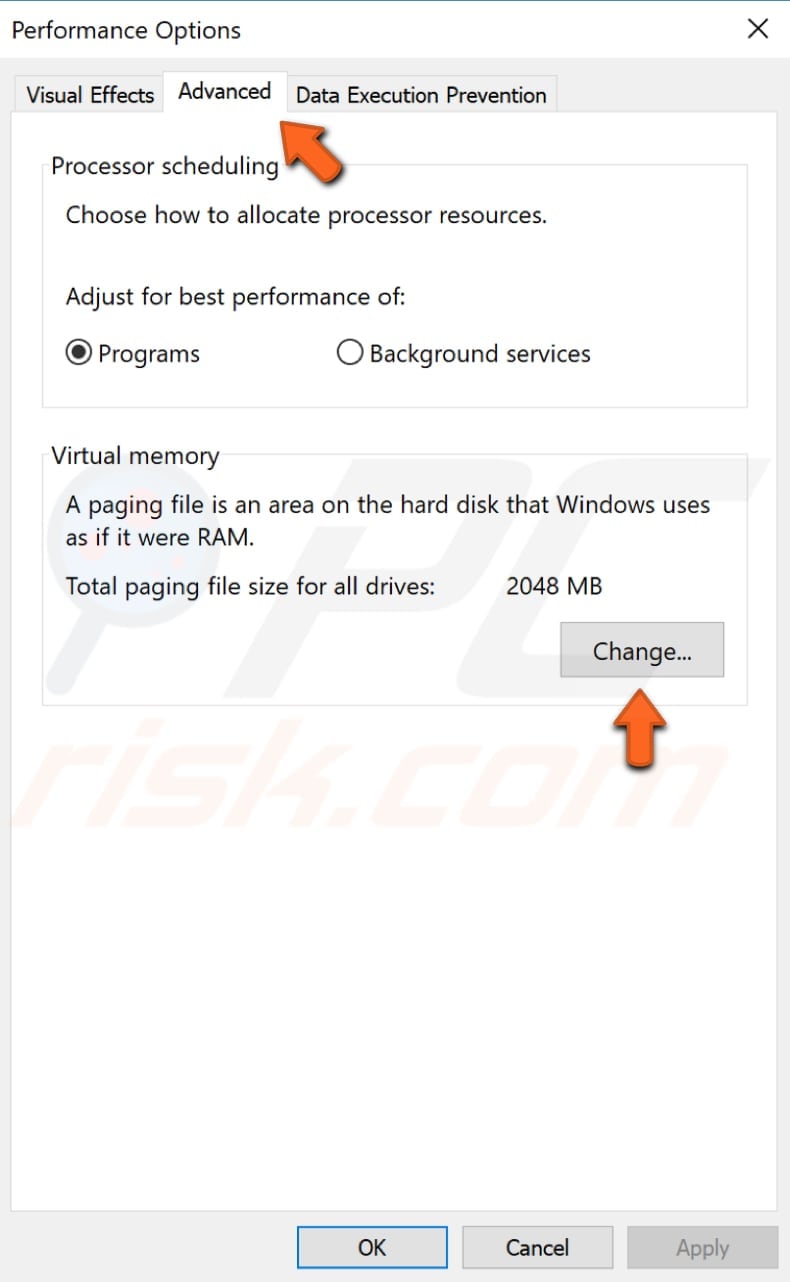
Now select the "Advanced" tab once again and click "Change..." under "Virtual memory".
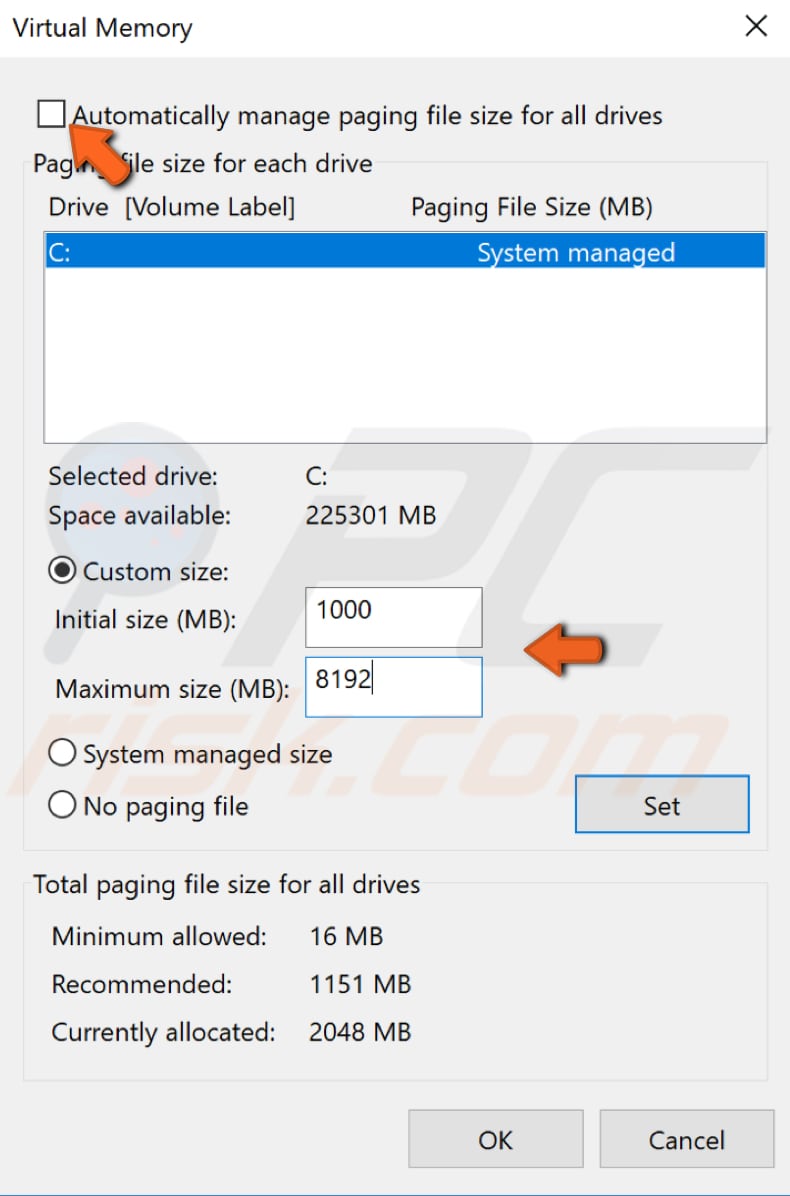
Ensure that "Automatically manage paging file size for all drives" is unchecked and click the "Custom size" option. Set "Initial size (MB)" to 1000 and "Maximum size (MB)" to 8192. Click OK to save changes and restart your computer. See if this solves the problem.
Adjust Your Power Plan
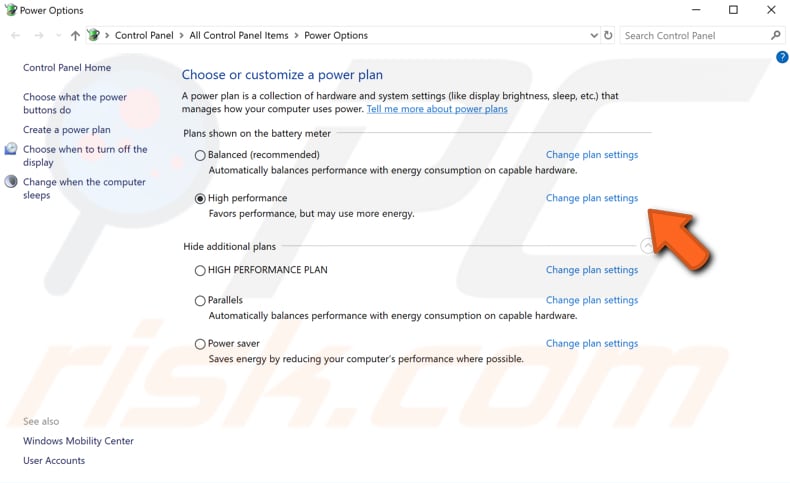
If you are using an SSD (Solid State Drive), a storage device that stores persistent data, that is faster, more durable, and quieter than HDD. If there is one on your computer, you might need to change your Power plan settings to prevent Windows from freezing.
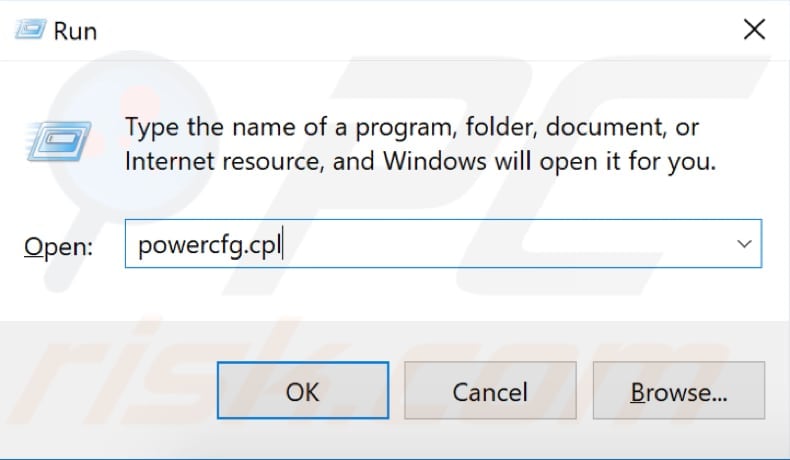
To adjust your power plan, open the Run dialog box by pressing Win + R keys or typing "run" in Search and clicking the Run result. Once you have the Run dialog box open, type "power cfg.cpl" and press Enter on your keyboard or click "OK".
Now find your default power plan and click "Change plan settings".
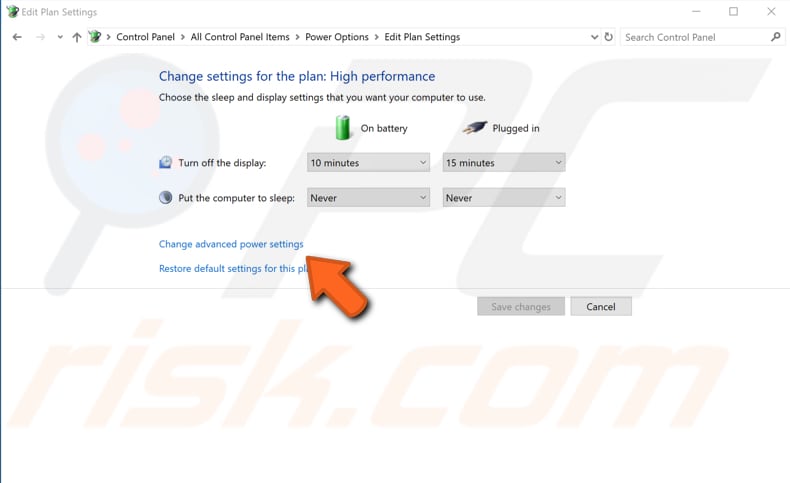
In the Edit Plan Settings window, find and click "Change advanced power settings".
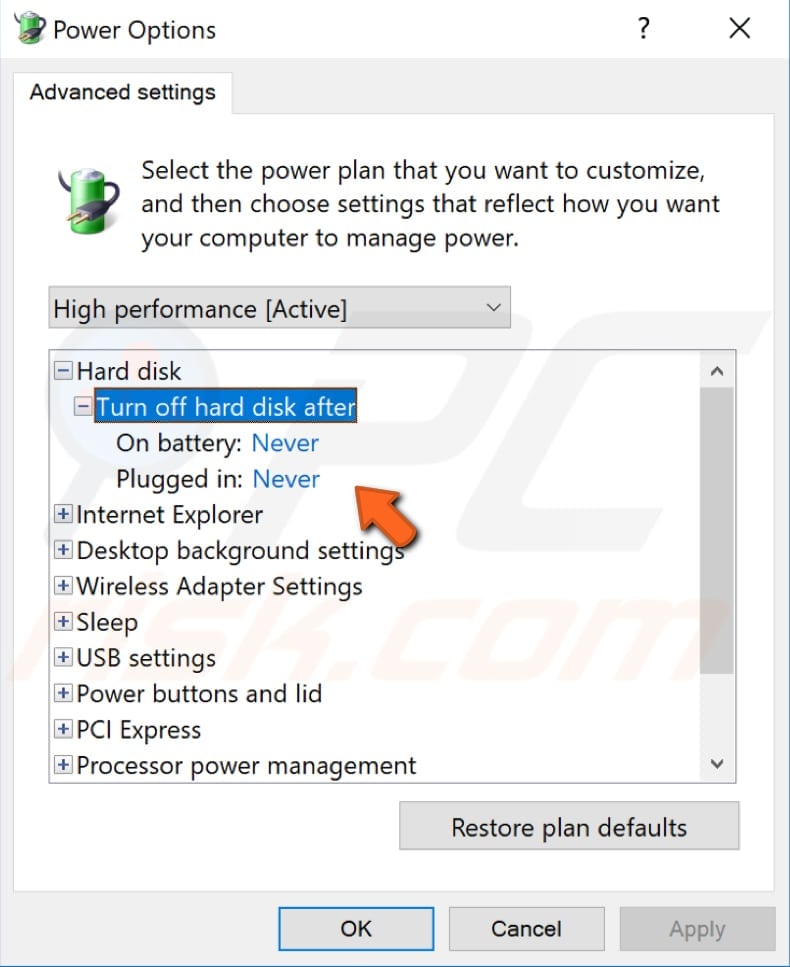
In the Advanced settings tab, find "Hard disk" section and expand it. You should see the "Turn off hard disk after" line and time settings under it. Delete the numbers, and it should be set to "Never" then. Click "Apply" to save the changes and close the Power options windows.
Many users reported that this fixed the problem for them. See if this prevents your Windows 10 from freezing as well.
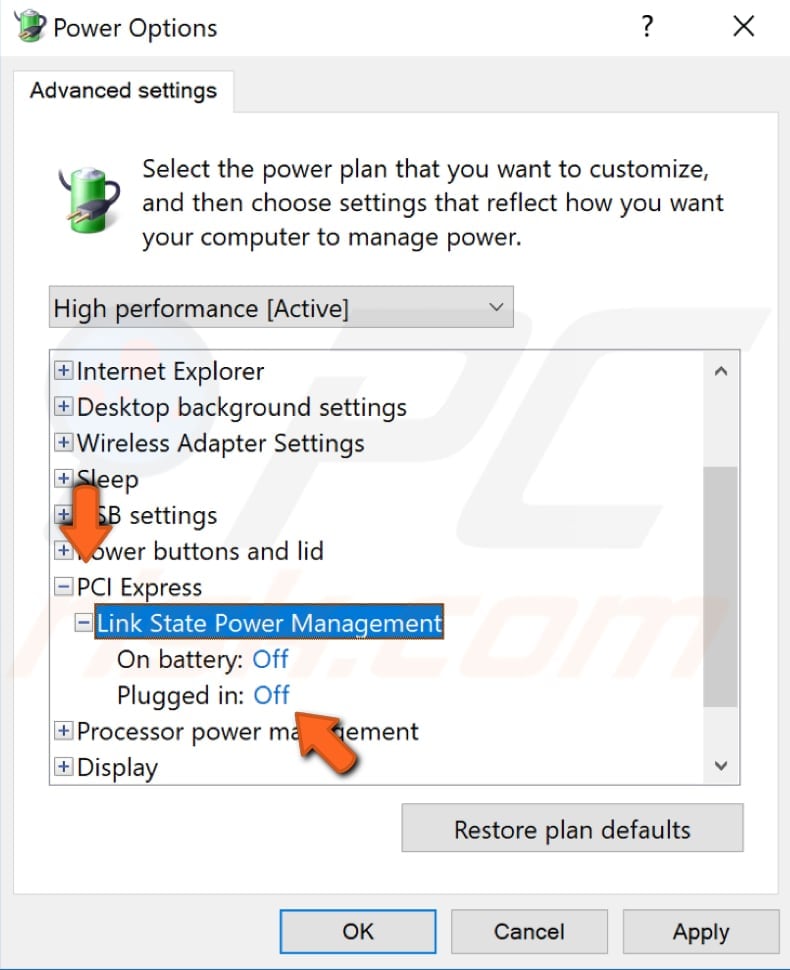
Turn Off Link State Power Management
Link State Power Management is a complex subject. However, simply put, it is a power-saving mechanism. Some users reported that turning off Link State Power Management helped them to prevent Windows 10 from freezing.
To turn it off, you will need to go to the point where we changed advanced power settings. Follow the steps mentioned in previous methods to reach the Advanced settings in the Power Options window. Once you are there, find "PCI Express" and expand it.
You will see the "Link State Power Management" section under "PCI Express". Expand it as well and make sure that this option is turned off. Click "Apply" to save the changes and see if this helped to solve the problem.
We hope at least one of the solutions solved the problem for you and helped to prevent Windows from freezing.
Share:

Rimvydas Iliavicius
Researcher, author
Rimvydas is a researcher with over four years of experience in the cybersecurity industry. He attended Kaunas University of Technology and graduated with a Master's degree in Translation and Localization of Technical texts. His interests in computers and technology led him to become a versatile author in the IT industry. At PCrisk, he's responsible for writing in-depth how-to articles for Microsoft Windows.
▼ Show Discussion