How to Fix "Windows Resource Protection could not start the repair service" Error
Get Free Scanner and check your computer for errors
Fix It NowTo fix found issues, you have to purchase the full version of Combo Cleaner. Free trial available. Combo Cleaner is owned and operated by Rcs Lt, the parent company of PCRisk.com read more.
How to Fix the "Windows Resource Protection could not start the repair service" Error on Windows 10
System File Checker (SFC) is a utility in Windows that allows users to scan for corrupt Windows system files and restore them. Unfortunately, you may get the "Windows Resource Protection could not start the repair service" error when running the "SFC /Scannow" command. This article will show you how to fix this problem.

Windows Resource Protection (WRP) prevents the replacement of essential system files, folders, and registry keys part of the operating system. Permission for full access to modify WRP-protected resources is restricted to TrustedInstaller.
WRP-protected resources can only be changed using the Supported Resource Replacement Mechanisms with the Windows Modules Installer service.
TrustedInstaller is a process belonging to the Windows Modules Installer service in Windows 10, 8, 7, and Vista. Its primary function is to enable installing, removing, and modifying Windows Updates and optional system components.
Sometimes TrustedInstaller.exe may become corrupted, and you may get an error message. In such a case running the System File Checker may help.
However, sometimes, even the Windows Resource Protection service, which runs the System File Checker (SFC), is affected. In such a case, if you try to run the "sfc /scannow" command, you may get the error message saying: "Windows Resource Protection could not start the repair service".
Read the guide below to fix the "Windows Resource Protection could not start the repair service" error while trying to run the System File Checker.
Video Showing How to Fix the "Windows Resource Protection could not start the repair service" Error:
Table of Contents:
- Introduction
- Enable Windows Modules Installer Service
- Run System File Checker in Safe Mode
- Run DISM Scan
- Video Showing How to Fix the"Windows Resource Protection could not start the repair service" Error
Download Computer Malware Repair Tool
It is recommended to run a free scan with Combo Cleaner - a tool to detect viruses and malware on your device. You will need to purchase the full version to remove infections. Free trial available. Combo Cleaner is owned and operated by Rcs Lt, the parent company of PCRisk.com read more.
Enable Windows Modules Installer Service
Windows Services (also known as services.msc), are used to modify how Windows services run on your system. You can modify a service's settings for security, troubleshooting, and performance-related reasons.
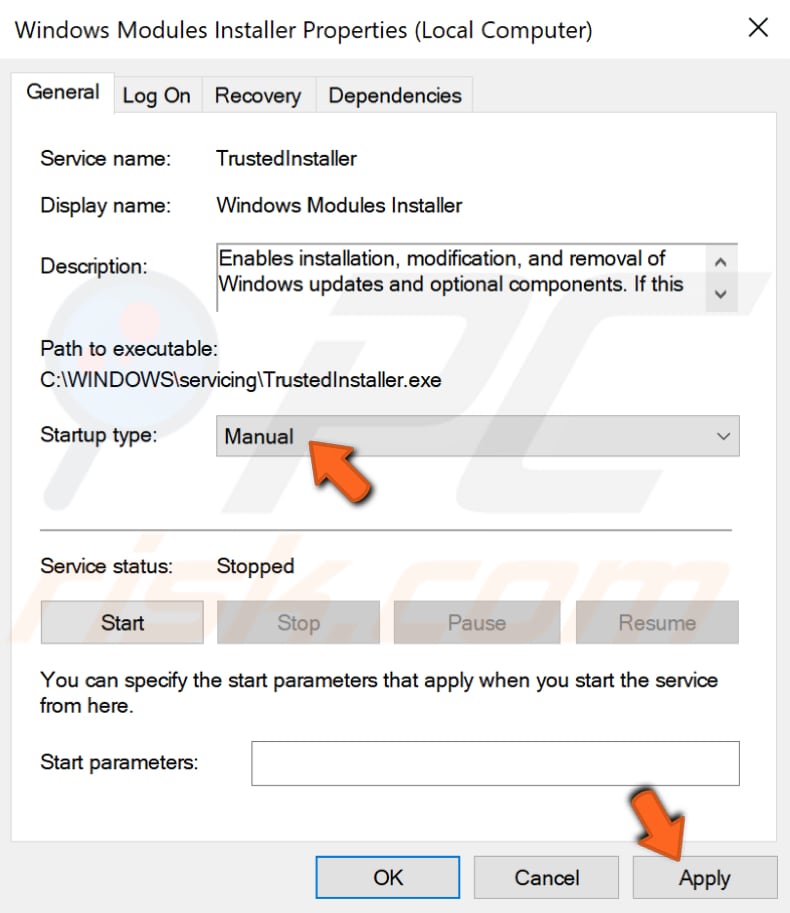
You will need to access the Windows Installer service, which enables installation, modification, and removal of Windows updates and optional components. If this service is disabled, install or uninstall of Windows updates might fail for your computer.
To access the Windows Modules Installer service type "run" in Search and click the "Run" result.

In the Run dialog box, type "services.msc" and click "OK" to open Windows Services.

Now scroll down through the services list to find the "Windows Modules Installer" service. Right-click it and select "Properties" in the dropdown menu. Or simply double-click the Windows Modules Installer service.

Make sure that "Startup type" is set to "Manual". If it is not set to Manual, then set it this way and click "Apply" to save the changes made.

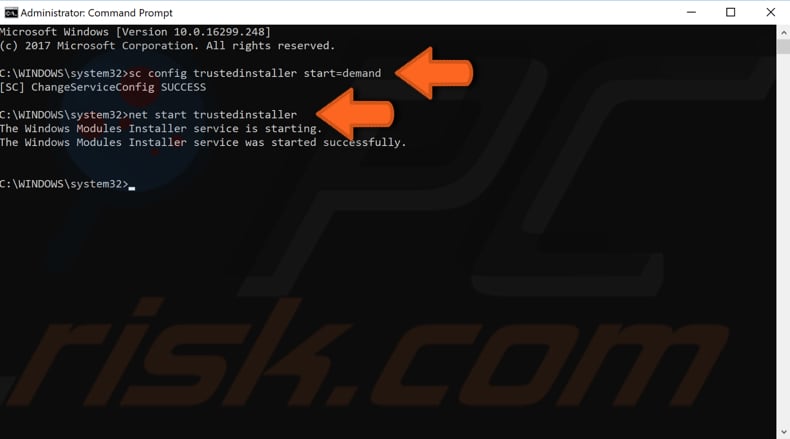
You can also try to enable the TrustedInstaller using Command Prompt and its commands. Some commands available in Windows require that you run them from an elevated Command Prompt. This means you have to be running it with administrator-level privileges.
To open Command Prompt, type "command prompt" in Search and then right-click on the "Command Prompt", select "Run as administrator" from the dropdown menu to run Command Prompt with administrator privileges.

Now you will need to execute a couple of commands. Type "sc config trustedinstaller start=demand" and press Enter on your keyboard.
Then type "net start trustedinstaller", and press Enter on your keyboard again.
Now try to run the System File Checker and see if you are still getting the "Windows Resource Protection could not start the repair service" error.

Run System File Checker In Safe Mode
Another thing you might want to try is to run the System File Checker in Safe Mode. Safe Mode is a diagnostic start-up mode in Windows operating systems used to obtain limited access to Windows when the operating system does not start or function normally.
If you are not sure how to start your Windows in Safe Mode, read this article.
Run DISM Scan
DISM stands for Deployment Image Servicing and Management, and it can be used to repair and prepare Windows images, including the Windows Recovery Environment, Windows Setup, and Windows PE.
To run DISM scan, you need to open Command Prompt as administrator again and type in this command: "DISM /Online /Cleanup-Image /RestoreHealth". Press Enter on your keyboard to execute it.
See if this fixes the "Windows Resource Protection could not start the repair service" error while trying to run the System File Checker.

We hope this article was helpful in trying to fix the "Windows Resource Protection could not start the repair service" error, and now you can run the System File Checker without any problems. Do not hesitate to write a comment in the comment section below if you found another workaround for this error!
Share:

Rimvydas Iliavicius
Researcher, author
Rimvydas is a researcher with over four years of experience in the cybersecurity industry. He attended Kaunas University of Technology and graduated with a Master's degree in Translation and Localization of Technical texts. His interests in computers and technology led him to become a versatile author in the IT industry. At PCrisk, he's responsible for writing in-depth how-to articles for Microsoft Windows.

▼ Show Discussion