Mouse Cursor Disappeared on Windows 10. How to Fix It?

Get Free Scanner and check your computer for errors
Fix It NowTo fix found issues, you have to purchase the full version of Combo Cleaner. Free trial available. Combo Cleaner is owned and operated by Rcs Lt, the parent company of PCRisk.com read more.
Mouse Cursor Disappeared/Missing on Windows 10. How to Fix It?
The mouse cursor can disappear due to outdated or incompatible drivers, among other reasons. This article will show you how to get the mouse cursor back if it's gone missing.

For many users, the mouse cursor used to disappear after upgrading to Windows 10. However, these days, if that happens, it's mainly due to outdated or incompatible device drivers. In addition, the cursor might get disabled.
The good news is that it is not difficult to solve this issue. However, a working keyboard is necessary since fixing this problem requires using it to navigate through Windows. If your keyboard is functioning normally, then you're good to go.
This guide will show you how you can get your mouse cursor back using your keyboard. We will show you several methods, and hopefully, trying them out one by one will finally solve this issue.
Note: This guide will show you how to navigate your Windows operating system using only your keyboard. To exit opened applications or windows, use the Alt + F4 combination.
Video Showing How to Fix Missing Mouse Cursor on Windows 10:
Table of Contents:
- Introduction
- Enable Your Mouse Using Function Keys
- Check if Your Mouse Is Enabled
- Update Your Mouse Driver
- Run Windows Troubleshooter
- Run the SFC Scan
- Update Your Windows Operating System
- Unplug All Peripherals Connected to Your Computer
- Perform Full System Scan
- Remove Temporary Files and Folders Using Disk Cleanup
- Restore Your System Using Restore Point
- Video Showing How to Fix Missing Mouse Cursor on Windows 10
Download Computer Malware Repair Tool
It is recommended to run a free scan with Combo Cleaner - a tool to detect viruses and malware on your device. You will need to purchase the full version to remove infections. Free trial available. Combo Cleaner is owned and operated by Rcs Lt, the parent company of PCRisk.com read more.
Enable Your Mouse Using Function Keys
We will start with this one. Maybe your mouse was accidentally disabled using your keyboard. A function key is a key on a computer or terminal keyboard that can be programmed to cause an operating system command interpreter or application program to perform certain actions. Those function keys are the keys from F1 to F12 on your keyboard.
Some F1-F12 keys include additional functionality when combined with the Fn key, usually located near Ctrl. You are going to need to use both F(x) and Fn keys for this one. Try out these keyboard combinations provided below to see if this helps you to make your mouse cursor visible again:
Fn + F3
Fn + F9
Fn + F7
Fn + F5
Fn + F8
Fn + F11
Check if Your Mouse Is Enabled
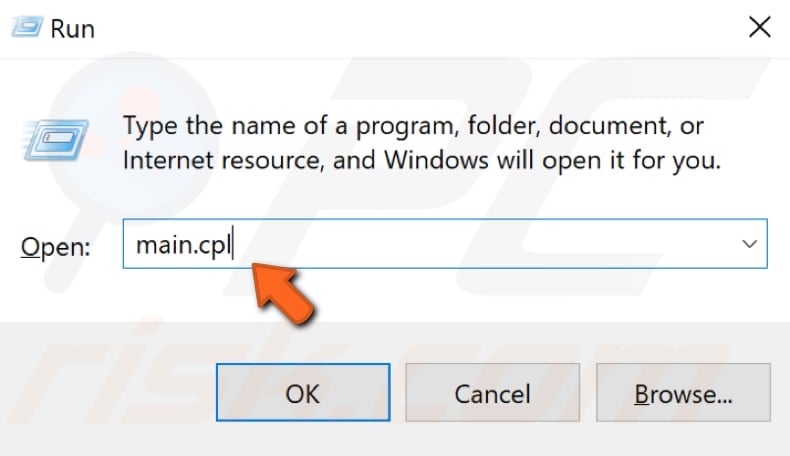
Now we are going to access Control Panel tools by typing a command in the Run dialog box. The Run command is used to directly open an application or document whose path is known. It functions more or less like a single-line command-line interface.
To open the Run dialog box, press the Windows (Win) key + R on your keyboard, then type "main.cpl" and press Enter on your keyboard to open Windows Mouse properties.
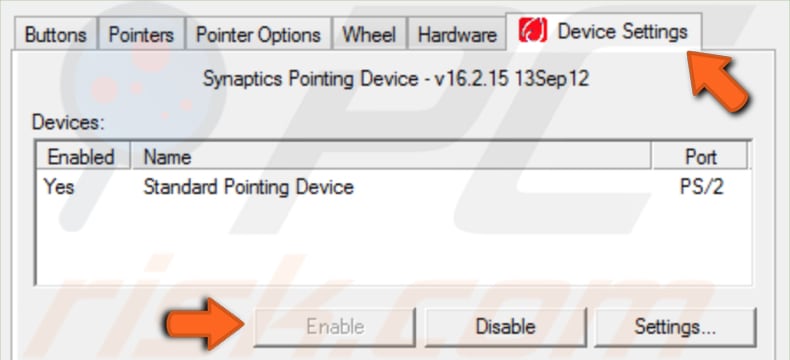
You will need to use Tab and arrow keys on your keyboard to navigate the Mouse Properties window. The Tab key on a keyboard is used to advance the cursor to the next tab stop, and usually, it is positioned above the "Caps Lock" key.
Press the Tab key until the "Buttons" tab is selected/highlighted. Then press the right arrow key to open the "Device Settings" window. Device Settings is just one possible name of the tab where you can change your mouse settings.
If your pointing device is disabled, press the Tab key on your keyboard until the "Enable" button is selected. Press Enter to enable your mouse if it was disabled. See if this solved the issue with your mouse cursor gone missing.
Update Your Mouse Driver
A device driver provides information to the operating system and other software about how to interact with certain hardware. The driver allows software and hardware to communicate smoothly. In most cases, computers are not able to send and receive data correctly without drivers.
If the appropriate driver is not installed, the device might not function properly, if at all. A faulty driver might need updating or a reinstall. A Faulty/outdated mouse driver can be the cause of your mouse cursor's disappearance.
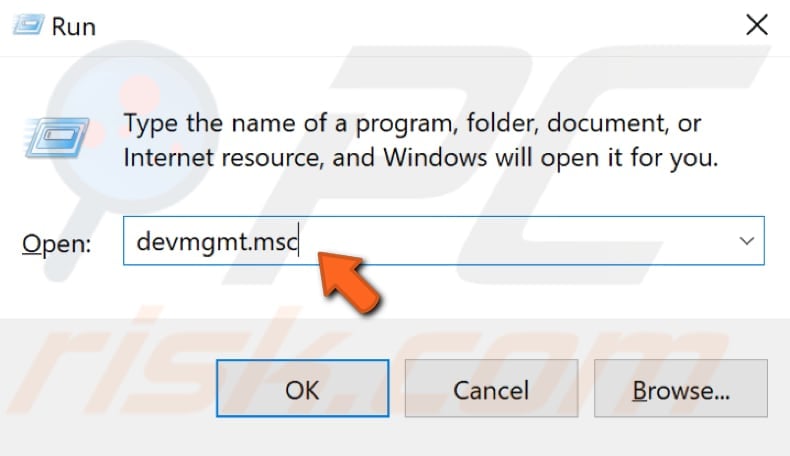
If updating your mouse driver does not fix the problem, then you might want to try to roll back your mouse driver as well. First, press Windows (Win) key + R to open the Run box and then type "devmgmt.msc", press Enter on your keyboard to open Device Manager.
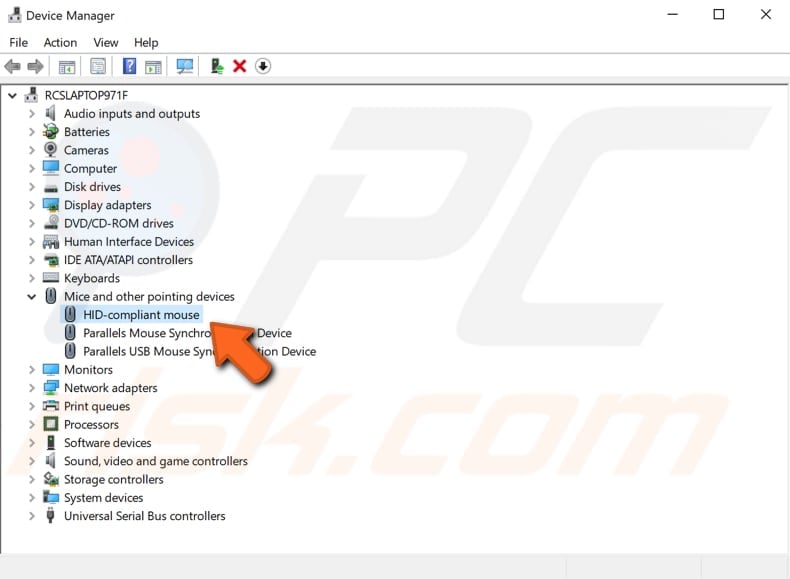
Now click the Tab key once, and it will highlight your computer name on the list of the devices. Use the down arrow key to select "Mice and other pointing devices" and then press the right arrow key to expand this section. Select your mouse using the down arrow key and press Enter on your keyboard to open its properties window.
Now keep pressing the Tab key until the "General" tab is selected/highlighted, and then press the right arrow key to select the "Driver" tab. Now press the Tab key until the "Update Driver" option is selected, and press Enter.
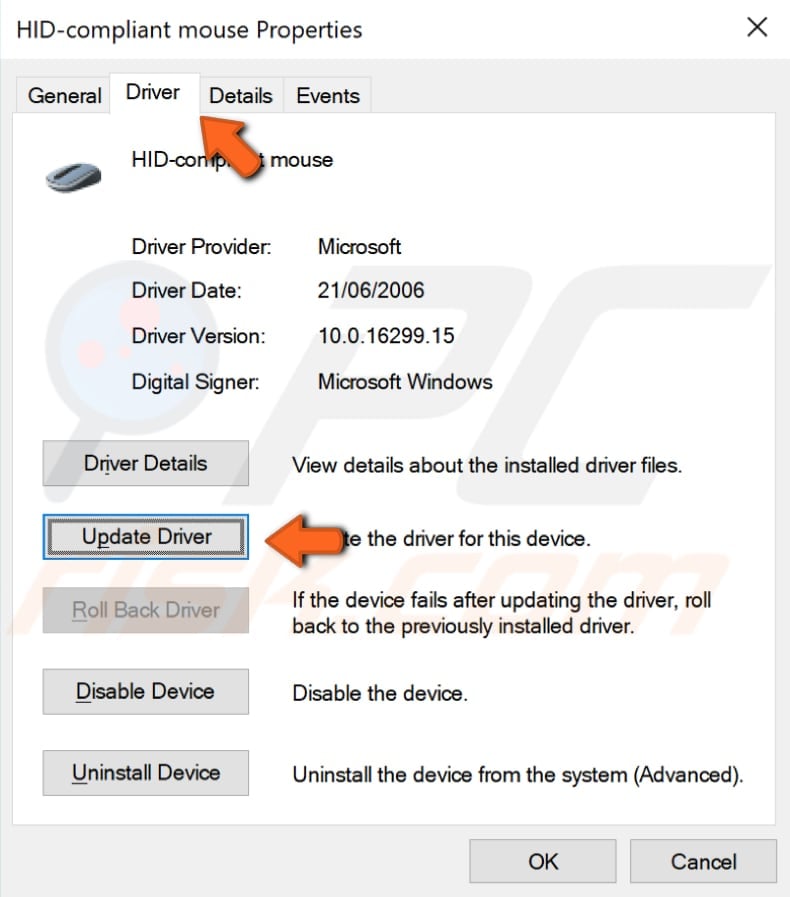
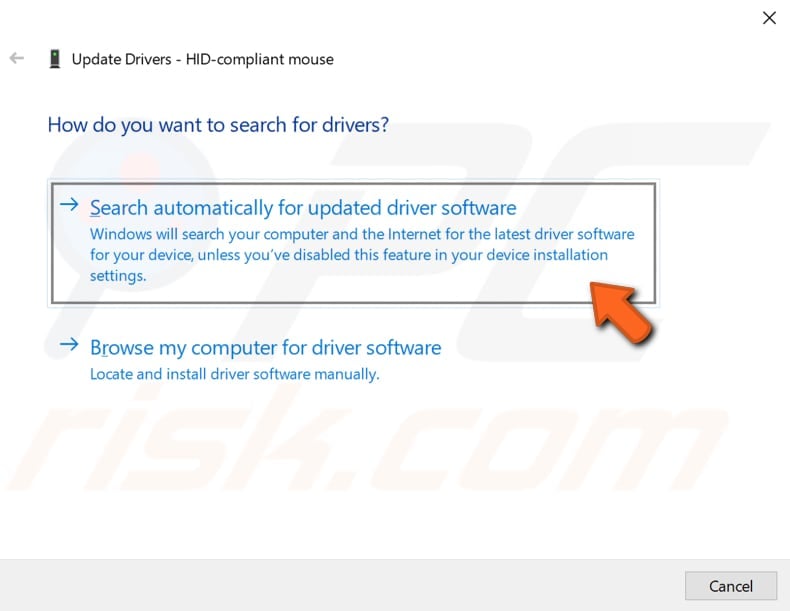
Press the Tab key to select the "Search automatically for updated driver software", and Windows will search your computer and the Internet for the latest driver software for your device.
If updating your mouse driver does not help, then repeat the steps until the point where you selected "Update Driver", select "Roll Back Driver" instead, and press Enter on your keyboard, follow the instructions. It will roll back to the previously installed driver.
Run Windows Troubleshooter
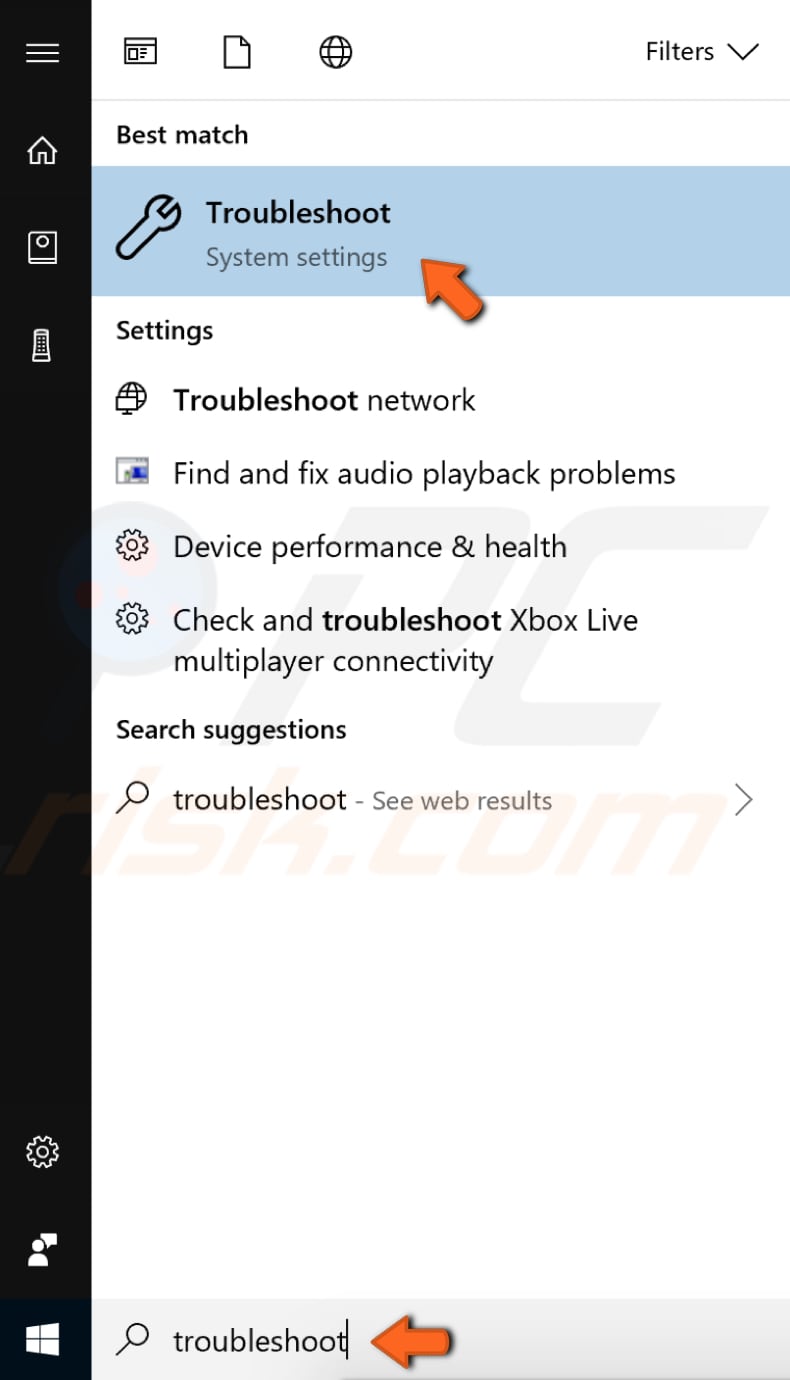
Windows includes several troubleshooters designed to quickly diagnose and automatically resolve various computer problems. Troubleshooters cannot fix all issues, but they are an excellent place to start if you encounter a problem with your computer or operating system. To begin troubleshooting, press the Windows (win) key on your keyboard and then type "troubleshoot", press Enter to open the selected "Troubleshoot" result.
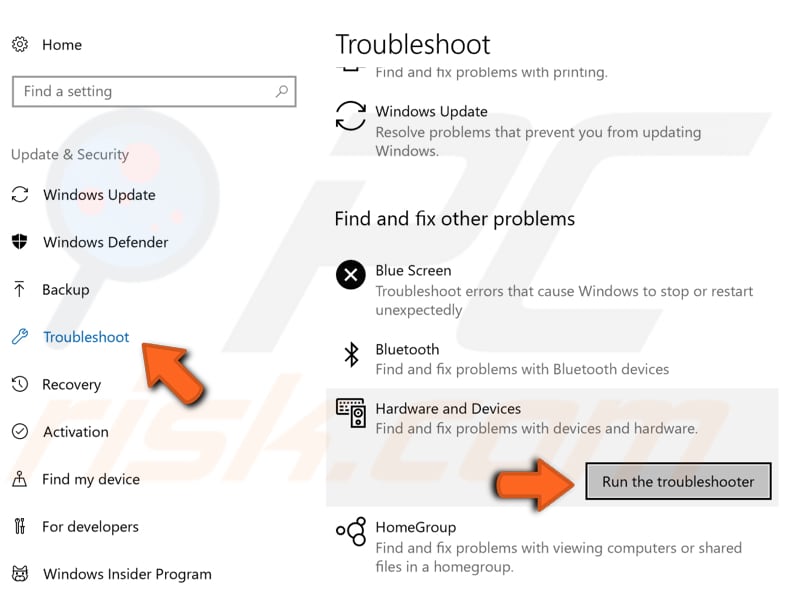
You will be directed to the "Troubleshoot" section on the left pane. Keep pressing the Tab key until you can choose one of the options un"er "Find and fix other problems". Use the down arrow key to select "Hardware and Devices" and press Enter. Then press the Tab key to select "Run the troubleshooter" and then press Enter again.
It will start troubleshooting your hardware and devices. Follow the instructions to complete the troubleshooting. If this does not fix the problem with your missing mouse cursor, try to unplug your mouse and plug it back in.
Run the SFC Scan
System File Checker (SFC) is a utility in Windows that allows users to scan for corruptions in Windows system files and restore corrupted files. This guide describes how to run the System File Checker tool (SFC.exe) to scan your system files and repair missing or corrupted system files (including .DLL files).
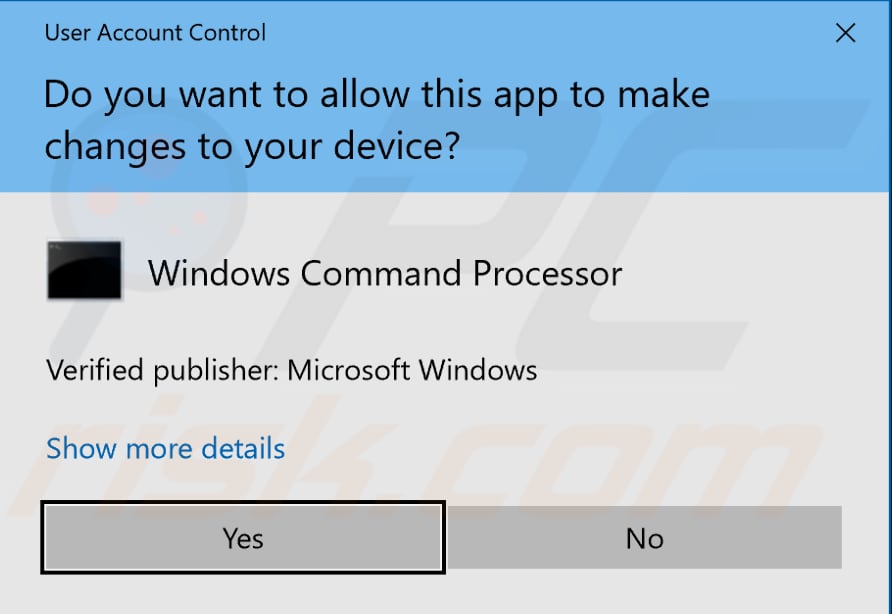
To run it you need to open Command Prompt first. To open it using keyboard keys, press the Windows (Win) key on your keyboard and then type "command prompt". The Command Prompt result should be selected. If not, select it using arrow keys (up and down) and then press Control + Shift + Enter to run Command Prompt as administrator.

You will be asked if you want to allow this app to make changes to your device. Select "Yes" using the left arrow key on your keyboard.
In opened Command Prompt window type "sfc /scannow" and press Enter on your keyboard to execute this command. System File Checker will start, and it should take some time to complete the scan.
It should take about 15 minutes. Wait for the scanning process to complete and restart your computer to see if you still have issues with your mouse cursor.

Update Your Windows Operating System
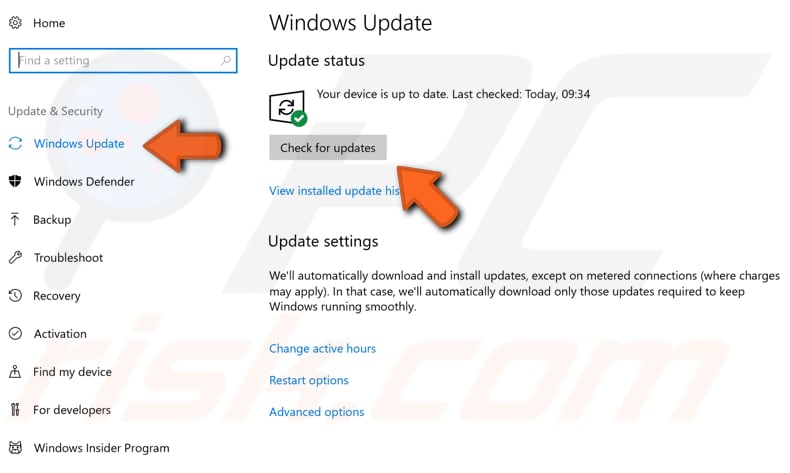
Another thing you might want to try is to update your current version of Windows. Checking for updates for the whole Windows operating system might help. Press Windows (Win) key on your keyboard and then type "check for updates".
Check for updates option should be selected as the primary. If not, then use your arrow keys to select it and press Enter.

You should be automatically directed to the Windows Update section on the left pane, and the "Check for updates" button should be already selected as well (if not, then select it using the Tab key). Simply press Enter to start checking for updates.
If there are updates available, then install them and try checking for updates again to ensure that you have the latest updates on your operating system. After the updates are installed (if there were any to install) see if you are still having the issues with your mouse cursor.
Unplug All Peripherals Connected To Your Computer
This might provide a solution since peripherals can create driver conflicts between different hardware. Unplug any connected peripheral such as USB drive (or drives), external hard drive, SSD (Solid-state drive), etc. Then turn off your computer and turn it on again.
Connect your mouse to your computer and see if this solves the problem with your mouse cursor gone missing. If your mouse cursor appears and starts working normally, then connect other peripherals one by one. If you start facing problems again, then you will know what the culprit of this issue is.
Perform Full System Scan
Malware might cause various issues on your computer, including mouse problems. Perform a full system scan and see if it detects any malware on your computer. You can use Windows Defender (a built-in antivirus program), which protects computers against viruses, spyware, and other malicious software.
Alternatively, try other third-party antivirus software. To run a full system scan using Windows Defender, press the Windows (Win) key and type "full scan", press Enter to open the selected "Virus & threat protection" option.

Using Tab or arrow keys, select the "Advanced scan" option, and once it is highlighted, press Enter.
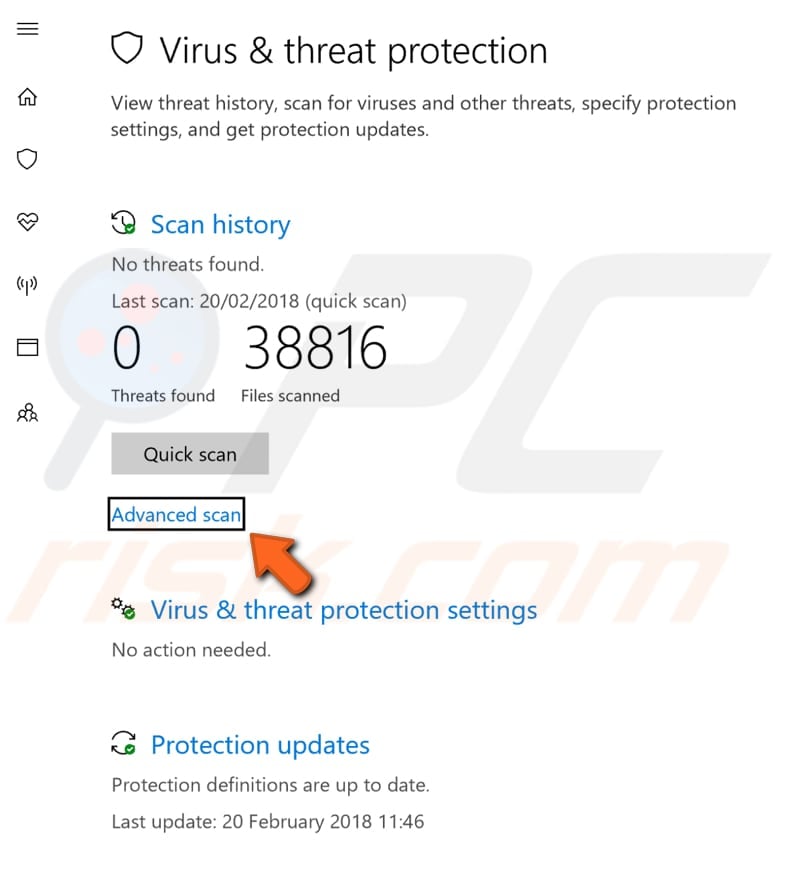
You need to select "Scan now" using the Tab key, keep pressing it until the Scan now button is selected and press Enter on your keyboard. the "Full scan" option should be selected by default.
If not, then select this particular scan using the Tab key and then press the Space bar. Then navigate to the Scan now button and, using the Tab key, and press Enter.

Remove Temporary Files and Folders Using Disk Cleanup
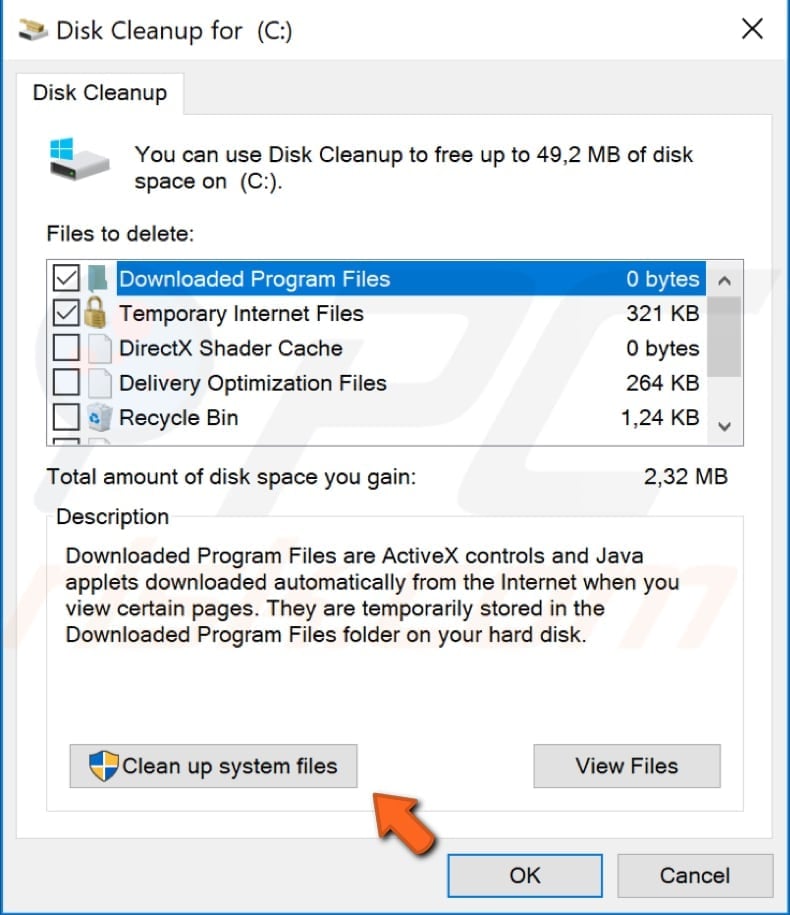
The simplest and quickest way to delete temporary files and folders from your Windows is to use Disk Cleanup. Disk Cleanup is used to reduce the number of unnecessary files on your drives, which can help your PC run faster. It deletes temporary files and system files, empties the Recycle Bin, and removes various other items that you might no longer need.
These junk files may affect your computer's speed, causing apps to respond slowly and can even prevent them from launching. These files could cause issues with your mouse cursor. To run Disk Cleanup, press the Windows (Win) key and type "disk cleanup". "Disk Cleanup" result should be selected by default. Press Enter to launch it.

Use arrow keys to navigate through the list and press the Space bar to mark the checkbox. After selecting what files to delete, press the Tab key to select "Clean up system files" and press Enter to start cleaning your computer.
Restore Your System Using Restore Point
System Restore tool creates restore points. A restore point is a collection of important system files stored by System Restore on a given date and time. System Restore reverts everything to a saved restore point, but first, you must have one recorded.
If a restore point does not exist on your computer, System Restore has nothing to revert to. To use this tool, you must have created restore points. With a created restore point, this feature will bring your system back to the previous working state without affecting your files and data.
This solution is kind of a last resort. Still, if you have any system restore points created before you started experiencing this missing mouse cursor issue, you may be able to fix it by performing a System Restore.
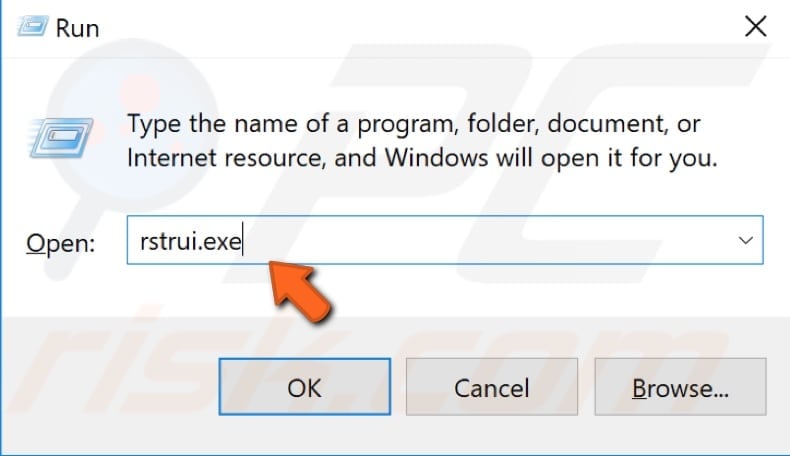
To restore your system, you will need to launch the Run dialog box. To start it, press Windows Key + R and type "rstrui.exe" in the Run dialog box. Press Enter on your keyboard.
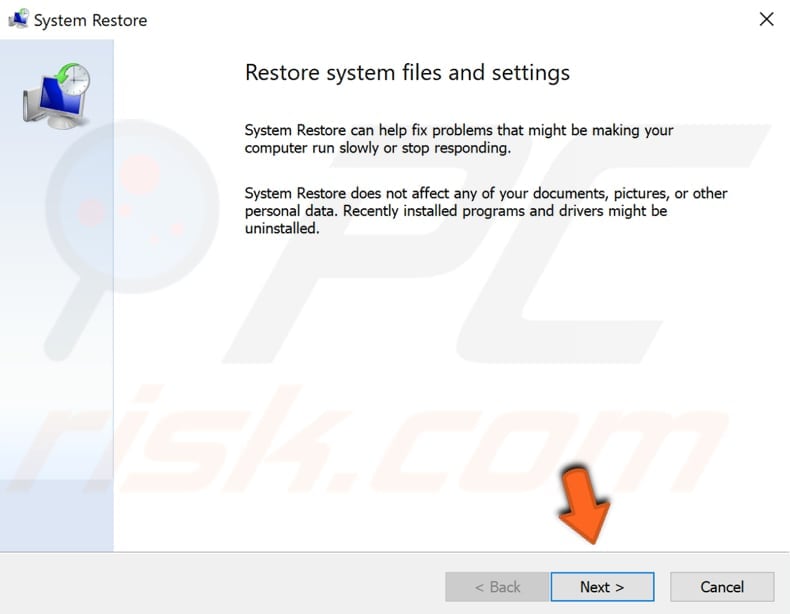
Select "Next" using the Tab key on your keyboard and press Enter.
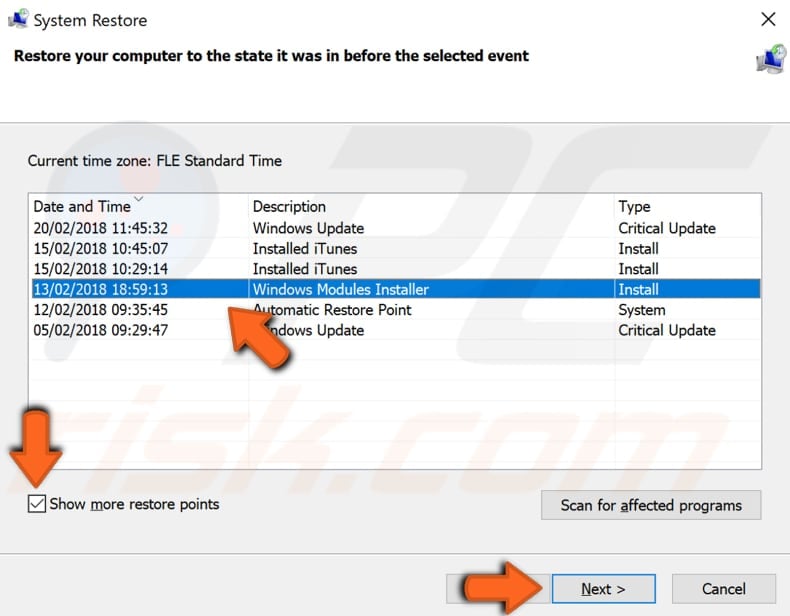
If there are restore points created, then you will see a list of restore points. Mark the "Show more restore points" checkbox by selecting the Tab key and then checking the checkbox by pressing the Space bar on your keyboard. It should display more restore points.
Select the restore point that suits you the best by using Tab and arrow keys (depending on the time created, etc.) and then select "Next" and press Enter. Do not select a Restore Point where your volume icon was already gone. You don't want to get back to that.
Now you will have to confirm your restore point. Your computer will be restored to the state it was in before the event in The "Description" field. If you are good with your choice, select "Finish" using the Tab key on your keyboard and press Enter. The system restoration process will begin.
We hope that at least one of the provided solutions helped you fix the problem with your mouse cursor gone missing, and you were able to get your cursor back.
We will appreciate that if you find more workarounds on Windows 10 to fix the missing mouse cursor problem and share them with us in the comment section below.
Share:

Rimvydas Iliavicius
Researcher, author
Rimvydas is a researcher with over four years of experience in the cybersecurity industry. He attended Kaunas University of Technology and graduated with a Master's degree in Translation and Localization of Technical texts. His interests in computers and technology led him to become a versatile author in the IT industry. At PCrisk, he's responsible for writing in-depth how-to articles for Microsoft Windows.
▼ Show Discussion