How to Improve Ping in Games?
Get Free Scanner and check your computer for errors
Fix It NowTo fix found issues, you have to purchase the full version of Combo Cleaner. Free trial available. Combo Cleaner is owned and operated by Rcs Lt, the parent company of PCRisk.com read more.
How to Decrease Ping/Latency in Games on Windows 10?
In online gaming, 'ping' refers to the network latency between a player's client and the game server. The lower the ping, the lower the latency, and vice versa. Many gamers seek ways to improve their latency, and this guide will show several ways to do this.

Generally, latency is the delay from system input to the desired outcome. In online gaming, 'ping' refers to the network latency between a player's client and the game server. The lower the latency, the less lag the player will experience.
In games where timing is critical (such as real-time games), a low ping is always desirable since this will give smoother gameplay by allowing faster updates of game data between the players' clients and the game server. You want as low a ping (ping time) as possible.
You can check and test the latency of your Internet connection on this website. A ping below 20ms is considered a good result, whereas a ping over 150ms is considered to cause noticeable delay/lag.
There is no single way to reduce ping, but the simplest solution is to close all other programs and windows on your computer. Also, ensure that there are no active downloads in the background that might cause high ping while playing. If that does not help, read the guide below for solutions to avoid a high ping in the virtual world.
Video Showing How To Reduce Ping/Latency In Games On Windows:
Table of Contents:
- Introduction
- Configure Windows Updates
- Use Ethernet Connection
- Optimize Your Game Settings
- Check Which Apps are Using Your Network Connection
- Turn Off The Wi-Fi Sense Feature
- Turn Off Location Tracking Feature
- Check Your Signal Strength
- Disable Your Antivirus
- Update Your Game Client
- Video Showing How to Reduce Ping/Latency in Games on Windows
Download Computer Malware Repair Tool
It is recommended to run a free scan with Combo Cleaner - a tool to detect viruses and malware on your device. You will need to purchase the full version to remove infections. Free trial available. Combo Cleaner is owned and operated by Rcs Lt, the parent company of PCRisk.com read more.
Configure Windows Updates
Updates are useful and important, but if Windows starts to download updates during gaming, it might cause high ping problems. This section shows how you can disable the Windows Update service or change how Windows delivers updates. You can use one of the methods or both together.
Windows Services (also known as services.msc) are used to modify how Windows services run on your system. These services are responsible for running available programs and managing many system settings and resources.
You can modify a service's settings for security, troubleshooting, and performance-related reasons. You need to access Windows Services to stop the Windows Update service. Type "run" in Search and click the "Run" result.

Type "services.msc" in the Run dialog box and click "OK" to open Windows Services.

In the Services window, find "Windows Update" service and right-click on it. Select "Properties" in the drop-down menu.

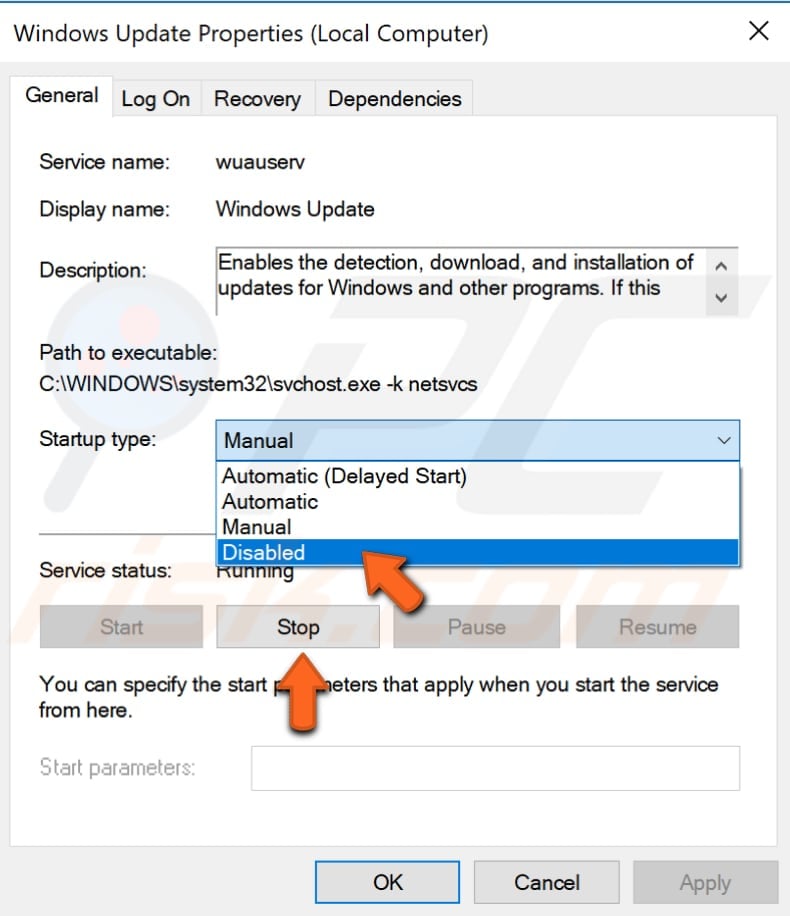
In the Windows Update Properties window, find "Startup type:" and set it to "Disabled". Then, find "Service status:" and click "Stop" to stop the Windows Update service.

Windows will no longer download updates at any time unless you revert these changes. We recommend that you use this method at your discretion and only when you are playing online games.
You could also change the way Windows updates are delivered. Windows 10 downloads updates on a peer-to-peer basis - this feature helps to save download bandwidth via the peer-to-peer (P2P) delivery update mechanism.
Using the P2P option, you can download a Windows update once and then use that machine to spread the update to all computers on your local network. You can also download Windows updates from other users in your area.
This feature might cause high ping problems while gaming, and so we demonstrate how to disable this feature on the Windows 10 operating system. First, go to Settings and select "Update & Security".

Locate "Advanced options" under "Update settings" and click it.

In the Advanced options window, click "Delivery Optimization".

In the Delivery Optimization window, turn off the "Allow downloads from other PCs" option by toggling the switch.

In addition, you can also turn on the metered connection option in Wi-Fi settings (if you are using the Wi-Fi connection on your PC) - this could also reduce ping/latency. The Metered connection allows you to prevent background downloads.
To turn the metered connection option on in Windows 10, go to Settings, select "Network & Internet". Select "Wi-Fi" on the left pane and then click "Advanced options".
In the Advanced options window, find "Metered connection" and toggle the switch to the "On" position under "Set as metered connection".
Use Ethernet Connection
Ethernet is a family of computer networking technologies commonly used in local area networks, metropolitan area networks, and wide area networks. Wi-Fi is a more convenient connection than Ethernet, but Ethernet has advantages. Ethernet is simply faster than Wi-Fi, and Wi-Fi increases latency/ping.
If reducing latency as much as possible is your concern, switch to an Ethernet connection. Connecting to a device directly with Ethernet is the best way to ensure you have the lowest possible ping and a much more stable connection.
Optimize Your Game Settings
From a computer resource perspective, it is important to ensure that your game settings are optimized. Setting your graphics to maximum makes games more pleasant to view, but this also can impact framerates.
It is important to ensure that the graphics card, RAM, and processor can support the settings you choose for the smoothest gaming experience.
Check Which Apps Are Using Your Network Connection
To check which apps are using your network connection, use Task Manager - a system monitor program used to provide information about the processes and programs running on a computer and the general status of the computer.
Some implementations can also be used to terminate processes and programs and change processes' priorities. To open it, press Ctrl + Shift +Esc on your keyboard or right-click on the Start menu and select "Task Manager" from the contextual menu.

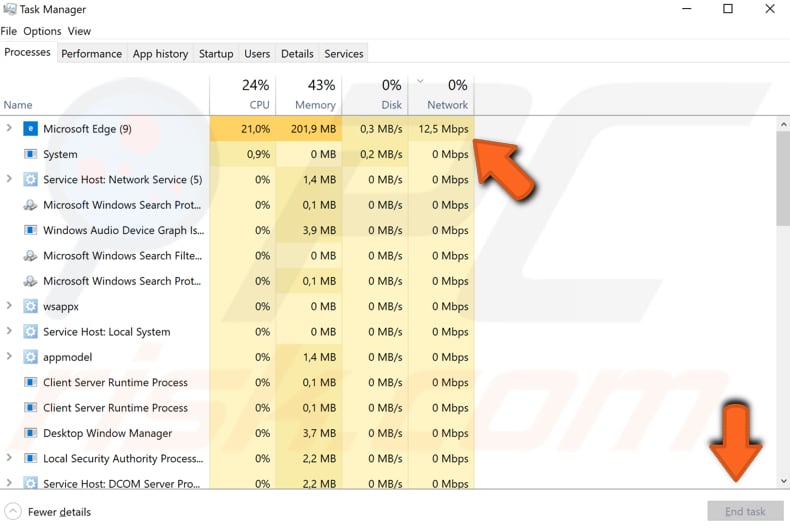
You will be automatically directed to the first Task Manager tab called "Processes". Here, you will see a list of processes running on your system. Find the "Network" section and select it. This will sort the processes list by network usage (processes using the most network resources will be shown at the top of the list).
Select the process (or processes) that is using your network and turn it off by clicking "End task", or right-click on the process and select "End task" from the contextual menu.

Turn Off The Wi-Fi Sense Feature
This feature enables you to share Wi-Fi connections. You can share your network's bandwidth with specific people. This feature can also connect you to other Wi-Fi networks shared with you by your friends or other people. If you would like to disable this feature, go to Network & Internet, choose "Wi-Fi", and then go to "Manage Wi-Fi Settings".
To stop connecting to networks shared with you by your friends or other people, turn off the "Connect to suggested open hotspots" feature. If you want to stop sharing Wi-Fi networks you log in to, uncheck "Outlook.com contacts" and other contacts below. We recommend that you simply disable all of the available options.
Turn Off Location Tracking Feature
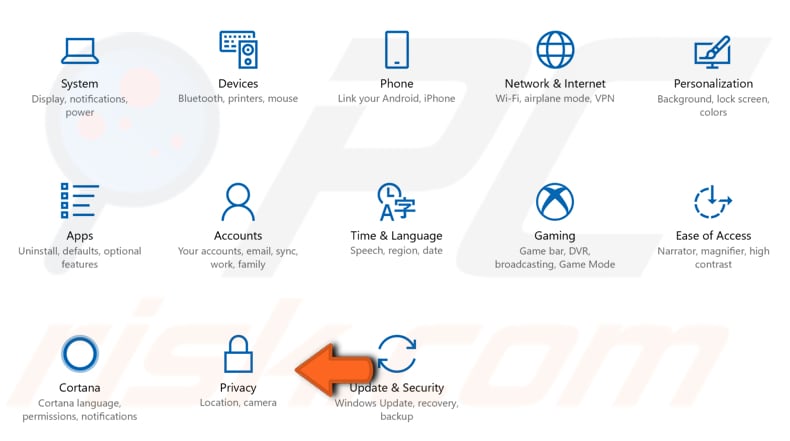
Windows 10 includes a built-in device location tracking feature that helps you to easily find the exact geographical location of the device in case it is stolen, or you misplace it somewhere. This feature might cause high ping/latency in games. To disable this feature, go to Settings and select "Privacy".

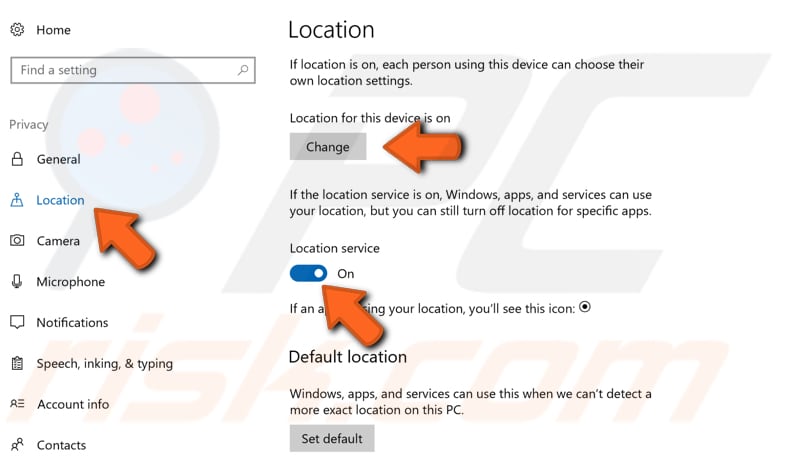
Select "Location" on the left pane and then toggle the switch to the "Off" position under the "Location service" section. If you do not see the switch, click "Change" and then toggle the switch.

Check Your Signal Strength
If you are using Wi-Fi connection, check your position to the router and signal strength of the Wi-Fi. Many apps are available that help determine the best location for your computer to receive a stronger Wi-Fi signal. You can use one of these apps or simply move your computer closer to the router and see if this makes any difference.
Disable Your Antivirus
A high latency/ping problem can occur due to antivirus software interfering with the network connection. Temporarily disabling it might help to fix this problem. If disabling the antivirus software fixes the issue, consider switching to a different antivirus program or removing your antivirus software completely.
Third-party firewalls can also cause a high ping/latency problem. For example, ZoneAlarm can cause issues. Try to remove ZoneAlarm and see if this helps to reduce ping/latency issues. Some users have stated that removing this firewall software actually helped them to resolve the issue.
Update Your Game Client
A Game client is a network client that connects an individual user to the main game server, used mainly in multiplayer video games. It collects data such as the score, player status, position, and movement from a single player (sending it to the game server), which allows the server to collect each individual's data and show every player in the game.
Although the game server displays all player information, individual players have their own unique set of information collected by the game client - thus each player's perspective of the game is different.
In most cases, a player cannot connect to a server without having the latest game client. However, sometimes it is possible to connect to a server using an older game client. Ensure that you have the latest game client installed on your computer. Game clients with the newest patches have improved connections to the game server.
We hope that one of the above solutions helped you decrease ping/latency and see a noticeable difference when connecting to the server. If not, try to connect to a faster Internet connection, often resulting in reduced ping.
Unfortunately, high ping/latency can sometimes be due to factors outside of your control, in which case you have to wait for the server to resolve the issue.
Share:

Rimvydas Iliavicius
Researcher, author
Rimvydas is a researcher with over four years of experience in the cybersecurity industry. He attended Kaunas University of Technology and graduated with a Master's degree in Translation and Localization of Technical texts. His interests in computers and technology led him to become a versatile author in the IT industry. At PCrisk, he's responsible for writing in-depth how-to articles for Microsoft Windows.

▼ Show Discussion