How to Set Network Location to Private or Public
Get Free Scanner and check your computer for errors
Fix It NowTo fix found issues, you have to purchase the full version of Combo Cleaner. Free trial available. Combo Cleaner is owned and operated by Rcs Lt, the parent company of PCRisk.com read more.
How to Set Network Location to Private or Public in Windows 10 & 7?
Windows 10 allows you to configure wired and wireless connections to be Public or Private network locations. This article will show you several ways to change network location type in Windows 10 and Windows 7.

What Are the Differences Between Private and Public Networks?
Public networks connect computers to the Internet while traveling - visiting public places such as cafes, airports, hotels, trains, buses, schools, etc. In public places, a wireless Wi-Fi link is most commonly used. Windows Firewall rules are set to the most restrictive in a public network location so that file and printer sharing, network discovery, and automatic set-up of network devices, etc., are disabled.
A private network location should be used in your home, work, or office networks. Your computer can connect to a homegroup and network devices such as printers in this type of network. Being in private network mode, your PC is discoverable by other devices on the network, and you can share files/printers connected to your PC.
How to Change Your Network Location Type?
Here, we demonstrate several ways to change network location type in Windows 10 and Windows 7. Remember to sign in as administrator when you want to change the network location of your network adapter.
Videos Showing How to Set Network Location to Public or Private:
Windows 10 users:
Windows 7 users:
Table of Contents:
- Introduction
- Change a Network Location in Settings
- Change a Network Location in Local Security Policy
- Change a Network Location Using HomeGroup
- Change a Network Location Using Windows PowerShell
- Change a Network Location by Editing Windows Registry
- Videos Showing How to Set a Network Location to Public or Private
Download Computer Malware Repair Tool
It is recommended to run a free scan with Combo Cleaner - a tool to detect viruses and malware on your device. You will need to purchase the full version to remove infections. Free trial available. Combo Cleaner is owned and operated by Rcs Lt, the parent company of PCRisk.com read more.
Change a Network Location in Settings
Changing the location of a wireless network is only slightly different from changing an Ethernet network location type. We also show how to change a Wi-Fi network location type in Windows 10. First, click the wireless network link icon in the system tray and select "Network & Internet Settings".
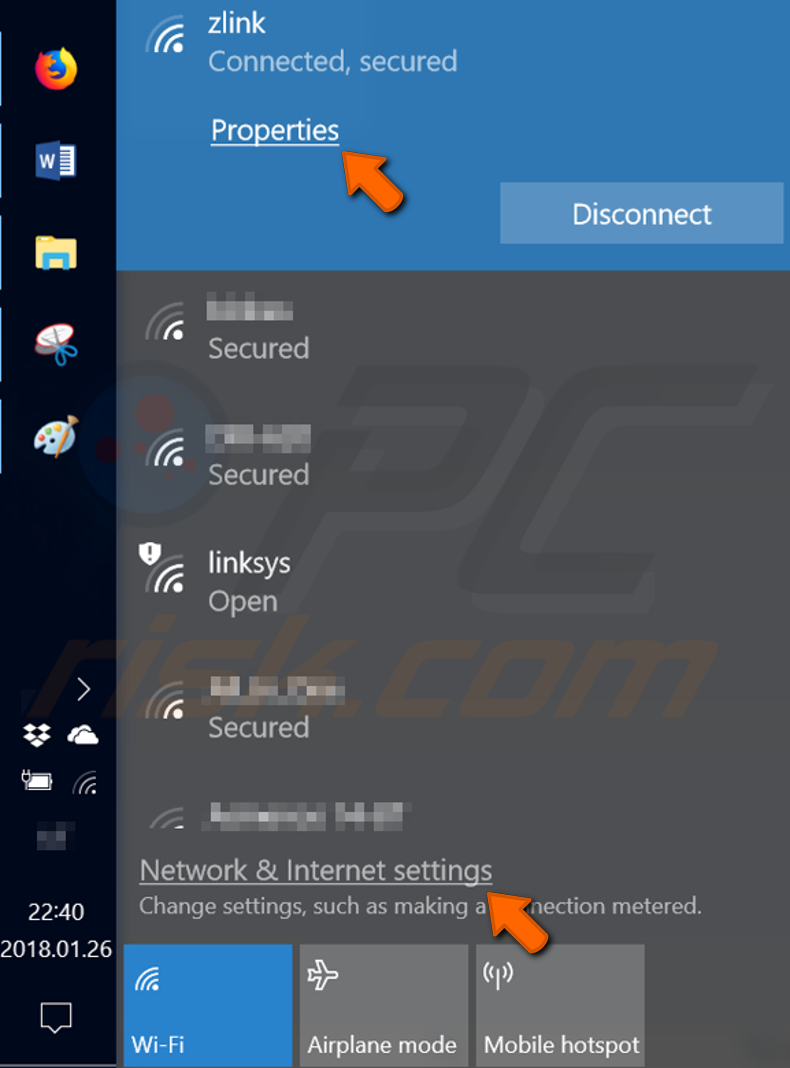
Another way to directly reach a configured wireless link properties window is to click "Properties" under the wireless link title. In the Settings window, click Wi-Fi on the left side.
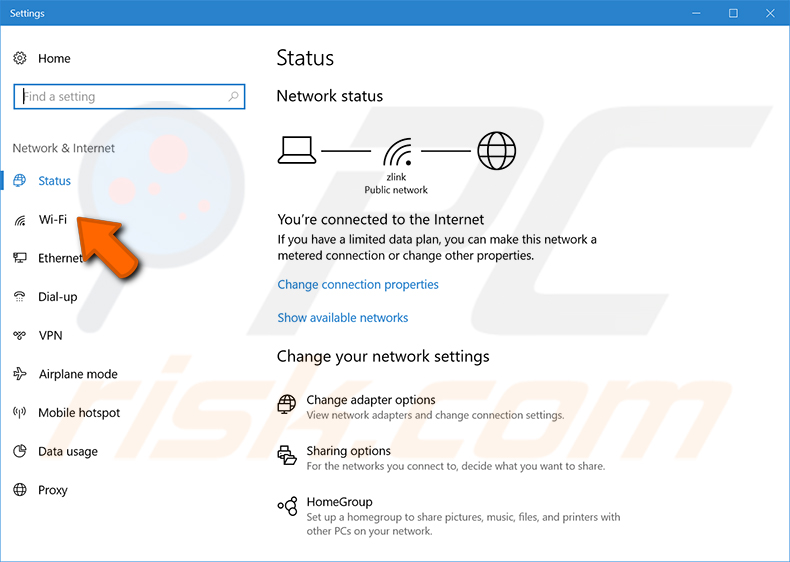
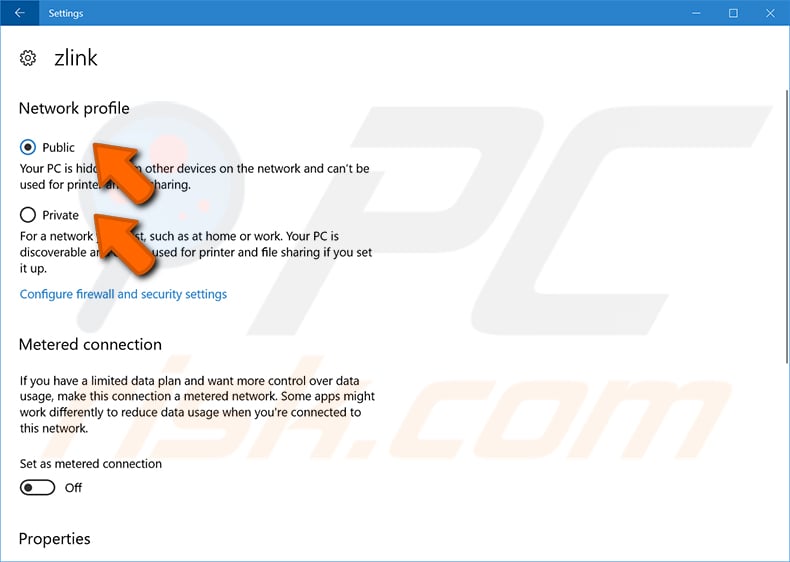
Click the Wi-Fi network title ("zlink") below the "Wireless Network Connection" switch and select "Public" or "Private" link mode in the next window.
Change a Network Location in Local Security Policy
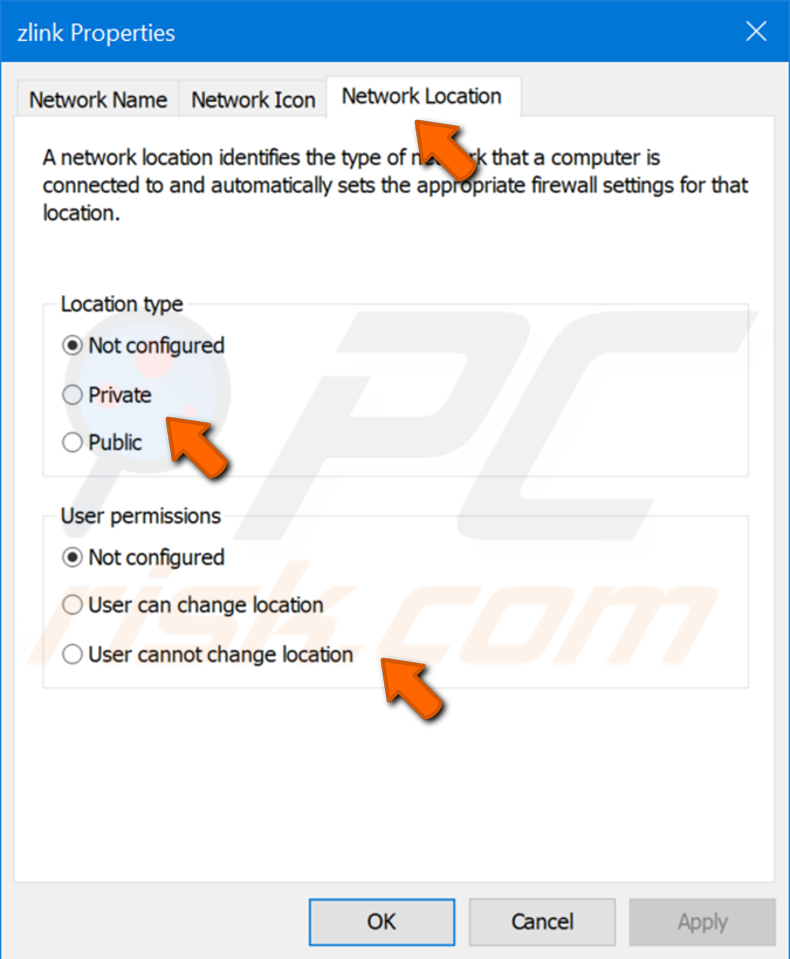
In the Local Security Policy window, select "Network List Manager Policies" in the left panel and click the network whose location you want to configure by double-clicking the title in the right panel ("zlink" in the screenshot).
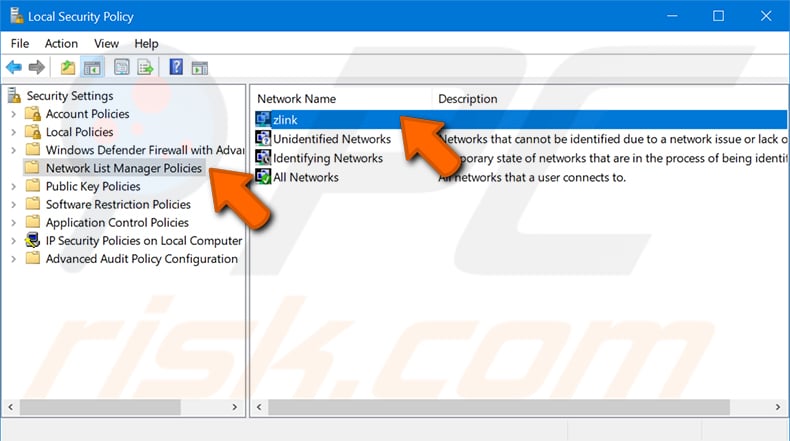
In the Network Properties window, select the "Network Location" tab and check "Location type" (Not configured, Private, or Public) you wish to assign to the network to which you are connecting.
If you check "User cannot change location" in the "User permissions" box, you will be unable to change the network type described in the first method.
Change a Network Location Using HomeGroup
If any homegroup is not discovered on the network, the connection type will be set to "Private", and you will have the option to create a homegroup.
If you want to restore a network location to Public, use the other options explained in this tutorial. The HomeGroup configuration window can be accessed in the Control Panel/Network and Sharing Center by clicking "HomeGroup" on the left side.
In Windows 7, follow Control Panel/Network and Internet and click the HomeGroup link.
Video showing how to change a network location using HomeGroup:
Change a Network Location Using Windows PowerShell
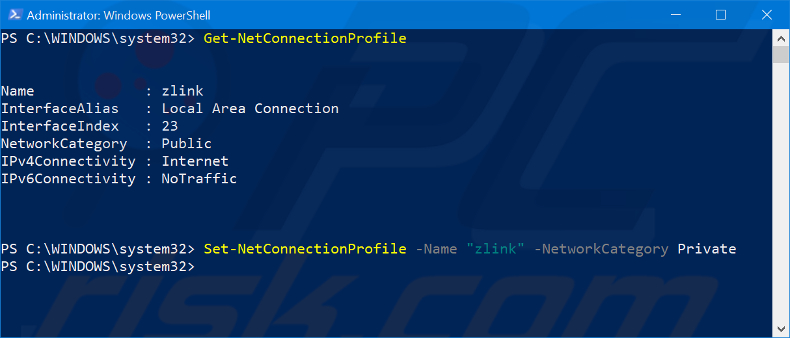
If you prefer working in a command-line shell, you can configure your network type in Windows PowerShell. Type "power" in the search field of Windows Start and run the Windows PowerShell Desktop App using the method "Run as administrator".
In the PowerShell, use the command "Get-NetConnectionProfile" to see the name of your network connection. Next, use the command "Set-NetConnectionProfile" with parameters shown in the screenshot below.
Change a Network Location by Editing Windows Registry
The network location can be changed directly in Windows Registry. To call Registry editor, press Windows key + R and type "regedit" in the Run window. Respond Yes to the User Access Control asking, "Do you want to allow this app to make changes to your device".
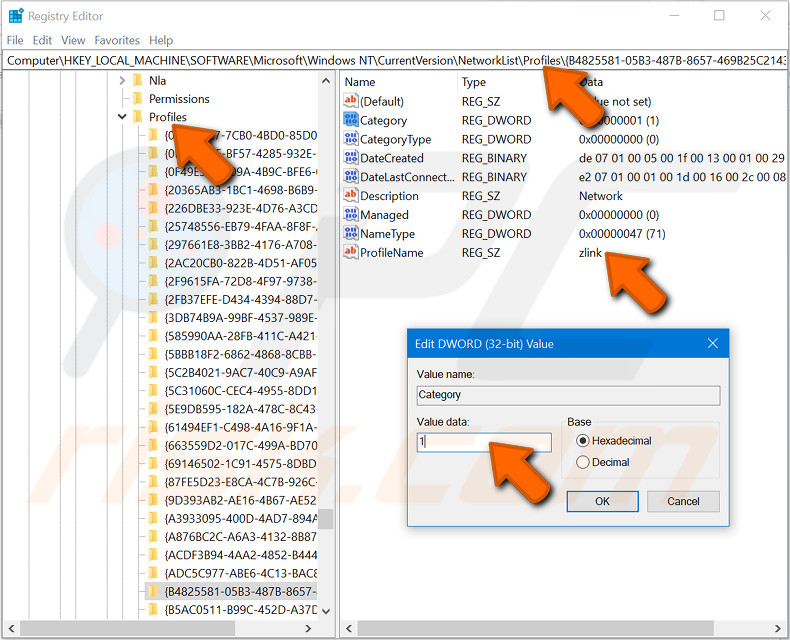
In the opened Registry Editor, navigate to the location "HKEY_LOCAL_MACHINE\SOFTWARE\Microsoft\Windows NT\CurrentVersion\NetworkList\Profiles". The exact location is valid for Windows 10 and Windows 7.
Scroll through the records on the left pane to find the record containing "ProfileName" of the connection whose network location you want to change. In the screenshot below, we will change the network location for the connection called "link".
Double-click on the "Category" item and set new Value data to 0 (zero) for Public or 1 for Private type network location. You need to restart Windows to make the new network location setting to become effective.
Share:

Rimvydas Iliavicius
Researcher, author
Rimvydas is a researcher with over four years of experience in the cybersecurity industry. He attended Kaunas University of Technology and graduated with a Master's degree in Translation and Localization of Technical texts. His interests in computers and technology led him to become a versatile author in the IT industry. At PCrisk, he's responsible for writing in-depth how-to articles for Microsoft Windows.

▼ Show Discussion