FIX: Can't Install Updates on Windows 10 & 7
Get Free Scanner and check your computer for errors
Fix It NowTo fix found issues, you have to purchase the full version of Combo Cleaner. Free trial available. Combo Cleaner is owned and operated by Rcs Lt, the parent company of PCRisk.com read more.
FIX: Can't Install Windows Updates on Windows 10 and 7
Sometimes, Windows updates can get stuck in the "Searching for updates" or "downloading updates" phase, failing to install or configure a particular update. This article will show you several general techniques how to fix Windows 7 and Windows 10 Update problems.
Windows updates are essential to keeping your system safe from virus threats, especially ransomware. Windows Update service runs in the background by default and downloads updates from Microsoft's servers.
However, in Windows 7 and Windows 10, the update process may get stuck, failing to install a particular update or configure the system after updates are installed.
Before searching for how to fix Windows Update issues, reboot your system and ensure that problems still exist. Furthermore, before trying to fix anything, give Windows enough time to complete updating.
Fixing Windows Update issues may be as simple as running the built-in Windows Update Troubleshooter, but the most severe cases might require a reinstallation of Windows.
Here, we will show you several general techniques for fixing Windows 7 and Windows 10 Update problems. If you get a particular error code during the update installation process, it could be worth searching for this specific error fix.
Videos Showing How to Solve Problems With Windows Updates
Windows 10 users:
Windows 7 users:
Table of Contents:
- Introduction
- How to Run Windows Update
- See Which Updates Were Installed Successfully or Failed
- How to Check Windows Version
- Using Windows Update Troubleshooter
- Deleting Windows Update Cache Manually
- Use Convenience Rollup for Windows 7
- Fix Windows File Corruption using DISM and SFC for Windows 10
- Fix Windows Update Using System Update Readiness Tool for Windows 7
- Try Free Windows Repair Tool From Tweaking.com
- Fixing Fresh Installed Windows 7 Update Stuck on "Checking for updates"
- Videos Showing How to Solve Problems With Windows Updates
Download Computer Malware Repair Tool
It is recommended to run a free scan with Combo Cleaner - a tool to detect viruses and malware on your device. You will need to purchase the full version to remove infections. Free trial available. Combo Cleaner is owned and operated by Rcs Lt, the parent company of PCRisk.com read more.
How to Run Windows Update
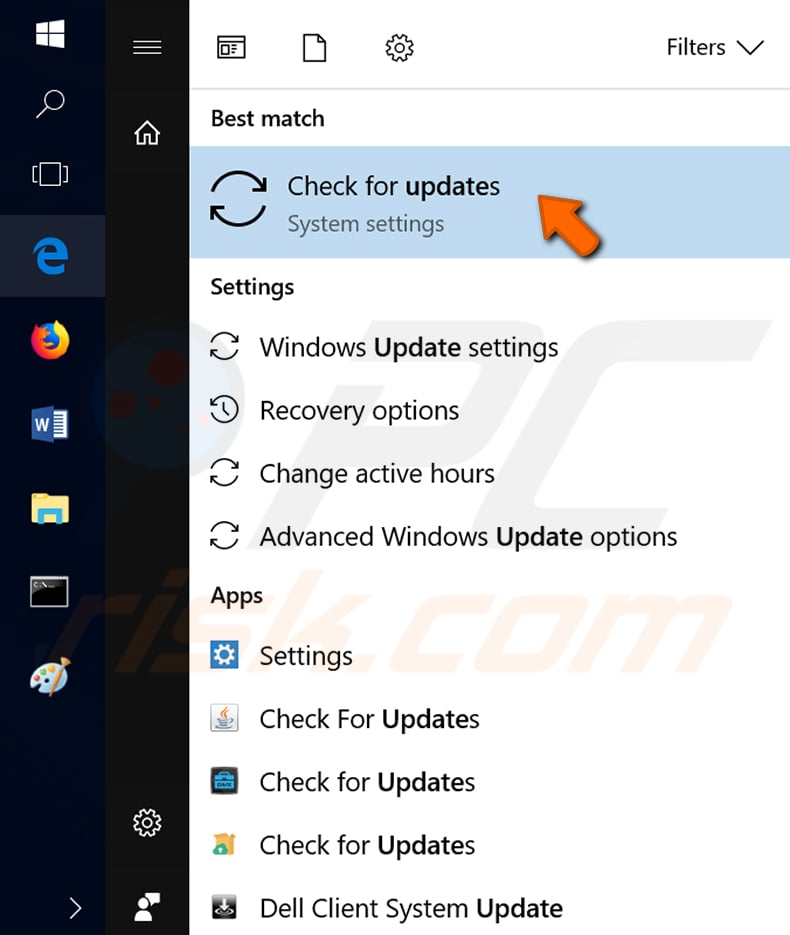
In Windows 10, type "update" in the Start search box and select "Check for updates".
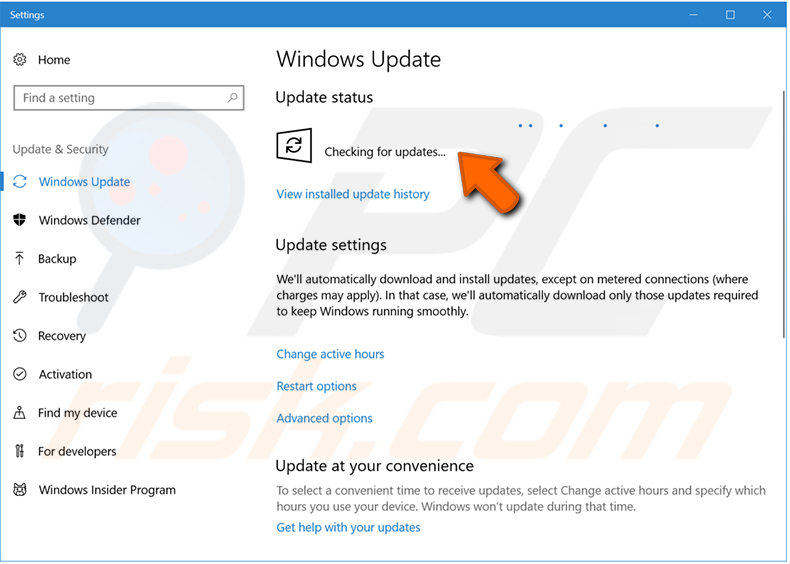
In the opened Windows Update window, click "Check for Updates". It might happen that it will be stuck in the "Checking for updates…" process.
If you are using Windows 7, click on the Start search field, type "update", and select "Windows Update". Windows Update will check for available updates and will show a window indicating important and available updates.
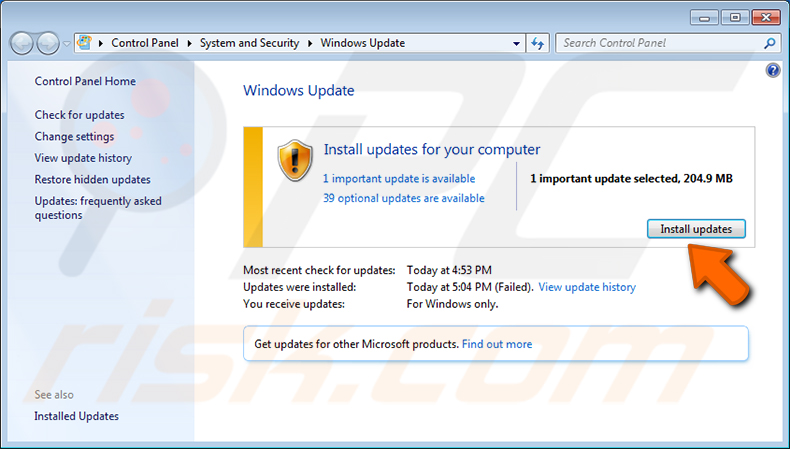
If you click the "Install updates" button, the download and installation process will start.
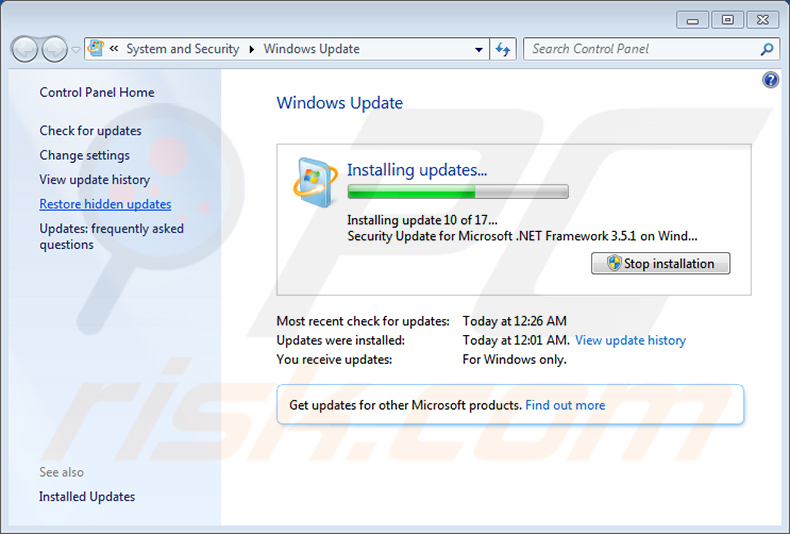 Some updates are related, and for all of them to install successfully, several Windows restarts may be required. An indication to restart your system can be a failure to install some updates indicated in the picture below.
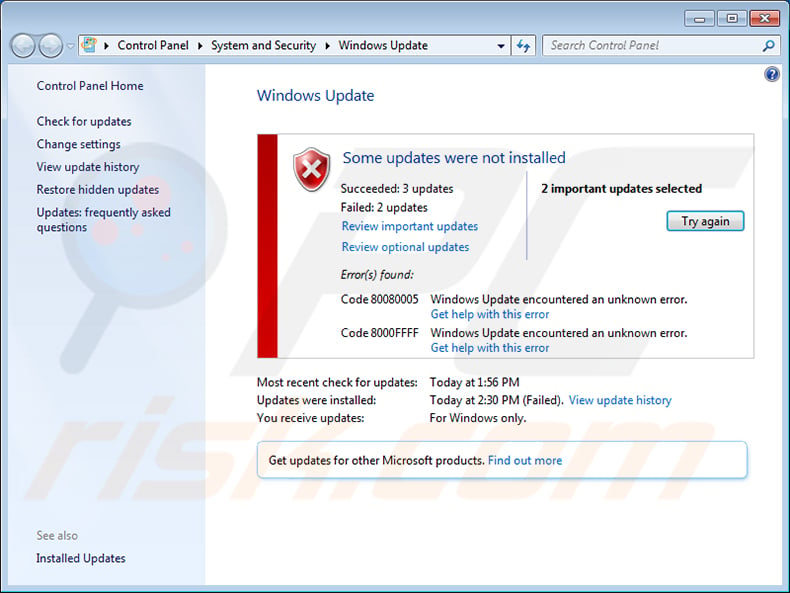
Restarting Windows is the first step to try to fix updates issues. Several restarts may be needed if you are installing many updates at once. Restarting often helps even if Windows Update reports encountering an unknown error.
See Which Updates Were Installed Successfully or Failed
In Windows 10, type "settings" in the Start search field and select "Settings". In the opened Settings window, click the "Update & Security" icon. Select the "Windows Update" tab on the left.
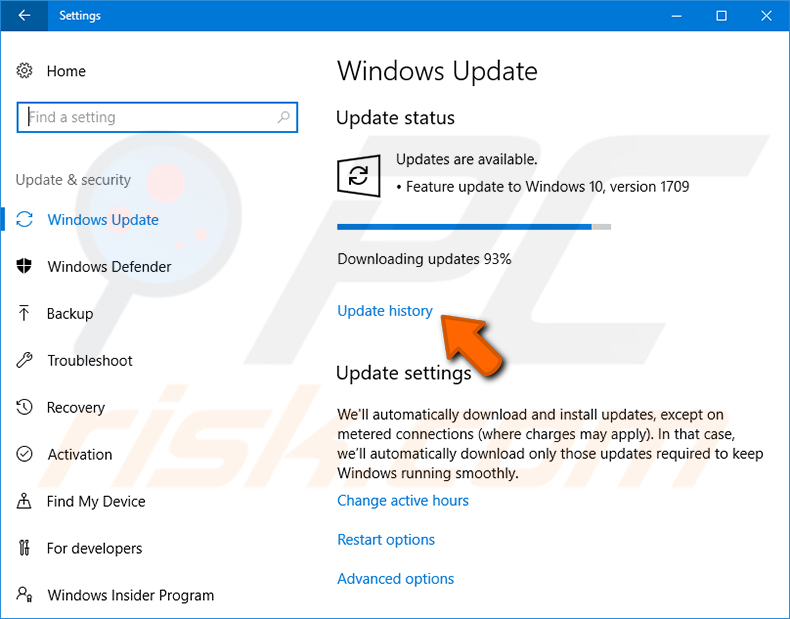
Click on the "Update history" link and see which updates were installed successfully or failed in the window below.
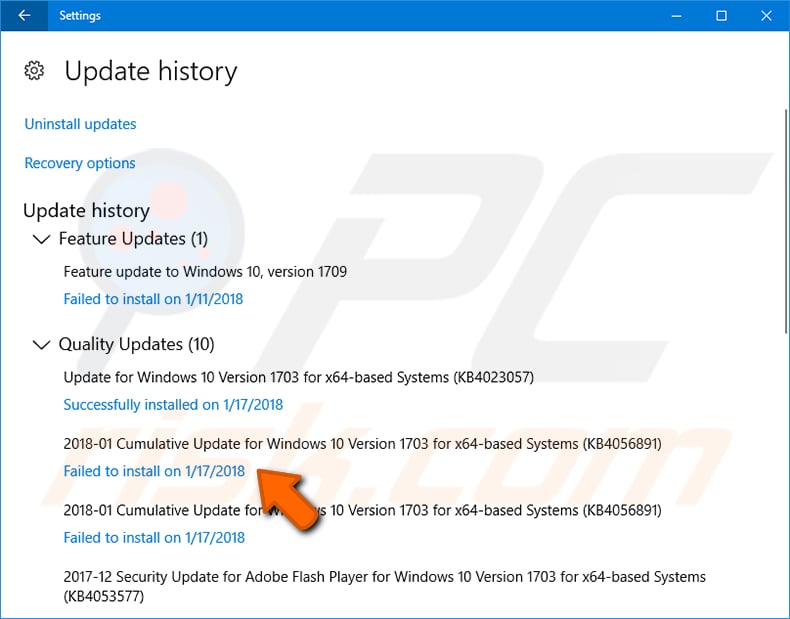
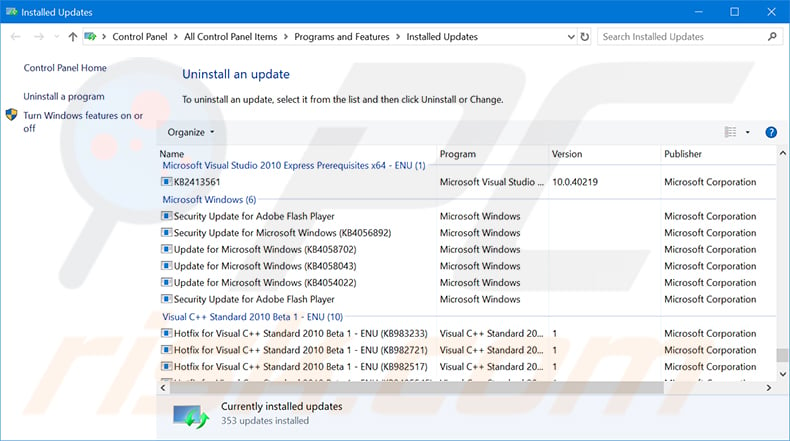
If update history is displayed empty (this may happen folder C:\Windows\SoftwareDistribution was rebuilt), the other way to see installed updates is through Control Panel. Select Programs and Features and click View installed updates on the left. Here you can also uninstall selected updates. In any case, blank updates history is not a problem because it does not affect installed updates.
How to Check Windows Version
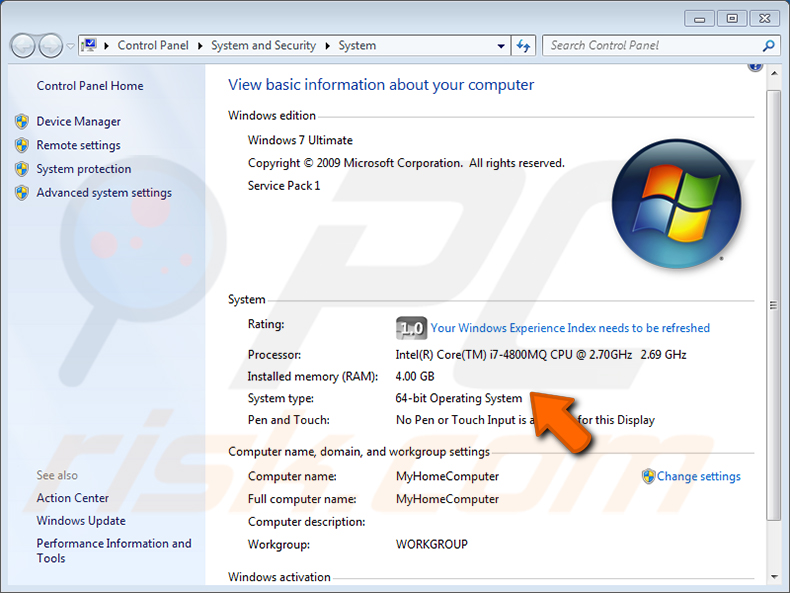
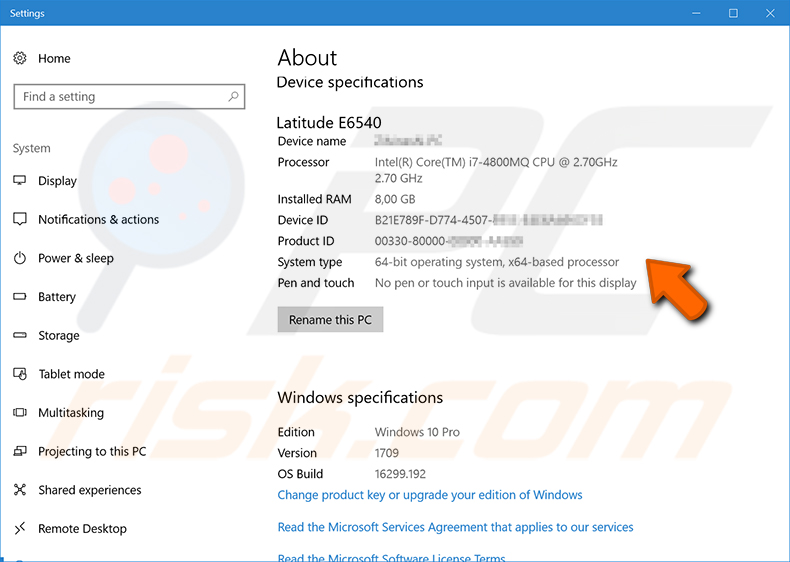
What you often need to know about your Windows is the bit version (32 or 64-bit). Downloadable updates or fixing utilities are separate for different 32 or 64-bit versions of Windows 7 and 10.
In Windows 7, Start search box, type "control panel", and open it. Then select "System and Security", and the System window will display operating system and system type (64 bit in the picture below).
You can find it typing "about" in Windows 10 Start search box and then selecting "About your PC". Scroll down in the "Settings About" window to see the number of bits of your Windows system.
Using Windows Update Troubleshooter
When dealing with Windows update problems, the first suggestion is to use Microsoft dedicated Windows built-in tool called Windows Update Troubleshoot available in both Windows 7 and Windows 10. A quick manual on operating it can be accessed at Description of the Windows Update Troubleshooter - Microsoft Support.
You can download Windows Update Troubleshooter for Windows 7 or Windows 10 by visiting Microsoft Support at Windows Update Troubleshooter.
In Windows 10, double-click the downloaded file "wu170509.diagcab" and follow the instructions in dialog windows. In the first Window shown below, click the "Next" button.
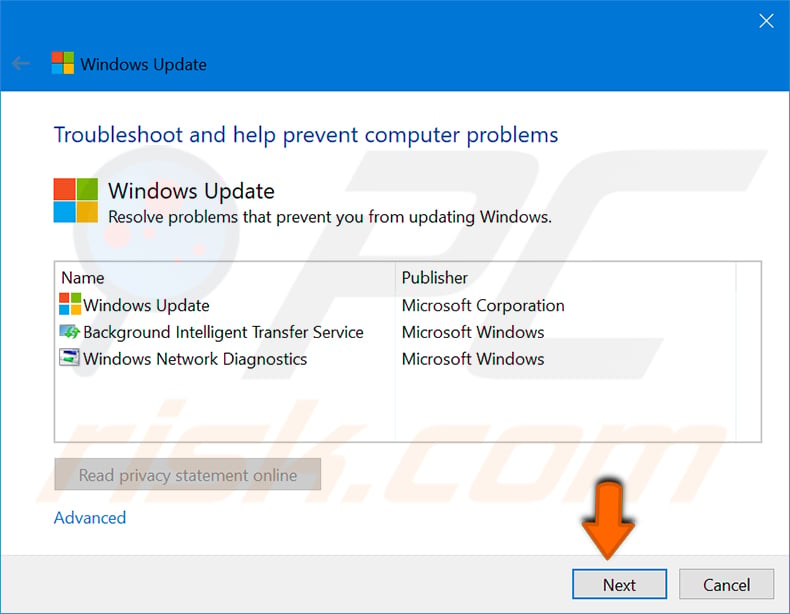
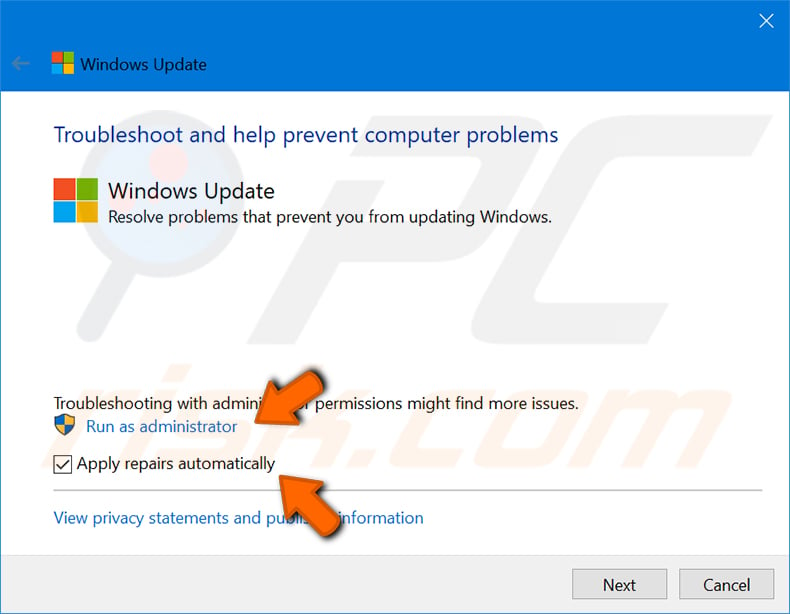
In the window below, check "Apply repairs automatically" and press "Run as Administrator", and then click "Next". Checking and repairing may take 15 to 20 minutes.
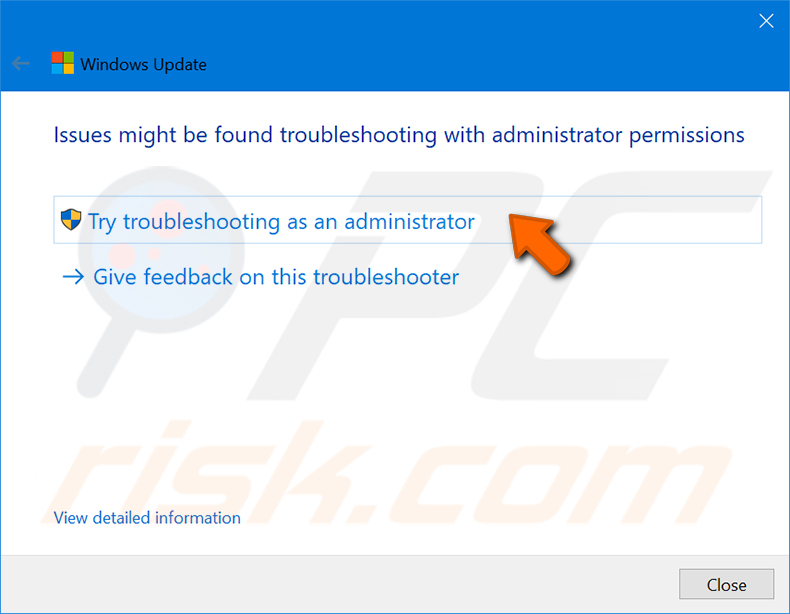
Depending on the status of your Windows system, the troubleshooter may suggest deleting and re-downloading updates. Agree with this and press "Apply this fix".
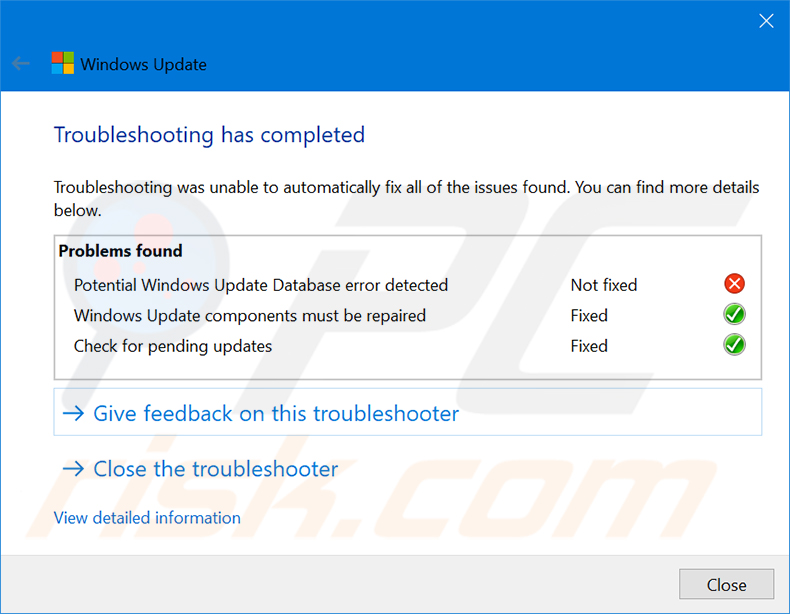
The final results of the Windows Update Troubleshooter are displayed in a window shown below. Even after the troubleshooter, some unresolved issues may be left.
Deleting Windows Update Cache Manually
Deleting the Windows Update cache manually is another step to try. In Windows 7 and Windows 10 update cache is located in folder "C:\Windows\SoftwareDistribution".
In Windows 10, it was possible to clean all Windows Update Cache without booting in Safe mode. Before deleting cache files, you need to stop two Windows services: "Background Intelligent Transfer Service" and "Windows Update". Services control window can be accessed by typing service in the Start search field.
Select the necessary service in the list and choose "Stop" from the drop-down list for both mentioned services.
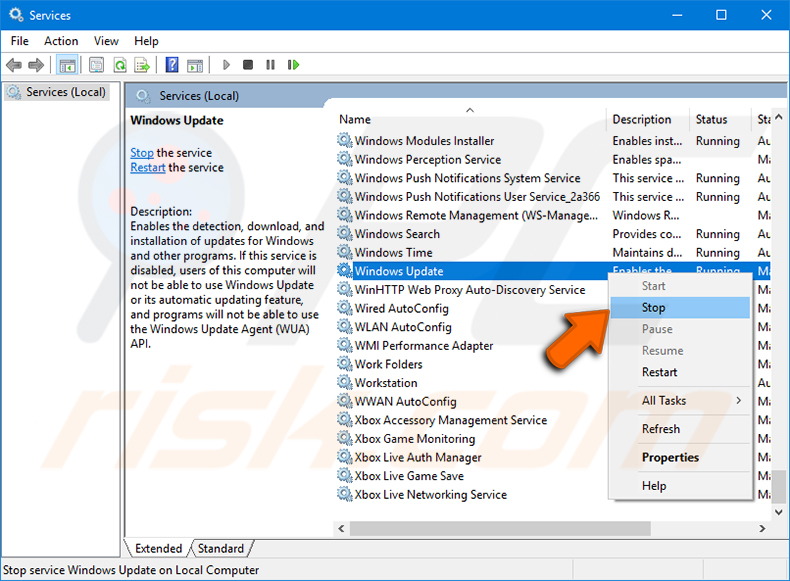
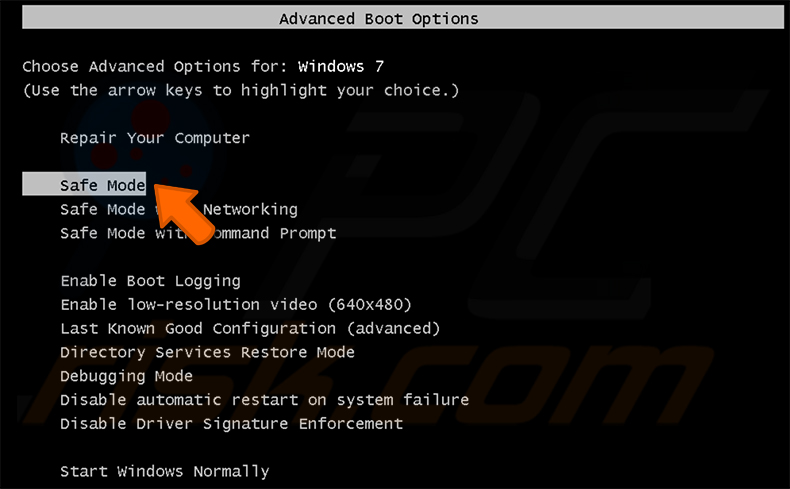
In Window 7, it was necessary to boot in Safe mode to stop Background Intelligent Transfer Service and Windows Update services. To boot Windows 7 in Safe mode, you need to restart Windows and hold the F8 key (or F12) during the Windows start process.
Then, in the Advanced Boot Options window, select "Safe Mode" and press Enter.
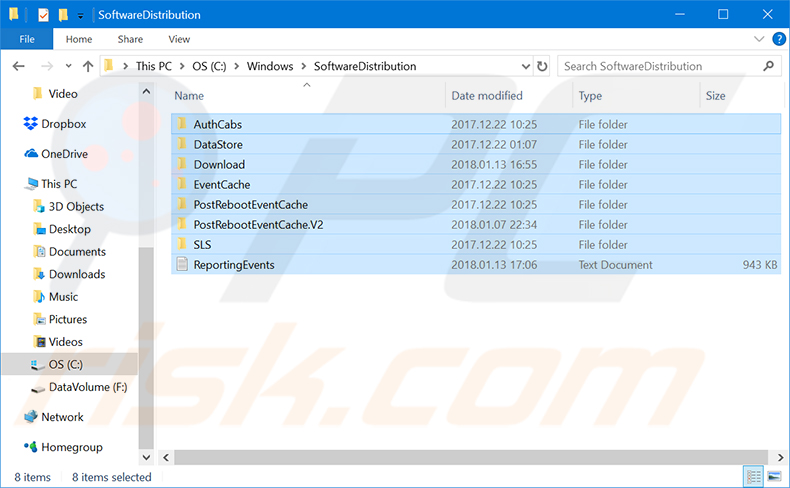
When necessary services are stopped, you need to delete contents of the folder "C:\Windows\SoftwareDistribution". There's nothing important here because Windows Update restores everything it needs the next time you run Windows Update.
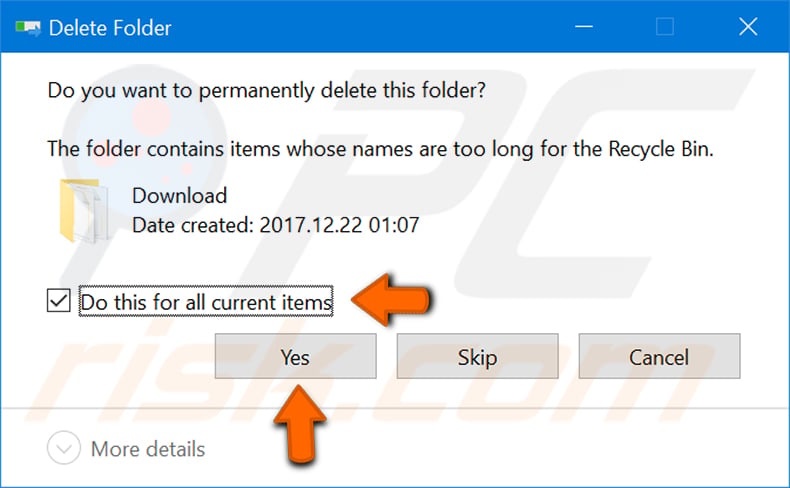
It was only a warning popping up during the delete process. Select option "Do this for all current items" and click "Yes". It takes some time for Windows to move the entire contents of Update Cache to Recycle Bin.
Now try to reboot and start Windows Update again to see if any update problems still persist.
Use Convenience Rollup for Windows 7
By using Microsoft convenience rollup (or Windows 7 Service Pack), you can speed up and possibly avoid problems installing many updates on a fresh Windows 7 installation. Windows 7 convenience rollup package contains updates released from around February 2011 until May 2016.
There are several prerequisites for the installation of the convenience rollup. Microsoft says you must have installed Service Pack 1 for Windows 7 or Windows Server 2008 R2 (KB976932) and April 2015 servicing stack update for Windows 7 and Windows Server 2008 R2 (KB3020369).
Microsoft also states that you need at least 4 GB of free disk space required to install convenience rollup. Convenience rollup can be downloaded from Microsoft Update Catalog. Depending on your Windows 7 bit version (32-bit or 64-bit), click the appropriate "Download" button on the right.
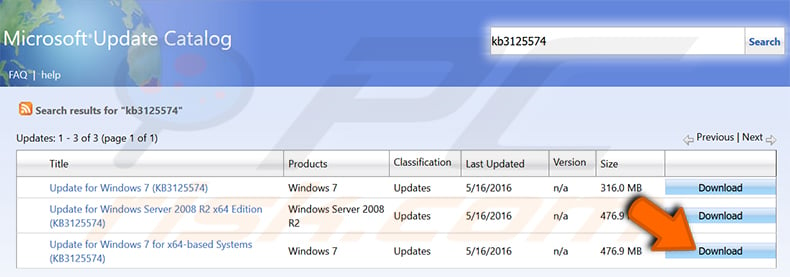
Press on the link to the convenience rollup installation file.
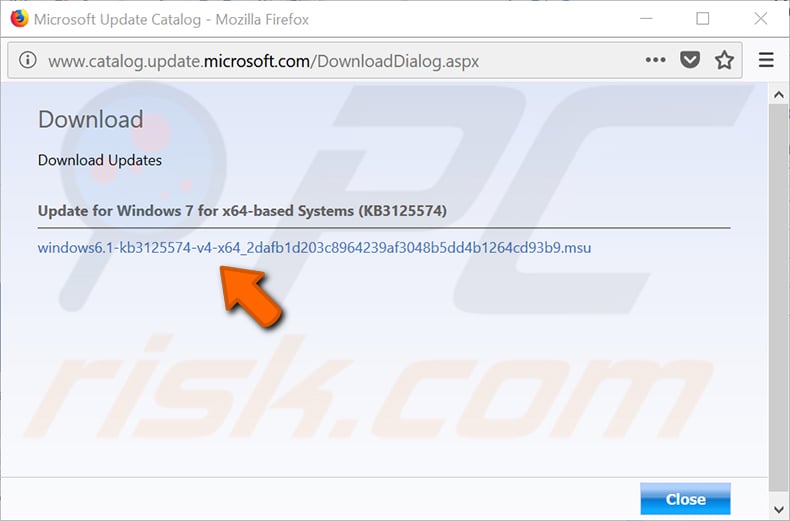
Install the convenience rollup on your Windows 7 system. You can get more about convenience rollup from the Microsoft article Convenience rollup update for Windows 7 SP1 and Windows Server 2008 R2 SP1. If your Windows system already has updates installed, it will notify you and cancel the convenience rollup installation.
Fix Windows File Corruption Using DISM and SFC for Windows 10
Microsoft recommends using prompt DISM (Deployment Imaging and Servicing Management) and SFC (System File Checker) commands to fix Windows file corruption. Call the command prompt with administrator rights.
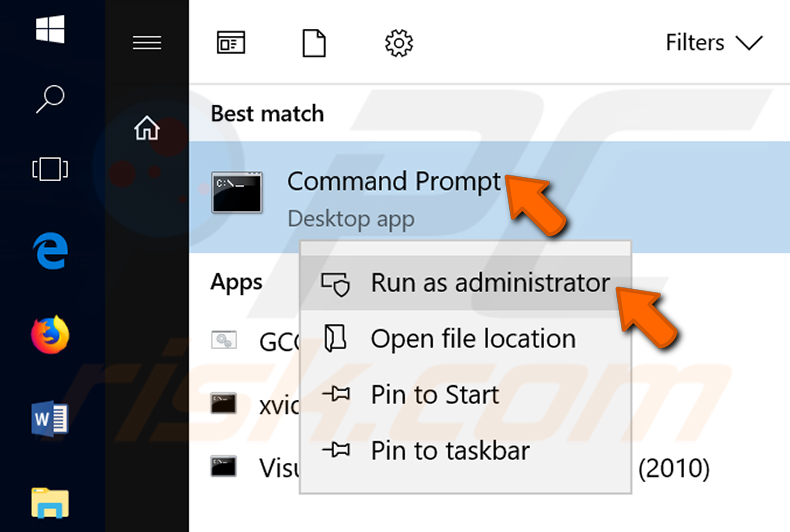
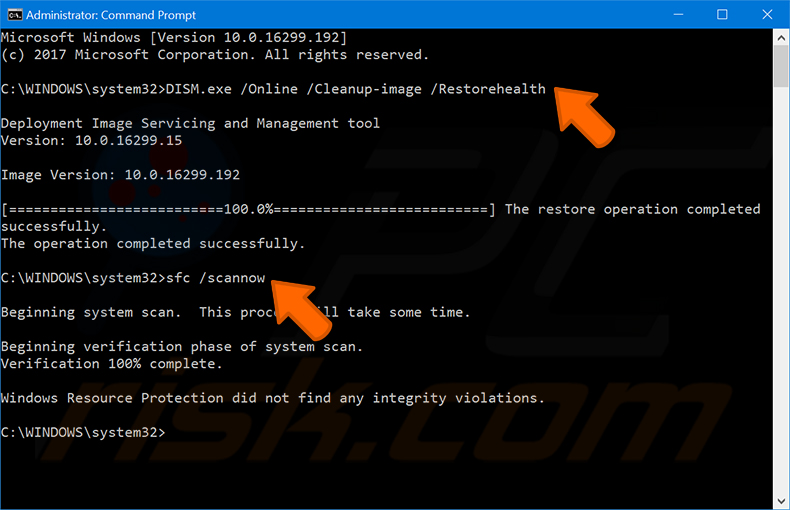
Type "DISM.exe /Online /Cleanup-image /Restorehealth" in the Command Prompt window and press Enter. It might take from several to twenty minutes to complete this command. Then type "sfc /scannow". It will also take around twenty minutes to complete this command. Upon successfully running DISM and SFC commands, you should see a confirmation about the completed verification in the Command Prompt window. After DISM and SFC finish, successfully rerun Windows Update.
Fix Windows Update Using System Update Readiness Tool for Windows 7
For Windows 7, the System Update Readiness Tool (SURT) can be used. Download Windows 7 SURT from here. The size of SURT for the 64-bit Windows 7 version is around 550MB. After the download is completed, start the installation of "Windows6.1-KB947821-v34-x64.msu." When asked, agree to install "HotFix for Windows (KB947821)".
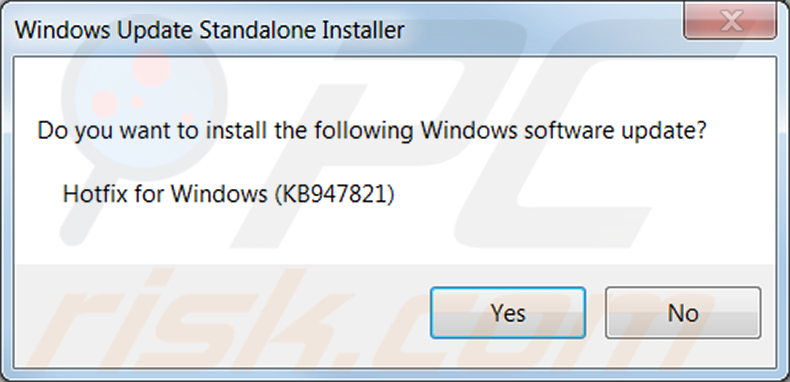
Allow SURT installation to complete. When the installation is finished scanning for and fixing problems is started automatically. You just need to wait for the process to complete. It may take up to 15 minutes or more, depending on your computer. Now try to rerun Windows Update.
If some problems still remain unresolved, more experienced users can follow guidelines in Fix Windows Update errors by using the DISM or System Update Readiness tool to manually fix corruption errors that are found in the "CheckSUR.log".
Try Free Windows Repair Tool From Tweaking.com
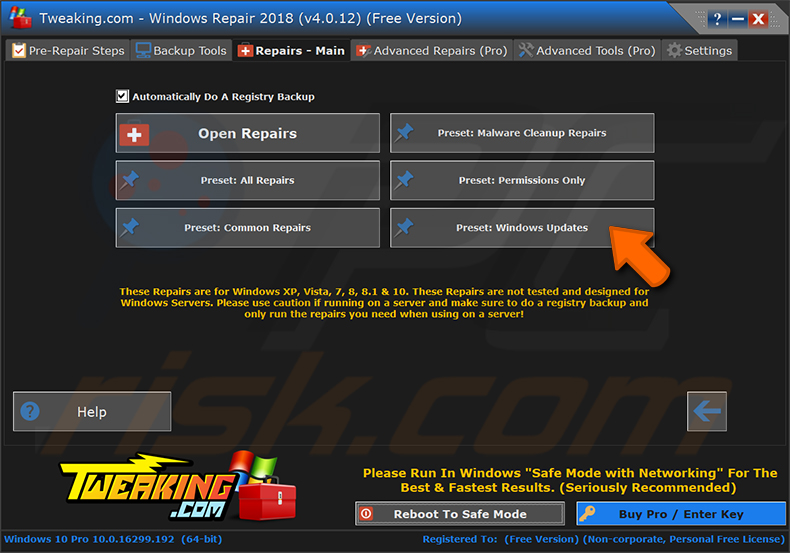
An external tool called Windows Repair from Tweaking.com can be used to repair Windows Update issues. Windows Repair comes in Free and paid Pro versions. The tool has many features for fixing a wide range of Windows problems. It can be downloaded by following links at Tweaking.com. The installation file size is only 37 MB and requires just 53 MB of your disk for installation.
A page contains an excellent video introducing features of Windows Repair. Windows Update Repair function is included in the free version of Windows Repair. It is highly recommended to run the Windows Repair tool in safe mode or with administrator rights (right-click mouse and select Run as Administrator from the drop-down menu).
Fixing Fresh Installed Windows 7 Update Stuck on "Checking for updates"
Microsoft has a Windows forum article Fix: Windows 7 Update stuck on checking for updates explaining how to update Windows Update itself immediately after fresh Windows 7 installation.
This update solves the issue of updates getting stuck in the phase "Checking for updates" and accelerates the installation of many other Windows updates.
Share:

Rimvydas Iliavicius
Researcher, author
Rimvydas is a researcher with over four years of experience in the cybersecurity industry. He attended Kaunas University of Technology and graduated with a Master's degree in Translation and Localization of Technical texts. His interests in computers and technology led him to become a versatile author in the IT industry. At PCrisk, he's responsible for writing in-depth how-to articles for Microsoft Windows.

▼ Show Discussion