FIX: Service Host: Local System (Network Restricted) High CPU Usage

Get Free Scanner and check your computer for errors
Fix It NowTo fix found issues, you have to purchase the full version of Combo Cleaner. Free trial available. Combo Cleaner is owned and operated by Rcs Lt, the parent company of PCRisk.com read more.
Service Host: Local System (Network Restricted) is Using Too Much of Your CPU Resources
If you noticed that Service Host: Local System (Network Restricted) is using a lot of your CPU, Disk, or Memory, this article is going to show you several ways how you can fix this problem.

Some time ago, Microsoft started changing the Windows functionality from internal Windows services (that ran from .exe files) to using .dll files. You can't launch a .dll file directly like you can launch an executable (.exe) file. Instead, a shell is loaded from an executable file and used to host these .dll services.
That is how the Service Host process (svchost.exe) was programmed. Service Host(svchost.exe) is a generic service hosting container, and any number of required system services can be running in it.
Service Host: Local System is a collection of system processes that operate automatically through the system. It includes Windows Auto Update and other processes that take up a lot of CPU, Disk, and Memory resources.
If you are running Windows 10 and you find that Service Host: Local System (Network Restricted) is taking much of your CPU, Disk, or Memory usage, read the guide below and find the solution which works best for you.
How to Reduce Service Host: Local System (Network Restricted) CPU Usage:
Table of Contents:
- Introduction
- Disable Superfetch
- End HP Processes
- Troubleshoot Windows Update
- Run SFC and DISM Scan
- Fix the Memory Leak Using Registry Editor
- End SVChost Process
- Perform Clean Boot
- Restart Windows Update Service
- Video Showing How to Reduce Service Host: Local System (Network Restricted) CPU Usage
Download Computer Malware Repair Tool
It is recommended to run a free scan with Combo Cleaner - a tool to detect viruses and malware on your device. You will need to purchase the full version to remove infections. Free trial available. Combo Cleaner is owned and operated by Rcs Lt, the parent company of PCRisk.com read more.
Disable Superfetch
Superfetch preloads programs you frequently use into RAM so that they do not have to be called from the hard drive. Sometimes this can affect the performance and slow down your computer. This service may cause high CPU usage, and if this service decreases your computer's speed, we recommend you turn it off.
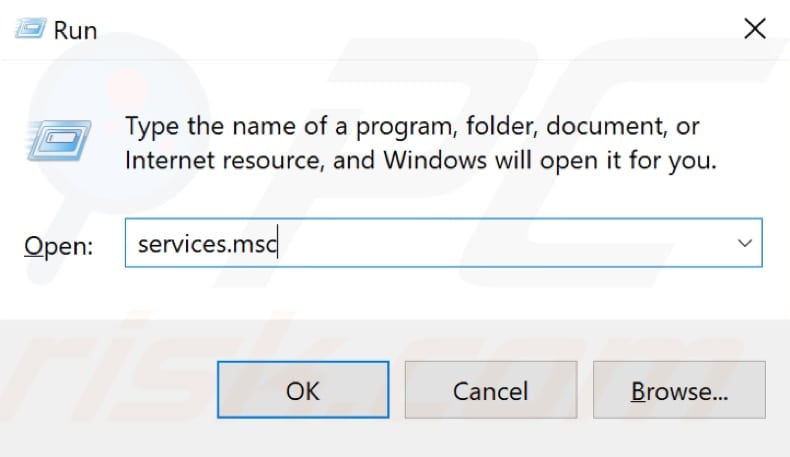
To disable Superfetch, open the Run dialog box. To open it, type "run" in Search and click on the "Run" result. Or you can use the Windows key + R keyboard shortcut to open it. In the opened Run dialog box, type "services.msc" and press Enter on your keyboard or click "OK."
In the opened Services window, you will see a list of local services. Scroll down to find "Superfetch" and right-click on it. Select "Stop" from the dropdown menu to stop the Superfetch service. Restart your computer for changes to take effect.
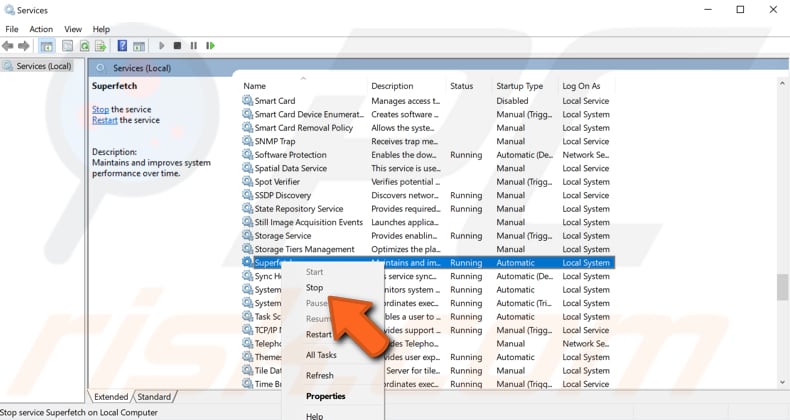
After disabling the Superfetch service and restarting your computer, the CPU usage should get back to normal.
End HP Processes
This one includes ending unnecessary HP (Hewlett-Packard) processes. You will need to use Task Manager for that. Some implementations can also be used to terminate processes and programs, as well as change processes priorities.
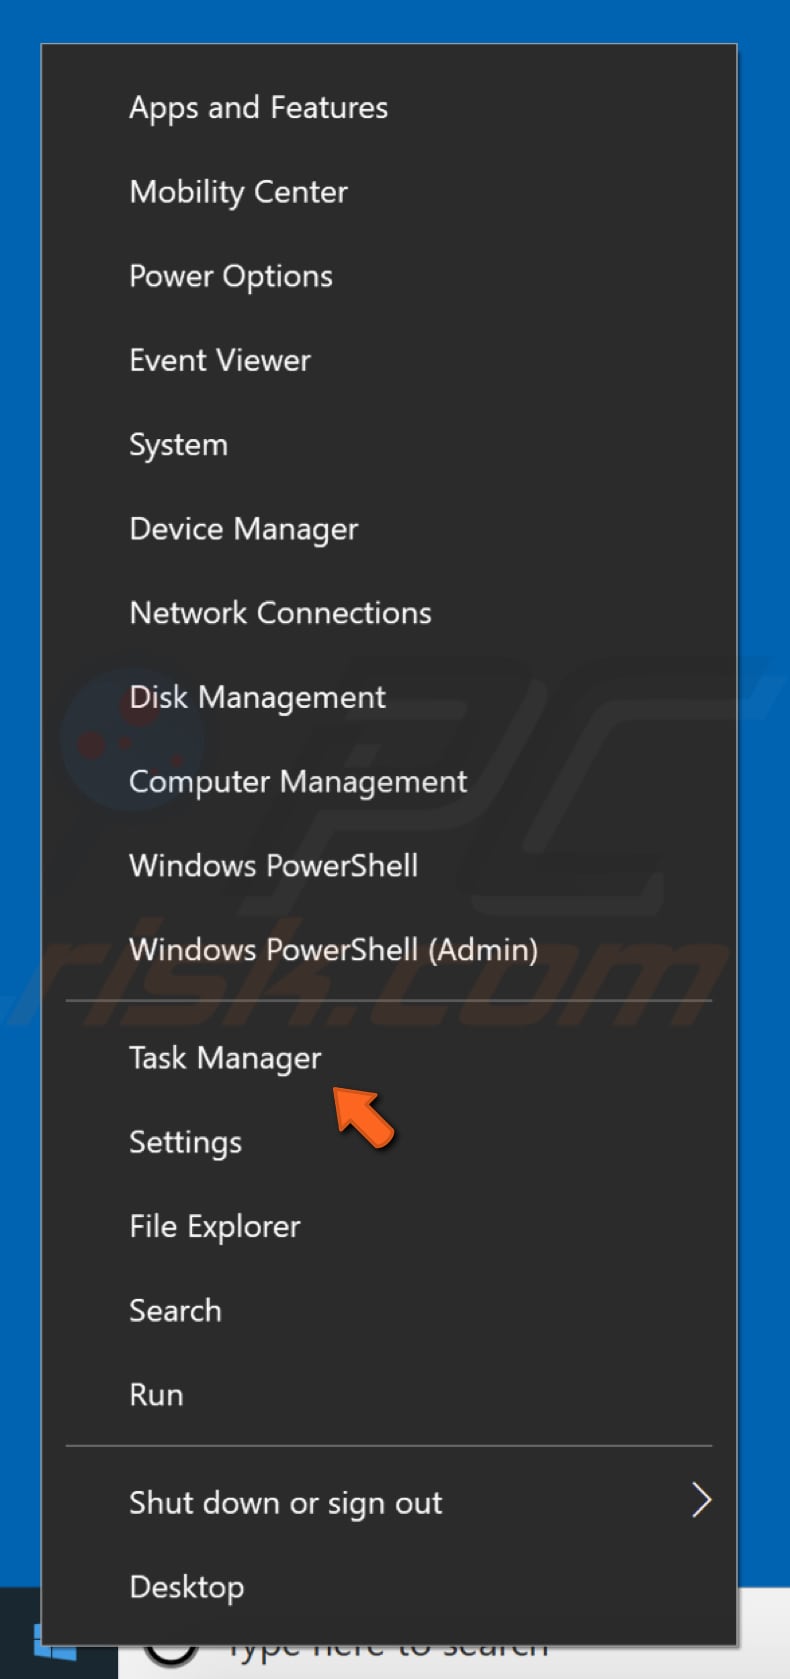
To open Task Manager, press Ctrl + Alt + Delete on your keyboard or right-click on the Start menu and select "Task Manager."
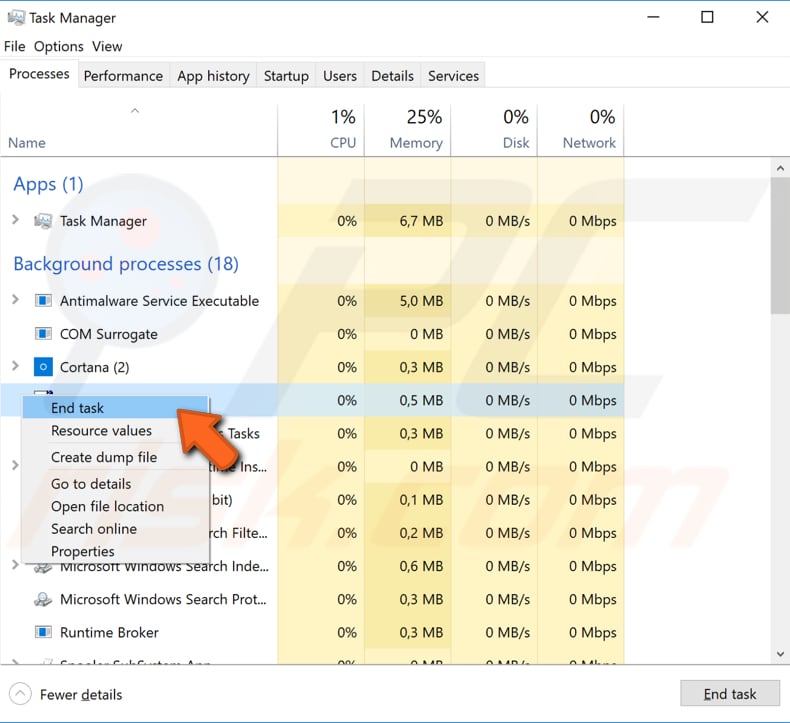
Find (unnecessary) running HP processes and then turn them off by right-clicking on any of the processes and selecting "End task" from the dropdown menu. Or select the HP process and then click on "End task" in the bottom-right corner.
If this method helped fix this problem with high CPU usage, you might need to repeatedly end those processes when this problem occurs the next time.
Troubleshoot Windows Update
Windows Update is a necessary part of running on any Windows operating system. On most computers with Windows operating systems, updates are installed automatically. However, it also can be the cause of high CPU usage.
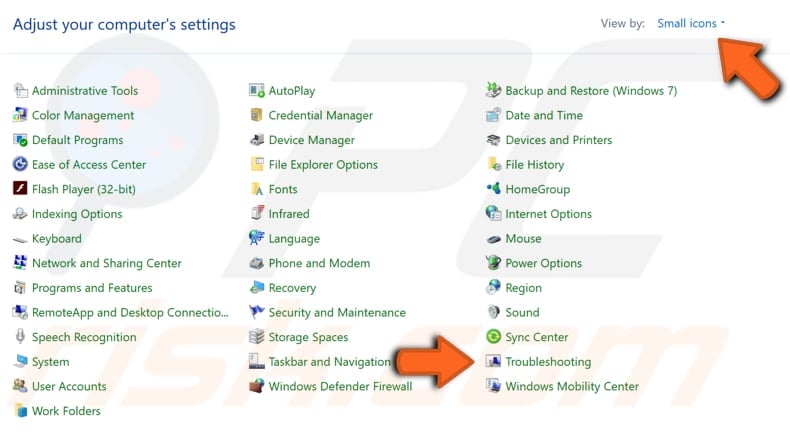
Try to run the Windows Update troubleshooter to see if there is a problem with it. Go to Control Panel and then select to view by small icons in the top-right corner. Click on "Troubleshooting."
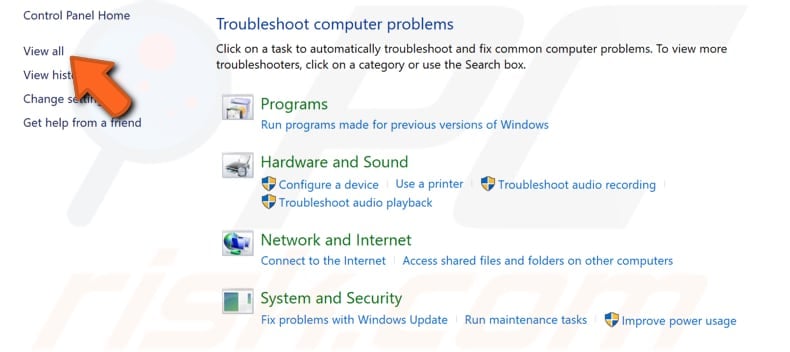
In the Troubleshooting window, find "View all" on the left pane and click on it.
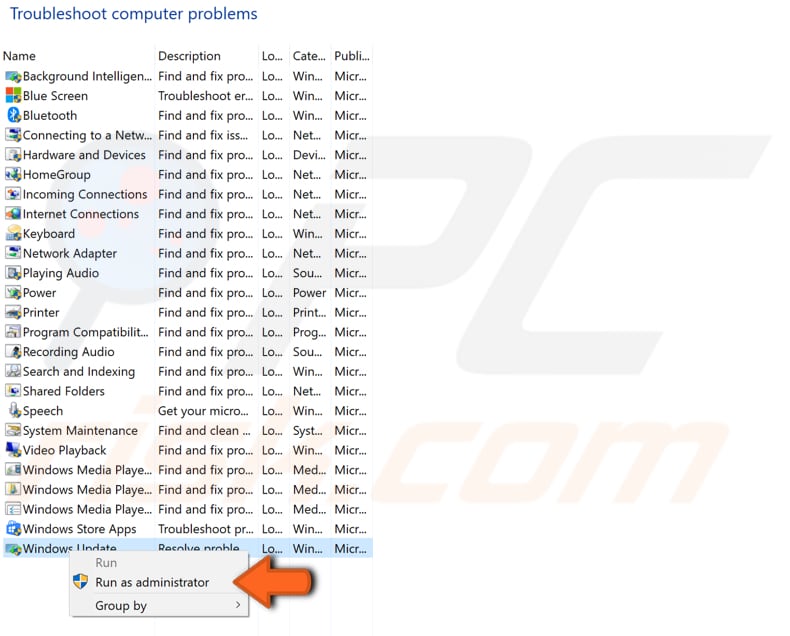
Now you will see a list of computer problems that you can troubleshoot. Find "Windows Update" (It should be the last one on the list) and right-click on it, select "Run as administrator" from the dropdown menu.
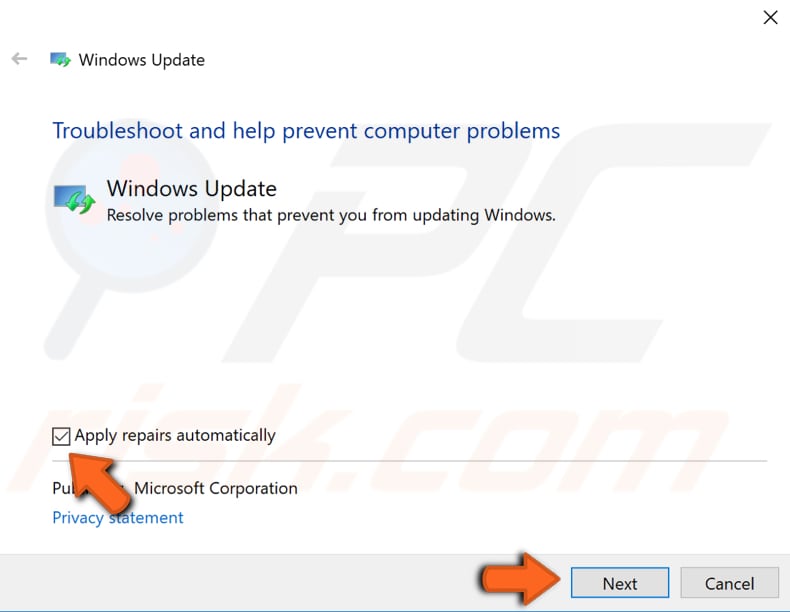
In opened Windows Update window, click on "Advanced" and check the "Apply repairs automatically" checkbox. Click "Next" and follow the instructions on the screen to complete the troubleshooter.
Run SFC and DISM Scan
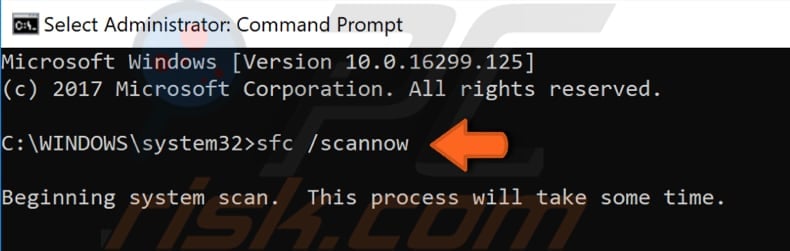
The "sfc /scannow" option is one of the several specific switches available in the SFC command, the Command Prompt command used to run System File Checker. To run it, you need to open Command Prompt first.
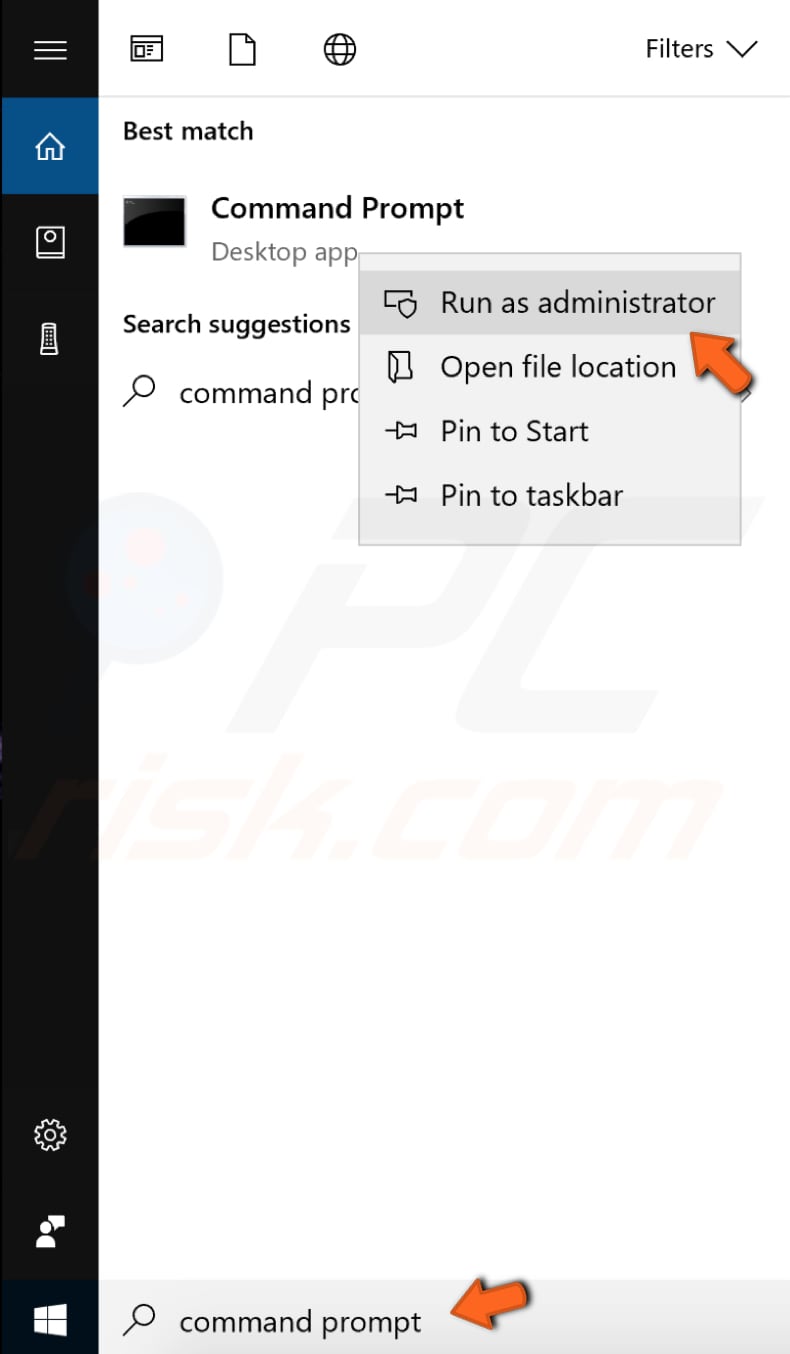
To open it, type "command prompt" in Search and then right-click on the "Command Prompt," select "Run as administrator" from the dropdown menu to run Command Prompt with administrator privileges. You must run an elevated Command Prompt to be able to perform an SFC scan.

In opened Command Prompt window, type "sfc /scannow" and press Enter on your keyboard to execute this command. System File Checker will start, and it should take some time to complete the scan. It should take about 15 minutes. Wait for the scanning process to complete, and then restart your computer.
If the SFC scan did not help fix the problem (or you could not run the SFC scan), try running the DISM scan. DISM stands for Deployment Image Servicing and Management, and it can be used to repair and prepare Windows images, including the Windows Recovery Environment, Windows Setup, and Windows PE.
To run DISM scan, you need to open Command Prompt as administrator again and type in this command: "DISM /Online /Cleanup-Image /RestoreHealth". Press Enter on your keyboard to execute it.
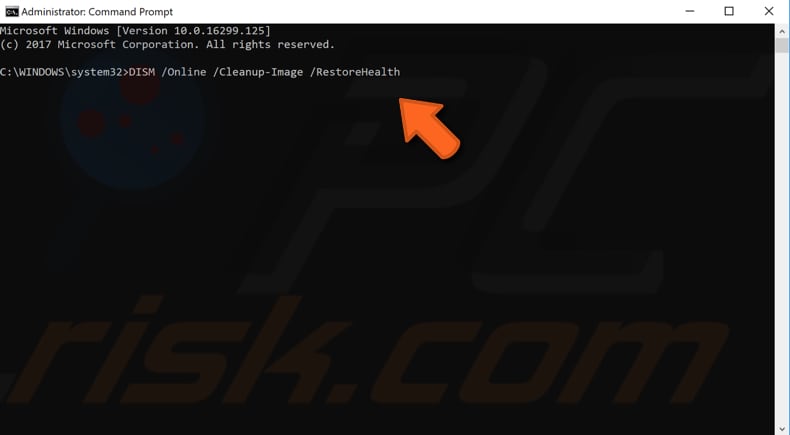
When the DISM scan is finished, check if the problem still persists. If this did not help, then try rerunning the SFC scan if you could not run it the first time.
Fix the Memory Leak Using Registry Editor
A wide variety of advanced settings can only be changed by directly editing the Windows Registry. Some other settings may be accessible through Group Policy – but the Group Policy editor is only included on Professional editions of Windows. The registry allows you to change most settings that can be accessed through Group Policy.
Note: Editing the registry is risky, and it can cause irreversible damage to your installation if you do not do it correctly.
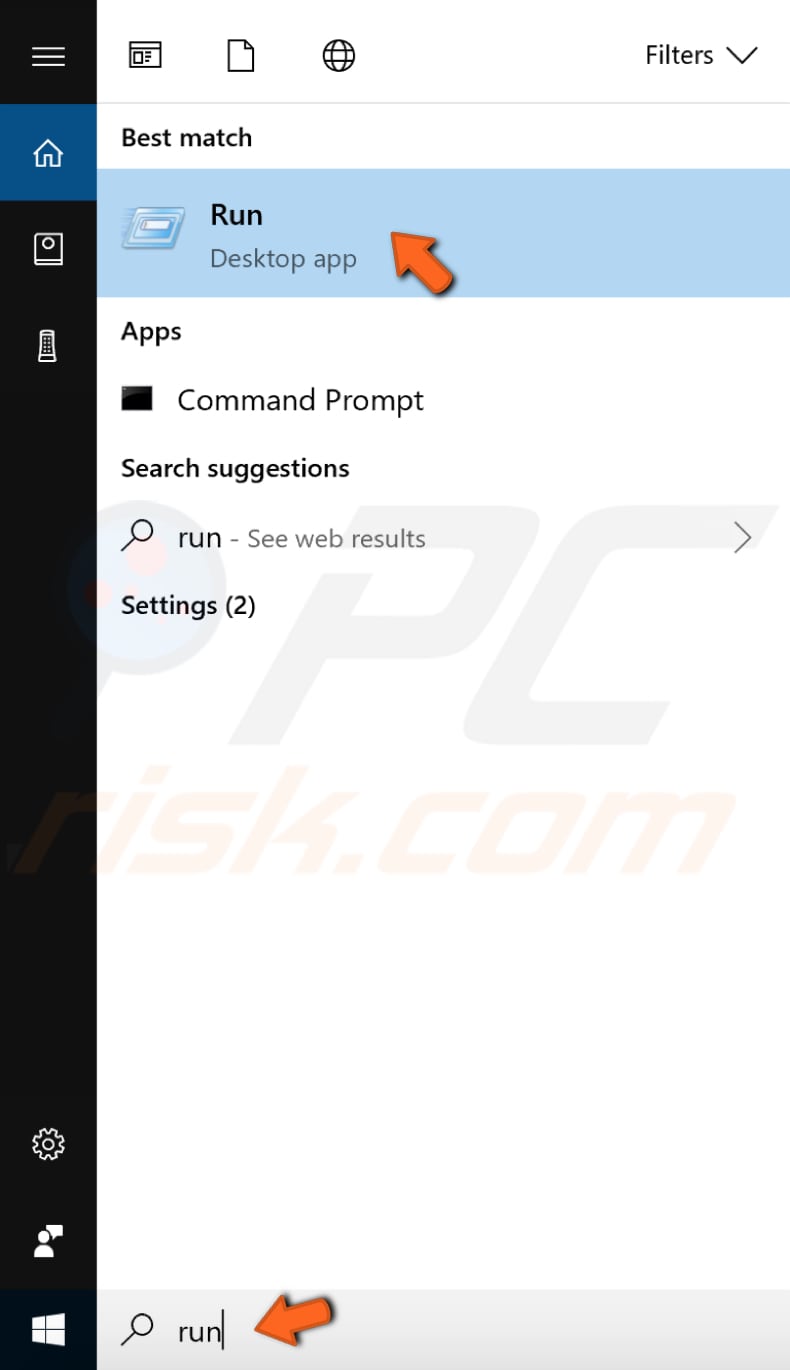
Open the Run dialog box by typing "run" in Search and click the "Run" result.
In the Run dialog box, type "regedit" and click "OK" to open Registry Editor.
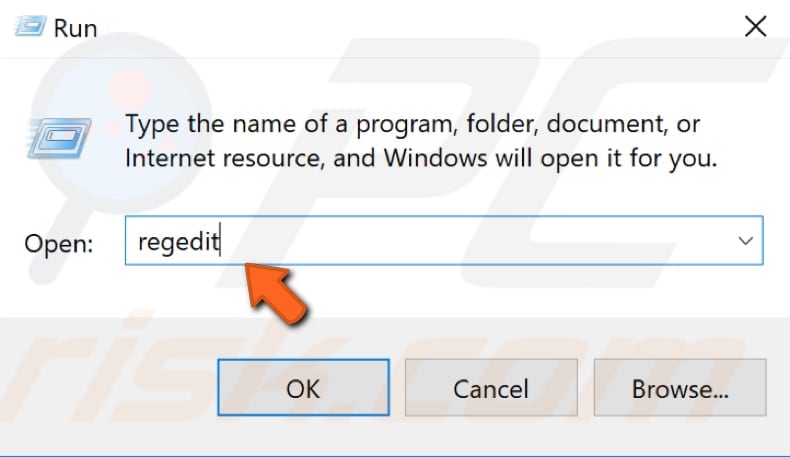
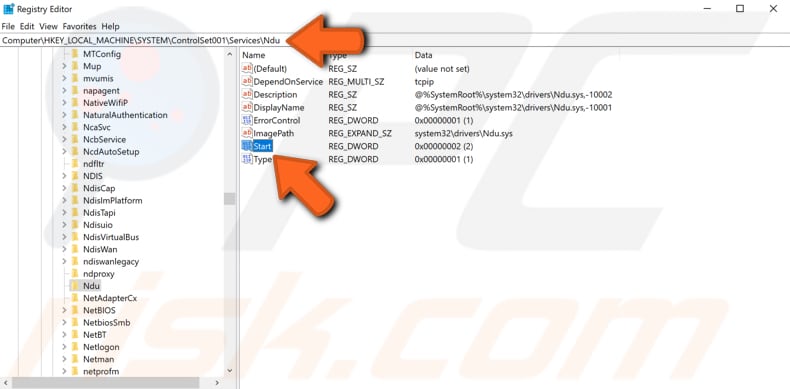
In opened Registry Editor, follow this path: "HKEY_LOCAL_MACHINE\SYSTEM\ControlSet001\Services\Ndu". Once you clicked on "Ndu," double-click the "Start" on the right pane.
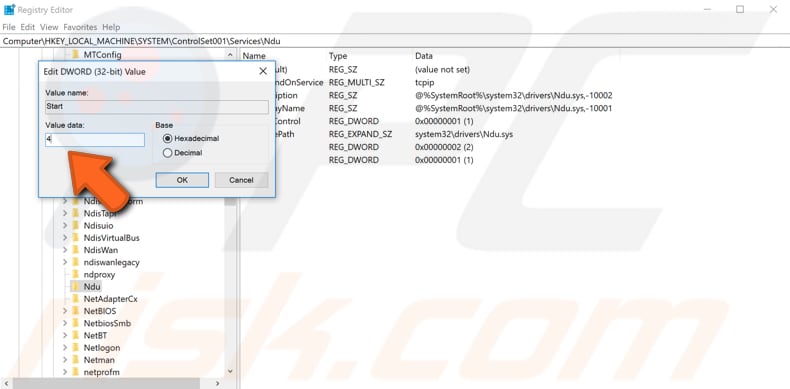
Change "Value data:" to 4 and click "OK." Changing its value will plug the memory leak in the non-paged pool. Close registry editor and restart your computer to see if this helped, and System Host: Local System (Network Restricted) is no longer using too much of your CPU (or Disk).
End SVChost Process
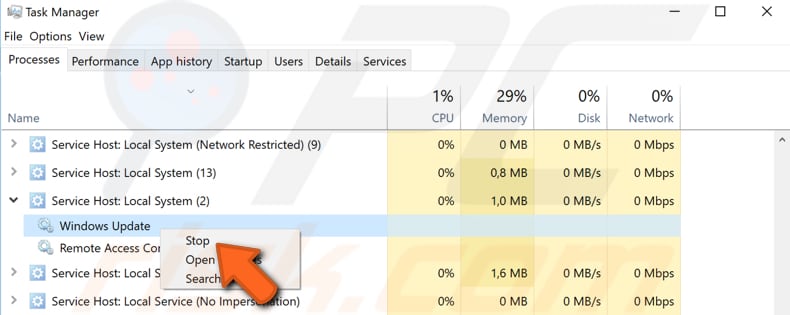
Ending the Service Host process in the Task Manager might solve this issue as well. To open Task Manager, press Ctrl + Alt + Delete on your keyboard or right-click on the Start menu and select "Task Manager."
In the opened Task Manager window, click on "More details" to expand it and see all the running processes. Find the process named "Service Host: Local System." There could be several processes called like this, so find the one which hosts "Windows Update" and the "Update Orchestrator Service".
Select these processes and click "End task" or right-click on the processes one by one and select "Stop" from the dropdown menu.
Perform Clean Boot
When you start Windows using a normal startup operation, several applications and services start automatically and then run in the background. These programs include basic system processes, antivirus software, system utility applications, and other previously installed software.
These applications and services can cause software conflicts. A clean boot is performed to start Windows by using a minimal set of drivers and startup programs. This helps eliminate software conflicts that occur when you install a program or an update or when you run a program in Windows.
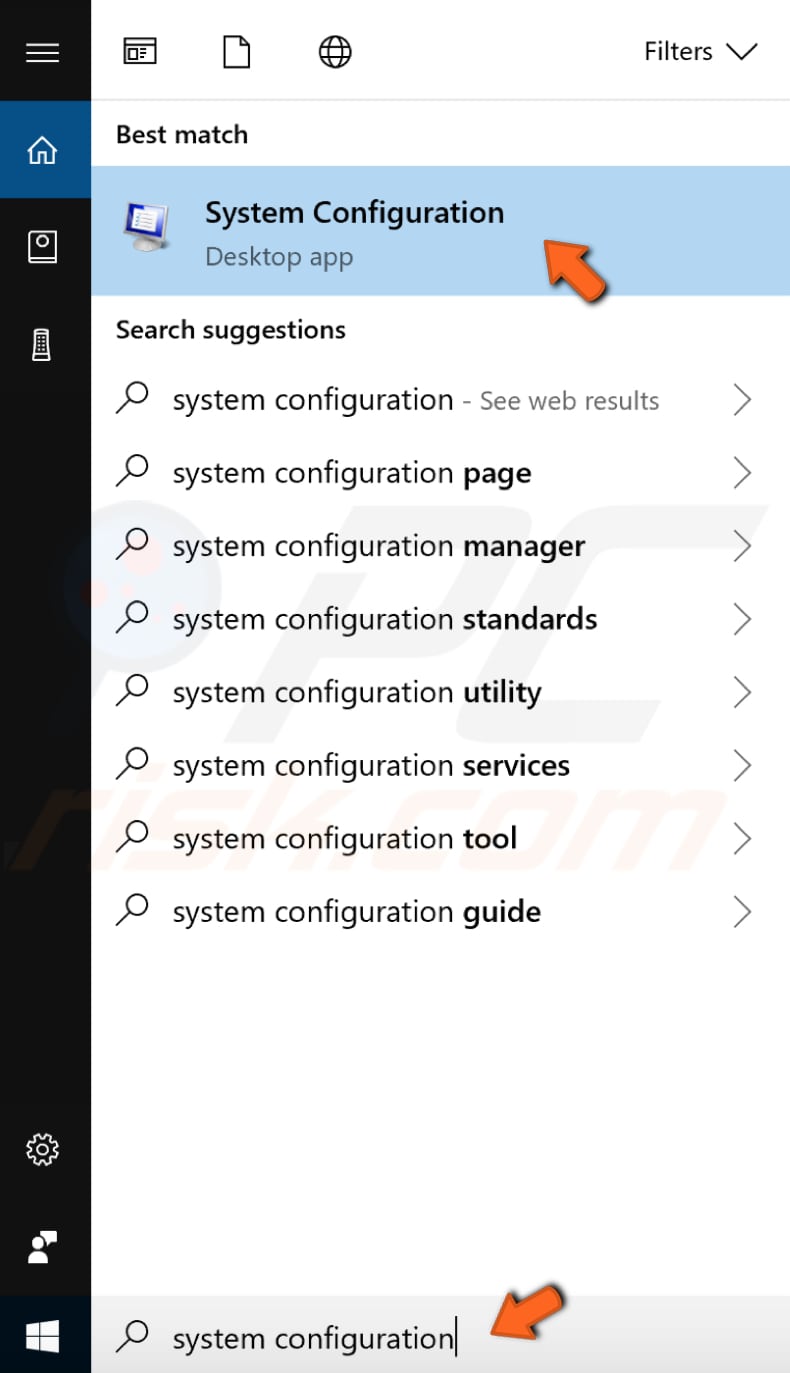
To perform a clean boot, type "system configuration" in Search and click on the "System Configuration" result.
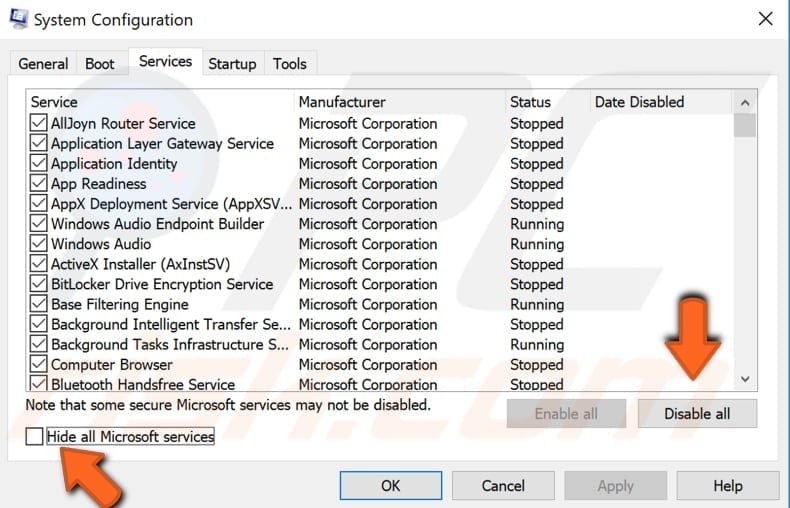
In the opened System Configuration window, click on the "Services" tab and then mark the "Hide all Microsoft services" checkbox. Then click on "Disable all."
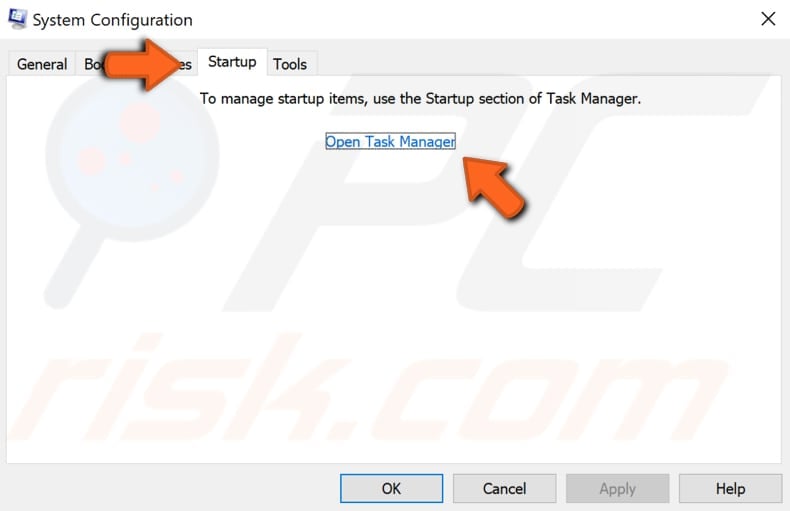
Then click on the "Startup" tab and click on "Open Task Manager."
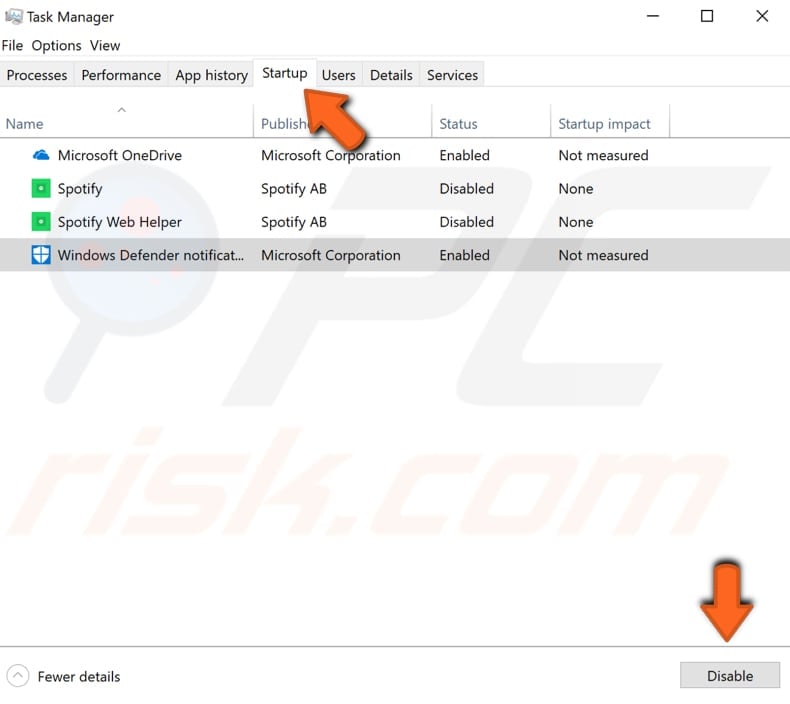
Under Task Manager's Startup tab, select the first application and click "Disable" to disable it. Disable all applications one by one repeating this step. Once you disabled all programs, close Task Manager and click "OK" in the System Configuration's Startup tab and restart your computer to see if this helped fix the issue.
Your computer will run only with default applications and services. If this helped, then it means that one of the disabled applications is causing the error. To find that application, you need to repeat the steps mentioned above, enable startup services and enable applications one by one until you find it. You need to restart your computer after enabling the application or service to apply changes. Once you find the problematic application, you can keep it disabled, update it, reinstall it or totally remove it from your Windows operating system.
Restart Windows Update Service
This is the last method you might want to try out. You will need to restart the Windows Update service using Command Prompt and its commands.
To open Command Prompt, type "command prompt" in Search and then right-click on the "Command Prompt," select "Run as administrator" from the dropdown menu to run Command Prompt with administrator privileges.
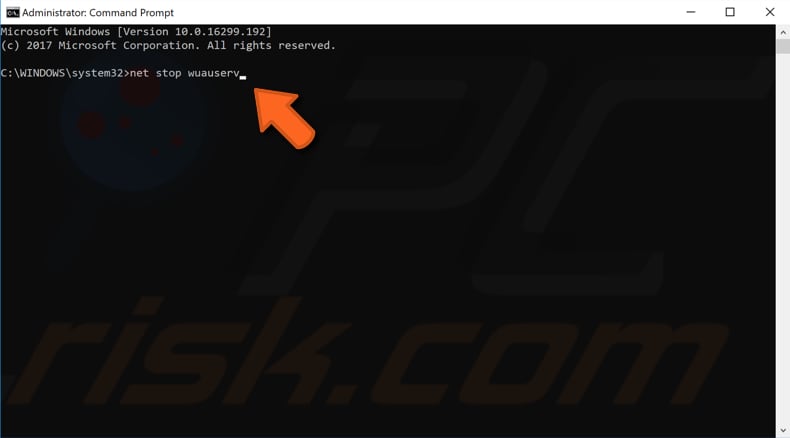
In opened Command Prompt window, type "net stop wuauserv" and press Enter on your keyboard, then type "net stop bits" and press Enter on your keyboard again to execute these commands.
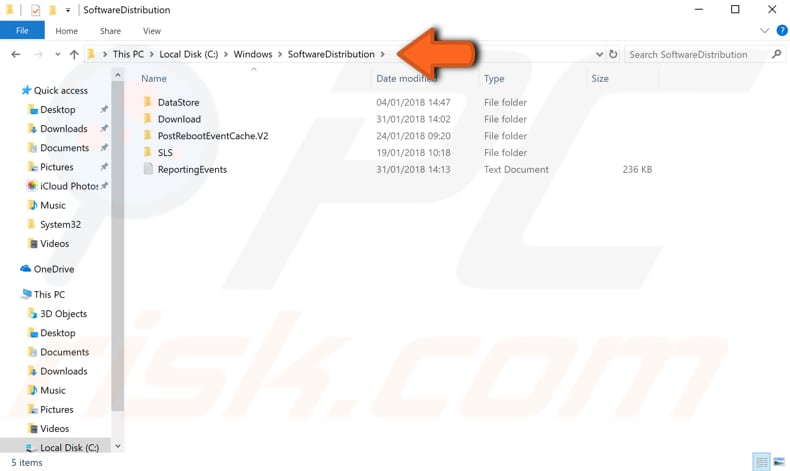
Minimize Command Prompt window (do not close it) and go to File Explorer and follow this path: "Windows > SoftwareDistribution". Delete all files that are on the SoftwareDistribution folder.
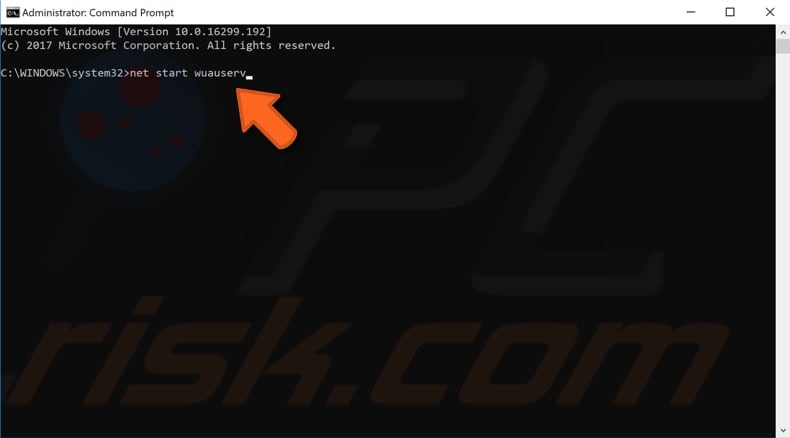
Go back to the Command Prompt window and type in these commands: "net start wuauserv" and "net start bits". Press Enter on your keyboard after entering each command.
That's all we have for now. We hope that at least one of the methods helped you reduce the CPU or Disk usage for "Service Host: Local System (Network Restricted)" services, and you can now normally use your computer without any problems.
Share:

Rimvydas Iliavicius
Researcher, author
Rimvydas is a researcher with over four years of experience in the cybersecurity industry. He attended Kaunas University of Technology and graduated with a Master's degree in Translation and Localization of Technical texts. His interests in computers and technology led him to become a versatile author in the IT industry. At PCrisk, he's responsible for writing in-depth how-to articles for Microsoft Windows.
▼ Show Discussion