How to Speed up Your Computer?
Get Free Scanner and check your computer for errors
Fix It NowTo fix found issues, you have to purchase the full version of Combo Cleaner. Free trial available. Combo Cleaner is owned and operated by Rcs Lt, the parent company of PCRisk.com read more.
How to Speed up Your Windows 7 and Windows 10 Computer?
Do you suspect your Windows 7 or 10 computer is running slow? What are the possible techniques to speed it up? This article shows some techniques and tools to speed up computers running Windows 7 and 10.
Do you suspect your Windows 7 or 10 computer is running slow? What are the possible techniques to speed it up? This article shows some techniques and tools to speed up computers running Windows 7 and 10.
Poor performance can make you feel dissatisfied working with your computer, especially if it has deteriorated from its original state. There are many reasons for performance problems. To improve this situation, you need to find the possible reasons affecting performance.
This could be hardware resources that are inadequate to run the latest Windows installations or application programs. For example, you might need to add additional RAM (Random Access Memory) to your machine or install a higher capacity hard disk, SSD (solid-state disk), etc.
Similar to hardware, the software is also responsible for the performance of your computer. You might have too many software programs installed and running simultaneously that even powerful hardware is not capable of handling. Or you might need to perform system maintenance or change its configuration.
Video Showing How to use Windows Disk Cleanup Utility in Windows 10:
Table of Contents:
- Introduction
- Find Programs Consuming Most of Your PC Resources
- Use Windows Resource Manager to Find Out More about Bottlenecks of Your System
- Windows Performance Monitor for Experienced Users
- Disk Cleanup
- Defragment Your Hard Disk
- Disable Or Tune Search Indexing
- Manual Removal Of Unnecessary Programs
- Remove Startup and System Tray Programs
- Removing Malware, Adware, etc.
- Select A Proper Power Plan
- Reduce Windows Animations Display
- Disconnect Tipping
- Video Showing How To Speed Up Your Computer
Download Computer Malware Repair Tool
It is recommended to run a free scan with Combo Cleaner - a tool to detect viruses and malware on your device. You will need to purchase the full version to remove infections. Free trial available. Combo Cleaner is owned and operated by Rcs Lt, the parent company of PCRisk.com read more.
Find Programs Consuming Most of Your PC Resources
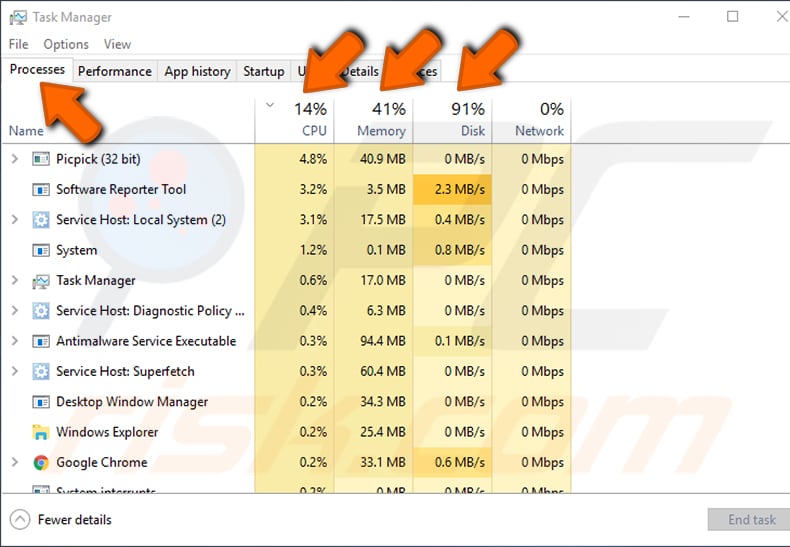
To view details of programs consuming computer resources (including CPU load, Memory, and Disk), start the Task Manager utility by pressing Ctrl+Alt+Del and selecting "Task Manager" in the menu. Alternatively, go to Windows Start and type "task manager."
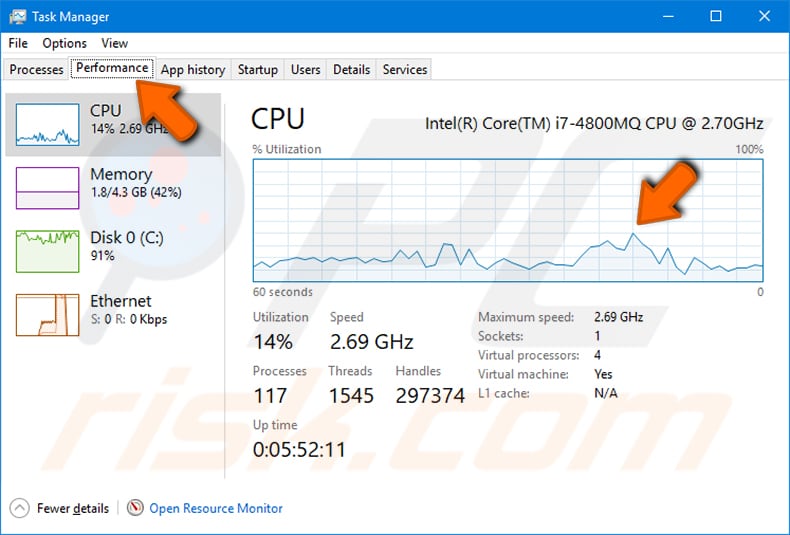
To see computer performance, click "Performance."
Use Windows Resource Monitor to Find Out More about Bottlenecks of Your System
From the Task Manager Performance tab, start the "Resource Monitor" utility by pressing "Open Resource Monitor" at the bottom of the Window.
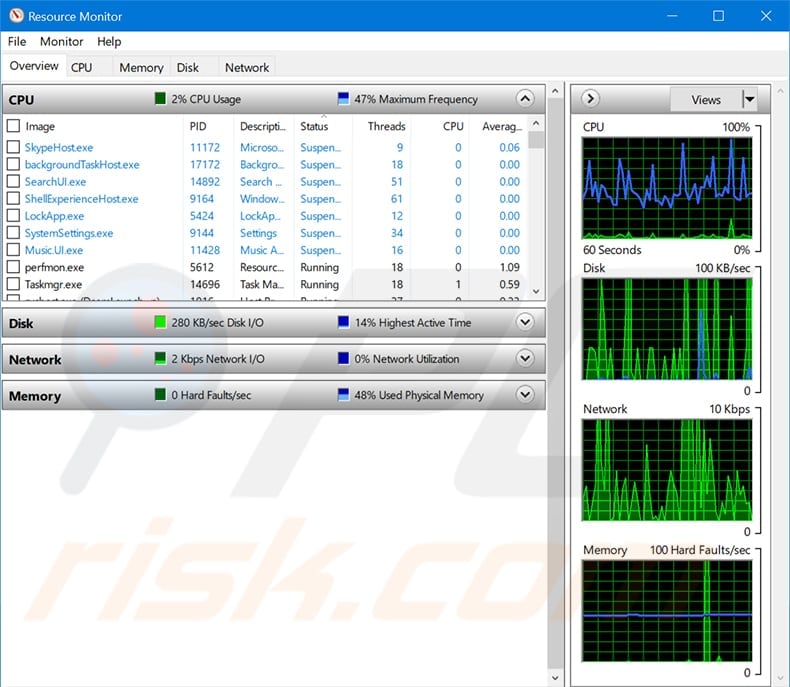
In the Resource Monitor window, choose the "CPU," "Memory," "Disk," or "Network" tabs to discover which programs load the corresponding resources most heavily. For instance, see how much of your physical memory is utilized by software processes and which of them consume the largest amount of memory. You can locate memory-hungry programs and stop them to free up memory. The charts on the right side of the Resources Monitor window show memory consumption trends in time. The impact of launching and stopping particular programs on memory utilization can be seen in real-time on these charts.
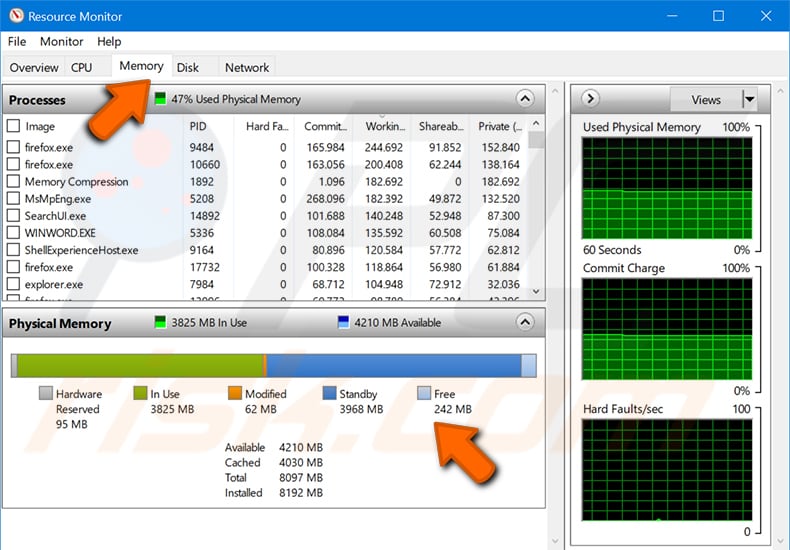
In Windows 7 and 10, the memory system comprises physical semiconductor DRAM memory (computers are usually equipped with 4 GB, 8 GB, 16 GB, etc. RAM memory) and a page file system allocated on the hard disk. If you have many programs launched that require more memory than physical RAM memory will allow, then a much slower hard disk hosted memory system comes into use. This obviously causes an overall system slowdown. But how do you know that you need more RAM memory to buy and install on your machine? One hint is to observe the "Hard Faults" column in the "Processes" table of the Memory tab in Resources Monitor. It is normal to have a few Hard Fault occurrences. Indeed, these indicate how intensively your hard disk located memory is used. If, however, the instances of Hard Faults become larger, i.e., swapping data from physical and hard disk located memory takes place much more frequently, then perhaps you should consider increasing the computer's physical memory. Conversely, a small amount of free memory available does not necessarily mean that you will benefit from more physical memory.
Windows Performance Monitor for Experienced Users
Perhaps the most comprehensive tool for identifying PC performance issues is Windows 10's Performance Monitor. To open it, search for "Performance Monitor" in Start and then click the result. In the first Performance Monitor window, you will see a summary of Memory, Network adapter, Physical Disk, and Processor Information.
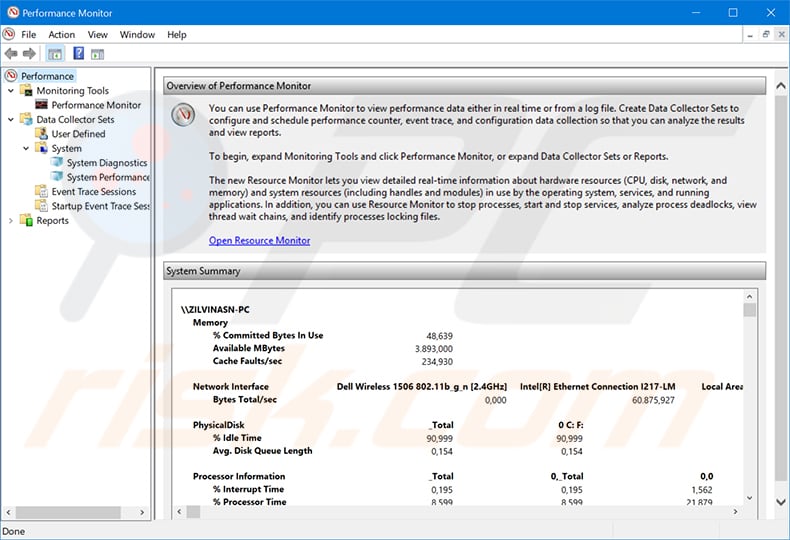
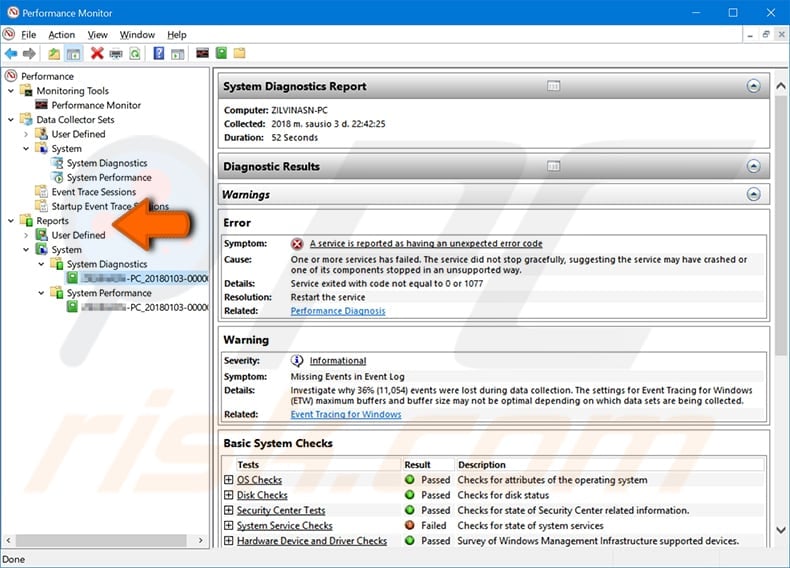
System Diagnostics and System Performance (available at Data Collector Sets and System in the left panel of Performance Monitor) can be started from the drop-down menu. After stopping System Diagnostics and System Performance, corresponding reports will be generated and placed into the Reports area. Exploring reports may require some level of expertise in computer systems and operating systems. These contain detailed information regarding your system health and ability to run software on your existing hardware, all of which strongly relate to the performance of your system and user experience.
Disk Cleanup
It is advisable to periodically run the Windows disk clean-up utility to keep your hard disk free from accumulating too many temporary installation and other files. Also, clean up your system files - click the "Clean up system files" button and wait for the 'Calculating and Scanning' process to complete. Depending on the status of your Windows system, this process takes some time.
Defragment Your Hard Disk
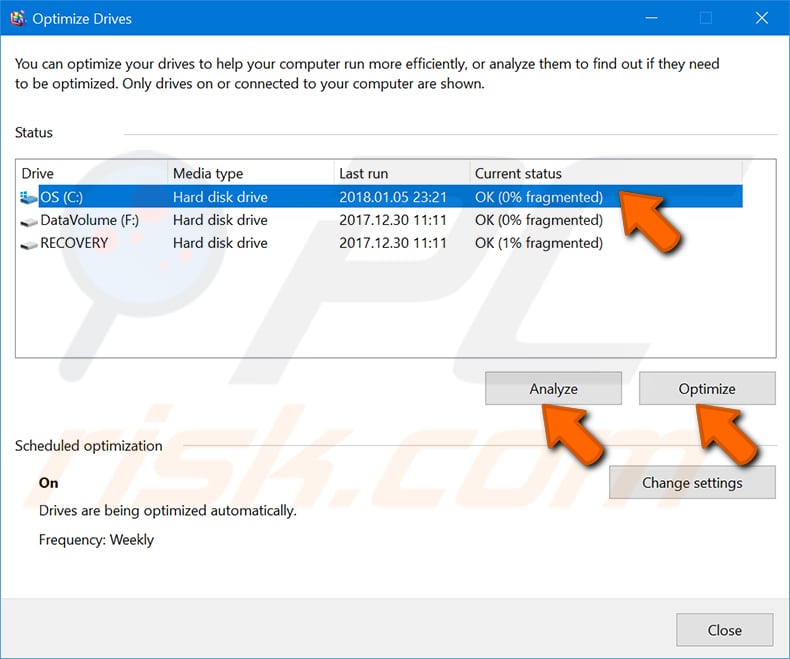
Fragmentation of file systems on hard disks used to be a strong reason for reduced computer performance. In Windows 7 and 10, defragmentation is performed in the background automatically once per week. To verify that your hard disk is defragmented and optimized, go to Start, type "defrag," and then select "Defragment and optimize Drives." The image below shows hard drives C: and F:, both 0% fragmented. This means they are defragmented. If you see a disk with fragmentation, for example, higher than 5%, click Optimize to run defragmentation on that drive. SSD-type drives do not require defragmentation.
Disable Or Tune Search Indexing
Windows 7 and 10 implement file indexing to speed up search functions. Sometimes, however, indexing itself may be the reason for computer performance reduction. You may consider an option to disable indexing and then check if your computer performance improves. To do this, open Windows Explorer, right-click the drive of interest and click "Properties" in the drop-down menu of the selected drive. In the General tab, uncheck "Allow files on this drive to have contents indexed in addition to file properties."
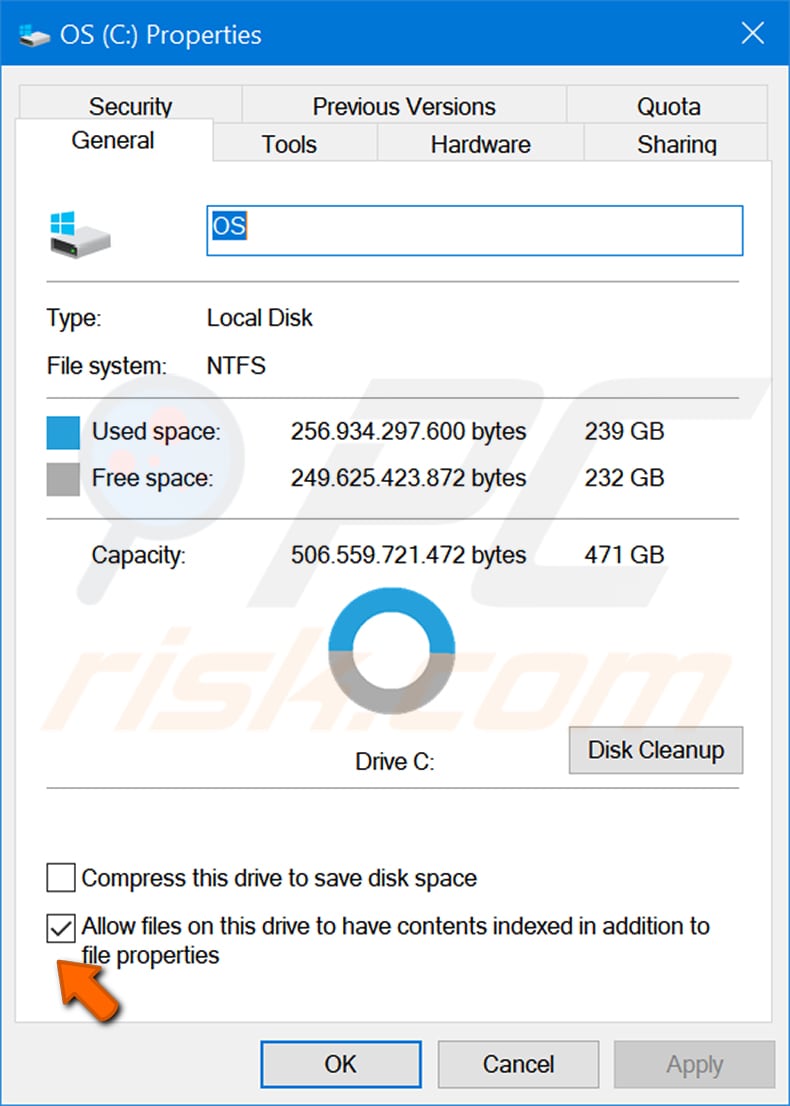
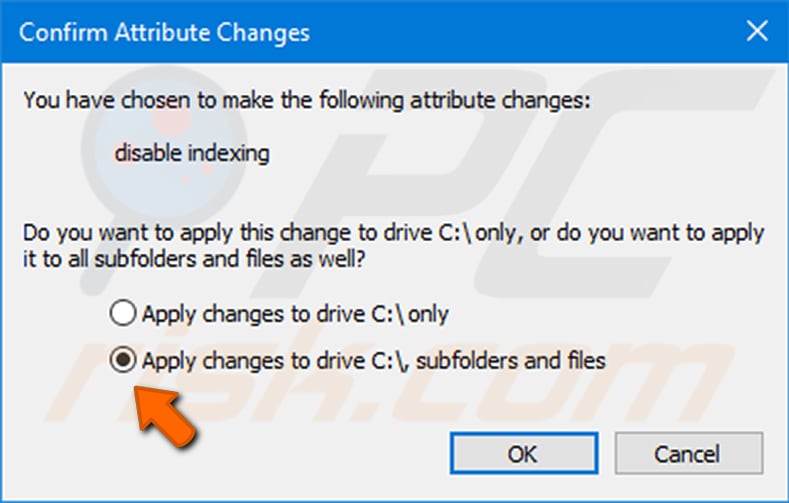
When you click the "Apply" button, a warning window will pop up. Select the option, "Apply changes to drive C:\, subfolders and files."
More options for tuning Windows indexing service can be accessed by typing "indexing" in the Start search field and selecting "Indexing Options."
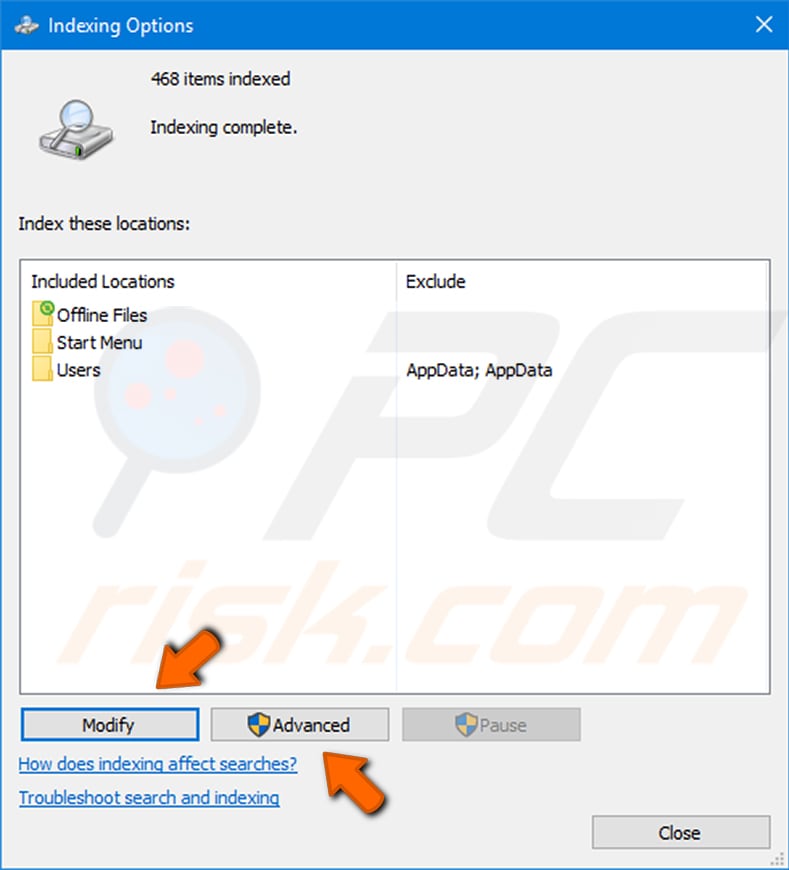
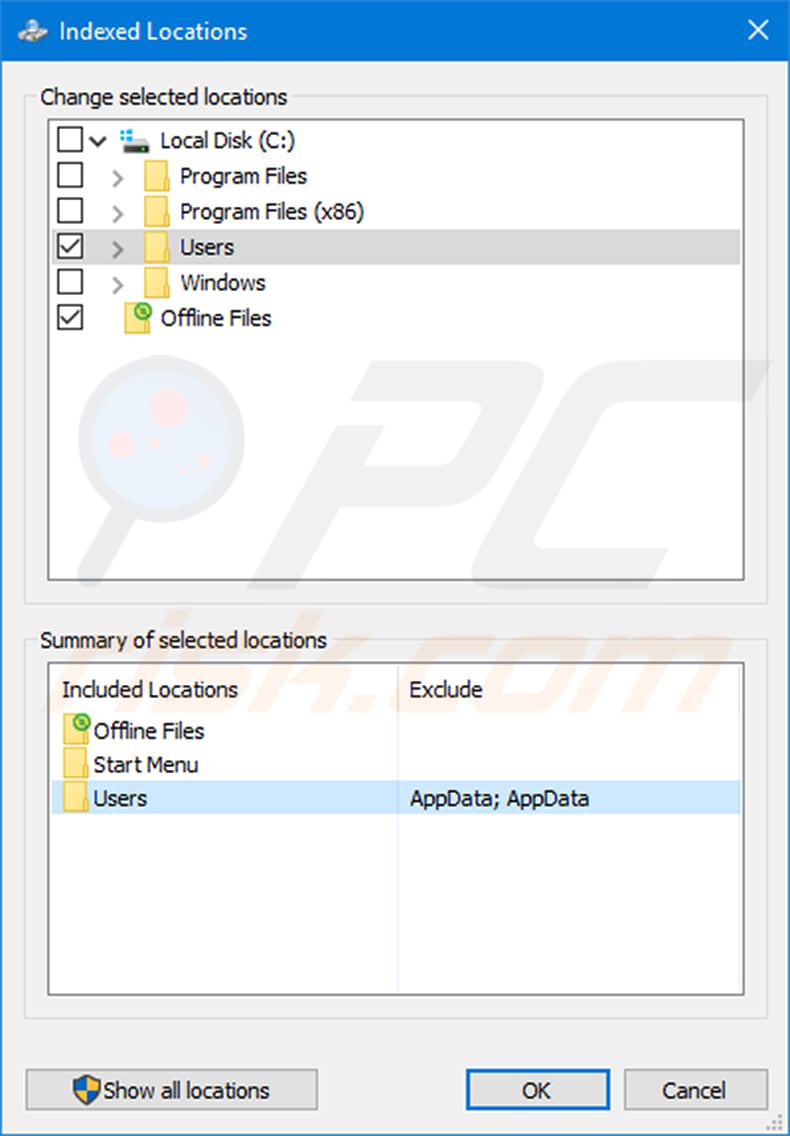
Press the "Modify" button to open the "Indexed Locations" configuration window. Select which disk locations you want to index for faster searching and which to disable for indexing.
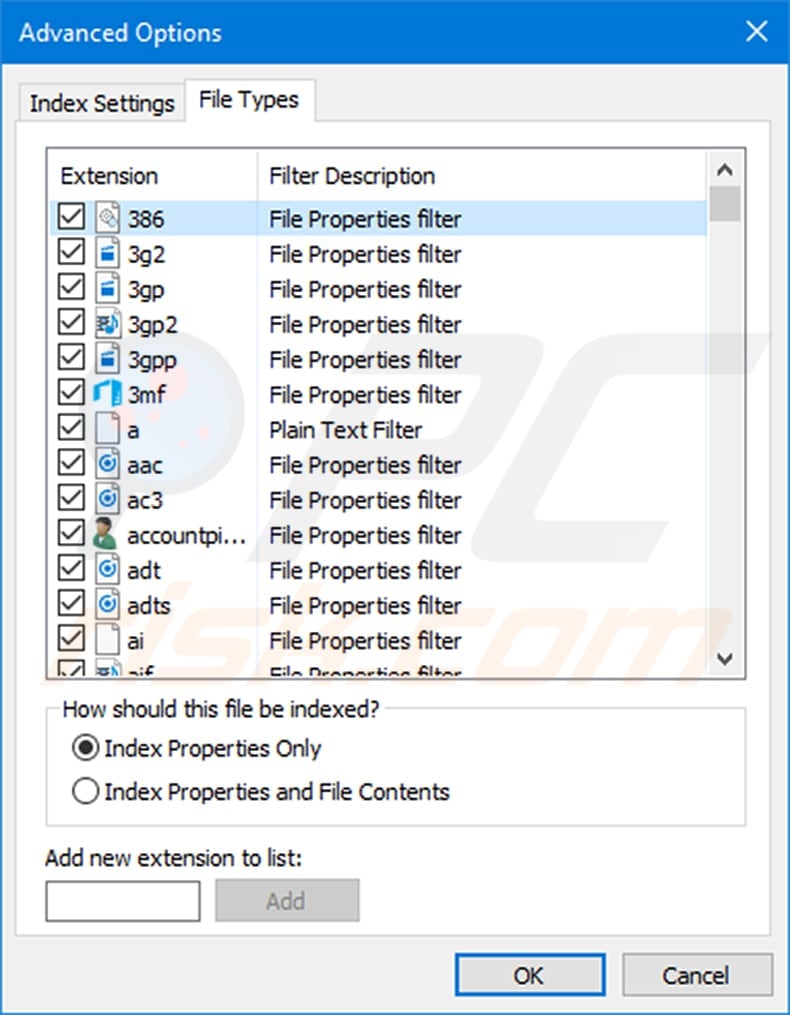
Opt-in the file types to index in the "File Types" tab of the "Advanced Options" window, which is opened by clicking the "Advanced" button in the "Indexing Options" window.
Manual Removal Of Unnecessary Programs
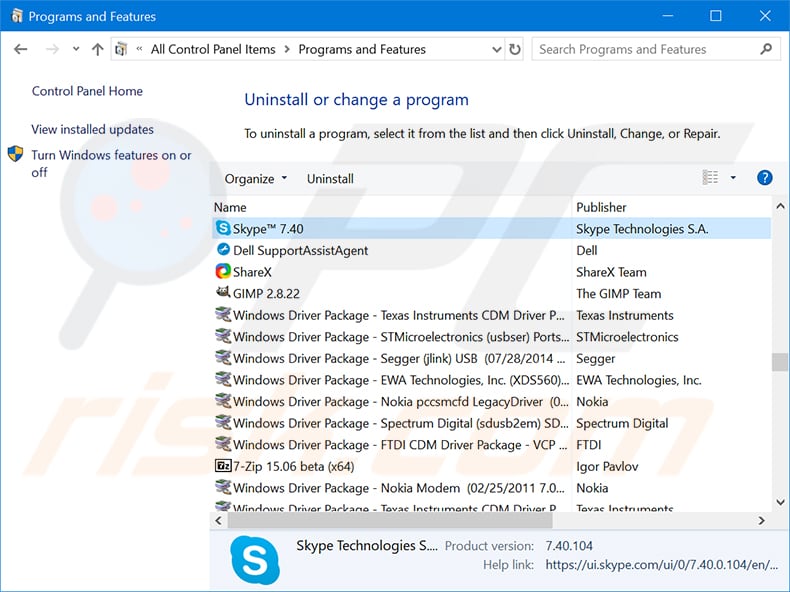
Unwanted and unnecessary software often installed and activated on your PC without your knowledge is called bloatware, malware, adware, etc. Regardless of what these programs do, they consume computer resources, leaving what remains for your work or entertainment. Therefore, removing all unwanted and unnecessary software will improve performance and the overall experience of using your computer. The full list of programs installed in Windows can be accessed by navigating to Start/Control Panel/Programs and Features and choosing "Uninstall" in the drop-down menu of the item you wish to uninstall. It might be necessary to restart your computer to finalize the uninstall process of some programs.
Remove Startup and System Tray Programs
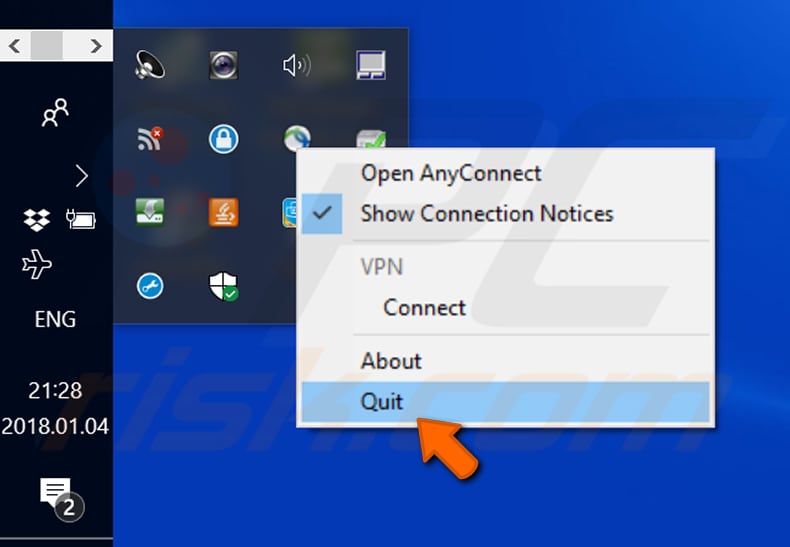
It is advisable to review Windows start-up programs and disable any not required permanently. Another area to reveal running programs that also consume computer resources is the System Tray. System Tray programs are accessible by clicking the arrow icon in the Windows Toolbar. You can often unload the selected program by choosing the "Quit" (or similar) item in the drop-down menu. The drop-down menu pops up when you position a mouse over the program icon and click the left mouse button. The image below shows how to stop "Cisco VPN client" from System Tray.
Removing Malware, Adware, etc.
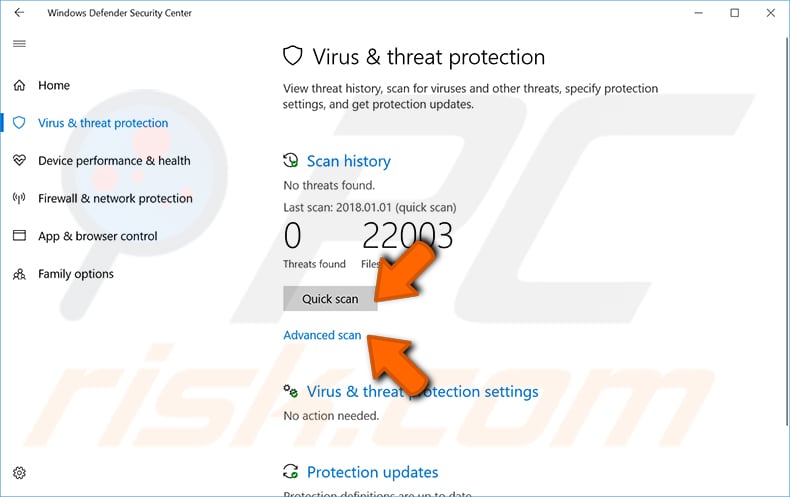
You may see programs installed and running but find it difficult to know if they are required by your system or they (for example) represent malware. In this case, running adware/malware removal tools is recommended. Start with Windows 10's built-in Windows Defender. From the Start menu, run "Windows Defender Security Center" and select "Quick" or "Advanced Scan." Windows Defender will scan your system and remove malware. It is also wise to run an alternative anti-malware utility.
Select A Proper Power Plan
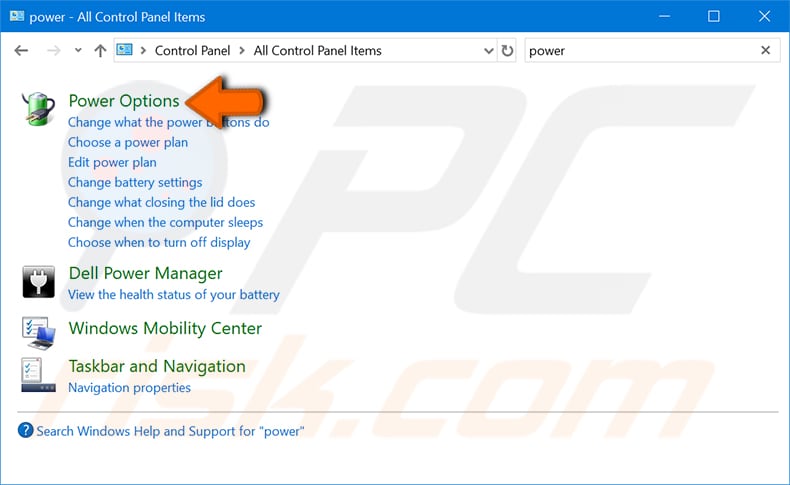
Select "High Performance" or "Balanced plan" to prioritize computer performance over battery saving.
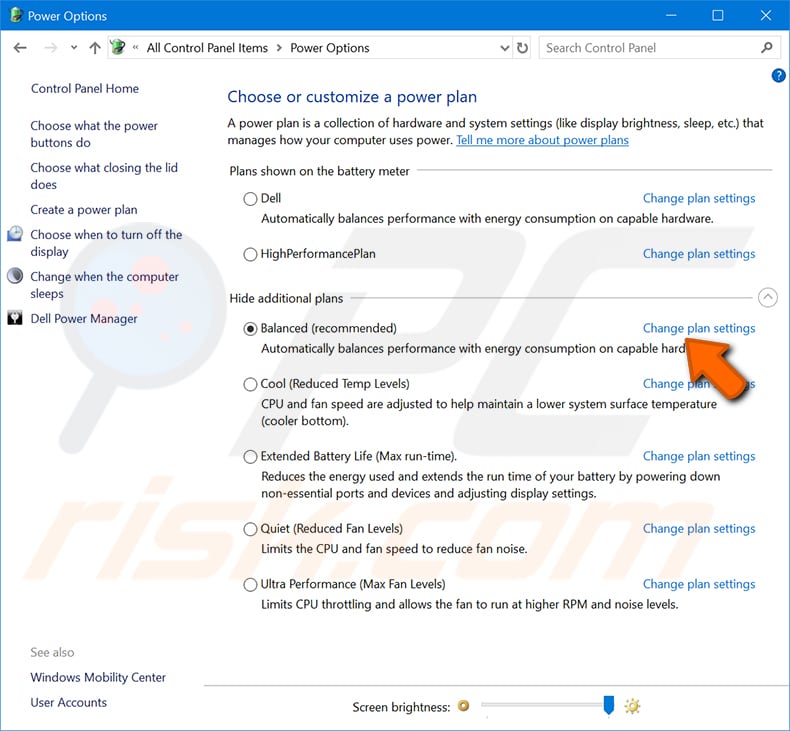
Click "Change plan settings" to edit plan settings.
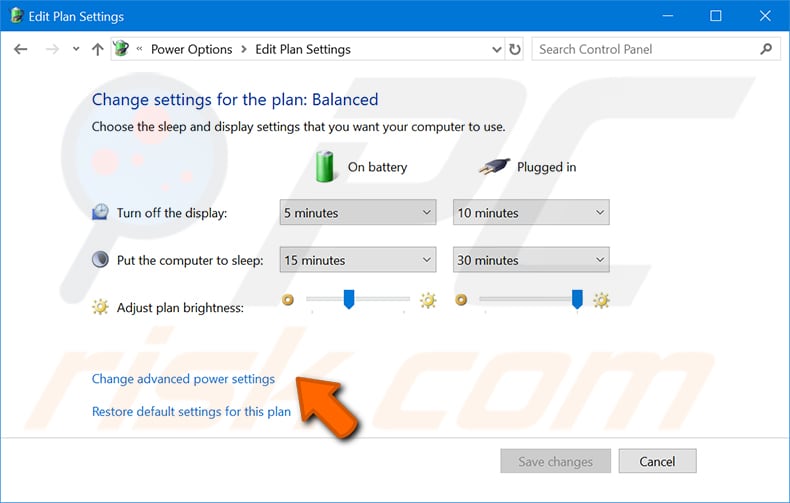
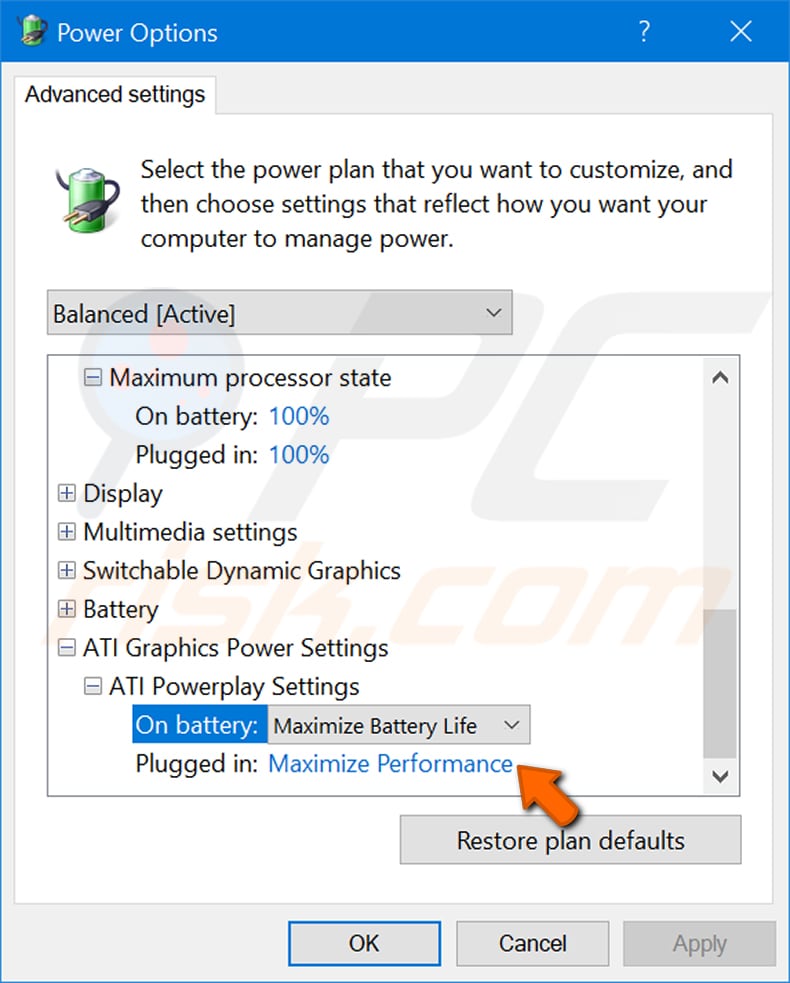
In Edit Plan Settings, click "Change advanced power settings." In the Power Options window, explore various settings. Most options have two sub-options: 1) power supply from battery [On Battery]; 2) power supply from mains electricity [Plugged in]. Some of these options are related only to system power-saving issues. For example, when to turn off the display (which does not affect computer performance), but some are intended to define utilization of hardware resources dependent on the connected power supply of your computer or laptop (battery or grid). Sometimes, you might experience that performance is worse when powered by the battery. Therefore, we recommend running from mains to achieve higher PC performance.
Reduce Windows Animations Display
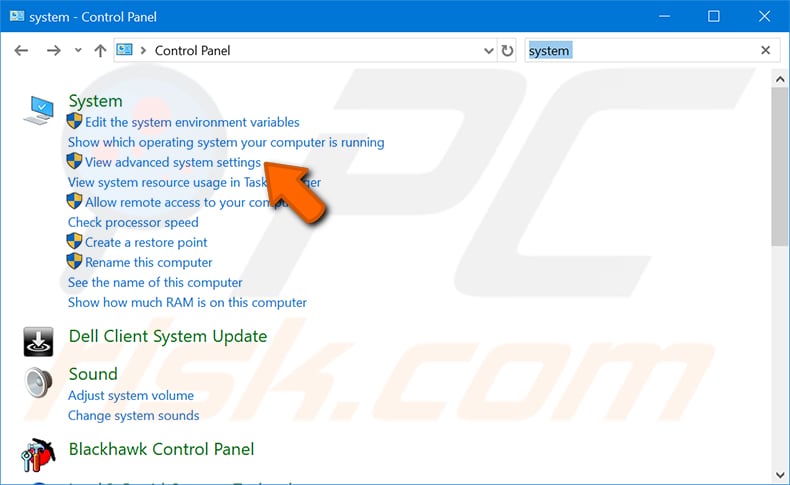
Windows uses some visual effects such as animations, which may slightly impact the performance of your computer. To select which of these to disable, go to Start and Control Panel, and then type "System" in the search box. Select "View advanced system settings" under the System menu list.
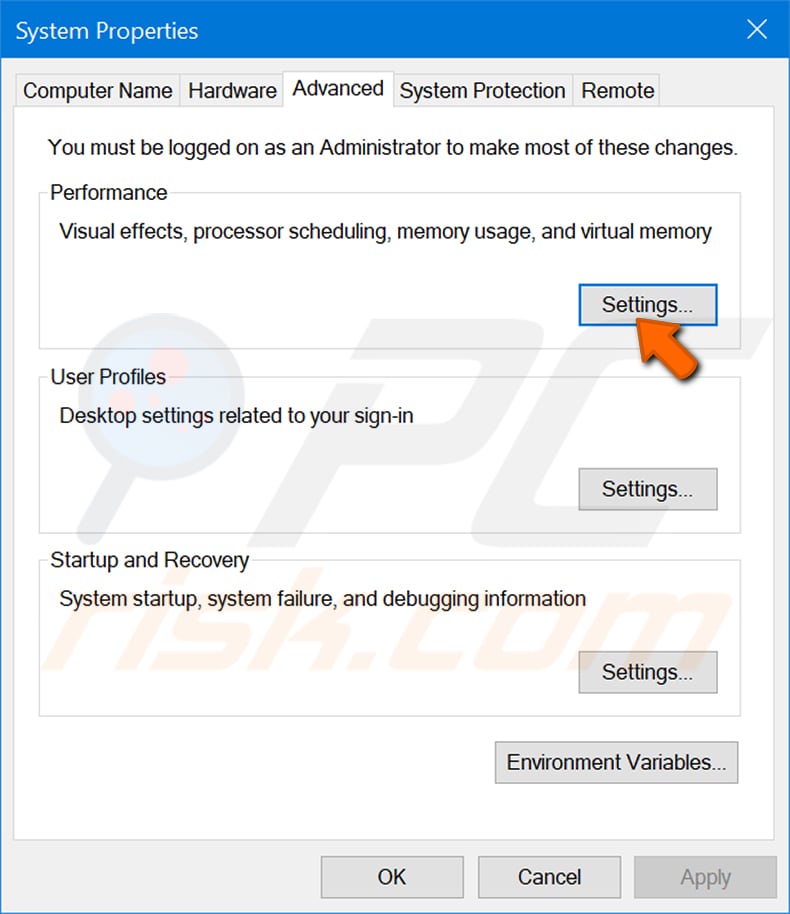
In the System Properties window, choose the "Advanced tab and click Settings…" button in the Performance panel.
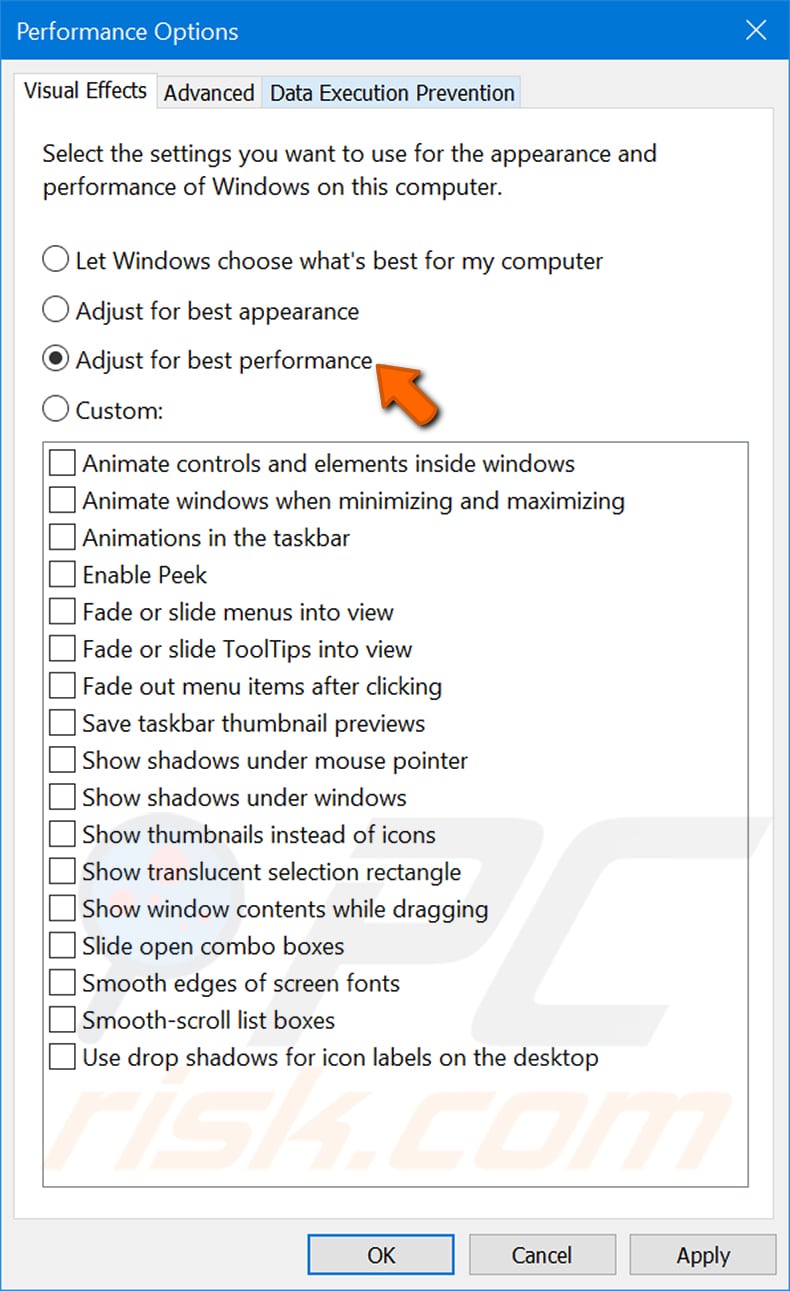
Choose the "Visual Effects" tab in the Performance Options window and check the "Adjust for best performance" option. Confirm your selection by clicking OK or the Apply button.
Disconnect Tipping
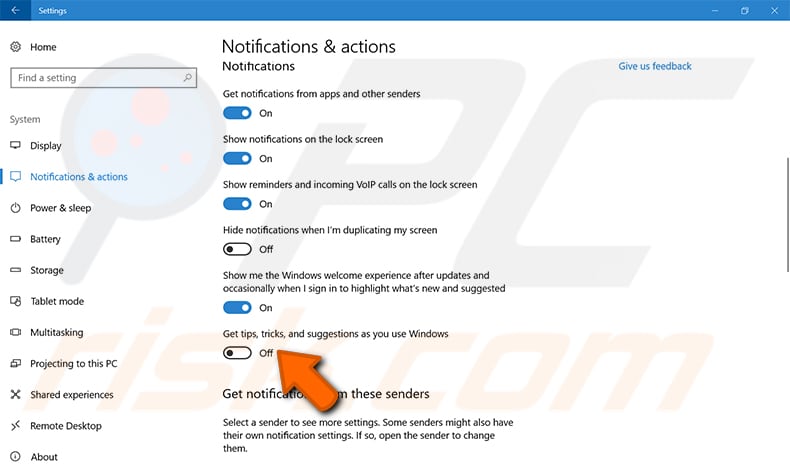
To turn off Windows 10 tips, go to Start / Settings / System / Notifications & actions and select the "Off" for the "Get tips, tricks and suggestions as you use Windows" option. Disabling this option might slightly increase your system performance.
Share:

Rimvydas Iliavicius
Researcher, author
Rimvydas is a researcher with over four years of experience in the cybersecurity industry. He attended Kaunas University of Technology and graduated with a Master's degree in Translation and Localization of Technical texts. His interests in computers and technology led him to become a versatile author in the IT industry. At PCrisk, he's responsible for writing in-depth how-to articles for Microsoft Windows.

▼ Show Discussion