How to Backup and Recover Files in Windows 10?

Get Free Scanner and check your computer for errors
Fix It NowTo fix found issues, you have to purchase the full version of Combo Cleaner. Free trial available. Combo Cleaner is owned and operated by Rcs Lt, the parent company of PCRisk.com read more.
How to Backup and Recover Files in Windows 10 Using System Tools?
We should all be concerned about protecting our data, especially when we store important photos, documents, or other sensitive files of any format on our computers. Backing up files is a simple process that can help you to avoid data loss. In this article, we look at Windows backup and recovery tools and show you how they work.
Even if you take precautions to protect your computer from malicious software and other threats that could destroy your data permanently, there is still a chance that hardware failure, errors, or other problems may occur. And, to restore your data without a backup could take time and expense, given that it's at all possible.
Backing up files can help you to avoid data loss. It involves making copies of your valuable files and storing them in a safe place.
Windows 10 includes several tools for backup and recovery of your data. File History is the primary backup tool in Windows 10, which can fully back up and restore previous versions of your files.
It also includes the Backup and Restore utility, allowing you to make selective or full backups and creating an image file. Windows also offers recovery and the ability to reset Windows to its default settings fully.
Video Showing How to Backup and Recover Files in Windows 10:
Table of Contents:
- Introduction
- Backup Using Backup And Restore
- Backup Using File History
- Backup Using System Image Backups
- Backup Using OneDrive
- Recovery Using System Restore
- Recovery Using Drive Creator
- Recovery Using Advanced Startup Options
- Recovery Using Reset This PC
- Video Showing How to Backup and Recover Files in Windows 10
Download Computer Malware Repair Tool
It is recommended to run a free scan with Combo Cleaner - a tool to detect viruses and malware on your device. You will need to purchase the full version to remove infections. Free trial available. Combo Cleaner is owned and operated by Rcs Lt, the parent company of PCRisk.com read more.
Backup Using Backup and Restore
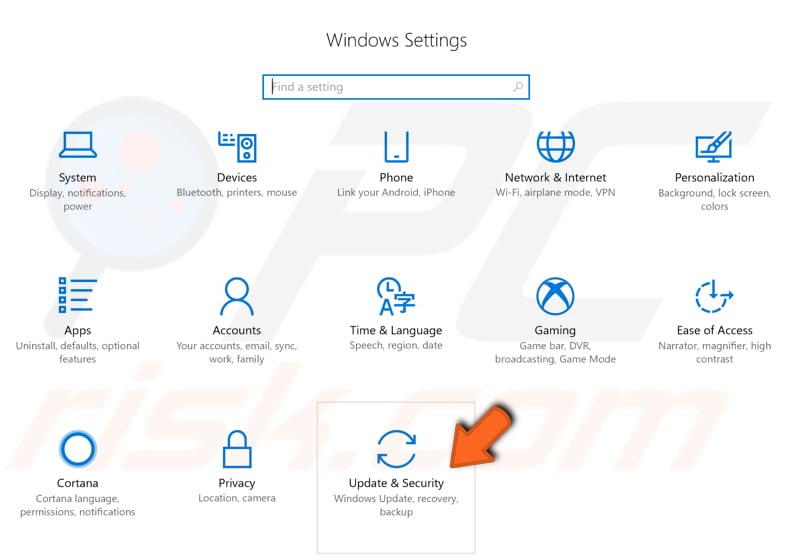
Backup and Restore is a tool from Windows 7, but you can also use it to back up your Windows 10 system. It also allows you to restore your backups from Windows 7 onto a Windows 10 system. This tool is easy to use, and you can create a backup of almost anything on your hard drive. You can find this tool in your Windows 10 settings. First, go to Start and click the Settings icon.

In the Windows Settings window, click "Update & Security."
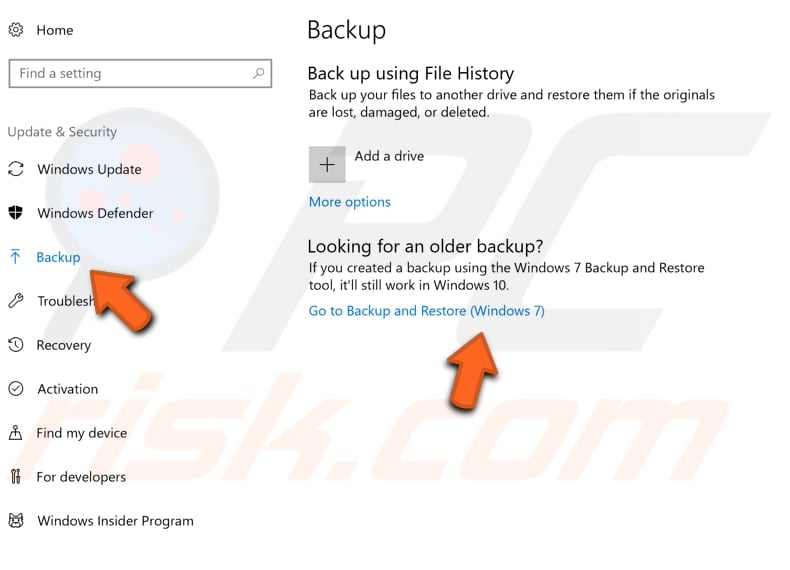
 Click "Backup" on the left side of your window. In "Backup," click "Go to Backup and Restore (Windows 7).
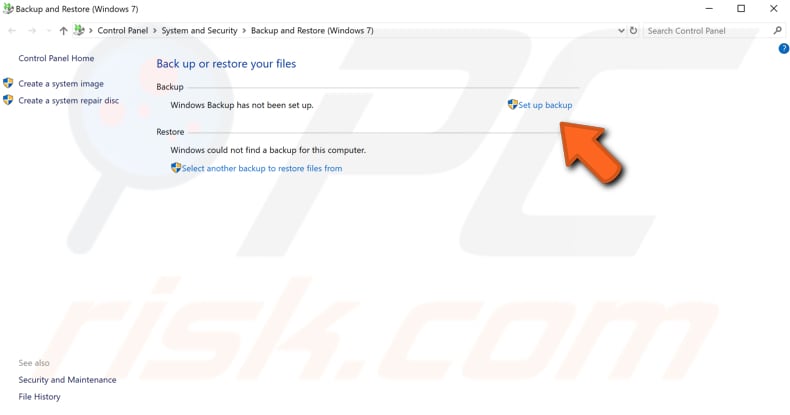
 To start creating your backup, click "Set up backup" on the right.
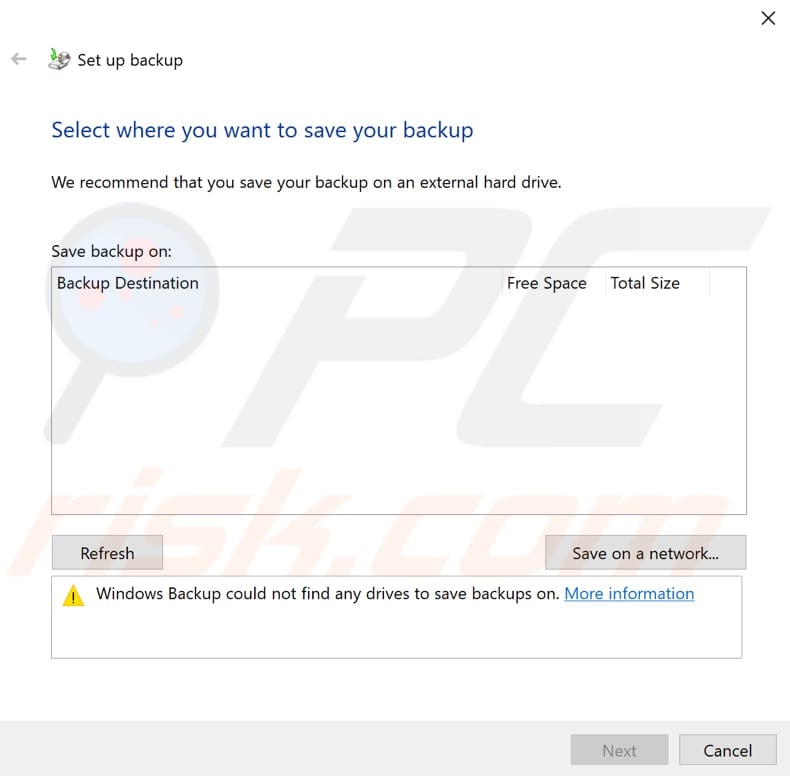
Select where you wish to save your backup file. Windows recommends that you save your backup on an external hard drive. Ensure that your external drive is connected (or inserted), choose it as the backup destination, click "Next," and then follow the instructions.
Backup Using File History
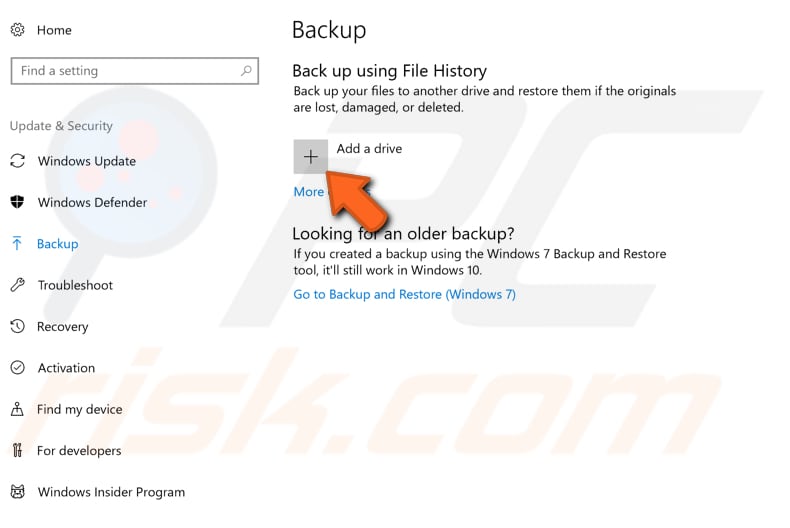
File History is a primary built-in tool in Windows 10. It does not create a full backup of your entire PC, but you may consider using it for creating backups of your personal files. It backs up files and also retains previous versions that you can easily restore later. By default, it backs up folders in your user folder - folders such as Documents, Downloads, Music, Pictures, Videos, and Desktop. You can also add other folders on your PC that you wish to back up. To access the File History tool, go to Settings>Update & Security>Backup. In Backup, click "Add a drive" to back up your files to another drive and restore them if the originals are lost, damaged, or deleted.
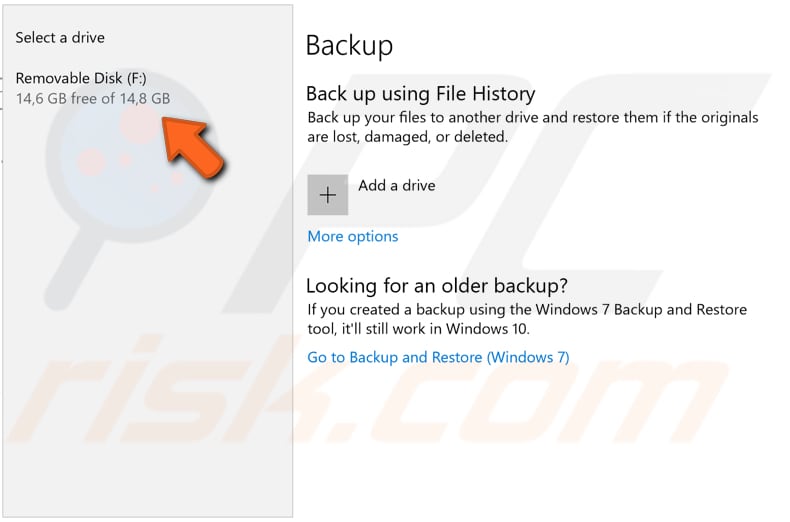
Click the drive to assign it as the destination of your backup.
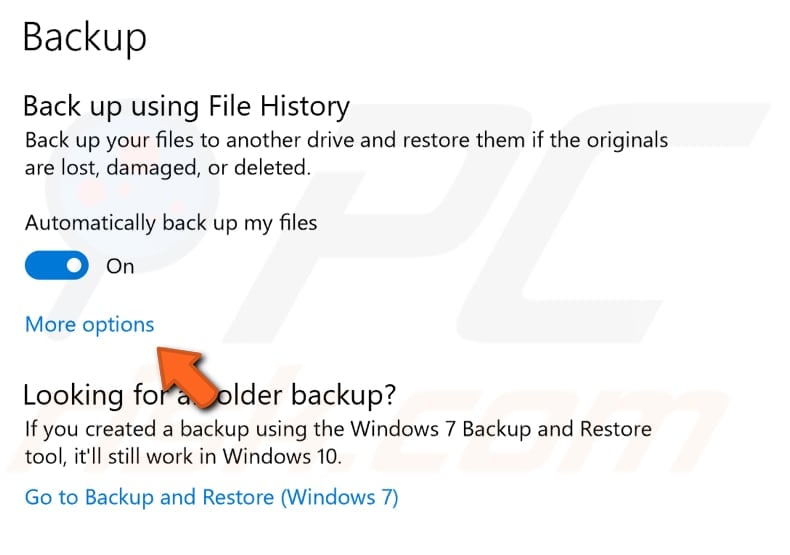
Now, go back to the Backup menu and click "More options."
Here, you can see the list of folders that will be backed up. Add new folders or remove existing folders from the list simply by clicking them and choosing "Remove."

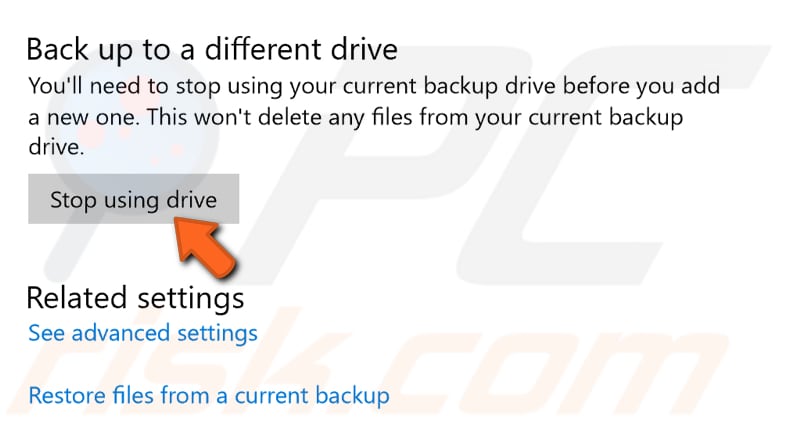
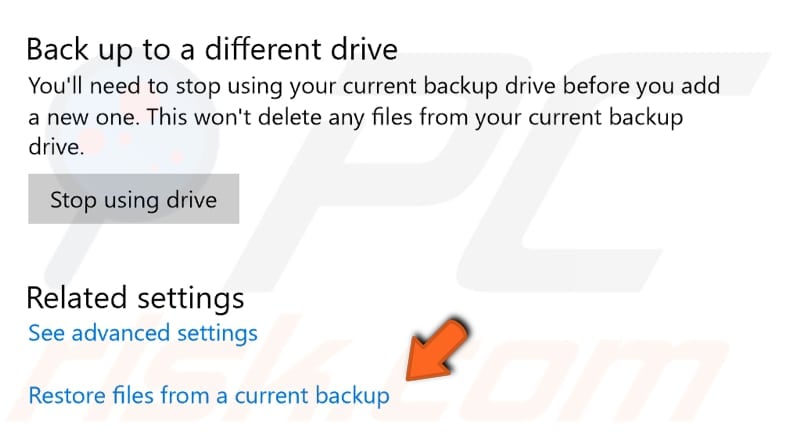
If you want to back up your files to a different drive, discontinue using your current backup drive before adding a new one. Scroll down in the Backup options window and click "Stop using drive."
When you want to restore your backed-up files, click "Restore files from a current backup."
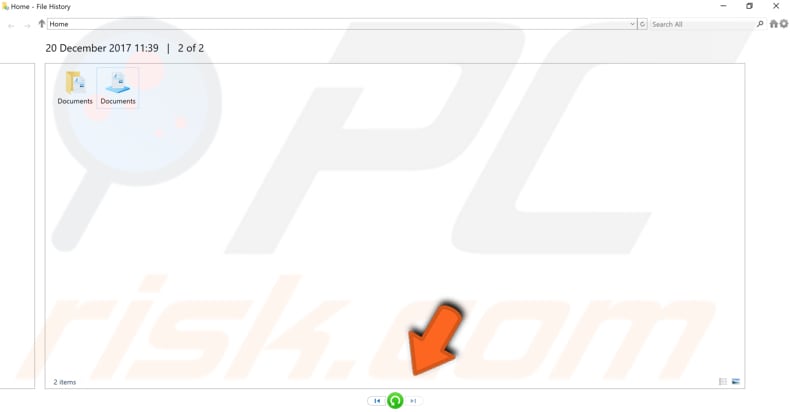
In this window, you will see the entire collection of backed-up files and folders. Choose which you wish to restore and click the "Restore" icon. This will restore your files and folders to their original destinations.
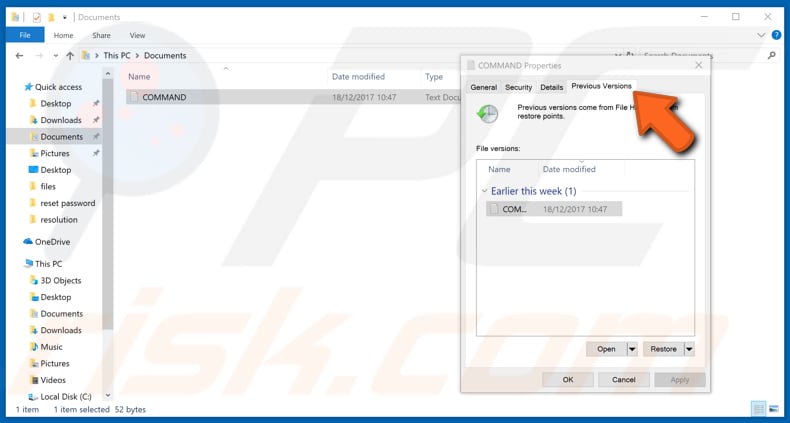
Alternatively, you can restore previous versions of your files and folders through File Explorer. Find the file or folder you want to restore, right-click it, and choose "Properties." In the properties window, click "Previous Versions," and you will see the previous version/s of the backed-up file. Then, choose what do you want to do with it.
Backup Using System Image Backups
This feature is also a Windows 7 tool, which is still available in Windows 10. It creates an image file containing your entire system - installed programs, system files, personal files, etc. This is useful if your hard drive fails and you want to revert to the prior version of Windows without reinstalling the operating system. The process takes time, but it may be beneficial. You will need a bigger drive for this backup since it is your entire system, not just files and folders. If you wish to create an image file with the backup copy of your Windows plus data, go to "Update & Security" and choose "Backup."

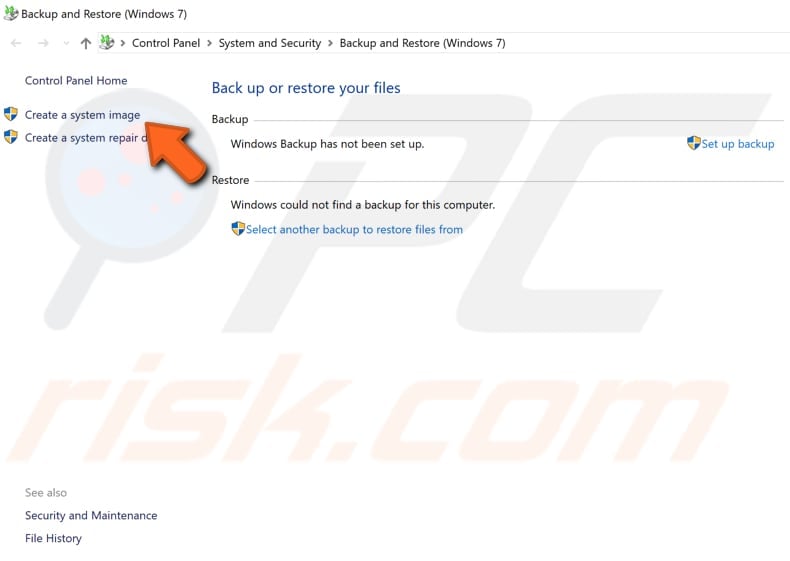
Click "Go to Backup and restore (Windows 7)" and choose "Create a system image."
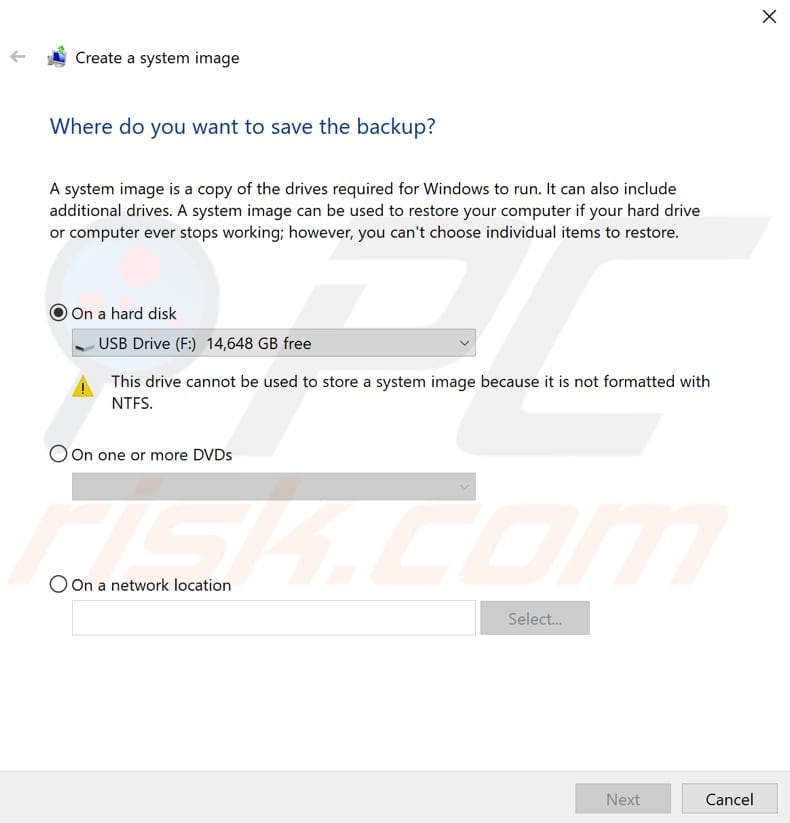
Choose where you want to save your backup. If you select USB, ensure it is NTFS formatted. You can format your USB drive to the correct format by right-clicking on it and choosing "Format...". To create an image file of your backup, click next and follow the instructions.
Backup Using OneDrive
This is not a complete backup but worth considering as an option to retrieve your files. Files that you store on OneDrive are stored in the Cloud - you just need to log into your OneDrive account and choose the stored files you wish to access. To start using OneDrive, sign up and set up online. You can find the OneDrive app in Windows 10 by typing "one drive" in search.
Recovery Using System Restore
System Restore tool creates restore points. A restore point is a collection of important system files stored by System Restore on a given date and time. System Restore reverts everything to a saved restore point, but first, you must have one recorded. If a restore point does not exist on your computer, System Restore has nothing to revert to. To use this tool, you must create restore points.
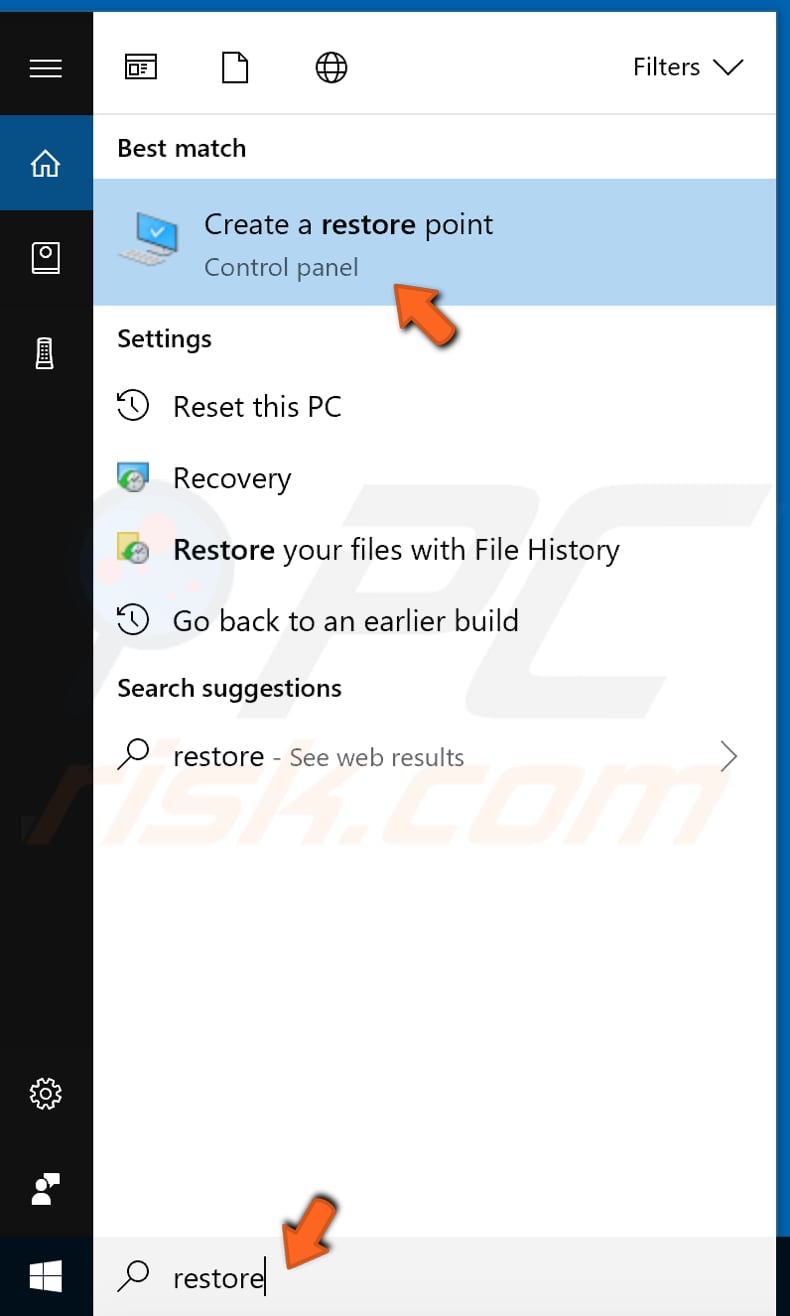
To create a restore point, type "restore" in Search and click the result: "Create a restore point."
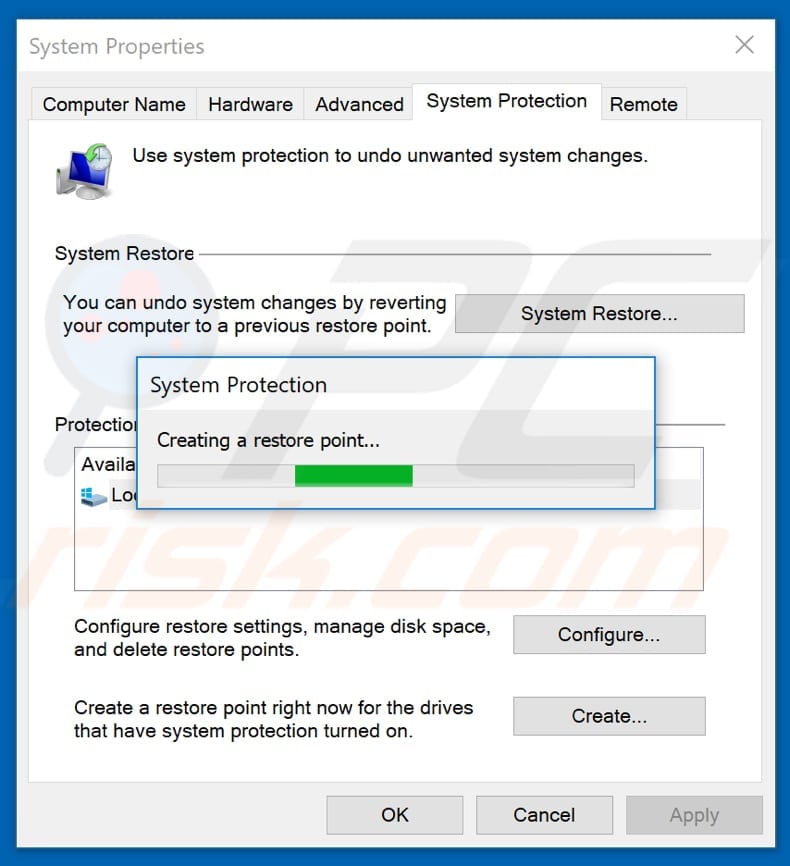
Click "Create..." in the System Properties window.

Name your restore point and click "Create." Windows will start creating a restore point for you.
When you want to revert to a restore point you previously created, return to the System Properties window and choose "System restore...", follow the instructions.
Recovery Using Drive Creator
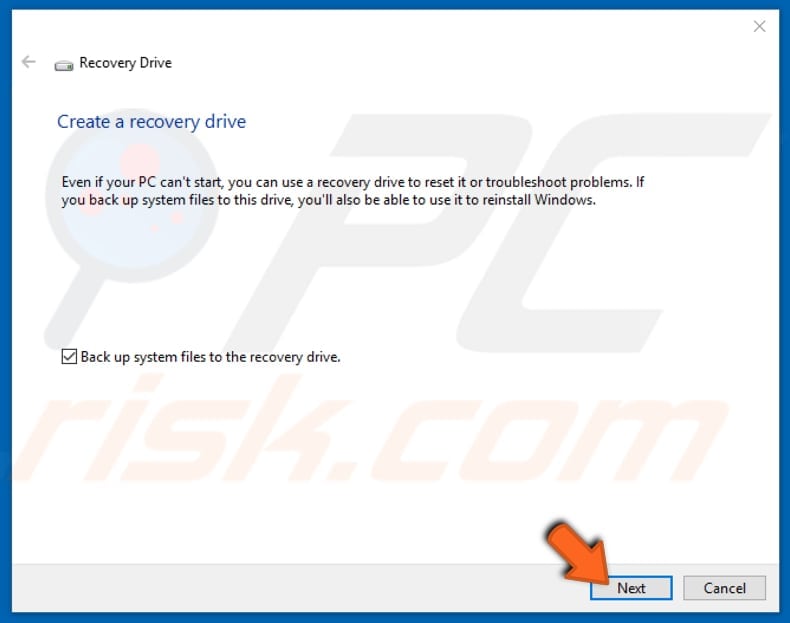
Creating a recovery drive lets you access advanced start-up options. Even if your Windows installation is damaged, you cannot access advanced start-up and want to restore an image backup. To create a recovery drive, type "recovery" in Search and click the result: "Create a recovery drive."
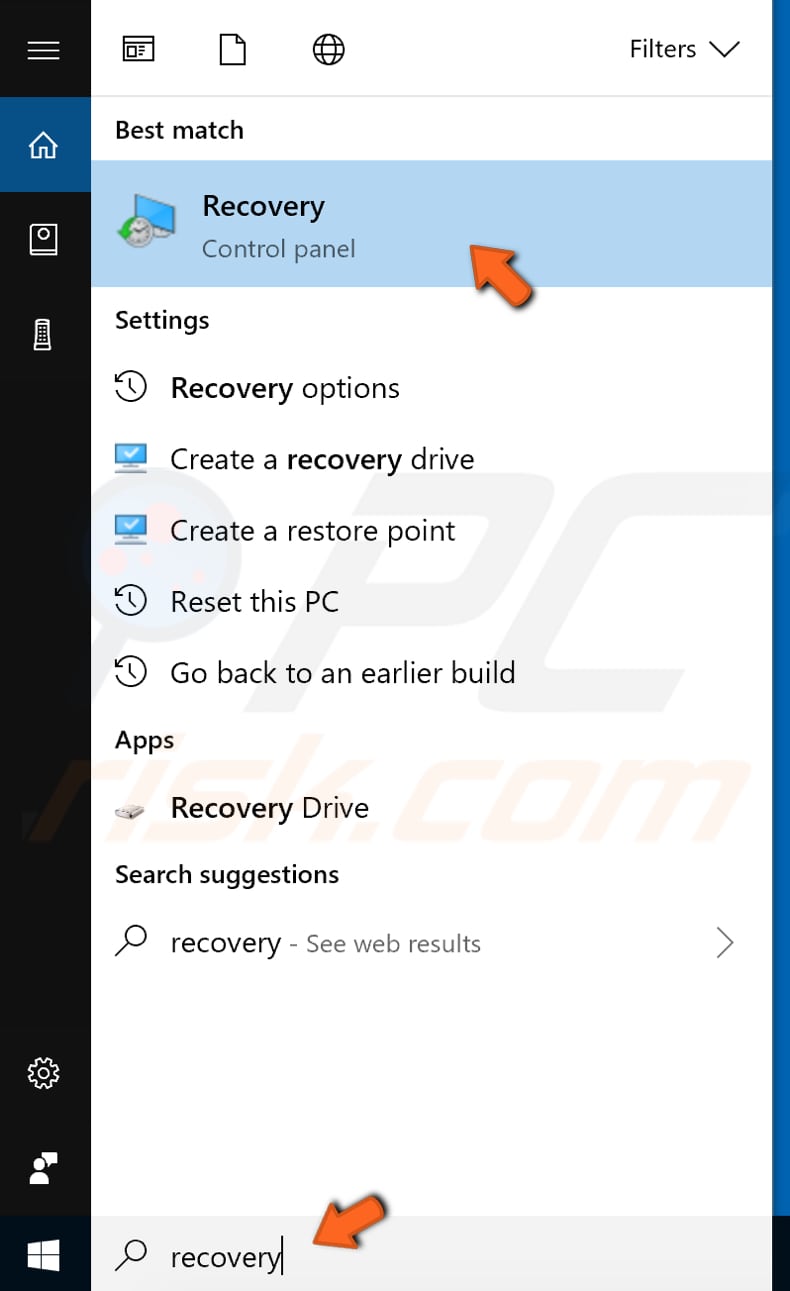
Insert your USB and click next in the Recovery Drive window to create a drive to reinstall Windows. Use this drive when Windows does not load.
Recovery Using Advanced Startup Options
If Windows cannot load normally, you will see Advanced Startup Options appear automatically. From here, you can restore Windows from the system image you previously created and choose other options. The advanced options window appears as follows:
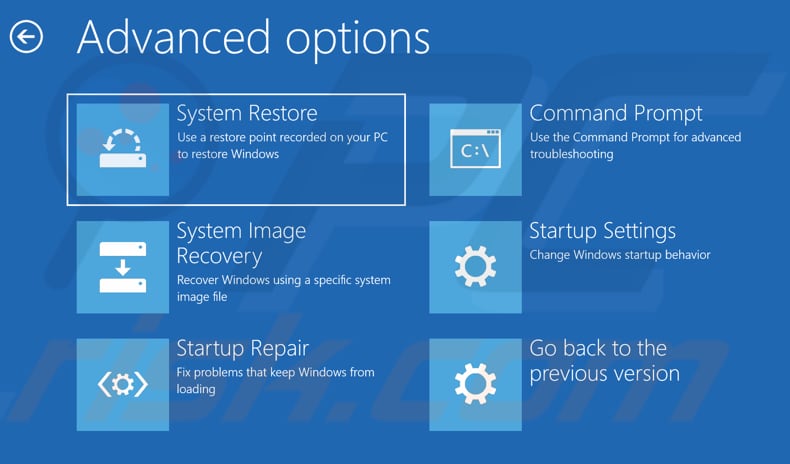
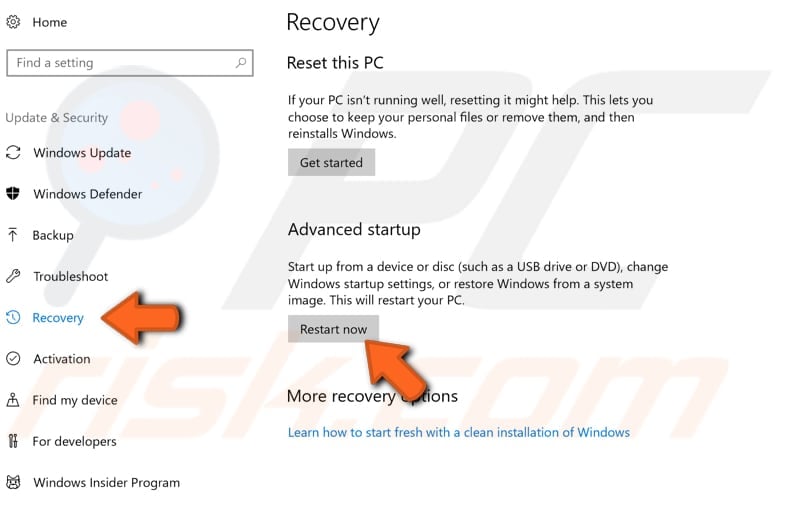
You can also access these advanced start-up options in Settings>Update & Security>Recovery. This will restart Windows and open Advanced options.
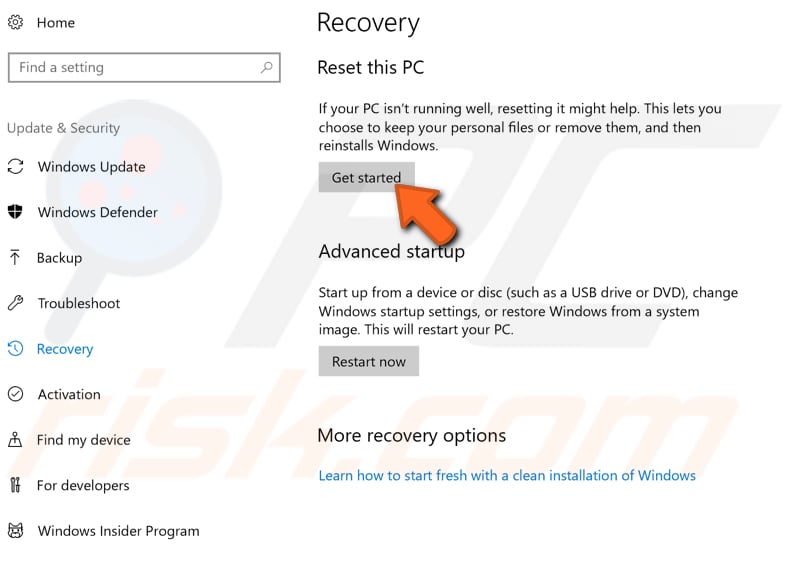
Recovery Using Reset This PC
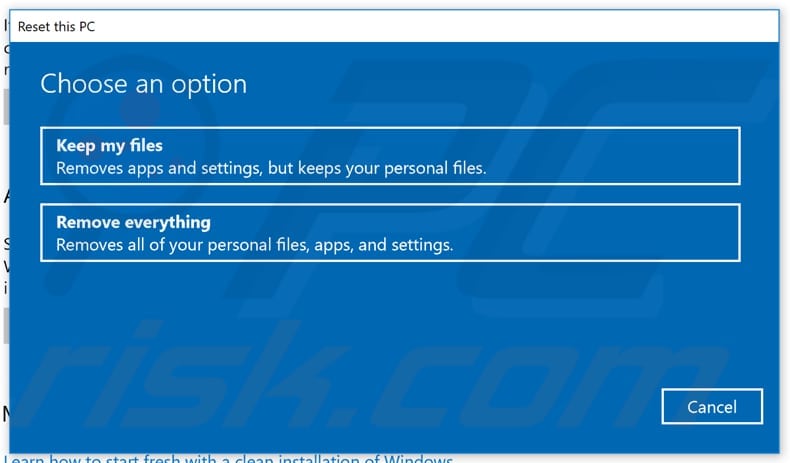
This feature is used to restore your Windows to its default state. This is a good alternative when you want to reinstall Windows without an installer. This also enables you to keep your personal files if you wish. Go to Recovery settings and click "Get Started" under "Reset this PC."
Choose whether you want to keep your files or remove everything. Choose the option that suits you best, and let Windows do the rest.
As you can see, backing up files these days is very easy - just a few clicks and your files are backed up. We suggest you start using this Windows feature as soon as possible.
Share:

Rimvydas Iliavicius
Researcher, author
Rimvydas is a researcher with over four years of experience in the cybersecurity industry. He attended Kaunas University of Technology and graduated with a Master's degree in Translation and Localization of Technical texts. His interests in computers and technology led him to become a versatile author in the IT industry. At PCrisk, he's responsible for writing in-depth how-to articles for Microsoft Windows.
▼ Show Discussion