How to Take a Screenshot on Windows 10 and 7

Get Free Scanner and check your computer for errors
Fix It NowTo fix found issues, you have to purchase the full version of Combo Cleaner. Free trial available. Combo Cleaner is owned and operated by Rcs Lt, the parent company of PCRisk.com read more.
How to Take a Screenshot on Windows 10 and 7
A screenshot is a still image saved from the currently visible part of your screen. In this article, we show different methods to capture screenshots in Windows 7 and Windows 10.

To select a region from your screen for capturing, you can use keyboard shortcuts, mouse pointer, or tablet touchscreen-pointing techniques. Screenshot capturing can be performed using Windows built-in utilities or third-party external programs and web browser-based extensions.
We will start with simple traditional screenshot techniques and, later, show more advanced screenshot-capturing tools.
Video Showing How to Take a Screenshot Using Awesome Screenshot Browser Add-On:
Video Showing How to Take a Screenshot Using the Microsoft Edge Browser:
Table of Contents:
- Introduction
- Taking Screenshots With Windows 7 & 10 Keyboard Shortcuts
- Taking Screenshots With Windows Built-in Snipping Tool
- Desktop Screenshot Capturing Applications for Windows 7 & 10
- Taking Screenshots With Browser-based Extensions
- Video Showing How To Take a Screenshot Using Awesome Screenshot Browser Add-On
- Video Showing How To Take a Screenshot Using Microsoft Edge Browser
Download Computer Malware Repair Tool
It is recommended to run a free scan with Combo Cleaner - a tool to detect viruses and malware on your device. You will need to purchase the full version to remove infections. Free trial available. Combo Cleaner is owned and operated by Rcs Lt, the parent company of PCRisk.com read more.
Taking Screenshots With Windows 7 & 10 Keyboard Shortcuts
The fastest and simplest way to take a screenshot is to use keyboard shortcuts supported by Windows. On most keyboard models, the Print Screen key appears as Prt Sc, PrnScn, PrntScrn, Print Scr, etc. The key is usually located to the right of the F12 or Home key. On Laptop keyboards, you may need to simultaneously press the Fn key. For example, Fn + PrnScn. Note: the plus (+) sign denotes pressing two or even three keys simultaneously. The order in which keys are pressed is not important, but all need to be held down for a short moment. The table below lists shortcuts and corresponding image focus (area to be captured) together with the target destination for Windows 7 and Windows 10.
| Windows 10 | Windows 7 | Focus | Destination |
| Prt Sc | Prt Sc | Full Screen | Clipboard |
| Alt + Prt Sc | Alt + Prt Sc | Active Window | |
| Windows Key + Shift +S | Selected Area Using Mouse | ||
| Windows Key +Ctrl + Prt Sc | Full Screen | File In Folder Pictures/Screenshots | |
| Windows Key + Alt +Prt Sc | Active Window |
Taking Screenshots With Windows Built-in Snipping Tool
A built-in tool for screenshot capturing in Windows can be accessed by selecting:
- Start>Accessories>Snipping Tool in Windows 7
- Start>Windows Accessories>Snipping Tool in Windows 10
Snipping Tool allows you to choose between Free-form Snip, Rectangular Snip, Window Snip, and Full-screen Snip modes. The mode can be selected from the toolbar drop-down list of the Mode button (Windows 10 version) and from the toolbar drop-down list of the New button (Windows 7).
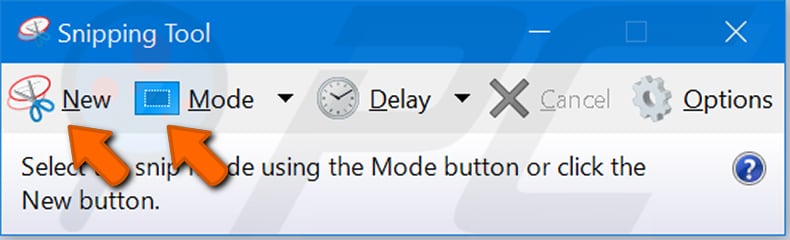
To capture a screen using the selected mode, click "New" in the Snipping Tool. The screen will be dimmed. Using a mouse, select a window or region to capture. The captured screenshot appears in the Snipping Tool editor, where you can apply some minimal annotations using a highlighter, eraser, and pen for freeform shape drawing. PNG, JPG, GIF, and Single file HTML (MHT) formats are available for saving the image to a file. Another option is to copy the image in Snipping Tool to the clipboard and paste it to a more sophisticated image editing tool or to a document processing program such as Microsoft Word.

The snipping tool also lets you take a snapshot of any drop-down menu. Firstly, the Snipping tool must be running and empty (no image in the editor window). Secondly, go to the program and open the drop-down menu you wish to capture. Thirdly, click Ctrl + PrnScr to activate the Snipping tool selection process. The drop-down menu is not removed from the screen and can be captured with the Snipping tool. This feature is ideal for user instruction preparation.
Video showing how to take a screenshot in Windows 10 using Snipping Tool:
Desktop Screenshot Capturing Applications for Windows 7 & 10
There are many third-party screenshot-capturing tools. Some are open source, whilst others must be purchased or are free versions with restricted capabilities. Online overviews compare and discuss these tools. Examples are TomsGuide and Itsmdaily. A common feature of these programs is that they capture screenshots and have image editors capable of modifying and saving screenshots.
Here are some screenshot-capturing features that go beyond the built-in Snipping tool using a tool from NGWIN PicPick, which can be downloaded from PicPick. A distinctive feature is that the program can be downloaded in a 'portable compilation,' which means you can run it without installation. PicPick is compatible with both Windows 7 and Windows 10. When launched, the program can stay in the Windows tray - capturing is activated using keyboard shortcuts. Shortcuts are useful since they can be configured according to the user’s choice. Remember that when PicPick is running, Windows built-in shortcuts are no longer active as they are used by PicPick.
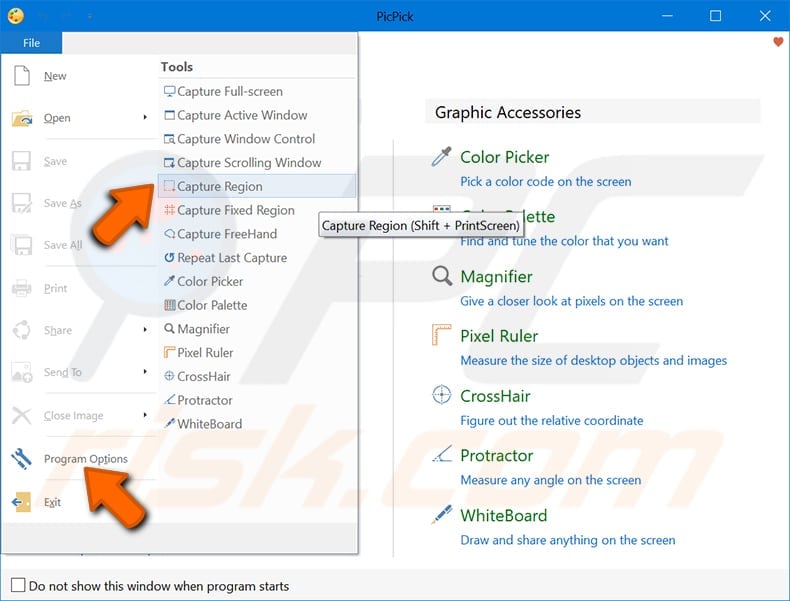
Scrolling Window and Window Control are convenient capturing modes used to capture particular Windows controls such as menus, buttons, toolbars, checkboxes, text regions, etc. PicPick usually runs in the background, and you activate the selection process by pressing hotkeys and then pointing to the Window control you want to capture using the mouse. Similarly, a Scrolling Window (activated using an assigned unique hotkey) can be captured. A Scrolling Window is part of a real Window, containing only the part with scrollable content. Usually, menus and toolbars in a real Window are not part of scrollable content.
Once capturing is complete, images are opened in the editor window, and you can save, share, or send them using various options shown in the video. You can save a captured image in graphical formats such as PNG, BMP, JPG, GIF, and a PDF file. The extensive editing features include image resizing, rotation, changing brightness, color balance, adding watermarks, adding shapes and text, etc.
PicPick features many options to share your screenshot using Facebook, Email (invokes your default email client with the screenshot attached), Skype, FTP server, etc. The screenshot can be directly pasted to any open Microsoft Word, Excel, PowerPoint program. Otherwise, a screenshot can be copied to the clipboard and pasted to any other external program.
It is worth taking the time to explore all PicPick capturing and editing.
Examples of other screenshot programs include Gadwin PrintScreen (freeware), ShareX (allow you to record a video and export as a GIF or MP4 file), Greenshot, TinyTake (freeware), SnagIt (free trial), Ashampoo Snap 9 (price $39,99), etc.
Video showing how to take a screenshot using PicPick application:
Taking Screenshots With Browser-based Extensions
If you mainly need to capture screenshots of internet browser windows, browser-based extensions may be the best tool for you. For example, we show how to install an extension to take screenshots: Awesome Screenshot for Chrome and Firefox. This extension does not provide the sophisticated capturing and editing features of most desktop applications discussed in the previous chapter, but it is easy to handle in the browser environment.
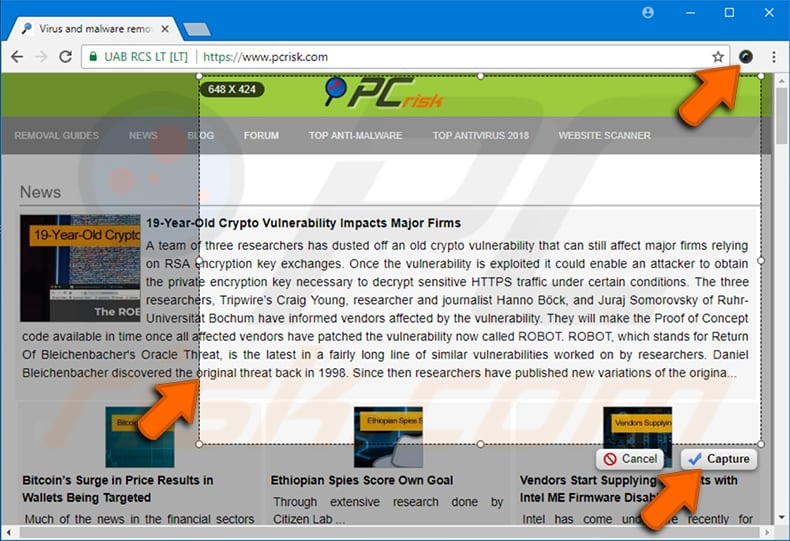
Using a built-in editor, highlighting or blurring sensitive information can be done in few mouse clicks. After editing, the image can be saved in JPG or PNG formats to a local folder or stored in Awesome Screenshot’s free Cloud storage. Some features of the Awesome Extension require an upgrade to their Premium plan for $5.99.
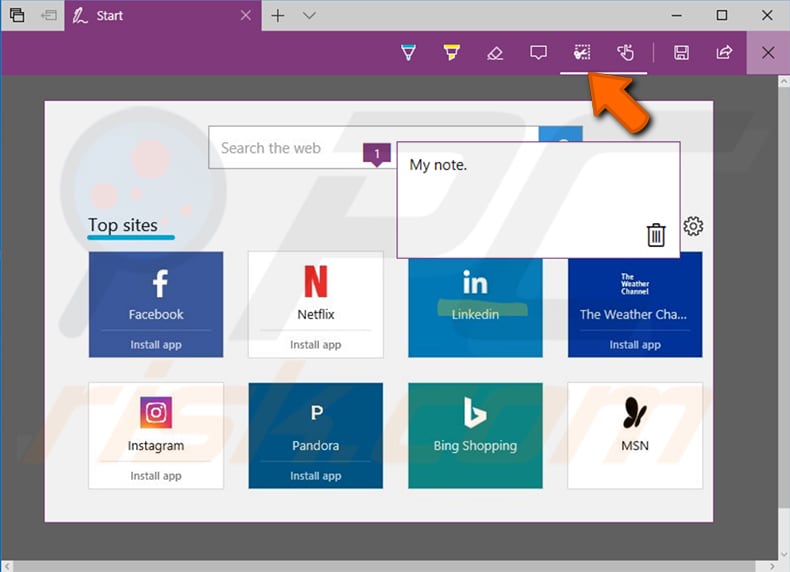
Other browser-based extensions such as Nimbus Screenshot for Chrome and Firefox are also available. For Microsoft Windows 10, the Edge browser tool, Web Note, is available free of charge. This rather simple tool can be invoked by clicking the square icon with a pencil in the upper right corner of the Edge browser. Unlike Awesome Extension, the Edge tool allows marking and annotation on the screen first and then selecting a region for capturing. The captured image can be pasted to any external image-editing tool via the clipboard or sent to the OneNote application.
Share:

Rimvydas Iliavicius
Researcher, author
Rimvydas is a researcher with over four years of experience in the cybersecurity industry. He attended Kaunas University of Technology and graduated with a Master's degree in Translation and Localization of Technical texts. His interests in computers and technology led him to become a versatile author in the IT industry. At PCrisk, he's responsible for writing in-depth how-to articles for Microsoft Windows.
▼ Show Discussion