How to Disable Startup Programs in Windows 7 & 10?
Get Free Scanner and check your computer for errors
Fix It NowTo fix found issues, you have to purchase the full version of Combo Cleaner. Free trial available. Combo Cleaner is owned and operated by Rcs Lt, the parent company of PCRisk.com read more.
How to Disable Startup Programs?
Startup programs in Windows 7 and Windows 10 are user programs launched automatically after Windows boots up. Removing a program from the Startup list does not uninstall it, and you can launch it manually any time later. Furthermore, you can always return any removed program to the Startup list. This article demonstrates how to disable programs that you do not want to be launched at Windows boot.
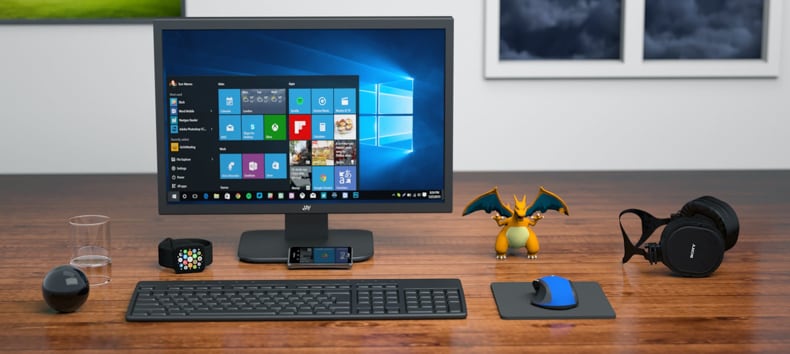
Any program in Windows can become a startup program if it is included in the Startup programs list. Sometimes, while installing a Windows program, the user can include the program in the Startup list. Other programs may be added without such notifications. Various programs responsible for product updates and upgrades are often added to the Startup list and continually poll update servers for new software versions.
Typical examples of startup programs are Spotify, Skype, Dropbox, Microsoft OneDrive, etc. Unfortunately, Malware programs can also appear in your Startup list. It is convenient to maintain useful programs in the list that you know you will need every day. However, the more programs reside in your Startup, the longer it takes to launch Windows.
Remember that Startup programs are launched when you Restart Windows. Resuming Windows from Hibernate or Sleep states does not cause Startup programs to be executed again since they're already loaded in memory, and their execution is simply resumed. If you believe your computer has suddenly or gradually became slow, check how many programs you have in your Windows Startup and disable unnecessary ones.
Video Showing How to Disable Startup Programs in Windows 7
Video Showing How to Disable Startup Programs in Windows 10
Table of Contents:
- Introduction
- How to Disable Startup Programs in Windows 7
- How to Disable Startup Programs in Windows 10
- Manual Registry Editing
- External Utilities for Windows Startup Programs Management
- Disabling a Startup Program from Its Own Setting Dialog
- Video Showing how to Disable Startup Programs in Windows 7
- Video Showing how to Disable Startup Programs in Windows 10
Download Computer Malware Repair Tool
It is recommended to run a free scan with Combo Cleaner - a tool to detect viruses and malware on your device. You will need to purchase the full version to remove infections. Free trial available. Combo Cleaner is owned and operated by Rcs Lt, the parent company of PCRisk.com read more.
How to Disable Startup Programs in Windows 7
Using System Configuration Utility
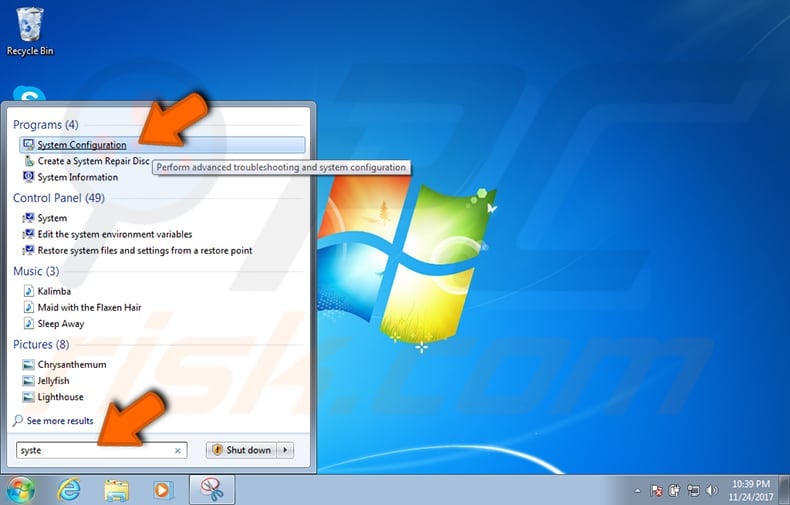
Click the Start button and type in System Configuration in the the Search programs and files field. In the drop down list, select System Configuration.
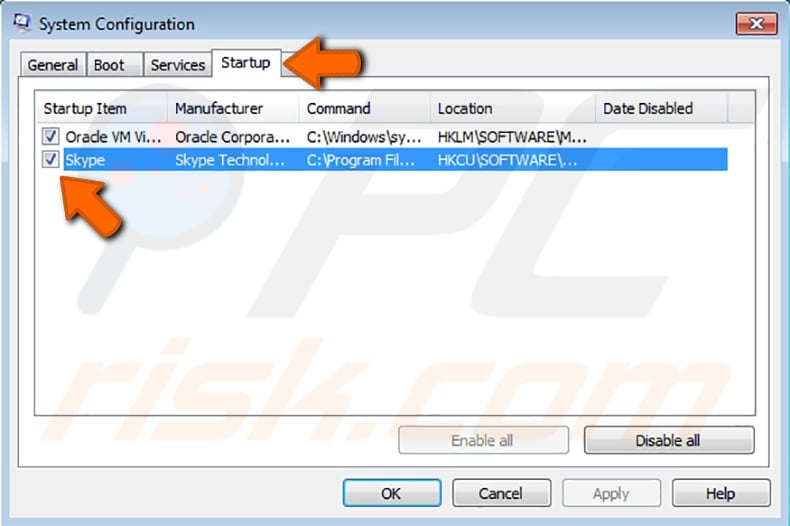
In the System Configuration window, select Startup tab. In the Startup tab, you will see all programs that are launched at Windows boot. Uncheck entries for programs that you wish to remove from the Startup list, and then click Apply. For example, you may wish to uncheck the Skype program from the list.
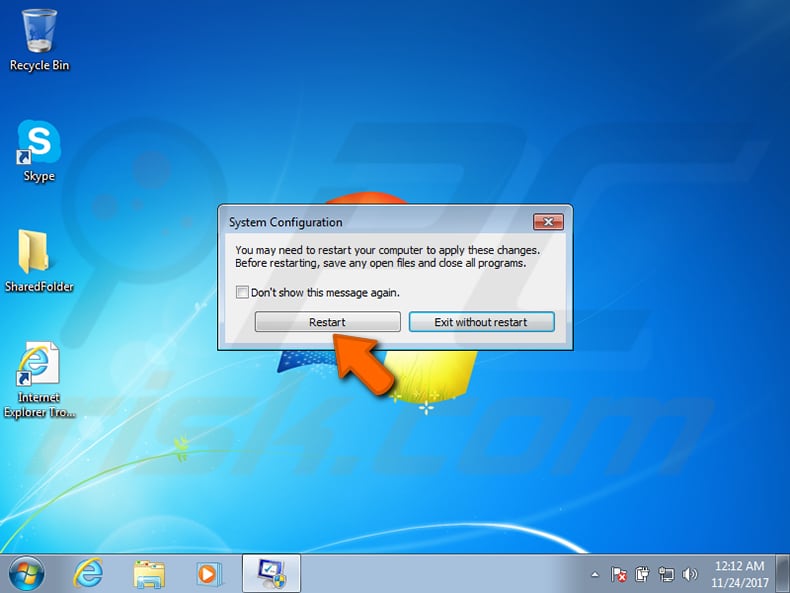
Click OK in the System Configuration window. Before closing, it may ask to restart the system to apply changes. Select Restart button or Exit without restart depending on your wish (for example if you have other programs open, or wish to restart at some later time).
Using Startup Folder Shortcuts
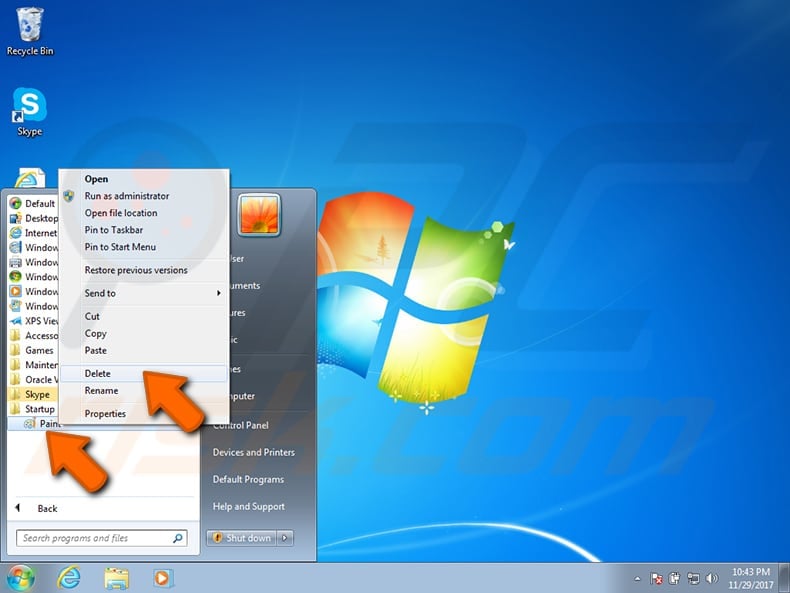
One quick way to disable Startup programs is to look for and delete their shortcuts from the Startup folder. To do this, go to Windows Start and navigate to the All Programs folder called Startup. In the Startup folder, select the program (in fact, this will be a 'shortcut' to the program) you wish to remove from Startup, and choose Delete from the drop-down menu. When the pop-up window appears asking for confirmation: “Are you sure you want to move this shortcut to Recycle Bin”, click Yes. The image below shows how to remove the Paint program shortcut from the Startup folder.
Bear in mind that when you delete a shortcut, you do not delete the program itself and, later, it can be launched using shortcuts located elsewhere or directly invoking the program executable.
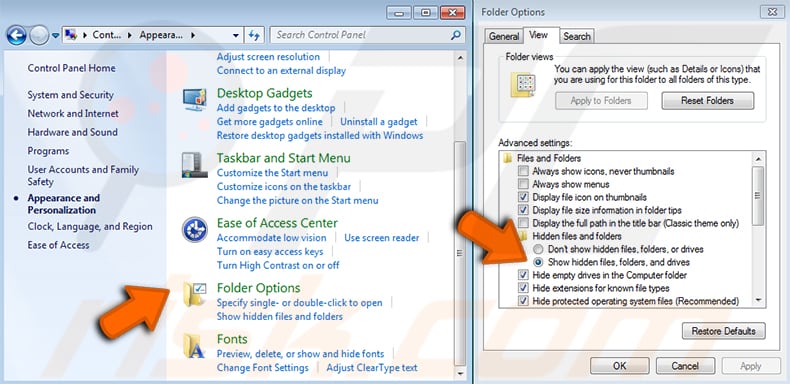
If the folder Startup is not visible, you can find it by navigating to the folder “C:\Users\MyUser\AppData\Roaming\Microsoft\Windows\Start Menu\Programs” using Explorer. Since folder AppData is usually hidden, you may need to configure Folder Options to show hidden files. To do this, access the Control Panel / Folder options View tab and check Show hidden files to show folders and drives under the Hidden files and folders item. Press OK to confirm your selection.
How to Disable Startup Programs in Windows 10
Using Task Manager
To disable Startup programs in Windows 10, use the Task Manager utility. Launch Task Manager by going to Start / Windows System / Task Manager. An alternative option is to simultaneously press Ctrl + Alt + Del on the keyboard and select Task Manager from the list.
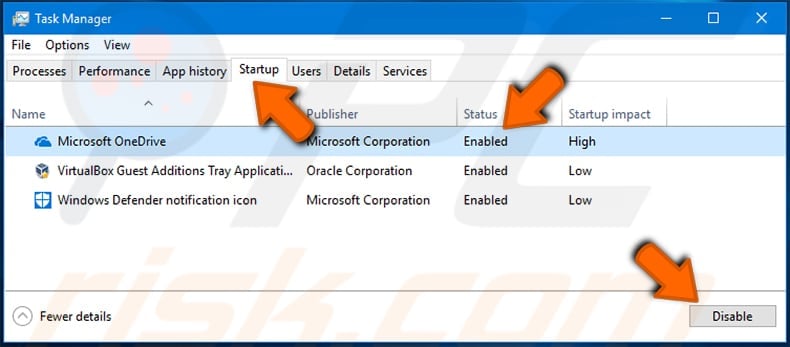
In the Task Manager window, select the Startup pane and mark a program to disable on Windows Startup. For example, you may wish to choose the Microsoft OneDrive utility as shown in the picture. Click Disable and close Task Manager window. The next time you reboot Windows, the disabled program will not start automatically. You can verify this by returning to Task Manager and confirming that Status column of Microsoft OneDrive indicates it as Disabled.
Manual Registry Editing
Startup programs can be removed by manually editing Windows Registry using Registry Editor tool. To invoke Windows Registry Editor in Windows 7, type regedit in the Start search field. To invoke Windows 10 Registry Editor, also enter regedit in the Start search field. When you attempt to start Registry Editor, the Windows User Account Control utility may ask you to confirm that you want to allow Registry Editor to make changes to this computer. Windows 7 and Windows 10 dialogue windows are shown below. Press Yes to allow Registry Editor to start.
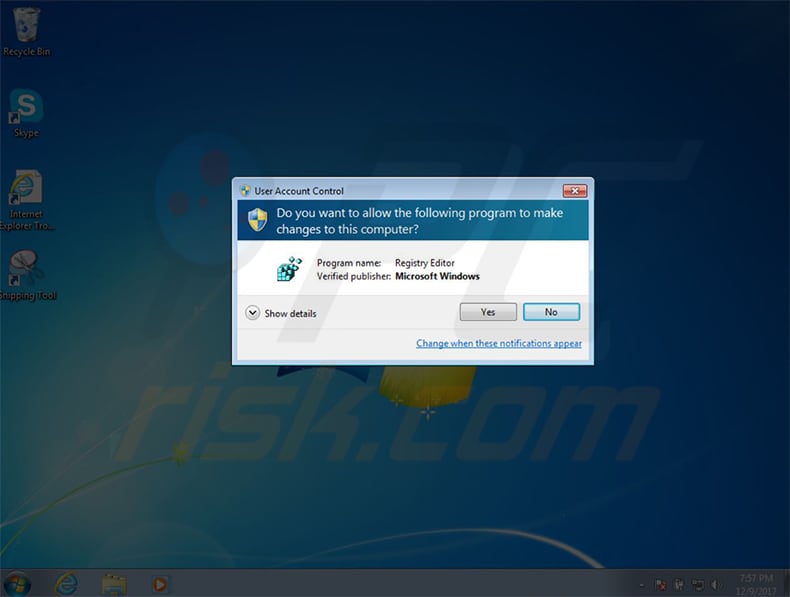
First, you will see the window registry folders displayed on the left panel.
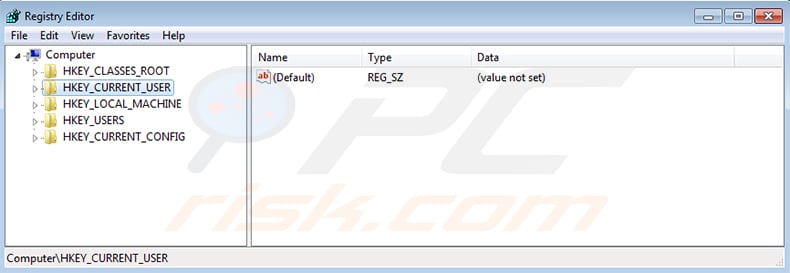
Programs that are launched at Windows Start can be listed in one of the following folders:
- HKEY_LOCAL_MACHINE\Software\Microsoft\Windows\CurrentVersion\Run
- HKEY_LOCAL_MACHINE\Software\Microsoft\Windows\CurrentVersion\RunOnce
- HKEY_LOCAL_MACHINE\Software\Microsoft\Windows\CurrentVersion\RunServices
- HKEY_LOCAL_MACHINE \Software\Microsoft\Windows\CurrentVersion\RunServicesOnce
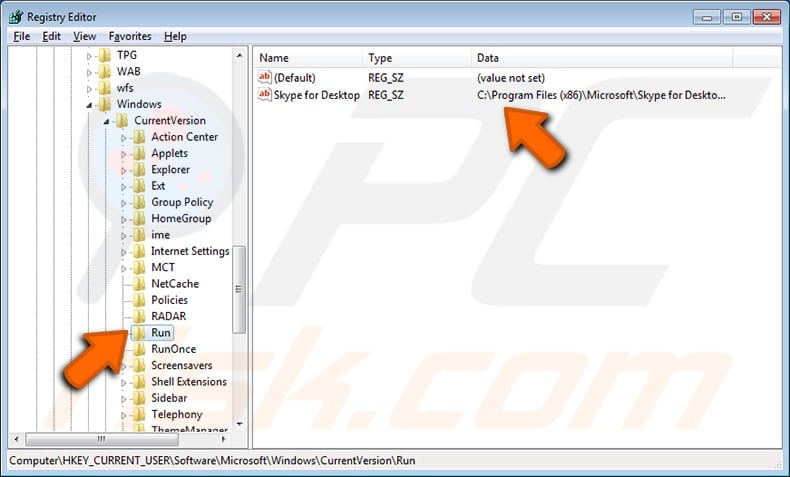
- HKEY_CURRENT_USER\Software\Microsoft\Windows\CurrentVersion\Run
- HKEY_CURRENT_USER \Software\Microsoft\Windows\CurrentVersion\RunOnce
- HKEY_CURRENT_USER \Software\Microsoft\Windows\CurrentVersion\RunOnceEx
For example, to disable the Skype program from starting up at Windows reboot, navigate to HKEY_CURRENT_USER\Software\Microsoft\Windows\CurrentVersion\Run. Then select Skype for Desktop entry on the right panel of Registry Editor and choose Delete from Edit menu.
Note: Be very careful when modifying Windows Registry. If you do not know the purpose of particular entries, never change them. It is advisable to create a restore point for Windows before making any registry modifications. In this case, you can restore the system from the last working backup if you damage something.
External Utilities for Windows Startup Programs Management
Autoruns Utility
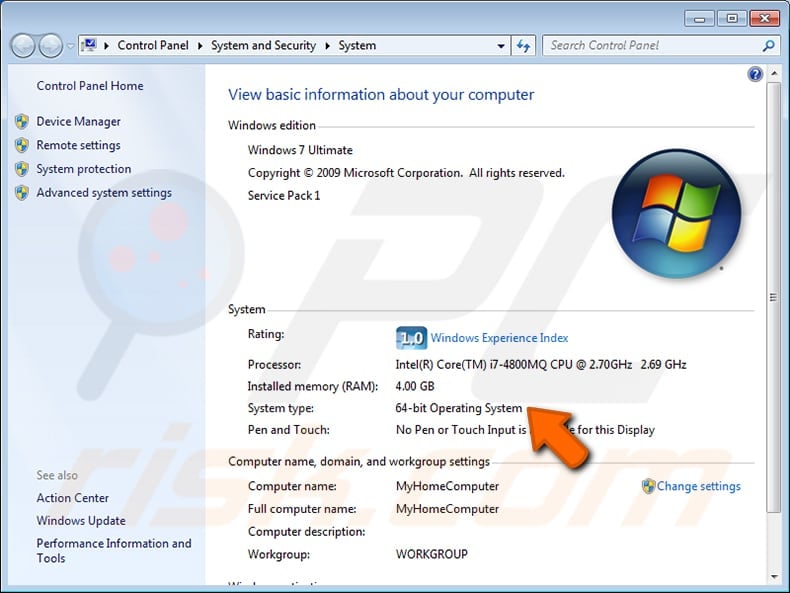
You may like to use free Autoruns utility from Sysinternals to manage your Windows Startup programs. First, download Autoruns.zip archive from https://docs.microsoft.com/en-us/sysinternals/downloads/autoruns. Then unzip Autoruns.zip to the folder of your choice and launch Autoruns.exe or Autoruns64.exe (dependent on whether you run the 32-bit or 64-bit version of Windows). In Windows 7, this easily found in Control Panel/System and Security/System: 'System type'.
When you first start Autoruns, it will ask you to agree with the license. Click Agree at the bottom of the dialog window. When Autoruns starts, allow it to collect all the information from your Windows system. An example of the appearance of the Autoruns window is shown below. If, for example, you want to disable Skype on Windows Start, simply uncheck the box in the Autorun Entry column in front of the Skype for Desktop title. Close the Autoruns program and your selections will automatically be saved.
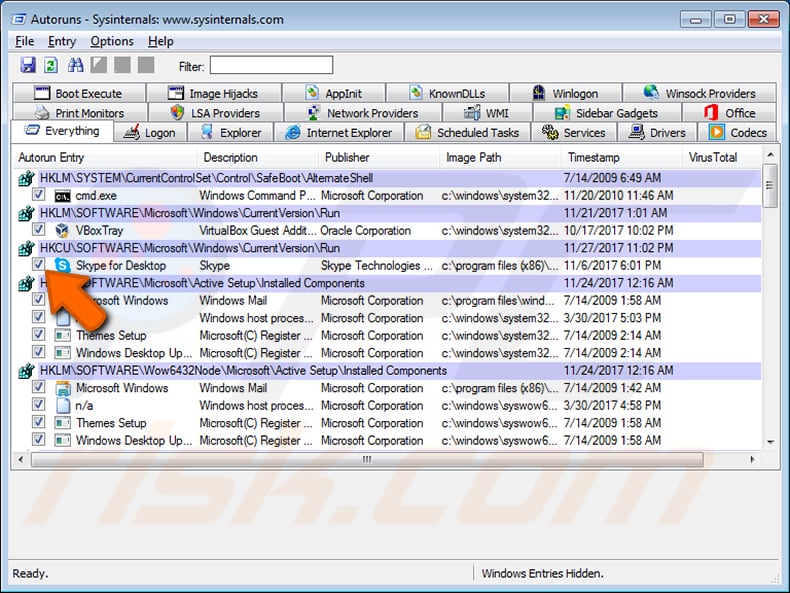
In Autoruns, you can also delete entries (startup programs) in addition to disabling them. To do this, mark the entry you want to delete and select Delete item from Entry menu. To delete entries, you may be asked to re-launch Autoruns with administrative rights. Note that, unlike disabled entries, deleted entries cannot be renabled.
Be careful not to delete or disable entries you do not know, since this might impact on entire system operation!
CCleaner Utility From Restoro
A free version of CCleaner utility can be downloaded from http://www.piriform.com/ccleaner. Although a paid professional version of CCleaner is available, the functionality of the free version is sufficient for managing Windows Startup program in the way shown below.
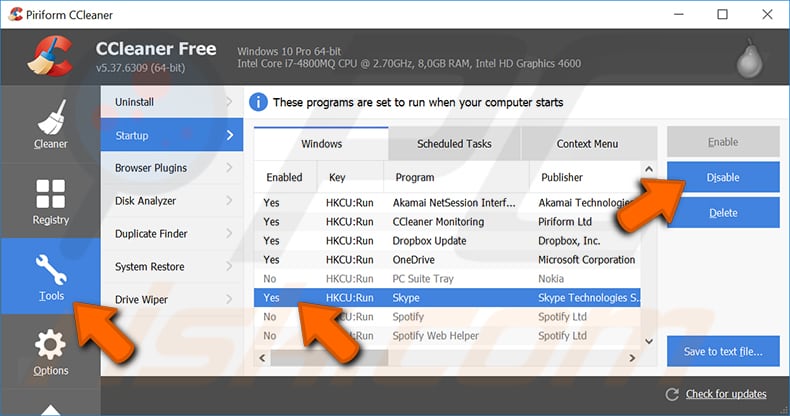
By default, CCleaner adds itself to the list of Startup programs. If you do not wish it to monitor your system and automatically start after Windows boot, then remove CCleaner Monitor from Startup using CCleaner itself (as explained above) or using any other method described in this article. Also, bear in mind that you cannot close CCleaner simply by closing the main window. To completely close CCleaner, position the mouse over its icon in the Task Tray, click the right mouse button and select Exit from the drop down list.
Disabling a Startup Program from its Own Settings Dialog
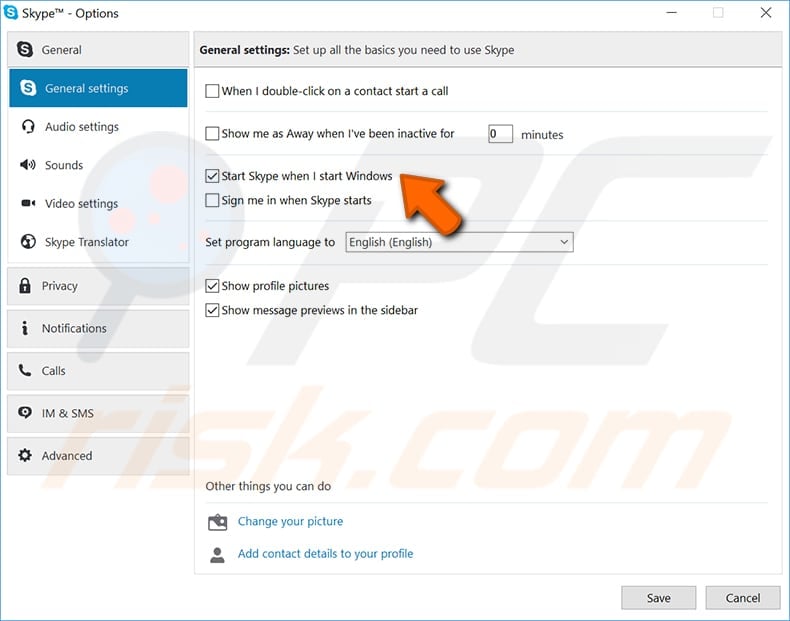
It is a good practice to manage startup settings from the individual program settings. Usually, the enable/disable option for a program's startup status is located under menu items such as Settings, Properties, Options, Preferences, etc. For instance, to disable Skype from automatically launching upon Windows start, login to Skype and go to menu item Tools/Options. In the General Settings page, uncheck 'Start Skype when I start Windows' and click Save as shown below. Similar possibilities may exist in various other programs.
Share:

Rimvydas Iliavicius
Researcher, author
Rimvydas is a researcher with over four years of experience in the cybersecurity industry. He attended Kaunas University of Technology and graduated with a Master's degree in Translation and Localization of Technical texts. His interests in computers and technology led him to become a versatile author in the IT industry. At PCrisk, he's responsible for writing in-depth how-to articles for Microsoft Windows.

▼ Show Discussion