How to manage and personalize notifications on your iPhone and iPad
Get Free Scanner and check your computer for errors
Fix It NowTo fix found issues, you have to purchase the full version of Combo Cleaner. Free trial available. Combo Cleaner is owned and operated by Rcs Lt, the parent company of PCRisk.com read more.
Easy guide to managing your iPhone and iPad notifications
Notifications on your iPhone or iPad are important. They keep you updated about messages, emails, and app activities. But sometimes, they can be overwhelming.
This guide will help you understand how to control notifications on your device. You will learn how to customize them so that you only see what matters to you. By managing notifications, you can reduce interruptions. This can help you focus better and use your device more efficiently.
You will learn how to turn off notifications for specific apps and change how notifications appear. Whether you want them to appear on the lock screen or silently in the background, this guide has you covered.
By the end of this guide, you will feel more in control of your device. Managing notifications can make your iPhone or iPad a lot more pleasant to use. Let's get started!
Video on How to manage and personalize notifications on your iPhone and iPad
Table of Contents:
- Introduction
- Clear your notifications
- Turn notifications on or off
- Change the notification style
- Change the notification sound
- Set notifications Scheduled Summary
- Change when notification previews appear
- Turn notifications on or off while screen-sharing
- Customize specific app notifications
- Silence your notifications
- Video on How to manage and personalize notifications on your iPhone and iPad
Download Computer Malware Repair Tool
It is recommended to run a free scan with Combo Cleaner - a tool to detect viruses and malware on your device. You will need to purchase the full version to remove infections. Free trial available. Combo Cleaner is owned and operated by Rcs Lt, the parent company of PCRisk.com read more.
Clear your notifications
Clearing notifications on your iPhone or iPad is easy. Here's how you can do it step-by-step:
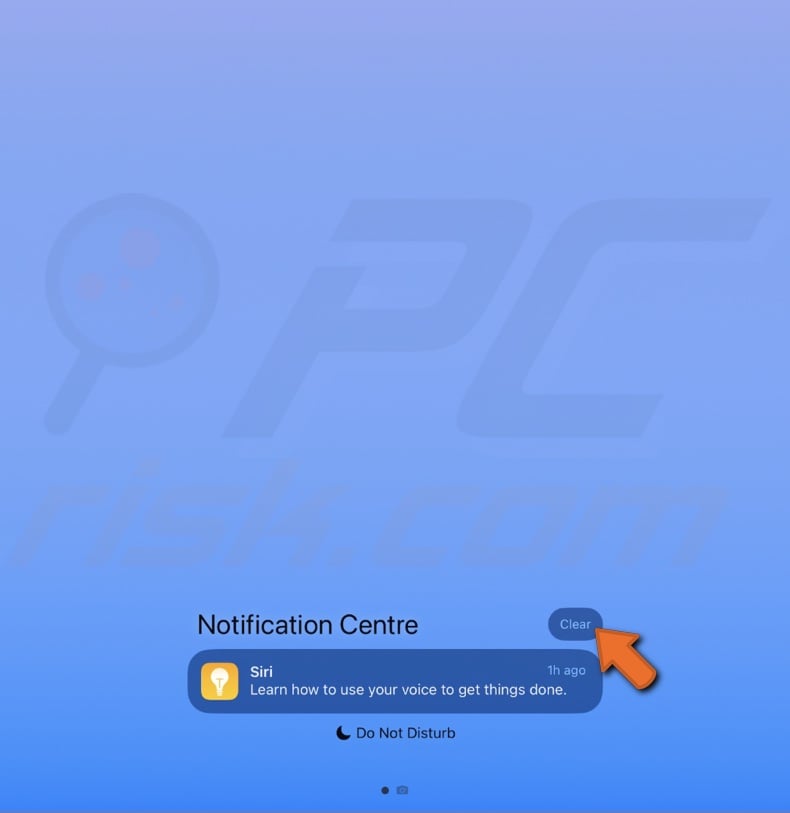
1. Swipe down from the top middle of your screen to open the Notification Center.
2. To remove a single notification, swipe left on it and tap "Clear".
3. If you want to clear all notifications at once, tap the "X" button at the top and then select "Clear" or "Clear All Notifications".
Turn notifications on or off
Although you can't turn off all notifications at once, you can turn off notifications for individual apps. Here's how to do it:
1. Go to your iPhone or iPad's settings and tap on "Notifications".
2. In the "Notification Style" section, select the app for which you want to manage notifications.
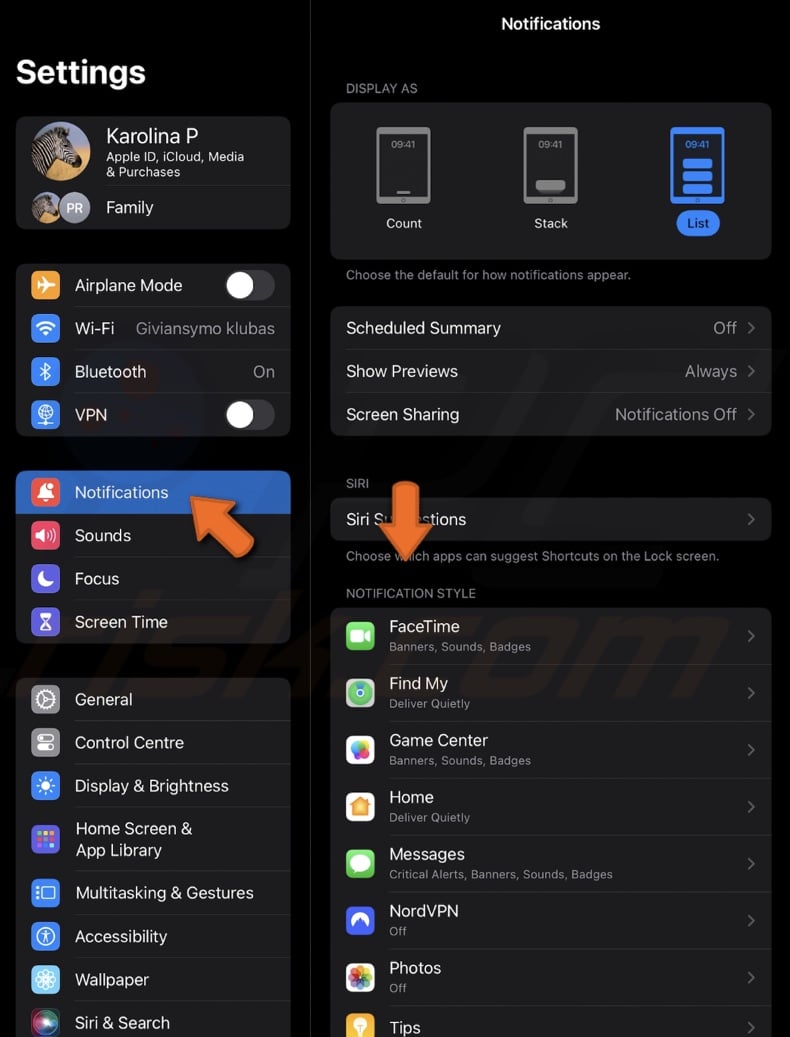
3. To turn on notifications, switch the "Allow Notifications" toggle to the on position (it will be green).
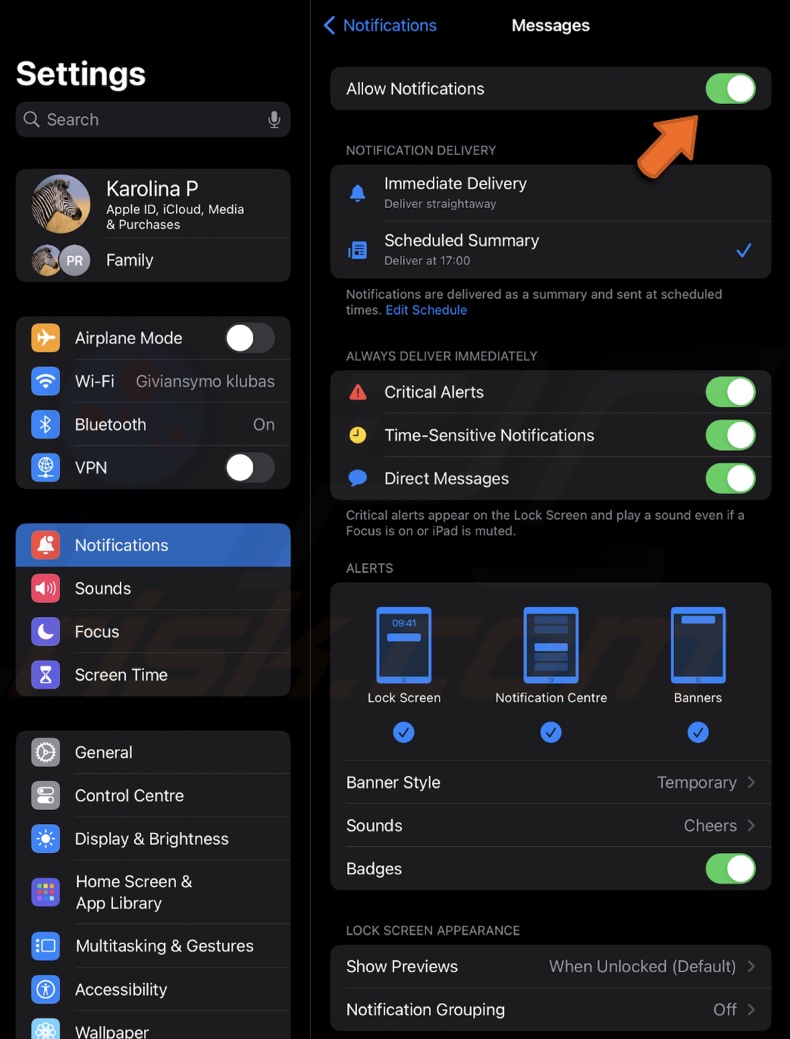
To turn off notifications, switch the "Allow Notifications" toggle to the off position (it will be gray).
Change the notification style
You can customize how notifications appear on your iPhone or iPad based on your preference. Here's a simple guide to help you change the default notification style:
1. Locate and tap the "Settings" icon on your home screen.
2. Go to the "Notifications" settings.
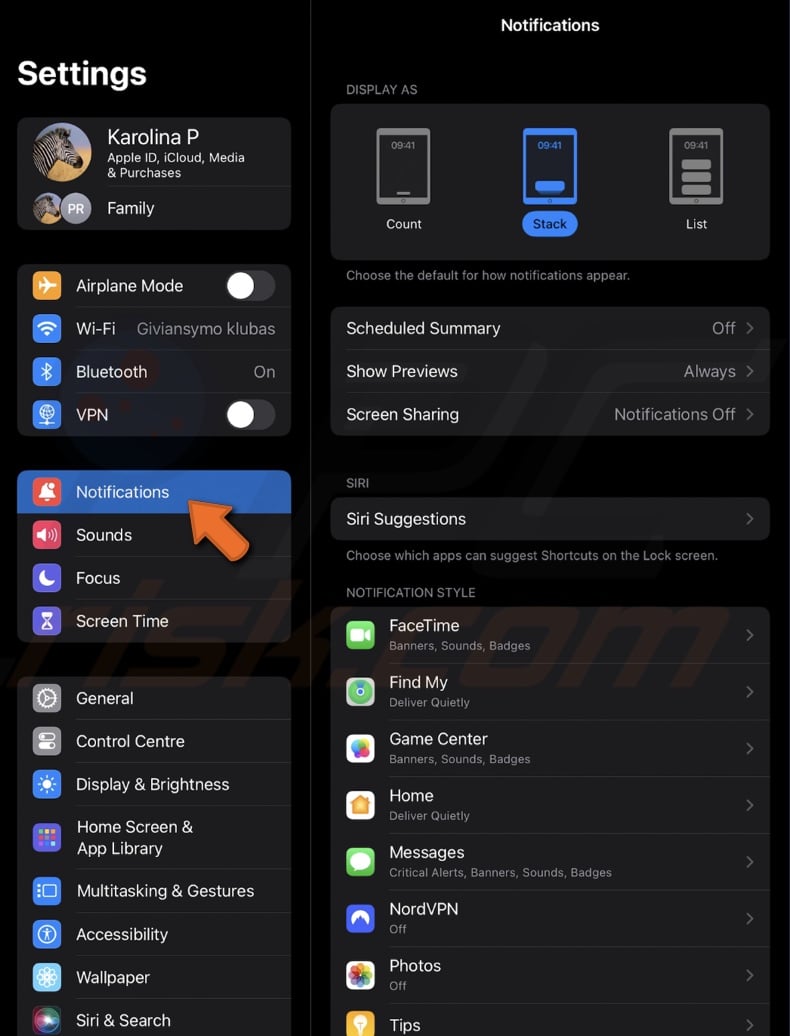
3. Under the "Display As" section, you have three options to choose from:
- List: Notifications will appear in a scrollable list.

- Stack: Notifications will stack with the most recent one on top. You can swipe to see older notifications.

- Count: Instead of seeing individual notifications, you will see a total count of new notifications in the Notification Center.
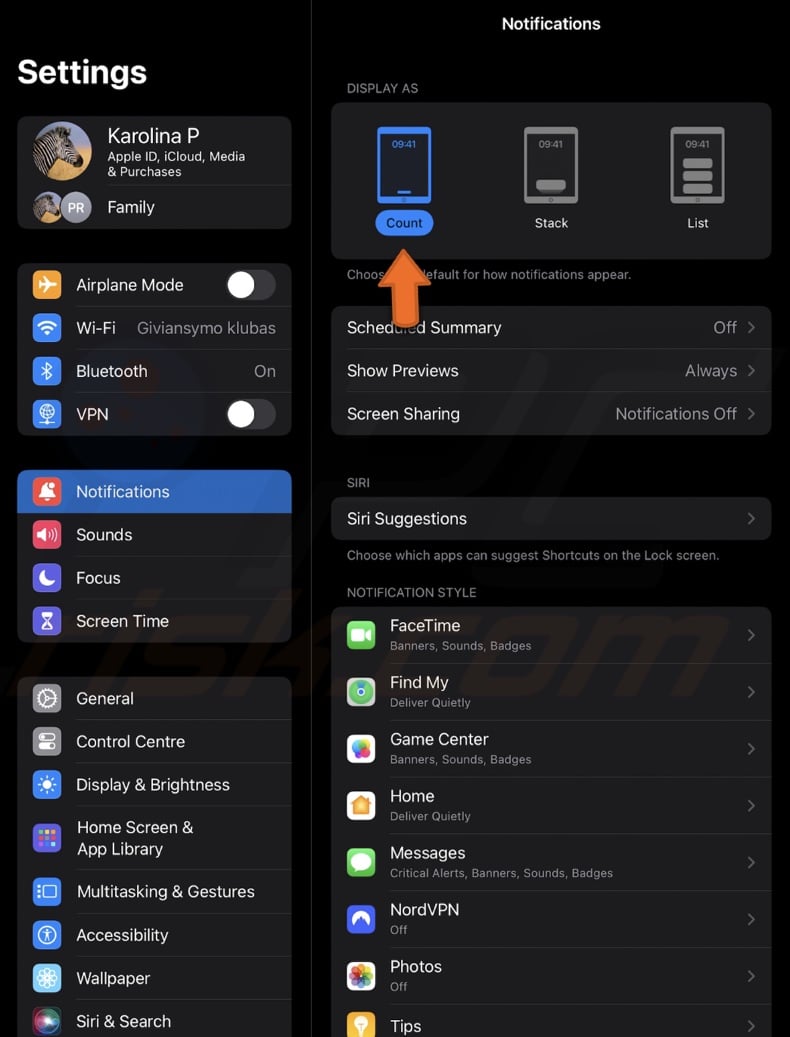
4. Choose an option to change the style or leave it as it is.
Change the notification sound
If you want to change the notification sound on your iPhone or iPad, follow these simple steps:
1. Open the Settings app on your device and tap on "Sounds".
2. You will see a list of different system notification sounds that you can change.
3. Choose the type of notification you want to change (like Text Tone, New Voicemail, or New Mail).
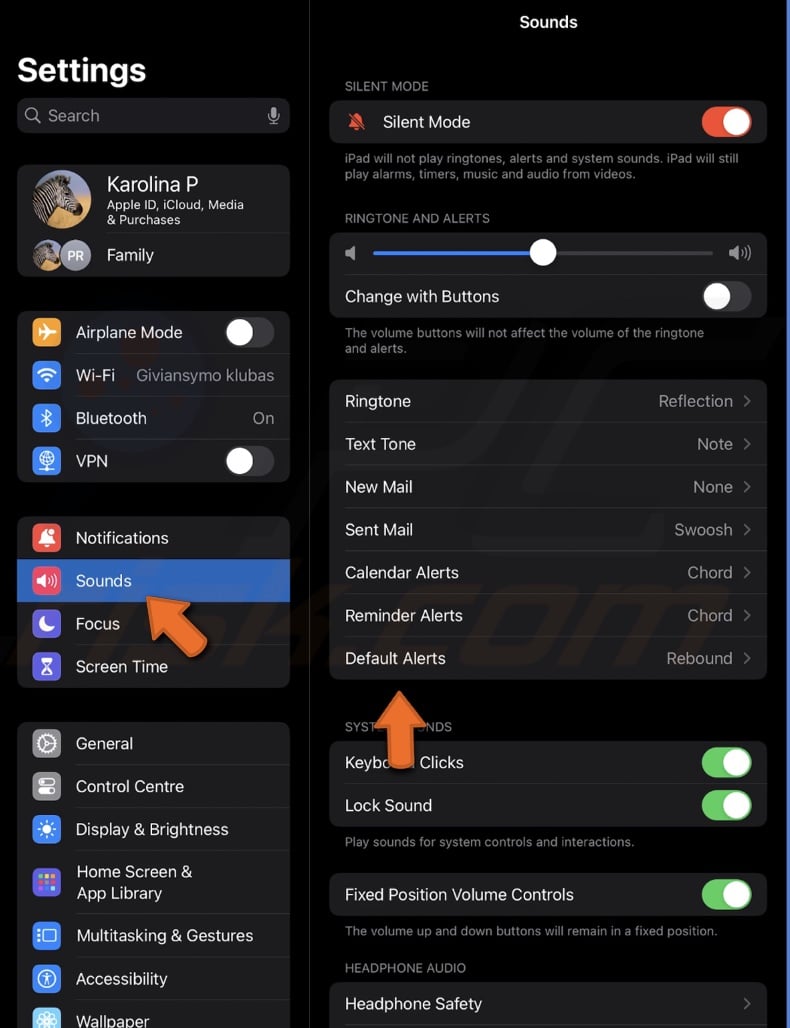
4. Select your preferred notification sound from the list.
Set notifications Scheduled Summary
The Scheduled Summary feature on your iPhone or iPad helps you manage notifications by delivering them at a set time. It's great for reducing distractions from non-urgent notifications. Here's how you can set it up:
1. Find and open the Settings app on your iPhone or iPad.
2. Go to the "Notifications" settings.
3. Inside the Notifications menu, find and tap on "Scheduled Summary".
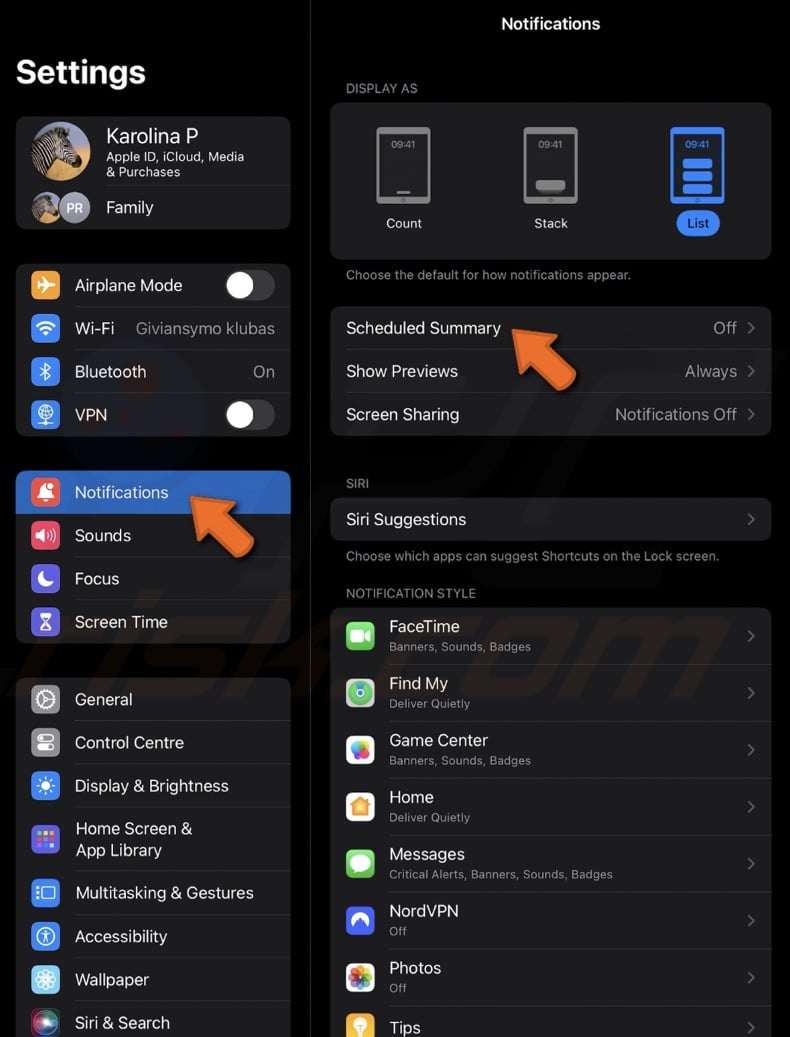
4. Turn on "Scheduled Summary" option to set up a new schedule and tap "Continue". This allows you to choose specific times when you want to receive the notification summary.
5. If you need to delete a schedule, tap the minus (-) button next to the schedule you want to remove. Then, tap the "Delete" button that appears.
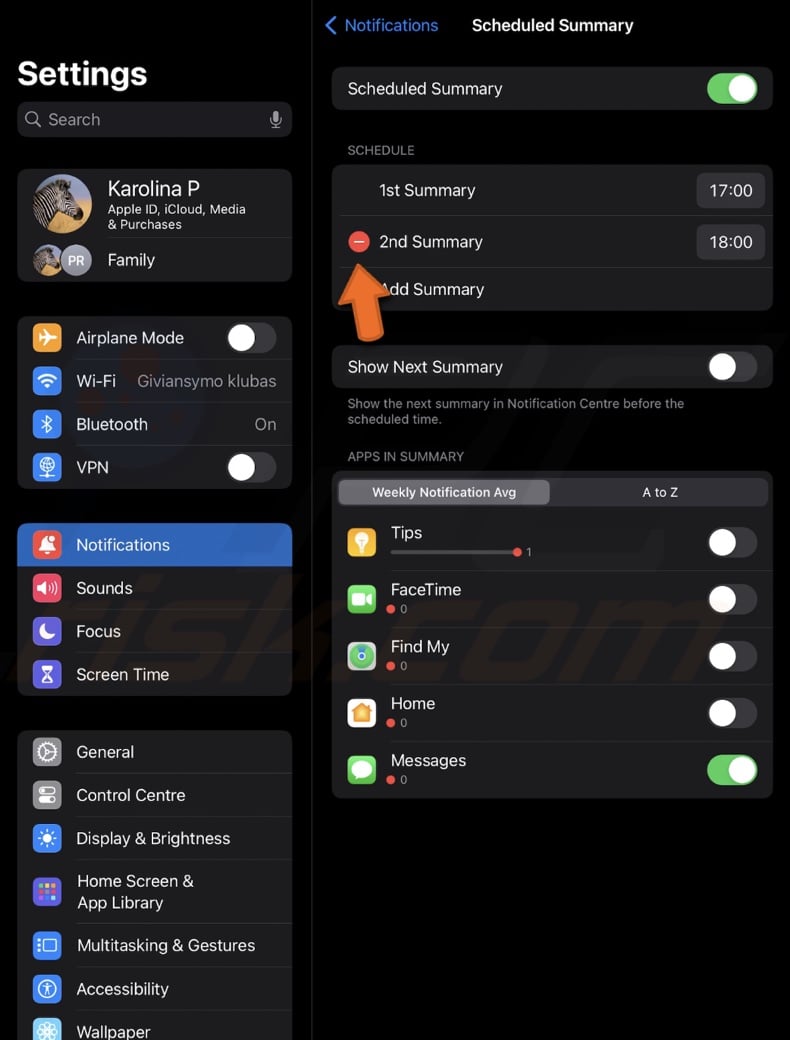
6. Scroll down to see a list of apps. Toggle on the switch next to the apps you want to include in the Scheduled Summary.
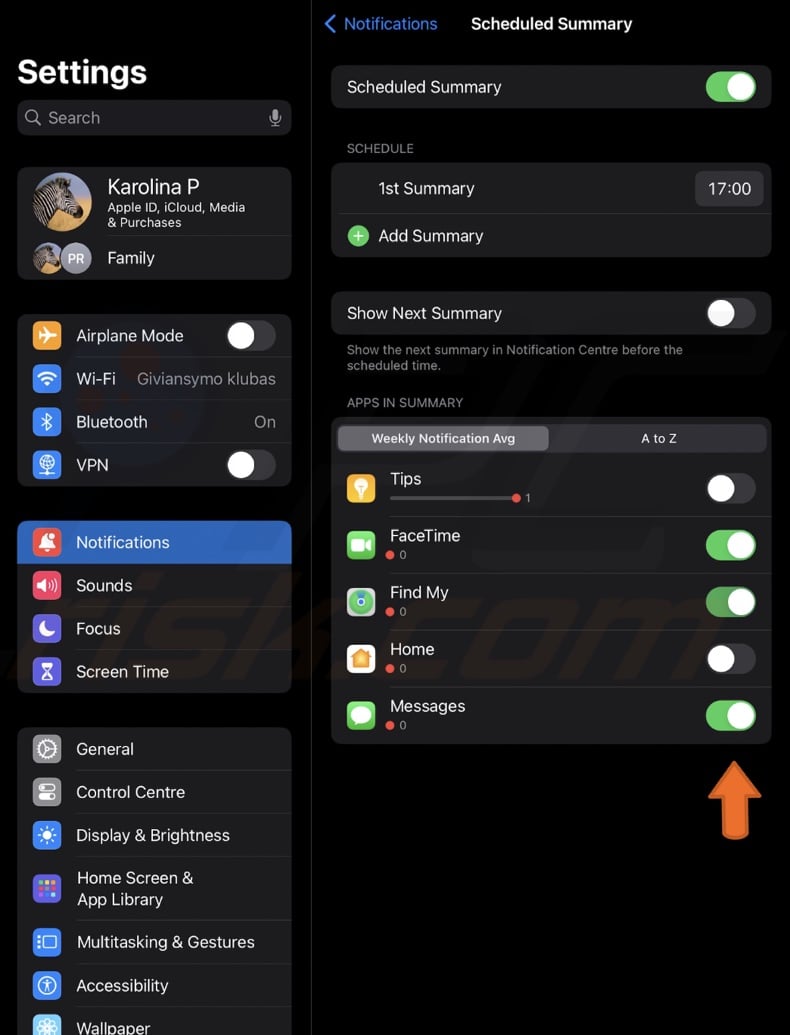
By following these steps, you can easily manage when and how you receive notifications on your device.
Change when notification previews appear
Notification previews show a small part of your notifications' content. While most previews are harmless, some might show private information. You can change how these previews appear to suit your needs.
1. On your iPhone or iPad, go to the Settings app.
2. Tap on "Notifications".
3. Find and tap on "Show Previews".
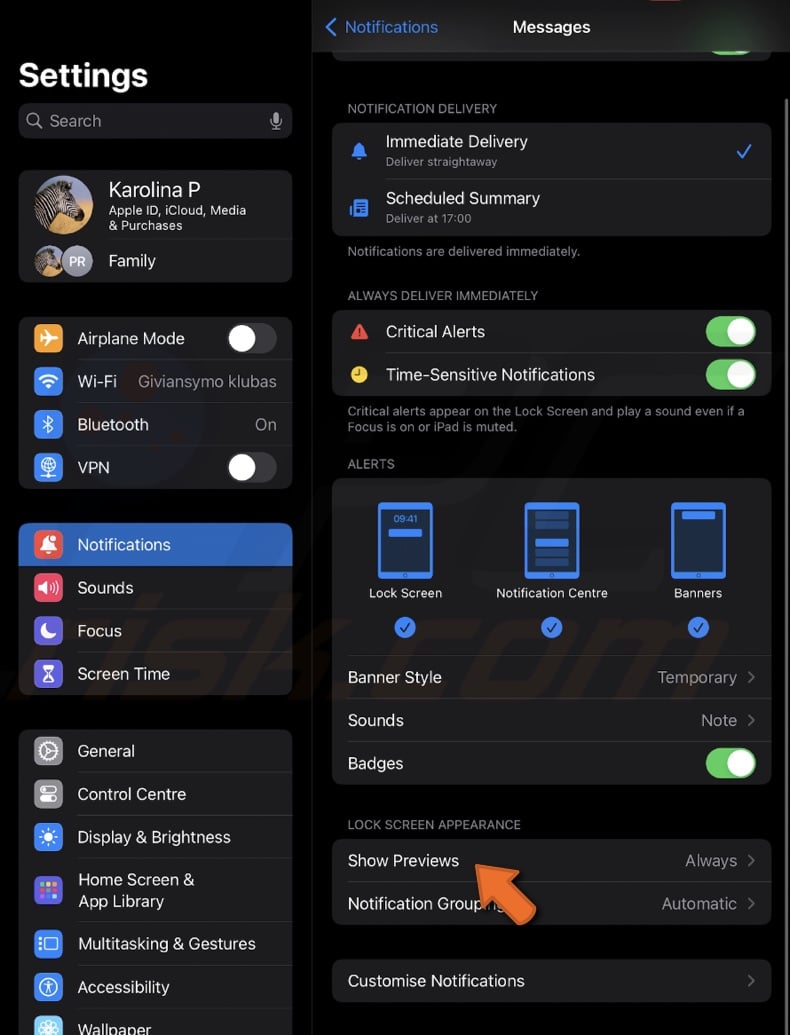
4. Choose "Always", "When Unlocked", or "Never".
Turn notifications on or off while screen-sharing
With iOS 15.1 and later, you can share your screen during FaceTime calls. Apple also provides a way to manage your privacy by choosing whether or not to show notifications while screen sharing.
1. Go to your iPhone's settings app and navigate to "Notifications".
2. In the notifications settings, find and tap on "Screen Sharing".
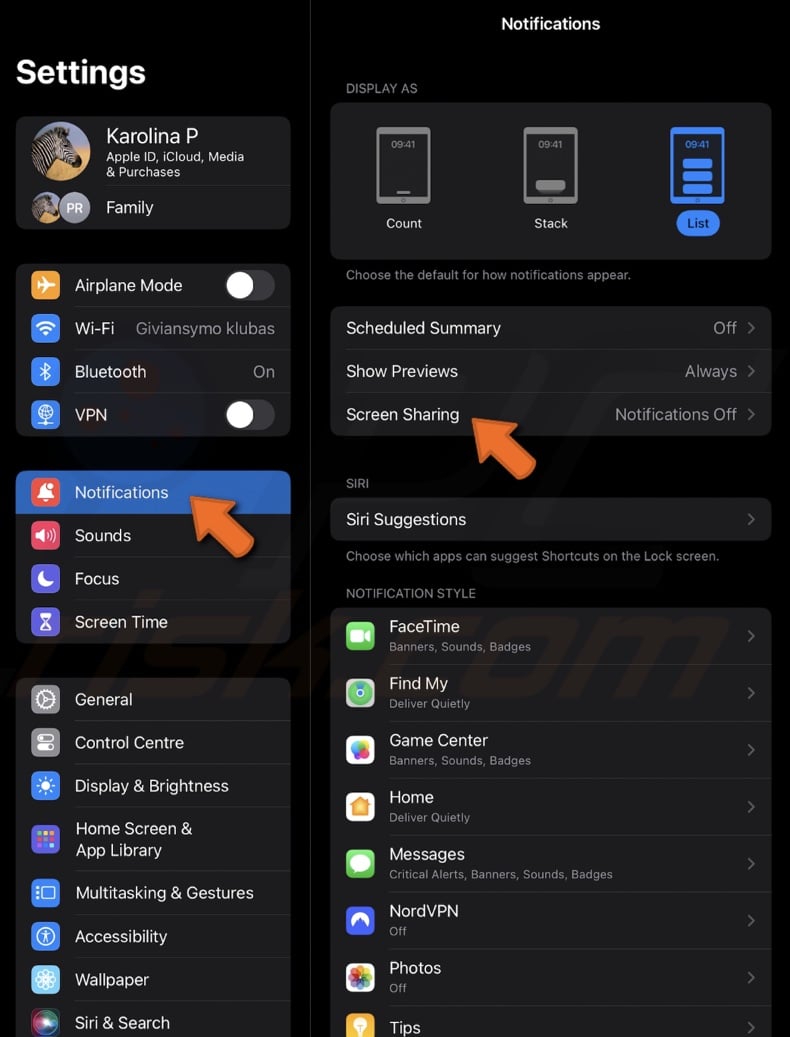
3. To allow others to see your notifications when you share your screen, turn on "Allow Notifications".
4. If you prefer to keep your notifications private, ensure "Allow Notifications" is turned off.
Customize specific app notifications
If you don't want to turn off notifications for an app completely, you can personalize them. Here's a simple guide to help you customize app notifications:
1. Go to the Settings app on your iPhone or iPad.
2. Tap on "Notifications".
3. Scroll down and choose the app for which you want to customize notifications.

4. Decide if you want notifications to be delivered "Immediately" or later in the "Scheduled Summary".
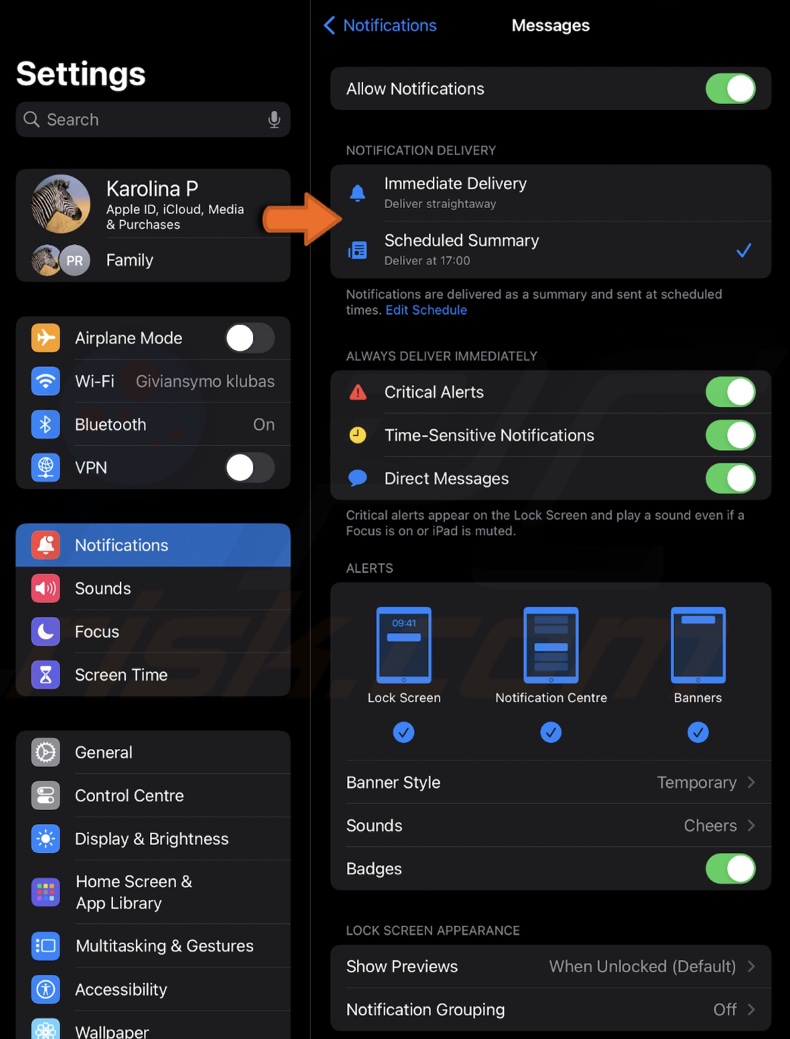
5. Toggle "Time Sensitive Notifications" if you want urgent notifications to appear on your Lock Screen for an hour. These are the most important notifications.
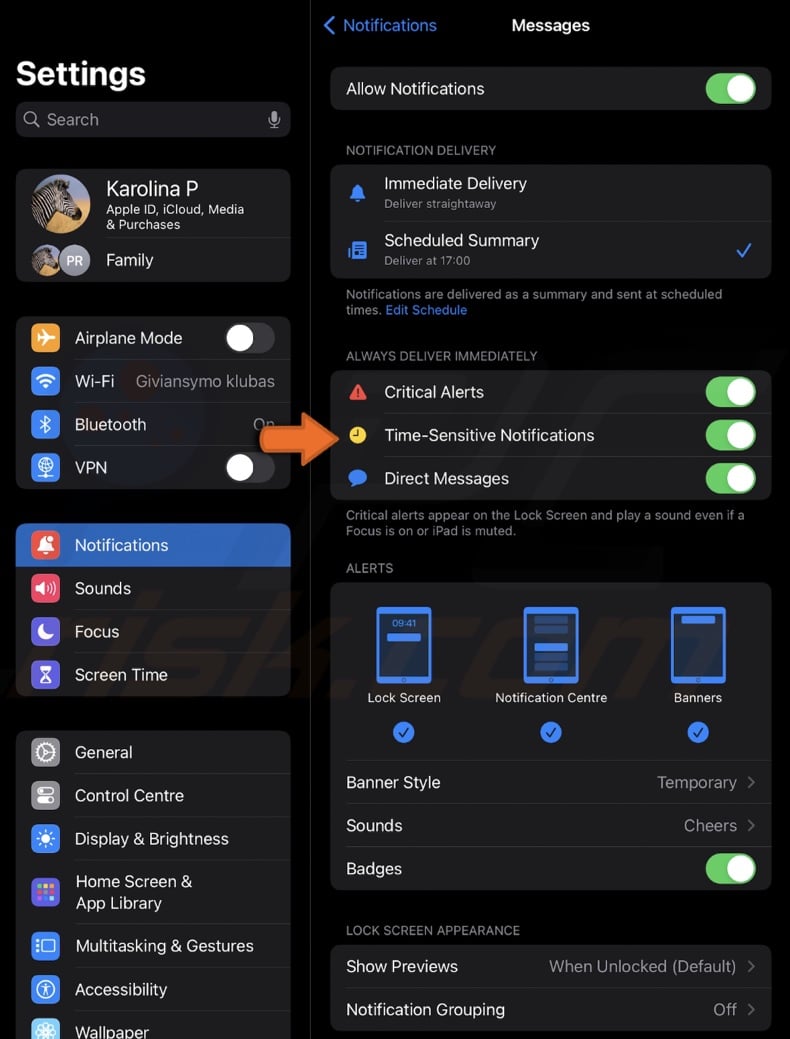
6. Under the "Alerts" section, tap on "Banner Style".
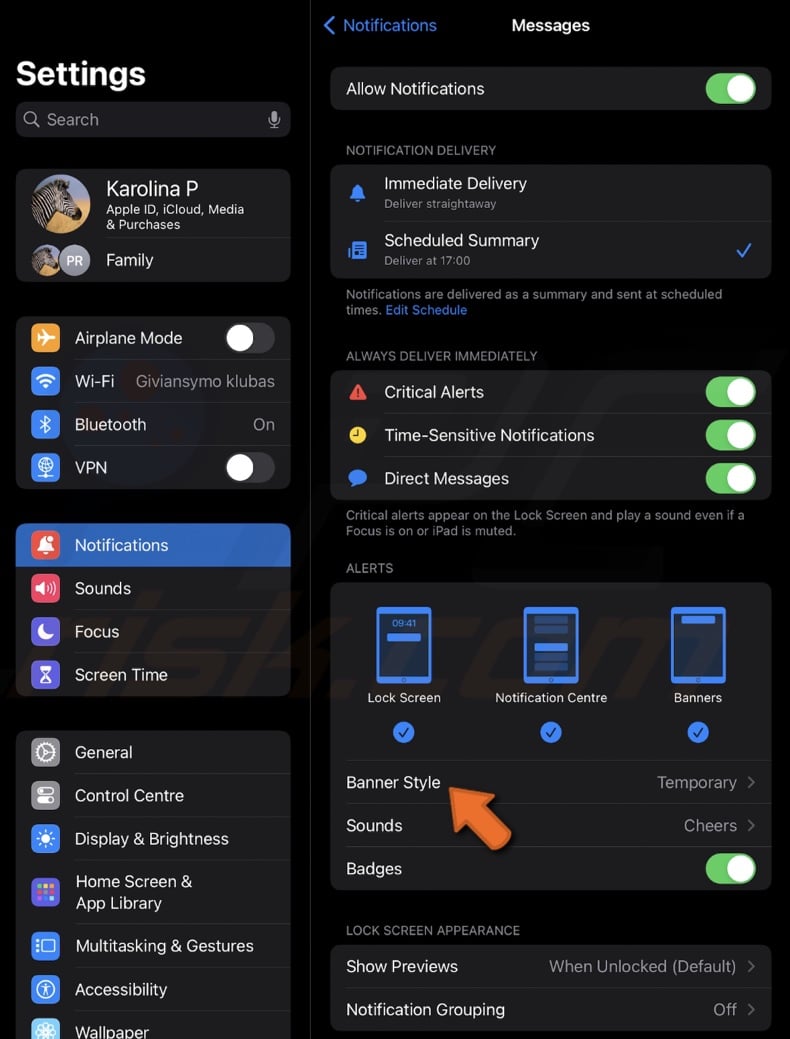
7. Choose between "Temporary" (disappears after a few seconds) or "Persistent" (stays until you dismiss it).
8. Tap on "Sounds" to pick a unique notification sound for the app.
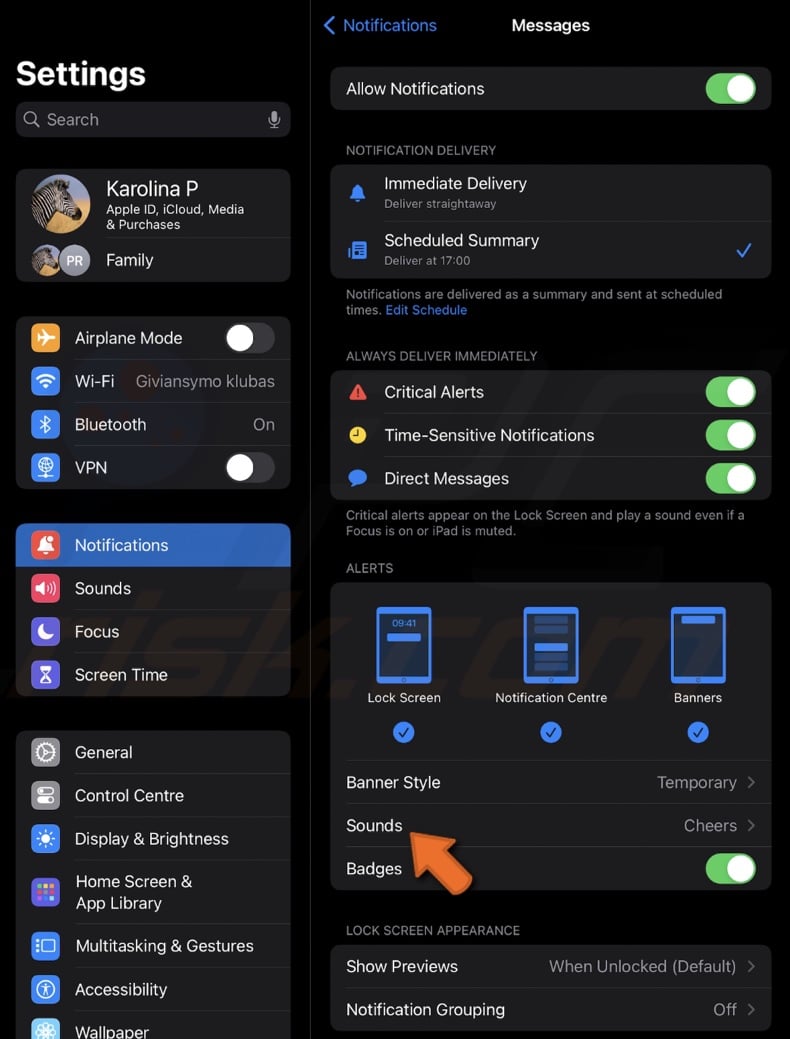
9. Turn on "Badges" if you want a notification count to appear on the app icon.
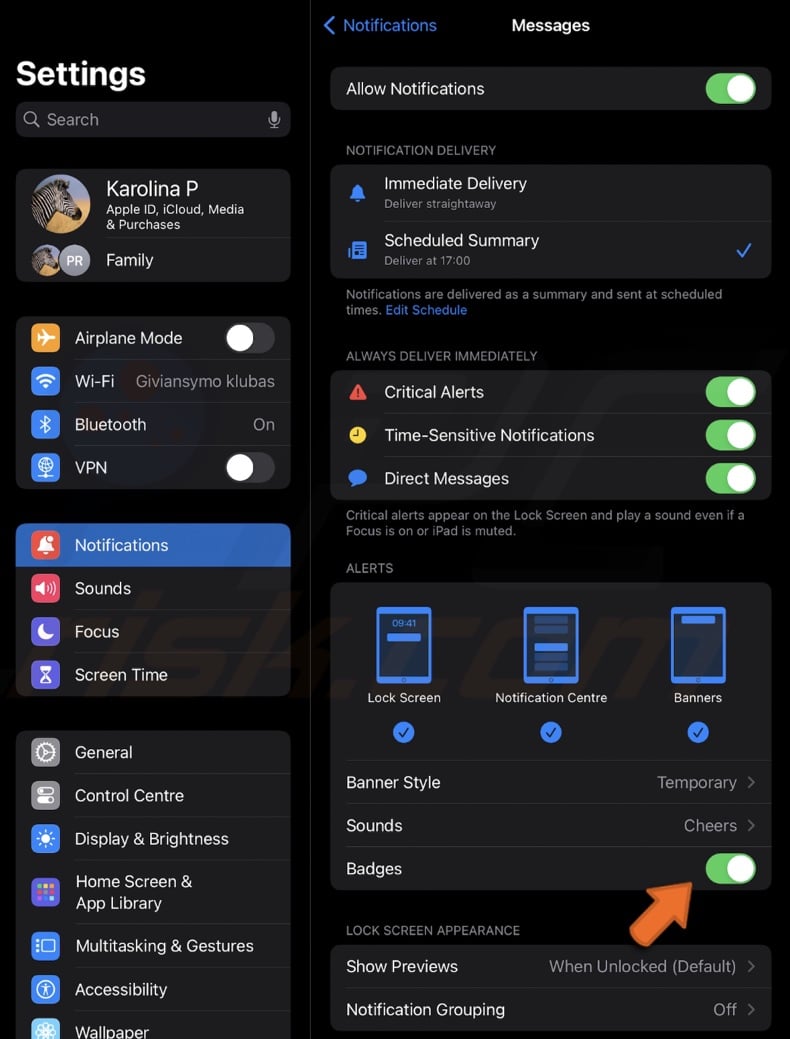
10. Under "Lock Screen Appearance", tap on "Show Previews".

11. Choose your preferred preview style (always, when unlocked, or never).
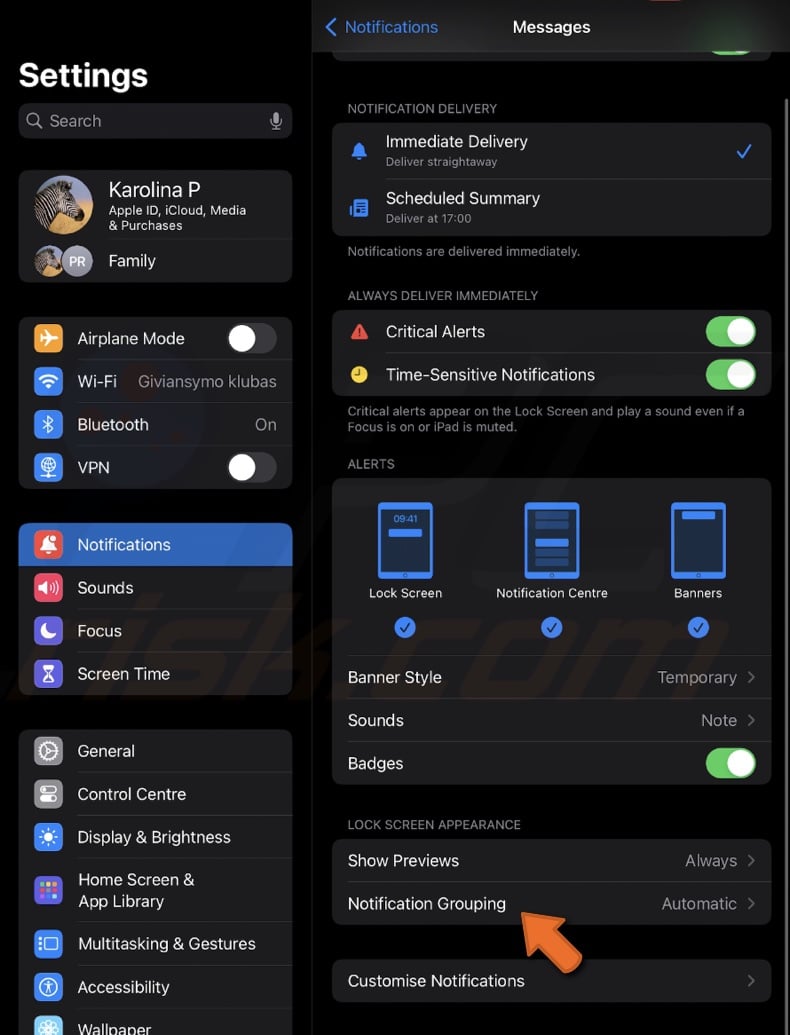
12. Tap on "Notification Grouping" and select one of the options to organize multiple notifications from the same app into one stack.
13. Then, go to "Customise Notifications" and tap "Repeat Alerts". Choose how often to repeat the alerts.
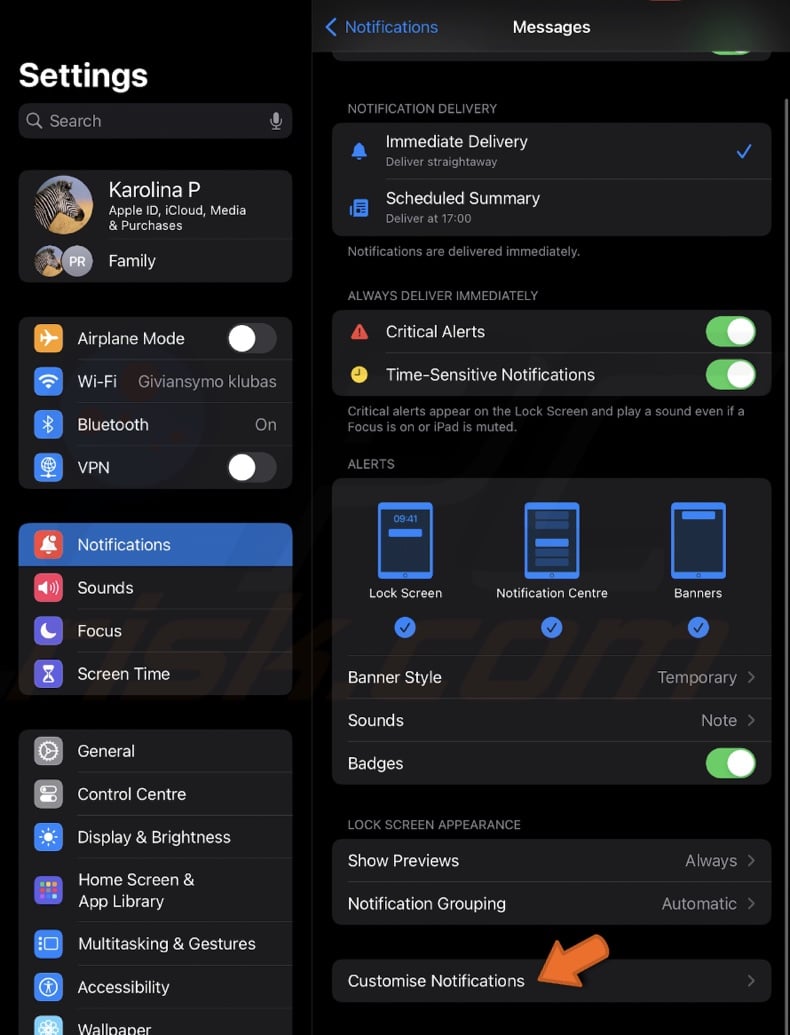
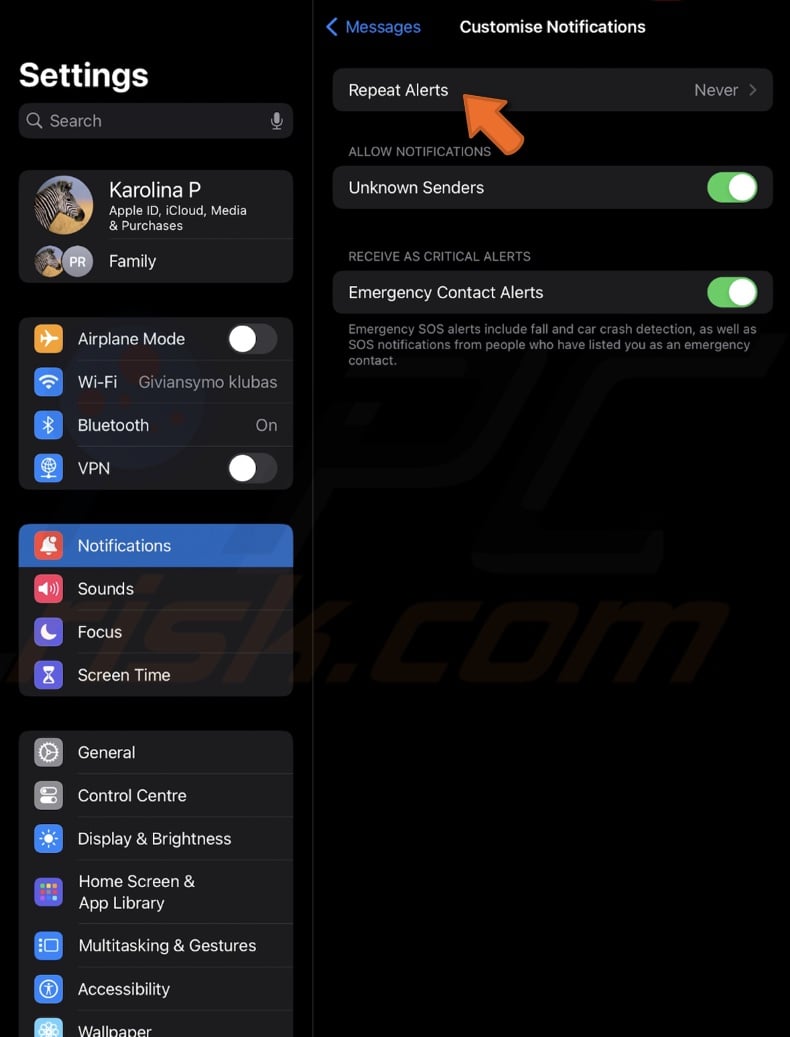
14. Go back and enable or disable notifications from "Unknown Senders" and "Emergency Contact".
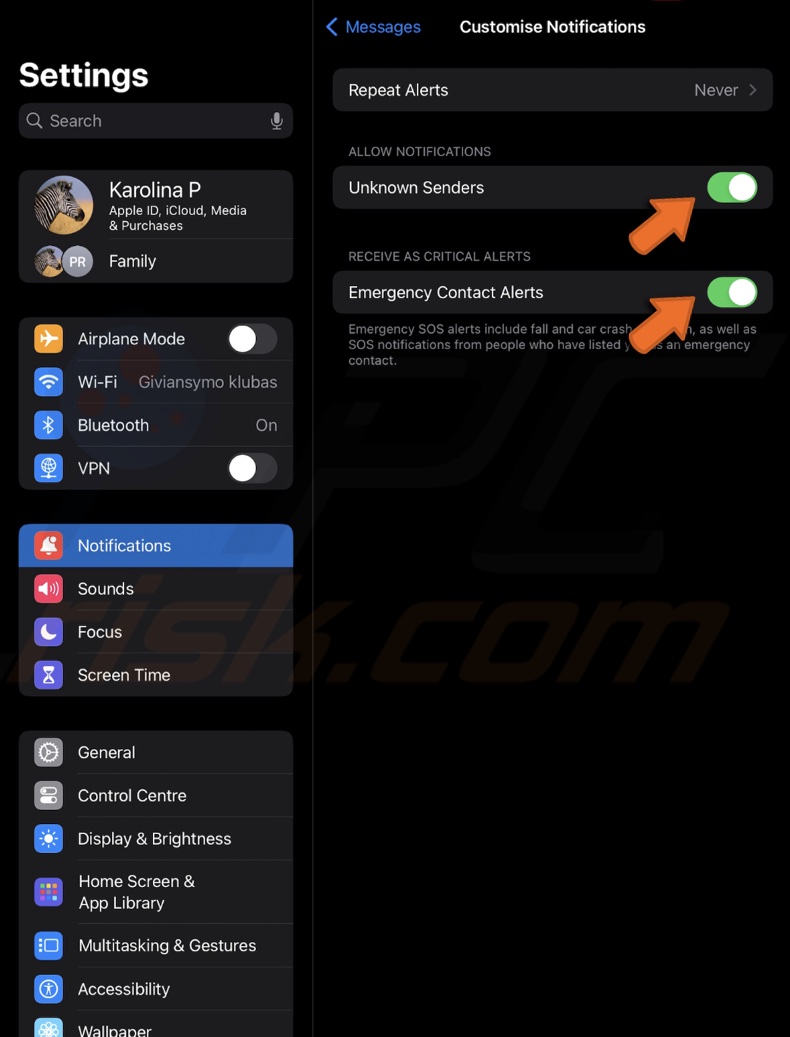
By following these steps, you can tailor each app's notifications to your preferences, ensuring you stay informed without being overwhelmed.
Silence your notifications
Putting your iPhone on Silent mode might seem like it silences all notifications. However, you'll still see notification badges and previews that can be distracting. For a more effective solution, use the Do Not Disturb mode in the Focus settings. It will silence all notifications until you turn it off.
Here's how to activate Do Not Disturb mode on your iPhone or iPad:
1. Swipe down from the top right corner to open the Control Center.
2. Press and hold the "Focus" button.
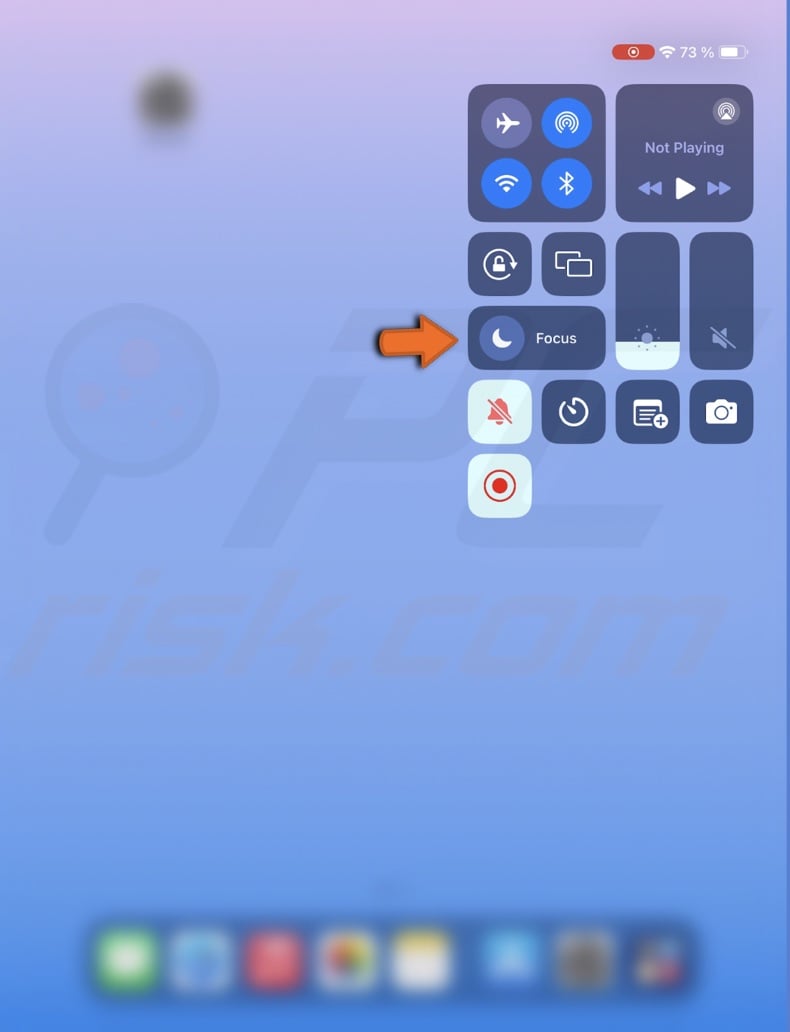
3. Tap the "Do Not Disturb" button to enable it.
4. Hit the three-dot icon next to it and go to "Settings".
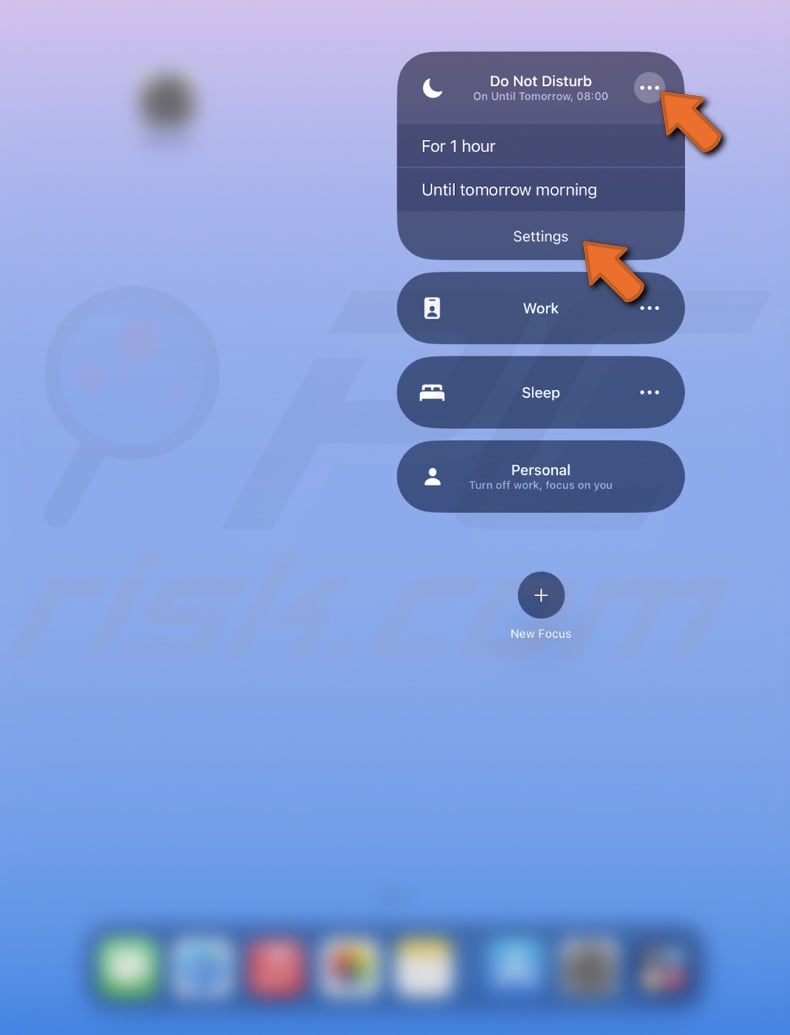
5. Set a custom schedule and customize the screen.
6. You can set a schedule for Do Not Disturb to turn off automatically or turn it off manually when you no longer need it.
Customizing your notification settings creates a more focused and less intrusive device experience. Explore these settings and adjust them as your needs change, ensuring your technology serves you in the best way possible.
Share:

Karolis Liucveikis
Experienced software engineer, passionate about behavioral analysis of malicious apps
Author and general operator of PCrisk's News and Removal Guides section. Co-researcher working alongside Tomas to discover the latest threats and global trends in the cyber security world. Karolis has experience of over 8 years working in this branch. He attended Kaunas University of Technology and graduated with a degree in Software Development in 2017. Extremely passionate about technical aspects and behavior of various malicious applications.

▼ Show Discussion